McKesson TRUE METRIX PRO User manual

INTRODUCTION:
McKesson TRUE METRIX® PRO
Professional Monitoring Blood Glucose Meter
McKesson TRUE METRIX® PRO is a simple, accurate way to
test whole blood glucose (sugar) level, anytime, anywhere. Our
goal is to provide quality healthcare products and dedicated
customer service. For questions about McKesson TRUE
METRIX® PRO products, call 1-800-777-4908.
McKesson recognizes the importance of practicing safe
and reliable testing using the McKesson TRUE METRIX®
PRO Professional Monitoring Blood Glucose Meter. Each
patient should have specic blood glucose target ranges
that are determined by their Doctor or Diabetes Healthcare
Professional. Having most blood glucose results within the
patient’s target range shows how well a treatment plan is
working to control glucose levels. Keeping results within the
patient’s target range helps slow or stop complications from
diabetes.
e McKesson TRUE METRIX® PRO Professional Monitoring
Blood Glucose Test Strips are for use with the McKesson
TRUE METRIX® PRO Professional Monitoring Blood Glucose
Meter to quantitatively measure glucose (sugar) in fresh
capillary whole blood samples drawn from the ngertip or
forearm, or venous whole blood collected only in sodium
heparin vacutainer tubes. e McKesson TRUE METRIX®
PRO Professional Monitoring Blood Glucose Meter measures
current glucose results. It also detects, analyzes and corrects for
hematocrit and temperature, and calculates the glucose result.
1

IMPORTANT SAFETY INFORMATION:
For the most accurate results using McKesson TRUE
METRIX® PRO:
• Read all product instructions for use before testing.
• Use of McKesson TRUE METRIX® PRO in a manner not
specied in this Owner's Manual is not recommended and
may aect ability to determine true blood glucose levels.
• McKesson TRUE METRIX® PRO is an in vitro (outside the
body) quantitative system for multiple patient use testing
of human whole blood only.
• Do not use for the diagnosis of or screening for
diabetes mellitus or for measuring blood glucose in
newborns.
• ONLY use auto-disabling single use lancing devices/
lancets to obtain capillary blood sample.
• Alternative site (forearm) testing should not be used to
calibrate continuous glucose monitors (CGMs).
• Alternative site (forearm) testing should not be used for
insulin dose calculations.
• DO NOT use venous whole blood collected in sodium
uoride (grey top), lithium heparin, or EDTA vacutainer
tubes for testing, as this may cause inaccurate results.
• Use ONLY McKesson TRUE METRIX® PRO Professional
Monitoring Blood Glucose Test Strips and McKesson
TRUE METRIX® Control Solution with the McKesson
TRUE METRIX® PRO Professional Monitoring Blood
Glucose Meter.
2

3
• Remove only one test strip at a time from test strip vial.
Recap vial immediately.
• NEVER reuse test strips. NEVER wipe test strips with
water, alcohol or any cleaner. DO NOT attempt to
remove blood or control sample from test strips or clean
test strips and re-use. Reuse of test strips will cause
inaccurate results.
• NEVER add a second drop of sample to test strip.
Adding more sample gives an error message.
• Perform Control Tests before performing a blood
glucose test for the rst time.
• Perform Control Tests with more than one level of
control solution. ree levels of McKesson TRUE
METRIX® Control Solution are available for Control
Tests. Call 1-800-803-6025 for assistance in obtaining
dierent levels of control solution.

4
IMPORTANT INFORMATION (cont.):
WARNING!
Healthcare Professionals should adhere to standard
precautions and disinfection procedures when handling or
using this device for testing. ALL parts of the McKesson
TRUE METRIX® PRO Professional Monitoring Blood
Glucose Meter are considered potentially infectious, and
capable of transmitting blood-borne pathogens between
patients and healthcare professionals.
2,3
Only use auto-
disabling, single-use lancing devices/lancets to obtain
capillary blood. For more information on standard
precautions and practices please refer to http://www.cdc.
gov/hicpac/ 2007ip/2007isolationprecautions.html.
• Multiple patient use devices such as blood glucose meters
should be used on only one patient and not shared. If
dedicating blood glucose meters to a single patient is
not possible, the meters must be properly cleaned and
disinfected aer every use following the guidelines found
in Meter Care, Cleaning/Disinfecting.
• Healthcare Professionals should wear gloves when
cleaning and disinfecting the meter. Wash hands aer
taking o gloves. A new pair of gloves should be worn
before testing each patient.

IMPORTANT INFORMATION (cont.):
• If the patient is showing symptoms of low or high
blood glucose, check their blood glucose. If any result
seems higher or lower than expected, repeat the test
with a new test strip. Contact the Doctor or Diabetes
Healthcare Professional with any unusual results.
~ Low blood glucose (hypoglycemia) symptoms may
include trembling, sweating, intense hunger,
nervousness, weakness or trouble speaking.
~ High blood glucose (hyperglycemia) symptoms may
include intense
thirst, a need to urinate oen, a dry
mouth, vomiting, or headache.
• is device has not been validated for use in the
critically ill.
• Inaccurate results may occur in severely hypotensive
individuals or in dehydrated patients or patients in
shock. Inaccurate results may occur for individuals
experiencing a hyperglycemic-hyperosmolar state, with
or without ketosis.
• Follow facility protocols to verify blood glucose results
with laboratory results for patients who are unresponsive
or unable to communicate.
5

6
Phone Number and Expected Results ...................................................Cover
Introduction and Important Information..................................................1
Description of System
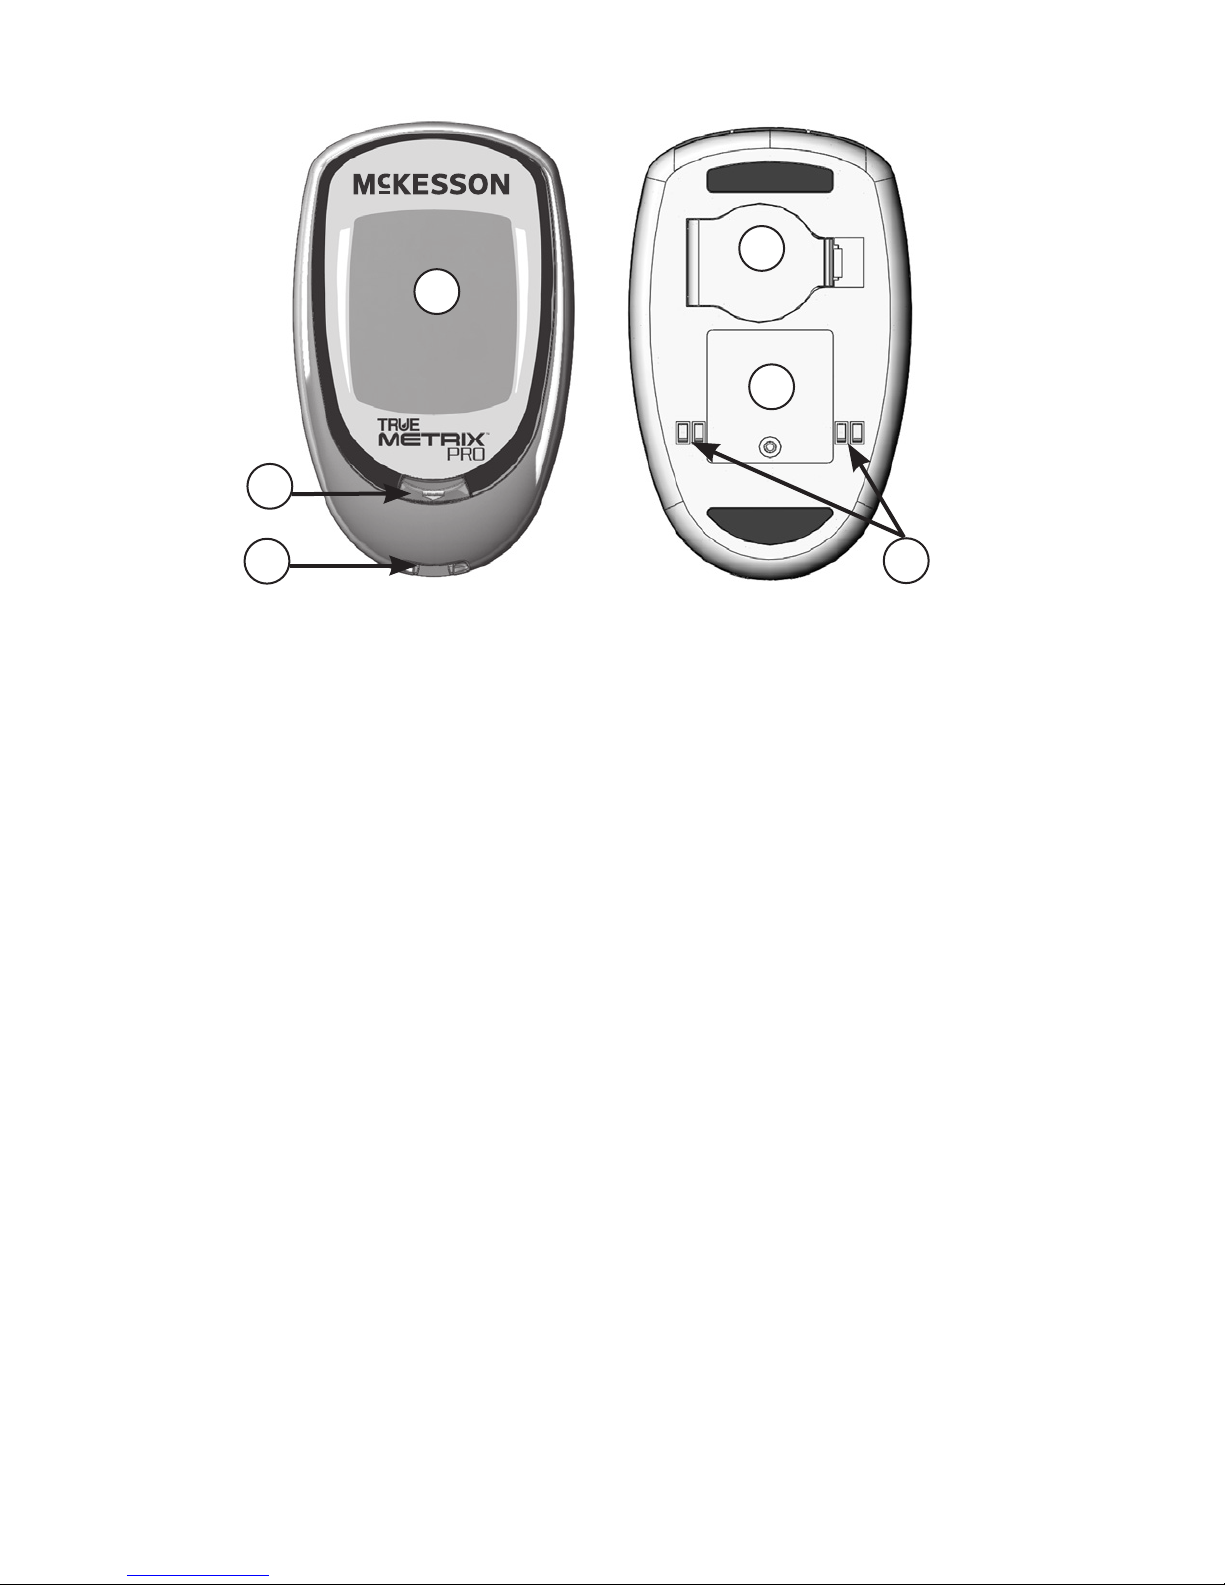
Meter ..............................................................................................................7
Test Strips ....................................................................................................10
Control Solution .........................................................................................12
Quality Control Testing
Automatic Self-Test ....................................................................................13
Control Test .................................................................................................14
How to Test Control ...................................................................................15
Blood Glucose Testing
Obtaining a Blood Sample.........................................................................19
How to Test Blood ......................................................................................22
TRUE METRIX® PRO Meter and Laboratory Testing...........................25
System Out of Range Warning Messages.................................................26
Meter Set Up
Set Time and Date.......................................................................................27
Set Event Tags, Ketone Test Alert and Test Reminders..........................29
Meter Memory
View Averages (7-, 14-, and 30-day) .........................................................33
View Memory...............................................................................................34
Care, Cleaning/Disinfecting and Troubleshooting
Caring for TRUE METRIX® PRO.............................................................35
Changing Battery ........................................................................................39
Troubleshooting...............................................................................................40
Display Messages ........................................................................................41
System Specifications/Chemical Composition............................................44
Warranty...........................................................................................................45
References.........................................................................................................46
Notes .................................................................................................................47

7
Description of System
Meter
①“ ▶ ” Button
Increase numbers in Meter Set Up; add ALT Symbol;
move forward by date/time when viewing results and
Averages in Memory; scroll through Event Tags to
mark results (if feature on).
②“ • ” Button
Turn meter on to view Average values, to view results
in Memory, to access Meter Set Up, and turn on Event
Tags in Meter Memory.
③“ ◀ ” Button
Decrease numbers in Meter Set Up; remove ALT
Symbol; move backward by date/time when viewing
results and Averages in Memory; turn on Event Tags in
Meter Set Up.
Top of Meter
1 32

①Display Screen
Shows results, messages, user prompts, information.
②Test Port
Insert Test Strip here, contact blocks facing up.
③Strip Release Button
Releases test strip aer testing for disposal.
④Battery Door
Use one non-rechargeable 3V lithium battery
(#CR2032), positive (“+”) side up
(see Changing Battery).
⑤Meter Label
Contains serial number of meter.
⑥Data Contacts
Connects meter with computer for data upload.
8
2
1
Front of Meter
3
4
5
Back of Meter
6

9
Full Display Screen
1. Result is from Memory
2. Time, Date
3. Time is AM/PM
4. Event Tag Symbols
5. Result is from 7-, 14-, or 30-day Average
6. Test Result
7. Control Symbol
8. Battery Symbol
9. Alternate Site (ALT) Symbol
10. Drop Symbol - Apply blood or control solution
11. Temperature Symbol
12. Test Reminder Symbol
13. Ketone Test Alert Symbol
14. Unit of Measure (Note: Factory set to mg/dL,
cannot be changed by user.)
3
4
2
1
7
6
5
8
910 11 12
13
14

10
①Contact End -
Insert into Test Port with contact
blocks facing up
.
②Sample Tip -
Touch Tip to top of drop of sample
(blood or control solution) aer Drop Symbol
appears in the Display.
Note: Insert test strip into meter before touching Sample
Tip to blood or control solution drop.
Sample Placement
Correct Incorrect
• Allow sample drop to be drawn into Sample Tip
until testing begins (meter beeps and dashes move
across Display)
.
• Do not smear or scrape drop with test strip.
• Do not apply more sample to Sample Tip aer testing
begins.
• Do not apply blood or control to top of test strip.
Do not insert Sample Tip with sample into Test Port.
May damage meter.
Test Strip
12
Top of Test Strip

①Lot Number (LOT) - Used for identification
when calling for assistance.
②Expiration Dates (EXP) - Write date first opened
on vial label. Discard vial and unused test strips
either 4 months aer rst opening or date printed
next to EXP on vial label has passed, whichever
comes rst.
Caution! Use of test strips or control solution past the
Expiration Dates may give incorrect test
results. Discard out-of-date products and test
with new products.
③Control Test Range - Range of numbers in
which Control Test result must fall to assure the
system is working properly.
11
Test Strip Vial Label
1
2
2
3
May 30, 2015

12
Control Bottle Label
①Lot Number (LOT) - Used for identification
when calling for assistance.
②Expiration Dates (EXP) - Write date first opened
on bottle label. Discard bottle either 3 months
aer rst opening or date printed next to EXP on
bottle label has passed, whichever comes rst.
③Control Solution Level (1, 2, or 3) - We
recommend testing at least 2 levels of control
solution. Call 1-800-803-6025 for assistance in
obtaining dierent levels of control solution.
• For use only with McKesson TRUE METRIX ® and
TRUE METRIX ® PRO Blood Glucose Test Strips
• Not intended for human consumption
• For in vitro diagnostic use only
Store at temperature range of 36-86°F (2-30°C).
DO NOT FREEZE.
Distributed By McKesson Medical-Surgical Inc.
Richmond, VA 23228 Rev. 00 03/15
Made in USA R5SUN01 rev 1
Control Solution LEVEL 1
MFR # 06-R5051-1
NET CONTENTS
3 mL
LOT
8LOA18
EXP
2015/10/31
12
3
May 30, 2015
Control Solution (Control)

Contact Blocks
Face Up
13
Quality Control Testing
To assure accurate and reliable results,
McKesson TRUE METRIX® PRO oers
two kinds of Quality Control Tests.
ese tests ensure that McKesson TRUE
METRIX® PRO is working properly and
testing technique is good.
Automatic Self-Test
An Automatic Self-Test is performed
by the meter each time a test strip is
inserted correctly into the Test Port.
Insert a test strip into the Test Port.
e meter is working properly if:
~ the full Display appears, then
~ the time appears in the upper
part of the Display, and then,
~ the Drop Symbol begins to blink.
If an error message appears in the Display,
the meter will not perform a test.
See Troubleshooting or call for assistance
(see Booklet cover for phone number).
Caution! If any segments are missing in the Display
when meter is first turned on, do not use the
meter for testing. Call for assistance.
Full Display
Drop Symbol
Error Message

14
Control Test
We recommend performing Control Tests to check the
performance of the system.
Control Tests should be performed:
• Before using the System for the rst time,
• For practice to ensure testing technique is good,
• When opening a new vial of test strips,
• If results seem unusually high or low, based on
patient's condition,
• If a vial has been le opened or exposed to extreme
heat or cold, or humidity,
• Whenever a check on the performance of the system is
needed,
• If meter damage is suspected (meter was dropped,
crushed, wet, etc.)
Note: It is important to perform Control Tests with more
than one level of control solution. ree levels of
McKesson TRUE METRIX® Control Solution are
available for Control Tests. Call 1-800-803-6025
for assistance in obtaining dierent levels of control
solution.
Caution! Ranges printed on test strip vial label are for
Control Test results only and are not to be used
for management of patient’s blood glucose.
Do not drink control solution.

How to Test Control Solution
Use ONLY McKesson TRUE METRIX®
Control Solution with the McKesson TRUE
METRIX® PRO Professional Monitoring
Blood Glucose Meter and Test Strips.
1. Check dates on control solution label
and test strip vial label. Do not use
control solution or test strips if
Expiration Dates have passed.
(Control solution - 3 months aer
rst opening or date next to EXP
on label; test strips - 4 months aer
rst opening or date next to EXP
on labels.) Discard expired products
and use new products.
2. Allow control solution, vial of test strips and
meter to adjust to room temperature. Write date
first opened on both control solution bottle label
and test strip vial label.
3. Gently swirl or invert control solution bottle to
mix. DO NOT SHAKE!
4. Remove one test strip from vial. Close strip vial
immediately. Use test strip quickly aer removal
from vial.
15
May 30, 2015

16
5. Insert test strip into Test Port.
Meter turns on.
Note:
If test strip has been out of the vial
too long before testing, an error
message appears upon insertion
of the test strip into the meter.
Release and discard old test strip.
Use new test strip for testing.
6. Wait until Drop Symbol appears in
Display. Keep test strip in meter until
testing is finished.
Note: If Strip is removed before testing is finished, an error
message appears. Release and discard old test strip.
Use new test strip for testing.
7. With cap removed, turn control
solution bottle upside down.
Squeeze one drop of control
solution onto a clean tissue. Wipe
o bottle tip and discard tissue.
8. Gently squeeze a drop of control
solution onto a small piece of
unused aluminum foil or clear
plastic wrap. Dispose aer use.
LB0010
9 JUNE 2009
Contact Blocks
Face Up
Drop Symbol

9. With test strip still in meter, touch
edge of Sample Tip to top of drop of
control solution. Allow drop to be
drawn into test strip. Remove test
strip from drop when meter beeps.
10. Dashes appear across the Display to
show meter is testing.
Note:If meter does not beep and begin
testing soon aer drawing up sample,
release and discard test strip. Repeat
test with new test strip. If problem
persists, see Troubleshooting.
11. Compare meter result to Control
Test range printed on test strip
vial label for level of control
solution you are using. If result
is in range, system can be used
for testing blood. If result does
not fall within range, repeat test
using a new test strip.
Note: Control Test result shows the
Control Symbol in the Display.
17
Meter testing
Control Symbol
Test Strip
Vial Label
Control Bottle
Label
• For use only with McKesson TRUE METRIX
®
and
TRUE METRIX
®
PRO Blood Glucose Test Strips
• Not intended for human consumption
• For in vitro diagnostic use only
Store at temperature range of 36-86°F (2-30°C).
DO NOT FREEZE.
Distributed By McKesson Medical-Surgical Inc.
Richmond, VA 23228 Rev. 00 03/15
Made in USA R5SUN01 rev 1
Control Solution LEVEL 2
MFR #
06-R5051-1
NET CONTENTS
3 mL
LOT 8LOA18
EXP 2015/10/31

CAUTION! If Control Test result is outside range,
test again. If result is still outside range,
system should not be used for testing
blood. Call for assistance (see manual
cover for phone number).
12. Aer result is shown, Strip
Release Button flashes. Hold
meter with test strip pointing
down. Press Strip Release Button
to release and discard test strip
into appropriate container. Meter
turns o.
Note:Removing test strip before result displays
cancels the test. An error message appears and
the result is not stored in Memory. Retest with
a new test strip and do not remove before result
is displayed.
18

19
Blood Glucose Testing
Obtaining a Blood Sample
Refer to your facility approved method for lancing to
obtain a blood sample for blood glucose testing.
Follow the facility's precautions for blood-borne
pathogens or refer to Biosafety in Microbiological and
Biomedical Laboratories (BMBL) practice guidelines at
http://www.cdc.gov/biosafety/publications/bmbl5/ .
"Protection of Laboratory Workers From Occupationally
Acquired Infections, Approved Guidelines - ird Edition."
Clinical and Laboratory Standards Institute (CLSI) M29-A3
.
Venous whole blood collected only in sodium heparin
tubes may be used for testing. Mix well before use.
DO NOT use sodium uoride (grey top) vacutainer
tubes. is may cause false low glucose results.
Caution!
• ALL parts of the McKesson TRUE METRIX®
PRO Professional Monitoring Blood Glucose
Meter could carry blood- borne pathogens aer
use, even aer cleaning and disinfecting.
2
• You should clean and disinfect the meter aer
each use to prevent the transmission of blood-
borne pathogens.
• ONLY use auto-disabling single use lancing
devices/lancets to obtain capillary blood sample.
• A new pair of gloves should be worn before
obtaining blood sample from each patient.

20
Tips for Fingertip Sampling
1. Select ngertip. Clean area with soap and warm
water, rinse or use an approved disinfectant to clean
the area. Dry thoroughly.
2. Lance nger.
3. To help blood drop form, lower the hand to a level
below the heart and gently massage the nger from
palm to ngertip. Allow the blood drop to form
before attempting to apply the test strip. Apply sample
to Sample Tip.
4. Discard all biohazard materials into appropriate
container. Wash hands aer taking o gloves.
Table of contents
Other McKesson Blood Glucose Meter manuals