MDM C-Shell 4X3 Manual

© MDM INC.
WWW.MDMINC.COM
Generated from efficiency. Adapted for flow. Built for longevity.
Proudly Made
in the USA.
© MDM INC.
WWW.MDMINC.COM
Generated from efficiency. Adapted for flow. Built for longevity.
Proudly Made
in the USA.
4X3 GENERAL ASSEMBLY 4X3 GENERAL ASSEMBLY
®
INSTALLATION AND SERVICE MANUAL
WARNING: Please read completely before you install or operate your new pump. Do NOT allow the motor to become submerged.
Never run dry - Never reverse rotation. Never exceed an internal case pressure of: 100 PSI.
PLEASE FILL IN FOR FUTURE REFERENCE:
MODEL: ___________________________
SERIAL NUMBER: ____________________
DATE PURCHASED: ___________________
* PLEASE FILL OUT THE WARRANTY REGISTRATION
CARD INCLUDED WITH THIS PRODUCT OR ONLINE AT:
WWW.MDMINC.COM/PUMP-REGISTRATION
S/N: XXXX-XXXXXX
XXXXXXXXX
®

© MDM INC.
WWW.MDMINC.COM
Generated from efficiency. Adapted for flow. Built for longevity.
Proudly Made
in the USA.
4X3 GENERAL ASSEMBLY
®
WARNING: EYE PROTECTION IS STRONGLY RECOMMENDED
We congratulate you on your choice of the C•Shell®Centrifugal Pump. It has been carefully designed using the advantages of today’s
technology and carefully constructed to give you the dependability of yesterday. To insure proper performance and longevity, we urge you
to carefully follow the instructions in this manual. If you have any questions, contact MDM for assistance.
PRIOR TO INSTALLATION
1. Once received from factory, store all crated pumps in a dry and covered location
2. Make certain all uncoated machined surfaces are coated with a dielectric or marine grease every seven day to prevent oxidation
3. Rotate motor shaft multiple times once a week
INSTALLATION
1. Locate the pump as near the fluid source as possible. A flooded suction situation is preferred.
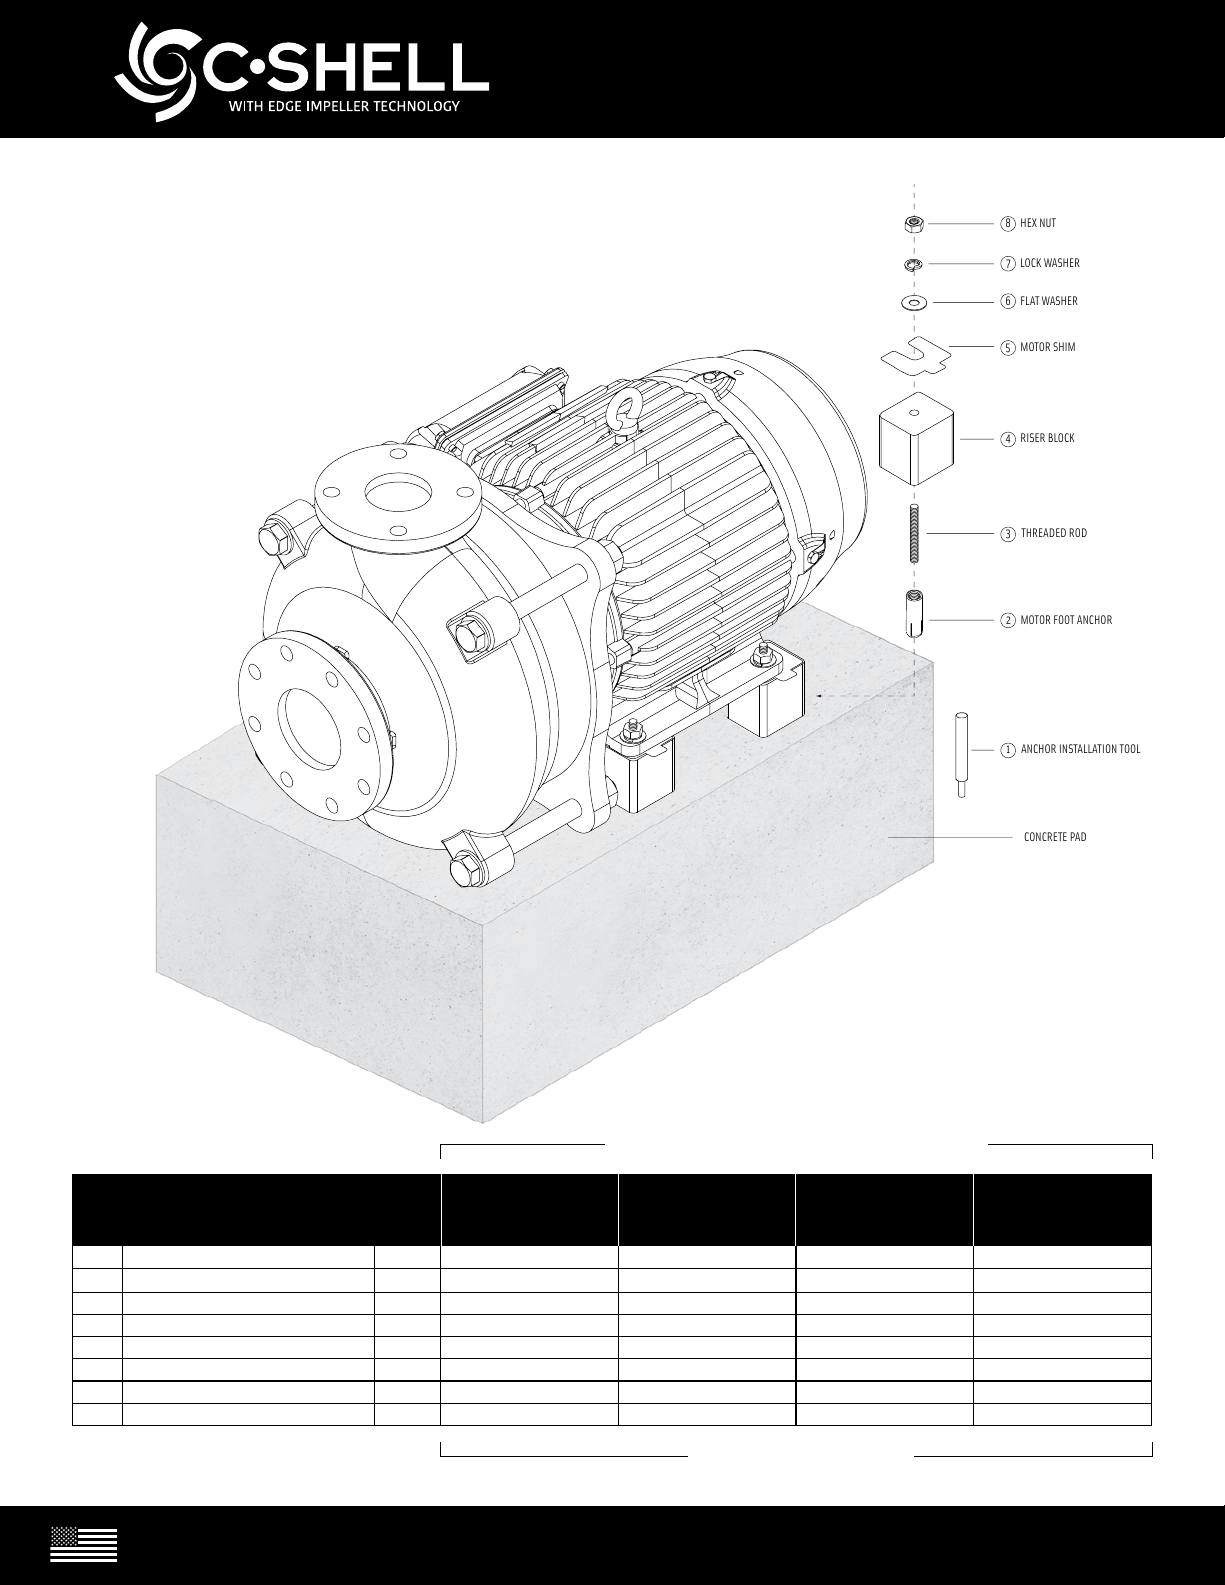
2. Mount motor base to a secure, immobile foundation.
3. The pipe fittings should be self-supported and in neutral alignment with each port. (i.e. Fittings must not be forced into alignment which
may cause premature line failure or damage to the pump volute.)
4. Never restrict the intake. Keep both input and discharge lines as free of elbows and valves as possible. Always use pipe of adequate
diameter. This will reduce friction losses and maximize output.
5. The C•Shell®Pump is not self-priming. It must not be run dry. We recommend a flooded suction installation.
6. For additional plumbing tips, review MDM’s website: www.mdminc.com for pump installation recommendations.
ELECTRICAL HOOK-UP
WARNING: ALWAYS SHUT OFF ELECTRICAL POWER BEFORE INSTALLATION AND / OR SERVICING THIS PUMP!
All electrical wiring should meet state and local ordinances. Improper wiring may not only be a safety hazard but may permanently
damage the motor and/or pump! 50 HZ motors available - contact your supplier for information.
1. Check that supply voltages match the motor’s requirements.
2. Check motor wiring and connect, according to instructions on motor, to match supply voltage.
3. Verify motor rotation with rotation meter. Incorrect rotation can cause serious damage to pump and/or motor. MDM does not recommend
checking rotation by quickly switching power on and off because serious damage can occur.
4. Supply power wiring (load side) should be protected by conduit or by cable and be of proper gauge. Length should be no longer than necessary.
5. Power should be drawn directly from an enclosure with circuit breaker protection or with a fused disconnect switch.
PUMP END ASSEMBLY/DISASSEMBLY
Contact a factory authorized agent, service center, or factory directly before disassembly or assembly. MDM Incorporated factory hours are
7:30am - 4pm MST, Monday through Friday. You can reach us toll free at (800) 447-8342 or e-mail us at sales@mdminc.com.

© MDM INC.
WWW.MDMINC.COM
Generated from efficiency. Adapted for flow. Built for longevity.
Proudly Made
in the USA.
© MDM INC.
WWW.MDMINC.COM
Generated from efficiency. Adapted for flow. Built for longevity.
Proudly Made
in the USA.
4X3 GENERAL ASSEMBLY 4X3 GENERAL ASSEMBLY
®
14 15 16 17
12
11
8
4
5
3
9
7
6
13
10
2
1A
1B 1C
1B
REFERENCE NUMBER PART NAME QUANTITY
1A HEX NUTS 7/8” - 9 4
1B FLAT WASHER 7/8” 8
1C HEX BOLTS 7/8” - 9 x 9” 4
2 BRACKET PLATE 1
3 HEX HEAD CAP SCREW ½”-13 x ¾” 4
4 SEAL HOUSING 1
5 SEAL, CARBON GRAPHITE / CERAMIC (Option SIC VS SIC) 1
6 SHAFT SLEEVE 1
7 CASE O-RING 1
8 CASE GASKET 1
9IMPELLER 1
10 PENTAGON HUB O-RING 1
11 IMPELLER SPACER 1
12 IMP PENTAGON HUB 1
13 FLAT WASHER 1/2", 316SS 1
14 LOCKWASHER 1/2, 316SS 1
15 IMPELLER BOLT O-RING 1
16 IMPELLER BOLT 1
17 CASE 1

© MDM INC.
WWW.MDMINC.COM
Generated from efficiency. Adapted for flow. Built for longevity.
Proudly Made
in the USA.
4X3 GENERAL ASSEMBLY
®
MAINTENANCE
*The pump must be drained before servicing or if stored below freezing temperatures. Periodic replacement of seals may be required due to
normal face material.
Lubrication:
Rotary Seal - Requires no lubrication after assembly.
TROUBLE SHOOTING AID
Motor Will Not Rotate
1. Check for proper electrical connections to motor.
2. Check main power box for tripped circuit breaker.
Motor Hums Or Will Not Rotate
1. Check for proper electrical connections to motor and proper wire size according to local electrical codes.
2. Check for foreign material inside pump.
3. Remove volute and check for impeller rotation without excessive resistance and/or noise.
4. Remove pump and check shaft rotation for excessive bearing noise.
5. Check start switch and/or capacitor.
Pump Operates With Little Or No Flow
1. Check to insure that pump is primed.
2. Check for leaking seal.
3. Improper line voltage to motor or incorrect rotation.
4. Check for clogged inlet port and/or impeller.
5. Defective check or foot valve.
6. Check inlet lines for leakage, either fluid or air.
Pump Loses Prime
1. Defective check or foot valve.
2. Inlet line air leakage.
3. Seal leaking.
4. Fluid supply low.
Motor Or Pump Overheats
1. Check for proper line voltage and phase, also proper motor wiring.
2. Binding motor shaft or pump parts.
3. Inadequate ventilation.
4. Fluid being pumped should not exceed 194°F (90°C) for extended periods of time
MDM INCORPORATED
3345 N. Cascade Ave • Colorado Springs, CO • 80907
Toll Free Phone (800) 447-8342 • Fax (866) 425-1346

© MDM INC.
WWW.MDMINC.COM
Generated from efficiency. Adapted for flow. Built for longevity.
Proudly Made
in the USA.
4X3 GENERAL ASSEMBLY
®
6 FLAT WASHER
7 LOCK WASHER
4 RISER BLOCK
3 THREADED ROD
2 MOTOR FOOT ANCHOR
1 ANCHOR INSTALLATION TOOL
8 HEX NUT
5 MOTOR SHIM
CONCRETE PAD
C•SHELL® 4X3 MOTOR ANCHOR INSTALLATION
Visit McMaster-Carr Supply Company at www.mcmaster.com to find parts
listed in the table below. Enter the McMaster part number in their search
engine to be directed to part page.
IMPORTANT: Make certain all inlet and discharge
plumbing take-offs are independently supported
to a post base, strut, and pipe clamp system.
B GROUP MOTORS C GROUP MOTORS D GROUP MOTORS D GROUP MOTORS
213/5JM 254/6JM 284/6JM 324/6JM
NO. DESCRIPTION QTY. 3/8-16 1/2-13 1/2-13 5/8-11
1 ANCHOR INSTALLATION TOOL 1 97077A120 97077A130 97077A130 97077A140
2 MOTOR FOOT ANCHOR 4 97095A121 97095A131 97095A131 97095A141
3 THREADED ROD 4 90575A292 90575A736 90575A732 90575A810
4 RISER BLOCK 4 INCLUDED INCLUDED INCLUDED INCLUDED
5 MOTOR SHIM (AS NEEDED) 4 94420A160 94420A160 94420A160 94420A160
6 FLAT WASHER 4 90107A127 90107A033 90107A033 90107A035
7 LOCK WASHER 4 92147A031 92147A033 92147A033 92147A035
8 HEX NUT 4 94819A049 94819A055 94819A055 94819A058
McMaster-Carr Part Numbers
Consult Motor Name Plate for Frame Size Specification
Table of contents
Other MDM Water Pump manuals
Popular Water Pump manuals by other brands

Gasboy
Gasboy 61 Special installation instructions

Pentair
Pentair SHURFLO PIRANHA 375-116-10 quick guide

Elmo Rietschle
Elmo Rietschle V Series operating instructions

Oerlikon
Oerlikon TURBOVAC series operating instructions

Grundfos
Grundfos DMH 25X Installation and operating instructions

Clarke
Clarke BIP1000 Operation & maintenance instructions

VT
VT Econo 2000 User instructions

Wayne
Wayne ESP15 Operating instructions and parts manual

Kompernass
Kompernass KH 4232 operating instructions

ASP
ASP SSPC Installation, operation & maintenance instructions

Swiss Made
Swiss Made Gotec GO5 Instruction and maintenance manual

Metabo
Metabo HWW 5500/20 M Original operating instructions