manuals.online logo
Brands
  1. Home
  2. •
  3. Brands
  4. •
  5. MeCan
  6. •
  7. Lens
  8. •
  9. MeCan NY1S-a5100 User manual

MeCan NY1S-a5100 User manual

Popular Lens manuals by other brands

OptiSource LENS INSPECTION STATION+ user manual

OptiSource

OptiSource LENS INSPECTION STATION+ user manual

Panasonic Lumix H-ES12060 Service training manual

Panasonic

Panasonic Lumix H-ES12060 Service training manual

Navitar 1-62314 Dimensional drawing

Navitar

Navitar 1-62314 Dimensional drawing

Angenieux OPTIMO PRIME user manual

Angenieux

Angenieux OPTIMO PRIME user manual

Sealife SL050 instruction sheet

Sealife

Sealife SL050 instruction sheet

Tamron SP 70-300mm F/4-56 Di VC USD Brochure & specs

Tamron

Tamron SP 70-300mm F/4-56 Di VC USD Brochure & specs

Panasonic VW-W4907 operating instructions

Panasonic

Panasonic VW-W4907 operating instructions

Leica APO-SUMMICRON-SL 1:2/50 ASPH. instructions

Leica

Leica APO-SUMMICRON-SL 1:2/50 ASPH. instructions

Cosina Voigtländer NOKTON instruction manual

Cosina

Cosina Voigtländer NOKTON instruction manual

Cosina Voigtländer NOKTON instruction manual

Cosina

Cosina Voigtländer NOKTON instruction manual

Cosina Voigtländer SUPER NOKTON 29mm F0.8... instruction manual

Cosina

Cosina Voigtländer SUPER NOKTON 29mm F0.8... instruction manual

Navitar 1-51200 Dimensional drawing

Navitar

Navitar 1-51200 Dimensional drawing

Shamir Star Quick start user guide

Shamir

Shamir Star Quick start user guide

Navitar 1-51332 Dimensional drawing

Navitar

Navitar 1-51332 Dimensional drawing

Canon J11ex4.5B Operation manual

Canon

Canon J11ex4.5B Operation manual

Sony LKRL-Z200 Series Product information

Sony

Sony LKRL-Z200 Series Product information

Lensbaby CIRCULAR FISHEYE quick start guide

Lensbaby

Lensbaby CIRCULAR FISHEYE quick start guide

Navitar 1-51338 Dimensional drawing

Navitar

Navitar 1-51338 Dimensional drawing

manuals.online logo
manuals.online logoBrands
  • About & Mission
  • Contact us
  • Privacy Policy
  • Terms and Conditions

Copyright 2025 Manuals.Online. All Rights Reserved.

NY1S-α5100 – Microscope Documentation Set
Photomicrograph with
Sony α5100
Remove eyepiece
and install ①.
Use ② for eyepiece
withφ30mm
diameter.
First, attach ④ and ①.
Next, install ④ to lens
mount and secure.
Insert ① directly.
Secure with screw
which may be
attached to F-tube
Screw ③into C-mount.
Attach ①and ②, and
insert it into ③. Secure
with screw at the side.
Installation
Nikon F
p
hototube
E
y
e
p
iece
φ
23.2/30mm
C-Mount
Attach NY-BH (option)
to PT phototube.
Insert ① into it
and secure with screw
at the side of NY-BH..
.
Ol
y
m
p
us PT
p
hototube
Attach NY-JIS (option)
to JIS phototube.
Insert ① into it
and secure with screw
at the side of NY-JIS..
.
JIS
p
hototube
** Compatible with
Direct
(
1.0x
)
C -mount
1. Settings
* Page number next to each line refer to pages in Instruction Manual and Help Guide
Settings described here are only standard examples for starter.
Please adjust details in accordance with your specific requirement
as you get more accustomed to the operation.
1-1 Turning on the camera and setting up the date/clock - Instruction manual - P20
1-2 Shoot mode - P (Program Auto) - Help Guide[33]
1. Press Menu Button
2. Select Camera Setting (Camera Icon)
3. Rotate control wheel to select P (Program Auto)
4. Press Set button.
1-3 ISO Sensitivity - Help Guide [92]
1. Press Menu Button
2. Select Camera Setting (Camera Icon)
3. Rotate control wheel to select ISO
4. Select desired setting.
1-5 Power Save Start Time - Help Guide [163]
1. Press Menu Button
2. Select Setup
3. Rotate control wheel to select Pwr Save Start Time.
4. Select 30min for automatically switch to power save mode.
1-4 Release w/o lens - Help Guide [129]
1. Press Menu Button
2. Select Custom Setting
3. Rotate control wheel to select Release w/o Lens
4. Select Enable, so the shutter can be released when no lens is attached
Important!!
2. Shooting Movie
** HDMI cable is sold reparatory
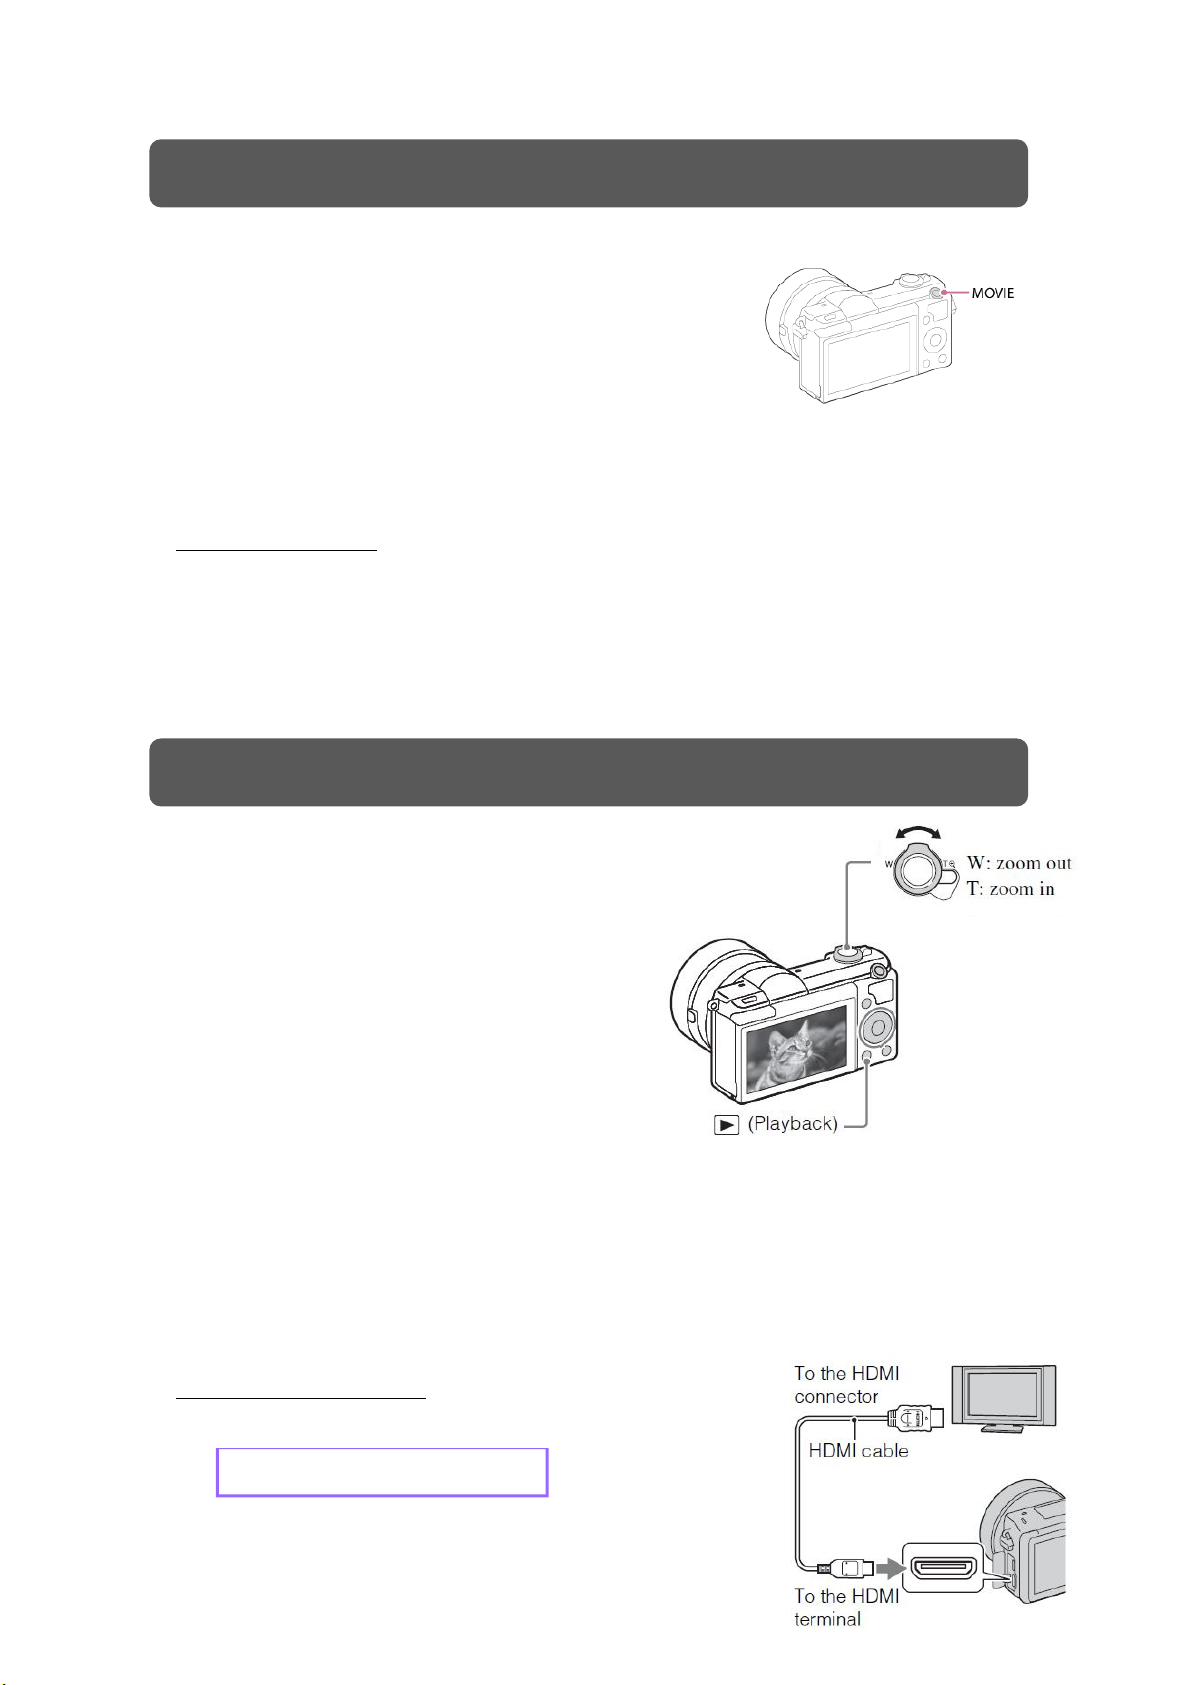
3. Play Back Image
Instruction Manual P.21 - Help Guide [163]
5. Press the MOVIE button to start recording.
6. Press the MOVIE button again to stop recording.
Point
-Focusing and brightness would be adjusted automatically
-Press the shutter button half way to focus quickly during recording,.
Audio Recording off - Help Guide [105]
1. Press Menu Button
2. Select Camera Setting
3. Rotate control wheel to select Audio Recording.
4. Select off for Audio recording off
Instruction Manual P.22 - Help Guide [140]
1. Press the Playback button.
2. Select Image with control wheel
★ Playback Zoom - Help Guide [141]
3. Display the image and slide the W/T lever to the T side to zoom up.
If the image is too large, slide the W/T lever to the W side to adjust.
4. Select the portion you want to enlarge by pressing the top/bottom/right/left
side of the control wheel.
Playback image on HDTV - Help Guide [154]
Connect HDMI terminal of camera and TV with HDMI cable