Med X Change HDMD User manual

User Manual www.medxchange.com
Model HDMD® U5002-1, 7.0 2011-11-03


U5002-1, 7.0
1
Contents
I. Introduction
About the HDMD® System ............................. 2
HDMD® Med X Change Version 6.0
Software Features .......................................... 3
Video and Still Image Formats & Quality........ 4
Storage ........................................................... 4
Approved DVDs.............................................. 4
Networking...................................................... 4
II. Quick Install
Contents ......................................................... 5
Accessory Connections - Front ...................... 5
Accessory Connections - Back....................... 6
III. Record
Starting a Recording / Taking a Still Image..... 7
Selecting Cameras ......................................... 7
Additional Recording Information ................... 8
IV. Playback
Video Playback and Still Image Viewing......... 11
V. Burn Media
Single Recording ............................................ 13
Multiple Recording.......................................... 13
Burning to CD/DVD ........................................ 14
Saving to Memory Card.................................. 14
DCIM Format .................................................. 15
VI. Printing
Printing Still Images ........................................ 16
VII. Disk Management
Disk Management........................................... 17
VIII. Mobile
Med X Mobile.................................................. 18
Troubleshooting Med X Mobile Connection .... 23
IX. Settings
Help Section ................................................... 25
Recording Storage.......................................... 25
Recording Properties...................................... 26
System Properties .......................................... 26
Watermark Tab ............................................... 27
Camera Labels ............................................... 27
Detail Fields.................................................... 28
Mobile ............................................................. 28
X. Fluorescence Setup and Operation
Testing Communication ................................. 29
Foot Pedal ..................................................... 29
Hand Control ................................................. 30
Touch Screen ................................................. 30
Picture in Picture ........................................... 31
XI. Technical
HDMD®ProductSpecications...................... 32
Glossary of International Symbols.................. 32
XII. Safety/Electrical/Maintenance/Update Record
HDMD® Computer.......................................... 33
Connecting Computer to Power ..................... 33
Classications................................................ 33
Notes ............................................................. 34
Warranty ........................................................ 34
XIII. System Compliance Statements
System Compliance Statements & Tables...... 35
XIV. Med X Change Contact Information
Technical Support & Contact Information ....... 38

U5002-1, 7.0
2
About the HDMD® System
In the most basic terms the Med X Change HDMD® System is a custom built digital recording system which
canrecordStandardDenition(SD)&HighDenition(HD)videofrommultiplesources,takedigitalstillswithout
interrupting the video, and can burn this stored information to a disk for documentation and presentation.
The system runs on the latest technology in both hardware and software. The hardware is state of the art,
utilizing Intel®Core 2 Duo Processors, high capacity hard drives, and the fastest SATA Blu-ray DiscTM burner
combo DVD-R/CD-R drives available. The software is built on MPEG-4 technology, utilizing the best compression
available.VideoscanbestoredasWindowsMediaVideoHDles(.wmv)orh.264(.mp4).
Because of rapid advancements in technology, it was important that the system be easy to update. This is
a dynamic system that can grow and be adapted as technologies change. The system’s software is easily
upgradeable via CD, providing you with updates that will keep your system “State of the Art”.
The HDMD® is a Class I medical device intended to be used as an accessory to various surgical cameras to
record video and static images during surgical procedures and operations.
The HDMD® is not intended for use with radiological imaging or diagnostic systems.
I. Introduction

U5002-1, 7.0
3
HDMD® Med X Change Version 6.0 Software Features:
RECORD PAGE
•Preview Change: The preview displays 30 frames per second.
•Still Image Capture: Still images are now de-interlaced upon capture.
•Video Compression:Itisnowpossibletoadjustthevideoquality(.wmv:10,18,20,MegabitStream;
.mp4:Low,Med,Highh.264)duringtherecording.
•New Recording:Additionaleldscanbesetupformorerecordinginformation;i.e.patientname,patient
number, doctor, hospital.
•Remote Storage: Checkbox to enable the user to record to a remote storage drive.
•Archiving: Indicator to let the user know that archiving is enabled and working.
•Camera Buttons: System remembers which camera you had selected the last time you used the system.
•Video Settings: Independently adjust the brightness, contrast, hue and saturation of the video by the easy
touseslidebars(SDvideoonly).
PLAYBACK PAGE
•Thumbnails: Thumbnails of video segments and still images.
BURN PAGE (BURN MEDIA)
•Copy: Burn Videos and Images to DVD/CD, copy to a memory card, or copy to a SD card.
•Thumbnails: Thumbnails of video segments and still images.
•Preview Window: Review the stills and videos on the burn page.
•Memory Card: There is a tab that allows you to copy videos and stills to a USB memory stick or external
hard drive.
•Multiple Recordings: Ability to burn videos and still images from multiple cases to one or more discs or
USB drives.
PRINT PAGE
•Page Layout: You can select a different layout for each page and then select from the thumbnails to add
pictures to your page.
•Printer: This will work with any standard USB printer for Windows XP.
DISK MANAGEMENT PAGE
•Stills and Videos: You have the ability to delete individual segments and stills from a particular recording.
•Archiving: If archiving is enabled on the settings page, the user can manually archive videos and still
images to the selected location from this page.
•Preview Window:Thereisapreviewwindowonthispageusedtovisuallyconrmwhatisbeingdeleted
or archived.
MOBILE PAGE
•Images and Videos: You have the ability to transfer images and videos to mobile devices.
•Convert: Convert videos to a mobile playback format prior to transferring.
•Annotate:Useannotationsaslenamesonmobiledevices.However,DCIMformatwilltakepriorityifselected.
•Preview Window:Thereisapreviewwindowonthispageusedtovisuallyconrmwhatisbeingtransferred.
SETTINGS PAGE
•Data Fields:Customizabledataeldstothesystemwhichyoulloutatthebeginningoftherecording.
Thepurposefortheseisforarchivingandsearchingonacentralserver.Theseeldswillalsobeonthe
Recording Viewer that we are building for the CD/DVD’s that are created from the system.
•Audible Speech:Enablesthevoicenoticationforrecording,pausedandstillimagecapture.
•Watermarking:Thistaballowsyoutoapplyawatermarktoyourrecordings.Theselecteditem(s)will
appearinthelowerrightcornerofeachrecording.(ForSDvideoonly)
•Multiple Languages:Thesysteminterfacecannowbeswitchedtomultiplelanguages(English,Spanish,
French,Italian,Portuguese,Swedish,German)fromadropdownmenu.(ContactMedXChangeforsupport).
I. Introduction (continued)

U5002-1, 7.0
4
Video and Still Image Formats and Quality
Video: The Med X Change HDMD® System utilizes the latest in MPEG and h.264 encoding and compression.
MicrosoftWindowsMediaVideo(.wmv)produceshighqualityvideoutilizingMPEG-4compression.H.264
encodingiscapturedinaHD.mp4le(MacandWindows7compatible).
Still Images: HighDenitionStillimagesarestoredin1280x720or1024x720(~1megapixel)uncompressed
bitmaples(.bmp).Thestillsarecapturedandstoredasuncompressedbitmapssince.bmplesarebestfor
editingandarecompatiblewithboththeMacandPC.TheSD(NTSC,PAL)stillimageswillbestoredas640x
480(~1/3ofamegapixel).AlsocapableofstoringJPEGimagesinadditiontoBMP.
Storage
I. Introduction (continued)
* BACKUP YOUR VIDEO AND STILL IMAGES PERIDOCIALLY TO EXTERNAL STORAGE *
* THE HDMD® IS NOT INTENDED FOR LONG TERM STORAGE/ARCHIVING *
TheHDMD®Systemisconguredwithagenerous320 GB hard drive available for video storage, as well as a
SATA Blu-ray DiscTM Burner combination DVD-R/CD-R recorder. This allows stored recordings to be easily copied
to disk. The Blu-Ray combo disc drive has the advantage of storing up to 45 minutes of video with stills on a
DVD-R disk, or using more economical CD-R/RW for storing smaller amounts of data. Larger amounts of data can
be stored on Blu-Ray disc such as the BD-R
Approved DVD’s:
•Taiyo Yuden 16x Premium Line DVD-R
•Sony DVD-R 16x (Version 1.3) DVD-R
Note: It should also be noted that blank DVDs labeled “For Authoring” are made for commercial, high
volume recorders and are NOT compatible with general purpose recorders, such as those used in the
Med X Change HDMD® system.
Networking
The HDMD® System is network ready and can be quickly deployed across a network. Because the system has
been left open, a network administrator can quickly bring the system online. TCP/IP and NetBUEI have been
loaded to support drive mapping, network piping, and local intranet web access to the videos and still images
using NT authentication.
U5002-1, 7.0
5
Contents
UponreceivingtheHDMD,thefollowingcontentsshouldbeinthebox:
•1xHDMD(BluRay)
•1 x 3ft HDMI to HDMI Cable
•1 x 6ft HDMI to HDMI Cable
•1 x 6ft DVI to HDMI Cable
•1 x Black Keyboard
•1 x Black Touchpad
•1 x 12” BNC Cable
•1x18”S-VideoCable
•1 x LEMO Cable
•1 x BNC to BNC F/F adapter
•2 x BNC to RCA Adapters
•1 x Medical Grade Power Supply
•1 x MedXMobile User Manual
•1 x Standard Power Supply and Cable
•1 x User Manual
•5 x Blank DVD’s
•1xRecoveryDiskrev.2A(OnSystem)
•1 x Gefen DVI Connector
•1 x Belkin Wi-Fi Adapter and Base
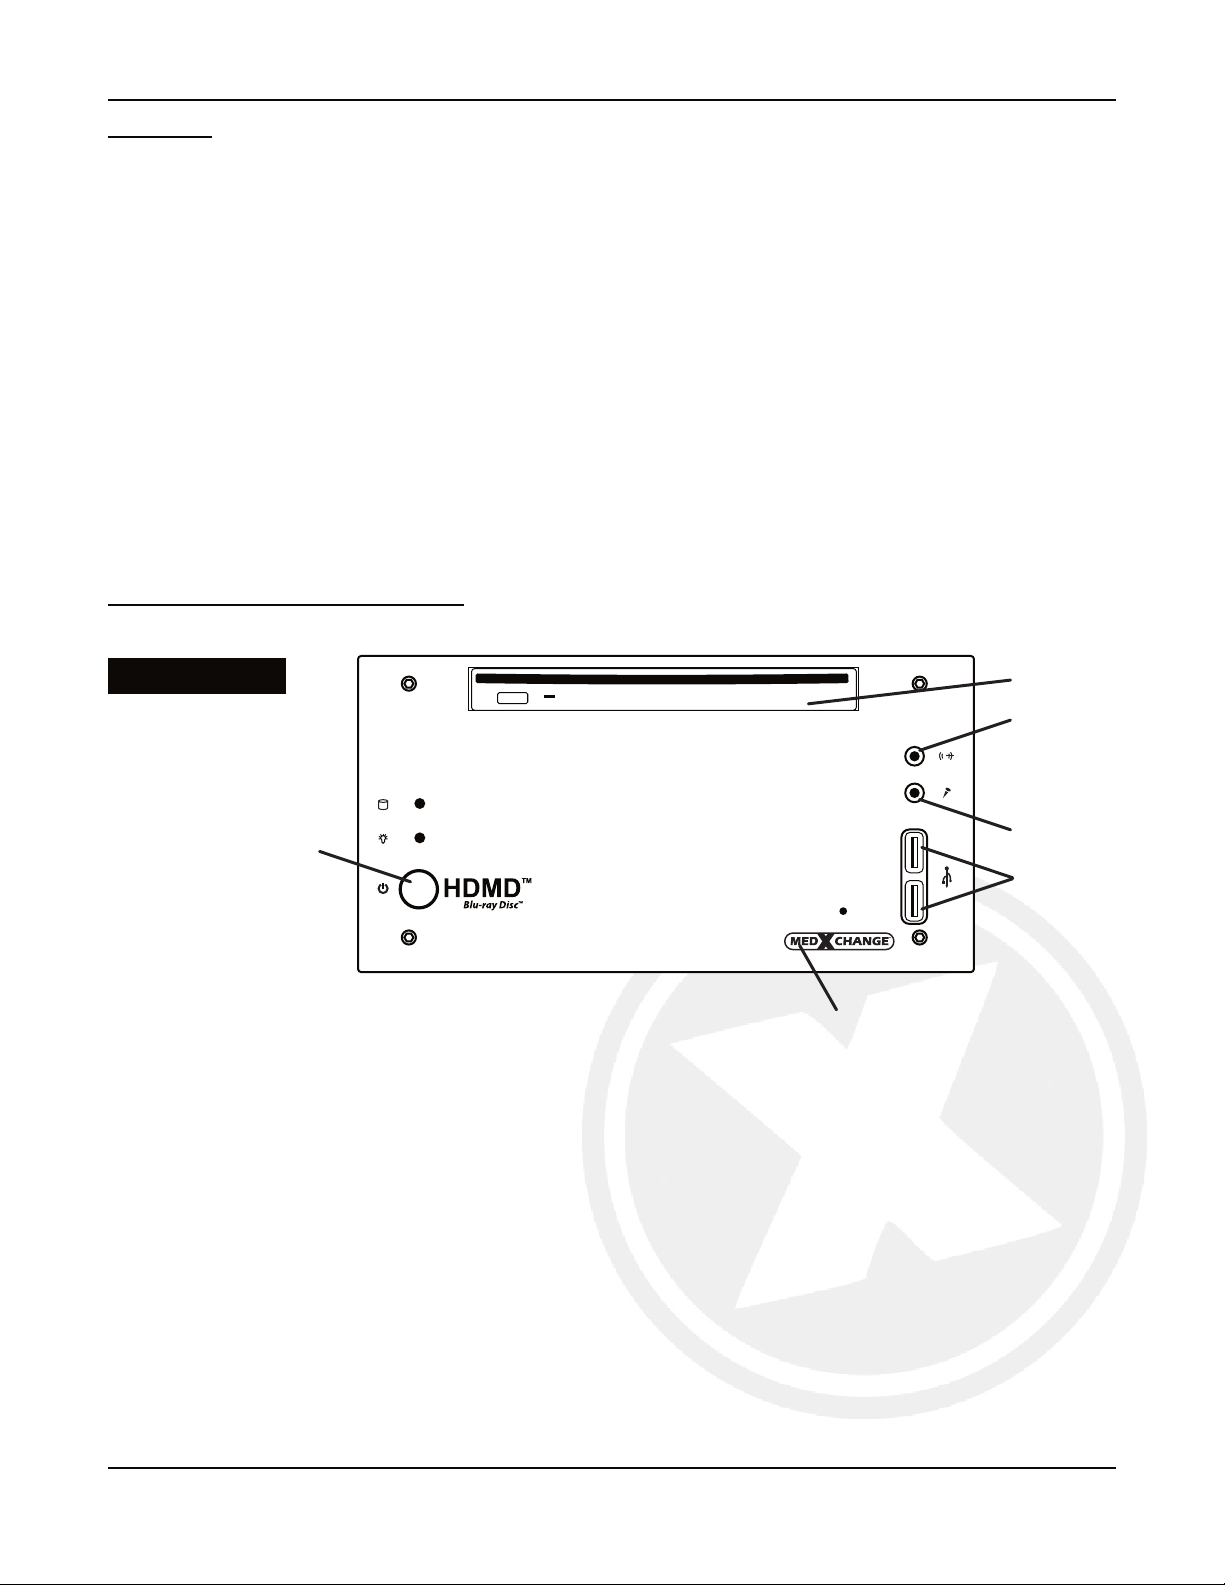
Accessory Connections - Front
Figure 2-1 and Figure 2-2 detail the HDMD accessory connections
II. Quick Install
HDMD® Front
Figure 2-1 DVD Drive
Audio Out
Mic In
USB
Power
Med X Change Logo
U5002-1, 7.0
6
II. Quick Install (continued)
HDMD Computer Back Panel
Figure 2-2
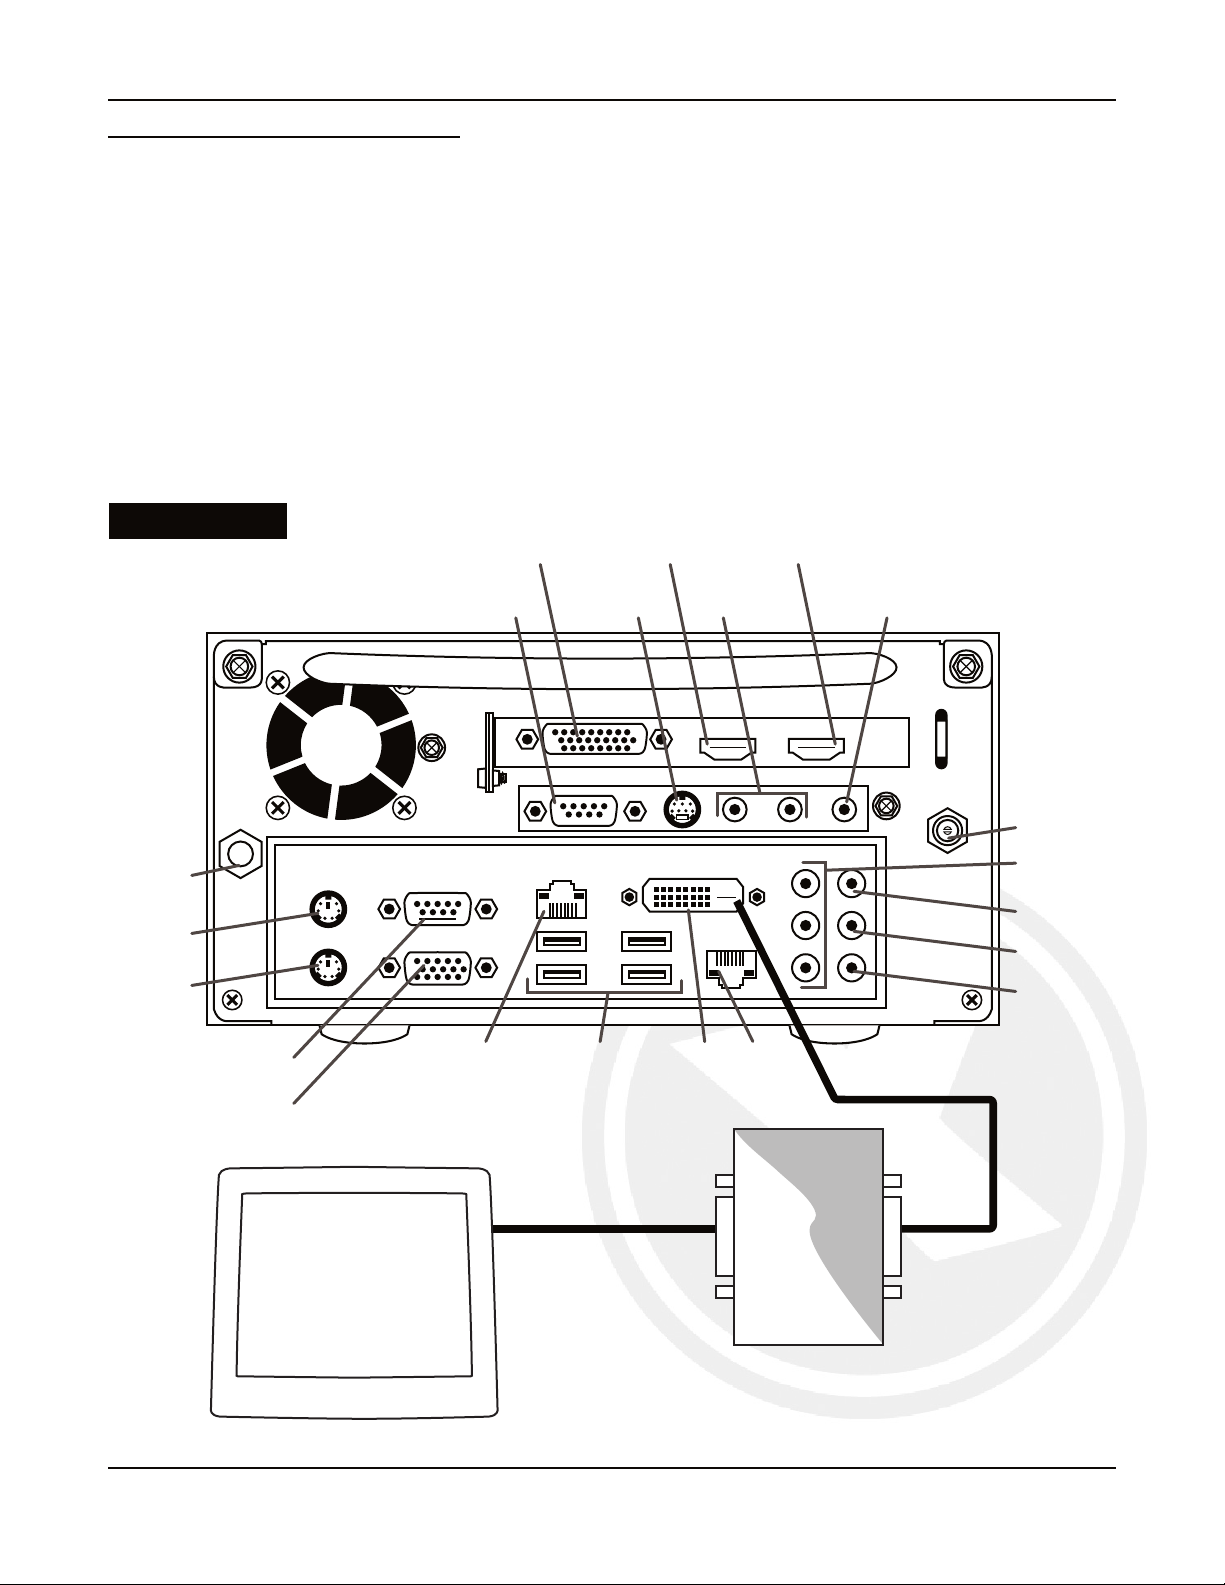
Accessory Connections - Back
Figure 2-2 shows the correct locations for connecting HDMD® accessories. Accessories should only be
connected as shown and/or described below.
•To connect a monitor, attach a DVI Cable from the HDMD® DVI Out to the EDID Adaptor DVI In. Attach a
second DVI Cable from the EDID Adaptor DVI Out to the Monitor DVI In.
•The HDMD Recording Software outputs via the DVI OUT Connector which displays in 1440x900 resolution.
The monitor that is to be used needs to support this resolution to properly display the Graphical User Interface.
•If a microphone is to be used, it should be attached to the MICROPHONE jack.
•Any video device that is to be used for capturing video, should be attached to one of the 3 video capture
connections(1S-Video,2Composite).
•Only the power supply that is shipped with the HDMD® should be connected to the POWER connection.
The power supply is a TrumPower Medical Power Supply Model # PMP130-13-1-B12.
NOTE When a DIC-500/DIC-700 is being used, it should be connected to the VGA Port on the HDMD®
DVI
detective
DVI In
DVI Out
DVI Out
S-Video In Composite In
HDMI Out HDMI In
Foot Pedal
LAN USB(4)
VGA
Scope
Keyboard
Mouse
LAN
Power
NA
Microphone
Line Out
NA
NA
EQ-Bolt NA
DVI OutDVI In DVI In
DVI Cable
DVI Cable
EDID Adaptor
Monitor
U5002-1, 7.0
7
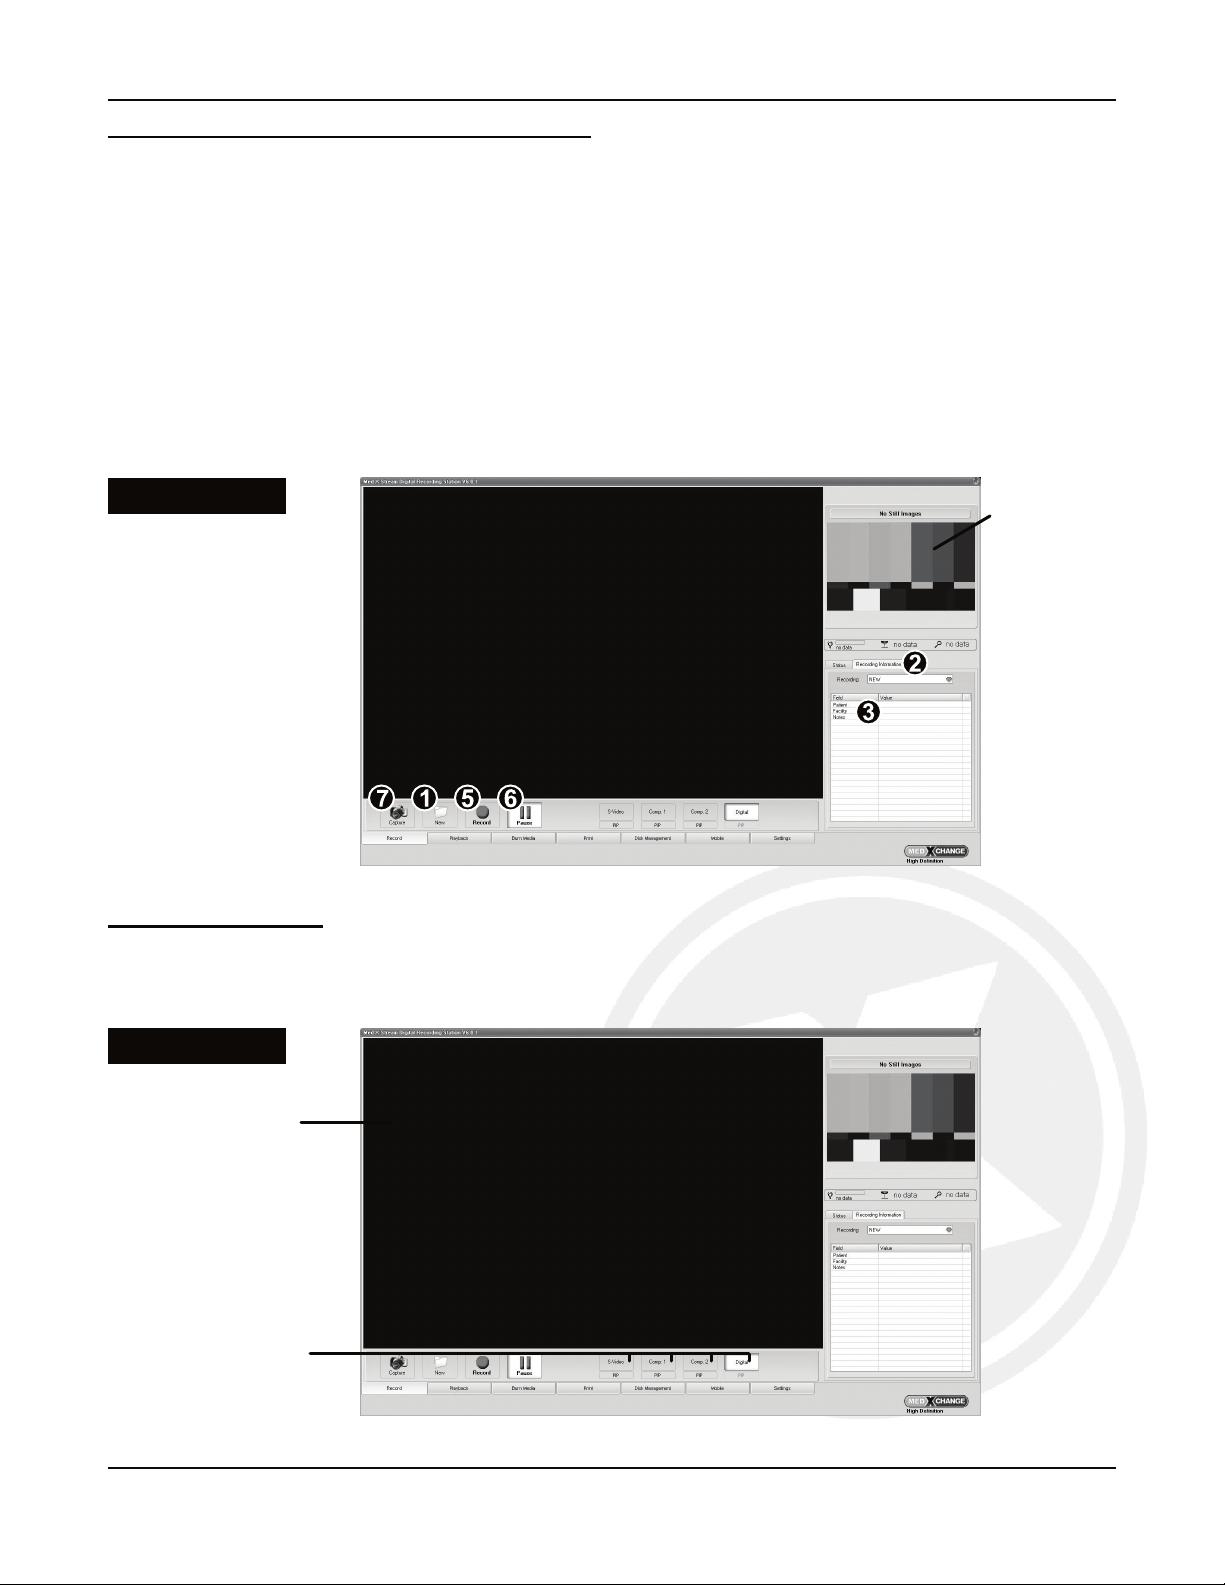
Starting A Recording / Taking A Still Image
1.To start a new recording, tap the ‘New’ button. The ‘Recording Information’ tabwillopen.(Figure 3-1)
2.The ‘Recording Information’ tab displays the name of the recording, any Fields that have been assigned &
their corresponding Values.
3.Start by entering a name for the case or a Value for a Field (such as Patient, Facility, Notes). Tap a Field and
the on screen keyboard will appear. Type the information into the on screen keyboard and hit the ‘Enter’ button.
4.Repeat step 2 to enter Values for the remaining Fields. Fields can be added/deleted as needed from the
‘Settings’ tab (see pg. 28), prior to starting a case.
5.To begin a recording session, tap the ‘Record’ button.
6.To pause recording during a session, tap the ‘Pause’ button. Tapping the ‘Record’ button will resume the session.
7.To capture a still image while recording, simply tap the ‘Capture’ button.
III. Record
Figure 3-1
Selecting Cameras
Cameras are selected and switched using the four camera buttons under the Preview Pane (Figure 3-2). These
buttons are labeled with the names given to them using the Camera Labels tab (see pg. 27). Switching can occur
between the four inputs during a recording session, but the recording must be paused prior to switching.
Figure 3-2
Preview
Pane
Camera
Buttons
Displays Last
Still Taken

U5002-1, 7.0
8
III. Record (continued)
Additional Recording Information
1. STATUS tab displays information on current segment length, total recording time and disk usage. (Figure
3-3) You can also change the quality of the video, and enable remote storage. For more information on
remote storage and archiving, see page 25.
Figure 3-3
2. RECORDING name is the name associated with the case (Figure 3-4). It will be used when burning onto a
CD/DVD.Itisalsoimportantforarchivingonthedrive.TherecordingwillbestoredontheD:\driveinafolder
named by this entry. If the user does not make an entry, the name defaults to the current system date and time.
Figure 3-4

U5002-1, 7.0
9
III. Record (continued)
3. VIDEO SETTINGS tab brings up slider controls to use for adjusting brightness, contrast, hue and saturation
for SD video only (Figure 3-5). For HD video adjustments see page 26.
Figure 3-5
SD Video
4. PICTURE IN PICTURE (PIP)allowstheusertodisplayasecond,smallerviewingwindowinthecornerofthemain
display (Figure 3-6). PIP is available when recording in wmv mode or as a FL Loop Mode feature when recording
in h.264 mode. For more information on PIP in FL Loop Mode, see page 31.
Figure 3-6
U5002-1, 7.0
10
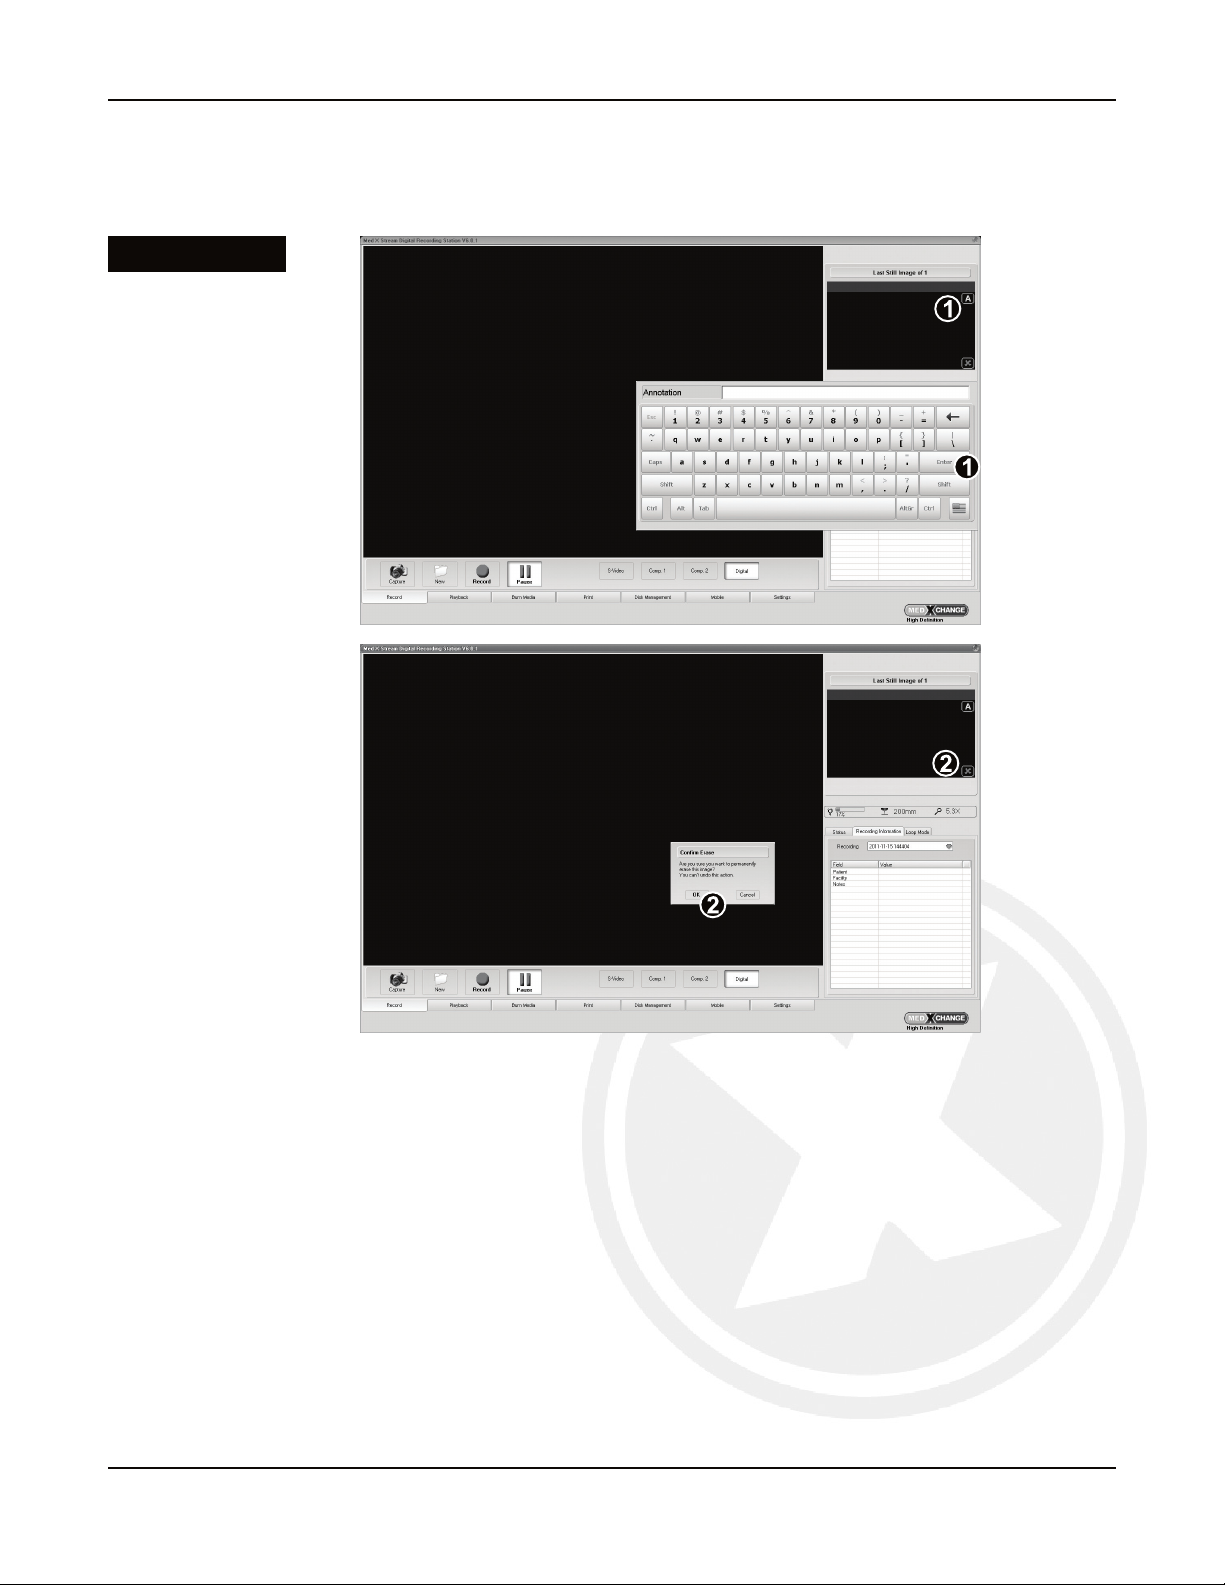
Annotate and Delete Last Still Image (Figure 3-7) allows the user to either annotate or delete the last still image taken.
1. To annotate the last still image, click the “A” button. On the popup keyboard, add the annotation and click Enter.
2. Todeletethelaststillimage,clickthe“X”button.ConrmtheerasebyclickingOK.
Note: This will permanently delete the image from the system.
Figure 3-7
III. Record (continued)
U5002-1, 7.0
11
IV. Playback
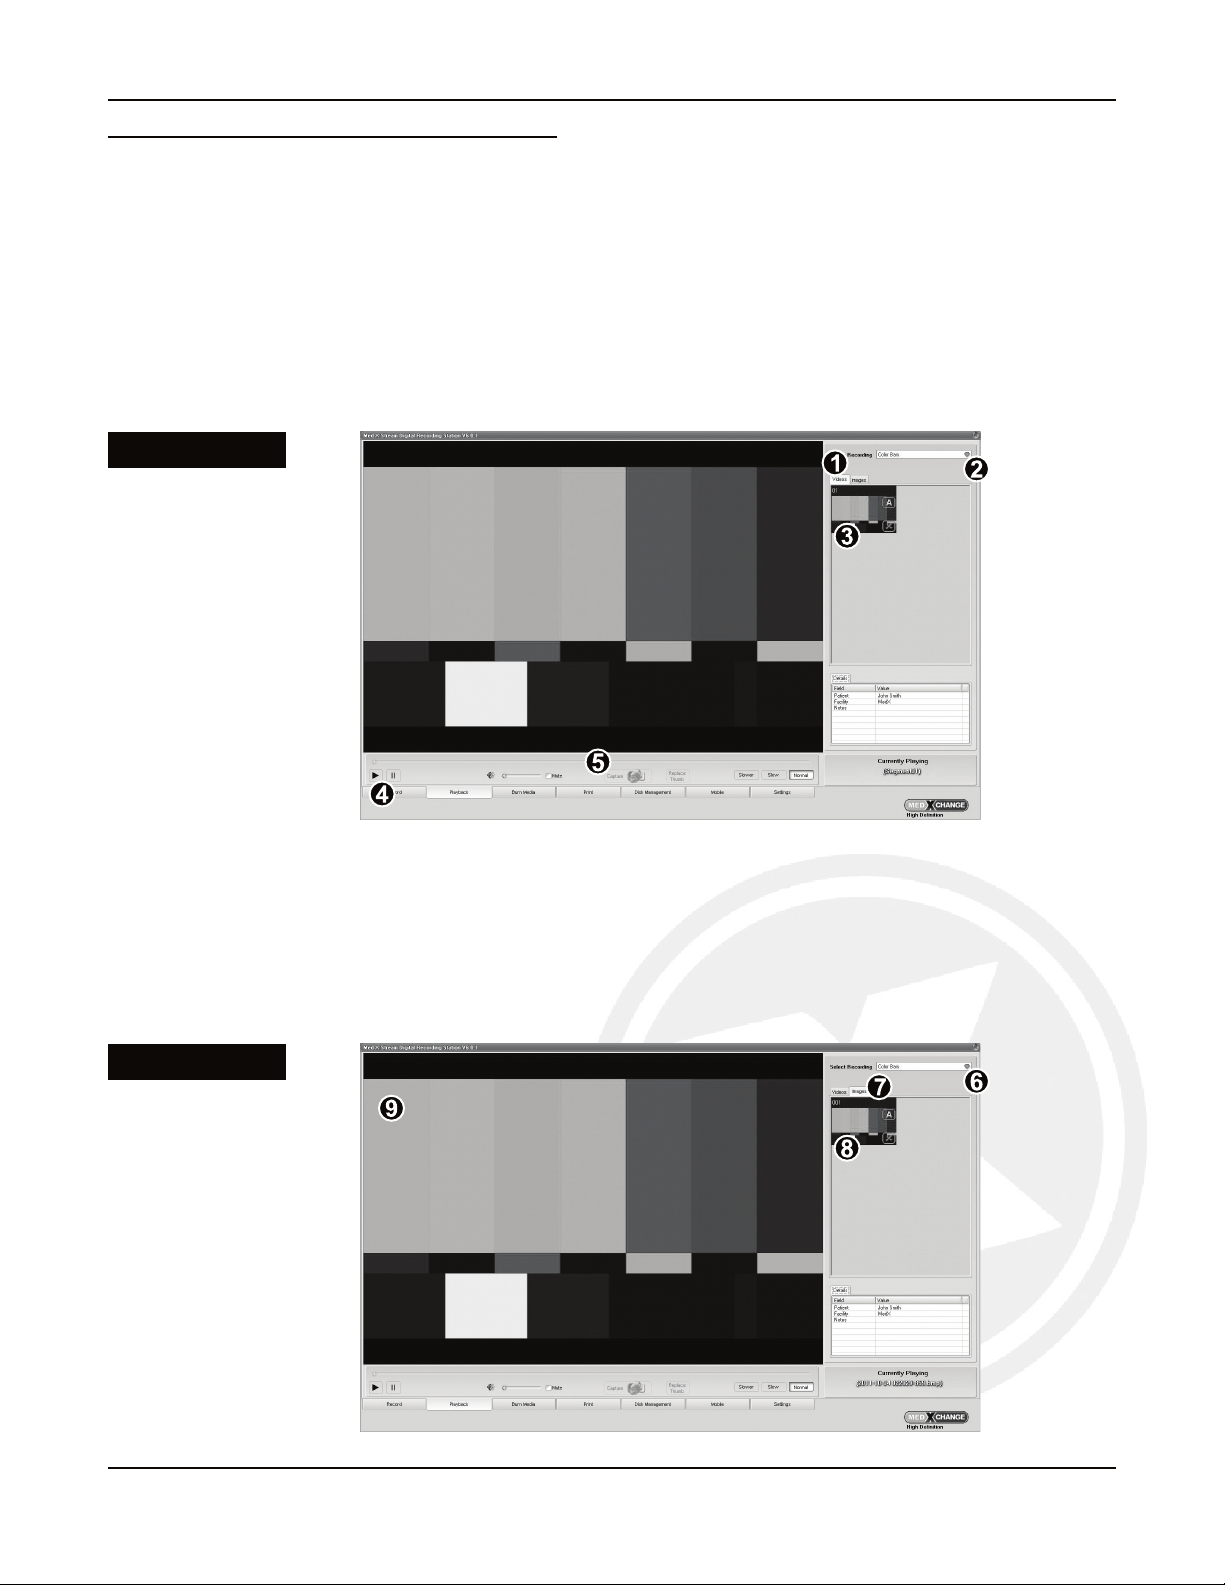
Video Playback and Still Image Viewing
The Playback page is for video playback and still image viewing. This can be for the current session or any
previously recorded session.
Forvideoplayback:
1. Select the ‘Videos’ tab (Figure 4-1).
2. Select a recording session from the ‘Select Recording’ dropdown select box.
3. Play a video by tapping the thumbnail image.
4. Use the playback controls to control the current playback.
5. Still images can be captured from previously recorded video by pressing the Capture button.
Toviewstillimages:
6. Select the ‘Images’ tab (Figure 4-2).
7. Select a recording session from the ‘Select Recording’ dropdown select box.
8. View a still image by tapping the thumbnail image.
9. The image will load into the media player window.
Figure 4-1
Figure 4-2

U5002-1, 7.0
12
IV. Playback (continued)
Annotate and Delete Videos and Images (Figure 4-3) allows the user to either annotate or delete a video or image.
1. Toannotateavideo/image,clickthe“A”buttononthedesiredle.Onthepopupkeyboard,addtheannotation
and click Enter.
2. Todeleteavideo/image,clickthe“X”buttononthedesiredle.ConrmtheerasebyclickingOK.
Note: This will permanently delete the image from the system.
Figure 4-3
U5002-1, 7.0
13
Figure 5-1
V. Burn Media
Figure 5-2
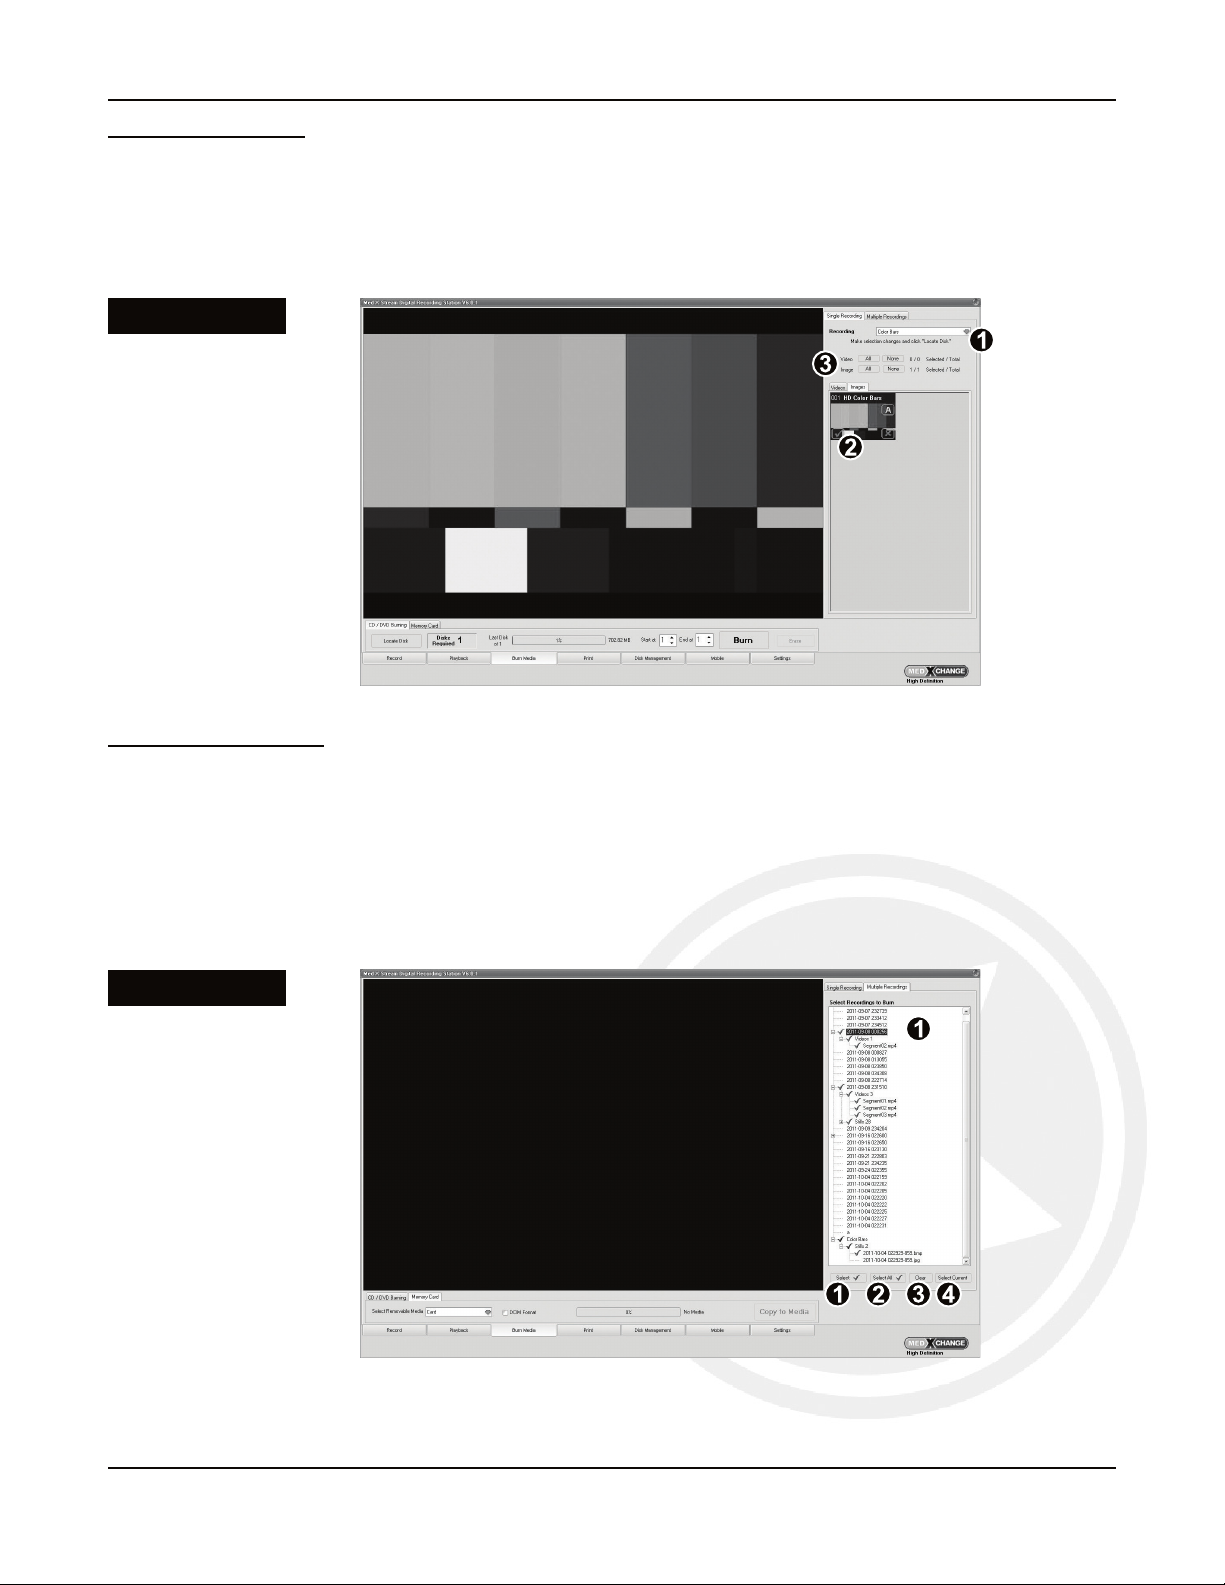
Single Recording
Single Recordingallowsforrecordingoneormorevideo/image(s)fromasingle recording session (Figure 5-1).
1. Select the Recording from which to burn videos and/or images.
2. Select the Video(s) and/or Images(s) you would like to burn, by tapping the check box over the thumbnail.
3. The All button can be used to select all videos/images. The None button will un-select all.
Multiple Recording
Multiple Recordingsallowyoutorecordoneormorevideo/image(s)frommultiple recording sessions (Figure 5-2).
1. Select Recordings To Burn allows you to select videos/images from different recording sessions, not just the
currentsession.Highlightthesessions(s)/video(s)/image(s)youwant,andclicktheSelect button.
2. Select All will select all the videos/images.
3. Clear will clear the selection of all videos/images.
4. Select Current will select all the videos/images from the current recording session only.
U5002-1, 7.0
14
V. Burn Media (continued)
Figure 5-3
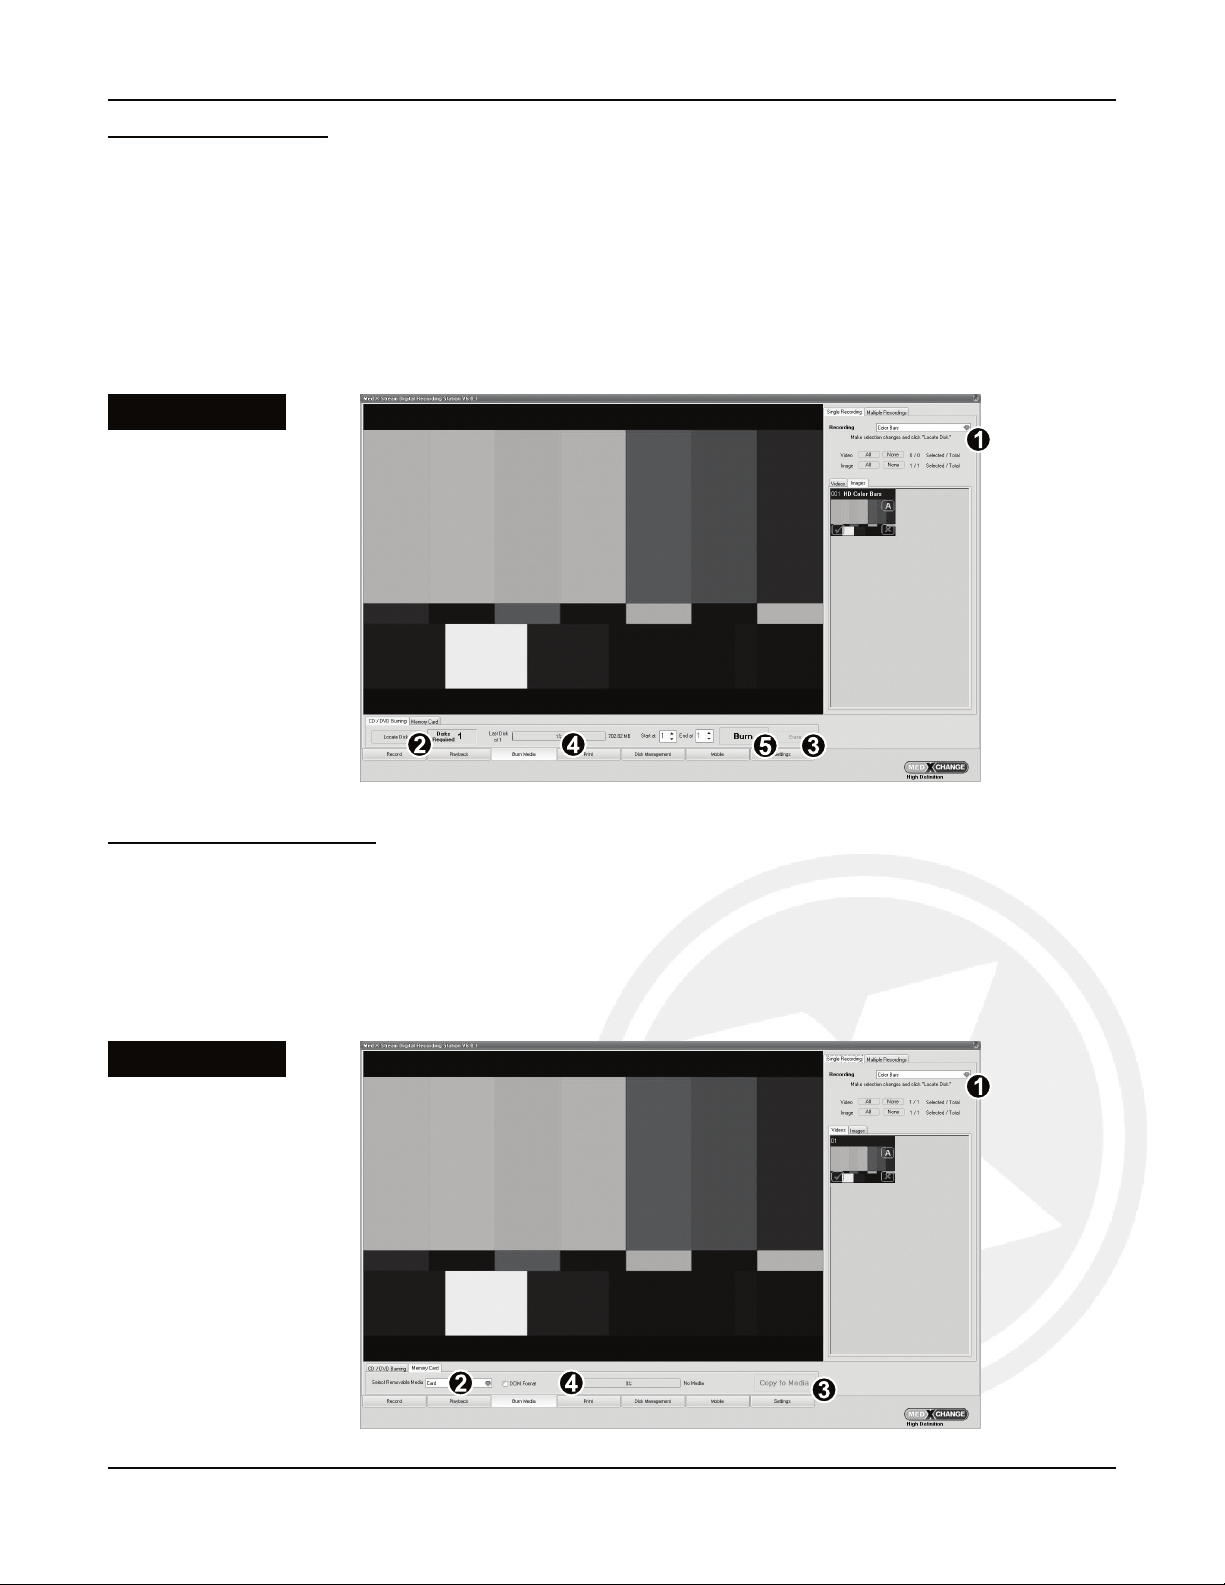
Burning to CD/DVD
Insert a blank CD-R, DVD-R or BD-R into the recorder drive tray.
1. Select the desired Video(s) and/or Still(s) from either Single Recording or Multiple Recording (Figure 5-3).
2. Use the Locate Disk button to re-read the disk size if another disk is inserted.
3. The ERASEbuttonisusedifthereispreviouslyrecordedcontentonthedisk(DVD-RW/CD-RW).
4. Disk % Available displays the percentage of disk space which will be used for the burning session. Also
displays the progress of the burn session.
5. When ready, tap Burn to start burning.
Saving to Memory Card
Insert a USB Drive into the front of the system.
1. Select the desired Video(s) and/or Still(s) from either Single Recording or Multiple Recording (Figure 5-4).
2. Selecttheappropriatedriveletter;usually“F:”drive.
3. Tap Copy To Media. A progress bar displays % complete. When the progress bar disappears the copy is done.
4. Progress bar will indicate the percentage of data selected to be copied.
Figure 5-4

U5002-1, 7.0
15
V. Burn Media (continued)
DCIM Format
DCIMFormatallowsforHDMDlestobecopiedtoaSDcard(viaUSBtoSDadaptor)andthengetpluggedinto
theApple®iPad®cameraconnectionKitadaptorforletransfertoiPad.TosaveforDCIM:
1. Check the box next to DCIM Format (Figure 5-5).
2. Follow the Saving to Memory Card directions as detailed on page 14.
Figure 5-5

U5002-1, 7.0
16
VI. Printing
Printing Still Images
The Print page allows for printing still images from one or multiple recordings.
1. Select the Recording to print. (Figure 6-1)
2. Select the Page Layout. Layout can also be designated as default by tapping the Set as Default button,
which will also retain the number of copies and the default printer.
3. Select the individual still images by tapping each image.
4. To select all images for print, tap the All button. To clear all selected images, tap the Clear button.
5. Select the number of Copies to print.
6. Select the Current Printer to print from. If necessary, install printer drivers (close software prior to installing
new printers).
7. Tap Print.
Figure 6-1

U5002-1, 7.0
17
Disk Management
Disk Management allows for the easy deletion of recordings from the hard drive. It features a built-in viewer to
previewtherecordingsbeforedeletingthem,aswellasadditionalrecordingleinformation.Additionally,the
recordingcapacityindicatorontheRecordPagewillbegintoashwhentheharddrivecapacitydropsbelow
10%.Ifthishappens,oldlesmaybeselectedfordeletionfromtheDiskManagementpagetoensurethereis
plenty of disk space.
Todeleterecordings:
1. Select the recordings to delete in the ‘Select Recordings to Delete or Modify’ window by tapping to highlight
them and then tapping the ‘Select’ button. Use the Select All button to delete all the recordings.
2. To preview the recording before deleting it (highly recommended!), tap the image in the preview pane.
3. Once all the videos slated for deletion have been previewed and selected, tap the ‘Delete’ button to
permanently delete the recordings.
VII. Disk Management
Warning: Files deleted using the Disk Management page are permanently deleted from the hard
drive. This can not be undone. To guard against total loss of valuable recordings, it is recommended
that all recordings be archived before deletion. For details on how to record to a CD, DVD, or Memory
Card, see the instructions for utilizing the Burn Media features on page 13.
Figure 7-1
File
Information
U5002-1, 7.0
18
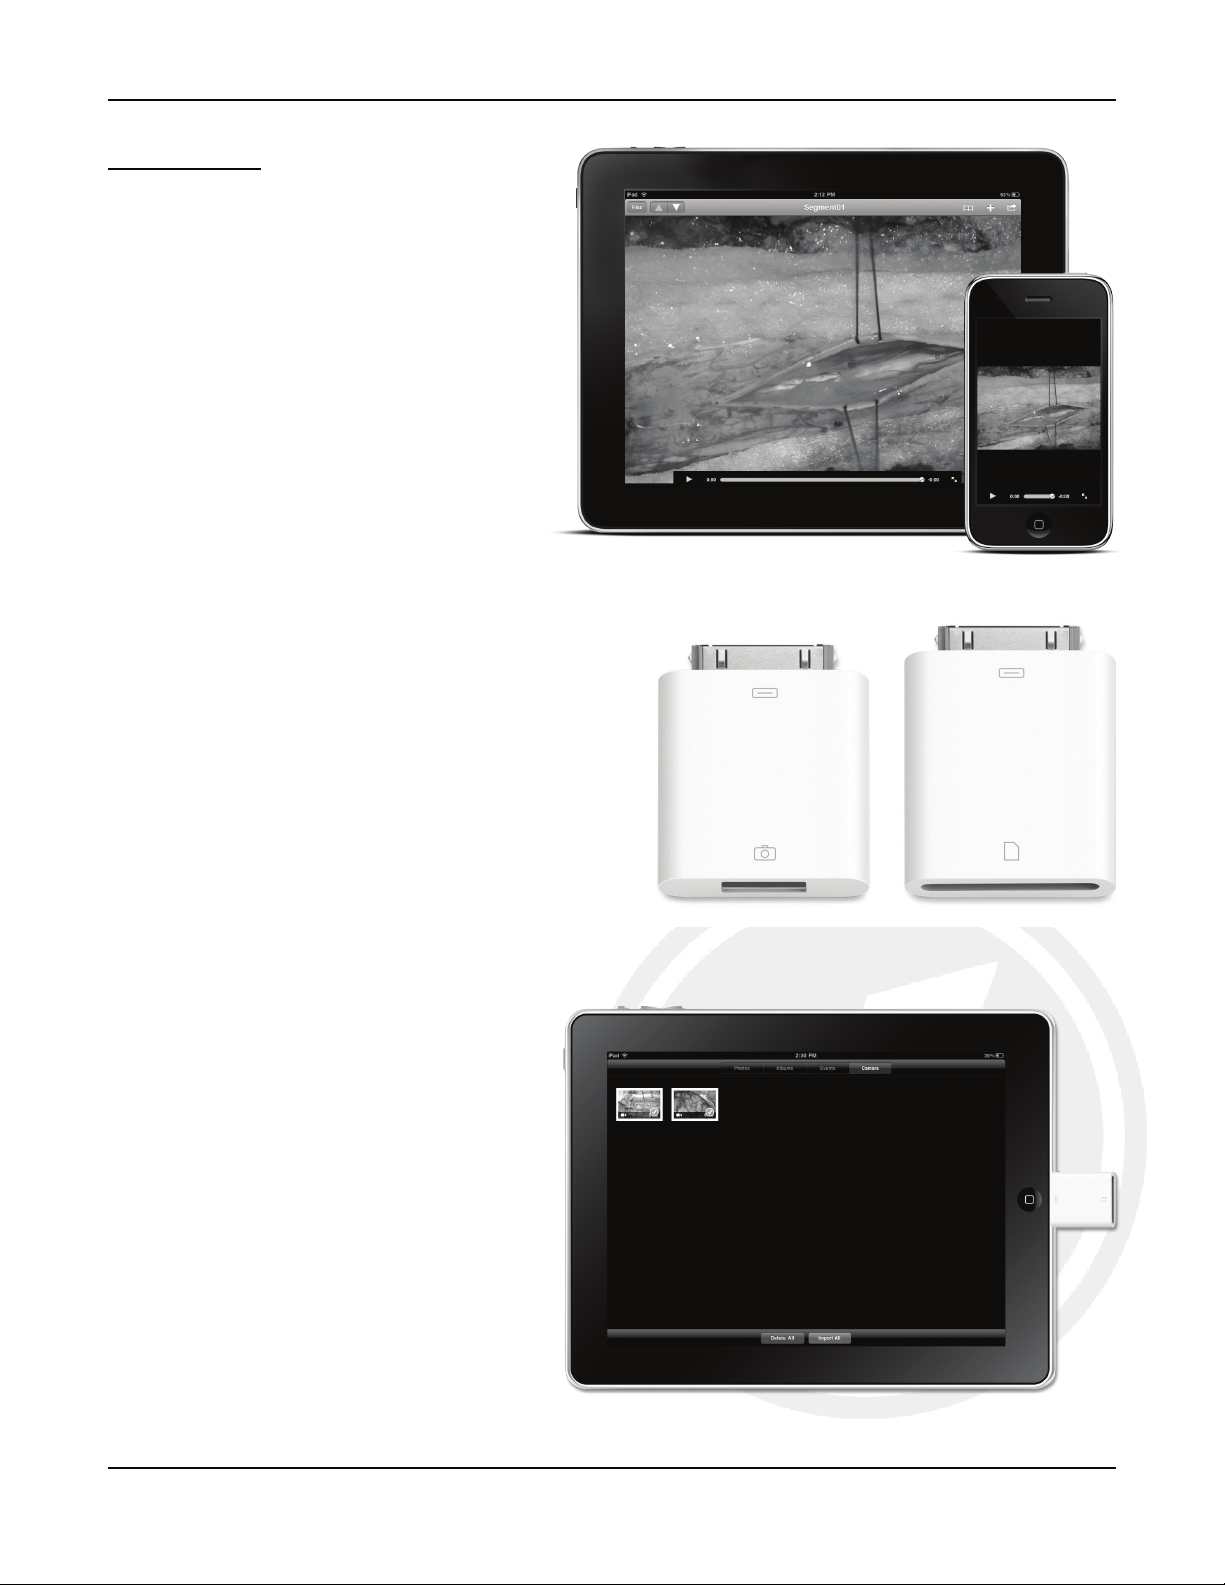
Med X Mobile
With the Med X Mobile application, videos created
on the HDMD can be transferred to an iPad®,
iPhone® or iPod® touch while still in the OR.
Videos can be transferred wirelessly or copied to
an SD card via the iPad Camera connection kit
and a SD card reader.
TobeginusingtheMedXMobileapplication:
• InstalltheWiFiAdaptertothebackofthe
HDMD via USB.
• DownloadtheMedXMobileappfromthe
Apple iTunes store onto your iPad, iPhone or
iPodtouch:
http://itunes.apple.com/us/app/med-x-
mobile/id367806603ORsearchforkeyword
“MedXMobile”.
VIII. Mobile
iPad Camera Connection Kit
iPad Camera Connection Kit in use
Table of contents


