Eagle Eye PV912 User manual

PV912 | ENGLISH USER MANUAL
1
USER MANUAL
Please read this user manual carefully and thoroughly before any attemptto Install
and operate this product and retain it for your future reference.

PV912 | ENGLISH USER MANUAL
2
CATALOG
INTRODUCTION ……………………….…….………………………………….3
WARNING ……………..……………..…..……………………………………… 4
OVERVIEW………...………………………………………………………...…5-7
Main device………………………..……………..…………………………...…….5
Remote Controller…………………………………………………………………..6
Power charger………………………………………………………………………7
BASIC OPERATION ………………….…...…………………………….….. 8-13
Battery Installation……………………...…………………………………..………8
Connect with the camera …………………………………………... ……..……….9
Start recording………………………………………………………....…………..10
Connect with TV…………………..………………………………........…………11
Connect with computer………….………………………….…………...……..12-13
FUNCTION MODES……………………………………………………….14-20
Booting picture………………………………………….……...…………………14
Record Interface………………..………………………………………………….14
Record interface…………………………………...……………………….…….15
Multi-media folders…………………………………….………...…………16-20
Function setting…………………..…..…………….……………...……21-39
ACCESSORIES……………………………………...……………………….40-41
PARAMETERS…………………………………………………………………..42

PV912 | ENGLISH USER MANUAL
3
INTRODUCTION
Thank you for purchasing PV912 which has the unique, ultra-small and delicate design. It
can be used in many recording situations. PV912 rings more convenience, safety and funs
to your daily life.
Approval Information:
All our products meet the requirements of approval FCC or CE, and are granted the
FCC or CE certification. They are authorized to bear FCC or CE mark.
FCC:
This product has been tested and found to comply with the limits for a Class B digital
device, pursuant to Part 15 of the FCC rules. These limits are designed to provide
reasonable protection against harmful interference in a residential installation.
CE:
This product complies with standards including Low Voltage Device Directive
73/23/EEC; EMC Directive 89/336/EEC and R&TTE Directive1999/5/EC. It passed the
subject tests by the authority concerned and is authorized to bear CE mark.
OVERVIEW
Along with the improvement of people’s living standard and the development of
picture compression and memory technology, the digital video memory has been a part of
our daily life. PV912 a high-tech product, just meets a plenty of needs of people and
market. It possesses a series of advanced functions including digital photography, voice
memory, sound trigger recording, high speed USB data transferring and USB charging.
EU Environmental Protection
Waste electrical products should not be disposed of with
household waste. Please recycle where facilities exist.
Check with your Local Authority or retailer for recycling
advice.

PV912 | ENGLISH USER MANUAL
4
WARNING
To prevent fire or shock hazard, do not expose the unit to rain or moisture.
Attention
The electromagnetic fields at the specific frequencies may influence the picture of
the recorder. Be sure to read the following before using the recorder and the mini
camera.
Trial recording
Before you record one-time events, you may want to make a trial recording to
make sure that the recorder and the camera are working correctly.
Notes on image data compatibility
Playback of moving images recorded with your recorder on other equipment and
playback of moving images recorded or edited with other equipment on your
recorded are not guaranteed.
Do not shake or strike the recorder
In addition to malfunctions and inability to record moving images, this may render
the SD card unusable of image data breakdown, damage or loss may occur.
LCD screen and mini camera
Be careful when placing the camera near a window or outdoors. Exposing the
LCD screen or the lens of camera to direct sunlight for long period may cause
malfunctions.
Back up recommendation
To avoid the potential risk of data loss always copy data to a disk.

PV912 | ENGLISH USER MANUAL
5
*Overview
Main Device
1.Function knob 9.Esc / Quit / Cancel
2.Video output 10.Play/Record/Confirm
3.Earphone jack 11.UP
4.Camera connector 12.USB jack
5.Working indicator 13.Micro-SD slot
6.Power switch/Delete/Capture 14. Down
7.Record indicator 15.Volume
8.TFT LCD 16.Microphone

PV912 | ENGLISH USER MANUAL
6
1.Speaker 2.Battery Mount
Remote control
Start recording Stop recording
Remote control only can works when main DVR is power on.
Available distance is about 30 meters without block outside; Available distance is about 8
meters inside the room.

PV912 | ENGLISH USER MANUAL
7
Power Charger:
Please read the manual carefully before use the power charger.
1. Put the battery into the charger. ( Up-side with label)
2. Connect DVR unit with power charger by USB cable. (Shown as Fig Above)
3. Insert the power charger into the power outlet;
4. During power charging, the red indicator of the power charger and DVR will
continuous lighting on;
5. After the power full charged, the indicator of the power charger and DVR will turn off,
green indicator turn on at the same time.
Make sure the battery and power charge working as long as possible.
The electronic release can not surpass a week, excessive power charge will reduce the
battery working life;
If set the battery for free long time, it will gradual losing the power and please charge
it again before next time use.
Please disconnect the power if the main device is free.
The battery can not be used in deviant range.
For the first time usage, charge the battery at least 12 hours. Make sure the power is off
when charging battery

PV912 | ENGLISH USER MANUAL
8
BASIC OPERATION
Install the battery:
Pull down the cover according the picture shows below, open the battery back cover.
Shown as Fig below:
The 4 golden female pins of the battery should be full touched with the male pins in the
battery house.
Close the cover after install the battery well.
Battery using time information form:
Capability
Charging time
Standby time
Playing time
Recording time
1300mAh
Approx :4
hours
Approx :2
hours and 19
minutes
Approx :4
hours
Approx one
hour and 43
minutes

PV912 | ENGLISH USER MANUAL
9
Connect With the Camera:
Picture 1
:
1. Open the rubber cover of the camera connector on the main unit, insert the camera
cable into the special slot on the main unit.
2. Power on the main unit, turn to the record mode by the “Function Knob”.
Picture 2
:
1. Open the rubber cover of the camera connector on the main unit, then insert the
transfer cable into the special slot on the main unit.
2. Connect the color A/V cables with other video device.
3. Power on the main unit and turn to the recording mode by the knob.

PV912 | ENGLISH USER MANUAL
10
Start Recording
①Turn to Setting mode by the knob, set the record mode: one-key record, motion record
and time-setting record.
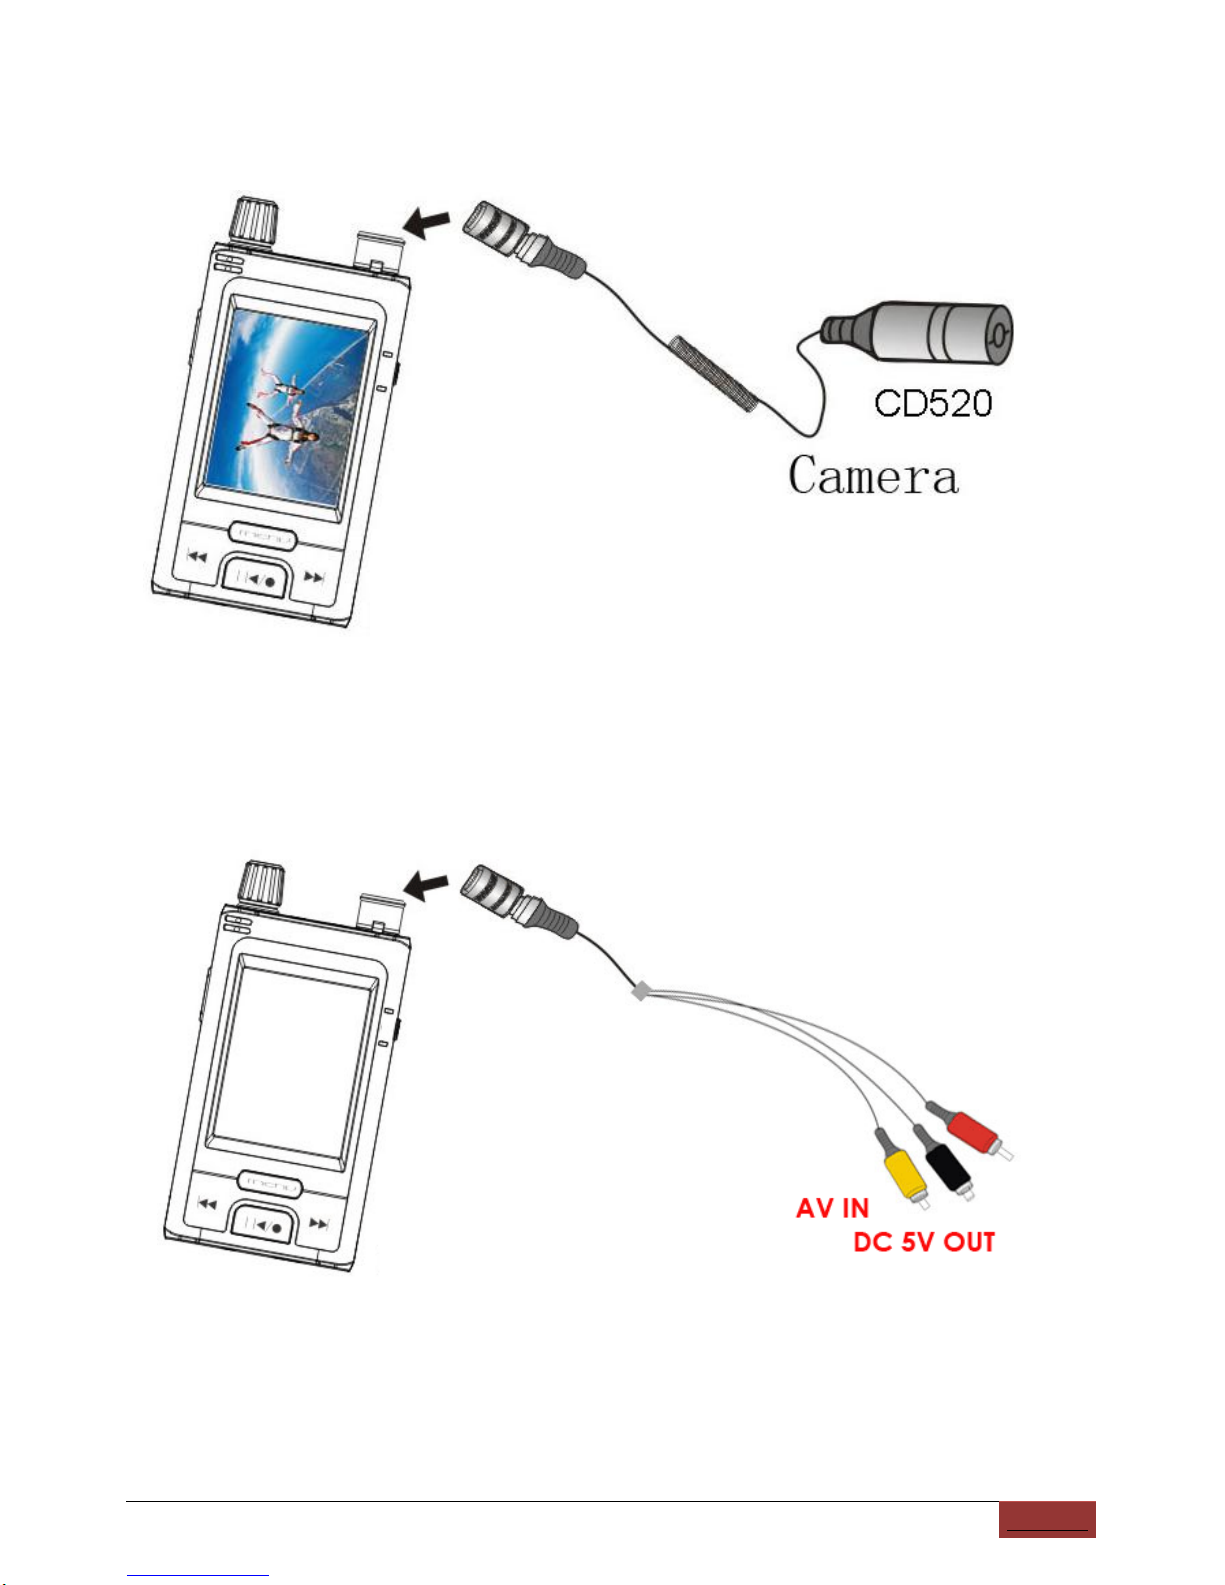
②Turn to the recording mode by the knob, the screen will display the catched picture by
the camera.
③Press start recording, and the screen will appear an icon .
④Press “ESC”stop the recording, and then the icon will disappear.
⑤press start picture capture
Once-Operation recording mode: Continuous recording and storage the video per
30 minutes;
Motion recording mode:It will continuous recording if movement sensed, 30
minutes longest for each part, if movement is not sensed, recording will stop after 15
Secs.
Timing recording mode:Start recording according to the time you setted, 30 minutes
of each video file.
Audio recording mode: The audio file will not storage in partial.
Attention
:
The mein unit has the vibrate notice while low power and no video signal.
1.While the camera did not connect with the main unit correctly, the main unit will
vibrate because of no signal, please check the connection carefully.
2.While the power is not enough, the main unit will continuous vibrate 3 times, at
the same time stop recording.

PV912 | ENGLISH USER MANUAL
11
Connect with TV:
1.Connect the video cable with theAV slot of the TV. (Show As Fig.):
2.Power on the main unit and TV, check and play the files in the SD card or only
monitor.
The default signal output mode is PAL, if the system in your local place is NTSC, please
enter setting menu and select the correct output system. More details please consider
page 32.

PV912 | ENGLISH USER MANUAL
12
Connect with Computer:
①Connect the USB and MINI USB with computer and the main unit separately.
②After connect with computer, pv912 will display “ USB Connect”, recharge
indicator always on.
Note:
Connect with computer at power on states, can not operate as it is External Hard Drive.
Connect with computer at power off states, can do any operation as it is recharging.

PV912 | ENGLISH USER MANUAL
13
③ Open “my computer” to check if there has the removable hard disk, called
“NO_NAME” .
Picture details:
④Open the video files in the folders.
⑤Check the video files in the folders, and play it by the default media player in your
computer.
Attention
:
Connect the main unit with PC under power off state
,
it is power charge mode, red
indicator flash at the same time, files in the storage can not be read. Connect the main
unit under power on state, the computer will read the files in the storage automatically
and power charging at the same time.

PV912 | ENGLISH USER MANUAL
14
*Function Modes
Booting Picture:
Record Interface:
Recording Mode:
⑵Recording symbol ⑺Battery capacity
⑵Current time ⑻Current time
⑶Video files ⑼Picture quality of recording
⑷Record time ⑽Record content
⑸Card icon( if memory card available) ⑾Circular record
⑹Available memory

PV912 | ENGLISH USER MANUAL
15
Record interface:
Select the audio source and press confirm, then the screen will display the rest
time of storage.
Press start recording

PV912 | ENGLISH USER MANUAL
16
Multi-media folders:
Use or to select the folder and press confirm and enter.
Video folder:
As picture above:”20091012” means the folder that built in 12th Oct of 2009. One folder
for every day.
Video files:
As picture above:”223118.AVI”means the video file that built in 22:31:18 ,30 minutes
in a file of each part.

PV912 | ENGLISH USER MANUAL
17
Video play:
Use and select the video for playing and press start play or
pause.
Use and select forward/backward mode and press to play or
pause.
Notice:Here has 4 speed level of forward and backward.×2、×4/×8/×20

PV912 | ENGLISH USER MANUAL
18
Audio folders:
Use or to select the folder and press confirm and enter.
For the audio files that already exist,please use and to select the
content and press confirm and playing.
Playing interface:
Press and button to play other audio content.

PV912 | ENGLISH USER MANUAL
19
Picture folders:
Press or to select picture folder, press confirm and enter.
Press or to choose the picture, press playing it.
Picture Display:
Press or to browse other pictures.
Note:JPG format picture, 640×480 resolution.

PV912 | ENGLISH USER MANUAL
20
Delete files:
Enter video folder,choose the file that you want to delete, short press “Power”button till
the delete menu appear.
Press or to choose “ALL/CURRENT”. Press confirm or choose
“Cancel”menu quit operation.
Use or to choose “YES”or “NO”.Press confirm delete or cancel this
operation.
ALL:Delete all data
CURRENT:Delete the file that selectd
CANCEL:Cancel the delete operation
This manual suits for next models
1
Table of contents