Media WI-1000XM2 Operating instructions

Wireless Noise Canceling Stereo Headset - Troubleshooting
WI-1000XM2
No sound
•Check that both the headset and the connected device (i.e., smartphone) are turned on.
•Check that the headset and the transmitting Bluetooth device are connected via Bluetooth
A2DP.
•Turn up the volume if it is too low.
•Check that the connected device is playing back.
•If you are connecting a computer to the headset, make sure the audio output setting of the
computer is set for a Bluetooth device.
•Pair the headset and the Bluetooth device again.
•Check that the headphone cable is connected firmly.
Low sound level
•Turn up the volume of the headset and the connected device.
•Connect the Bluetooth device to the headset once again.
Low sound quality
•Turn down the volume of the connected device if it is too loud.
•Keep the headset away from a microwave oven, wireless LAN device, etc.
•Bring the headset closer to the Bluetooth device. Remove any obstacles between the
headset and the Bluetooth device.
•Keep the headset away from a TV.
•Switch the Bluetooth connection to A2DP with the connected device when the headset
and the transmitting Bluetooth device are connected via an HFP or HSP Bluetooth
connection.
•If you connect a device with a built-in radio or tuner to the headset, broadcasts may not
be received or the sensitivity may be reduced. Move the headset away from the connected
device and try again.
•If the headset connects to the previously connected Bluetooth device, the headset may
only establish the HFP/HSP Bluetooth connection when it is turned on. Use the
connected device to connect via an A2DP Bluetooth connection.
•When listening to music from a computer on the headset, the sound quality may be poor
(e.g., difficult to hear the singer’s voice, etc.) for the first few seconds after a connection
is established.
This is due to the computer specifications (priority on stable connection at the start of
transmission and then switches to priority on sound quality several seconds later) and is

not a headset malfunction. If the sound quality does not improve after a few seconds,
press the (play) button on the headset once during playback. Or use the computer to
establish an A2DP connection. For information on how to establish it on your computer,
refer to the operating instructions supplied with the computer.
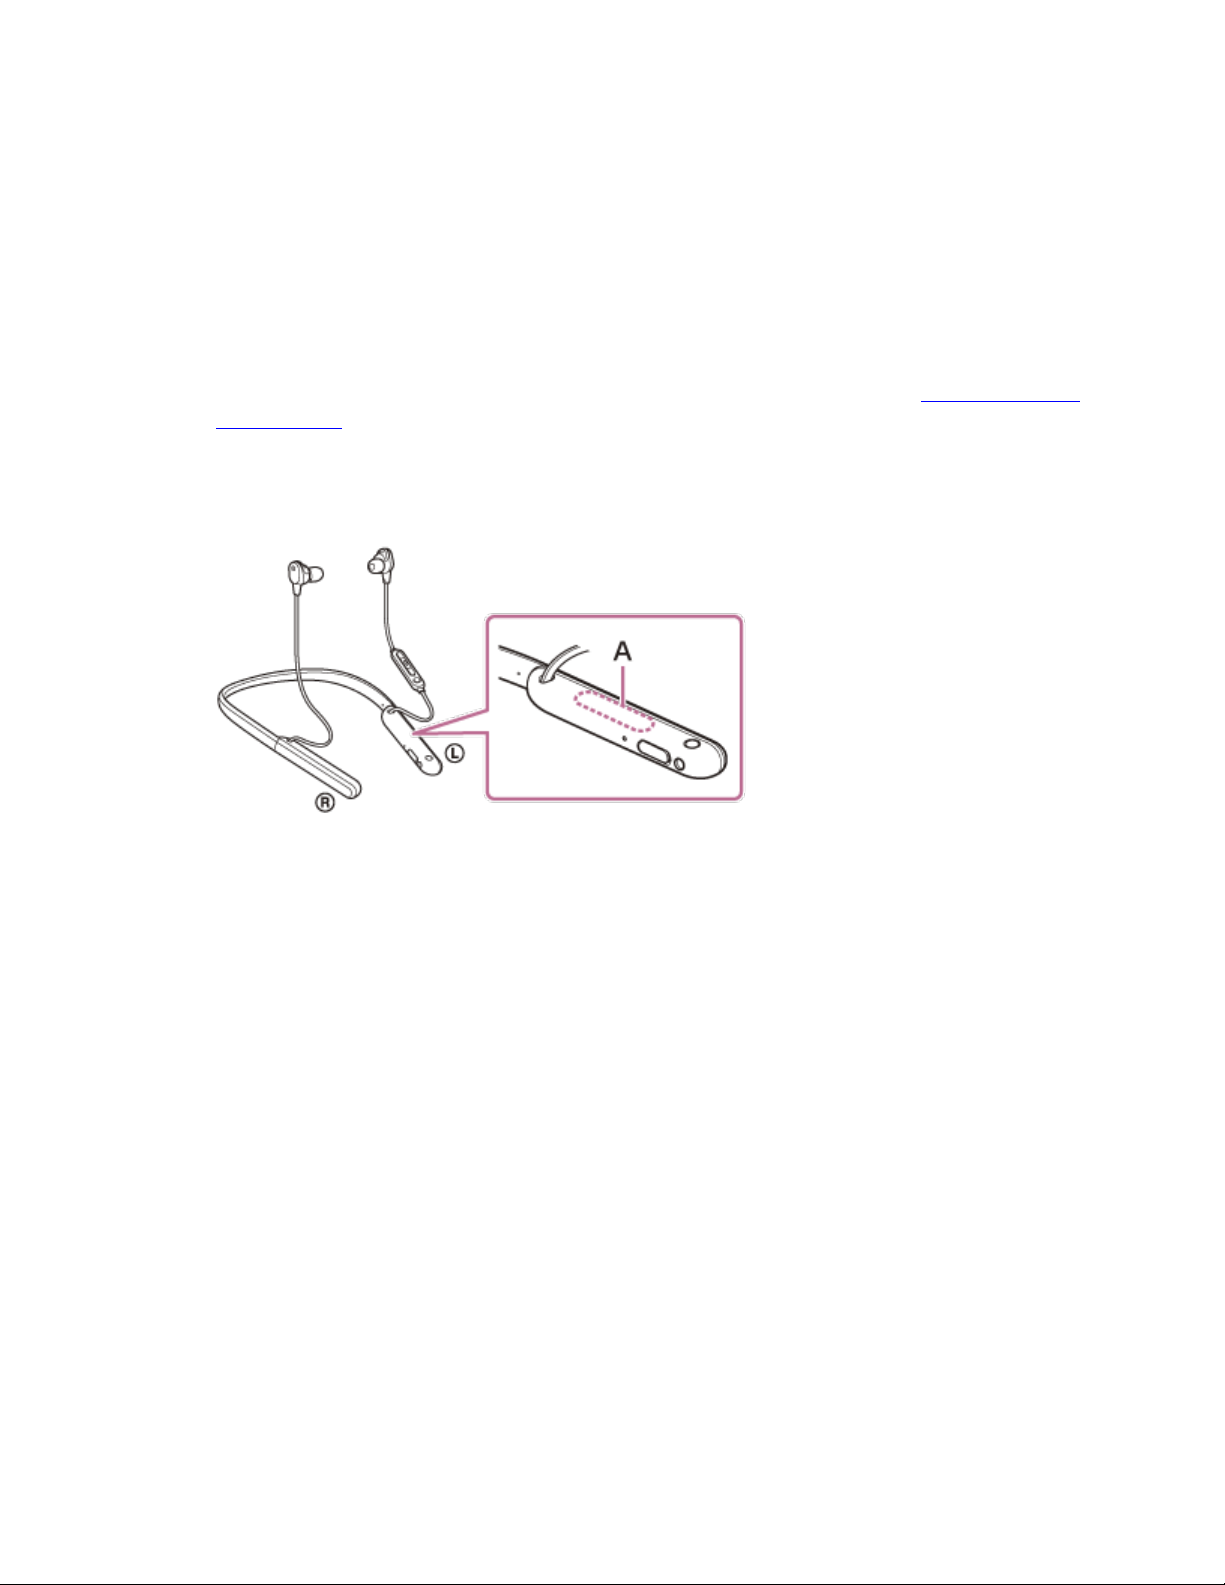
Sound skips frequently.
•Set the headset to “Priority on stable connection” mode. For details, see “About the sound
quality mode”.
•Remove any obstacles between the antenna of the connecting Bluetooth device and the
built-in antenna of the headset. The antenna of the headset is built into the part shown in
the dotted line below.
A: Location of the built-in antenna
•Bluetooth communications may be disabled, or noise or audio dropout may occur under
the following conditions.
oWhen there is a human body between the headset and the Bluetooth device
In this case, put the Bluetooth device in the same direction as the antenna of the
headset to improve the Bluetooth communications.
oThere is an obstacle, such as metal or a wall, between the headset and the
Bluetooth device.
oIn places with wireless LAN, where a microwave oven is used, electromagnetic
waves are generated, etc.
•The situation may be improved by changing the wireless playback quality settings or
fixing the wireless playback mode to SBC on the transmitting device. For details, refer to
the operating instructions supplied with the transmitting device.
•Because Bluetooth devices and wireless LAN (IEEE802.11b/g/n) use the same frequency
band (2.4 GHz), microwave interference may occur and result in noise, audio dropouts,
or communications being disabled if this headset is used near a wireless LAN device. In
such a case, perform the following steps.
oWhen connecting the headset to a Bluetooth device, use the headset at least 10 m
(30 feet) away from the wireless LAN device.
oIf this headset is used within 10 m (30 feet) of a wireless LAN device, turn off the
wireless LAN device.
oUse this headset and the Bluetooth device as near to each other as possible.
•If you are enjoying music with your smartphone, the situation may be improved by
shutting down unnecessary apps or restarting your smartphone.
The noise canceling effect is not sufficient.
•Make sure that the noise canceling function is turned on.
•Change to the earbud that allows you to hear the least ambient sounds for both the left
and right units.
•Adjust the headset into a comfortable position.
•The noise canceling function is effective in low frequency ranges such as airplanes,
trains, offices, near air-conditioning, and is not as effective for higher frequencies, such
as human voices.
Using the noise canceling function
If you use the noise canceling function, you can enjoy music without being disturbed by ambient
noise.
1. Turn on the headset.
You will hear the voice guidance say, “Power on”.
The noise canceling function is turned on automatically.
To turn off the noise canceling function
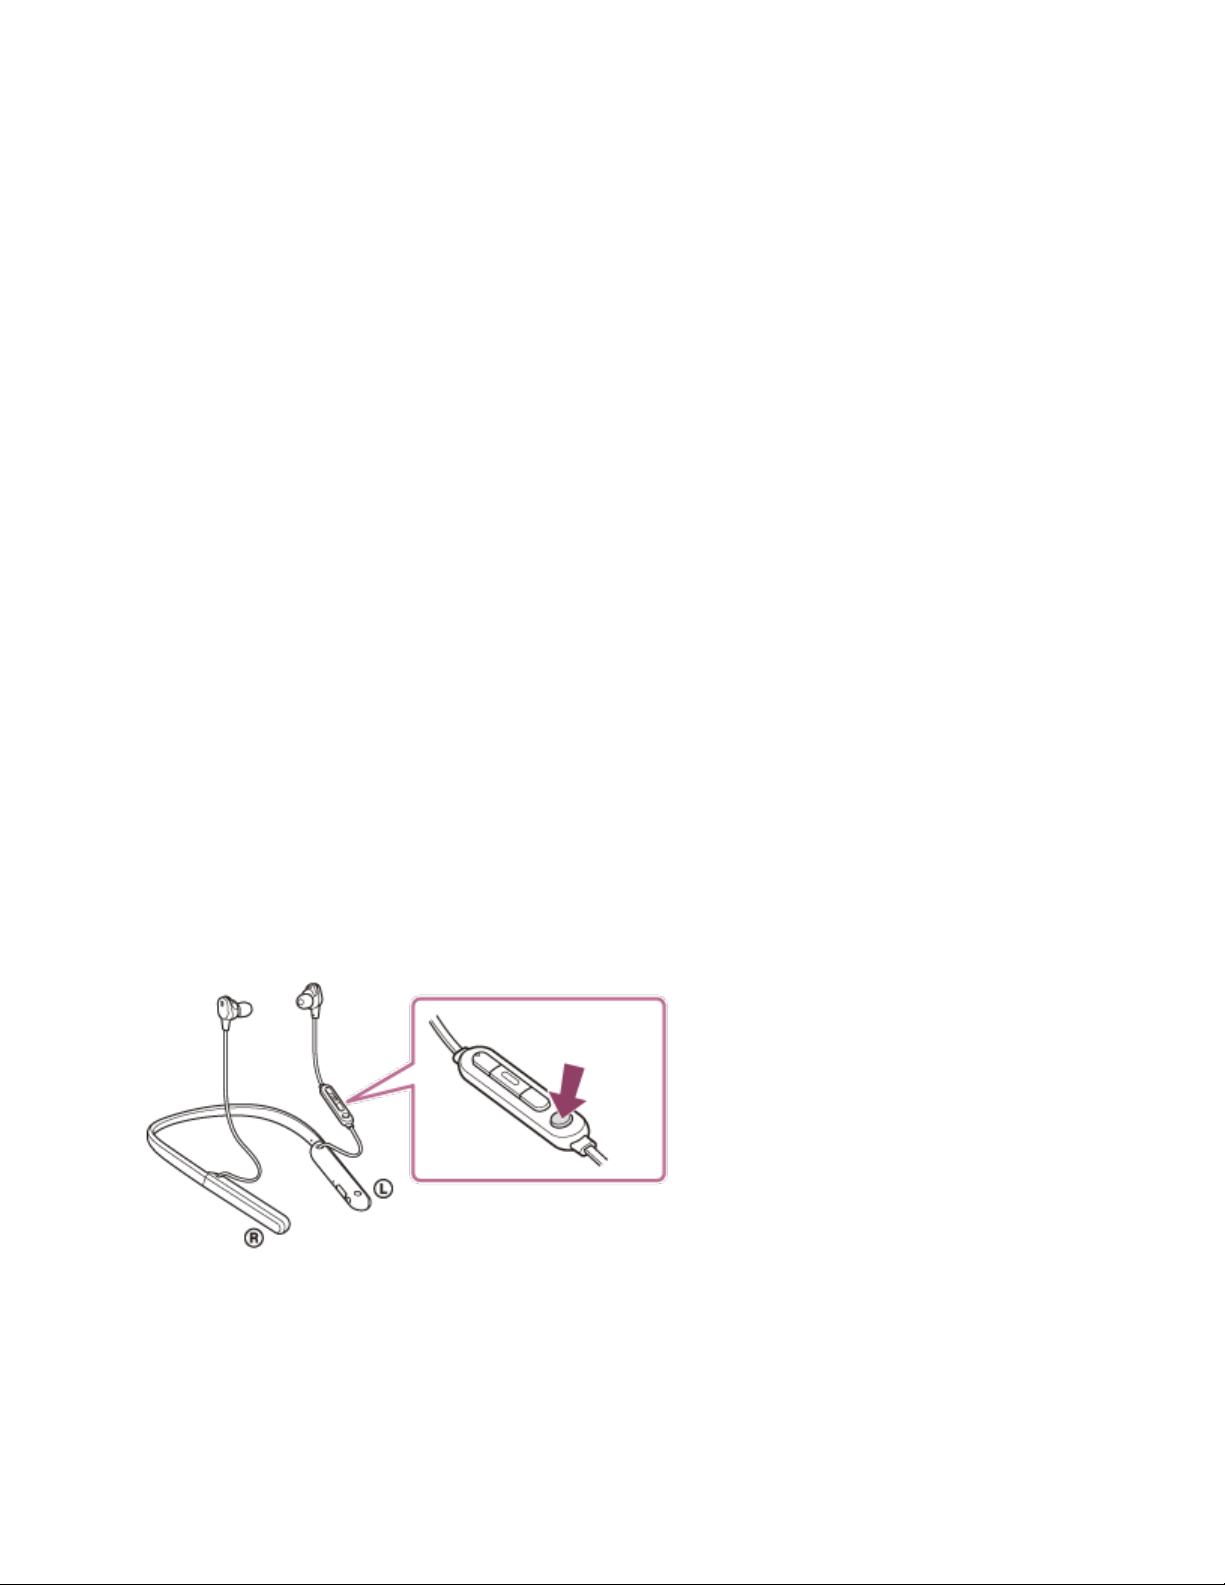
Press the C (custom) button repeatedly to turn off the noise canceling function.
Each time the button is pressed, the function switches as follows and is announced by the voice
guidance.

The Ambient Sound Mode: ON
The noise canceling function: OFF/The Ambient Sound Mode: OFF
The noise canceling function: ON
About the instruction manual video
Watch the video to find out how to use the noise canceling function.
https://rd1.sony.net/help/mdr/mov0007/h_zz/
Hint
•If you use the noise canceling function with a Bluetooth connection, the noise canceling function
is on even if you connect the supplied headphone cable.
•When you use the headset as ordinary headphones, turn off the headset and use the supplied
headphone cable.
•You can also change the settings of the noise canceling function and Ambient Sound Mode with
the “Sony | Headphones Connect” app.
Note
•If the C (custom) button is set as the Google Assistant button, the noise canceling function and
Ambient Sound Mode cannot be switched from the headset. You can also change the settings of
the noise canceling function and Ambient Sound Mode with the “Sony | Headphones Connect”
app.
•If the C (custom) button is set as the Amazon Alexa button, the noise canceling function and
Ambient Sound Mode cannot be switched from the headset. You can also change the settings of
the noise canceling function and Ambient Sound Mode with the “Sony | Headphones Connect”
app.
•The headset cannot fully perform the noise canceling function unless the supplied earbuds are
used.
•The headset cannot fully perform the noise canceling function unless the earbuds are firmly
inserted into the ears. Adjust the headset into a comfortable position.
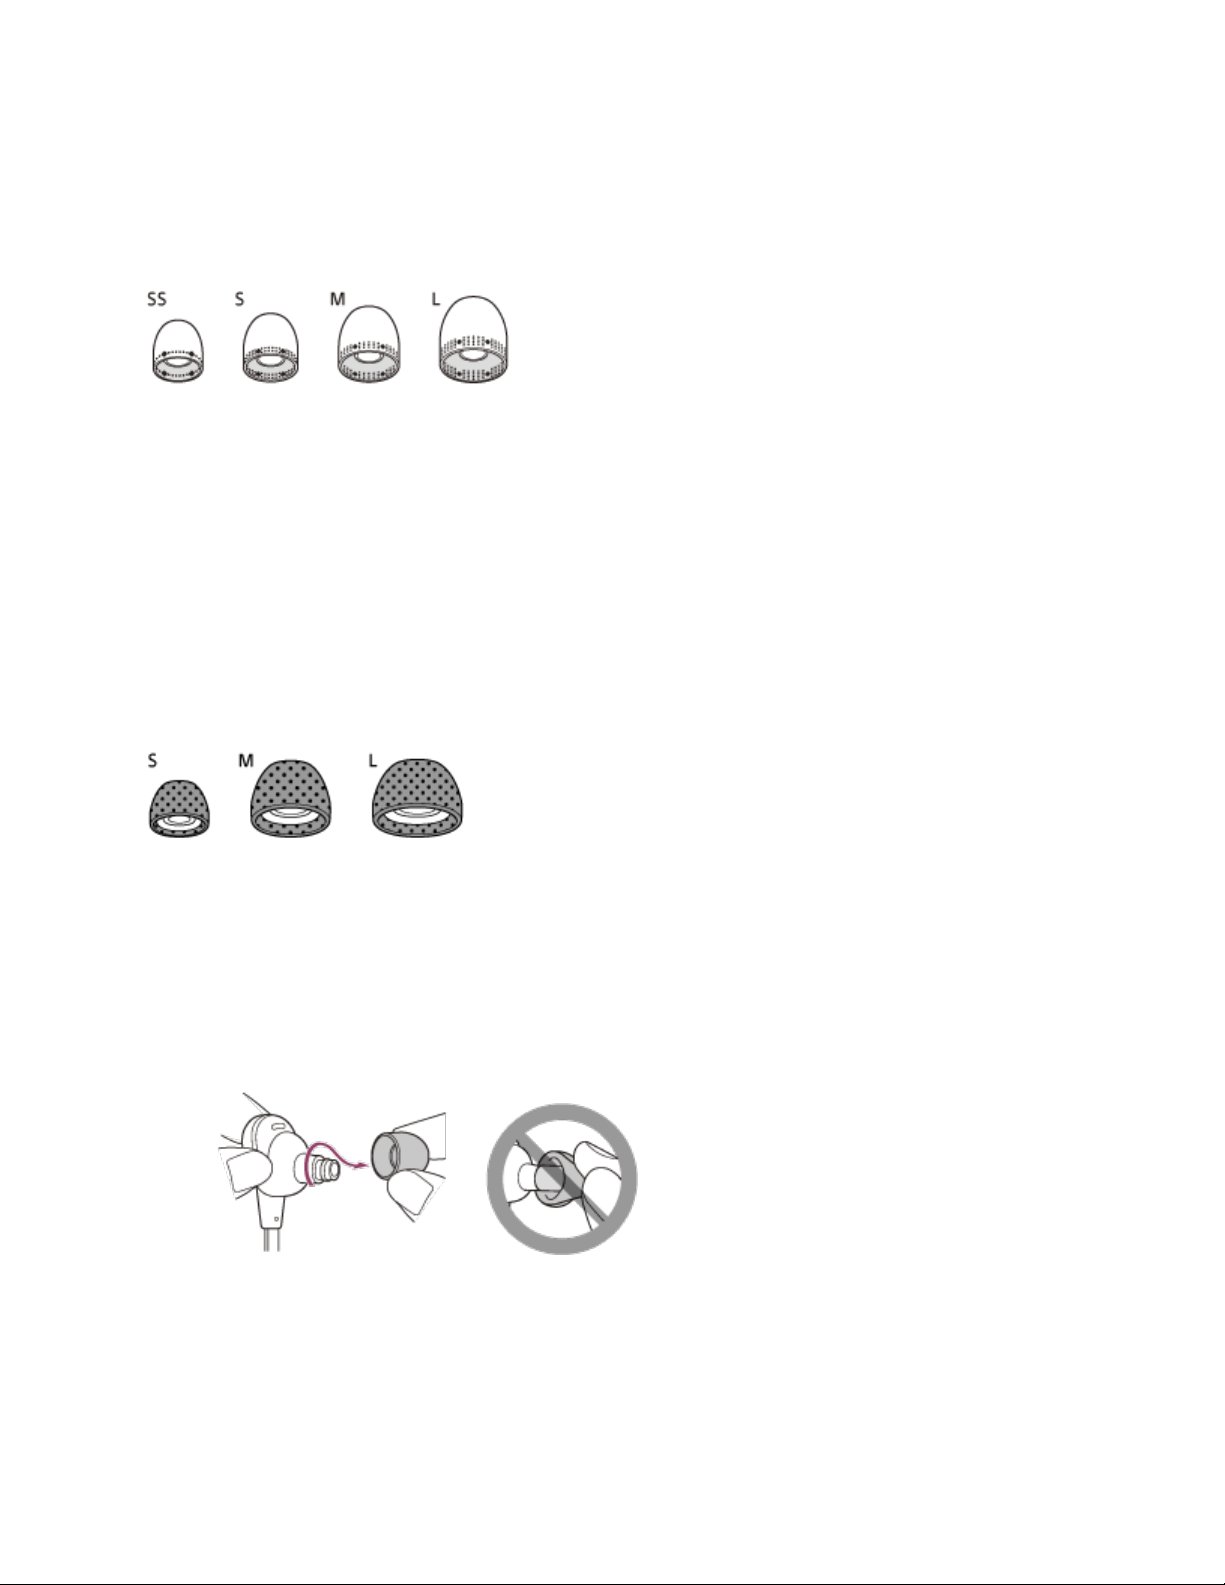
Replacing the earbuds

For the noise canceling function to be fully effective, select the earbuds that fit your ears the
best.
M-sized long hybrid silicone rubber earbuds come attached to the left and right units of the
headset. Change to the earbud that allows you to hear the least ambient sounds for both the left
and right units.
Long hybrid silicone rubber earbuds
The size of the earbuds can be determined based on the number of dotted lines inside the bottom
of the earbuds.
SS size: 1 line
S size: 2 lines
M size: 3 lines
L size: 4 lines
Triple-comfort earbuds
The size of the earbuds can be determined based on the color of the inside of the earbuds.
S size: orange
M size: green
L size: light blue
1. Remove the earbuds.

oDo not pinch the end of the earbud when removing it.
2. Attach the earbuds.
oFirmly insert the earbuds all the way. Do not attach the earbuds in a loose or
skewed manner.
Charging the headset
The headset contains a built-in lithium-ion rechargeable battery. Use the supplied USB Type-C
cable to charge the headset before use.
1. Open the USB Type-C port cover.
2. Connect the headset to an AC outlet.
Use the supplied USB Type-C cable and a commercially available USB AC adaptor.
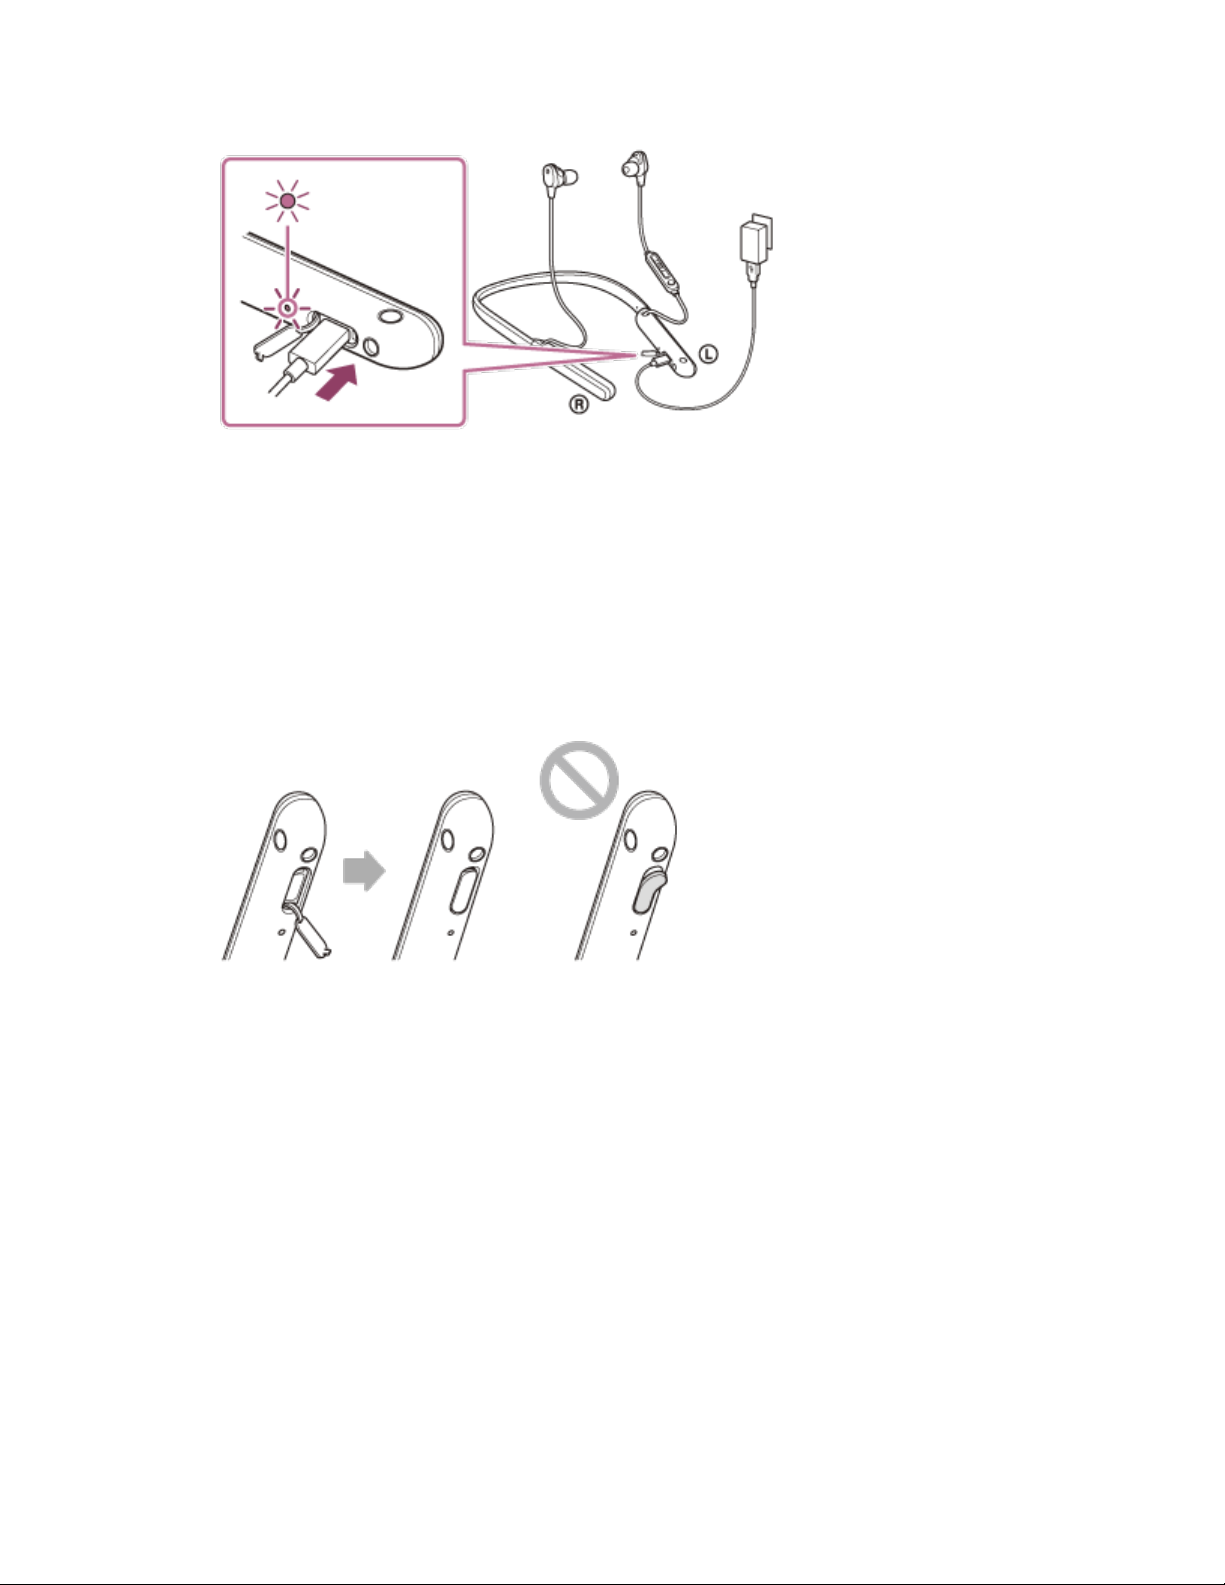
oThe indicator (red) of the headset lights up.
oCharging is completed in about 3.5 hours (*) and the indicator (red) turns off
automatically.
*Time required for charging the empty battery to its full capacity. The charging time may
differ depending on the conditions of use.
After charging is complete, disconnect the USB Type-C cable and close the USB Type-C
port cover securely to prevent water or dust from entering the headset.
System requirements for battery charge using USB
USB AC adaptor
A commercially available USB AC adaptor capable of supplying an output current of 0.5 A (500
mA) or more
Personal computer
Personal computer with a standard USB port
•We do not guarantee operation on all computers.
•Operations using a custom-built or homebuilt computer are not guaranteed.

Hint
•The headset can be also charged by connecting the headset to a running computer using the
supplied USB Type-C cable.
•If charging starts while the headset is turned on, the headset will turn off automatically.
Note
•Charging may not be successful with cables other than the supplied USB Type-C cable.
•Charging may not be successful depending on the type of USB AC adaptor.
•When the headset is connected to an AC outlet or computer, all operations such as turning on
the headset, registering or connecting to Bluetooth devices, and music playback cannot be
performed.
•The headset cannot be charged when the computer goes into standby (sleep) or hibernation
mode. In this case, change the computer settings, and start charging the headset once again.
•If the headset is not used for a long time, the rechargeable battery usage hours may be reduced.
However, the battery life will improve after a few recharges. If you store the headset for a long
time, charge the battery to its full capacity once every 6 months to avoid over-discharge.
•If the headset is not used for a long time, it may take longer to charge the battery.
•If the headset detects a problem while charging due to the following causes, the indicator (red)
flashes. In this case, charge once again within the charging temperature range. If the problem
persists, consult your nearest Sony dealer.
oAmbient temperature exceeds the charging temperature range of 5 °C - 35 °C (41 °F - 95
°F).
oThere is a problem with the rechargeable battery.
•If the headset is not used for a long time, the indicator (red) may not immediately light up when
charging. Please wait a moment until the indicator (red) lights up.
•If the usage hours of the built-in rechargeable battery decrease significantly, the battery should
be replaced. Consult your nearest Sony dealer to replace the rechargeable battery.
•Avoid exposure to extreme temperature changes, direct sunlight, moisture, sand, dust, and
electrical shock. Never leave the headset in a parked vehicle.
•When connecting the headset to a computer, use only the supplied USB Type-C cable, and be
sure to directly connect them. Charging will not be properly completed when the headset is
connected through a USB hub.
Replacing the earbuds
For the noise canceling function to be fully effective, select the earbuds that fit your ears the
best.
M-sized long hybrid silicone rubber earbuds come attached to the left and right units of the
headset. Change to the earbud that allows you to hear the least ambient sounds for both the left
and right units.
Long hybrid silicone rubber earbuds
The size of the earbuds can be determined based on the number of dotted lines inside the bottom
of the earbuds.
SS size: 1 line
S size: 2 lines
M size: 3 lines
L size: 4 lines
Triple-comfort earbuds
The size of the earbuds can be determined based on the color of the inside of the earbuds.
S size: orange
M size: green
L size: light blue
1. Remove the earbuds.
oDo not pinch the end of the earbud when removing it.
2. Attach the earbuds.

oFirmly insert the earbuds all the way. Do not attach the earbuds in a loose or
skewed manner.
Pairing cannot be done.
•Bring the headset and the Bluetooth device within 1 m (3 feet) from each other.
•The headset automatically enters pairing mode when pairing for the first time after
purchasing, initializing, or repairing the headset. To pair a second or subsequent device,
press and hold the (power) button of the headset for 7 seconds or more to enter
pairing mode.
•When pairing a device once again after initializing or repairing the headset, you may be
unable to pair the device if it retains pairing information for the headset (iPhone or other
device). In this case, delete the pairing information for the headset from the device and
pair them again.
Pairing and connecting with an Android smartphone
The operation to register the device that you wish to connect to is called “pairing”. First, pair a
device to use it with the headset for the first time.
Before starting the operation, make sure of the following:
•The Android smartphone is placed within 1 m (3 feet) of the headset.
•The headset is charged sufficiently.
•The operating instructions of the Android smartphone is in hand.
1. Enter pairing mode on this headset.
Turn on the headset when you pair the headset with a device for the first time after you
bought it or after you initialized the headset (the headset has no pairing information). The
headset enters pairing mode automatically. In this case, proceed to step 2.
When you pair a second or subsequent device (the headset has pairing information for
other devices), press and hold the (power) button for about 7 seconds.
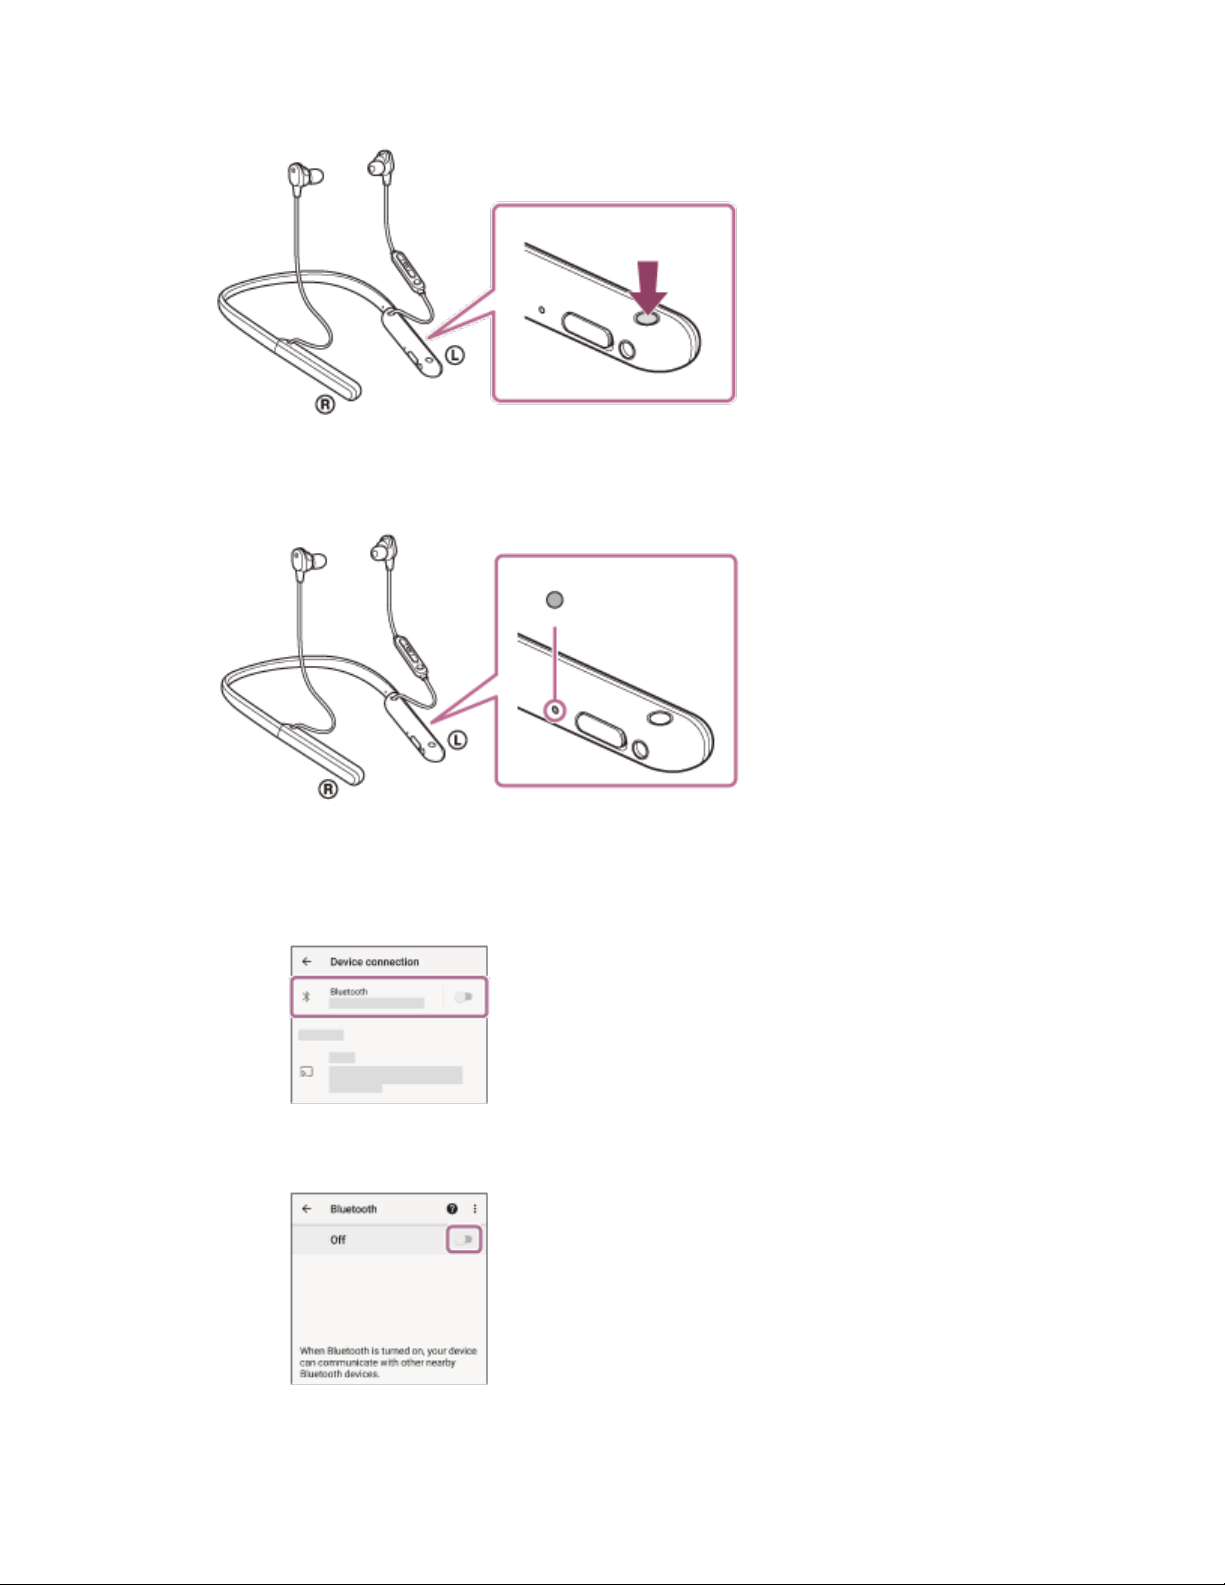
Check that the indicator (blue) repeatedly flashes twice in a row. You will hear the voice
guidance say, “Bluetooth pairing”.
2. Unlock the screen of the Android smartphone if it is locked.
3. Find the headset on the Android smartphone.
1. Select [Settings] - [Device connection] - [Bluetooth].
2. Touch the switch to turn on the Bluetooth function.

4. Touch [WI-1000XM2].
If Passkey (*) input is required, input “0000”.
The headset and smartphone are paired and connected with each other. You will hear the
voice guidance say, “Bluetooth connected”.
If they are not connected, see “Connecting to a paired Android smartphone”.
If [WI-1000XM2] does not appear on the Android smartphone screen, try again from the
beginning of step 3.
*A Passkey may be called “Passcode”, “PIN code”, “PIN number”, or “Password”.
Hint
•The operation above is an example. For more details, refer to the operating instructions
supplied with the Android smartphone.
•To delete all Bluetooth pairing information, see “Initializing the headset to restore factory
settings”.
Note
•When pairing a device, [WI-1000XM2], [LE_WI-1000XM2], or both may be displayed on the
connecting device. When both or [WI-1000XM2] is displayed, select [WI-1000XM2]; when
[LE_WI-1000XM2] is displayed, select [LE_WI-1000XM2].
•If pairing is not established within 5 minutes, pairing mode is canceled. In this case, start the
operation again from step 1.
•Once Bluetooth devices are paired, there is no need to pair them again, except in the following
cases:
oPairing information has been deleted after repair, etc.
oWhen a 9th device is paired.
The headset can be paired with up to 8 devices. If a new device is paired after 8 devices
are already paired, the registration information of the paired device with the oldest
connection date is overwritten with the information for the new device.
oWhen the pairing information for the headset has been deleted from the Bluetooth
device.
oWhen the headset is initialized.
All of the pairing information is deleted. In this case, delete the pairing information for
the headset from the device and then pair them again.
•The headset can be paired with multiple devices, but can only play music from 1 paired device at
a time.
Sound skips frequently.
•Set the headset to “Priority on stable connection” mode. For details, see “About the sound
quality mode”.
•Remove any obstacles between the antenna of the connecting Bluetooth device and the
built-in antenna of the headset. The antenna of the headset is built into the part shown in
the dotted line below.
A: Location of the built-in antenna
•Bluetooth communications may be disabled, or noise or audio dropout may occur under
the following conditions.
oWhen there is a human body between the headset and the Bluetooth device
In this case, put the Bluetooth device in the same direction as the antenna of the
headset to improve the Bluetooth communications.
oThere is an obstacle, such as metal or a wall, between the headset and the
Bluetooth device.
oIn places with wireless LAN, where a microwave oven is used, electromagnetic
waves are generated, etc.
•The situation may be improved by changing the wireless playback quality settings or
fixing the wireless playback mode to SBC on the transmitting device. For details, refer to
the operating instructions supplied with the transmitting device.
•Because Bluetooth devices and wireless LAN (IEEE802.11b/g/n) use the same frequency
band (2.4 GHz), microwave interference may occur and result in noise, audio dropouts,
or communications being disabled if this headset is used near a wireless LAN device. In
such a case, perform the following steps.
oWhen connecting the headset to a Bluetooth device, use the headset at least 10 m
(30 feet) away from the wireless LAN device.

oIf this headset is used within 10 m (30 feet) of a wireless LAN device, turn off the
wireless LAN device.
oUse this headset and the Bluetooth device as near to each other as possible.
•If you are enjoying music with your smartphone, the situation may be improved by
shutting down unnecessary apps or restarting your smartphone.
Table of contents


