MediaTech IP WEBCAM MT4009 User manual

IP WEBCAM
Instruction manual
Remote Surveillance IP Camera
MT4009

Table of Contents
1. Overview
1.1 General Overview ...............................................................................2
1.2 Product Applications .........................................................................3
1.3 Package Includes .................................................................................3
1.4 System Requirements........................................................................3
2. Utilities And Tools
2.1 Cam EZ Search......................................................................................3
2.2 MT4009 Exterior Function Introduction .....................................4
2.3 TV Out Function Introduction ........................................................5
3. Getting Start
3.1 System Login.........................................................................................5
3.2 Liveview ..................................................................................................6
3.3 Take A Shot ............................................................................................7
4. Advanced Function With Liveview
4.1 Image Adjustment .............................................................................8
4.2 Avi Record Setup ................................................................................8
4.3 Zoom In Display ..................................................................................8
4.4 Motion Detection Setup ..................................................................9
5. Advanced Application
5.1 Image Setup ..........................................................................................9
5.2 Capture View...................................................................................... 10
5.3 Event Trigger ...................................................................................... 11
5.4 Network Setup................................................................................... 11
5.5 Server Setup....................................................................................... 13
5.6 Administration Setup...................................................................... 14
5.7 Update.................................................................................................. 15
Appendix
Appendix A. Using a PPPOE Dial Up Connection and DDNS
with the MT4009 EZ IP WEBCAM (using a hub).............................. 16
Appendix B. FAQ....................................................................................... 22
2
1. Overview
1.1 General Overview
MT4009 is the most affordable and efficient remote surveil-
lance / security program available. It is extremely simple
to install, and can be used without a computer. With its in-
ternal web server, users can conduct remote video surveil-
lance and security tasks from a web browser (such as IE or
Netscape), and quickly observe surveillance video feeds at
any time, anywhere from local network or Ethernet Inter-
net connection.
The MT4009 combines CPU, CMOS Sensor Control, Image
processor, GPU, JPEG, CODEC, Ethernet MAC function that
is capable of 350,000 pps.
In addition, the system supports PPPoE, DHCP, Static IP,
DDNS, SMTP, FTP, NTP, and other types of network protocol,
and includes high efficiency SDRAM control and memory
access. Also, the internal TV Out decoder / encoder devices
allow display of common household television formats
(supports NTSC and PAL). The system also includes fast
Motion Detection and SD expansion slot. The MT4009 has
Night Vision IR LED’s allowing it to see in the dark or assist
in low light situations. A professional grade remote surveil-
lance and camera technology for many fun and security
purposes.
The MT4009 is the most affordable quality network surveil-
lance and broadband camera system on the market, and it
is the most intelligent choice for business of all kinds.

3
1.2 System Requirements
Minimum System Requirements
■CPU: Intel Pentium 4® 2.0GHz or equivalent
■Memory: 64MB (256MB recommended)
■Operating System: Windows 98, Windows 2000® or Win-
dows XP®
■Browser: Microsoft IE 6.0® and later
■Hard Disk Space: 10MB Minimum
■Network: 10/100Mbps Ethernet Port
1.3 Package Includes
1. IP WEBCAM
2. DC5V adapter
3. RJ-45 Red Cable(connect to PC)
4. RJ-45 Blue Cable(connect to internet)
5. TVCable
6. CD-Rom
7. User’s Guide
8. Screw Bag
2. Utilities and Tools
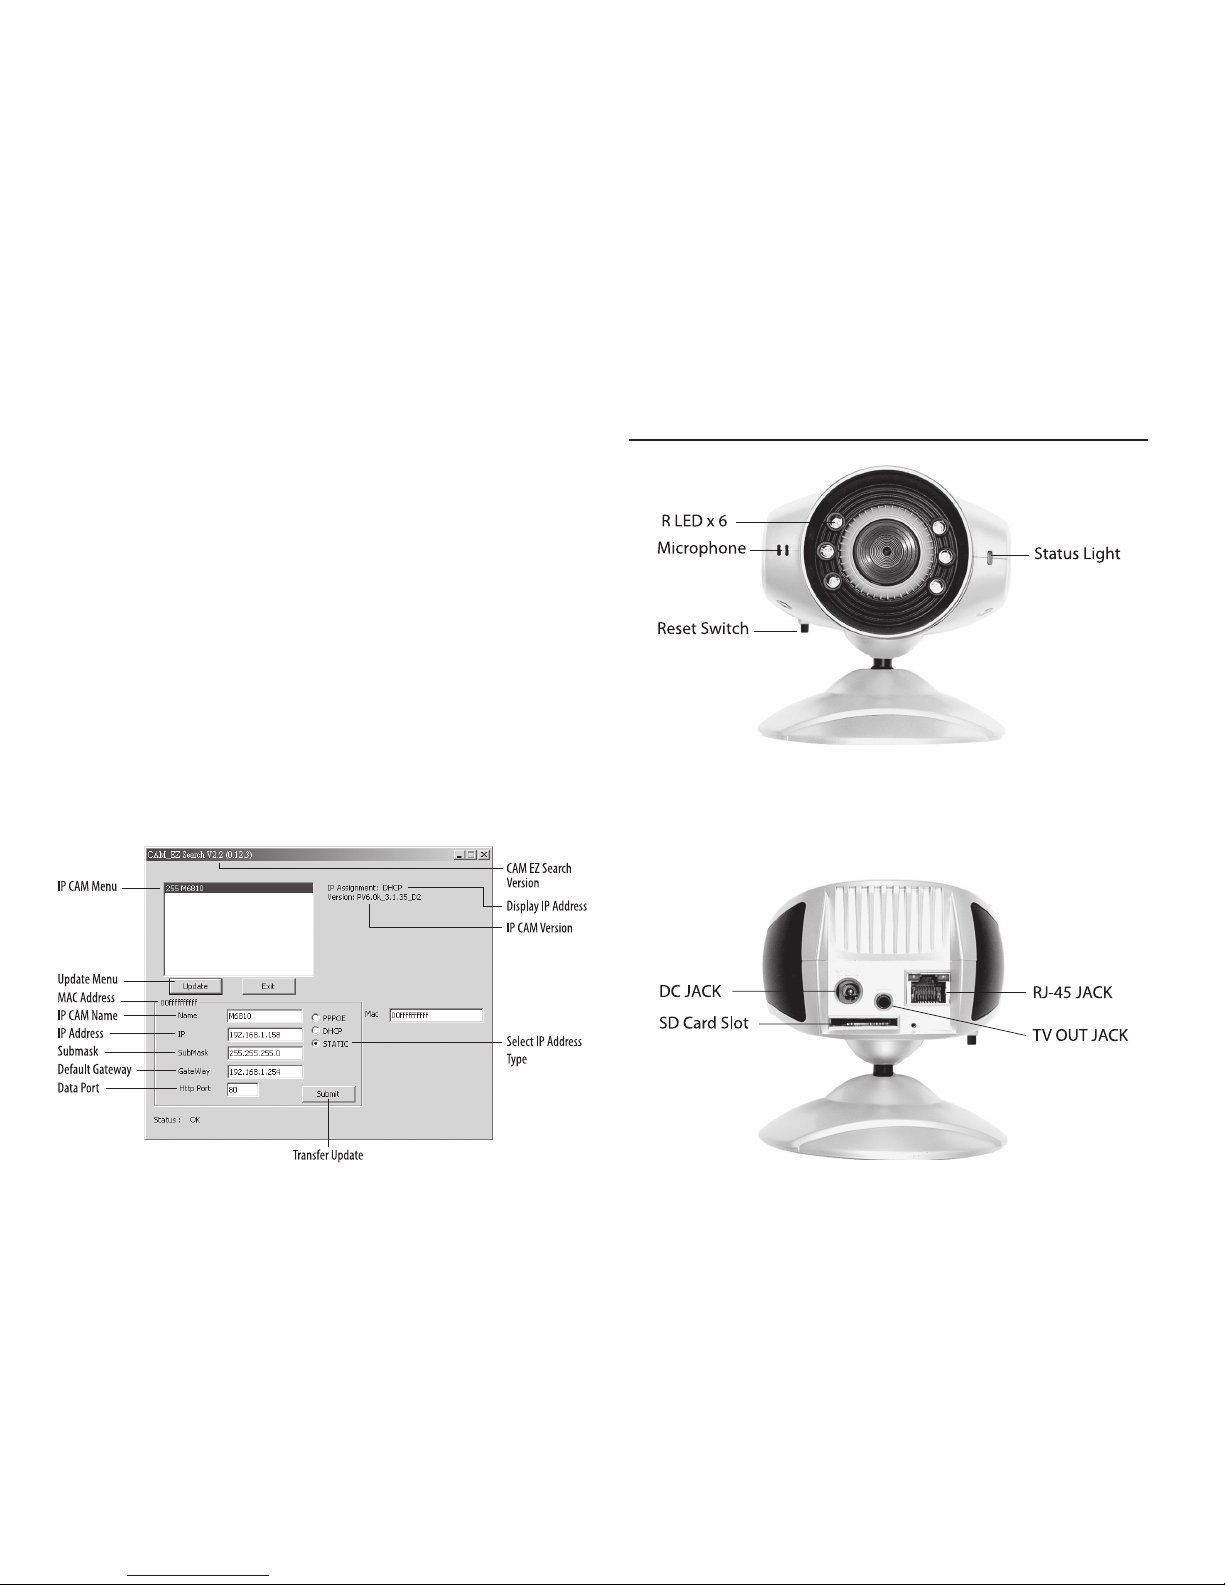
2.1 CAM EZ SEARCH
CAM EZ Search is a searching application capable of search-
ing for IP WEBCAM on the local network.The application
urges all IP WEBCAM to respond by sending out query
packets, and then displays a list of all IP WEBCAM available
on the network. In addition, CAM EZ allows the network
settings of a designated IP WEBCAM to be changed (such
IP address or name). CAM EZ can be used by following
these easy steps:
1. Open CAM EZ Search application.
2. Check to see if the IP addresses from the network are the
same as shown in CAM EZ Search: Go to Control panel
> Go to Network and Dialup Connection > Select the
settings for the local network connection being used
> Right click using your mouse > Select Preferences (P)
> Select Internet Protocol (TCP/IP) > Select Preferences
(R), and you can view the IP address for your computer.
If the settings are diff erent, you must update the IP set-
tings for the MT4009 EZ IP WEBCAM. Do so as follows:
1.4 Product Applications
- IP WEBCAM - Web Server
- IP Surveillance- IP DVR
-Networking -Real-time Remote Monitoring
Surveillance-Value-Added IP
-IP Video Server Surveillance Device
TOP
4
Step 1: Name: The user can rename the MT4009 EZ IP WE-
BCAM.
Step 2: IP: The IP address of the MT4009 EZ IP WEBCAM (for
example with a computer with an IP of 192.168.1.159, the
user would have to set the MT4009 EZ IP WEBCAM IP to
192.168.1.* (* = 1~254).
Step 3: Sub Mask (U): Usually set to 255.255.255.0
3. Step 4: Gateway: Change to correspond with the gate-
way settings of the network.
4. Step 5: HTTP Port: Change to 80
After settings are complete, press Submit, and the MT4009
EZ IP WEBCAM settings will take effect.
Press Update to update the MT4009 EZ IP WEBCAM menu.
Left click twice with your mouse on the desired name from
the list, and a browser window will open automatically,
displaying the CAM EZ Search network surveillance feed
icon:
2.2 MT4009 Exterior Function Introduction
Reset Switch button operation: When in operation, press
Switch button for 3 seconds the system will reboot. If you
press and hold down the SW button for longer than 5 sec-
onds, the system will return to factory default settings.
TOP

5
2.3 TV OUT Function Introduction 3. TV_OUT Operation :
■Push to Ch-Flk: Press Reset switch button once, you can
adjust Ch-Flk 50Hz, 60Hz, Outdoor.
■Hold to Exit: Press and hold down for 2 seconds, Exit Ch-
Flk window.
Reset
Switch
TV OUT Default setting is NTSC system, please press
Reset switch and hold on for 3 seconds to change to
PAL system.
1. Connect the AV cable between TV set and IP WEBCAM as
the drawing.
2. Press RESET switch and plug in power adaptor at same
time, continuously hold on your press on RESET switch
for 2 seconds then release the press, the IP WEBCAM will
enter into“TV Out mode”.
3. Getting Start
3.1 SYSTEM LOGIN
System login is the process of identifying all people try-
ing to log into the system, as to confirm user identify, and
granting authorized users access to the system’s functions.
This system provides two layers of security access: “admin-
ister” and “general user”. After a successful login to the sys-
tem, users can begin to access both surveillance and set-
ting functions, follow the steps below:
Step 1: Open the login window, as shown below.
Directions: Using the
CAM EZ Search applica-
tion, select the MT4009
EZ IP WEBCAM menu,
and click twice.
TOP

6
Step 2: The system login window will appear in IE as
shown:
Step 3: Enter Account ID and Password
Step 4: Press “Submit” to confirm, and the a network sur-
veillance window shall appear, as shown:
Step 5: Enter “admin” as the Account ID, and “password” for
the password.
Step 6: If a mistake has been made, press“Cancel” , and en-
ter login information again.
3.2 LIVEVIEW
When using IP WEBCAM for the first time, users must
change the IE security settings (please refer to settings
step 3.2.1). Otherwise, the system will display the follow-
ing warning, and be unable to display the surveillance
feeds.
After having successfully set up the IP WEBCAM settings
during the first use,
users do not need
to change the set-
tings again for later
use.
3.2.1 The IE security settings can be changed
by following the
steps below:
Step 1:
IE Toolbar ---> Tools -
--> Internet Settings
---> Security --->
Custom Settings (C)
TOP
7
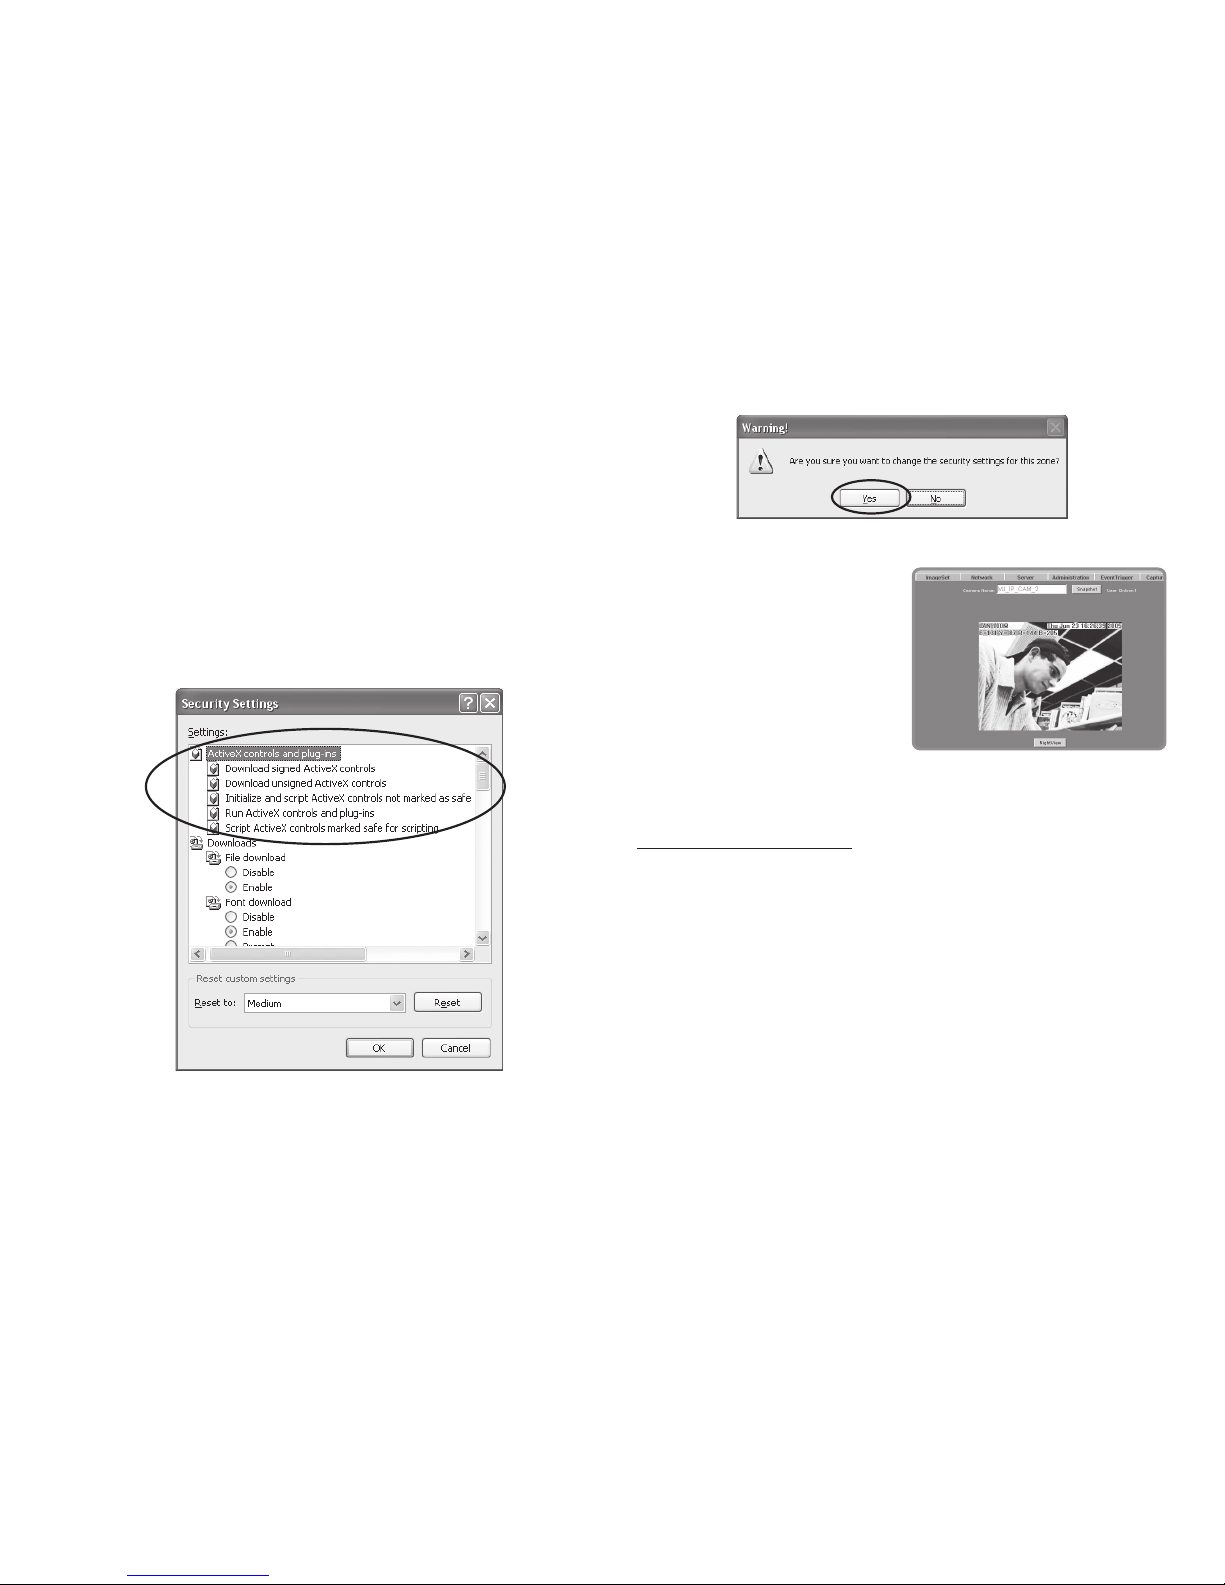
Step 2: After clicking on Custom Settings(C), a security set-
tings window shall appear.
Change ActiveX Control Options and Plug-ins settings to
the following:
1. Download signed ActiveX controls: Enable
2. Download unsigned ActiveX controls: Enable
3. Initialize and script ActiveX controls not marked as safe:
Enable
4. Run ActiveX controls and plug-ins: Enable
5. Script ActiveX controls marked safe for scripting: Enable
Step 3: After pressing“OK”, a warning window shall appear.
Click on “Yes” (Y), and you shall return to the last window.
Press “OK”, and the setup is completed.
Step 4: At this time, the computer should display a warning
window then press“Yes”(Y).
Step 5: When completed,
you may begin viewing the
surveillance image for the
first time as shown.
NOTE: This action loads ActiveX components from the
MT4009 System to a local machine.
3.3 TAKE A SHOT
This function allows users to capture the screen shot as a
photo, and save it on the computer.
Directions:
Step 1: Go to the“LiveView” menu, and go to the live image.
Step 2: Select an image, and hold down the Ctrl key.
Step 3: Place the cursor on the surveillance image and left
click with your mouse. The captured image should flash
momentarily: (or press the “Snapshot” button).
Step 4: Release the Ctrl key, and the single still shot image
has been successfully captured.
Step 5: Select the “CaptureView” menu to browse through
the captured images.
TOP

8
4. Advanced Function with LIVEVIEW
Move the cursor to the live image, and right click with your
mouse. A small menu should appear with four options.
Image: Adjust image values
Record: Setup for recording into AVI format.
Zoom: Select digital zoom value for window.
Motion Detec Set: Settings for motion detection
These settings are described in detail in the next chapter.
4.1 Image Adjustment
After selecting an Image, you may change various image
settings as shown:
4.2 AVI Record Setup
By selecting “Record”, you can adjust the AVI Frame Rate
settings and file name.
4.3 Zoom In Display
Using your mouse, select the portion of video that you
wish to view, and release. The image will zoom in accord-
ing to the dimensions entered.
TOP

9
4.4 Motion Detection Setup
Setting up the Motion Detection (MD) values, including
the first set (red) and second set (green).
Please check to see whether the Event Trigger has been en-
abled. If so, you can set it up as described below:
Reset MD range: Select motion detect 1, and hold down
on the left mouse button (this will appear as the upper left
corner of the MD range). Then, drag out the desired range,
and release when finished.
Cancel MD: Same as above, but just left click once and re-
lease. This will cancel the MD (Motion Detection).
Motion detec set: This sets the MD (Motion Detection)
sensitivity, which is usually set to a value of 5. This means
that the motion detection will be toggled with as little of
a 5% change in the MD range. The lower the number en-
tered, the higher the sensitivity of the MD.
When MD is engaged, the screen should display a MD
warning in the upper left hand corner if there is movement
within MD1 or MD2, as shown:
Any motion detection range can be selected in 640x480
and 320x240 resolutions
In 160x120 resolution, the motion detection is fixed to the
entire image.
5. Advanced Application
This chapter explains the advanced settings for the MT4009
EZ IP WEBCAM, including:
- Image Setup - Event Trigger Setup
- Capture View - Administration Setup
- Network Setup - FW Update
- Server Setup
5.1 Image Setup
This includes:
■Resolution: Users can select between image resolution
of 160x120, 320x240, and 640x480. The default resolu-
tion is 320x240.
■Quality: Users can select between “fine”, “normal”, and
“basic”image quality. The default image quality is“basic”.
TOP

10
■Anti-Flicker: Users can select between 60Hz, 50Hz, or
Outdoor. The default setting is 50Hz. Please change to
“outdoor” when shooting outside.
■Audio: Audio output. Default setting is “off”.
■Rotate 180: Image reverse. Default setting is “off”.
■IR Auto Detection: IR LED control. Default setting is“off”.
Image Setup Directions:
Step 1:
Click on “ImageSet” to view the menu.
Step 2:
After entering the desired values, click on “Submit”.
Step 3:
If you wish to cancel your changes, click on “Cancel”.
5.2 Capture View
This view includes;
- Manual capture of still images using LiveView.
- Automatic capture of still images via MD.
How to Use Capture View:
Step 1:
Click on CaptureView to enter the menu.
The menu is capable of displaying up to 48 images, view-
able on three pages.
Step 2:
You can set the system
to read from either your
computer or your flash
card.
After making your se-
lection, click on “Apply”.
Step 3:
Select desired thumb-
nail image using the
cursor to view image at
the default dimensions.
TOP

11
5.3 Event Trigger
This includes both event trigger settings and display, in-
cluding:
- Event: Entering events
- Trigger: Setting trigger
and picture capture times.
Detailed explanations are presented in the next chapter.
How to Use Event Settings:
Step 1: Engage Event for either set (MD will automatically
display the trigger sensitivity)
Step 2: After you are finished, click on Submit.
Step 3: Otherwise, click on Default to use factory default
settings (all sets off)
NOTE: After engaging either type of event,“Save in PC”
will automatically turn on.
5.3.2 Trigger
Event trigger image transfer settings, including:
■Save in PC: The image file is saved in your computer.
■Save in Flash Card: The image file is saved in the SD
Card.
■Mail Image: Send captured event trigger image file by
e-mail.
■FTP Image: Send captured event trigger image file by
FTP.
■Shutter Timer: Change shutter time for event trigger
image capture.
2 seconds is the default setting.
5.3.1 Event
Event settings, including:
- Motion Detection (set 1)
- Motion Detection (set 2)
Either set signal input trigger can be engaged.
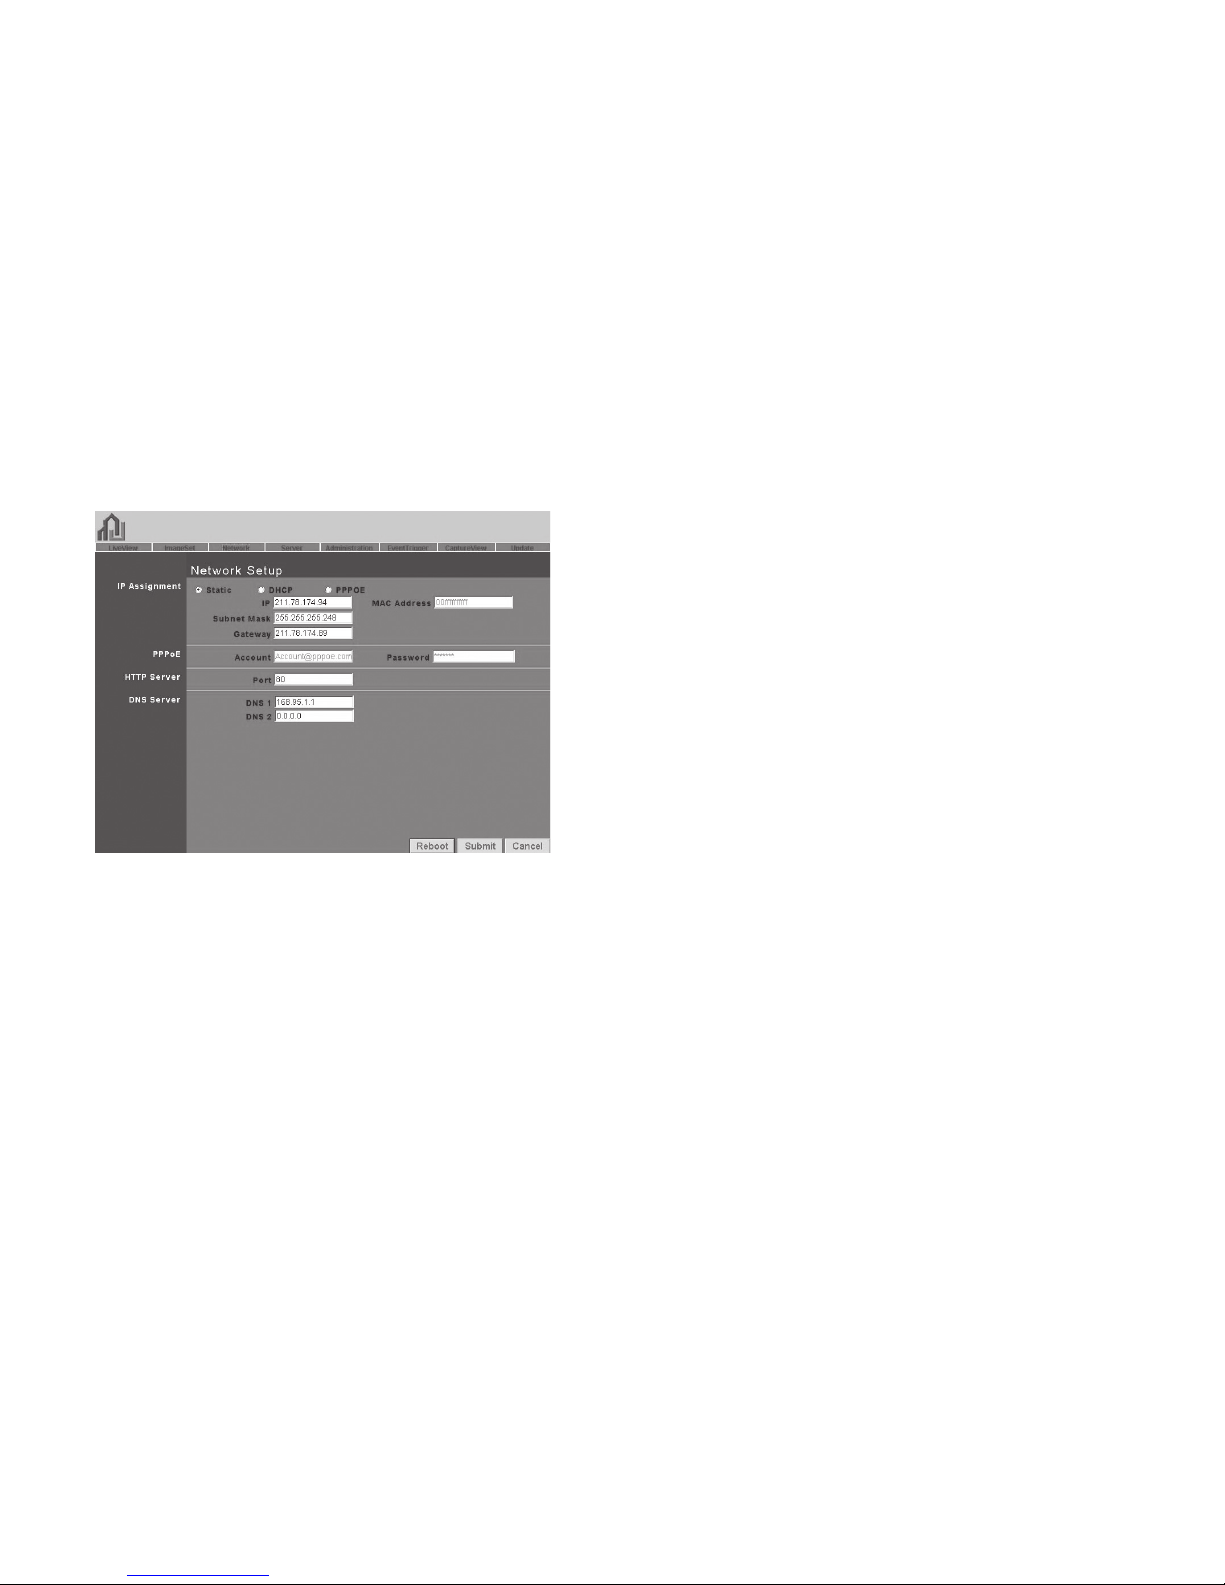
5.4 Network Setup
Network Setup can be used to change the network con-
nection settings of the IP WEBCAM. The default value for IP
assignment is “static”. These settings also include:
■IP Assignment°GStatic,
■DHCP, or PPPoE
■PPPoE settings
TOP
12
When using the “DHCP” setting, you do not need to enter
any of the above settings. You must only enter the address
of the DHCP Server in the “Server” field.
When using the “PPPoE” setting, you must correctly enter
your ID and password. Please refer to unit 5.4.2 for details.
5.4.2 PPPoE
This menu allows you to enter the dial up settings during
PPPoE IP assignment. This usually refers to entering your
ID account name and password. Remember that you must
also enter your ISP settings as well.
How to Setup PPPoE
Step 1: Enter your correct user ID in the “Account” field.
Step 2: Enter your correct password in the“Password” field.
Step 3: Click on “Submit” to complete your settings.
NOTE: Because PPPoE utilizes a dynamic IP address
from an ISP, the IP settings for the MT4009 EZ IP WEB-
CAM could differ for each use. It is thus suggested that
an IP Router be used to connect to the PPPoE or DDNS.
This will help your computer to find the IP WEBCAM.
5.4.3 HTTP Server
This menu allows you to enter the port number of the
MT4009 IP WEBCAM internal web server
(or HTTP Server) via HTTP protocol. The default port num-
ber is “80”.
5.4.1 IP Assignment
Static IP Assignment refers to the fixed settings of the ISP
or network engineering department.
IP Address: Includes static, DHCP, PPPoE. DHCP and PPPoE
are typically dynamic IPs.
When using the “static” setting, you must enter the follow-
ing information:
■IP Address: The IP address of the IP WEBCAM
■Subnet Mask: Set by default to 255.255.255.0
■Gateway: Default gateway
■Http Server port settings
■DNS settings
* MAC Address: Displays the Mac address of the IP WEBCAM
TOP

13
5.4.4 DNS Server
This menu allows you to enter the IP address of the DNS
(Domain Name Server ).
By doing this, you can replace the IP address of the IP
WEBCAM with an http name (such as myIP WEBCAM.XXX),
making it easier to remember. The default DNS1 value is
“168.95.1.1” (Hinet). If the connection fails, the system will
automatically attempt to connect to DNS2.
5.5 Server Setup
This menu allows you to enter various server settings, in-
cluding:
- Mail Server - DDNS Server
- FTP Server - NTP Server
5.5.1 Mail Server
This refers to settings pertaining to sending image files via
a mail server. You must also make sure that the Mail Image
settings from 5.3 EventTrigger are enabled to e-mail a file
to the designated address upon event trigger. This system
supports SMTP servers.
How to use mail server settings:
Step 1: Enter the IP address or http web address of the mail
server in “IP/Host”.
Step 2: Enter the e-mail address of the sender in “Mail
From”.
Step 3: Enter the e-mail address of the recipient in “Receipt
to”.
Step 4: Enter the registered account ID of the mail server
in “Account ID”.
Step 5: Enter the correct mail server password in “Pass-
word”
Step 6: Enter whether or not your mail server requires au-
thorization in “Authorization”
Step 7: Click on Submit when you are finished.
5.5.2 FTP Server
This menu allows you to enter the FTP (File Transfer Proto-
col) Server settings. You must also make sure that the FTP
Image settings from 5.3 EventTrigger are enabled to send
a file to the designated FTP server via FTP upon event trig-
ger. This system supports Port Mode and Passive Mode.
TOP

14
How to use FTP Server settings:
Step 1: Enter the IP or HTTP address of the FTP server in
“IP/Host”
Step 2: Enter the designated FTP port number in “Port”
Step 3: Enter the account ID of the FTP server in“Account ID”
Step 4: Enter the FTP server password in“Password”
Step 5: Select whether you wish to use“Port Mode”or “Pas-
sive Mode” transfer protocol.
Step 6: Click on Submit when you are finished.
5.5.3 DDNS Server
This menu allows you to enter your DDNS(Dynamic Domain
Name Server) Settings. You can also use a PPPoE (with dy-
namic IP) to connect to the http address of the IP WEBCAM
(such as sqIP WEBCAM.dyndns.org) by entering the regis-
tered HTTP address of the DDNS Server. This is convenient
for viewing IP WEBCAMS with non-fixed IP addresses.
Entering the DDNS Server Settings:
Step 1: Find a DDNS service (such as http://www.dyndns.
org ), and register a user account, password, and HTTP user
address.
Step 2: Enter the address (IP or HTTP) of the DDNS server.
Enter the host name, account ID, and password in each ap-
propriate field.
Step3:EntertheaccountIDoftheDDNSserverin“AccountID”
Step 4: Enter the DDNS server password in“Password”
Step 5: Select the DDNS server connection status auto-
matic display setting.
Step 6: Click on “Submit” when you are finished.
5.5.4 NTP Server
NTP(Network Time Protocol) allows you to calibrate the IP
WEBCAM timing.
Using the NTP Server settings:
Step 1: Enter the NTP Server IP or HTTP address in “IP/Host”
Step 2: Select the correct time zone in the “Time Zone”
menu
Step 3: Click on “Submit” when finished.
5.6 Administration Setup
This menu allows you to designate an IP WEBCAM name,
administrator password, and other user passwords. Admin-
istrators may access all IP WEBCAM functions and settings,
while general users may only utilize the LiveView view, and
may not access any of the settings.
TOP

15
5.6.1 Camera Name
This allows you to set a IP WEBCAM name that will be dis-
played on the video for identification purposes.
5.6.2 General User
This menu allows you to change the account ID and pass-
word for general users.
Using the General User settings:
Step 1: Enter the IP WEBCAM name in the “Account ID”
field.
Step 2: Enter you’re the password you wish to change in
the “Old Password” field.
Step 3: Enter the new password in the “New Password” field.
Step 4: Confirm the password by entering it once more in
the “Re-type”.
Step 5: Click on “Submit” to finish.
5.6.3 Administrator
This menu allows you to change the account ID and pass-
word for administrators.
Using the Administrator Settings:
Step 1: Enter the registered IP WEBCAM name in the “Ac-
count ID” field.
Step 2: Enter you’re the password you wish to change in
the “Old Password” field.
Step 3: Enter the new password in the“New Password”field.
Step 4: Confirm the password by entering it once more in
the “Re-type”.
Step 5: Click on “Submit” to finish.
5.7 Update
This menu allows you to update the IP WEBCAM software
(PV4.0_2.91.1 and up) online. You may use this feature to
update the internal
IP WEBCAM software so that you can make sure you have
the newest version available, as well as fixes to any soft-
ware glitches.
Using the Update Feature:
Step 1: The IP WEBCAM name is automatically detected
and displayed in the“Camera Name” field.
Step 2: The IP WEBCAM software currently being used is
automatically detected and displayed in the “Current Ver-
sion” field.
Step 3: Enter the name of the software file (including direc-
tory) that you wish to update in “New File Name”.
TOP

16
Step 4: You may also click“browse”to search for the file you
wish to update.
Step 5: Click “Submit” when you are finished.
Step 6: At this time, the system will begin to upload the file.
This should take 7-10 seconds for networks with 100Mbps
connections.
Step 7: The system will automatically begin a 50 second
countdown. If the process is successful, the words“Update
completed! System will auto reset after 3 seconds!” shall
appear.
Step 8: The system will return to the “System Login”screen.
Re-enter your Account ID and Password, and you’re fin-
ished.
Step 9: You may now check “Current Version” to make sure
that the update was successful.
NOTE: After completing Step 6, please do not discon-
nect the IP WEBCAM, or the unit may become dam-
aged, and require to be taken back to the factory for
repairs.
Appendix
APPENDIX A.
Using a PPPOE dialup connection and DDNS with the
MT4009 EZ IP WEBCAM (Using a hub)
This section is intended to help users connect to a com-
puter to the MT4009 EZ IP WEBCAM via a hub. It shall also
describe how to connect to ADSL with a PPPoE type IP ad-
dress, and also how to connect to the MT4009 EZ IP WEB-
CAM using DDNS. The directions are as described below:
A. Apply for a DDnS account using your home computer.
B. Connect to the MT4009 EZ IP WEBCAM with your home
computer (using the CAM EZ Search Tool).
C. Setup your MT4009 EZ IP WEBCAM to connect via PP-
PoE, and enter your DDNS settings.
D. You may now view your EZ IP WEBCAM with DDNS viewer.
A. Applying for a DDNS Account with Your Home Com-
puter
To do this, you must first have a Cable/ADSL Ethernet
modem (with RJ-45 connectors), and make sure that your
TOP

17
Step 3: Enter the desired account name (the account name
“mjIP WEBCAM001” is used in this example). Enter your E-
mail address and password application. Click on “Create
Account” to complete the application.
Step 4: If the application is successful, the following shall
appear on your screen.
broadband provider (ISP) is properly connected to the In-
ternet.
Step 1: Turn on your home computer, and connect to the
Internet.
Go to the http://www.dyndns.org/ website.
Step 2: Go to the “Account” Menu, and click on “Create Ac-
count”.
Step 5: After your application has been completed success-
fully, respond by E-mail to confirm, and go back to http://
www.dyndns.org/ to enter your user name and password.
Step 6: Go to Dynamic DNS from the “Account” menu, and
click on “Add Host”. The following should appear:
Step 7: The“Services”menu should automatically appear.
Choose your Domain Name (gotdns.com has been used in
this example for your reference).
TOP

18
Step 8: Enter your Host Name (mjIP WEBCAM001 has been
used in this example for your reference). Click on “Add
Host” to finish.
Step 9: After the new hostname has successfully created,
the following screen should appear:
B. Connecting to the MT4009 EZ IP WEBCAM with Your
Home Computer (Using the CAM EZ Search Tool)
Step 1: Please connect the MT4009 EZ IP WEBCAM to the
HUB as shown in following chart:
Step 2: Open CAM_EZ Search. Click on “Update” to begin
searching for any MT4009 EZ IP WEBCAM connected to
the local network. The menu should automatically display
the EZ IP WEBCAM under the name “MT4009”. It is recom-
mended that you first change its IP address to 192.168.9.1
(factory default). For gateway, it is recommended that you
use 192.168.9.253. Click “Submit” to update.
TOP
19
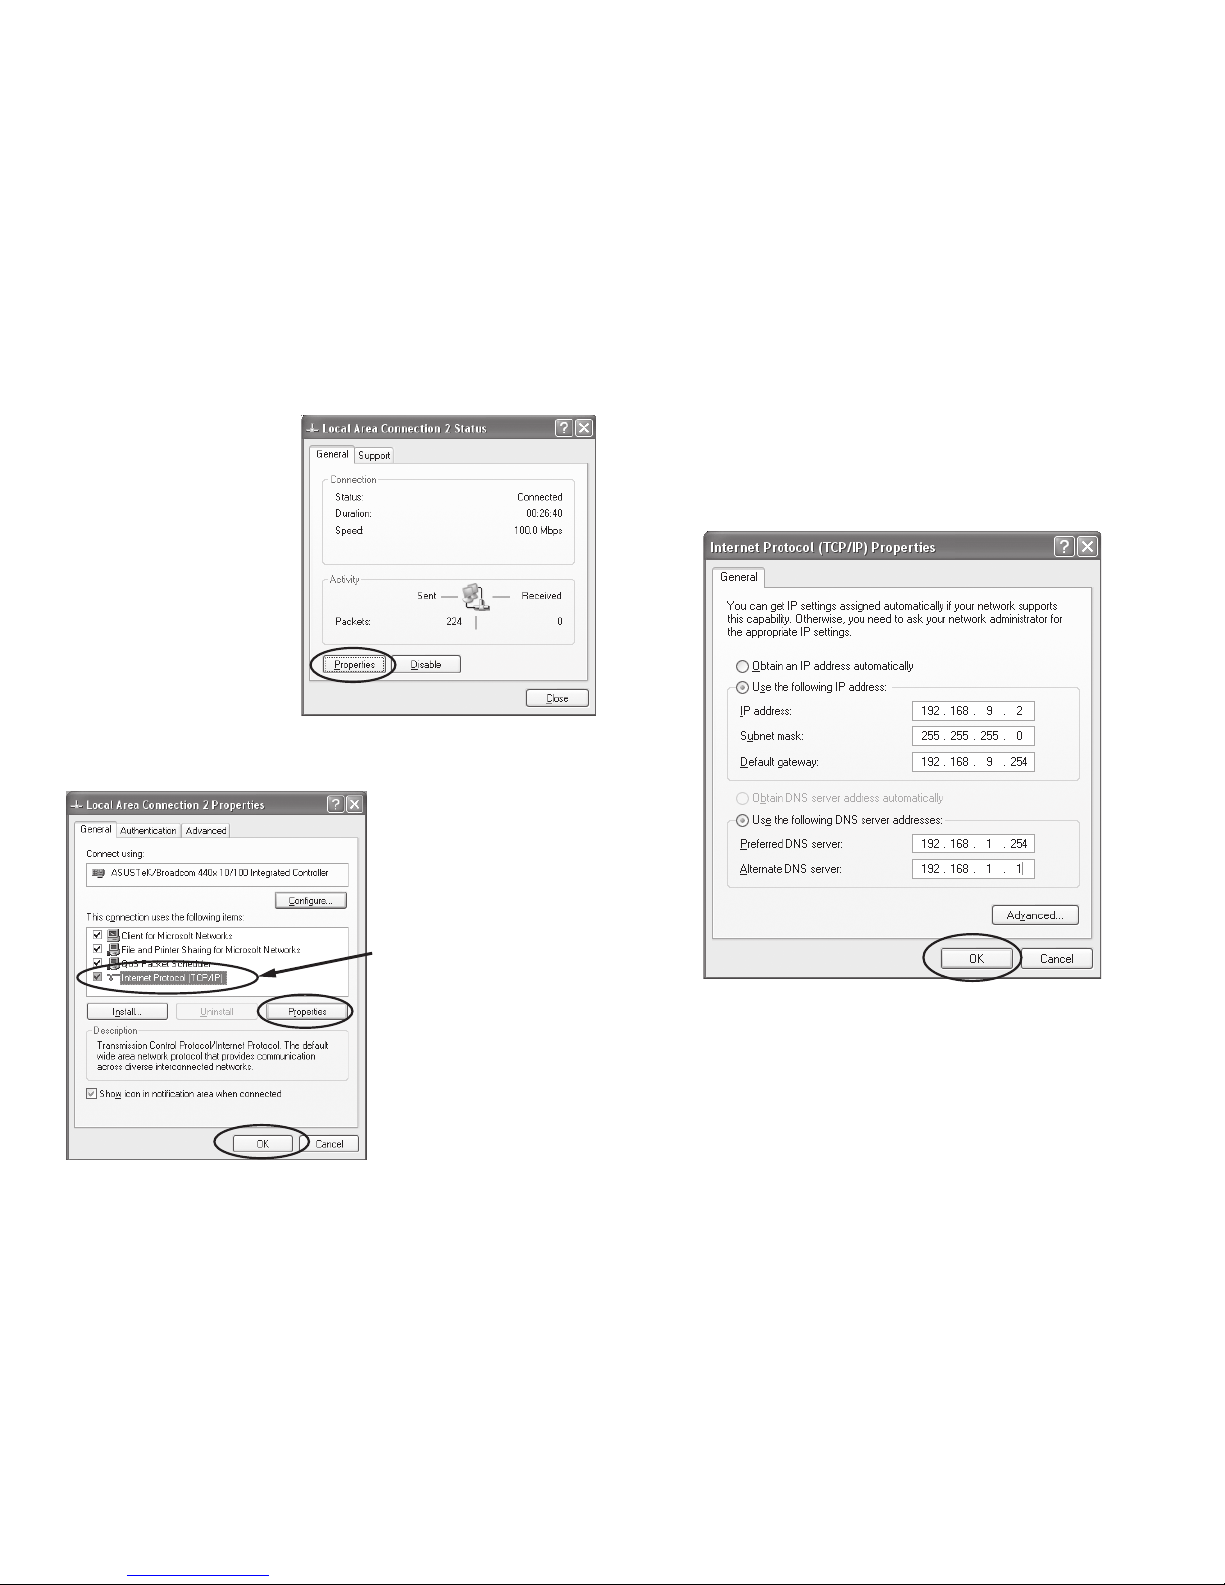
Step 3: Go to My Com-
puter > Control Panel
> Network and Dialup
Connection > Local
Connection > click on
“Properties (P)”.
Step 4: Select “Internet Protocol (TCP/IP)”, and click on the
Properties (R). Click on “Ok”.
Step 5: Change the IP Address to 192.168.9.2. Change Sub-
maskto255.255.255.0.Thedefault gatewayis 192.168.9.254
(Change the IP address to any numbers within the range of
192.168.9.2 - 192.168.9.253). Click on “OK”
Step 6: In EZ Search Tool, click on Update once more to
search for IP WEBCAM on the local network. Double click on
“MT4009”from the list, and your browser will automatically
take you to the MT4009 EZ IP WEBCAM login window.
Please refer to P.8 for information on how to browse the
surveillance video from the MT4009 EZ IP WEBCAM.
Select
TOP
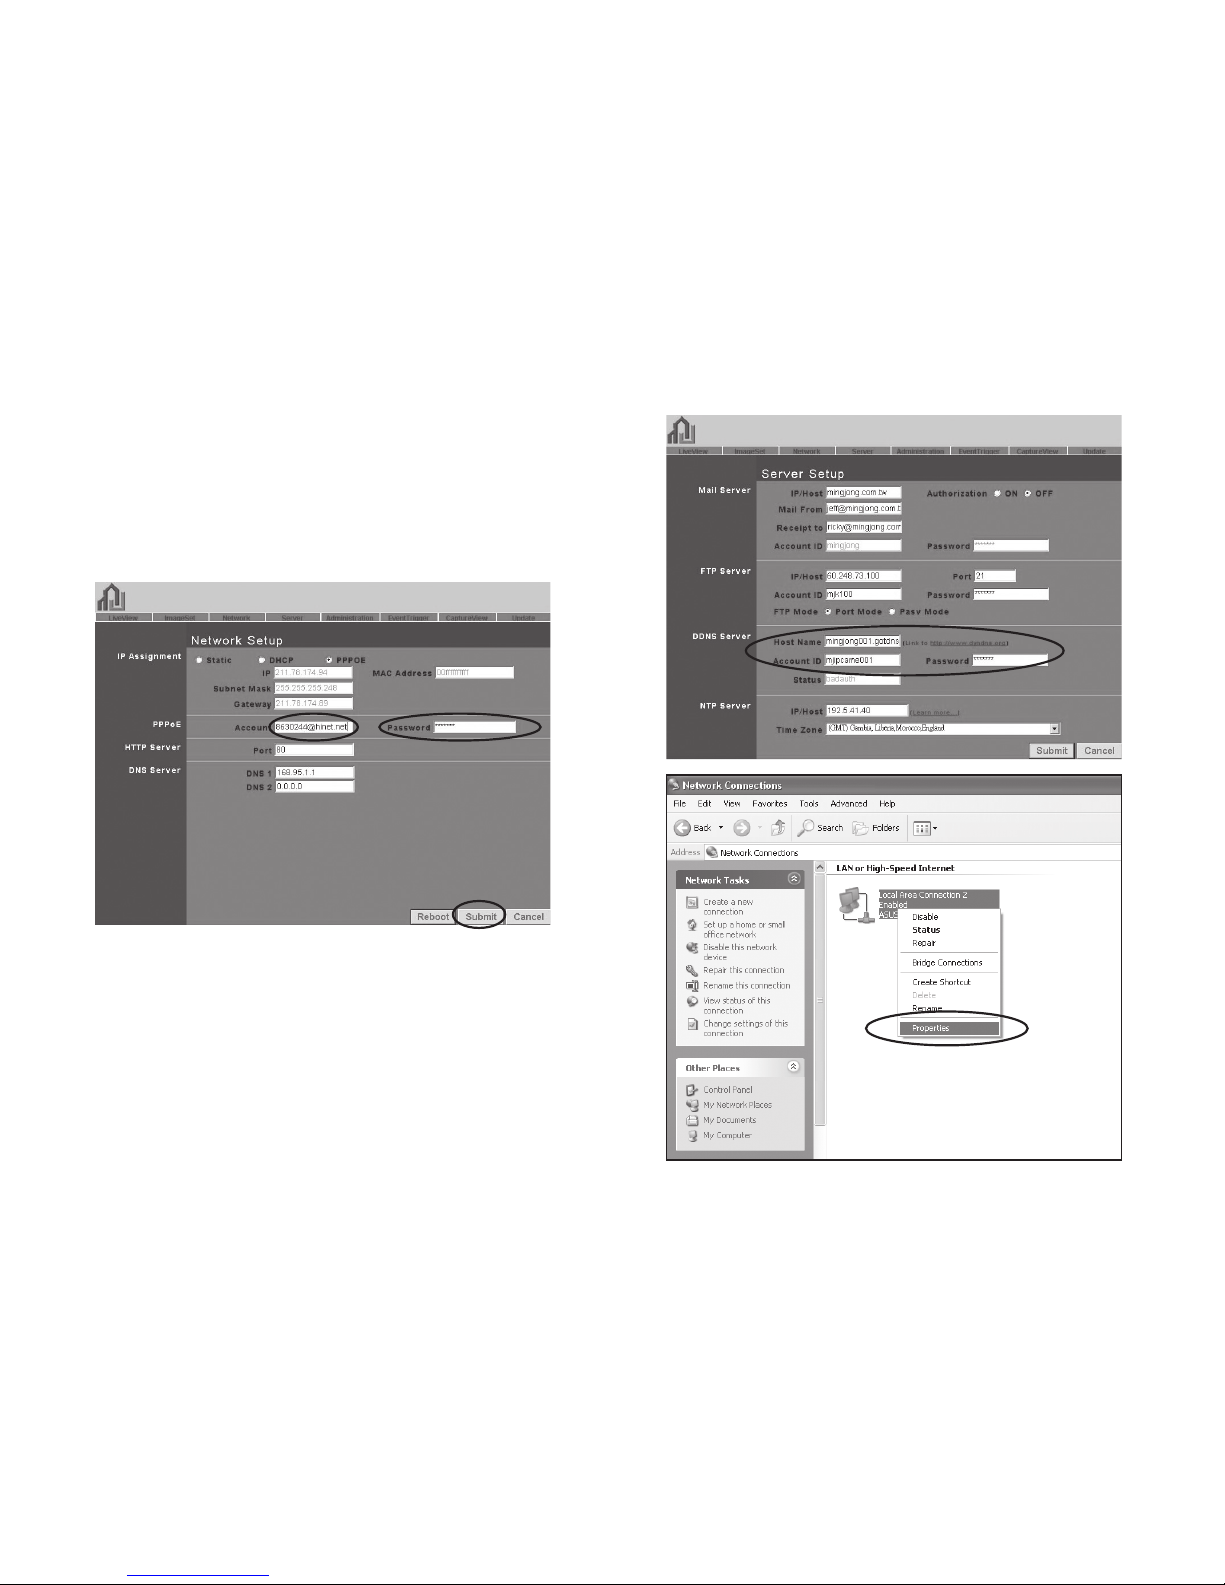
C. Changing the MT4009 EZ IP WEBCAM Settings to PP-
PoE / Using DDNS
Step 1: Select “Network” to open the network menu. Enter
your account ID and password in the appropriate field in
“PPPoE” (in this example, we have used Chung Hwa Tel-
ecom ADSL for your reference). Click on“Submit”.
Step 2: Go to the “Server” menu. Enter the host name, ac-
count ID, and password in the appropriate field in “DDNS
Server”. Click on “Submit” to finish.
Step 3: At this time, you must change the IP settings of your
home computer back to their original values (automatical-
ly retrieve IP address). To do this, click on “Network Neigh-
borhood”, right click on the Properties (R). Select your local
connection and right click to view the Properties (R).
20
TOP
Table of contents
Languages:
Popular IP Camera manuals by other brands


EtroVISION
EtroVISION 1080p/5M series user manual

Interlogix
Interlogix TruVision 11/31 Series installation guide

Blaupunkt
Blaupunkt VIO-H30 quick start guide

Lilin
Lilin IPS622M instruction manual

UTC Fire and Security
UTC Fire and Security UltraView IP XP3 quick start guide

Grundig
Grundig GCI-K1587V owner's manual


