MedicAir FZHCE05-MWEM User manual

MANUAL - FZHCE05-MWEM

Combining innovative technology with outstanding design, we bring you
a sophisticated air purication system to enhance levels of protection,
performance and reassurance.
Our state of the art MedicAir®system eliminates the invisible contaminants
in a room and disperses clean air ltered for viruses, bacteria and particulates.
With its ultra-high power 24W UVC technology, 360-degree air intake and ve
stage ltration process, it’s quick, efcient and quiet. Designed and developed
for quality and longevity with widely trusted technology.
Healthy Air Anywhere
Appliances that are obviously
damaged must not be operated.
Read the maintenance instructions
before opening the appliance or
replacing UV-C emitter.
+44 (0)1932 553023 | hello@medicair.co.uk
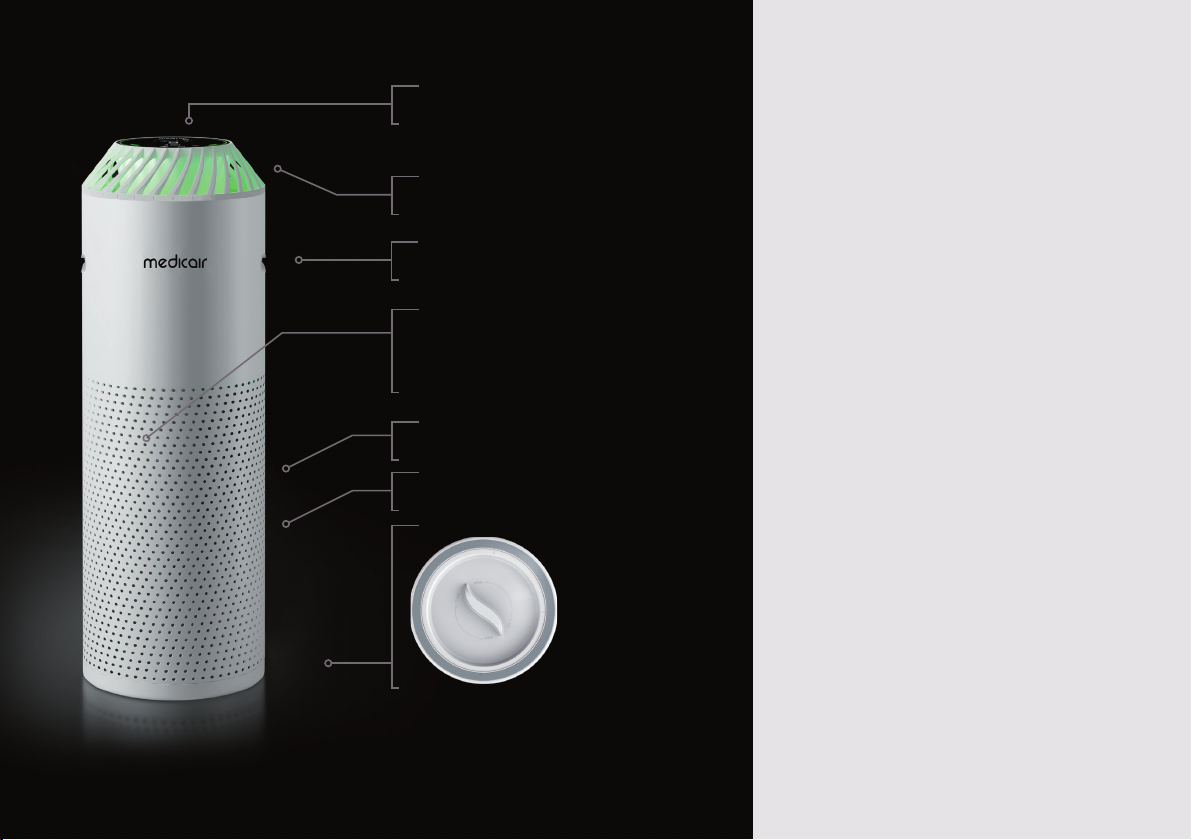
What’s Included
LCD touchscreen control panel
Venturi air outlet
Air inlets
Humidity and temperature
sensor / laser dust sensor /
TVOC odour sensor (internal)
Combined lter (internal)
Removable Base
»1 x MedicAir®unit
» 1 x Power cord (Country specic)
»1 x Remote control
»1 x Remote battery
»1 x Combined Filter:
»Nano Hybrid Activated Carbon
»HEPA H13
»TiO2 catalysed UVC Reaction Chamber
medicair.co.uk |03
Handles

5 6 7
Do not lift
MedicAir®out of
the box by the
top vents.
Getting Started
Remove the protective foam lid out of the
box, along with the power cord and remote.
Carefully lower the unit in the box to the
ground, until it is horizontal.
Using the bubble sleeve within which the
unit is located, slide the unit out of the
box, being particularly cautious not to hold
the unit by the top vents.
Connect the power cord at the bottom
of the side of the unit. Plug the other
end of the power cord into a power supply.
Press the glowing standby button located on the
touch screen. Wait for the LED screen to scan the
air quality within its surrounds and complete its
boot-up process, at which stage the screen will
stop ashing. At this point you can choose your
wind speed (via the Wind Speed Button - )
or activate the ReAKT function (via the ReAKT
button - ).
Use the remote or touch screen to change
settings at any time.
When leaving the room overnight - activate
sleep mode (via the Sleep Mode Button - )
or switch off the unit (via the power button -
) and turn off power at the mains.
5
6
7
4
3
2
1
Filter Life
REPLACE FILTER
5
3150
48 19
+44 (0)1932 553023 | hello@medicair.co.uk

medicair.co.uk |05
Filters
A. Pre-lter and ATP-HEPA
antimicrobial peptide lter
This consists of an omni directional
antimicrobial bre mesh fabric capable
of capturing and ltering large
particles such as dust, hairs and skin
akes. This prolongs the lifespan of
the HEPA lter and improves system
efciency.
The high-density ATP-HEPA H13
antimicrobial peptide lter removes
the majority of airborne particulate
matter with a mean aerodynamic
diameter of 2.5 μm.
B.High-efciency activated
carbon layer
This is a large honeycomb-structured lter
which works to remove harmful substances
such as mercury and benzene. It can
subsequently reduce odours in the room.
C. TiO2 Catalyzed UV-C
Reaction Chamber
By way of a 24-Watt UVC bulb placed in the
center of the reaction chamber, MedicAir®
is able to denature viruses and bacteria by
damaging their RNA/DNA.
Pre-lter and ATP-HEPA lter cartridge
High-efciency activated Carbon lter
TiO2 Catalyzed UV-C Reaction Chamber
A
B
C
B
A
C
Please visit the medicair.co.uk to buy
high-performance combined lters.

Changing The MedicAir®Filter Cartridge
Prepare for the changing the lter
cartridge by wearing gloves and
dispose of the old lter in line with
local recomendations.
UV radiation can be harmful
to the eyes and skin. Do not
operate UVC-emitter outside
the appliance.
Turn off the power on the unit and
disconnect from the power supply.
Gently lie the unit down on the
ground taking care to not handle
the unit by the top vent.
Carefully twist the lid off the
bottom of the unit (by twisting anti-
clockwise) and lift the lid off.
Disconnect the wire that connects
the lter cartridge and the
MedicAir®unit by unclipping at the
connector (this is tucked down the
side of the unit between the inside
of the unit and outside of the lter).
Slide the old lter out of the unit
and dispose of it appropriately.
Slide in the new lter cartridge into
the base of the unit with the solid
base positioned nearest the bottom
of the unit.
5
11
612
4
10
3
9
2
8
1 7 Connect the wire from the base
of the new lter cartridge to
the unit via the wire connector
and tuck this wire in the gap
between the inside of the unit
and the outside of the new lter.
Carefully replace the removable
lid (twisting clockwise).
Stand your MedicAir®back up
so the LED touchscreen faces
the ceiling.
Reconnect the power supply
and power on the machine.
Press and hold the sleep button
for ve seconds to recalibrate
the unit with the new lters.
Your device is now ready to use
as normal.
+44 (0)1932 553023 | hello@medicair.co.uk

Filter Life
REPLACE FILTER
5
3150
48 19
medicair.co.uk |07
5 sec
Filter Life
REPLACE FILTER
5
3150
48 19
Filter Life
REPLACE FILTER
5
3150
48 19
Filter Life
REPLACE FILTER
5
3150
48 19
Filter Life
5
3150
48 19
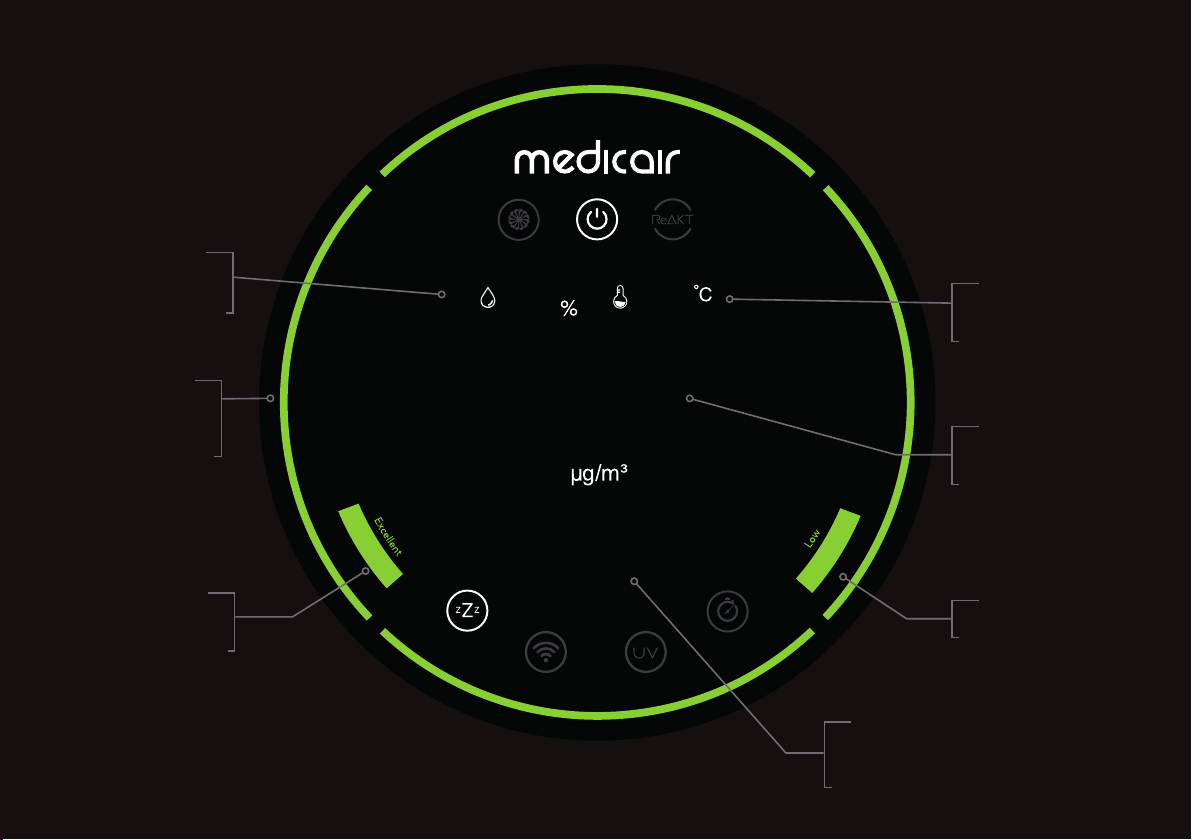
Figure reecting
air quality
Levels of
air quality
Temperature
level
Humidity
level
Light strips
reecting
air quality
Fan speed
Figure reecting lter life remaining
(ashes when lter needs replacing)

Start Button
When the unit is rst plugged into your power supply,
this button will glow red indicating standby mode.
To start the unit, tap this button and the unit will
begin scanning the air quality within your indoor
environment. MedicAir® will then default to the ReAKT
setting, continually adjusting wind speed in order to
achieve optimum air quality. This can be changed by
pressing the Fan Speed button. To re-enter standby
mode, simply press the Power button again.
ReAKT Button
When rst powered on, the air purier defaults to ReAKT
mode. Within this mode MedicAir
®
will adjust fan speed
in accordance with the air quality at that time in order to
optimise air quality.
Fan Speed Button
Press the fan speed button on the control panel or
relevant buttons on the remote to set the fan speed at
your desired level: low, medium, high or max.
Screen Display Introduction
Sleep Mode Button
To put the unit into sleep mode, press the sleep
button on the control panel or the remote control.
During sleep mode the air purier runs at the
slowest speed and only the sleep button will light
up on the control panel. To exit sleep mode, press
any button (other than start) and the unit will return
to the previous setting.
Lock Timer Button
Press the timer button for 3 seconds and the
red light will come on, indicating the air purier
will run in the child lock mode. If you press the
button for another 3 seconds the light will go off,
the unit will exit this mode and all other buttons
will be unlocked.
medicair.co.uk |09

‘MedicAir’ Mobile App Connection Instructions
5
6
7
10
11
8
9
4
3
2
1Download the ‘MedicAir®’ app
from either the Apple App Store
or Google Play store.
Once in the app you will be
prompted to enter an email to
set up an account. Enter your
chosen email.
You will receive an email with
a conrmation code - nd this
and then enter it when prompted
on the MedicAir® app.
You are now within the
MedicAir®App. Ensure you
accept all requests from the
app to use WiFi signal.
Click the + logo in the top
right of the screen to add
a new device.
Your app will default to ‘Add
Manually’. In the main body
of the screen should be an
‘Air Purier’ option - select this.
You will be prompted to enter
your wi passcode - enter this
and press NEXT.
At this stage you should avert your
attention to the MedicAir
®
Air Purier
Unit. Along the bottom of the screen
are 5 buttons- lightly tap the middle
one (power button) and turn off the
machine. Wait for 2 seconds. Again
tap this button to re-boot the unit.
Wait for the whole screen to stop
ashing (15-20 seconds)
.
Press and hold
(for 3 seconds)
the Wi Logo Button (positioned
on the touch screen).
The wi logo should then begin
ashing rapidly on your MedicAir®
screen. At this point avert your
attention back to the App and
tick the box to conrm ‘indicator
blinking rapidly’. Press NEXT.
Wait whilst your unit connects.
You do not need to interfere
with this stage- let the unit
do the work.
3
2
1
What to do if your unit
won’t connect:
Occasionally a unit might fail to
connect on the rst try. The best
way to mitigate this is to change
the wi you are using.
Complete the process (from the
step 5-11 again) but this time
use a ‘personal hotspot’ wi.
Your unit should then connect
without problems.
+44 (0)1932 553023 | hello@medicair.co.uk

medicair.co.uk |11
5
STEP
6
STEP
7
STEP
10
STEP
11
STEP

‘MedicAir Data’ Mobile App Connection
5
6
7
8
4
3
2
1
+44 (0)1932 553023 | hello@medicair.co.uk
Download the ‘MedicAir® Data’
app from either the Apple App
Store or Google Play store.
Once in the app you will be
prompted to enter an email to
access your account. Enter the
same email you have used to
login to the ‘MedicAir® App’
- see pages 10-11. Enter this
chosen email and press ‘next’.
You will now be prompted for
the ‘Virtual ID’ to one of your
existing MedicAir units. To
nd this navigate back to your
‘MedicAir® App’ (as introduced
on pages 10-11) and click on
one of your units you have
connected. Once on that unit - tap
the top right corner of the screen.
Once the menu comes up - press
‘device information’. Once you pass
to the next screen your ‘virtual ID’
will be shown - use the ‘copy’ button
to copy to clipboard.
Once you have copied your
‘Virtual ID’ go back to the MedicAir
Data App. Where prompted for a
‘Virtual ID’ - simply paste your
ID. Press ‘next’.
You will now be requested to create
a new password which will be used
to access your MedicAir® Data App.
Type and then retype this password
and press ‘next’.
You will now be on the home screen
of your MedicAir®Data App. All of
your devices from your MedicAir®app
(see pages 10-11) will be shown.
By default you will be on the
home screen of the app (see step
7 pictures on page 13). To see
each of your devices listed out
- press the button showing total
number of devices.
You can learn more about how
to navigate the app and all of
the functionality available at our
YouTube Channel - simply search
for ‘MedicAir®’under channels
on YouTube.
Before downloading this app - ensure
you have set up and connected your
devices via the “MedicAir®App” -
see pages 10-11.

medicair.co.uk |13
2
STEP
3
STEP
4
STEP
5
STEP
7
STEP
User Guide
WARNING
This product contains a lithium button/coin cell battery. If a new or used
lithium button/coin cell battery is swallowed or enters the body, it can cause
severe internal burns and can lead to death in as little as 2 hours. Always
completely secure the battery compartment. If the battery compartment
does not close securely, stop using the product, remove the batteries, and
keep it away from children. If you think batteries might have been swallowed
or placed inside any part of the body, seek immediate medical attention.
Tilt Detection
If the air purier tilts signicantly from its upright position,
it will automatically power off. When placed back upright your
machine will default to standby. Press the power button
(via the touchscreen) and if the machine defaults to
“ReAKT” mode then it is safe to use.
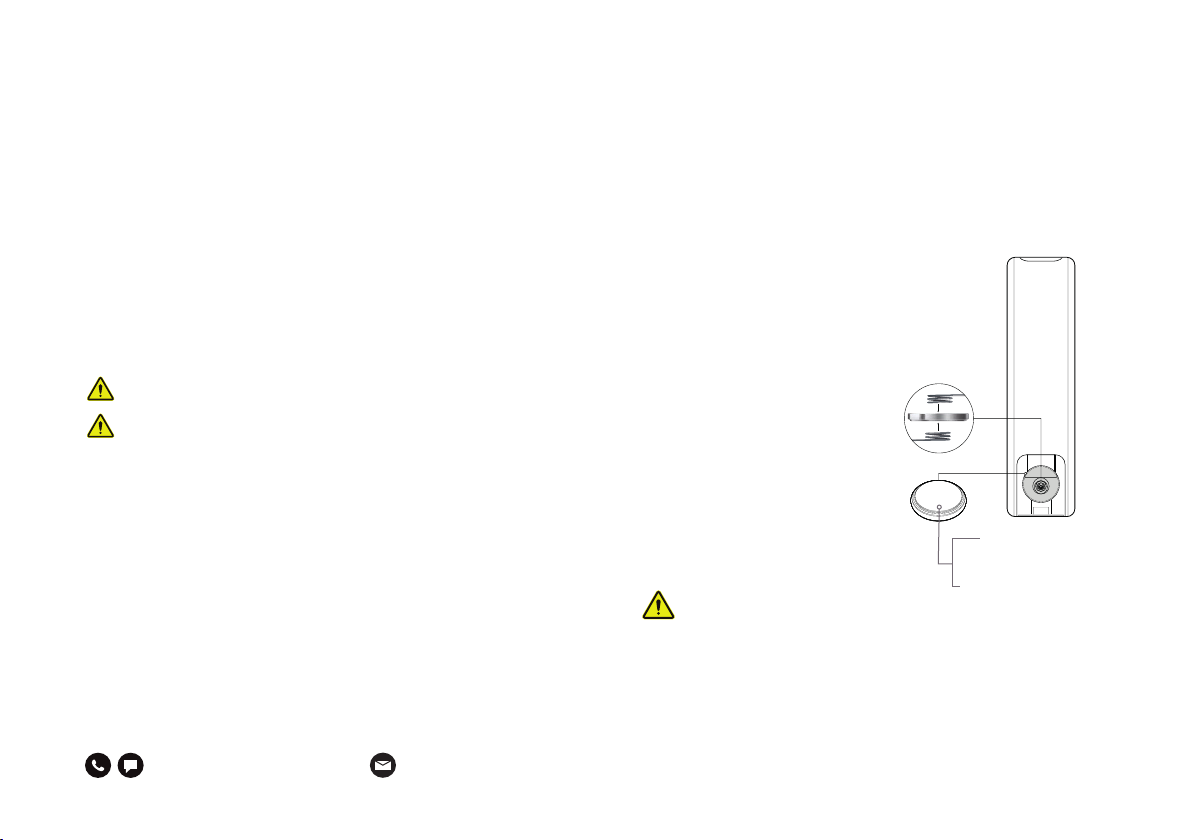
Remote Control - Battery Installation
Step 1 - On the reverse side of the remote,
remove the small cover at the bottom.
Step 2 - Gently slide the battery
BETWEEN the two coils - the side
with the ‘+’ symbol should
face upwards. Following this
step the battery should now
be secure even before the
cover is replaced - with
one coil above the battery,
one below.
Step 3 - Replace the back
cover of the remote. CR2032 Button battery
(3V, 20mm diameter)
Filter Guide Replacement/Installation
When started, the air purier will automatically calculate the
remaining usage of the lter, according to the unit’s running
conditions and the internally stored algorithm. When the lter
needs to be replaced, the word lter on the panel will continuously
ash to alert you. Once you’ve replaced the lter, start the unit
and press the sleep button for ve seconds to turn the lter light off.
This appliance contains a UV-C emitter.
Please handle used lters with care
and dispose of appropriately.
Timer Setting Function
Whenever the air purier is switched on, the screen will show
current PM2.5 concentration on the control panel. By pressing the
timer button, located on the bottom right of the screen, you will
see a number on screen alongside the letter H. If you select ‘1H’ for
example, the purier will switch off after 1 hour. This number can be
increased with further taps on this timer icon up to a maximum of
8H. If you select ‘0H’, the purier will exit timer mode and the timer
light will go off. When you select your chosen timer setting (e.g. 3H),
you need to wait ten seconds for the timer to activate. Once 3H (for
example) has disappeared from your screen, your timer has been set.
+44 (0)1932 553023 | hello@medicair.co.uk

H13 clean air delivery rate: up to 605m3/h
Particulate matter CCM: P4-level
Particulate matter purication-
related energy efciency:
10.9 (high-efcient level)
Sterilization rate: up to 99.99%
Timer settings: 1-8 hours
Fan speed settings: 1-2-3-4-Auto
Pollution-level identication: Numerical value; light strips
Remote control: ≤6m
Parameters
Class 13 HEPA +/- Activated Carbon/UVC Filter Chamber
Model CHIAC05-MWEM
- Low Voltage Directive (LVD) 2006/95/EC
- Eletromagnetic Compatibility Directive (EMC) 2014/30/EU
- Radio Equipment Directive (RED) 2014/53/EU
- Restriction of the Use of Certain Hazardous Substances in
Electrical and Electronic Equipment (RoHS) 2015/863/EU
Model CHIAC05-MWUS
- UL 61010-1 (2012-05,2018-11)
Certication
Name: MedicAir®
Model: FZHCE05-MWEM
Rated voltage: 220V-230V
Rated frequency: 50/60Hz
Input power: 85W
Main material: Aerospace Cold-rolled Steel Housing
Dimensions: (H)880 x (W)300 mm
Sensors: Laser particulate sensor (0.1-0.3um) /
humidity and temperature sensor /
TVOC odour sensor
Net weight: 14kg
Standby-power: ≤2W
Noise level: ≤68dB (A)
Indication: LED indicators and gures
Control: Touch, remote and WiFi
Specications
Specications
*
CADR values are ±10% and given with the H13 Filter in place, values will
vary depending on wind speed settings and your chosen lter conguration.
Air changes inuenced by obstructions and other sources of turbulence.
medicair.co.uk |15

Cleaning and Maintenance
Always turn off the power by
disconnecting the plug from
the socket before carrying out
maintenance, cleaning or changing
the fan position.
Please make sure that your air
purier is completely stopped
before cleaning.
Do not attempt to clean the HEPA/
Carbon lter with a grinding sponge,
scouring pad or hard brush.
RISK OF ELECTRIC SHOCK – These
servicing instructions are for use by
qualied personnel only. To reduce the
risk of electric shock, do not perform
any servicing other than that contained
in the operating instructions unless you
are qualied to do so.
Disconnect power cord before
cleaning the body, air outlet or opening
the bottom to avoid electric shock.
Turn off and unplug the power cord
before replacement of the HEPA Filter,
Activated Carbon Filter and the UV
lamp or unit maintenance.
If the power cord is damaged,
it must be replaced by the service
center or a similarly qualied person.
Do not apply force to the lter
in an effort to remove gathered
particulates.
When not in use, please store in
a dry place with good ventilation.
Please ensure maintenance work
is carried out by an authorised
service centre.
2
1
1 2
3
4
3
7
4
85
6
+44 (0)1932 553023 | hello@medicair.co.uk
If the power line or plug of the
appliance is damaged, immediately
stop using.
Children must not participate
or be present during the user
maintenance of the product.
WARNING

Warnings Warranty
medicair.co.uk |17
Moving
To move your air purier ensure
it’s switched off and unplugged
from its power source.
Installation
» The air purifier may not work
correctly if the filter cover plate
is not installed properly.
» Always ensure the inlets are more
than 20cm away from anything
that could obstruct the airflow,
such as walls.
AC power cord
» Do not excessively twist, pinch
or bend the power cord, or the
wire core will be exposed to the
air and/or break.
» Do not drag or pull the power
cord when unplugging.
» Do not use an AC socket that
is not compatible.
» Do not use the provided power
cord in other devices.
In use
» If the unit makes unusual sounds,
smells, overheats, or the fan rotates
irregularly, immediately turn the unit off.
» Do not insert anything into the air
inlet or outlet of the unit.
»Keep hair, fabric and other items
away from the unit as they may be
sucked in, which can cause injury,
and damage to the system.
»Do not sit on the air purifier, stand
too close to it or tilt it in any way.
»Open the ventilation system when using
with another combustion appliance in order
to prevent carbon monoxide poisoning.
Precautions
» The appliance is not to be used by persons
(including children) with reduced physical,
sensory or mental capabilities, or lack of
experience and knowledge, unless they are
supervised or have been given instruction.
» Children must not play with the
appliance and should be supervised
around it at all times.
Terms and conditions
MedicAir DentAir Ltd will
repair any MedicAir®issue
arising from a structural defect
or electrical defect for a period
of 3 years, without charge.
The liability will not exceed
the amount you originally paid
for the product. The warranty
does not cover defects arising
from negligence, product
modication, unauthorised
repairs, accidental damage,
theft, loss or acts of God.
IFU_EM1_Rev-1.4 June 2021
medicair.co.uk
MedicAir DentAir Ltd, The Barns, Hilltop Farm, Lyne Lane, Lyne, KT16 0AW
MedicAir® is a registered trademark of Bryant Medical Ltd in the United Kingdom, Australia and other countries.
This product helps protect against certain particulate contaminants but does not
eliminate exposure to or risk of contracting disease or infection. It is NOT a Medical device.
Part Name Part Code
Power Cord (Country Specific) MAPCEM2
MedicAir®Unit FZHCE05-MWEM
Filter Cartridge PAFCTFD2
Remote Control MARCEM3
Parts List:
In Partnership With:
+44 (0)1932 553023 | hello@medicair.co.uk
Table of contents


