Medical WAVE D-ACTOR 100 Ultra User manual
D-ACTOR 100 Ultra
QUICK REFERENCE GUIDE
SET UP & TROUBLE SHOOTING
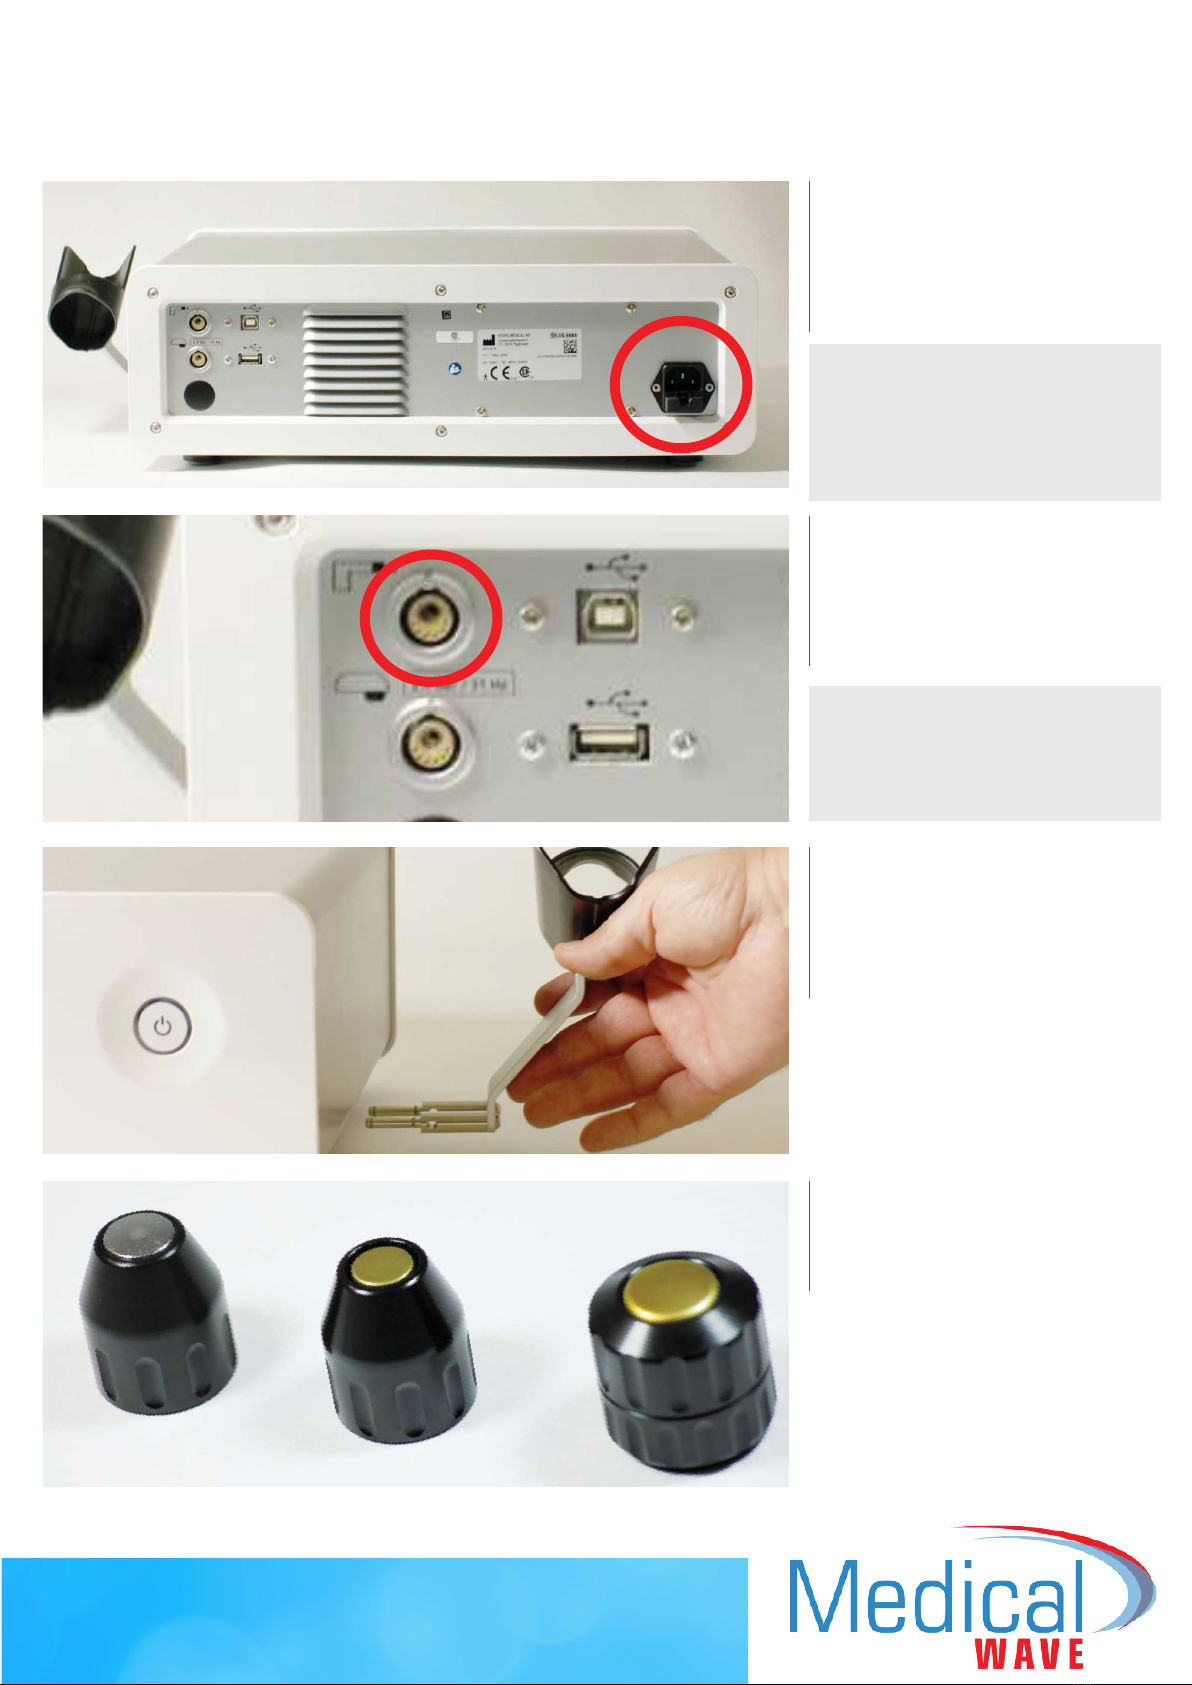
(a)
Plug power
cord into the
back of device.
(b)
Attach handpiece
to upper port in the
back of the device.
IMPORTANT: Make sure
to line up the red dots on
the coupling and the port.
(d)
Select desired
treatment tip.
SET UP HANDPIECE OPERATION
(c)
Attach
handpiece
holder.
IMPORTANT: Provide
adequate clearance for
ventilation on back and
underneath device.

SET UP HANDPIECE OPERATION
IMPORTANT : Use adequate amount of ultra sound gel for all treatments.
Treatment Pressure
Helps the operator know whether or not they are
applying the proper amount of pressure to propagate
the necessary energy to the treated tissue. Pay close
attention to the recommended levels of pressure for
each treatment chosen.
Visual pressure monitor : The digital gage is located on
the face of the handpiece, running vertical down the side.
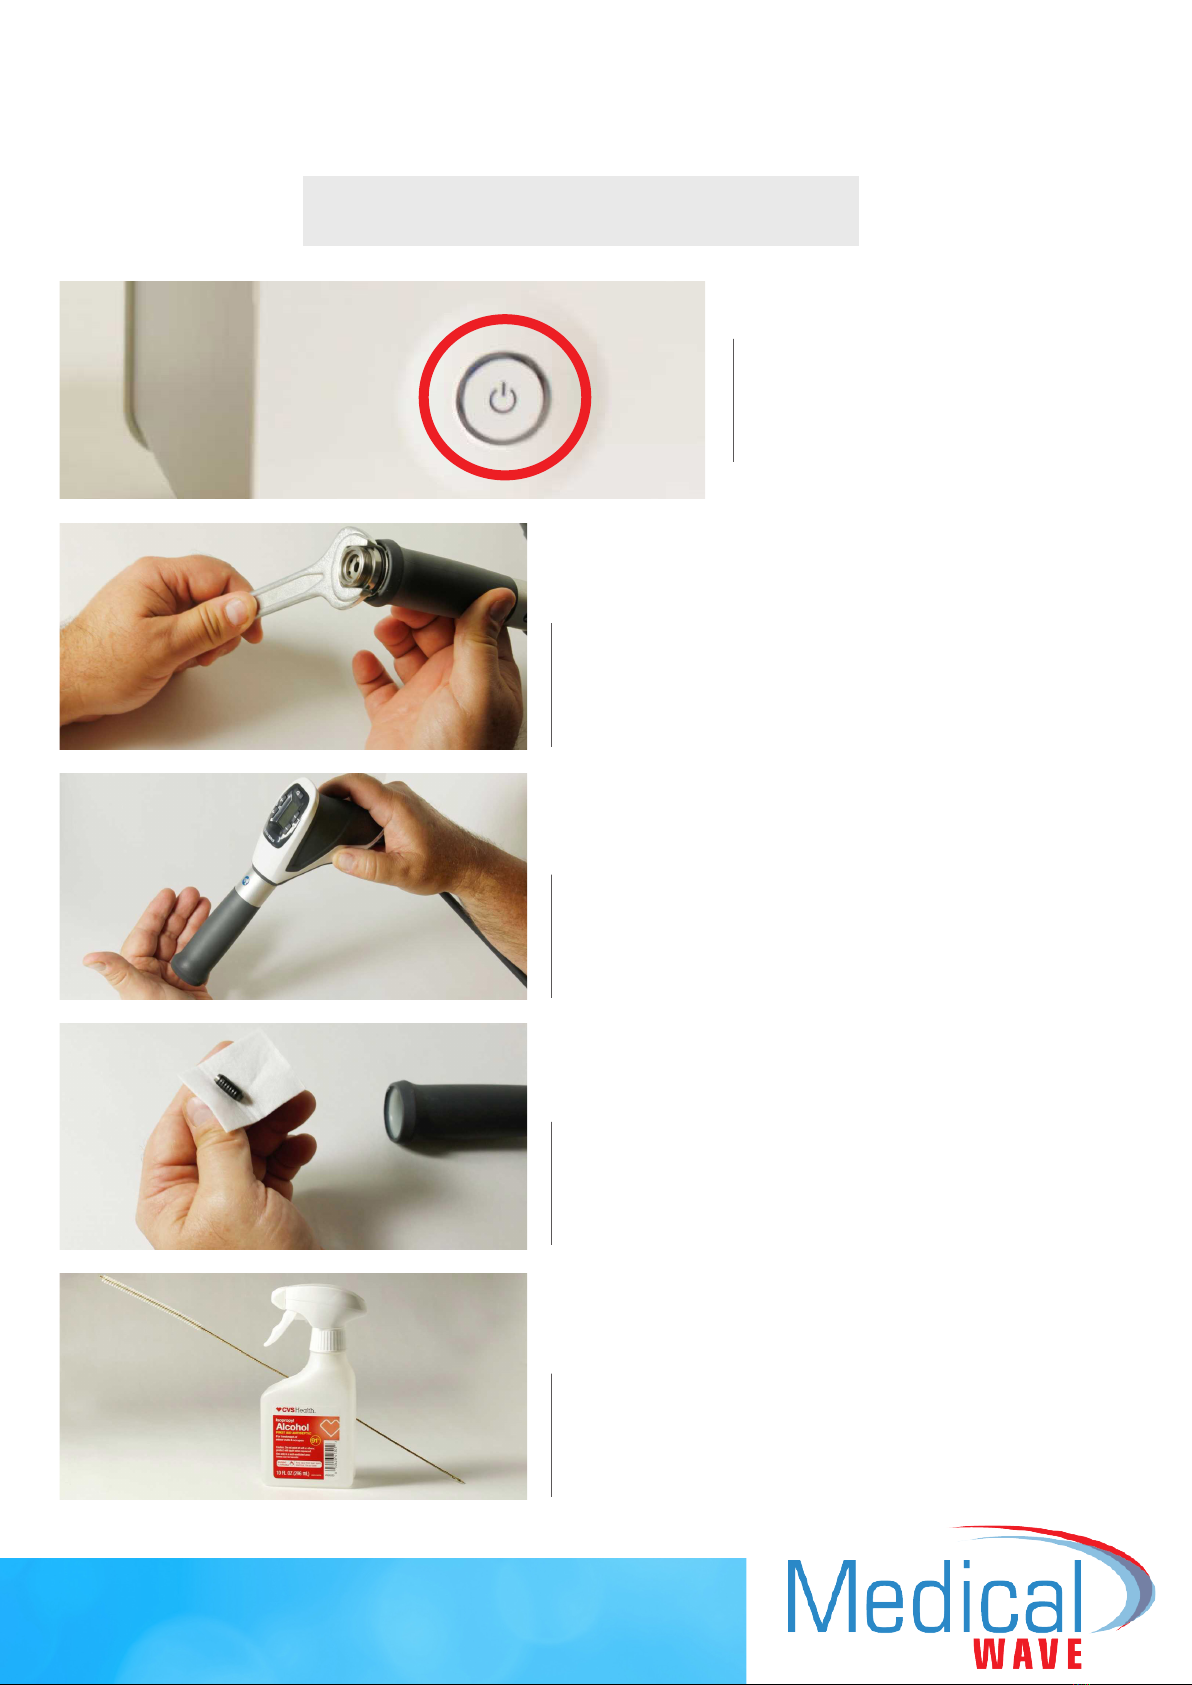
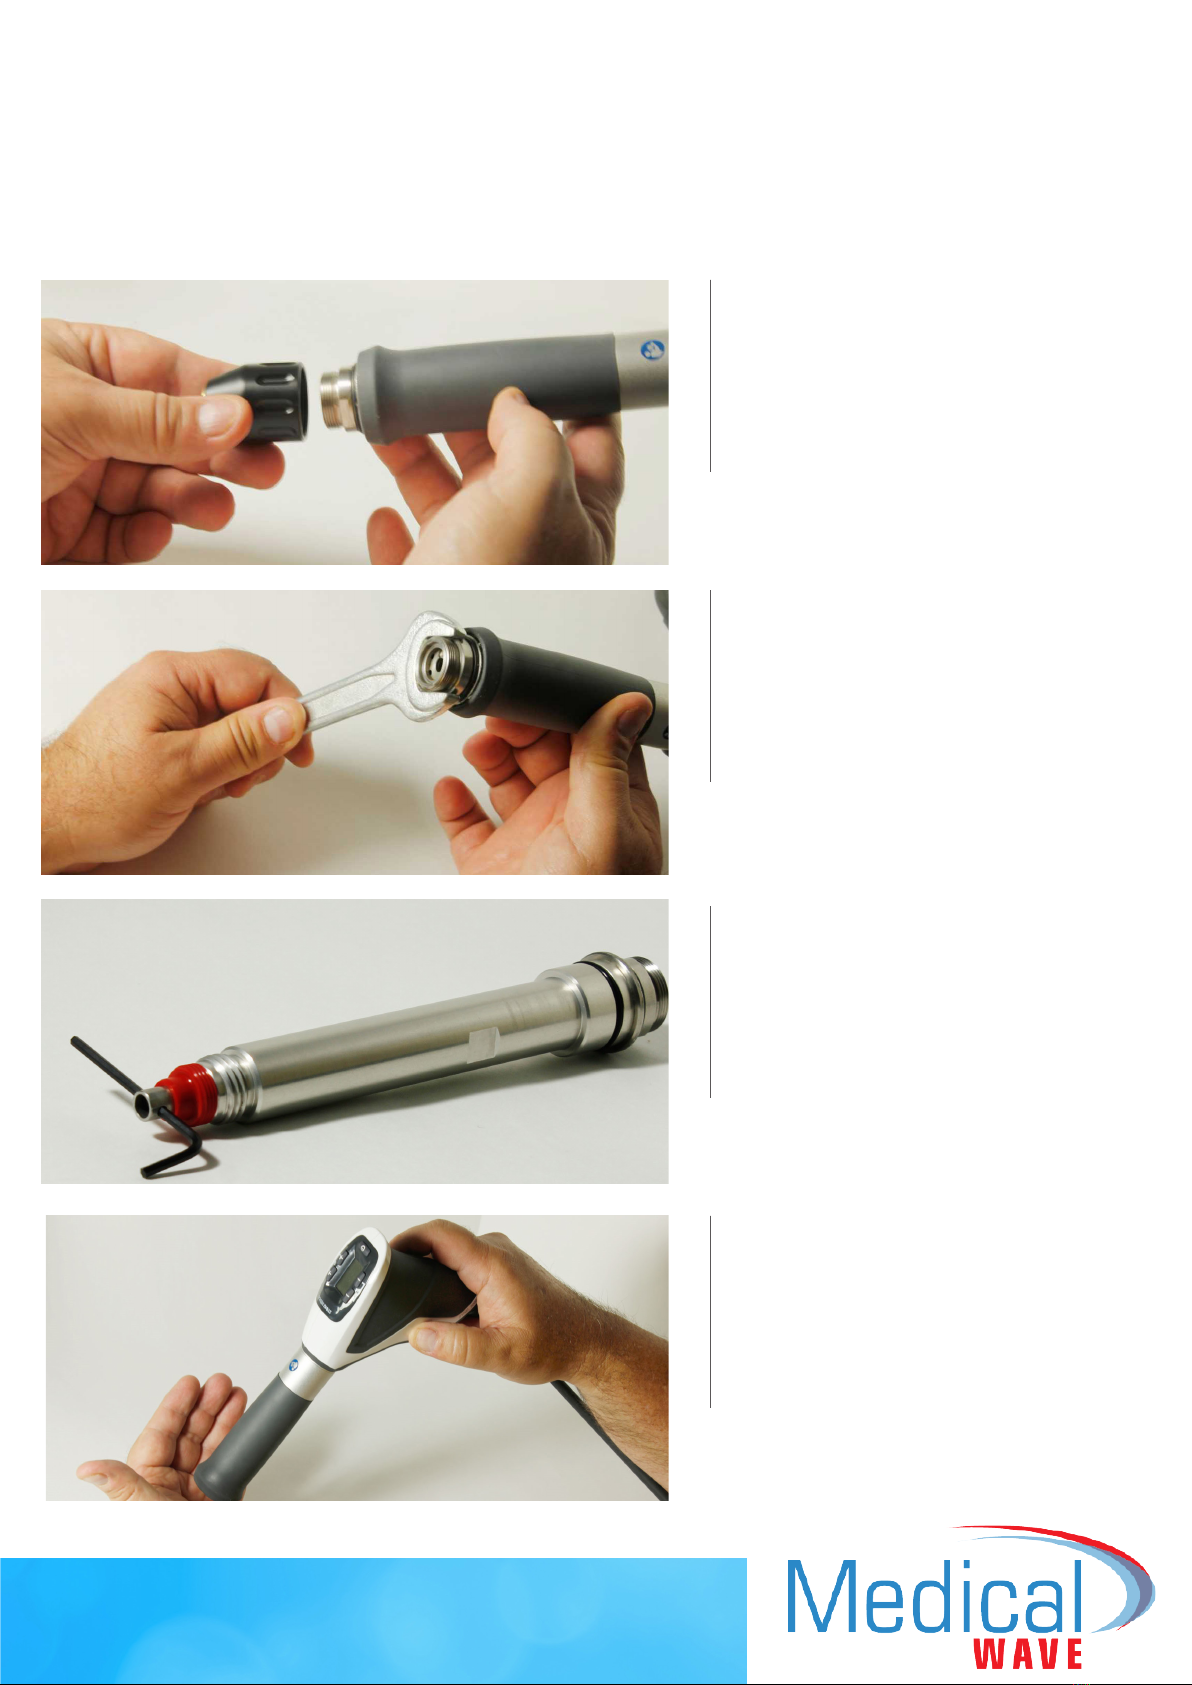
(a) Turn power o.
(b) Remove treatment tip.
IMPORTANT: Clean device weekly
(c)
Use provided wrench to
loosen shaft assembly.
(d)
Clap handpiece in cupped palm of hand to
remove bullet from handpiece magnet.
(e)
Clean bullet with alcohol
soaked gauze pad
(f)
Spray alcohol on pipe cleaner
supplied with device
DEVICE CLEANING
(a) Turn power o.
(b) Remove treatment tip.
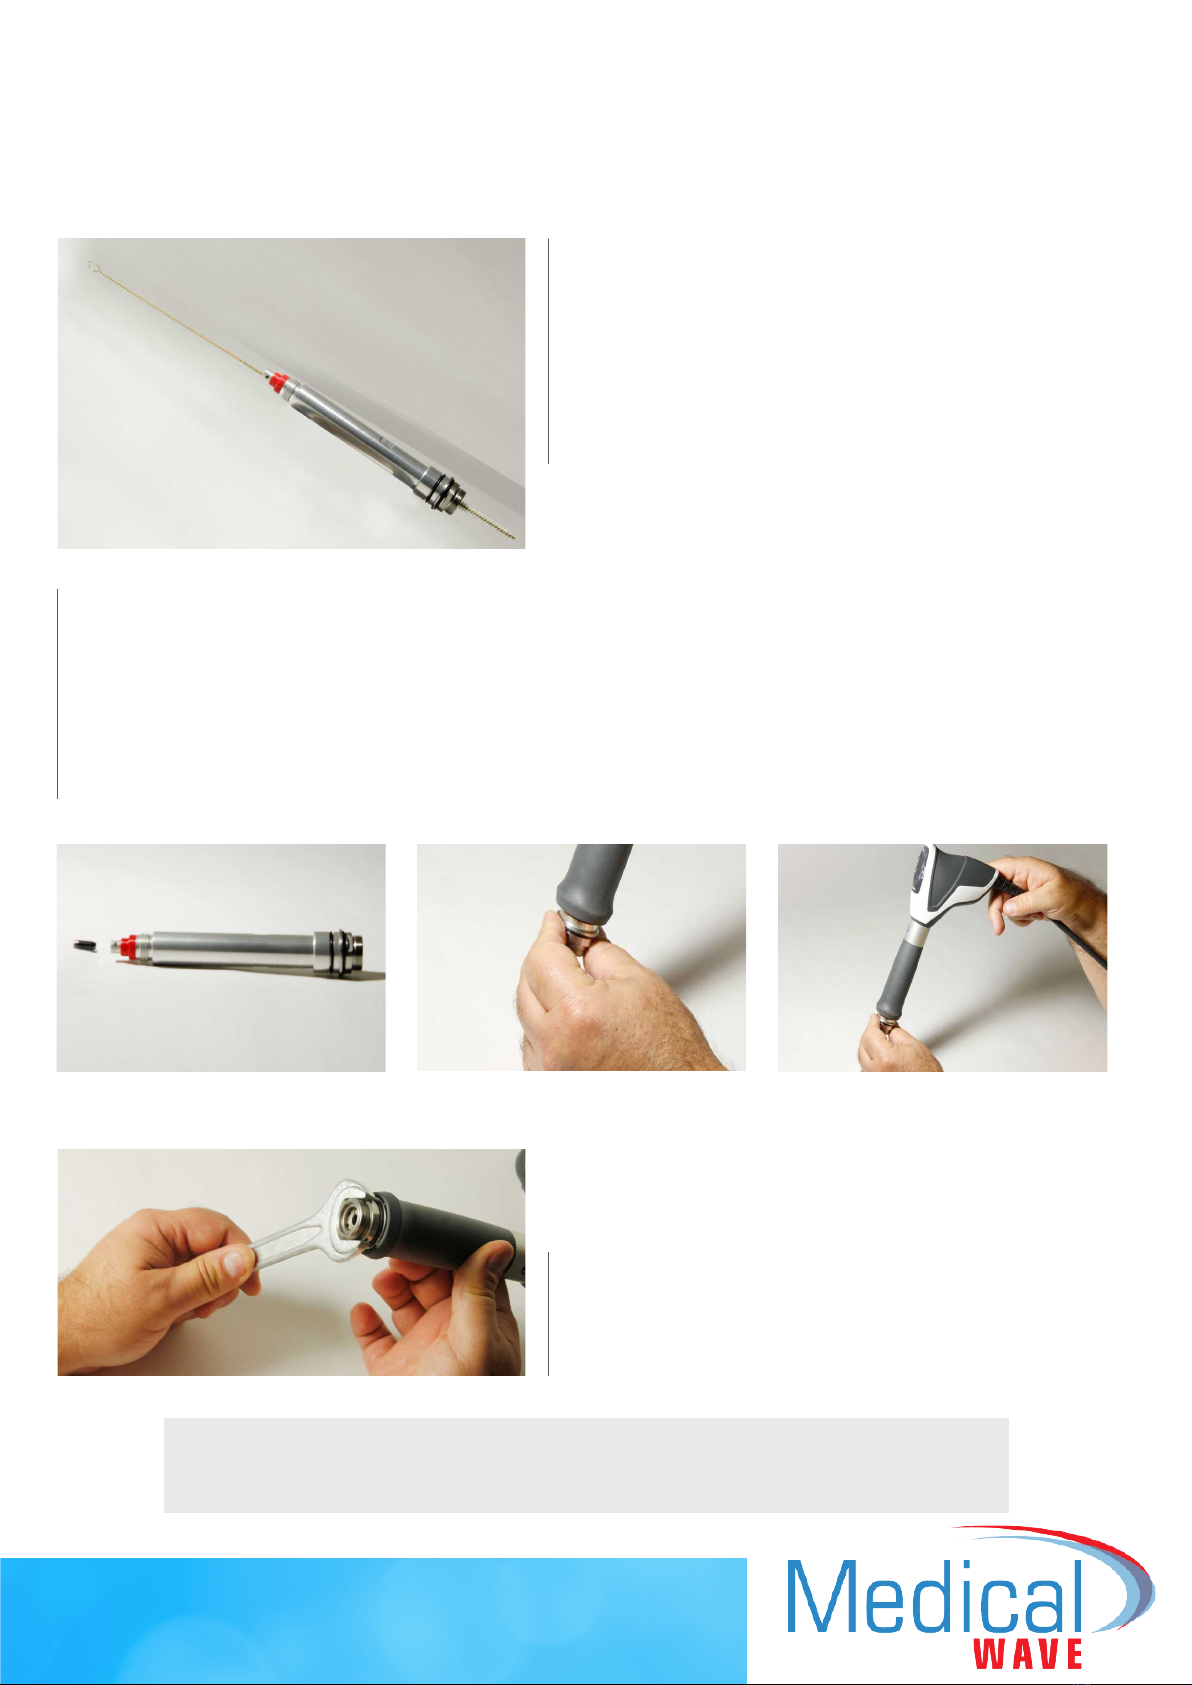
(g) Run pipe cleaner in one side of
shaft assembly and out the other.
(h) Wipe pipe cleaner with
clean paper towel.
VERY IMPORTANT: Put back together and be sure
all parts are rmly in place before ring handpiece.
(i) Repeat steps F, G, H.
(j) Place bullet back into guide tube. Thread by hand ( nger tight) into hand
piece with hand piece pointing towards oor to prevent the bullet from falling
out and getting in the way of tightening the shaft assembly to the handpiece.
(k)
Tighten shaft assembly to hand piece
with supplied wrench.
Bullet in shaft Finger Tight Pointing at the oor
DEVICE CLEANING DEVICE CLEANING (cont)
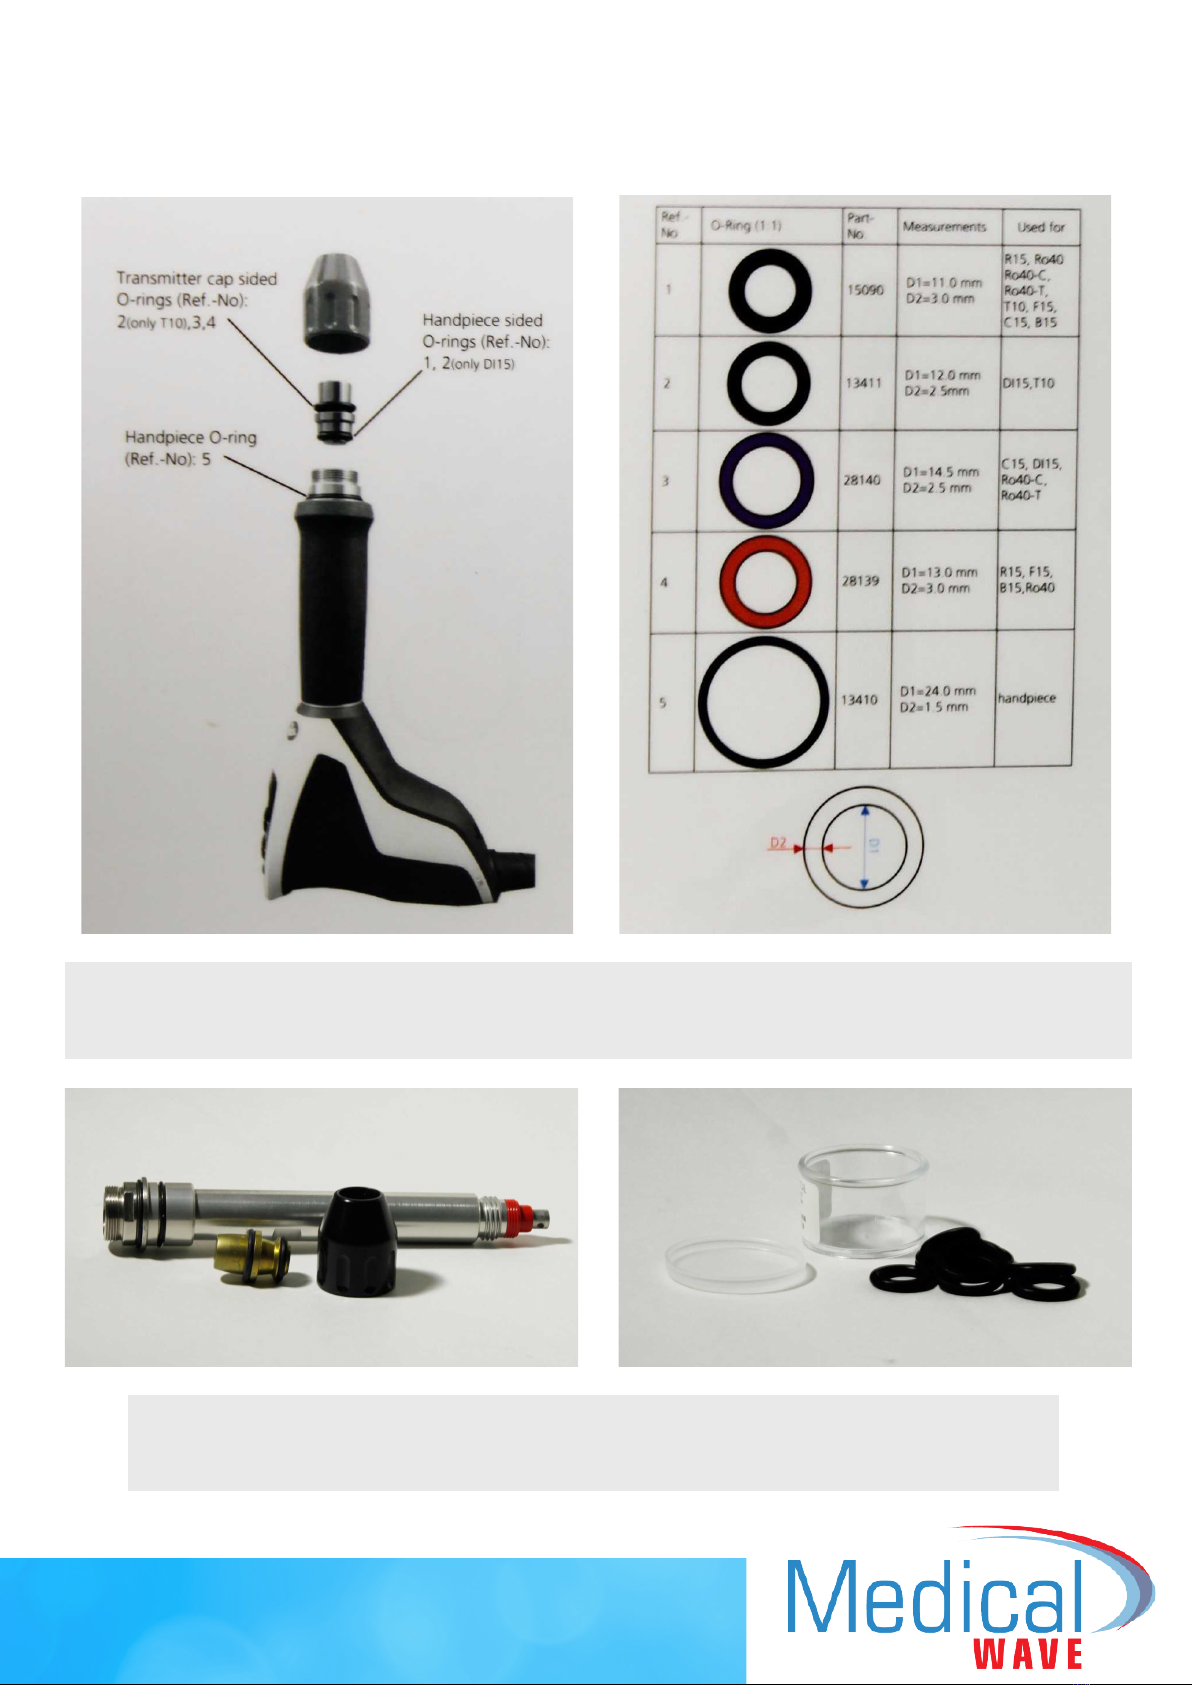
MAINTENANCE - ORINGS
VERY IMPORTANT : It is extremely important that the O Rings on the handpiece
and treatment tips are properly in place and in accordance with this picture.
VERY IMPORTANT : There is an extra supply of O rings in the plastic
canister in your handpiece box. Please do not misplace these.
MAINTENANCE - ORINGS CHANGING GUIDE
TUBE & BULLET
(a) Disconnect handpiece
from device.
(b) Remove treatment tip
from handpiece.
(c)
Using the wrench provided
unscrew the shaft assembly
from the handpiece
and pull out.
(d)
Pull the tightly tting
guide tube out of the
shaft assembly using the
Allen Wrench provided.
(e)
Clap handpiece in cupped
palm of hand to remove
bullet from handpiece magnet.
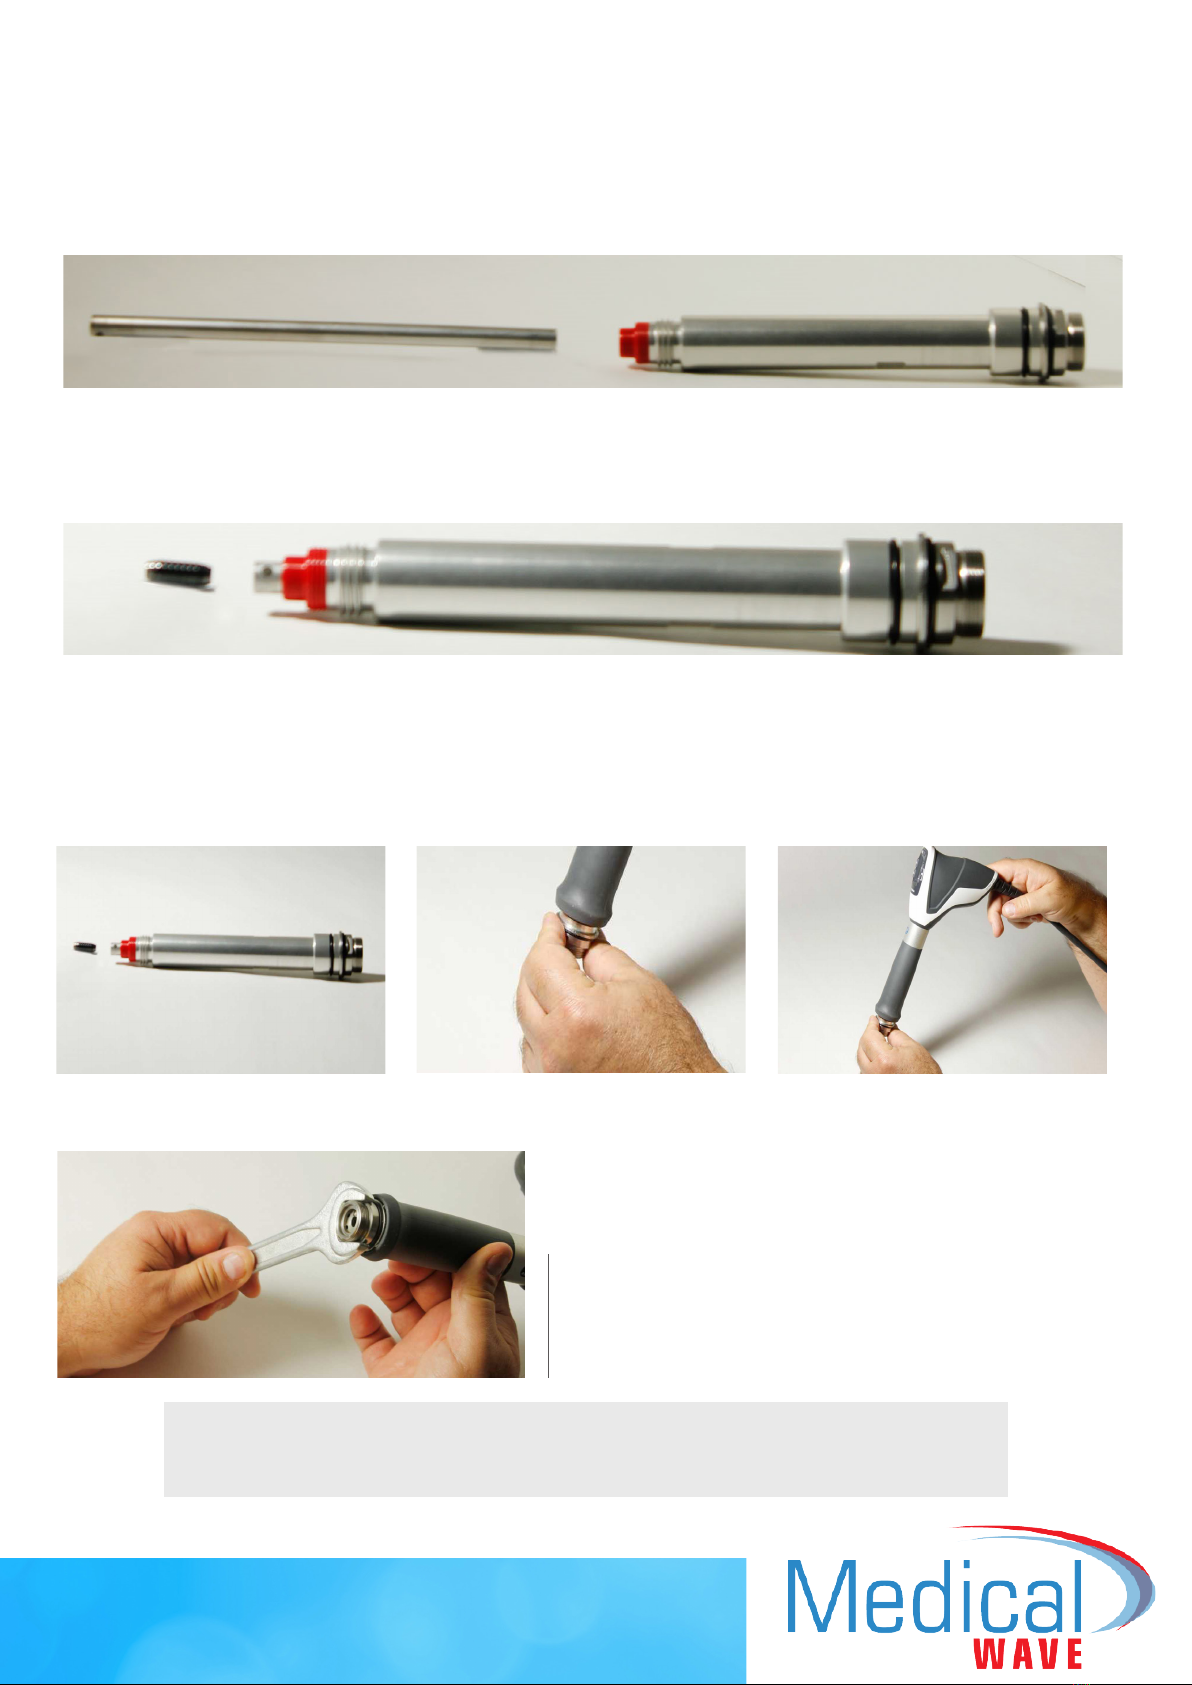
CHANGING GUIDE
TUBE & BULLET (cont)
(f) Install new guide tube into shaft assembly and make sure it’s all the way “in”.
Make sure the end of the guide tube where the two air slots are located is in the direction of the handpiece handle.
VERY IMPORTANT: Put back together and be sure
all parts are rmly in place before ring handpiece.
(h)
Finish tightening shaft assembly to
handpiece with wrench provided.
Bullet in shaft Finger Tight Pointing at the oor
(g) Place bullet back into guide tube. Thread by hand (nger tight) into handpiece
with handpiece pointing towards oor to prevent the bullet from falling out and
getting in the way of tightening the shaft assembly to the handpiece.
TROUBLESHOOTING
CHANGING GUIDE
TUBE & BULLET (cont) TROUBLESHOOTING
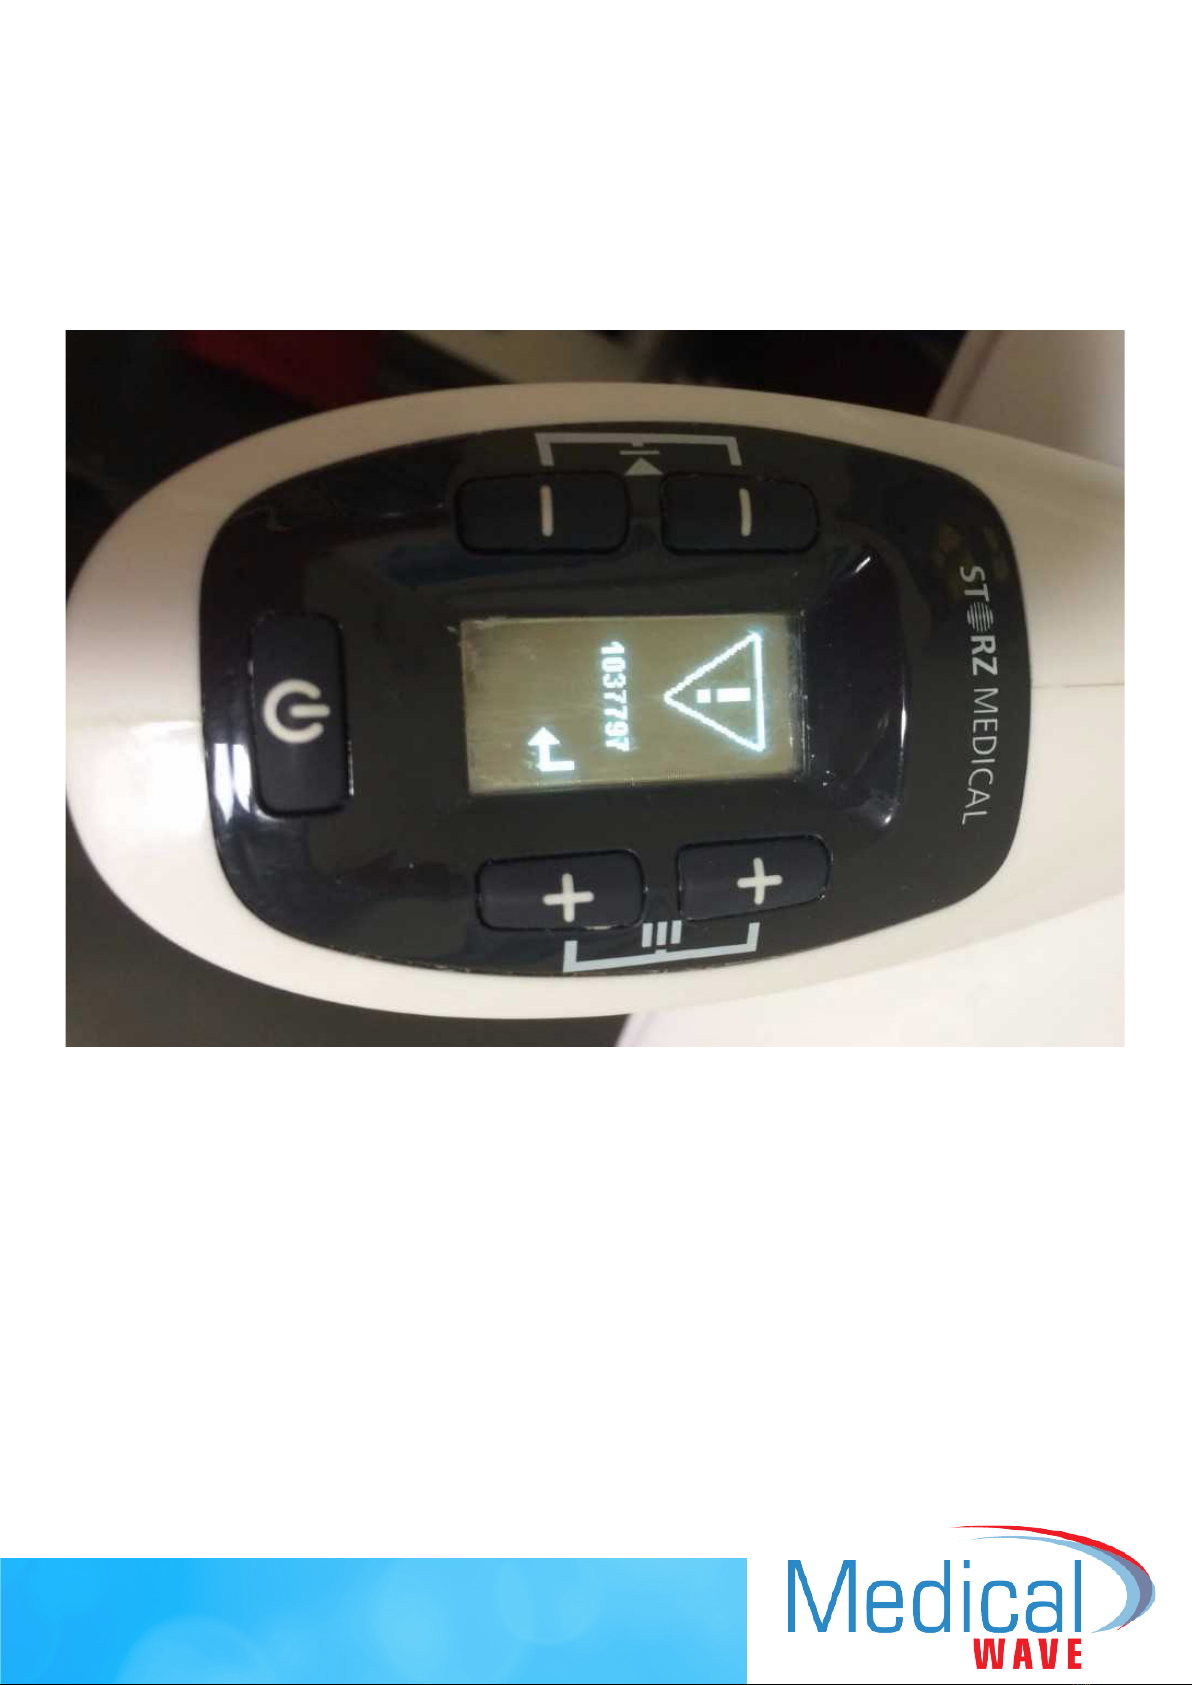
Handpiece Warning Indicator
Follow these instructions:
1. Press both + buttons simultaneously to change to the Main Menu.
2. Press the upper + button until Main Menu I (Info) appears.
3. Press the lower + button to select.
4. Under Info Point 1 in the menu information, the pulse count is displayed.
5. Press lower + button (pulse count is now highlighted).
6. Press simultaneously the upper and lower – button to reset the pulse counter.
7. To leave the Main Menu, press the lower – button 3 times.
TROUBLESHOOTING (cont)
Gun Counting, Not Firing
Handpiece Sounds Like it is Skipping When Firing
VERY IMPORTANT: If the gun is counting but not ring, this most likely
is a result of the bullet being stuck at the end of the shaft assembly.
Follow these instructions:
1. Push bullet back into shaft.
2. Make sure the O Rings are in place as per the O Ring instructions.
3. Make sure the treatment tip is rmly threaded into handpiece.
4. Make sure there is adequate pressure applied before ring handpiece.
5. Never re the handpiece without proper counter pressure.
This sometime occurs when the shaft and bullet need cleaning.
(See cleaning instructions). If this problem persists, it may be
time to change your guide tube & bullet.
DO’s & DONT’s

DO’s & DONT’s
• DO use the handpiece primarily with adequate
tip pressure. This will insure that it operates properly.
There is a chance the bullet will get stuck without proper
pressure applied.
• DO clean your guide tube & bullet at least once
per week to prolong the useful life of these parts. The
replacement kit costs $550 per guide tube/bullet.
• DO contact Medical Wave if you have questions
(800) 595-0577 or email info@medicalwaveus.com.
• DON’T ever kink the air hose.
• DON’T ever re handpiece without treatment tip
on device.
• DON’T use anything other than alcohol to clean
the guide tube & bullet.

D-ACTOR 100 Ultra
QUICK REFRENCE GUIDE
SET UP & TROUBLE SHOOTING
Table of contents
Popular Medical Equipment manuals by other brands


Seca
Seca mVSA 535 Instructions for use

Welch Allyn
Welch Allyn Spot Vision Screener VS100 Directions for use

Pronk Technologies
Pronk Technologies SimSlim SL-8 Operator's manual

SORIN GROUP
SORIN GROUP dideco kids d101 Instructions for use

Renovia
Renovia leva manual

Dittmann
Dittmann RGT 284 instruction manual