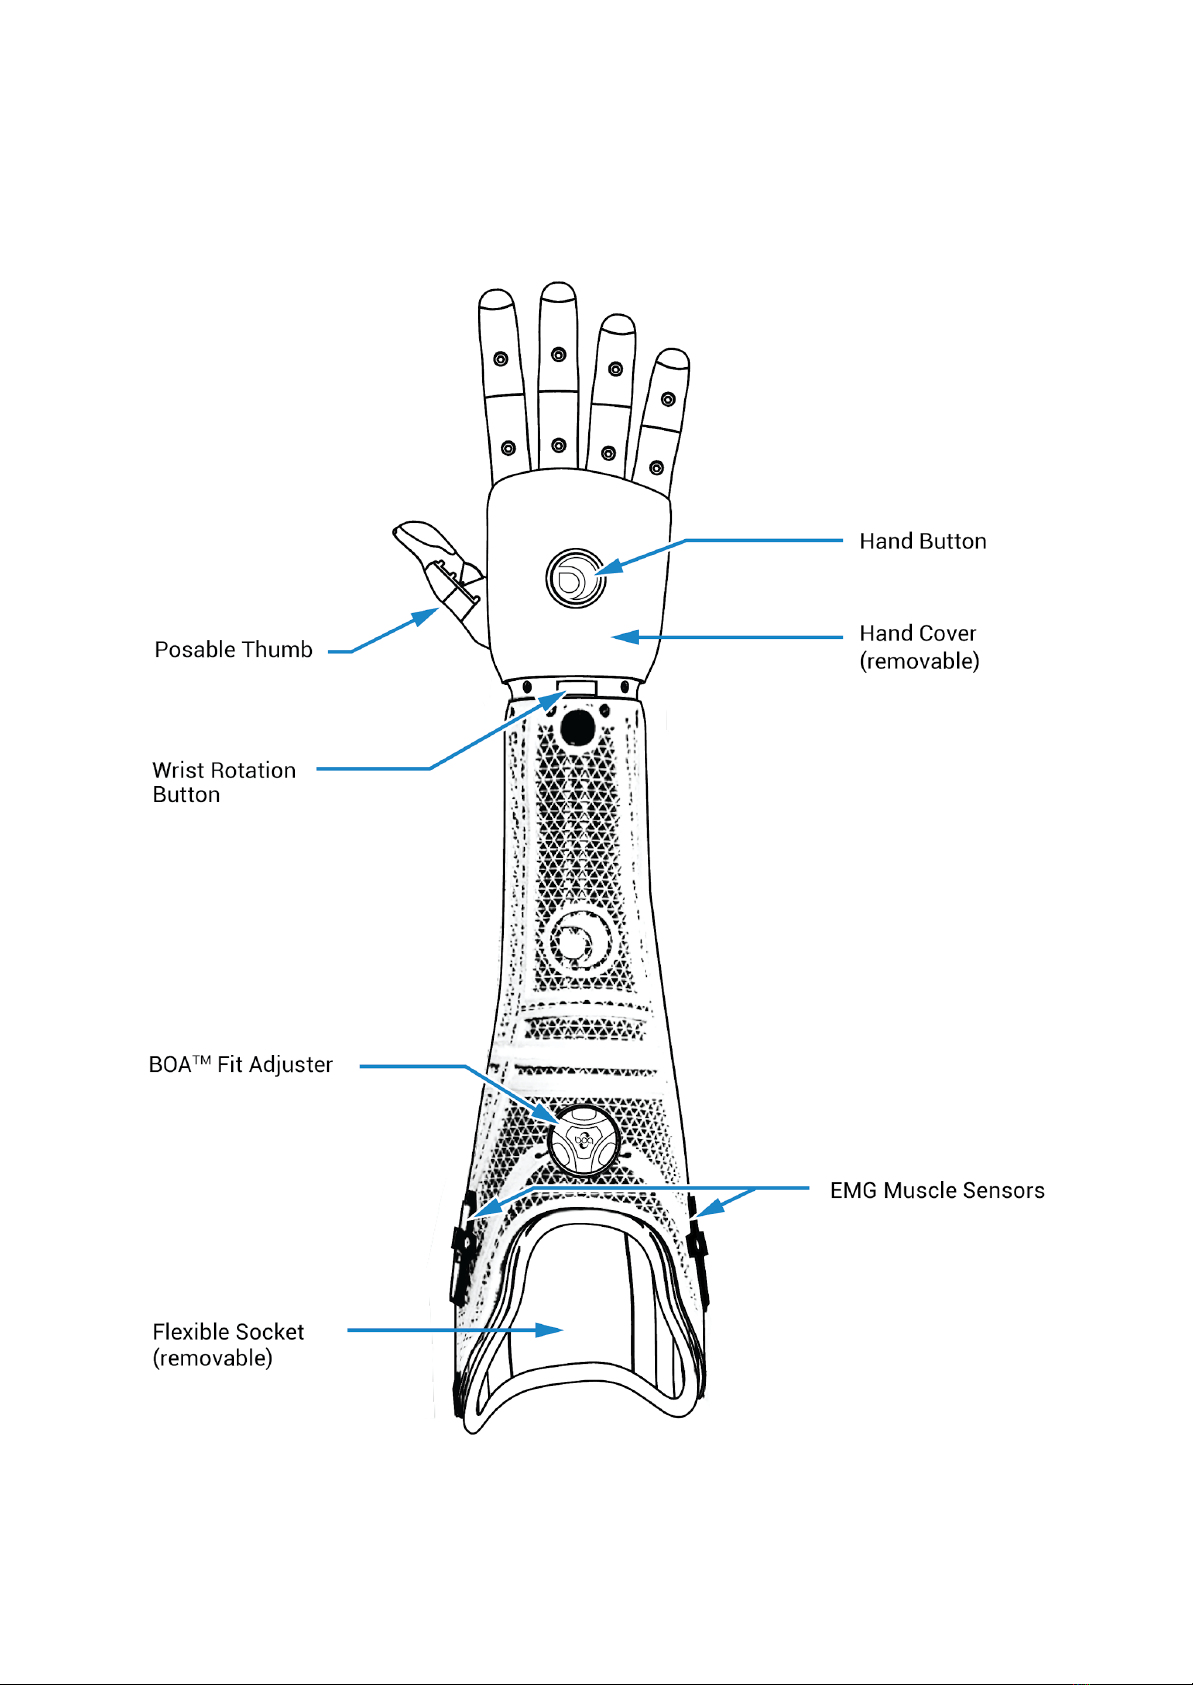
Open Bionics Hero Arm User manual

HERO ARM
User Manual
Version 6.0

Contents
Contents 2
Introduction 1
Hero Arm Overview 2
What’s in the Box 3
Configurations 3
Getting Started 5
When to Use Your Hero Arm 5
Putting on your Hero Arm 6
Switching on 6
Charging the Battery 7
Checking the Battery Status 8
How to use your Hero Arm 8
The Hand Button 8
Notifications/Status 9
Controlling the Hand 10
Speed Control 10
Controlling the Hand - Single Site Users Only 11
Grip Modes 13
Changing Grips 13
Group 1 - Fist and Hook 14
Fist 14
Hook 14
Group 2 - Tripod 15
Tripod A 15
Tripod B 15
Group 3 - Pinch 16
Pinch A 16
Pinch B 16
Freeze Mode 17
Wrist Rotation 17
Thumb Flexion 18
Calibration 19
Covers 20
Looking after your Hero Arm 22

Safety 22
Storage 22
Maintenance 22
Cleaning 23
Growing out of your Hero Arm 24
Troubleshooting 26
Battery 27
How to Store the Battery 27
Battery Life 27
Disposal 28
Safety 28
Warranty & Returns 29
Warnings 30
Regulatory Compliance 31
Symbols 32
CE mark 32
Caution 32
Manufacturer (adjacent to company name) 32
Refer to instruction manual 32
Wheelie Bin (WEEE) mark 32
Type BF Applied Part 32
Class II Equipment 32
Rechargeable battery 33
Serial Number 33
Date of Manufacture 33
Use-by-date 33

Introduction
Hero Arm is a powered bionic limb controlled by your muscles, with intuitive lifelike
precision. Each Hero Arm is bespoke, perfectly formed just for you, with a breathable
removable socket for enhanced ventilation and ease of cleaning. Powered by
high-performance motors, advanced software and long-lasting batteries, it is
lightweight and stylish.
This manual will give you an overview of how to use and look after your Hero Arm,
and the important safety considerations to take.
To search for a specific word or phrase, hit Ctrl + F (on Windows) or ⌘Cmd + F (on
Mac).
1

Hero Arm Overview
Note: Your Hero Arm may look slightly different from the version pictured.
2

What’s in the Box
1 x Hero Arm
1 x Battery
1 x Battery Charger
1 x Quick Start Guide
1 x Hand Cover
1 x Battery Cover
Configurations
Each Hero Arm is custom built for every individual, and comes in 3 different hand
sizes and 2 different arm layouts. As a result, you may see some differences
between your Hero Arm and the diagrams in this manual.
The Hero Arm comes with either a 3 Motor or 4 Motor Hand depending on the most
suitable size of hand for your arm. The key differences are the reduced size of the 3
Motor version, and the number of tendons.
The 4 Motor versions have 2 tendons on both the index & middle fingers, which
allows them to move independently. On the 3 Motor version, the index & middle
fingers will always move together.
3

Every socket is designed and 3D printed for each individual based on a 3D scan of
their residual limb, and comes in two different layouts: internal or external battery.
The functionality of both layouts are the same, but they have some noticeable
cosmetic differences as shown below:
4

Getting Started
Before putting on your Hero Arm for the first time, please familiarise yourself with
this user manual.
When to Use Your Hero Arm
The Hero Arm is intended to be used for day to day activities that require the use of
one or two hands. It is intended to be used for light to moderate activities such as:
●Holding objects such as cups, tools, kitchen utensils, trays, bottles, bags
●Performing operations such as opening doors, pressing buttons, getting
dressed.
The Hero Arm is not intended for use in activities that may result in injury or death to
the user or others as a result of it failing to perform the activity as intended. As such,
activities which are specifically prohibited include:
●Driving any form of motor vehicle, aircraft or boat,
●the use of firearms, or
●use while partaking in contact sports, watersports or extreme sports.
For all other activities, you should assess the impact of the following:
●The Hero Arm suddenly ceasing to function (for example if it were to run out
of battery). Bear in mind that this could leave the device unable to release.
●The Hero Arm losing its grip.
●The Hero Arm moving unintentionally.
●The Hero Arm shifting position on, or coming off your arm.
If the consequence of using the Hero Arm for any of the above activities is injury or
death to yourself or anyone else, the Hero Arm must not be used. In the case of
using the Hero Arm to return to work, you should discuss the above points with your
Health and Safety representative and conduct a formal risk assessment.
You can use your Hero arm above -5 °C (23 °F) and below +50 °C (122 °F). You can
use it at pressures equivalent to altitudes of up to 4000 m (16,400 ft, that’s 600 hPa
to be exact), making it safe to use in the cabin of a commercial airliner. Your Hero
arm is IP20 rated. IP is “Ingress Protection” the first number is a score for solids and
dust, the second is for liquids. IP20 means finger-sized objects and larger can't get
inside it is not waterproof. You should avoid exposing it to any water.If your Hero
Arm does get wet, turn it off, remove the battery and leave it to dry fully. It can be
used in Relative Humidities (RH) between 15% and 90%.
5

Putting on your Hero Arm
Your Hero Arm has been designed to perfectly fit your arm, and comes with an
adjustable BOA Fit System™ to reach the perfect balance of comfort and secure fit.
You can easily adjust the fit of your Hero Arm throughout the day without removing it,
simply by adjusting the BOA Dial.
Switching on
To switch on your Hero Arm, press the Hand Button for 1 second. The Hand Button
will pulse purple while initialising. Once the arm is on and ready to use, the Hand
Button pulses white.
6

Charging the Battery
Your Hero Arm comes with a battery and Smart Charger. The battery life of your arm
will vary depending on how heavily you use it, but we recommend charging it every
night.
You must remove the battery from the arm before charging. For safety reasons, only
ever charge your battery using the Smart Charger provided with your arm.
Follow the steps below to charge your Hero Arm battery:
1. Switch off your arm by holding down the Hand Button for 3 seconds
2. Once switched off, remove the battery cover and unplug the battery, by
pressing the latch and pulling on the white connector
3. Remove the battery from the arm by gently pulling on it
4. Plug the battery into the supplied Smart Charger
5. Plug the charger into a mains power outlet
6. The status Hand Button of the Smart Charger will flash to indicate that the
battery is charging
7. When the battery is fully charged, the status Hand Button will stop flashing
8. You can now disconnect the battery from the Smart Charger and reconnect it
to your Hero Arm
7

Checking the Battery Status
To check the status of the battery, with your Hero Arm switched on, hold the Hand
Button down for 1 second. The battery life is indicated by the colour of the Hand
Button:
How to use your Hero Arm
The Hand Button
The multi-function button on the back of the hand can be used to control a variety of
functions of your Hero Arm:
●Hand On/Off
○To switch on your Hero Arm, press the button for 1 second.
○To switch off your Hero Arm, press the button for 3 seconds.
●Change Grip Group
○Your Hero Arm has multiple grip groups; to change between these,
press the Hand Button for 0.5s. See ‘Grip Modes’ for more information
on grips.
●Check Battery Status
○Press the Hand Button for 1s, and its colour will change to indicate the
battery level.
8

Notifications/Status
The Hero Arm will notify you of a variety of status changes through the Hand Button
colour, vibration, and beeper. These are summarised below (in addition to the battery
level indicators listed in ‘Checking the Battery Status’):
9

Controlling the Hand
The Hero Arm comes with an advanced myoelectric, multigrip bionic hand. The EMG
Sensors in the arm detect your muscle movements, and the hand responds for
intuitive control. When being fitted for your Hero Arm, your prosthetist will have
found the optimal location of the EMG Sensors for your muscles.
As standard, the Hero Arm uses two EMG muscle sensors to control the
hand. However, if you only have one suitable muscle site on your residual
limb, your Hero Arm may only use a single EMG sensor. If this is the case,
the way you control the arm will be different. The control scheme for
single-site users is outlined in Controlling the Hand - Single Site Users.
The bionic hand is controlled by tensing the same muscles which are used to open
and close a biological hand. To close the Hero Arm’s hand, and perform the selected
grip, imagine flexing the wrist inwards while pulling the fingers into the heel of the
hand.
To open the hand, imagine extending the wrist with an outstretched palm.
If you are having trouble getting the hand to respond to your muscle movements,
please see the Troubleshooting section on pages 24-25.
Speed Control
The hand will move more slowly when your muscles are tensed gently, and will move
more quickly with a firmer tense. This control can be useful for manipulating small or
delicate objects.
10

The information on the following two pages (p11-12) only applies to users
with a single muscle site. For the vast majority of Hero Arm users (with two
muscle sites) the information in Controlling the Hand applies instead.
Controlling the Hand - Single Site Users Only
When you tense the muscles under your sensor, the Hero Arm swaps between
opening, then closing the fingers.
If you tense, the fingers will begin by closing.
If you relax and wait for 1 second, the hand will swap to be ready to open on your
next signal. It will indicate this by flashing blue and vibrating. Tensing now will cause
the fingers to open. Relaxing again will cause the hand to swap back to be ready to
close the fingers.
By alternating backwards and forwards like this, you can pick up and put down
objects.
11

The length of the vibration you receive when the hand changes direction provides
non-visual feedback about which direction it will go:
- Shorter pulses mean it has swapped to open next.
- Longer pulses mean it will close next.
When picking up small objects, it’s useful to pre-position the fingers so that they’re
spread just a little bit wider than the object. To do this, choose the grip you want, fully
close the fingers, then open them so that they are slightly wider apart than the
object. The hand will then be ready to close around the object.
Tensing harder causes the fingers to move faster, and tensing softer moves them
more slowly.
Do not attempt to tighten your grip on an object you are holding.
After picking it up, the hand will swap direction to opening, so your next
muscle tense will release it.
To tighten your grip on an object you must put it down (or otherwise
support it), release it with your Hero Arm, then re-grip it from scratch.
12

Grip Modes
The Hero Hand has 4 different grip patterns in the 3 motor version, and 6 different
grips in the 4 motor version. These grips are grouped together in pairs to make
switching between them quick and easy.
Changing Grips
To switch between grips within a group, move the hand into the open position, relax,
then hold an open signal for more than a second (see Controlling the Hand).
You will feel a long vibration, and the Hand Button will flash green a number of times
to indicate which grip number you have selected; 1 flash for the 1st grip in the group,
and 2 flashes for the 2nd grip in the group.
To switch between the different groups, press and release the Hand Button.
You will feel a short vibration, and the Hand Button will flash purple a number of
times to indicate which group number you have selected - i.e. 1 flash for group 1, 2
flashes for group 2.
The various grips are described in the following pages.
13

Group 1 - Fist and Hook
The primary group contains the Fist and Hook grips:
Fist
This grip is useful for carrying round objects such as bottles or fruit, for holding
utensils and handles, and can also be used for handshakes. First, the thumb closes,
followed by all 4 fingers.
Hook
Similar to the Fist grip, however the thumb remains open while the four fingers close.
This is ideal for carrying a shopping bag or briefcase, and also allows you to do a
“thumbs up” gesture.
14

Group 2 - Tripod
The secondary group contains two Tripod Grips. These are useful for picking up and
manipulating small objects, such as car keys, coins, jar lids, pens etc.
Tripod A
The middle and index fingers close to meet the thumb. The ring and little fingers
remain open.
Tripod B
The ring and little fingers close when selecting this grip, and when sending the close
signal, the index and middle fingers then close to meet the thumb. You can make a
“peace” hand signal with this grip.
15

Group 3 - Pinch
The final group, only available on the 4 Motor versions of the hand, contains two
Pinch Grips. The Pinch Grips are useful for manipulating small objects or picking
things up off a table such as a coin or pen. The pinch grips work with the thumb
knuckle in both the closed and open positions - if you’re finding it difficult to pick up a
small object, try moving the thumb knuckle (see Thumb Flexion on page 18).
Pinch A
The index finger closes to meet the thumb, all other fingers remain open. You can
make an “A-OK” hand sign with this grip.
Pinch B
When selecting this grip, the middle, ring and little fingers will close, and when
sending the close signal the index finger will then close to meet the thumb. You can
use this grip to point, or do a “come here” gesture.
16

Freeze Mode
Freeze Mode can be used with any of the grip patterns to temporarily freeze the
position of the hand and disable the muscle control - this allows you to set a grip
position without worrying about accidentally sending a muscle signal and releasing
your grip. To activate Freeze Mode, hold down the Hand Button for 1 second whilst
tensing the ‘Close’ muscles - the Hand Button will change to light blue (aqua) and
there will be a vibration to indicate Freeze Mode has been activated. Freeze Mode
will remain active until you disable it by pressing the Hand Button.
Wrist Rotation
You can adjust the rotation of the wrist through 180°. To do this, depress the Wrist
Button at the base of the wrist (on the back of the hand), and rotate to the desired
angle. Release the button to lock the wrist in the new position. The wrist can be
locked at any angle within the range of the rotation.
17
Table of contents