MEDIKOKIM SAFEBELT User manual

SAFEBELT®
Patient Safety Belt
Steel Lock Series Waist Roll Belt
User Manual

2 3
SAFEBELT®
Steel Lock Waist Roll Belt User Manual
SAFEBELT®
Steel Lock Waist Roll Belt User Manual
General Information
SAFEBELT®
Patient Safety Belt
Steel Lock Waist Roll Belt
User Manual
Page 3 | General Information
Page 3 | General Warnings
Usage
Page 4 | Locking the steel pin and unlocking it via magnetic key
Page 4 | Applying the belt
Page 5 | Extending the length of the Waist Roll Belt
Page 5 | Special Warnings
Page 6 | Using the Waist Roll Belt along with the Crotch Restraint
Page 7 | Using the Waist Roll Belt along with the Shoulder Restraint
Page 8 | Using the Waist Roll Belt along with the Multi-Purpose Extension Belt
Page 8 | Product Hygiene and Life
• Safebelt Waist Roll Belt safely fixates the
patient to the bed. However, thanks to its
mechanism in the waist area it allows the
patient to comfortably turn right and left.
• It comes in two different sizes, namely
small-medium and large.
• The small- medium size is for thin and
average built bodies, the large size is for
wider built bodies.
• Standard Accessories: Lock made of plastic
button and steel pin and magnetic key.
• Optional Accessories: Extension Belt,
Crotch Support Band, Shoulder Safety Belt
General Warnings
1 The patient’s safety and comfort are
dependent on the correct use and
assembly of the product. Read the usage
instruction thoroughly before applying for
the safety of the patient, do not use the
product without reading the manual.
2 Damaged goods pose risk to the user and
cause discomfort for the patient. Therefore
check if the products are damaged or
faulty before using. Do not use damaged
or torn products.
3 Time is crucial in crisis. The success in
applying the product during crisis depends
on the resisting strength of the patient, the
experience and number of applying
personnel. Therefor absolutely try the
products (on a bed and a chair etc.)
assemble and disassemble to gain
experience before applying it on the
patient.
4 Check beforehand that the key and lock
fit each other and that the lock can be
safely locked and can be unlocked
comfortably and fast by the magnetic key.
5 Keep the key in easily accessible spots,
do not forget its location. Do not hesitate
to cut the belt in emergency situations
where you cannot reach the key.
6 Use at most 4 layers of materials on top
of each other for the safety of the locking.
7 As these kinds of limitations can disturb
the patient, periodically watch and check
on the patient using the belts. Do not
leave them alone by themselves for long
periods of time.
8 Keep in mind that extended periods of
immobility can lead to muscle atrophy
and blood clotting.
9 Make sure that the products do not block
breathing or blood flow.
10 Our products are manufactured from
antiallergic and soft materials. However,
make sure it does no harm the skin in
extended uses or on patients with
sensitive skin.
11 Remove all items that can cause the
patient to be hurt during usage (jewellery,
watch, glasses etc.)
12 Always use original lock, pin, key and
spare parts with Medikokim Safebelt®
products.

4 5
Special Warnings
Image 6 Image 7
Image 8
Image 9
Image 1
Image 2
Image 3
Image 4
Image 5
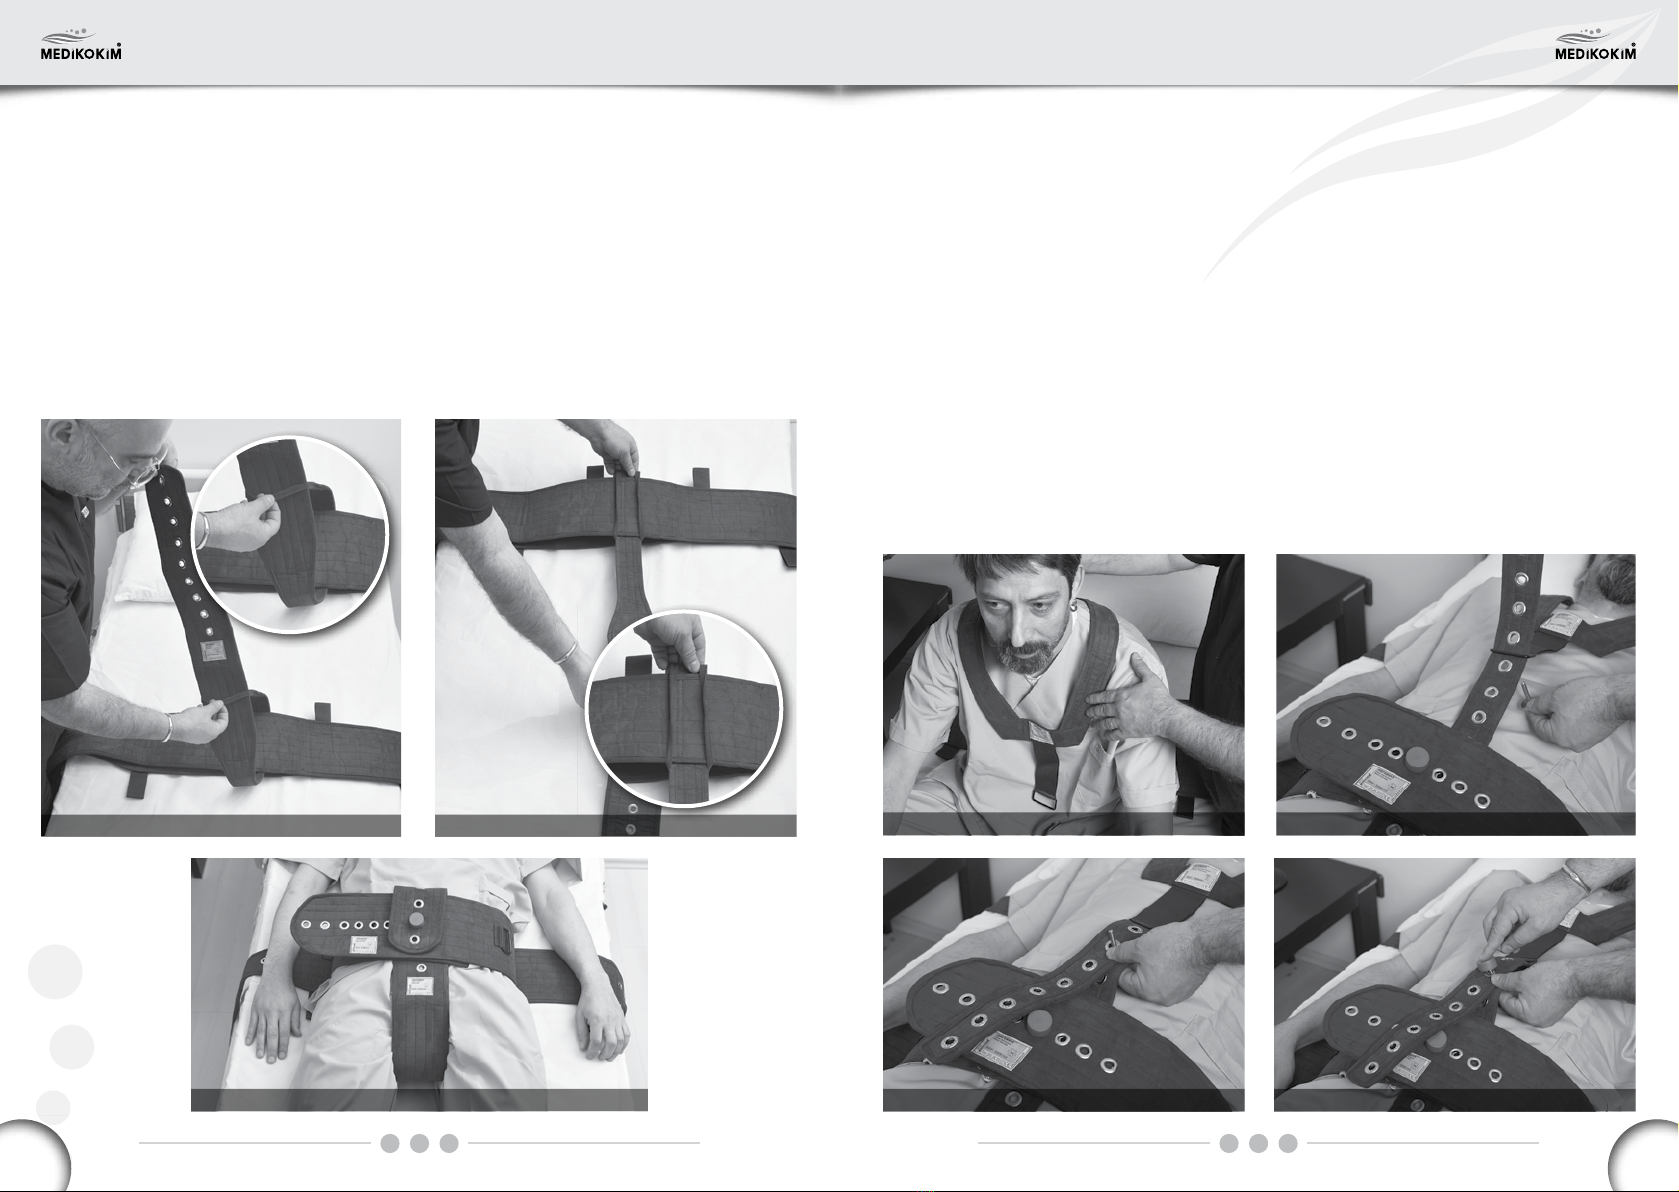
Locking the steel pin lock and unlocking
it with magnetic key
Locking: The steel pin is passed and
pushed through the red lock button and is
locked after it is set in place. A slight click
is heard from the lock cover and the pin
does not leave the button when retracted.
Unlocking: The metal surface of the
magnetic key is contacted with the upper
surface of the red lock button and at the
same time the steel pin is turned and
retracted opening the lock.
Applying the belt
1 Lay the belt on the bed in a way that it is
in line with the waist considering the
height of the patient and where their
heads will be (See. Image 1)
2 Keep in mind when laying the part that
will be wrapped around the waist needs
to be on top. (See. Image 2)
3 Pass both ends of the belt (in a way it is
stretched) through the sides of the
bedstead in a way that it will not slip out.
Bring them on top of each other by folding
them backwards, pass the steel lock pins
through the two corresponding holes
(aligned) and place them in the plastic
button part and lock it. (See. Images 3, 4 and 5)
4 Check if the belt is straight, parallel with
the short side of the bed stretched and
tied tightly to both sides of the bed.
5 Lay the patient on the belt, wrap the
belt around the patient’s waist tight
enough for them not to slip out. First pass
the steel lock pin through the matching
hole in the protective pockets on the
bottom part of the belt (See. Image 6),
then pass the pin through the matching
hole on the belt and lock it by setting the
lock’s red plastic button on the pin.
(See. Image 7).
1 Check if the belt hurts the breathing or
blood flow of the patient. (See. Image 9)
2 Never use the Waist Belt on the chest
(rib cage)
3 Make sure that the belt is tied to the
moving part of the bedstead in relation to
the patient and that in a possible change
of position of the bedstead the belt will
not tighten and hurt the patient.
It can be necessary to extend the belt for
very largely built or fat patients.
For this; attach the special Waist Belt
Extension part on the upper end of the
belt’s wrapped part, again via steel key.
(See. Image 8)
SAFEBELT®
Steel Lock Waist Roll Belt User Manual
SAFEBELT®
Steel Lock Waist Roll Belt User Manual
Usage
Extending the length of the Waist Roll Belt
6 7
Image 10 Image 11 Image 13 Image 14
Image 12 Image 15 Image 16
1 The Waist Roll Belt is used along with the
Crotch Restraint to prevent the movement
of patients who push themselves down to
release themselves from the belt.
2 For this; the narrow end of the Crotch
Restraint (the end with the circle shaped
extension) is aligned exactly in the middle
of the waist belt and is passed between
the top and bottom parts. Later pass the
wider section of the Belt through the circle
pull it all the way and fixate the crotch belt
on the waist belt (See. Images 10 and 11)
3 Bring the crotch belt forward on top of the
waist belt, by passing it in between the
patient’s legs from behind. After checking
whether it is tight enough fixate it on the
waist belt via steel lock. (See. Image 12)
(Position where the patient slipping out of the belt by sliding up is desired to be prevented
and/or when the patient’s body needs to be fixated on the bed).
1 The Waist Roll Belt is used along with the
Shoulder Restraint to prevent the
movement of patients who push
themselves up to release themselves from
the belt.
2 Pass the Shoulder Restraint over the
shoulders of the patient in a way that the
short part is in front. (See. Image 13)
3 Bring the longer part forward by passing it
between the legs of the patient from
behind and attach it to the shorter piece
via steel lock. (See. Image 14)
4 If the patient’s shoulders need to be
fixated on the bed, then the Multi-Purpose
Extension Belt is laid in a way that it is
aligned with the shoulders and is stretched
and fixated on both sides of the bedstead.
5 Then place the Shoulder Restraint on the
patient’s shoulder, pass the longer piece
of the belt beneath the laid extension belt.
Later bring it forward by passing it
between the patient’s legs from behind
and attach it to the shorter end via steel
lock. (See. Images 15 and 16)
6 The Crotch Restraint is not necessary
when the Shoulder Safety Belt is used.
(Position where the patient slipping out of the belt by sliding down is desired to be prevented.)
SAFEBELT®
Steel Lock Waist Roll Belt User Manual
SAFEBELT®
Steel Lock Waist Roll Belt User Manual
Using Waist Roll Belt along with the Crotch Restraint Using Waist Roll Belt along with the Shoulder Restraint
8
Medikokim Tıbbi Kimyevi Malzeme San. Tic. Ltd. Şti
İkitelli O.S.B. Demirciler Sanayi Sitesi B/7 Blok No:157 Başakşehir PK 34490 İstanbul / TÜRKİYE
Tel: 0212 549 57 78 • Fax: 0212 549 57 79 • E-Posta: [email protected] • www.medikokim.com
1 Remove the lock systems on the belts
before wash.
2 Wash in a washing machine, with cleaning
substances used on personal clothing.
Do not use industrial detergent, chorine or
bleach-like decolourant substances.
3 Water temperature should not exceed
95 °C.
4 In order to prevent the velcro locks getting
fibrous, wash with the velcro locks closed.
5 Do not iron the products.
(Position where fixating the patient’s body on the bed is desired.)
SAFEBELT®
Steel Lock Waist Roll Belt User Manual
Using Waist Roll Belt along with the Multi-Purpose Extension Belt
Product Hygiene and Life
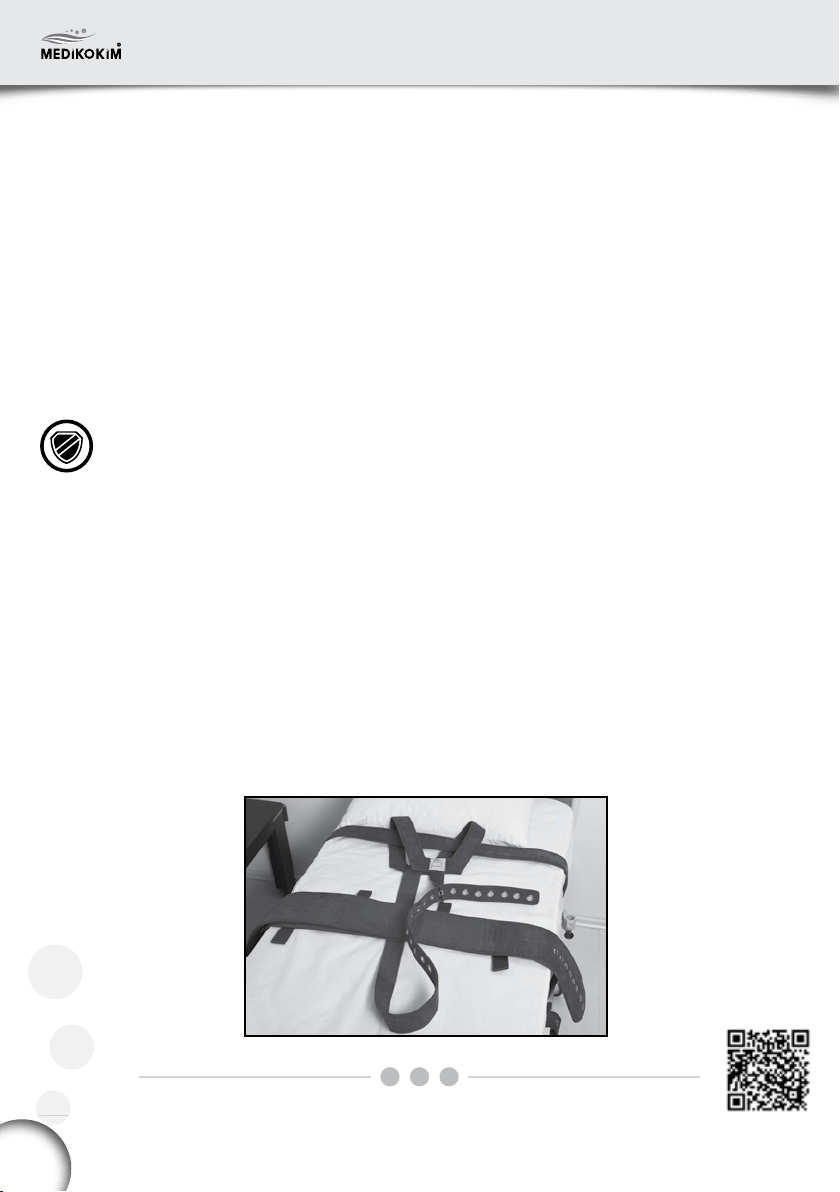
1 In cases where Shoulder Safety Belt is not
used, the body movement of patient who
pushes themselves forward can be
prevented with the Multi-Purpose
Extension Belt.
2 Bring the Multi-Purpose Extension Belt to
the patient’s neck, center it and bring the
ends behind by passing them through the
armpits of the patients (Nelson hold
position)
3 Then fixate the ends of the belt separately
on the head of the bedstead in a tight
manner.
4 The Shoulder Safety Belt is not necessary
when the body is fixated with the
Multi-Purpose Extension Belt.
6 Can be dried in machine dryer or outdoors.
When a machine dryer is used, using low
temperatures extends product life.
7 The tips of the locks are cleaned with
a cotton tipped stick with disinfectants.
8 Do not let water in the locks. Do not use
the locks with water before they dry
thoroughly. Check its safety prior to using.
9 If the velcro locks get fibrous, clean them
mechanically for them to close comfortably.
Table of contents


