Meditech Electronic AUDECOM 10095 User manual

1
Manual for the
System
MediTECH Electronic GmbH
Langer Acker 7
D-30900 Wedemark (Region Hannover)
Phone: +49 (0)5130-97778-0
Fax: +49 (0)5130-97778-22
E-Mail: [email protected]
Internet: www.meditech.de

2
General information
Table of contents
AUDECOM - General Information .................................................3
Device view................................................................................3
Safety instructions..........................................................................4
Installation and commissioning.......................................................6
Select an area............................................................................6
Connecting the AUDECOM .......................................................7
Installing software......................................................................8
Setting and adjustment ................................................................10
Preparing the setting for adjustment........................................10
Before the customer comes................................................10
After the customer arrives ..................................................11
Briefing customers ... ..........................................................12
Performing an adjustment........................................................13
Expanded operating capabilities...................................................14
Create some favourites............................................................15
Expanded operating capabilities..............................................16
Select favourites......................................................................16
Change the manufacturer display............................................17
Private Labels..........................................................................17
Prospects.................................................................................16
Equipment and Support................................................................17
Troubleshooting .......................................................................17
Equipment and Service............................................................18
Clean the AUDECOM..........................................................19
Maintaining and storing the AUDECOM..............................19
AUDECOM nameplate.............................................................19
Technical specifications...........................................................20
Inscription / nameplate power supply..................................22
Scope of delivery.................................................................22
System requirements for the computer....................................22
Program icons and buttons and their meaning.............................23

3
Operating keys
Switchbetween the auditorysystems
Operating LED
Device is
activated?
Display LED:
Indicates which auditory systems are selection
Numbers correspond to the operating keys
Stick-on bolt
for the acoustic shadow
Connection jacks
Connection of the silicone hoses
(Connection of the
auditory systems)
Connection LED
USB connection to
the computer
Device view
AUDECOM - General Information
The AUDECOM offers a comparative auditory system adjustment in an objective/oriented
manner in real time and thereby makes your work more effective and more seamless:
An intelligent, software-supported customer dialogue will guide you through the ad-
justment and toward a quicker decision on the performance class desired by the
customer.
The customer will directly hear the different between up to three hearing aid types. To
do this, it is necessary to switch between the auditory systems by pushing a button
He can thereby decide more clearly what is useful to him and make some clear spe-
cifications to the acoustician.
The customer - AND NOT THE ACOUSTICIAN - changes between the models and
can thereby recognise more quickly which auditory system he really prefers and is
useful to him in his daily routine.
Sound samples are supplied by surround sound and make it possible to implement,
rate and assess qualitative differences in wind noise suppression, verbal reproducti-
on, music reproduction or adjustment characteristics.
With this basis, the customer and the acoustician can usually decide in one sitting
which of the compared systems are actually worn and can best be gradually further
adapted.
General information

4
Safety instructions
The purpose of the AUDECOM is intended to present the differences bet-
ween various systems to the customer live in a convenient, and most im-
portant, comfortable manner, based on sound samples with the comparative
adjustment of auditory systems.
All other purposes of the device and the accompanying controller that do not
meet this purpose are contrary to purpose and are therefore not permitted.
The following safety notices are to be noted when operating the device:
Attention! If you or the person accompanying the user move in the
room, ensure that the headphones are put down or when
the device is removed, the cable length of the headphone
should be taken into account. Disconnection the AUDE-
COM by the headphone cable or yanking on the cable/
headphones must be avoided because damages can
occur.
Attention! Under no circumstances should the AUDECOM come
into contact with ultrasound baths, running water and
chemical cleaners, e.g. diluters, alcohol etc. It could be
damaged or destroyed.
Attention! Do not remove the cable (power, headphones, USB con-
nection) from the device. The cables could be damaged
and the device moved and even pulled off the table. Hold
the device carefully with one hand. Grasp the respective
connectors with the other and carefully remove it from the
device.
Attention! Only use the AUDECOM in dry rooms and protect it -
from wetness and dampness - both when working and in
a deactivated state. You or third parties can be injured.
In addition, the device could be sustainably and heavily
damaged.
Attention! Only use the supplied power supply to operate the de-
vice. It was especially developed for the AUDECOM.
Safety instructions

5
Attention! Under no circumstances should you open the device
housing. You or third parties can be injured. In addition,
the device could be sustainably and heavily damaged.
When the device is opened, all liability and warranty pro-
tections become invalid.
Attention! Only disconnect the deactivated AUDECOM from the
mains supply by pulling the power supply from the so-
cket. First remove the power cable from the device.
Attention! During training, only use the supplemental devices, which
are recommended to you by MediTECH.
Note: Do not lift the base on the support arms for the loudspea-
kers. The system could be damaged.
Note: Use the device and the base made of Plexiglas® Not as
a storage space. Do not put stress on the support arms
Do not bend the arms. Damages to the housing and
the base cannot be repaired and do not fall under the
warranty.
Note: Only use the original packaging in which the device was
supplied for storage or transport. Provide sufficient pro-
tection against vibrations during transport.
Note: Please note the cleaning instructions to avoid damages
to the device and the base.
Note: MediTECH assumes no liability for actions which viola-
te these safety regulations and the instructions in this
document
Please note the Usage Manual before use!
Safety instructions

6
Installation and commissioning
In this chapter, you will learn how to install the AUDECOM and the software
and which test room situation you need to follow.
Select an area
Select a quiet room with as view noises as possible for the adjustment. The
room should allow the following setting:
The room should be large enough so that you or the person accom-
panying the customer can freely move in the room in order to offer
communication from different directions.
Position the device on a table which is as free as possible on all sides.
The customer should only sit in front of the device in such a way that
he can operate the keys comfortably and can see the mini-lamps next
to the auditory systems. They means that he can easily recognise bet-
ween which auditory systems he can toggle and currently hears “in his
ear”. This makes it easier to note his impressions and comments on an
assessment form. He should have sufficient room for this.
You are sitting behind the AUDECOM, i.e. on the side in which the
headphones are connected and their volumes can be adjusted.
On the table, there must be enough room for a monitor and a compu-
ter keyboard with a mouse. The recommended setting is a computer /
laptop with an additional monitor so that you have access to the Expert
view and the customer has access to the Customer view on separate
monitors.
Installation and commissioning

7
Connecting the AUDECOM
The AUDECOM system is designed in such a way that it can always be in-
stalled as an operating unit. Thus, no new installation is generally required.
1. Insert the small USB connector of the supplied power supply into the
socket provided onto the back of the device.
2. Insert the plug of the power supply unit into a regular 230V mains socket.
3. Insert the small USB connector of the supplied USB cable into the
socket provided onto the back of the device.
4. Insert the large USB cable connector into a free USB port on the
computer.
5. If this does not occur, connect the acoustic shadow (Plexiglas® head) to
the bolts on the top of the AUDECOM.
Note: Plexiglas®distorts the visual impression. Get behind the device and
place the acoustic shadow vertically onto the bolts. Please note the
direction: The “nose” of the acoustic shadow must point in your direction,
i.e. to the side to which the headphones were connected and the volume
has to be changed.
6. Equip the auditory system connection jacks each with a
silicone hose - matching the auditory systems which you
will use (HDO or RIC).
7. Activate the five loudspeakers. To do this, push the sli-
der located on each loudspeaker to the ON position. On
the silver back, an LED with the colour meaning indicated
below will be illuminated.
Tip: Hold on to the loudspeaker with one hand
and press the key with the other hand. You
can thereby prevent the loudspeaker from
getting loose from its ground attachment.
Installation and commissioning
Power supply (power connection)
Headphones jack
On/off switch
Headphones-volume adjuster
USB connection socket
Head-
phones
1
LED colour Ready for use Charge
blue x
blue-red x x
red x
black
(LED off)
Head-
phones
2
Head-
phones
3

8
Installing software
This step is only necessary once on the computer which is used
for work with the AUDECOM system.
You must have administrative rights for your computer to install the software.
If you want to use the AUDECOM on a computer on which the operating
systems WINDOWS 8 or WINDOWS 8.1 installed, the USB driver signatures
must be deactivated for the installation. You can find the information forms at
http://www.meditech.de/fileadmin/flyer/Windows8-digitalSignatur.pdf
http://www.meditech.de/fileadmin/flyer/Windows8-1digitalSignatur.pdf
1. Afteryou inserttheCD, theInstallationWizardstarts.
If this wizard does not start automatically, click on
the set-up file Setup.exe in Windows explorer on
the included DVD.
2. Now select the language which should be used du-
ring the installation ofAUDECOM and click on OK to
continue the installation.
3. Gradually follow the instructional steps which the In-
stallation Wizard prescribes to you and confirm them
with Next.
4. In the last step, uncheck Install audio card driver and
startAUDE-COM_Frontend(title:exittheAUDECOM_
Frontend setup wizard).
Now you will find a newAUDECOM folder under “C:\
Programs(x86)\Meditech\“.Afolder called “Driver” is
located here.
5. Perform the set-up from this folder. The computer
will de-install the USB multi-channel-audio device
and require the computer to restart.
6. Restart the computer.
7. Start the installation of the file setup.exe under
C:\Programs(x86)\ Meditech\ again, follow the instructions until setup is
ended and do a restart.
8. Connect the AUDECOM to the computer and start it. Follow the chapter
on how to prepare the setting for adjustment.
Installation and commissioning

9
9. Start the new program USB multi-channel audio device. The blue sym-
bol at the bottom right in the symbol bar). The following
program window will appear.
Installation and commissioning
10. Change the values in the fields marked red here:
System input: 8 CH
Analogue output: 7.1 Loudspeakers
11. Now click with the mouse on the individual elements in the area mar-
ked green here and check whether the link to the device works and the
verbal output is properly delivered and can be heard in the individual
loudspeakers.
12. Click on OK to close the program.
13. Start the AUDECOM program.
14. In the menu select option . The General Settings window opens.
15. Select the devices indicated in each
case and close with window with
OK. This exits software installation.

10
Setting and adjustment
In this chapter you will learn how you can optimally prepare and implement
the session for an auditory system comparison.
Prepare the adjustment as follows:
Prepare the adjustment as follows::
Before the customer arrives ...
1. Start theAUDECOM on the computer. If this is not installed on your com-
puter, follow the steps in the chapter Installing Software.
2. On the start screen, click on the manufacturer logo. You can use its au-
ditory systems for the next comparative adjustment.
3. Switch on the AUDECOM.
To do this, turn the switch on the left (headphone side) to the left.
The operating LED’s are illuminated in blue to display the status.
The computer will attempt to establish a connection to the AUDE-
COM. If it was possible to establish a connection, the connection
LED is illuminated in green.
The loudspeakers automatically increase the volume to the maxi-
mum to always offer a consistent initial output volume. This process
takes approximately 10 seconds so that a volume change is completely
normal during this time.
Tip: In order to save power, you can switch off the loudspeakers if you will
not use them for the foreseeable future. Do not forget to turn off the lou-
dspeaker when you conclude a session with the AUDECOM. In order to
test whether the loudspeakers are connected, please note the following
located on the back:
Setting and adjustment
LED colour Ready for use Charge
blue x
blue-red x x
red x
black
(LED off)
11
After the customer arrives... ...
1. Program the auditory systems in the traditional manner according to the
audiometric measurement results. Here you must follow the setting in-
structions included in the program for the best possible effects! Here use
three auditory systems of only one manufacturer and ensure that you
choose from different quality and price segments: Basic - Middle Class -
High-End.
Alternative: 3standard systemswithanoptimisedsettingaccordingtoauditory
system manufacturer information. Fine adjustment later with the auditory
system according to the AUDECOM selection.
2. Connect the auditory systems to the hoses.
Please use the special position for the auditory
systems for RIC systems.
3. On the main screen, always select the respec-
tive auditory systems which you have con-
nected to the respective connection jacks. Here note the order:
Tip: If the auditory system does not correspond to the correct auditory system
which you connected to the AUDECOM device in terms of colours, you
can change the display colour if the image file for it is provided. Right-click
on the image. An image pull-down in which you can click on the correct
4. Print the assessment form out. To do this, click .
5. Give the following to the customer:
Pen
Assessment form with an appropriate notice: Please always fill
out the form during comparison. Please also note sensitivities,
impressions, positive/negative characteristics of the individual
auditory systems compared to the others. Then you have a good
basis for your decision.
Headphones which are connected to the AUDECOM and ask
him to position them on the correct side.
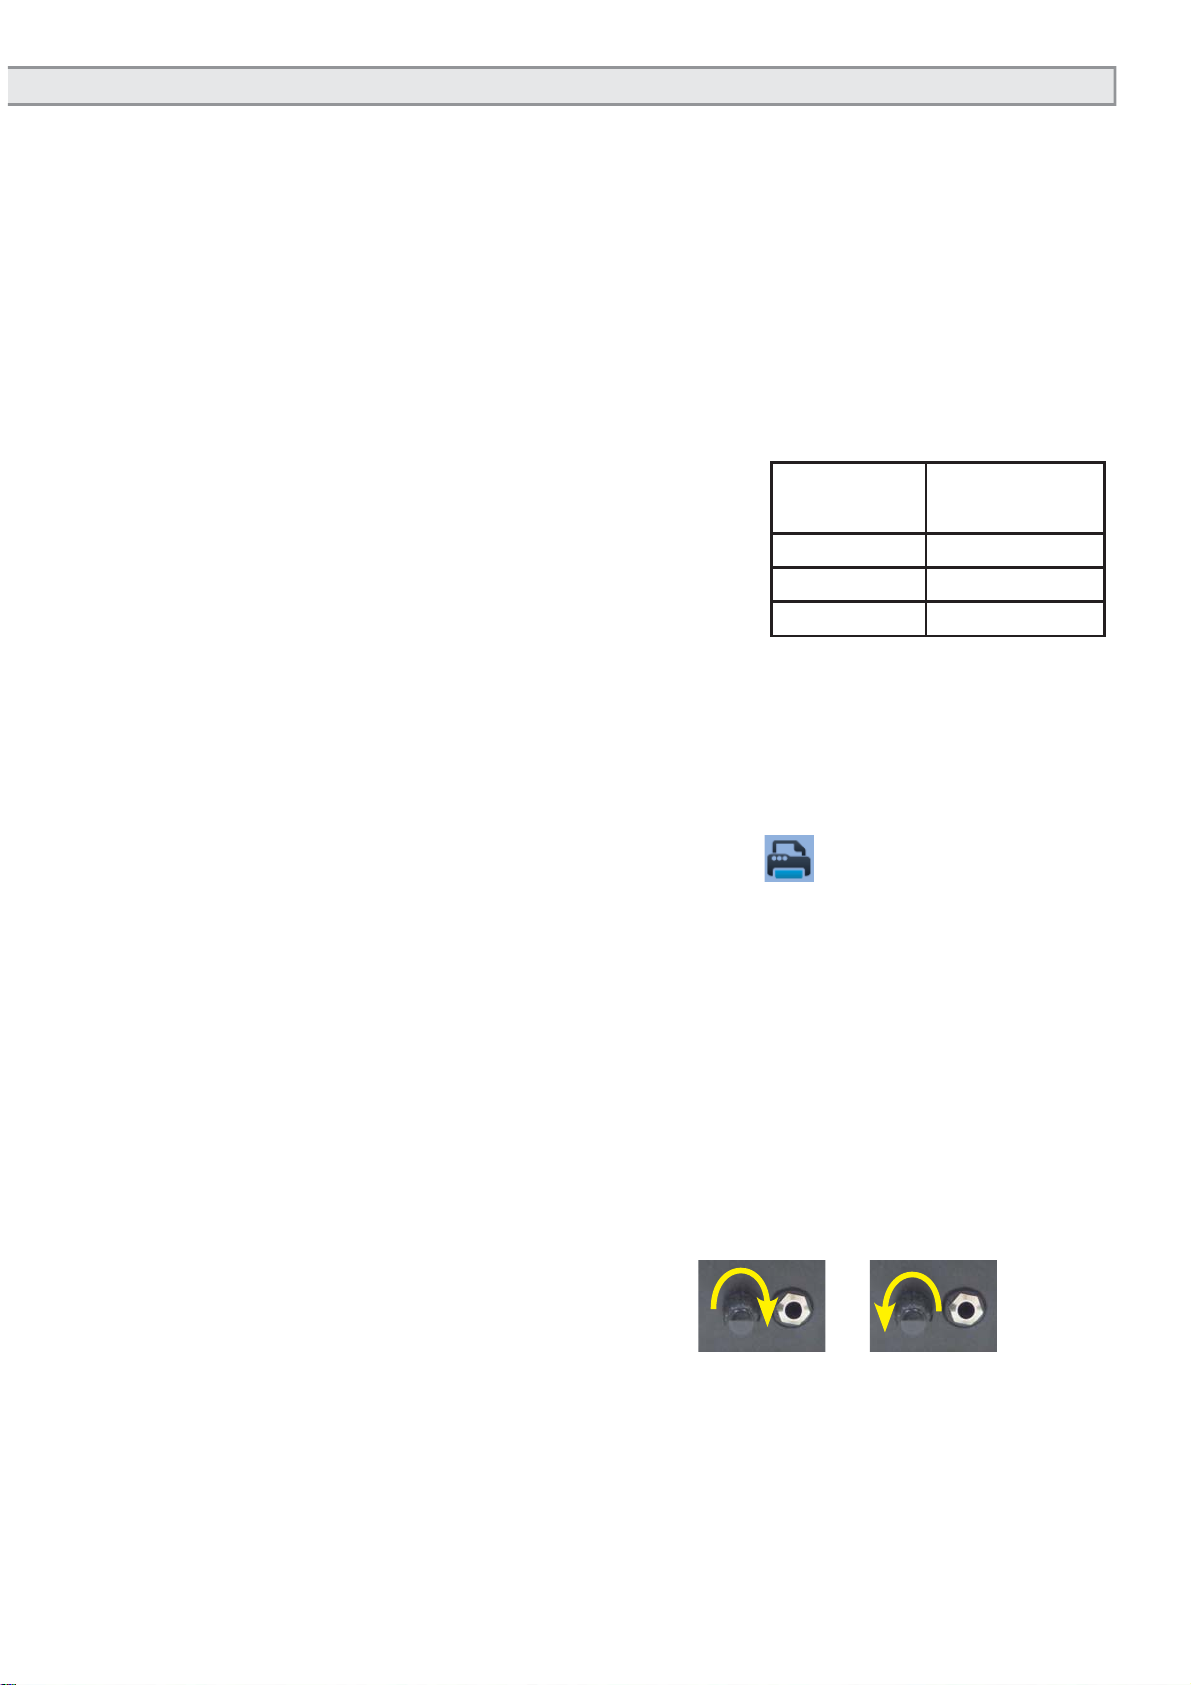
6. Change the volume for the customer as required. Please for contact
the customer for this purpose: Listen clearly and is the volume pleasant
for you? To do this, turn the control knob until the volume is considered
agreeable.
louder: clockwise
quieter: counter-clockwise
7. Repeat this for the person accompanying the customer and for yourself
with other headphones so that the language is clearly audible and under-
standable to all.
Of course, you can always change the volume as needed.
Position on
the device Display in the
software
1 left
2 centre
3 right
Setting and adjustment
louder quieter
12
Briefing customer ...
Before the adjustment, it is important to mention that the hearing impression
for the adjustment would be exactly the same as the customer will have in
the future. The auditory training and the process of becoming accustomed
which follow an adjustments will usually only improve verbal comprehension.
The auditory systems are only roughly adjusted to his needs - fine-tuning
occurs based on device selection.
Rather, the idea behind the process of auditory device comparison with
AUDECOM is to give the customer an impression of the audio quality and the
performancedifferencesof theauditorysystems.Thecomparisonhas the goal
of showing the (added) benefit in the comfort range which the (higher quality)
auditory system will offer in the future. Thus, the customer can assess based
on the differences which auditory system he would like to use and which
system he is willing to purchase:
How does wind noise suppression work?
What benefits does a special adjustment characteristic have?
How is the music and vocal replay in the different performance
classes?
The timeframe and the listener experience/adaptation are required so
that differences in one’s daily routine can be recognised.
“It is important that you can make an assessment based on your
own experience and make a decision on the auditory system most
suitable for you“
Inform the customer that he will be changing between the auditor systems
himself to be able to select in each case which auditory system he would like
to directly compare with which other auditory system and when. It is therefore
a good idea to only toggle after approximately 15 to 20 seconds because the
auditory systems must adjust to the sound situation in order to develop the
full scope of their performance.
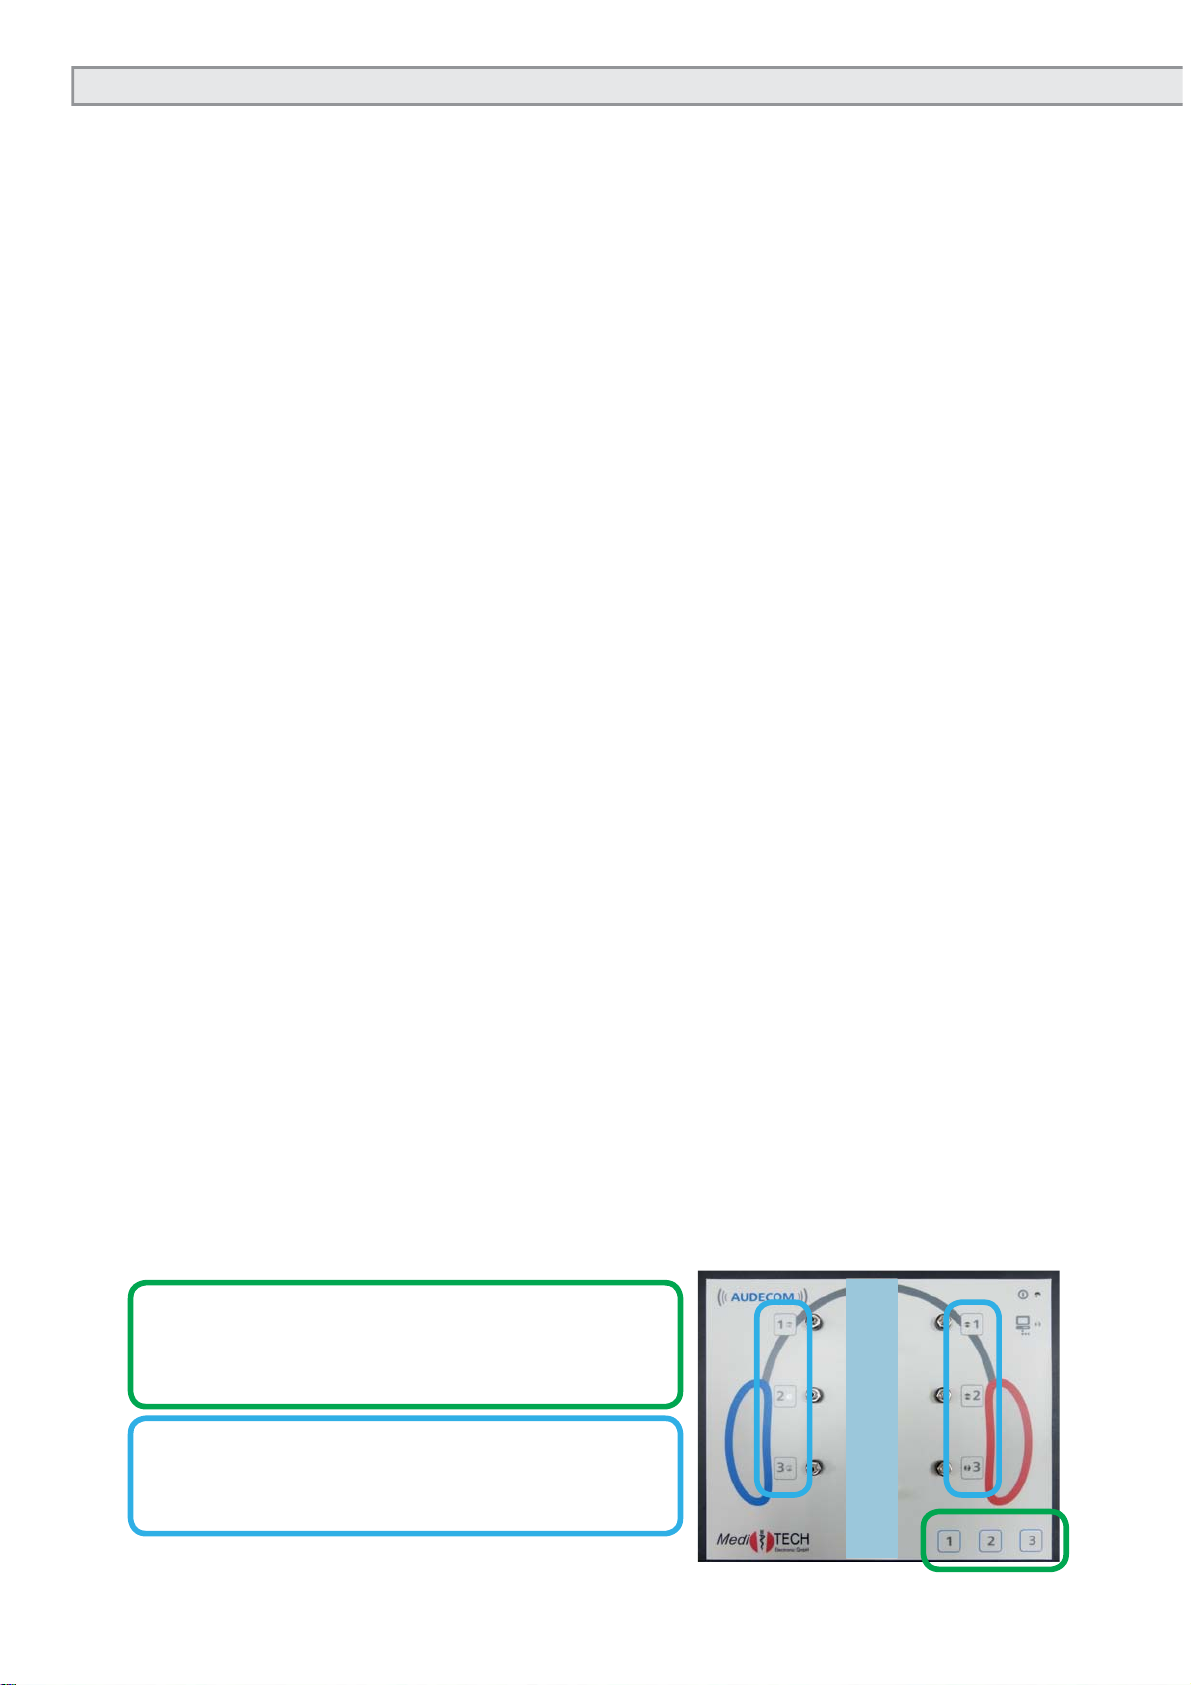
Toggling between the auditory systems (for customers explanation):
Select the desired auditory systems with the three keys at the bottom right:
Key 1 for auditory system 1
Key 2 for auditory system 2
Key 3 for auditory system 3
You can recognise which auditory system is
currently selected by the mini-lamps next to
the auditory systems.
Setting and adjustment
13
Performing an adjustment
1. Click on the existing images of the sound samples in the lower screen
section on the sound samples which the program provides for which you
would like to demonstrate the differences between the auditory system
types. The sample sounds are each played and the corresponding
image next to the note of which the customer should be aware is shown
enlarged.
2. Let the customer operate theAUDECOM himself below. You allow him to
decide between the performance classes himself.
Note: This will allow you to rebut any reservations. You can influence a deci-
sion for or against a certain auditory system or even steer the decision.
On the contrary: By selecting the auditory system himself, the customer
will be more likely to identify with his auditory system and then become
familiar with it.
Important: Follow the following instructions when sound samples can now
be heard:
Do NOT speak when voice-based sound samples are now run-
ning.
You or the person accompanying the customer should speak
when pure noise/sound samples run out.
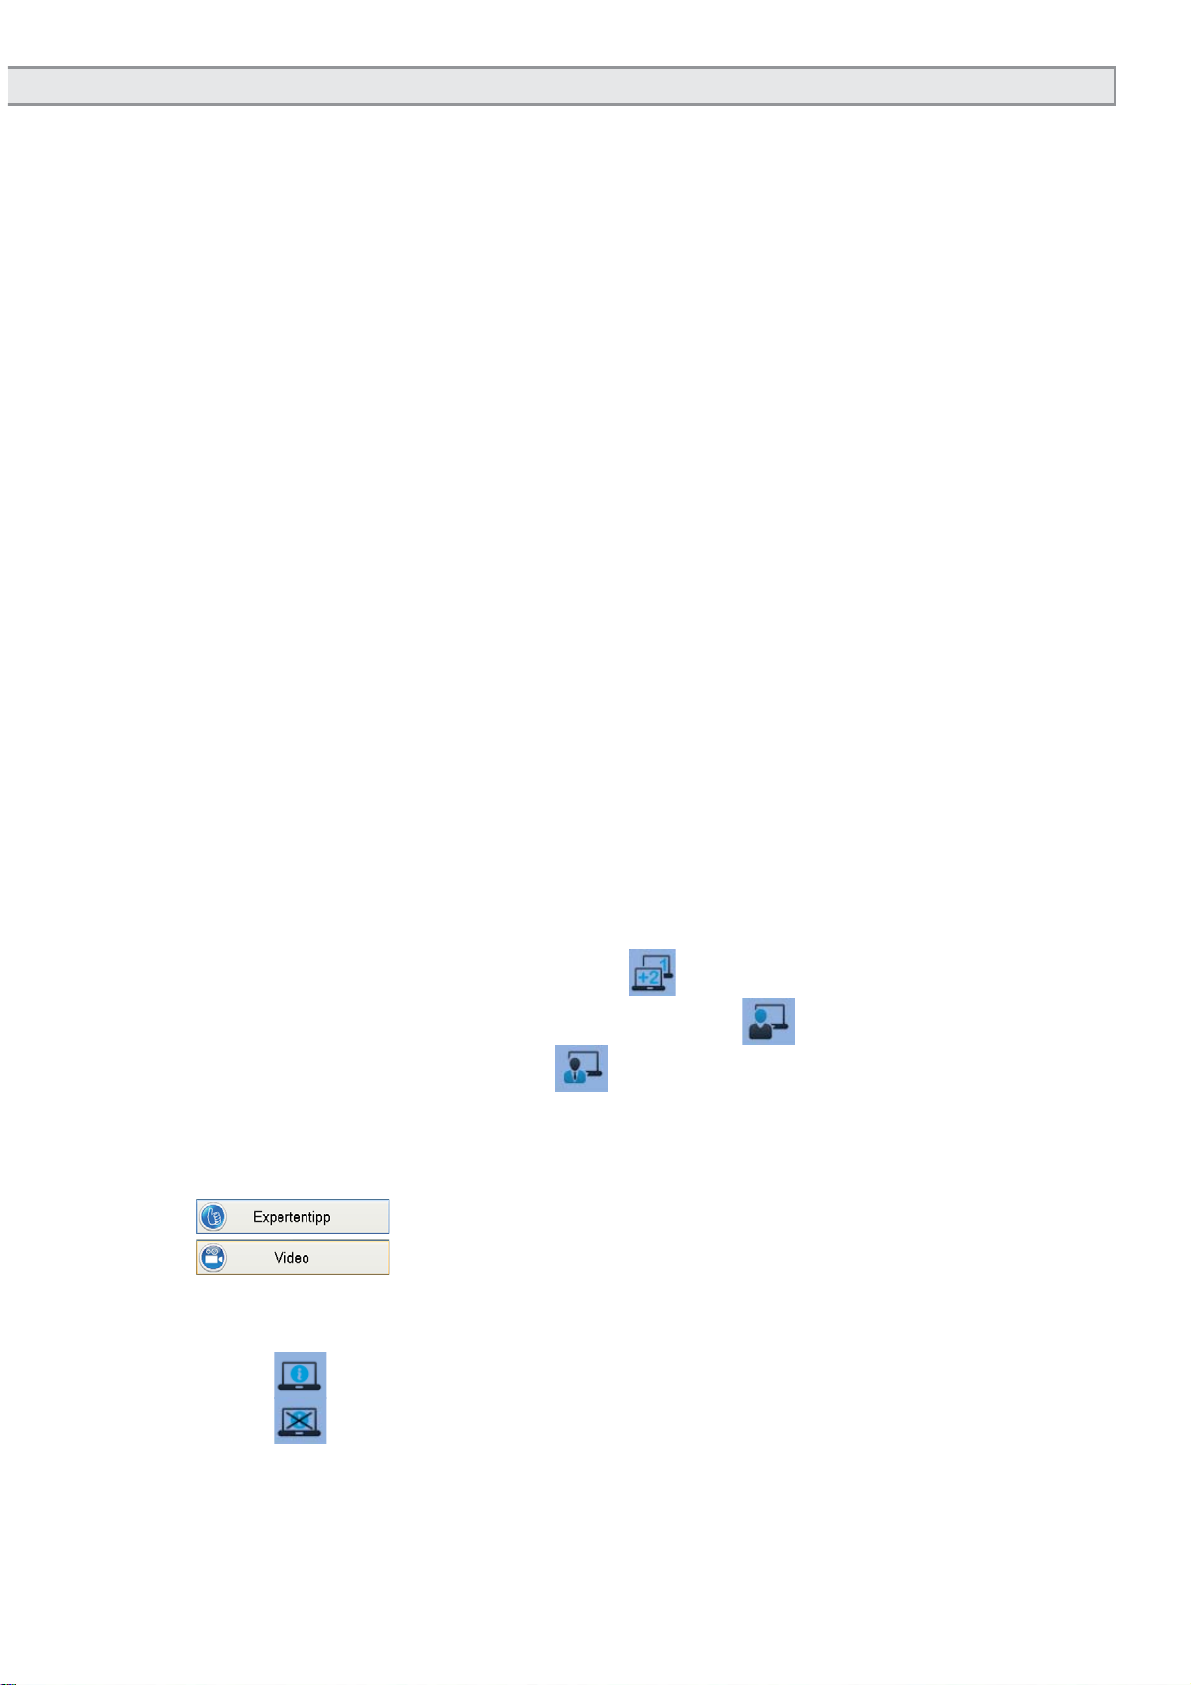
If you are using two monitors - for example a laptop with a connected
motor - switch to two-monitor-mode . That means that you
show the customer the Customer view and
the expert view for you .
In addition, you will also receive additional information on the auditory
systems you selected in your specialised language. You can also click
on the following buttons:
: View special information from the manufacturer
: Start the videos for the respective auditory system
You can do the following in the Customer View in the centre screen
area
Show customer-appropriate supplemental information
Switch off customer-appropriate supplemental information
This additional information is written in a layman’s language so that the
customer can easily understand the information.
Setting and adjustment

14
Expanded operating capabilities
Expanded operating capabilities
In addition to standard operation,AUDECOM will offer additional possibilities
which can adapt the system to your personal needs.
In this chapter, you will become more familiar with these capabilities
Create one favourites
You can create a favourites list with your own combination of existing sound
samples for certain customers, customer groups or situations which you can
access as necessary. For example, you can define a list “only background
noises” or “only conversational situations”.
1. To do this, click on it opens and then click on . The Favourites
window will open.
2. Click on New. In the Favourite Name field which appears, you are requ-
ested to enter a new name.
3. Type in the new name with the computer keyboard and click on OK.
TIP: Use a name which you can easily read and which will allow your emplo-
yees to recognise the content with sufficient clarity
4. The new list is created - the sound samples are deselected with .
5. Click on the below the respective images which you would like to add
to the list. The becomes a .
6. Click on OK if you want to save a combination and close the window.

15
Expanded operating capabilities
Select favourites
1. Right-click on the sample sound area. A pull-down list then opens with
all entered favourites.
2. Select the desired favourite from this list. The sound sample images
included therein are now shown in the list and are available. All other
sound samples are greyed out..
Tip: Ifyou should miss sound sampleswhich are normally available, it islikely
that another favourite was selected with the last adjustment with theAU-
DECOM. Select another favourite as it was described above and check
whether the missed sound samples are now offered..

16
Change the manufacturer display
You can change the display in the manufacturer screen according to your
needs.Forexample,you canchangetheorderof themanufacturerbuttons and
delete the manufacturer buttons with auditory systems which you do not offer.
1. To do this, click on and then .
The Manufacturer Management window opens.
All currently activated manufacturers are shown
in the window.
Note: When you cannot see the window, look in the
taskbar and open it that way
2. Ändern Sie die Reihenfolge und Anzeige nach
Ihren Wünschen:
Click to place up the respective manufacturer for one position
Click to place down the respective manufacturer for one position
Click to delete the respective manufacturer. In a security
prompt, you are again asked if you really want to delete the manu-
facturer.
3. If you accidentally deleted a manufacturer or would like to add more
manufacturers, please send an e-mail to AUDECOM_PW@meditech.
de - There you will receive the required passwords in order to set up the
manufacturers again. You can enter this with the New button. You will
receive a precise guide on the input with the e-mail. If a manufacturer
which is important to you is not in AUDECOM, please contact us. To-
gether we will find a solution.
Private Labels
If you are interested in private labels and want to integrate them, our sales
department is at your service. Feel free to contact us.
Prospects
The AUDECOM software is continuously further developed, expanded and
equipped with additional functionality. They are offered in patches, updates
or offered as upgrades. If you are interested in these updates, please contact
oursalesemployee.If your computer is connected to the Internet,AUDECOM
offers automatic system updates.
Expanded operating capabilities
17
Equipment and Support
In this chapter, you will see relevant technical information on theAUDECOM.
You can find help here for technical problems.
Troubleshooting
Issue Proposed solution
Not all sound samples are
shown which are usually
shown.
Another favourite is selected for the list of
the sound samples which does not include
the desired sound samples. Right click on
the sound sample bar on the main screen
and select the desired favourites. You can
find which sound samples are included in
which Favourites in the Settings menu under
Favourites.
The manufacturer selection
or the favourites selection
are not displayed although
they can be activated under
the Settings menu.
You can hide the selection behind one of
the views. Select the AUDECOM program in
the task bar. It is assumed that the relevant
window will be indicated there. Click on it. It is
displayed as a result.
Sound samples cannot be
heard although the ac-
companying images can
be clicked on and the time
progress bar on the screen
moves.
The loudspeakers are probably turned off
(LED on the loudspeaker is red or black) or
the volume is turned down. Activate the lou-
dspeaker or increase the volume.
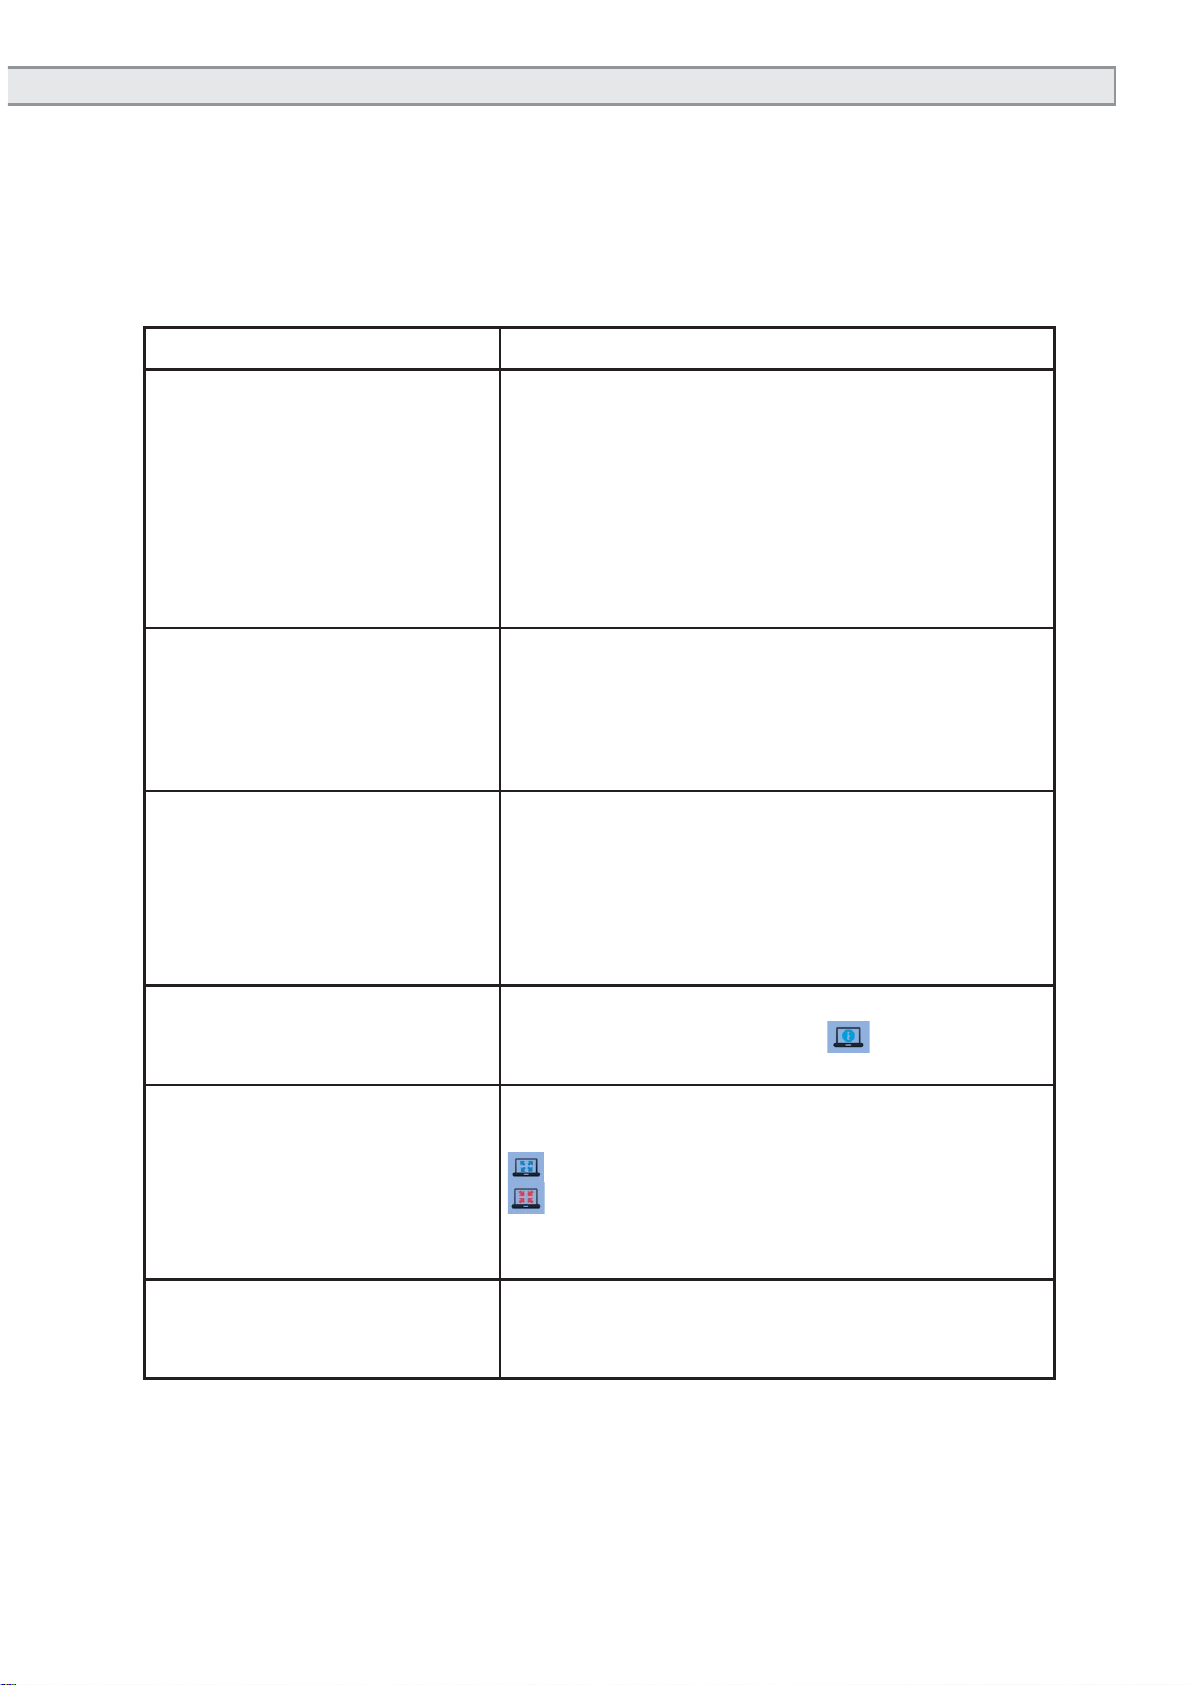
No details are shown on
the auditory systems in the
Customer view.
It can be assumed that the detail view is
activated. Click the button to display it
again.
The display on the laptop
screen is incomplete. The software has two screen views which are
optimised for different image sizes:
for normal monitors
for laptop monitors
It is assumed that the other setting is se-
lected.
The program AUDECOM
does not start. The program just can be started when the
device AUDECOM is connected to the com-
puter.
Do you have other questions, errors or problems when working with
AUDECOM? Please contact our Technical Customer Support:
+49-(0)5130-97778-55
We can then collaborate to advise on further steps!
Equipment and Support

18
Equipment and Service
In this following chapter, you will find information on the technical data of the
AUDECOM via which the technical accessories and the instructions on the
nameplates of the device and the power supply. In addition, you should learn
how to clean the device, maintain it, store it and properly dispose of it.
Clean the AUDECOM
The housing of the device and/or the headphones must be cleaned with a lint-
free cloth before reuse and after use which can be moistened, cleaned with a
commercial disinfectant. Do not use any abrasive substances. The surfaces
can be scratched or otherwise damaged.
Attention! When cleaning, you should absolutely follow the clea-
ning and safety instructions of the respective disinfectant
manufacturer.
Attention! Under no circumstances should the device come into
contact with ultrasound baths, running water and chemi-
cal cleaners, e.g. diluters, alcohol etc. It could be dama-
ged or destroyed.
The foam cushions of the headphones must be changed when the user ch-
anges. The cushions are not intended to be cleaned.
You can acquire the replacement articles as a specialised retail store or from
MediTECH. You can find the contact below or on the front page of this usage
manual.
Maintaining and storing the AUDECOM
1. Ensure that only you as the specialist disconnect the device and pull the
connector from the socket.
2. Store the device in a dry location at room temperature. Please use the
precise dimension transport case because the AUDECOM is particularly
protected in it.
3. Switch the loudspeaker off when you are not using the AUDECOM for
an extended period of time. Otherwise, the loudspeakers will lose their
charge without reason.
Please contact us if the device is no longer working flawlessly.
Attention! It is not permitted for you yourself to remedy a defect in/on the
device as a user. The device could be damaged. The liability
and warranty of MediTECH expire with independent “repair
attempts”.
Equipment and Support
19
Decommissioning the AUDECOM
1. Turn the device off.
Attention! When you disconnect the device from the mains supply,
first switch it off and then disconnect the plug of the power
supply from the socket. Under no circumstances should
you pull the pug on the device first.
2. Disconnect all accessory articles from the device.
Note The AUDECOM and accessories may not be disposed of
in everyday household rubbish because they contain elec-
tronic components. Sent it (with a short note on the pur-
pose) to MediTECH Electronic GmbH
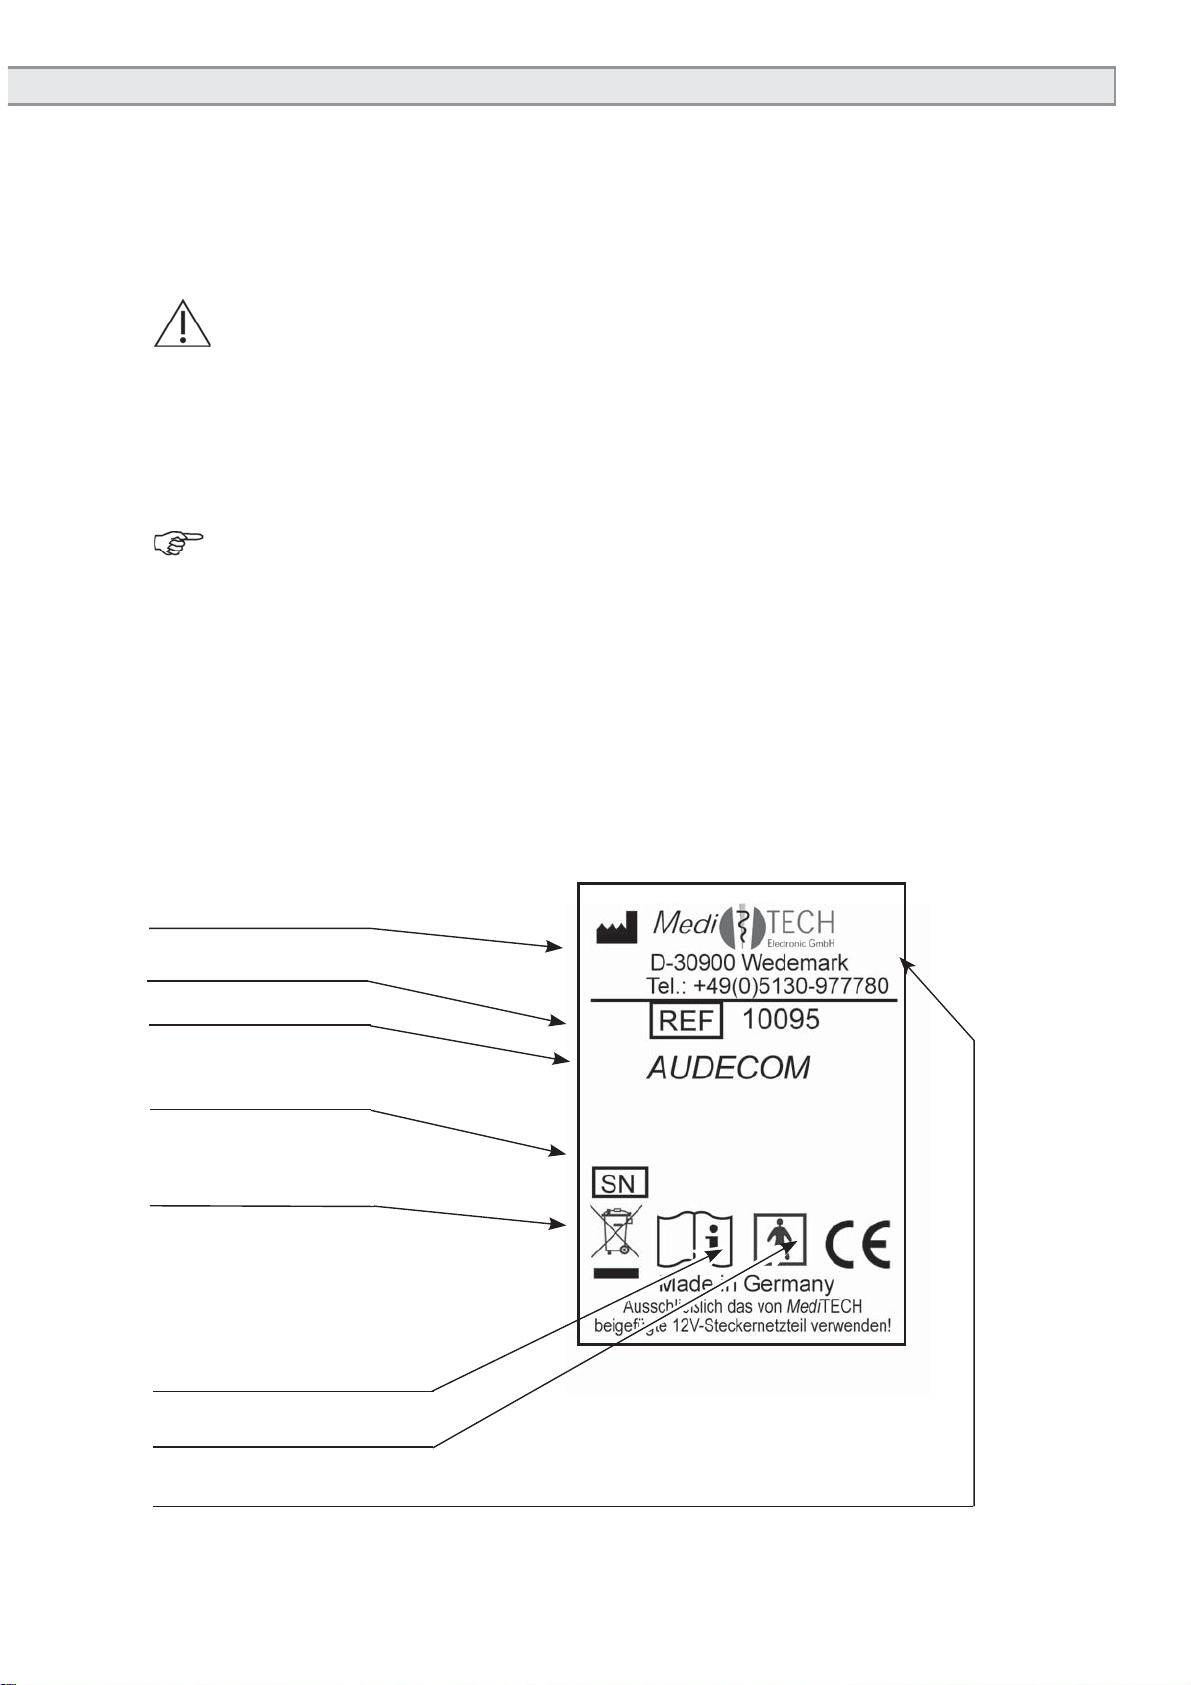
AUDECOM nameplate
Type
Production year
Serial number
Article number
The following nameplate is located on the back of the AUDECOM. The in-
formation and symbols have the following meaning::
Application part
Manufacturer
Environmentaldisposal
classification
Attention, follow the instruc-
tion manual!
Equipment and Support
20xx
XXXXXX
20
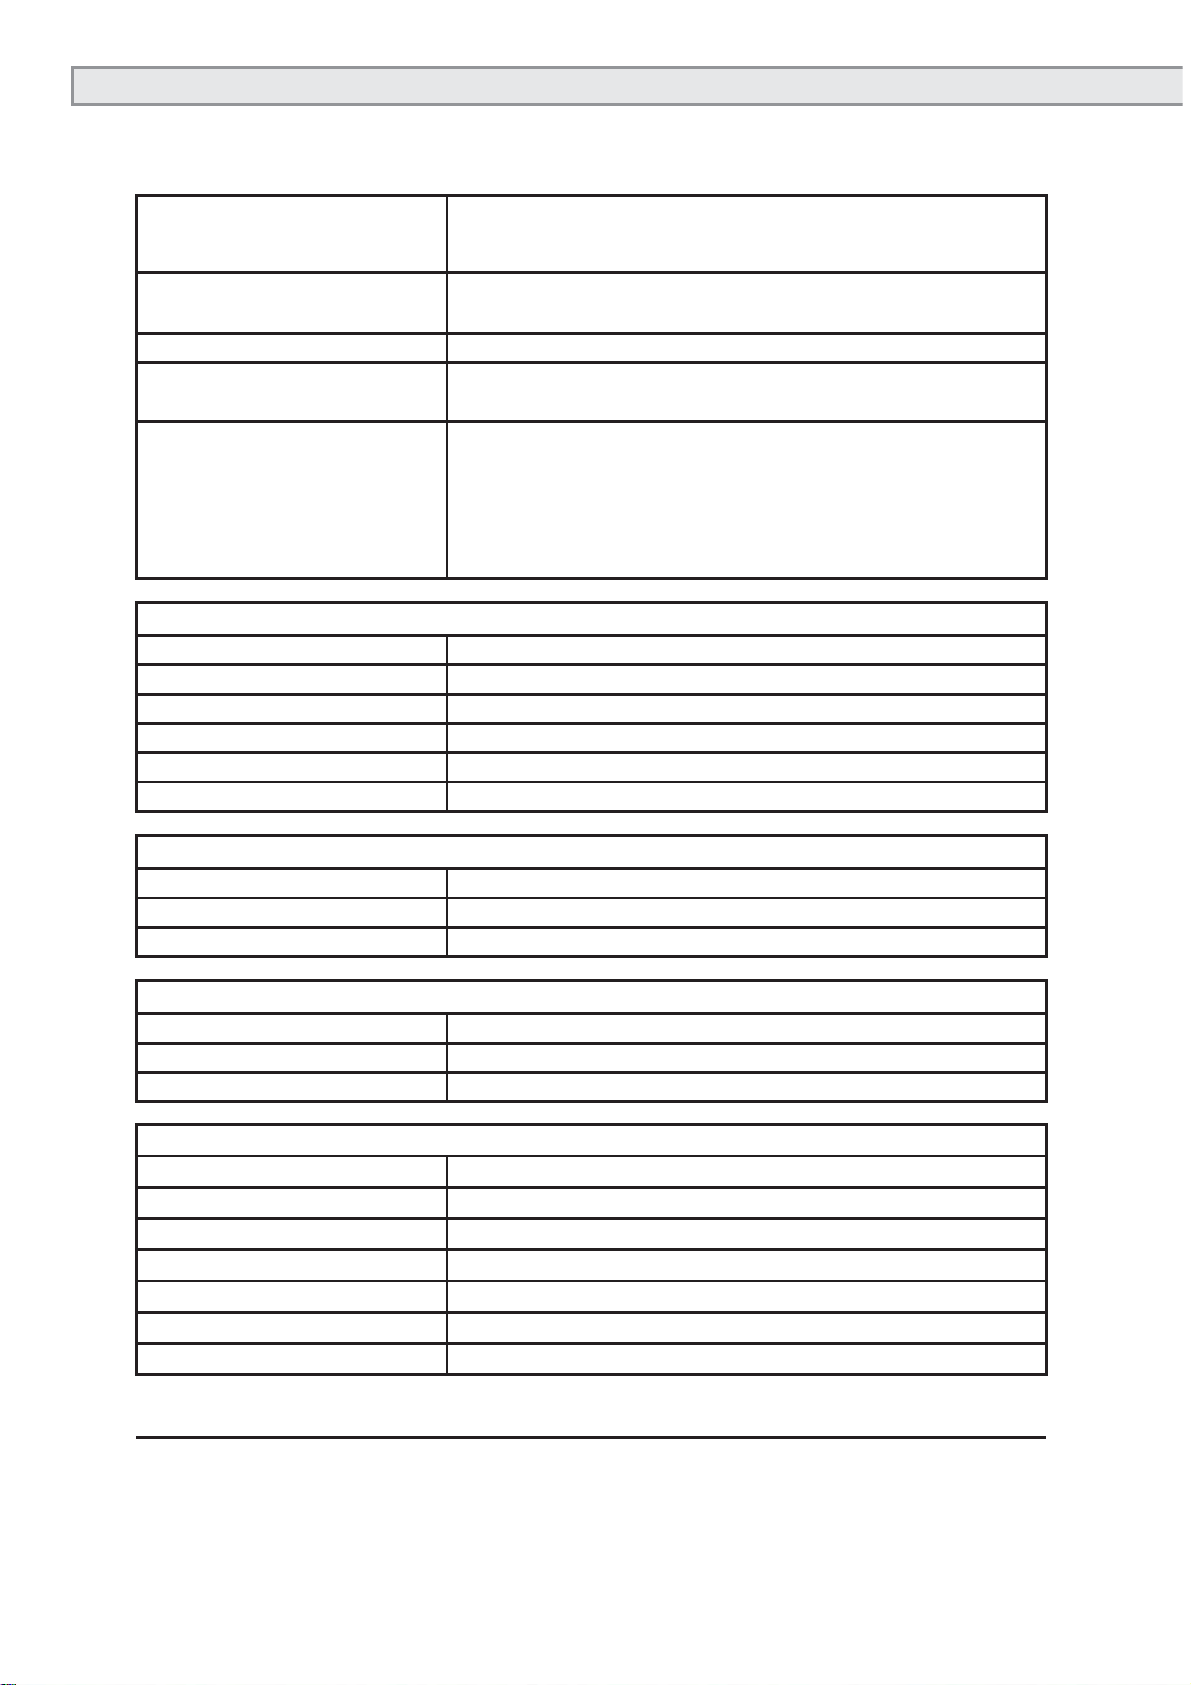
Technical specifications
Power supply: 12 V (with the supplied plug-in power supply
type FW 7556M/12)
Power supply specifica-
tions: Input: 220-240 V / 50-60 Hz / 400 mA output: 12
V / 1.5A
Operating current max. 700 mA
Service life: Approx. 10 years
The manufacturer year is noted on the nameplate
Dimensions:
Width x Height x Depth
AUDECOM
AUDECOM with acces-
sories
(Viewed from the front)
29 cm x 10 cm x 21 cm
40 cm x 23.5 cm x 41.5 cm
Light diodes
Shape 2.5 mm square
Colour green / blue
Beam width 60° - 80°
Light intensity min. 14 mcd at IF=20
Operating temperature 30 °C- + 85 °C
Storage temperature -40 °C- + 85 °C
Operation
Ambient temperature +5 °C to +40 °C
Relative humidity 40% - 65%
Air pressure 700- 1060 hPa
Storage and transport
Ambient temperature -20 °C to +50 °C
Relative humidity 20% - 95%
Air pressure 700- 1060 hPa
Headphones
Impedance 32 Ohm ± 15%
Frequency range 20 Hz-20,000 Hz
Noise level 110 dB ± 3 dB
Cable 1.8
Connector 3.5 mm / 6.35 mm stereo phono connector
Weight 376 g
Type Closed system
Equipment and Support
Table of contents
Popular Hearing Aid manuals by other brands

Hearing Products International
Hearing Products International Echo 2.4G user manual

ReSound
ReSound LiNX Quattro 88 user guide

ClearSounds
ClearSounds CLA7 Installation guide & user manual

Hansaton
Hansaton AQ HD S Instructions for use

Sonova
Sonova Phonak Roger NeckLoop 02 user guide

WELL BRAIN
WELL BRAIN WBI-144 user manual


