Hearing Products International Echo 2.4G User manual

User Manual
Hearing Products International Ltd
Product codes 922 / 923
Sales & Support Email: info@hear4you.com
www.hear4you.com
Sales & Support Email: info@hear4you.com
Echo 2.4G Wireless TV System
®
Product Code: 922 Product Code: 923

IMPORTANT SAFETY INSTRUCTIONS
1. Please read this instruction manual carefully and completely before using the
products. Keep this manual easily accessible at all times.
2. Always keep the product dry, and do not expose them to extreme temperatures.
3. The receiver must keep the minimum volume before switching the unit on.
High volume may cause hearing damage to persons with normal hearing,
especially to children.
4. Keep devices away from liquid. Before cleaning the product and its accessories,
disconnect the transmitter from the power adapter, and use only a slightly damp
cloth to clean the devices.
5. Use only the supplied power adapter.
6. Use the products with care and set them up on a stable surface of a clean,
dust-free environment.
7. The unit may get hot during use. Ensure the unit has adequate ventilation.
8. Please put the product far away from microwave oven, mobile phones, WiFi
router etc. to avoid unnecessary electronic wave interference.
9. Please switch off the transmitter and receiver after use, and pull out the power
adapter from the wall socket when not using for a long time.
10. Only qualified person can provide services! Do not attempt to open the unit!
01
Pacemaker Safety:
CAUTION!
Before using this product with a pacemaker or other medical device, consult
your physician or the manufacturer of your pacemaker or other medical device.
Thank you for choosing the Echo2.4G Wireless TV System. Please read this
guide carefully and keep it in a safe place for future reference. If you need any
further assistance, please contact our customer support team at:
Table of Contents
Important Safety Instruction .................................................... 01
Overview .................................................................................. 02
Features .................................................................................... 02
Product Diagram ....................................................................... 04
Package Contents ...................................................................... 05
LED Indication ......................................................................... 05
How to Use
1. Check Your TV/Audio Source Output Options before the Set up ..... 06
2. Turn on the Transmitter and Receiver ......................................... 07
2.1 Power the Transmitter ......................................................... 07
2.2 Turn on the Transmitter ....................................................... 07
2.3 Turn on the Receiver ........................................................... 07
3. Connect the Transmitter to Your TV/Audio Source ...................... 07
3.1 Digital Optical Connection .................................................. 07
3.2 RCA Analog Connection ...................................................... 09
3.3 3.5mm/AUX Analog Connection .......................................... 10
3.4 Other Connections in Special Cases ...................................... 12
4. Use Two Sets of Echo 2.4G Wireless TV System Simultaneously
in the Same House ..................................................................... 14
5. Charge the Receiver ................................................................. 15
6. Customizing your Echo 2.4G ..................................................... 16
7. The use of NeckLoop (923) ................................................. 18
Troubleshooting .......................................................................... 18
Warranty ................................................................................. ... 20
Technical Specifications .............................................................. 21
.......................................................................................
..........
www.hear4you.com www.hear4you.com
info@hear4you.com, visit www.hear4you.com
or give us a ring on 01614808003

OVERVIEW
FEATURES
02
(1) Wireless TV Hearing Assistance and Hearing Protecting Function
Soften the background sound, make the TV conversation stand out, help the
hearing impaired people to understand the TV clearly, solve the problem that
regular hearing aid cannot do. The unique voice clarifying tech and customized
tone adjustment allow people to enjoy TV programs in safe sounds, protecting
people's hearing from the progressive hearing damage caused by watching TV
with normal headphones for a long time.
(11) Receiver Designed with Auto Power Off Function for Power Saving
When no signal is received for 10 minutes, the receiver will be powered off
automatically.
Would you like to watch television with crystal-clear sound that won’t disturb
others in your family? Do you want to avoid hearing damage that could be caused
by wearing normal wireless headphones for a long time? Echo 2.4G wireless TV
hearing assistance and protecting system is just made for you.
Apply with the latest 2.4GHz Digital Automatic Frequency-Hopping Spread
Spectrum (FHSS) technology, it gives you crystal-clear sound with the freedom
of a wireless connection - up to 100 feet without obstacles. You can customize
your listening at a most comfortable volume level, via balance and tone controls.
Our voice clarifying and noise cancelling technology dynamically reduce TV
background sounds and make TV dialogues stand out. At last you can easily
understand the TV dialogues at a gentle volume without worrying about your
hearing being damaged.
The Echo 2.4G is especially helpful for hearing-impaired people. It overcomes
the weakness of regular hearing aids, which amplify both speech and
environmental background at the same time. If you are non-hearing aid user,
please use our headset version to enjoy watching TV.
For hearing aid users please use neckloop version to be able to pick up the sound
through your hearing aids (must have Telecoil – T-settings) directly
The unique “one-button push” sound amplifier function allows you to hear
clearly what people are talking nearby without taking off the receivers.
It’s compatible with both digital and analog audio output ports and suitable for
almost all TVs and the set-top boxes on the market.
(2) Personal Sound Amplifier
A MIC button is designed as an additional & unique feature to help you to
(10) Multiple Charging Solutions
You can plug the receiver into either of the main charging slots on the base
for recharging, or use battery charging slot. Spare battery sold separately.
(3) Long Distance Transmission
Supported with the latest technology, you can have wireless freedom and crystal
clear voice within a range of up to 100 feet.
(4) Voice Clarifying Tech (VCT)
Reduce background sound in TV to highlight the dialogues, so that words hard to
hear can easily stand out, making television dialogues to be understood easily.
(5) Noise Cancelling Tech (NCT)
Reduce the ambient noise to help the users to focus on listening to the dialogues
in TV.
(6) Automatic Signal Control (ASC)
Our special circuit design can adjust the sudden volume change and make the
output volume stable. It will avoid strong signal hurting the users' hearing.
(7) BALANCE Control (headset version only)
The balance control allows for right/left volume adjustment. Adjust the balance
so that you hear equally well with both ears.
(8) TONE Control
It is specially designed for people who have different sound frequency
sensitiveness. They can select TONE (Treble/Normal/Bass) to find the optimum
parameters, and hear the target audio source clearly.
(9) MONO/STEREO Optional
You can switch to STEREO for enjoying Hi-Fi sound quality music or select
MONO for enjoying more clear TV dialogues.
(12) One Transmitter Can Support Multiple Receiver
Additional Echo 2.4G wireless receivers can be added to the Echo 2.4G
system, allowing multiple listeners to enjoy the same audio source.
temporarily hear what people are talking to you when watching TV without taking
off the .receiver
www.hear4you.com www.hear4you.com
03

PRODUCT DIAGRAM
PACKAGE CONTENTS
(13) Good Compatibility
Compatible with most brands of TV/Smart TV box/ Cable TV box/Set-top
box/DVD/other audio device that has a Digital Optical, RCA or 3.5mm AUDIO
OUT port(s).
(14) Super-soft Memory Foam Ear tips
The super-soft memory foam ear tips can reduce earphone irritation and fatigue,
but we strongly suggest that you change your ear tips every 30 to 60 days, this will
ensure comfort and cleanliness. An extra set of memory foam ear tips and two sets
of washable and repeatable silicone tips are provided for replacement.
LED INDICATION
3. Transmitter 5. 3.5mm
Audio Cable
Ø
04 05
VOLUME
ON OFF
BALANCE
2. Receiver
Charging Socket
Wireless Receiving
Indicator (Green)
Personal Sound Amplifier
Indicator (Red)
(Left Right) (Low High)
Battery Cover
(Replaceable Li-battery inside)
Personal Sound
(MIC ON/OFF)
Amplifier Button
ON
VOL
BAL
OFF
L
R
L
H
LED Status Transmitter Status
Green LED flashes slowly No signal received within 5 minutes
Bright green LED lighting steadily
Red LED off
Dark green LED lighting steadily In standby mode (no audio signal in
for more than 5 minutes)
Wireless working mode
Receiver charging completed/no charging
LED Indicators of the Transmitter
Red LED ① ② lighting steadily charging
Receiver
Red LED ③ lighting steadily Spare battery charging
LED Indicators of the Receiver
Built-in MIC working mode
LED Status Receiver Status
Green flashes slowly LED No signal received
Green LED quickly and
receiver beeps every minute
flashes
Green LED lighting steadily Wireless working mode
Low power indication
Red LED lighting steadily
Built-in MIC off
Red LED off
Silicone
Ear Tips
Memory
Foam
Ear Tips
8. Ear Tips
x2 pair x1 pair
www.hear4you.com www.hear4you.com
4.Toslink
cable (209)
6. Audio cable
(360/B)
9. Scart(201/B) 10. Audio
connector(306/B)
1. Underchin
Receiver
476-1001-01
2. NeckLoop
Receiver
476-1002-01
7. Power
Adapter
or
476-1000-01
216
570-1012-01
1. Transmitter
AUDIO IN
OFF/ON
(OFF/MONO/STEREO)
POWER IN
OPTICAL IN
TONE
(TREBLE/ NORMAL/BASS)
Battery
Charging
Compartment 3
Charging
Indicator 3 2 1 (Red)
Power & Working
Indicator (Green)
Main Charging Slot
2
Main Charging Slot
1
BASS
TREBL ENORMAL
STER EO
TONE
AUDIO IN
MON O
OFF DC 5V
OFF /ONPO WER IN
OPTICA L IN
Spare
Li -ion
battery
sold separately
( )

BASS
TREBLENO RMAL
STEREO
TONE
AUDIO IN
MONO
OFFDC 5V
OFF/ ON POWER IN
OPTICAL IN
06 07
Note:
• The transmitter will automatically enter standby mode within 5 minutes of no
signal input, and it will automatically restart when there is an audio signal input.
HOW TO USE
Echo 2.4G is compatible with OPTICAL output, RCA (labeled “AUDIO OUT”)
and AUX 3.5mm output.
2.2 Turn on the Transmitter
Slide OFF/MONO/STEREO switch to “MONO” or “STEREO” position.
STEREO
MONO
OFF
OFF/ON
2.3 Turn on the
Slide ON/OFF switch to “ON” position.
Receiver
ON OFF
Power in
Power adapter
Transmitter
DC 5V
POWER I N
2.1 Power the Transmitter
Plug the supplied AC adapter into a standard electrical outlet, plug the other end
of the AC adapter into the port labeled “DC 5V” on the back of the transmitter.
2. Turn on the Transmitter and Receiver
1. Check Your TV/Audio Source Output Options before the Set up
Note:
• Three different audio cables included: digital optical cable, RCA cable and
3.5mm cable. Only one of these cables is needed to complete the installation.
• The receiver will power off automatically after 10 minutes of no audio signal in.
Using it again, you need to slide ON/OFF switch to “OFF” position, then slide to
“ON”. Be aware, the receiver will not automatically power off in the personal
sound amplifier mode unless the battery is flat.
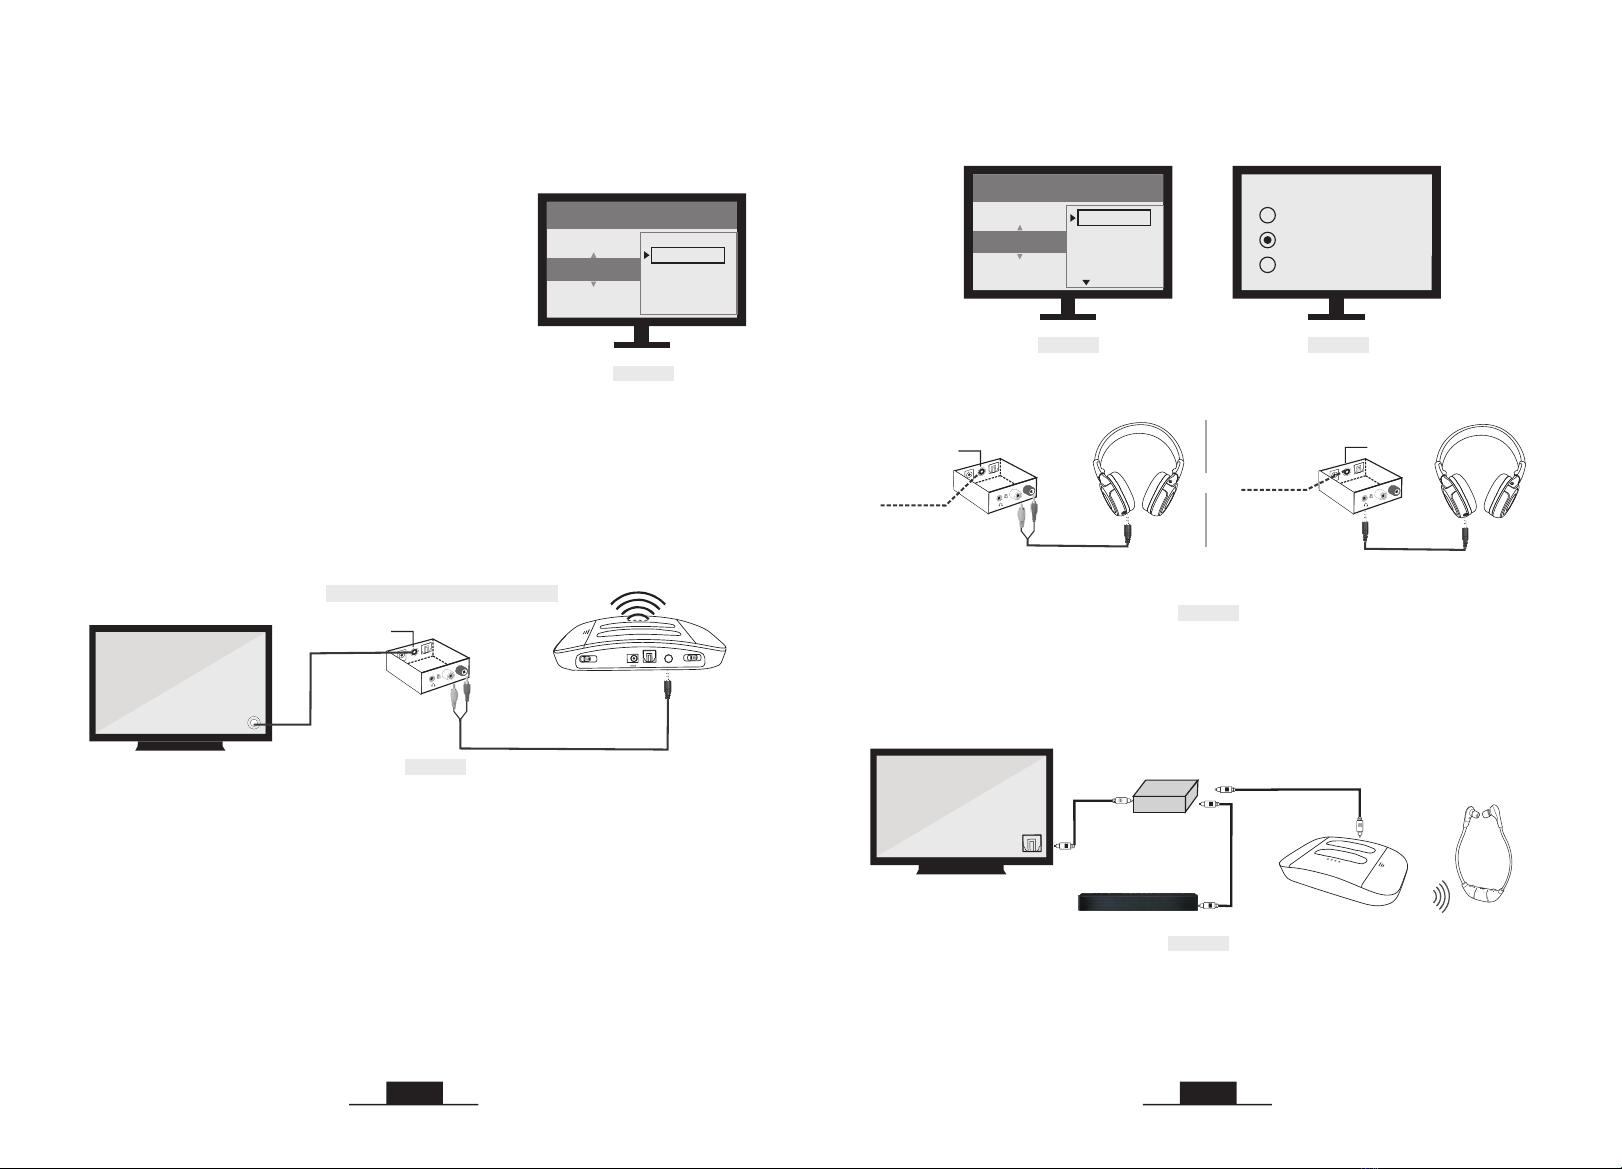
• If your audio source device has an optical audio out port, please connect
Echo 2.4G to this port preferentially. If not, you can also connect Echo 2.4G to
the RCA or AUX/3.5mm or other audio out port of the audio source device.
Fig 2-1
Fig 2-2
Fig 2-3
ON
VOL
BAL
OFF
L
R
L
H
Note: Please charge the for 3 hours before using it for the first time.receiver
BASS
TREBL E NORMAL
STEREO
TONE
AUDIO IN
MONO
OFFDC 5V
OFF/ON POW ER IN
OPTIC AL IN
Other RCA
jacks(usually
audio in)
AUDIO IN
Digital Optical
AUDIO OUT
OPTICAL
AUDIO OUT
(need extra 6.35mm
to 3.5mm adapter,
purchase separately)
(need extra digital to
analog converter,
purchase separately)
Digital
AUDIO OUT
Coaxial
COAXIAL
Jack
Options
Natively
supported?
Please refer
to Point
6.35mm
Phone jack
PHONE
3.1
AUX/3.5mm
3.3
RCA jacks
labled
AUDIO OUT
R
L
AUDIO OUT
3.2 N/A 3.4 3.4
Fig 1-1
R
L
3.1 Digital Optical Connection
This part will instruct you on how to connect the transmitter to your
television, satellite, or cable box using an optical digital audio cable.
Echo 2.4G
3. Connect the Transmitter to Your TV/Audio Source
• If you cannot get to the back of your TV and you only watch the programs
through a fixed TV box (cable/satellite box/DVD etc.), you can also use these
instructions to install the system to your TV box.
www.hear4you.com www.hear4you.com

BASS
TREB LE NORMAL
STEREO
TONE
AUDIO I N
MONO
OFFDC 5V
OFF/ONPO WER IN
OPTI CAL IN
08 09
Plug either end of the optical audio cable into the “Digital Audio Out (Optical)”
port on the back of the TV. Plug the other end of the optical digital audio cable
into the port on the back of the transmitter labeled “OPTICAL IN”.
Step 2. TV Audio Format and Speaker Setting (use TV remote control)
If you can not hear sound from your receiver after connecting:
CAP
Optical Audio Cable
Digital Audio Out
(Optical)
Step 1. Hook up Echo 2.4G to the Optical Audio Out Port of the TV/other
Audio Device
Remove the protective plastic caps
from both ends of the optical digital
audio cable.
• Ensure your TV speaker is set to “External Speakers”. (Ref. Fig 3-4)
• Be aware that the base should be placed at least 4 feet away from your Router/
smart WiFi TV/TV sticks/WiFi TV box to avoid interference.
Fig 3-1
Fig 3-2
Fig 3-3 Fig 3-4
• Ensure TV Audio Format is set to “PCM” or “Dolby/DTS” is OFF (This is
IMPORTANT, Ref. Fig 3-3)
PS: for certain smart Samsung models, the TV is retaining separate settings for
regular TV and internet TV setup. When you turn to the Smart Hub for Internet
source, please use the TV remote to go to Settings > Sound > Expert Settings >
Audio Format or Digital Output Audio Format, then select PCM.
3.2 RCA Analog Connection
This Part is an alternative to 3.1 on page 8. This part will explain how to connect
the Echo 2.4G transmitter to your television, satellite, or cable box using an RCA
analog audio cable.
Notes: If your TV only support single sound out, the TV’s speakers will be either
automatically muted when you plug something into an audio out port (Optical/
AUX/RCA, etc.) or they become disabled once you choose "External Speakers"
as your TV's audio output. It depends on TV circuit design.
Plug the red and white ends of the audio cable into the analog RCA Audio Out
ports (red and white ports labeled “AUDIO OUT”) on the back of the TV. Plug
the single end of the audio cable into the port labeled “AUDIO IN” on the back of
the transmitter.
* Setting menu may be different depending on different TV brands and models.
For most TVs, the TV's internal speakers and an external audio device can work
simultaneously. Such as, for some newer LG TVs, when do optical audio
connection, you can set the “Sound Out” to “Internal TV Speaker + Audio Out
(optical)”. And for some newer Samsung TVs, you can enable this feature by
selecting “TV Speaker” from the TV Sound Output lists.
• Be aware that the base should be placed at least 4 feet away from your Router/
smart WiFi TV/TV sticks/WiFi TV box to avoid interference.
• If you cannot get to the back of your TV and you only watch the programs
through a fixed TV box (cable/satellite box/DVD etc.), you can also use these
instructions to install the system to your TV box.
Step 1. Hook up Echo 2.4G to the RCA Audio Out Port of the TV/other Audio
Device
Speakers
Internal speakers
External speakers
Headset
Settings
Audio Format
Dolby Digital
DTS
DTS Neo 2:5
PCM
OPTICAL IN
OPTICAL IN
Fig 3-5
RCA Audio Cable
TV REAR
R AUDIO OUT L
BASS
TREBL E NORMAL
STEREO
TONE
AUDIO IN
MONO
OFFDC 5V
OFF/ON POW ER IN
OPTI CAL IN
AUDIO IN
www.hear4you.com www.hear4you.com

10 11
3.3 3.5mm/AUX Analog Connection
This part is an alternative to 3.1 and 3.2 on page 8-10. This part will explain how
to connect the Echo 2.4G transmitter to your television, satellite, or cable box
using a 3.5mm/AUX analog audio cable.
• If you cannot get to the back of your TV and you only watch the programs
through a fixed TV box (cable/satellite box/DVD etc.), you can also use these
instructions to install the system to your TV box.
*Setting menu may be different depending on different TV brands and models.
SETTINGS
ANALOG AUDIO OUT
VARIABLE
FIXED
SOUND / AUDIO
Step 2. TV Audio Out Checking and TV Speaker Setting (use TV remote
control)
If you can not hear sound from your s after connecting:receiver
AUDIO OUT
R
L
COMPONENT IN
VIDEO IN
TV REAR
Notes:
* If your TV only support single sound out, the TV’s speakers will be either
automatically muted when you plug something into an audio out port (Optical/
AUX/RCA, etc.) or they become disabled once you choose "External Speakers"
as your TV's audio output. It depends on TV circuit design.
Fig 3-6 Fig 3-7 Fig 3-8
• Ensure use TV Red/White ports labeled “AUDIO OUT” or “OUTPUT”, other
Red/White ports are incorrect. (Ref. Fig 3-6)
• Ensure your TV speaker is set to “External Speakers”. (Ref. Fig 3-7)
For most TVs, the TV's internal speakers and an external audio device can work
simultaneously. Such as, for some newer LG TVs, when do analog RCA audio
connection, you can set the “Sound Out” to “Internal TV Speaker + Headphones”.
And for some newer Samsung TVs, you can enable this feature by selecting “TV
Speaker” from the TV Sound Output lists.
Speakers
Internal speakers
External speakers
Headset
* Your TV’s analog audio settings may be set to “Variable” or “Fixed”. If you
want to be able to control your TV volume level separate from your Echo 2.4G
volume level, you will need to make sure your TV is set to “Fixed”.Contact your
TV manufacturer for assistance. (Ref. Fig 3-8)
AUX/3.5mm Audio Cable
H/P or Audio Out
Fig 3-9
Plug one end of the 3.5mm audio cable into the “Audio Out” port on the back of
the TV. Plug the other end of the audio cable into the port labeled “AUDIO IN” on
the back of the transmitter.
• If you connect the 3.5mm audio cable to the 3.5mm Audio Out port which is
usually a Headphone port on your TV, your Echo 2.4G will still function
properly, but the sound to your TV internal speakers will be muted. The port is
usually labeled with an headphone icon.
• Be aware that the base should be placed at least 4 feet away from your
Router/smart WiFi TV/TV sticks/WiFi TV box to avoid interference.
Step 1. Hook up Echo 2.4G to the 3.5mm Audio Out Port of the TV/other
Audio Device
Step 2. TV Audio Out / TV Speaker Setting (use TV remote control)
If you can not hear sound from your after connecting:receiver
• Plug a wired headphone/earphone into the 3.5mm audio out port of the TV to test
if you can hear the TV sound. (Ref. Fig 3-11)
• Ensure your TV speaker is set to “Headset”. (Ref. Fig 3-10)
BASS
TREBL E NORMAL
STEREO
TONE
AUDIO IN
MONO
OFFDC 5V
OFF/ON PO WER IN
OPTICAL IN
AUDIO IN
Fig 3-10 Fig 3-11
H/P or Audio Out
Speakers
Internal speakers
External speakers
Headset
a wired headphone/
earphone
94dB 85dB 75dB
volume
L
www.hear4you.com www.hear4you.com
12 13
Notes:
* Your TV’s audio settings may be set to “Variable”
or “Fixed”. We recommend that you set your audio
settings to “Fixed” for better audio quality when
using this installation option. If you want to be able
to control your TV volume level separate from your
Echo 2.4G volume level, you will need to make sure
your TV is set to “Fixed”. Contact your TV
manufacturer for assistance.
wireless
transmitter
Coaxial
Digital Out
AUDIO IN
Digital to Analog Converter
RCA OUT
L
R
COAXIAL IN
Step 2. TV Audio Format and Speaker Setting (use TV remote control)
If you can not hear sound from your receiver after connecting:
Note:
Setting menu may be different depending on different TV brands and models.
RCA
OUT
L
R
COAXIAL IN
Connect TV/
Cable box/
STB etc.
RCA Audio Cable
COAXIAL IN
Connect TV/
Cable box/
STB etc.
1) TV/Audio Source only has Digital Coaxial Audio Out port
3.4 Other Connections in Special Cases
* Setting menu may be different depending on different TV brands and models.
Fig 3-13
Fig 3-16
Step 1. Purchase a Digital to Analog Converter and Set up as Shown in
Fig 3-13
If your TV/Audio Source only has a digital coaxial audio out port, you will need
a digital to analog converter (DAC) for installation.
• Ensure TV Audio Format is set to “PCM” or “Dolby/DTS” is OFF (This is
IMPORTANT, Ref. Fig 3-14)
PS: for certain smart Samsung models, the TV is retaining separate settings for
regular TV and internet TV setup. When you turn to the Smart Hub for Internet
source, please use the TV remote to go to Settings > Sound > Expert Settings >
Audio Format or Digital Output Audio Format, then select PCM.
• Ensure your TV speaker is set to “External Speakers”. (Ref. Fig 3-15)
• Take turns to test RCA connection and 3.5mm /AUX connection.
Fig 3-12
SETTINGS
ANALOG AUDIO OUT
VARIABLE
FIXED
SOUND / AUDIO
Fig 3-14 Fig 3-15
Speakers
Internal speakers
External speakers
Headset
Settings
Audio Format
Dolby Digital
DTS
DTS Neo 2:5
PCM
H/P
L
R
94dB 85dB 75dB
volume
L
a wired headphone/
earphone
L
a wired headphone/
earphone
94dB 85dB 75dB
volume
or
2) If your TV/Audio Source’s Digital Optical Audio Out port is occupied
by soundbar, you will need an optical splitter for installation.
Step 1. Purchase an Optical Splitter and Set up as Shown in Fig 3-17
Step 2. If you can not hear sound from your after connecting, follow
the part of 3.1 on page 8-9 to check your settings.
receiver
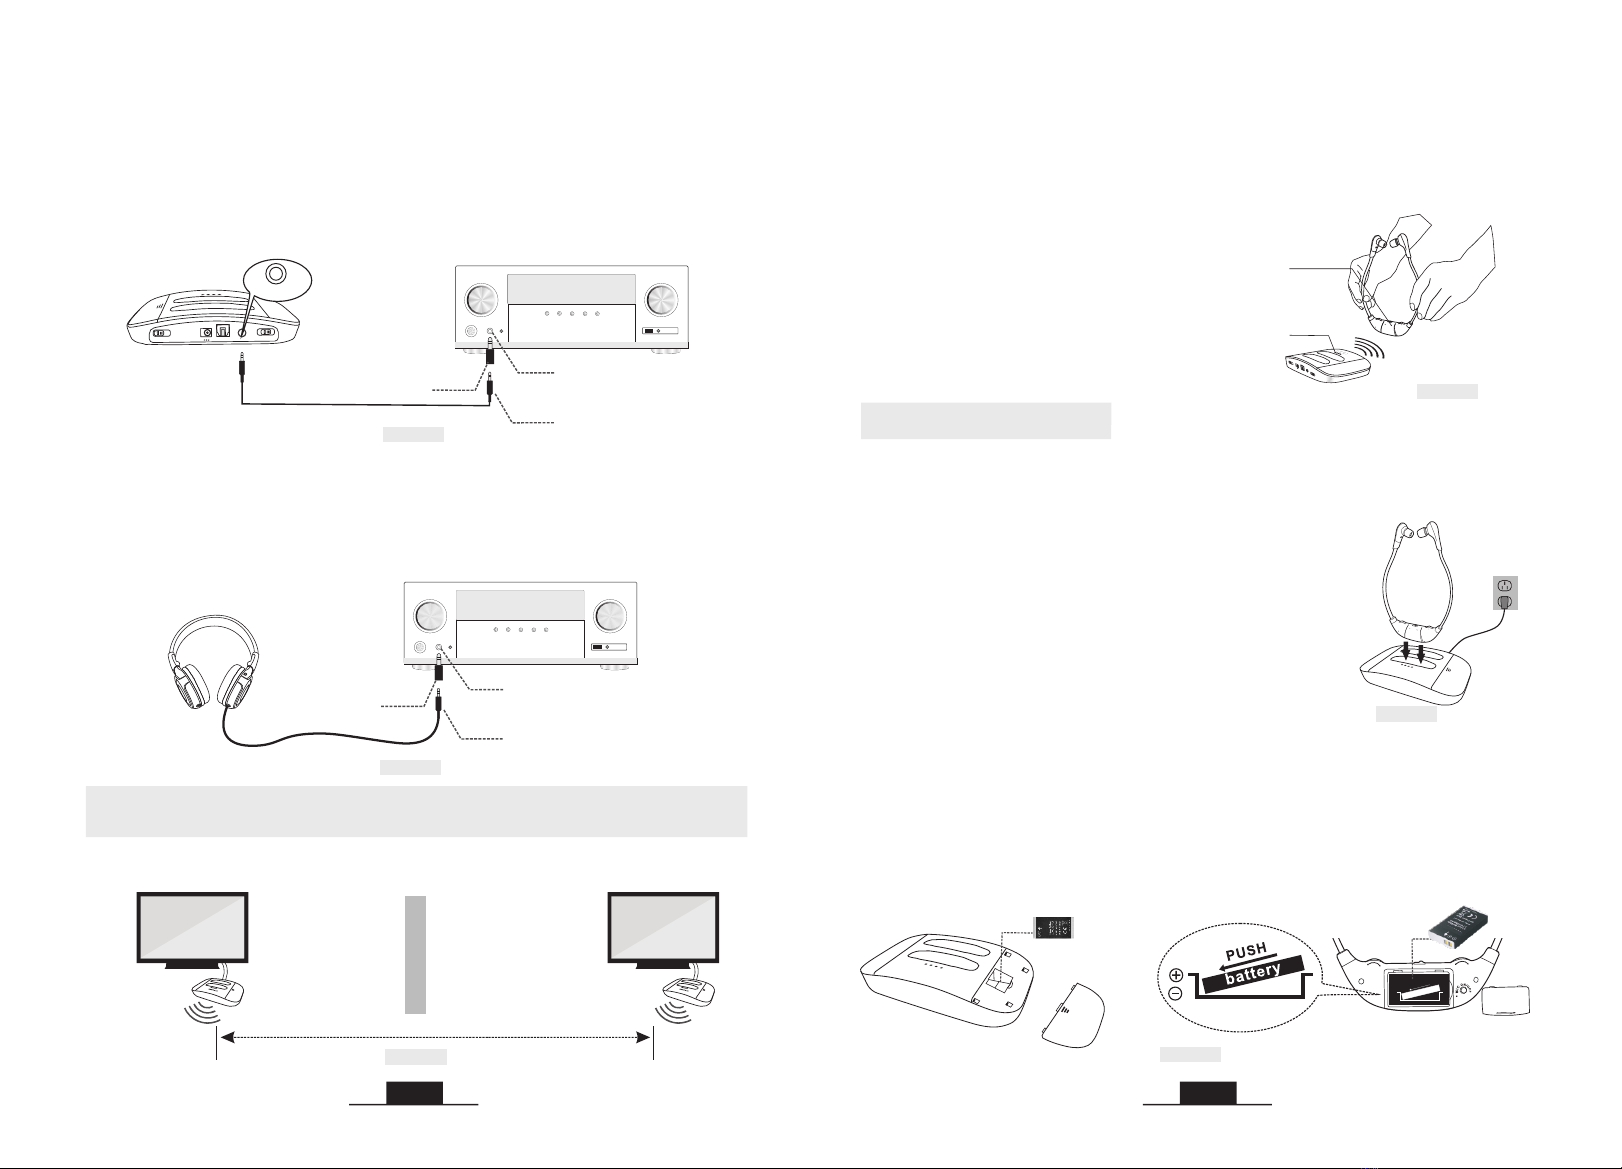
3) Use Echo 2.4G to your AV Receiver with 6.35mm PHONE jack
• Use a wired headphone/earphone to plug into the H/P port or RCA output of the
DAC to test if you can hear the TV sound. (Ref. Fig 3-16)
BASS
TREBL E NORMAL
STEREO
TONE
AUDIO IN
MONO
OFF DC 5V
OFF/ON POWER IN
OPTICAL IN
Optical splitter
Optical Fiber
Cable
Sound Bar
Optical Fiber
Cable
(Transmitter)
Fig 3-17
Digital Audio Out
(Optical)
www.hear4you.com www.hear4you.com
14 15
• Use the 6.35 to 3.5mm converter to plug a wired headphone/earphone into the
port on AV receiver to check whether the sound is normal.
Step 2. Check the Performance of the AV Receiver's Audio Output as Shown
in Fig 3-19
Pho nes
AV Receiver
6.35mm Audio adapter
(purchase separately)
3.5mm Audio Cable
6.35mm Phone jack
Fig 3-18
Fig 3-19
AV Receiver
6.35mm Audio adapter
(purchase separately)
3.5mm Audio Cable
6.35mm Phone jack
Step 1. Purchase a 6.35mm to 3.5mm Adapter and Set up as Shown in Fig 3-18
Echo 2.4G is not compatible with ANY RCA(L/R) ports on your AV Receiver,
ONLY use the BIG 6.35mm PHONE OUT on front side of your AV Receiver with
the 6.35mm to 3.5mm adapter (purchase separately).
If you can not hear sound from your headsets after connecting:
Pho nes
94dB 85dB 75dB
volume
L
BASS
TREBLEN ORMAL
STEREO
TONE
AUDIO I N
MONO
OFF DC 5V
OFF/ON PO WER IN
OPTIC AL IN
AUDIO IN
• The two sets of Echo 2.4G should be put at least 10 meters away from each
other when using them simultaneously.
4. Use Two Sets of Echo 2.4G Wireless TV System
Simultaneously in the Same House
Fig 4-1
room 1 room 2
(Transmitter 2)
(Transmitter 1)
Distance >10M (at least)
• receiver
receiver and make sure the green LED indicators are facing towards each other for
about 5 seconds.
Take the close to the transmitter, then turn on the transmitter and
Note: If two are used on the
same TV, only one transmitter needs to
be connected, because one transmitter
supports multiple receivers to work
simultaneously.
receivers
1) Connect the original power adapter with the transmitter
and an electrical outlet, slide the OFF/MONO/STEREO
switch to MONO or STEREO to power on the transmitter.
5. Charge the Receiver
2) Slide the ON/OFF switch of the receiver to “OFF”. Put
the receiver into the charging slot of the transmitter
vertically and carefully and be sure the front of the receiver
with the logo of “Echo 2.4G” is facing towards the front of
the transmitter with the logo of “Echo 2.4G”. The red
charging indicator on the transmitter lights up and the
receiver starts charging. If not, please check and make sure
the charging pins are fully inserted.
A: Through the main charging slots on the base
BASS
TREBLE NORMAL
TONE
AUDIO IN
OPTICAL IN
DC 5V
POWER IN
STEREO
MONO
OFF
OFF/ON
Fig 4-2
Wireless Receiving
Indicator (Green)
( )headset
(Transmitter)
Power &Working
Indicator (Green)
B: Through the battery charging compartment in the base
A spare battery charging compartment is located at the side of the transmitter. put
spare battery (sold separately) to charge it. When the receiver battery is low
power, pull the spare battery out of the battery charging compartment for
replacement, and the discharged battery can be put into the compartment for
recharging.
Spare Battery
( not included)
ON
VOL
BAL
OFF
L
R
L
H
battery
PUSH
Fig 5-1
Fig 5-2
Plug in
to
charge
www.hear4you.com www.hear4you.com
Rechargeable & Replaceable
Battery (included)

16 17
3) Balance Control: If the hearing abilities of two ears are not the same, you can
rotate the BAL dial on the headset for right/left volume adjustment so that you
hear equally well with both ears.
6. Customizing your Echo 2.4G
1) Please make sure the headsets are being worn properly. Each side of the
headset has a letter to guide the wearer: “L” for left and “R” for right. The headset
arms incorporate memory stainless steel strips which can be adjusted to a more
comfortable wearing shape.
Fig 6-2
Hanger loops
Fig 6-1
2) Hanger Loops Installation (if necessary)
You can attach the hanger loops (purchase separately) to the headset to help you
better adapt to the weight of the under-chin headset. (Ref. Fig 6-2)
* Hook the decompression hanger loops on each side of the headset.
* Put the hanger loops on the ears, rotate them to best fit yourself.
•
evenly bend inwards to adjust the arms
into a more comfortable shape.
• Repeat this process as necessary.
Hold each side of the headset arms and
Notes: The charging time is approx. 3 hours. The will last approx 5~7
hours on a full charge, but will last a lesser or greater amount of time depending
on the average volume level of the .
receiver
receiver
4) Tone Control: Select the TONE (TREBLE/NORMAL/BASS) at the rear of
transmitter to find the best feature, make sure you can hear the TV voice clearly.
(Ref. Fig 6-4)
5) Mono/Stereo Option: You can switch to STEREO for enjoying Hi-Fi sound
quality music or select MONO for enjoying more clear TV dialogues. If, despite a
correct balance adjustment, you can hear the sound only with one ear: Set the
STEREO/MONO switch on the transmitter to MONO.(Ref. Fig 6-5)
6) Personal Sound Amplifier Function: while listening wirelessly, press the
MIC ON/OFF button at the rear of the receiver, the personal sound amplifier
indicator will be solid red, you can clearly hear what people’s talking to you
nearby. Press the MIC button again or switch off the receiver and then on, it will
be back to wireless listening, the personal sound amplifier indicator will be off,
and the working indicator will be solid green. But if you press the MIC ON/OFF
button by chance when listening wirelessly, the volume will be low with the
ambient noise will be occurred.
STER EOAUDIO IN
MONO
OFFDC 5V
OFF/ ON POWER IN
OPTIC AL INBASS
TREBL ENORMA L
TONE
BASS
TREBLENORMAL
TONE
Fig 6-4
Fig 6-6
ON
VOL
BAL
OFF
L
R
L
H
STEREO
MONO
OFF
OFF/ON
Fig 6-5
BAL
L
R
ON
VOL
BAL
OFF
L
R
L
H
Fig 6-3 Fig 6-7
7) Ear tips Replacement and Cleaning
• Replace the ear tips as shown in Fig 6-7
• The additional silicone ear tips are washable & replaceable
www.hear4you.com www.hear4you.com
18 19
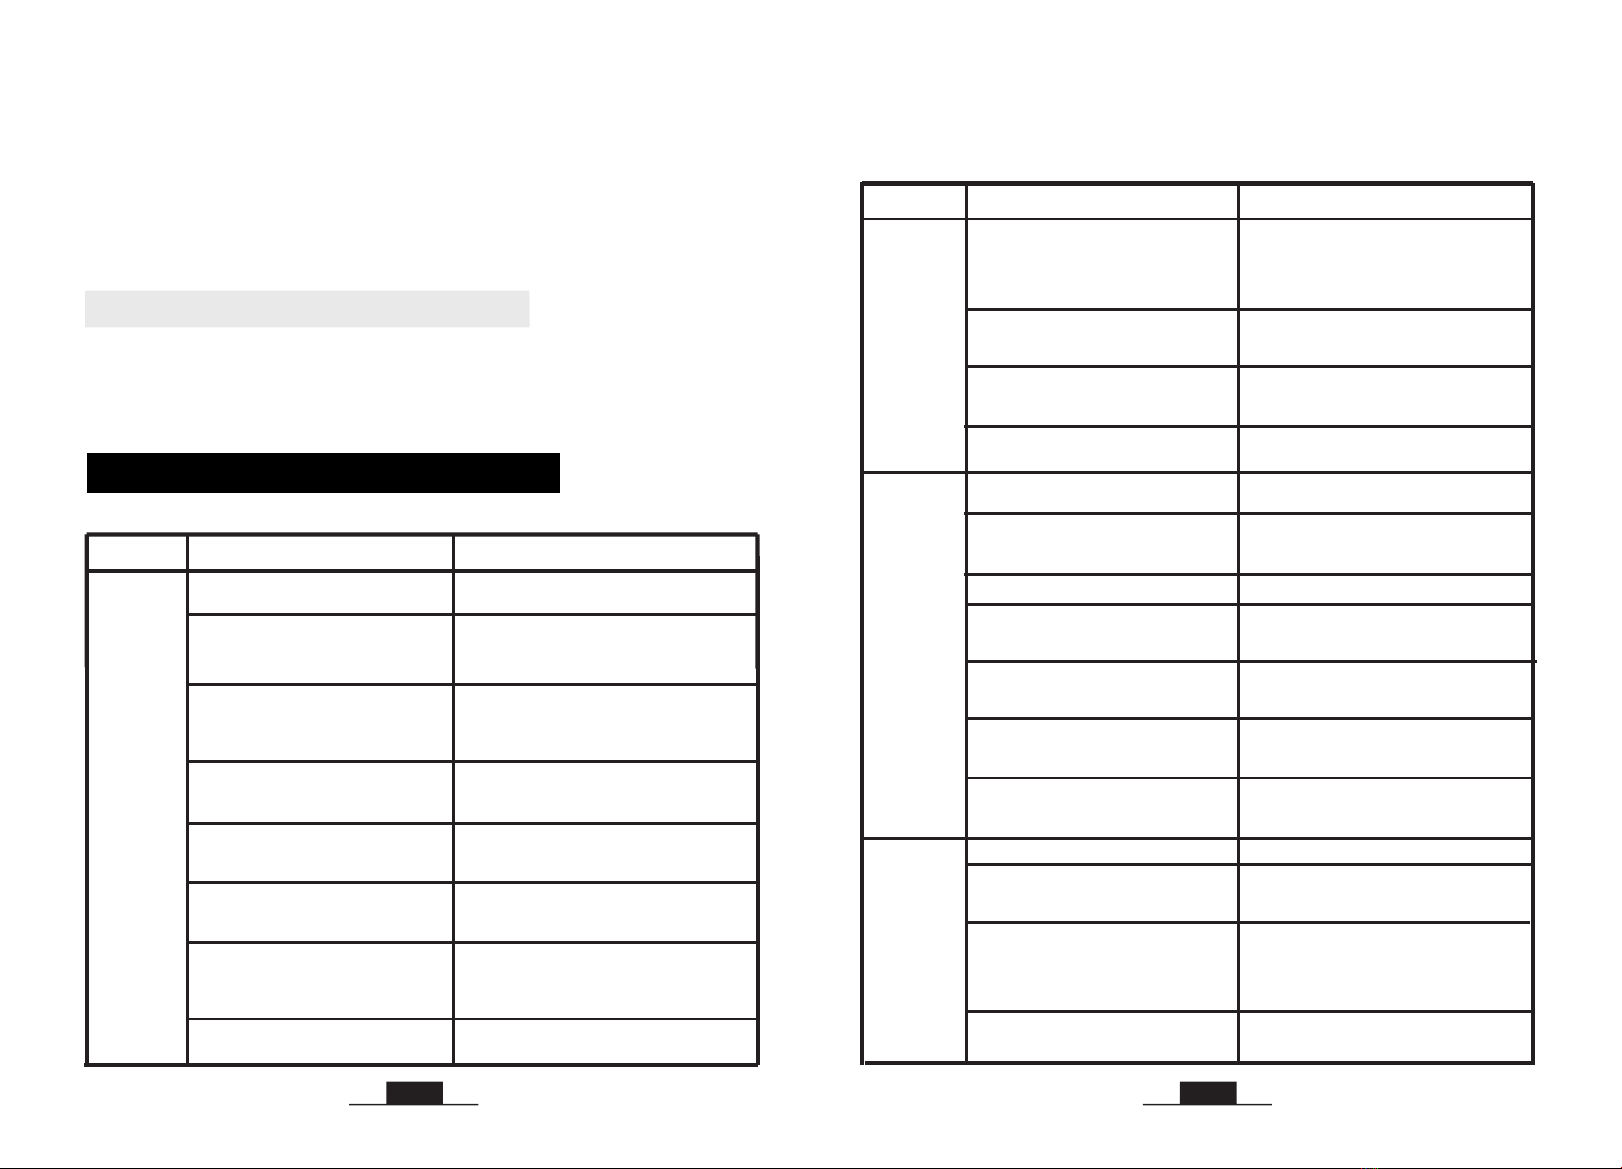
Phenomena Causes Solutions
Part 2
Receiver
doesn’t
work, or
no voice
received
The is out of the transmitting
range.
receiver Move the closer to the
transmitter.
receiver
The is working on “personal
sound amplifier” status with red
receiver
LED on.
Press the MIC ON/OFF button again or
turn the off then restart to return
to the wireless TV listening status.
receiver
The battery’s power is too low. Charge the battery fully.
The transmitter is placed too close to
metalworks or other electromagnetic
wave objects.
Put the transmitter far away from the
interference sources.
TV volume is turned down to ZERO.
Adjust the TV volume to a sufficient
level. If you want to mute the TV, please
click the MUTE key on the TV remote
control or go to TV settings to OFF the
Internal TV speaker.
The audio source’s volume is set
too low. Adjust its volume properly.
If you are using RCA connection,
the RCA audio cable connecting the
transmitter and your TV/audio
source is NOT FULLY plugged at
BOTH ends.
Try to waggle the audio cable or unplug
and plug the audio cable from both the
ends on TV/audio source and the
transmitter.
Sound cuts
in and out
or
some noise
is occurred
The audio out function of the
connected audio device is defective
(poor signal out).
The connection between the
transmitter and the audio source
is not in place.
Make sure the connection is firm
between the transmitter and the
audio source.
Connect to another audio out port.
Place the transmitter base at least 4 feet
away from smart WiFi TV/WiFi TV box/
TV sticks to avoid interference.
The receiver is used for listening to
streaming media (Netflix, Amazon
Prime Video etc.)
Adjust the balance control properly.
Switch the transmitter to MONO.
The balance is not adjusted properly.
The audio out signal of audio source
is mono, but the transmitter is
switched to STEREO.
The voice is
heard only
with one ear
To clean the silicone ear tips:
• Carefully remove the ear tips from the headset.
• Clean the ear tips with warm soapy water and rinse thoroughly.
• Dry the ear tips.
• Put the ear tips back on the headset.
TROUBLESHOOTING
The battery isn’t inserted properly
into the battery chamber or the
battery is run out.
Insert the battery properly, or charge
the battery fully.
The receiver is powered off
automatically. Switch the off, then on. receiver
The audio out port of the connected
audio device is defective
(no sig al out ).n
Connect to another audio out port .
Phenomena Causes Solutions
The transmitter is not connected well.
Make sure the AC adapter and the audio
cable of the transmitter are plugged
in place.
Switch to MONO or STEREO to power
the transmitter on.
The transmitter is not powered on.
Part 1
The connection between the
transmitter and the audio source
is wrong.
Make sure the connection is correct and
in place between the transmitter and the
audio source.
The analog audio cable is plugged
into the AUDIO IN jack of the
transmitter when connecting with
the optical cable.
Unplug the analog audio cable from the
transmitter.
Receiver
doesn’t
work, or
no voice
received
The audio sources (TV and TV related
AV devices) are not turned on or their
volume are set too low.
Turn on the audio source, and adjust its
volume to a sufficient level.
TV audio output is disabled or not
activated.
Follow the instructions in your TV user
manual to change the TV’s AUDIO OUT
setting to "External TV Speakers".
Set it to PCM. For example: Settings >
Sound > Digital Audio Out Format>
Dolby/DTS/PCM, menu depends on TVs.
The audio out format of TV and TV
related AV devices (e.g., Cable box,
STB, DirecTV, etc.) is not set to
PCM.
www.hear4you.com www.hear4you.com
For the NeckLoop (923), set the hearing aid that you are wearing to the “T”
position and adjust its volume. If no position “T”, please contact your
audiologist. Put on the receiving neckloop, adjust the Volume to a comfy
listening level
7. The use of NeckLoop (923)
Faulty cable/audio out port issue Try another audio cable or another
audio device.

Receiver
can not be
charged
successfully
Faulty Power source. Please change another power source like
PC USB port, socket, different USB charger
(5V/500mA-2A).
Phenomena Causes Solutions
Part 3
20
Signal-to-noise ratio
Transmission mode Automatic Frequency-Hopping Spread Spectrum
Carrier frequency 2.4GHz ISM BAND
Power Supply
output: DC 5V, 1A input : 100~240V
built-in 350mAh Li-ion Battery
Transmitter
Receiver
Frequency response
Distortion ≤1%
20 Hz – 20 KHz
≥70dB
Range Up to 100 feet (without obstacles)
Working time approx 5~7 hours under wireless hearing mode
Charging time 3 hours
plug of power cable : 4.0*1.7mm
TECHINICAL SPECIFICATIONS
WARRANTY
12 months warranty: The 12 months warranty will cover defects in manufacturing
and product failure for a period of 12 months from the original date of purchase.
The warranty period is not extended if we repair or replace a warranted product.
This warranty is provided at the discretion of Hearing Products International Ltd.
And does not cover mechanical damage or damage due to acts of nature, accident,
misuse, abuse, negligence, commercial use, or modification of or to any part of
the product. Accessories such as audio cables, power adapter and perishable
items such as ear tips and batteries are not covered under this warranty.
Please note that our 12 months warranty does not affect your consumer statutory
rights.
For full T&C go to www.hear4you.com
For more information contact us info@hear4you.com or 01614808003
Faulty USB charging cable. Please change another workable USB
charging cable to see if it works.
www.hear4you.com www.hear4you.com
The transmitter is not switched on.
The is not put into the
charging slot properly or firmly.
receiver
One of the charging slots is
defective.
Switch on the transmitter.
Make sure the is put into the
charging slot correctly and firmly,
receiver
the front
of the receiver with the logo of “Echo” is
facing towards the front of the transmitter
with the logo of “Echo”.
Put the battery in the battery charging
compartment of the base or change another
charging slot for recharging.
21
This manual suits for next models
2
Table of contents
Other Hearing Products International Hearing Aid manuals


