ITC Rhapsody 1600 User manual

In-The-Canal
1600
operations manual


Table of Contents
Overview
Features, Controls and Identification ............................ 2
Preparation
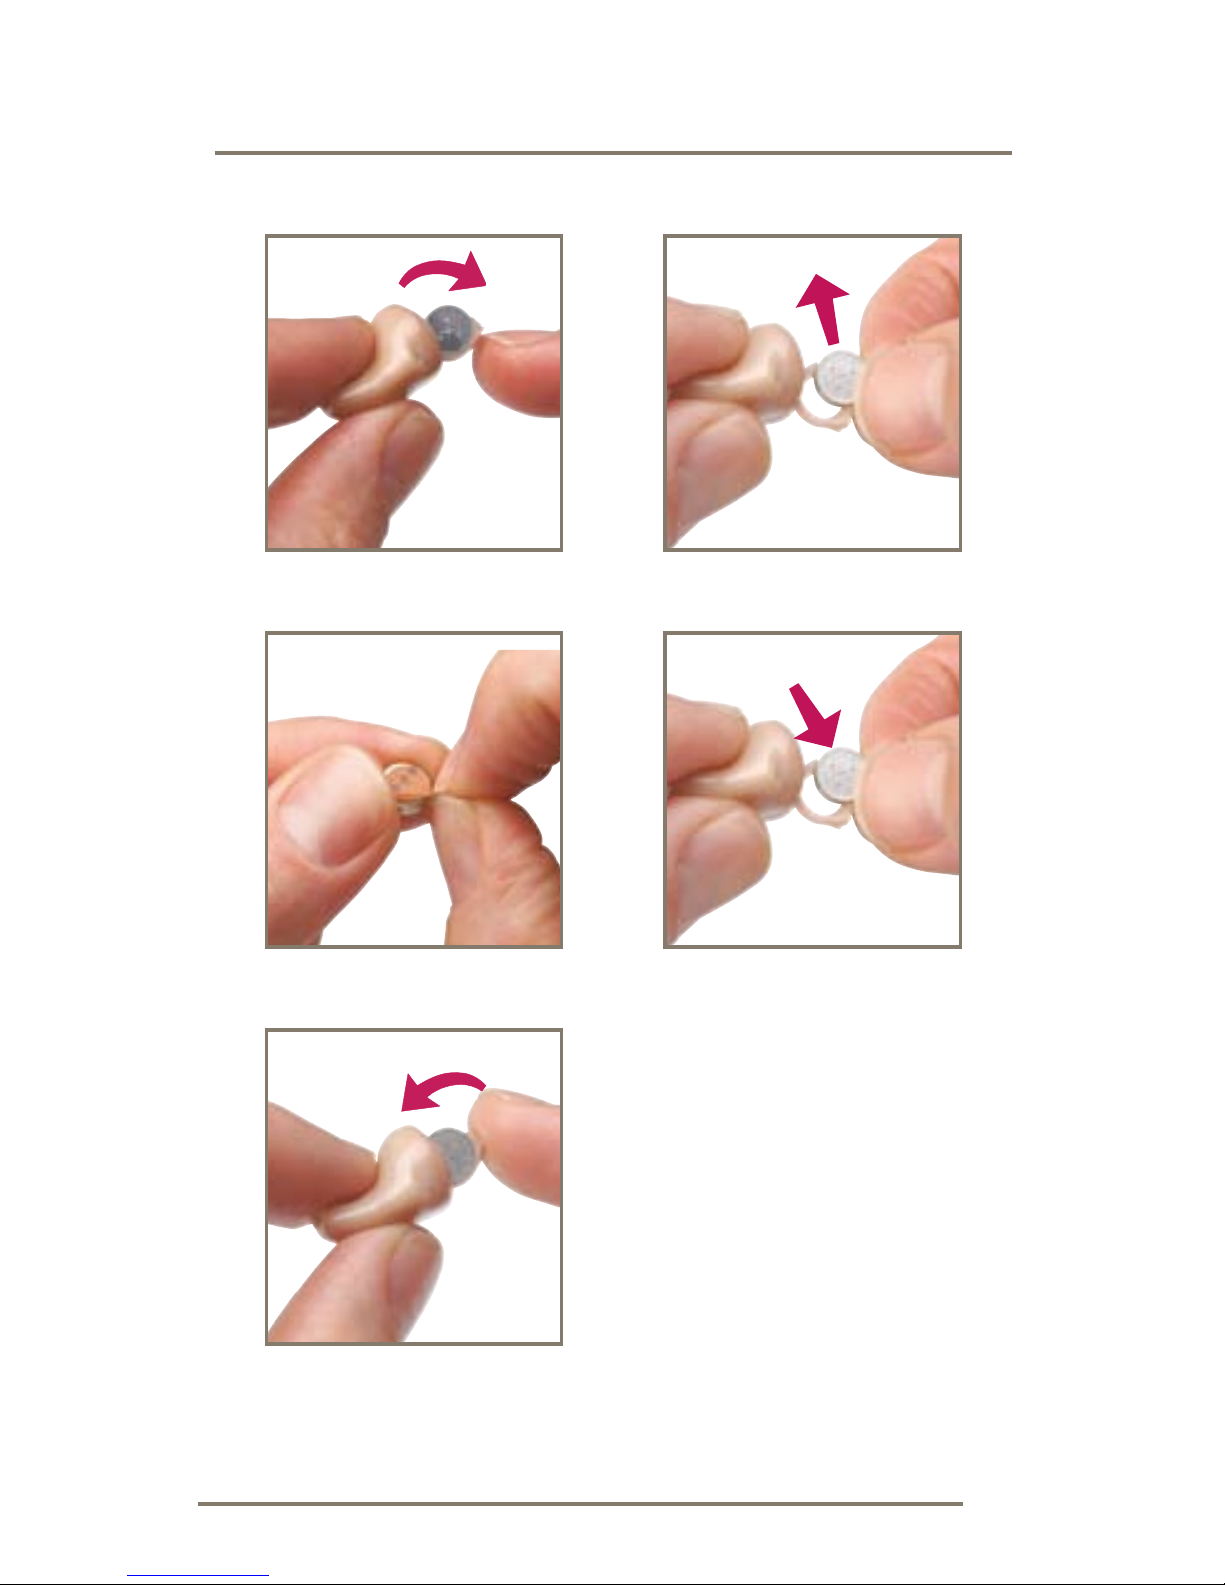
Batteries ........................................................................ 4
Battery Indicator Tones ................................................. 6
Insertion and Removal................................................... 8
Operation
On, Off and Volume Levels with No Volume Control.. 11
On, Off and Volume Levels with Volume Control........ 12
Multimemory Settings ................................................. 14
Directional Microphones ............................................. 16
Directional Settings ..................................................... 16
Telephone Use ............................................................ 18
Self Check ................................................................... 22
Reminder..................................................................... 23
Summary of Settings ................................................... 24
Hearing System Care
Instrument Care........................................................... 26
Service and Repair ...................................................... 28
Troubleshooting Guide ............................................... 29
Tips for Better Communication
For You ........................................................................ 30
For Your Family and Friends........................................ 31
FDA Information
Required Information .................................................. 32
1

2
Overview
Features, Controls and Identification
Your hearing system controls include:
1. Microphone opening(s)
2. Battery compartment (on/off control)
3. Vent (optional)
4. Receiver opening
Your hearing system can be identified by:
5. Location of serial number: RED Right
BLUE Left

3
Overview
1
2
3
4
0
0
-
0
0
0
0
0
0
0
0
5
Multimemory
Button (Optional)
Volume Control
(Optional)

4
Preparation
Batteries
Your hearing system uses
either a size 10 or 312
battery as its power source.
This battery size can be
identified by the yellow (10)
or brown (312) color code
on the packaging.
To insert or replace
the battery:
1. Use the nail grip on the battery door.
2. Open the battery door gently and remove
the old battery.
3. Remove the tab from the new battery.
4. Line up the battery’s plus “+” sign (flat side of
the battery) with the “+” on the battery door.
5. Close the battery door.

5
Preparation
1 2
3 4
5

6
Preparation
Battery Indicator Tones
An indicator will sound when the battery
voltage is low. You have approximately
20 minutes* to replace the battery. A different
tone lasting two seconds will sound just before
the battery stops working.
* Actual time between low battery indicator and shut
down will vary depending on environmental noise levels
and brand of battery used.
Helpful Hints
• NEVERFORCETHEDOORSHUT;thiscould
resultinseriousdamage;ifthedoorwillnot
close securely, check that the battery is inserted
correctly
• Donotopenthebatterydoortoofarordamage
is likely to occur
• Becauseoftheirsize,it’sagoodideatochange
and replace batteries above a table or desk
to reduce the risk of dropping the instrument
or battery

7
• Disposeofusedbatteriesimmediatelyinthe
proper waste or recycling container
• Becausebatteriescanvaryinsizeand
performance, your hearing care professional
is your best source for lifespan estimates and
verification that you are using the proper size
and type
Warnings
Batteries are dangerous if swallowed. To help
prevent the accidental ingestion of batteries:
Keep out of reach of children and pets
Check your medications before taking them
– batteries have been mistaken for pills
Never put batteries in your mouth, as they can
easily be swallowed
NationalButtonBatteryIngestionHotline:
202-625-3333
Preparation

8
Preparation
Insertion and Removal
To insert the hearing instrument:
1. Holdtheinstrumentwithyourthumband
forefinger on the outer edges of the case.
2. Tilt your hand slightly forward and gently insert
the canal tip of the instrument into your ear canal
and rotate the instrument backward.
3. Softly press the instrument into place with
your fingertip.
To remove the hearing instrument:
Grasp the instrument with your thumb and
forenger;gentlyrotateitasyoupulloutward.

9
Preparation
1 2
3

10
Preparation
Helpful Hints
• Minorirritationandinammationmayoccur
as your ear becomes accustomed to having an
objectinit;ifso,pleasecontactyourhearing
care professional.
• Ifanactualallergicreactionoccurs,alternative
materialsareavailable;contactyourhearing
care professional.
• Severeswelling,dischargefromtheear,
excessive wax, or other unusual conditions
warrant immediate consultation with a physician.

11
On, Off and Volume Levels With
No Volume Control
To turn ON:
Insert a battery and completely close the
battery door.
To turn OFF:
Open the battery door until the battery is no longer
touching the battery contacts.
Your hearing system has
been set to a specific
volume level by your
hearing care professional.
If sounds are generally too
loud or too soft, please
contact your hearing care
professional for advice and
adjustment.
Operation
My hearing instrument has no volume control.
Please read the section below.
My hearing instrument has a volume control.
Please skip to the section labled “On, Off and
Volume Levels with Volume Control.”

12
Operation
On, Off and Volume Levels
With Volume Control
To turn the instrument
“on,” use your fingertip to
rotate the volume control
forward, toward your face.
You should feel it “click” on if the instrument
was correctly turned off. To make sounds louder,
continue to rotate the control forward, toward
your face. Your hearing instruments may be
programmed to “beep” when you reach the
correct setting.
To make sounds softer, use
your fingertip to rotate the
control toward the back of
your head.
To turn the instrument
“off,” rotate the control further backwards, until
you feel it “click” and the control no longer turns.
ON OR VOLUME
INCREASE
ON OR VOLUME
INCREASE
DECREASE VOLUME
OR OFF
DECREASE VOLUME
OR OFF

13
Some hearing instruments are programmed to
have a power on delay. Your hearing professional
will place a check in the box below if your hearing
instruments have this feature.
The power on delay means that your instruments
will take several seconds to power up once they
have been turned on. This feature allows you to
get the hearing instruments in your ear before they
start to amplify sound.
Your hearing system has been set to a specific
volume level by your hearing care professional.
If sounds are generally too loud or too soft, please
contact your hearing care professional for advice
and adjustment.
Operation
My hearing instruments have a power on delay.

14
Operation
Multimemory Settings
Your hearing care professional can
set up to four hearing programs
for you. These additional programs
are accessed by pressing the
Multimemory button inward.
My hearing system has Multimemory.
Please read the information below.
My hearing system does not have
Multimemory. Please go to page 16.

15
Operation
When you press the Multimemory button, you
may hear an indicator or a tone series indicating
the device has changed to the next program.
Your hearing instrument has been setup with the
following environments.
Program Tone Speech Environment
1 1 Tone One Normal
2 2 Tones Two
3 3 Tones Three
4 4 Tones Four

16
Directional Microphones
Directional microphones help improve speech
understanding in noisy situations. When directional
microphones are activated automatically, the
hearing instrument will continually monitor
the environment and gradually adjust to the
appropriate mode to optimize speech intelligibility.
Directional Settings
Your hearing system has directional microphones
to help improve speech understanding in noisy
situations.
Your hearing system has been setup with the
following directional settings:
Operation
My hearing system uses omnidirectional
microphones. Please skip to the Telephone
Use section on page 18.
My hearing system uses directional microphones.
Please read the information below.

17
When the directional microphones are activated
automatically (automatic), the hearing instrument
will continually monitor the environment and
gradually adjust to the appropriate mode to
optimize speech intelligibility.
When the directional microphones are activated
by pushing the Multimemory button (manual), the
hearing instrument optimizes speech when you
select the directional memory.
Ask your hearing care professional about your
particular directional settings.
Operation
Program Directional Setting
1 Automatic Manual Off
2 Automatic Manual Off
3 Automatic Manual Off
4 Automatic Manual Off

18
Telephone Use
Your hearing instruments are equipped with tools
to help you effectively communicate on the
telephone. Your hearing professional will check the
box/boxes that represent the telephone settings in
your instruments.
Operation
Your hearing instruments have the following
telephone setting(s):
Automatic telephone response
Automatic telecoil
Telecoil. The telecoil is located in memory
position ______________.
A beep or indicator tone is enabled on your
instruments to signal you when the device
switches to the telephone setting
Table of contents
Other ITC Hearing Aid manuals