MedKlinn O3 Hydro 10 User manual

O3 Hydro 10 / 20
USER MANUAL

1. Safety Precautions
2. Device Identication
3. System Overview
4. Control Panel Identication
5. Fault Indicator
6. Geting Started
7. Installation Of Device
1
3
7
8
9
14
20
TABLE OF CONTENT

1. Do not use the device if the power cable or plug is damaged.
2. Do not insert any sharp or pointed object through the ventilation holes of the device.
3. Do not let unauthorized personnel to play with the device.
4. Do not immerse the device in water, or allow water or any uids to enter through the ventilation holes.
5. When removing the power plug, always hold the plug and never pull the cable.
6. Do not remove the power plug when your hands are wet.
7. Remove the power plug from the wall socket before cleaning the device.
8. Do not modify, disassemble or repair this device without proper training unless stated in the manual.
9. Do not replace the electric plug or cut the power cable. Replacing the plug or cutting the power cable in any way will
immediately cause the Warranty to become void. Any subsequent fault in the operation of the device will not be covered by the
Warranty, and repair and servicing will be chargeable.
10. If the power cable is damaged, contact an authorized Medklinn Service Centre for repairs immediately.
11. Do not attempt to open the inner compartment of the device. The device requires minimal maintenance, and no servicing or
repairs are to be carried out by the User. Opening the device or tampering with it in any way will cause the Warranty to become
void. If you encounter any problems with the device, please contact the nearest authorized Medklinn Service Centre.
12. Do not wipe the device with benzene or paint thinner.
SAFETY PRECAUTIONS
FOR FURTHER ASSISTANCE, PLEASE CALL OUR CUSTOMER SERVICE.
WARNINGS - To reduce the risk of electrical shock, re or injury:
1.

NOTE – Radio, TV or sensitive equipment interference:
If the device should cause interference to radio, television reception or any sensitive equipment, try to correct the interference
by one or more of the following measures:
- Reorient or relocate the receiving antenna.
- Increase the distance between the device and radio/TV receiver/sensitive equipment.
- Connect the device into an outlet on a circuit dierent from that to which the receiver is connected.
- Consult the dealer or an experienced radio/TV technician for help.
Cautions during operation:
1. Place the device at least 6 feet from radio, television or electronic equipment. This is to minimize the possibility of
interference with the equipment or the remote controller.
2. Do not cover the device in any way at all, particularly the ventilation holes. Doing so will cause excessive heat build-up and
may result in a re and irreparable damage to the device.
3. Avoid placing the device where curtains or other furnishings may cover the ventilation holes.
4. Avoid placing the device in an oily environment as it may cause the module to be coated with a thicker layer of
grease/debris. Hence, aecting its performance.
5. Ensure that there is free ow of air around the device.
6. Avoid locations where the device is exposed to condensation due to rapid and drastic temperature uctuations. The device
should only be used in temperatures between 5º-35ºC.
2.
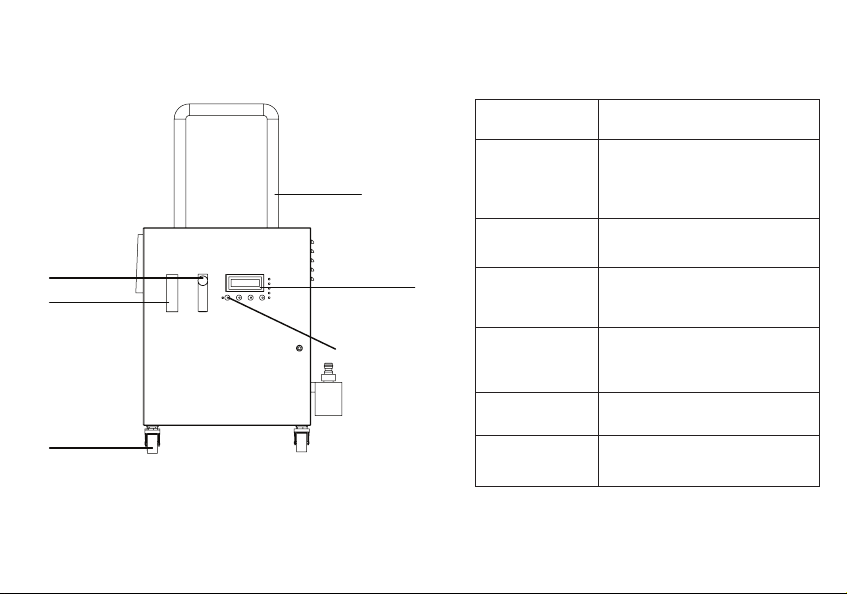
Device Identication
Side handle
Filter
Castor
wheel
O2 control Control panel
Power button
Functional parts
Filter
O2 control
Filters the air supply
Controls the amount of oxygen
owing into the device’s ozone
module
Power button To switch the device ON/OFF
Control panel
Castor wheel
Control/Monitors the entire
system
To ease in moving the device
and allow the device to be
stationary (lockable)
Door Door of the device
Door Lock Lock the device’s door
3.
Medklinn O3 Hydro 10 /20 (Front View)
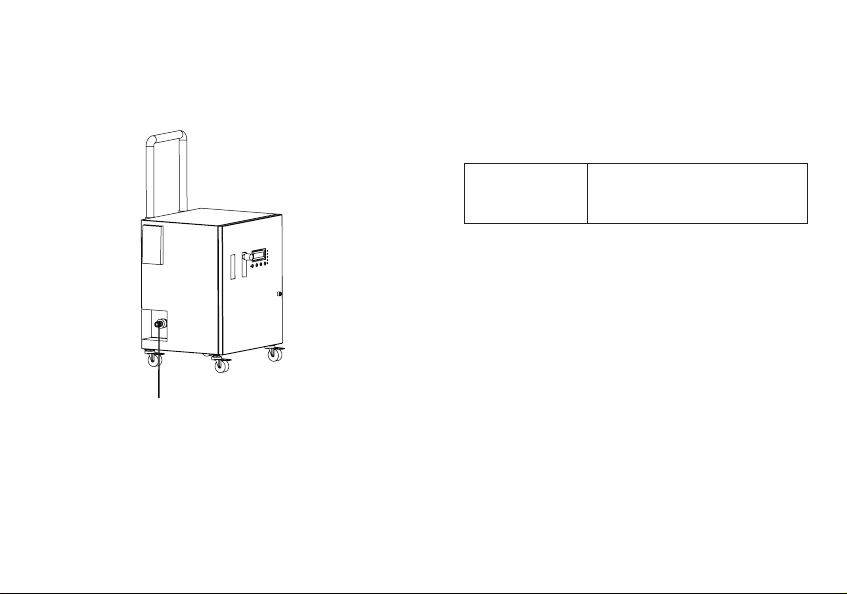
Water outlet
Device Identication
Functional parts
Water outlet Ozone water ows out from
here
4.
Medklinn O3 Hydro 10 /20 (Left Side View)
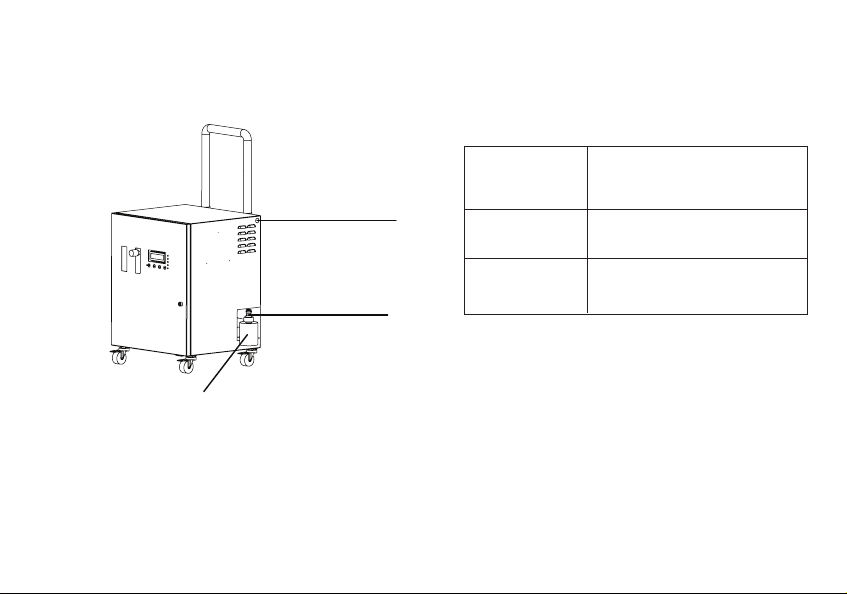
Booster pump
Device Identication
Functional parts
Power plug The power rating of the power
plug is 220/240v
Water inlet Water source ows in through
here
Booster pump
(Optional)
To boost the ow of the water
source
Water inlet
Power plug
5.
Medklinn O3 Hydro 10 /20 (Right Side View)

6.
Functional parts
Device Identication
Hose 2
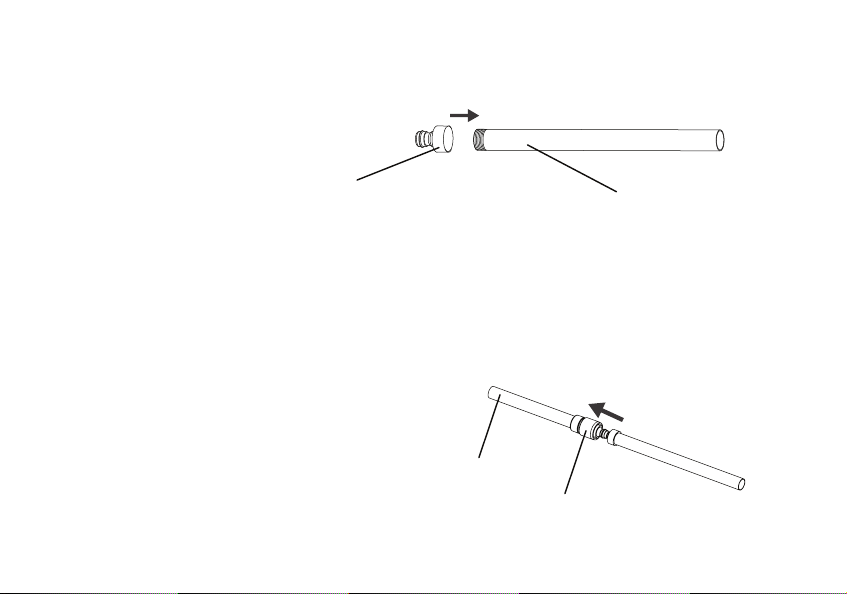
Medklinn O3 Hydro 10 /20 Accessories
Hose 1
Hose outlet
Hose
Quick plug (Female)
Quick plug (Female) Secures the hose to the water source and device
Hose outlet: Focuses the spray pattern of the water

7.
System Overview
Medklinn O3 Hydro 10 / Hydro 20 converts supplied oxygen (O2) into ozone (O3) and infuses it into the water. The ozone water
• Disinfects and deodorizes surfaces without hot water
• Eliminates bacteria viruses and mould
• Removes and prevents biolm build-up
• Dissolves oil and grease
When the Medklinn O3 Hydro 10 / Hydro 20 operates, the air is drawn into the device through the HEPA lter. This air is forced
through a ne mesh lter that traps pollutants before passing into the oxygen tank, which separates the nitrogen from the air,
resulting only oxygen is passed through The concentrated oxygen is nally supplied to the ozone module which breaks it
down to ozone (O3) with the use of electricity. It is then infused into the water through venturi injection to generate ozone
water.

8.
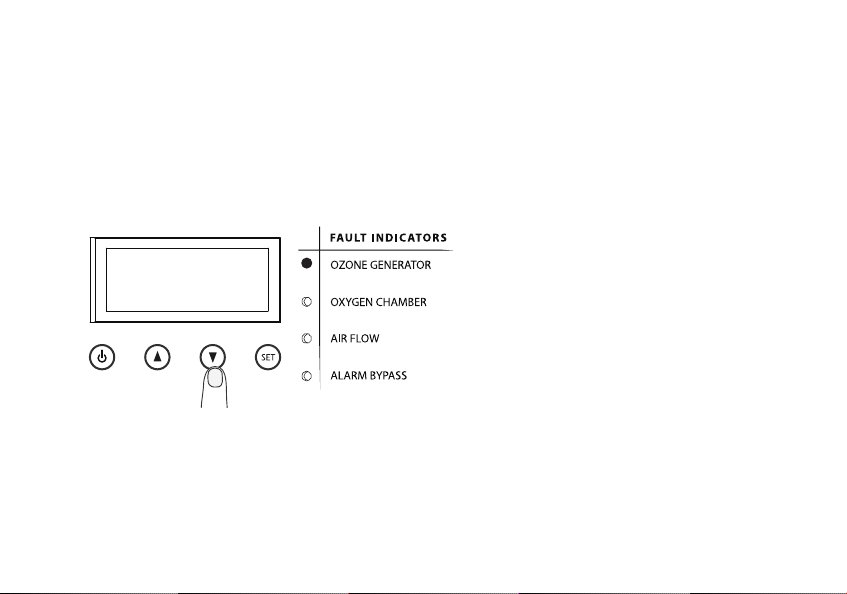
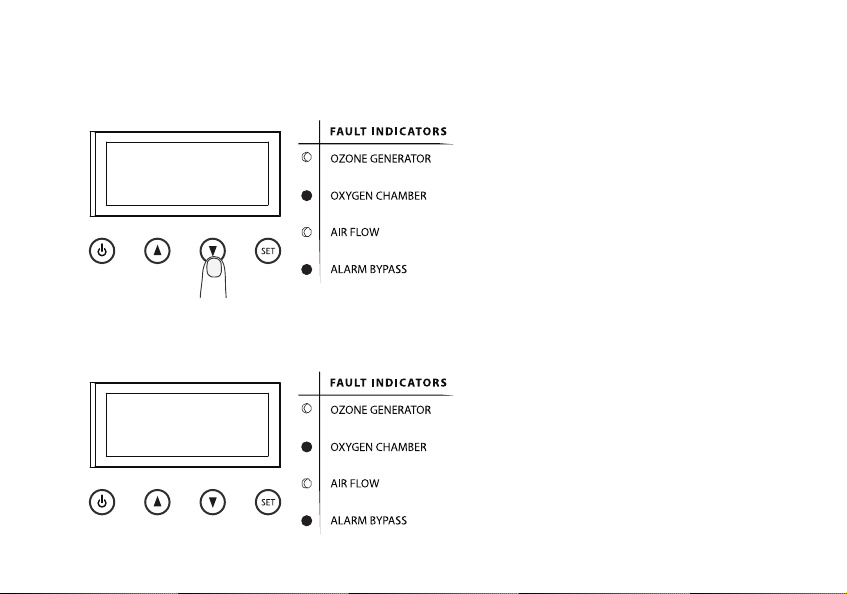
Control Panel Identication
Fault Indicators
NOTE: Follow the instruction displayed on the screen
if any address fault occurred
Ozone
generator:
Oxygen
chamber:
Air ow:
Points to a problem with the
ozone generator
Points to a problem with the
oxygen chamber
Points to a problem with the
air ow
Alarm bypass:
Shows that an alarm bypass
was done and the device will
continue running for another
30 days before shutting down
Display screen:
Power button:
Up / down
button:
Displays information status of
the device
To turn on the device
To scroll up and down in the
menus
Set button: To select options in the menus
Power
button
Up
button
Down
button
Set
button
9.
Fault indicators appear to notify the user that there is a problem with the device.
It is also accompanied with a buzzer sound. It directs the user to which component has failed.
Fault Indicators on the Control Panel
Ozone Generator Fault
Condition: Buzzer sound emitted, red light on Ozone Generator,
Display Screen shows ALARM: O3, Press v (Down) to mute.
Steps to take:
1. Press Down to switch o the alarm.
Alarm: O3
Press v to mute

10.
3. Meanwhile, the device will still continue to operate for the time stated on the Display Screen.
2. Contact the nearest Medklinn service centre to arrange for maintenance service immediately.
Call dealer for service
Mode: Temporary
Remain: 30 days
Oxygen Chamber Fault
Condition: Buzzer sound emitted, red light on Oxygen Chamber,
Display Screen shows ALARM: O2, Press v (Down) to mute.
Steps to take:
1. Press Down to switch o the alarm.
2. Contact the nearest Medklinn service centre to arrange for maintenance service immediately.
Alarm: O2
Press v to mute
Call dealer for service
11.

12.
3. Meanwhile, the device will still continue to operate for the time stated on the Display Screen.
Mode: Temporary
Remain: 30 days
Air Flow Fault
Condition: Buzzer sound emitted, red light on Air Flow, Display Screen shows Mode:
Stopped, Call for service, device has stopped operating.
Mode: Stopped
Call for service

13.
Steps to take:
1. Check to see if the O2 Control knob is not fully closed.
2. If it is, turn the O2 Control knob up. Press Power twice to switch the device o and on again. After 40
seconds, check to see if the device operates back in normal mode (without the fault status above). The
fault is resolved when the device is operating in normal mode after 40 seconds.
3. If it is not, press Power to switch the device o and contact the nearest Medklinn service centre to arrange
for maintenance service immediately.
14.
Getting Started: Connecting the hose
Using Quick Plug
1. Connect a Quick Plug (Male) to the water
source pipe with male threaded end.
NOTE: Make sure that there is enough Teon tape when attaching the Quick Plug (Male) to the threaded end of the
pipe to avoid leakage at that point
2. Pull the yellow cap of the Quick Plug (Female) while connecting
to the Quick Plug (Male). Release the cap to secure the
connection. There should be a “click” sound when the Quick
Plugs are secured together. Pull the hose gently to conrm that
the connection is indeed secured.
Quick Plug (Male)
Hose
Quick Plug (Female)
¾” Pipe with male
threaded end (water source)
15.
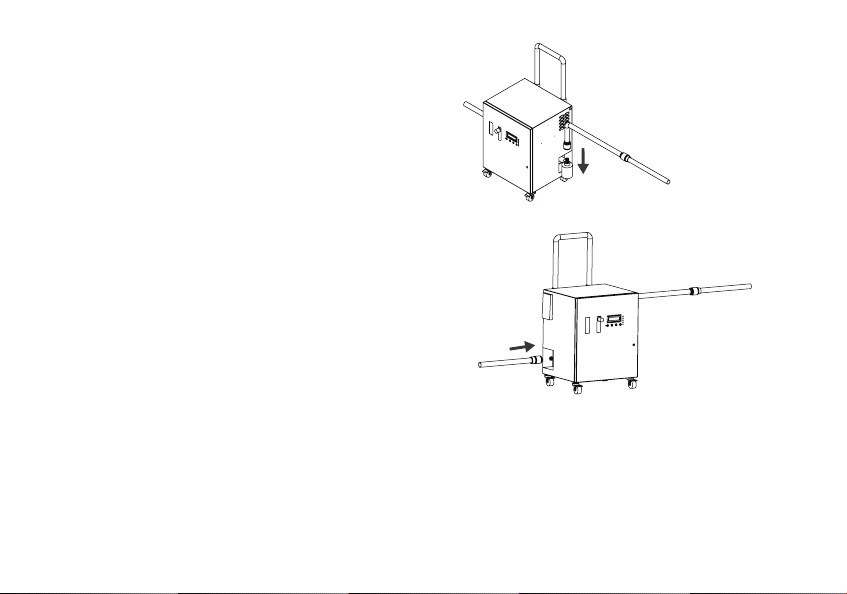
3. Connect the other quick plug (female) to the device’s water inlet.
4. Connect the second hose’s quick plug (female) to the device`s Water Outlet.
5. Switch on the device by pressing the power button.
6. Monitor the device status and oxygen ow by pressing up/ down button.

16.
NOTE: MODE:
Mode: Standby
STANDBY – indicates that the
device has no water ow
NORMAL – indicates that the
device is functioning
FLOW – shows the ow
rate of the oxygen
Mode: Normal Flow: 1 LPM
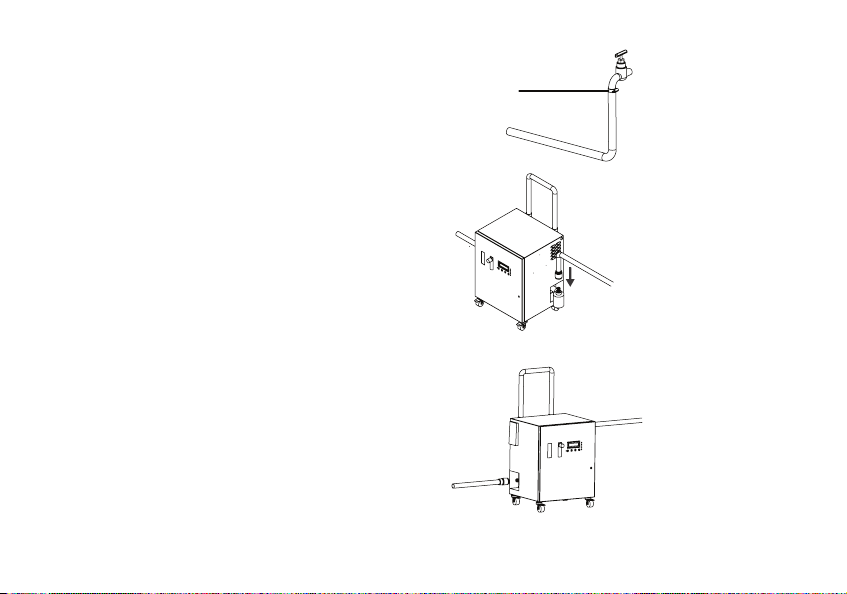
To a water tap
1. If you have a water tap, please remove one end of the
Hose 2 Quick Plug (Female) by loosening the cap.
2. Pull out the Quick Plug.
Hose 1
17.
3. Connect the hose to the water tap. Insert the hose clip to the hose before
connecting to the water tap. Tighten the connection by using the hose
clip with a screwdriver. Ensure it is tight and water will not leak out when
the tap is turned on.
4. Connect the other Quick Plug (Female) to the device’s Water Inlet.
5. Connect the second hose’s Quick Plug (Female) to the device’s Water
Outlet.
Hose Clip
18.
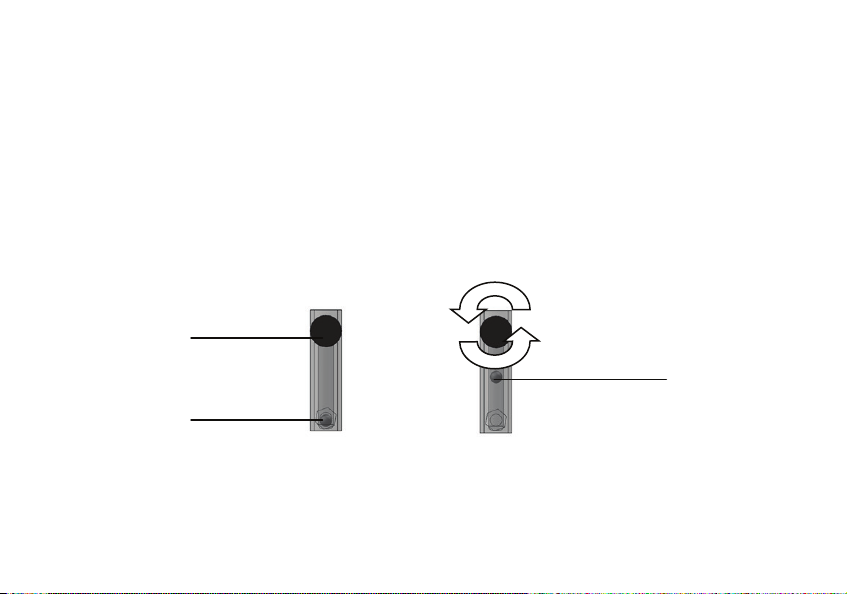
Getting Started: Controlling the ozone level into the water
The Medklinn O3 Jetspray Hydro 10 / 20 ozone level is controlled by turning the knob of the O2 Control to increase or decrease
the level ozone generation. It is advisable to keep the ow rate between 1 - 1.5 lpm.
Getting Started: Turn on the device
1. Plug the power inlet to the AC power outlet.
2. Connect both hoses provided to the device (Refer to Connecting the hose section).
3. Turn on the water supply.
4. Turn on the power button.
5. Make sure that the ow rate of the O2 Control is between 1- 1.5 lpm.
Before: O2 Control
when device is at rest
After: O2 Control when device
is in operation
Knob Turn
Ball Bearing
Ball Bearing is oating
This manual suits for next models
1
Table of contents
Popular Water System manuals by other brands

Unito
Unito INFINITY BWXX01 user manual

Field Controls
Field Controls Clearwave Water Conditioner CW-HD-2 instruction manual

Aquacentrum
Aquacentrum HIGHDROGEN AGE2 GO Blue900 user manual

Graf
Graf EcoBloc maxx Series manual

clage
clage Zip HydroTap G4 BCS 100/75 Operating and installation instructions

Marlo Incorporated
Marlo Incorporated TFC-25 Installation, operation & service manual


