Medoc TSA 2 Installation guide
DC 00573 TSA 2 Quick Installation and Set Up Overview Rev.1 Date of issue: 10.06. 2019 Page 1 of 9
TSA 2
Quick Set Up and Installation Overview
Before installing the system and software
1. Ambient room temperature should be: 18°C –24°C
2. Windows user must be an administrator to install the software.
3. Windows must be 7 and up. software cannot be installed on Mac operating system.
4. Disable any antivirus software during the installation.
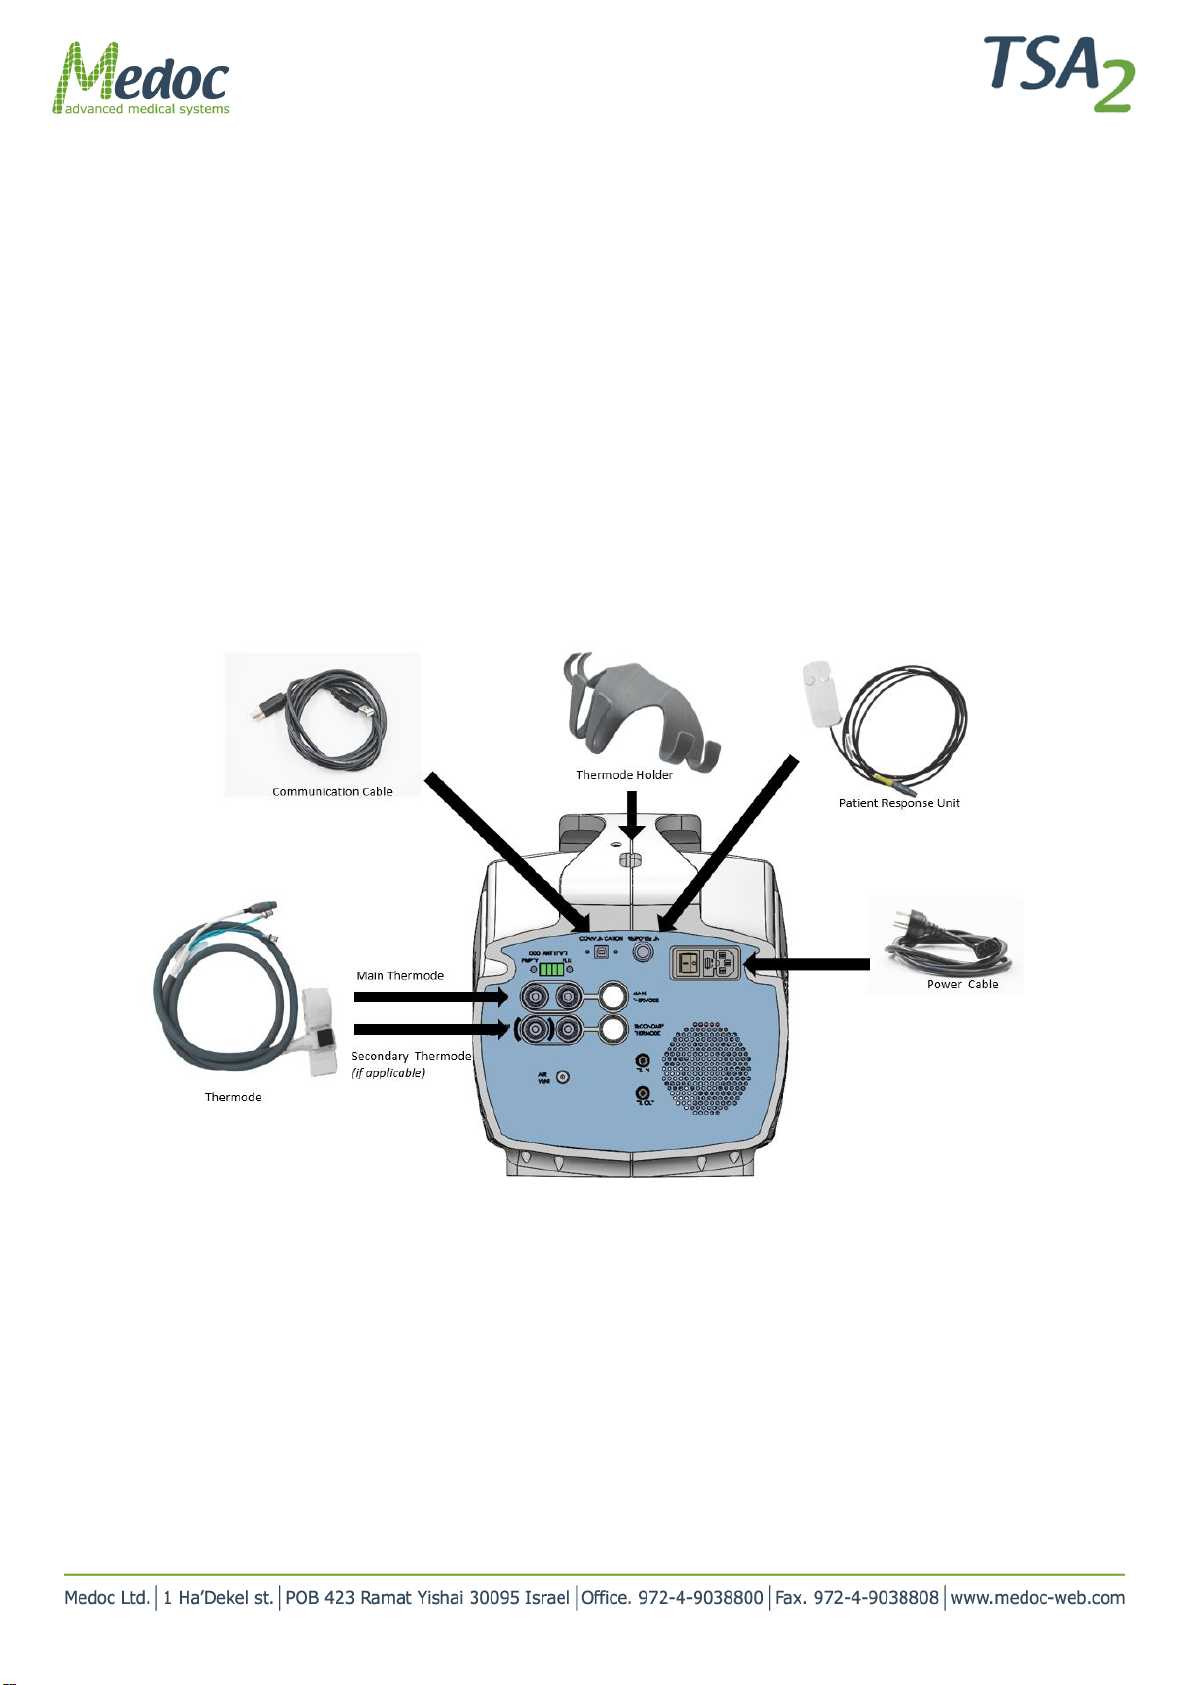
System set up - Connectors Panel
1. Unpack the box
2. Connect all the accessories according to the scheme pictured below:
Figure 1: TSA 2 Connection Scheme
3. Note that the CoVAS unit (if applicable) is connected directly via USB to the computer
4. Additional info can be found in section 3in the TSA 2 Operation Manual
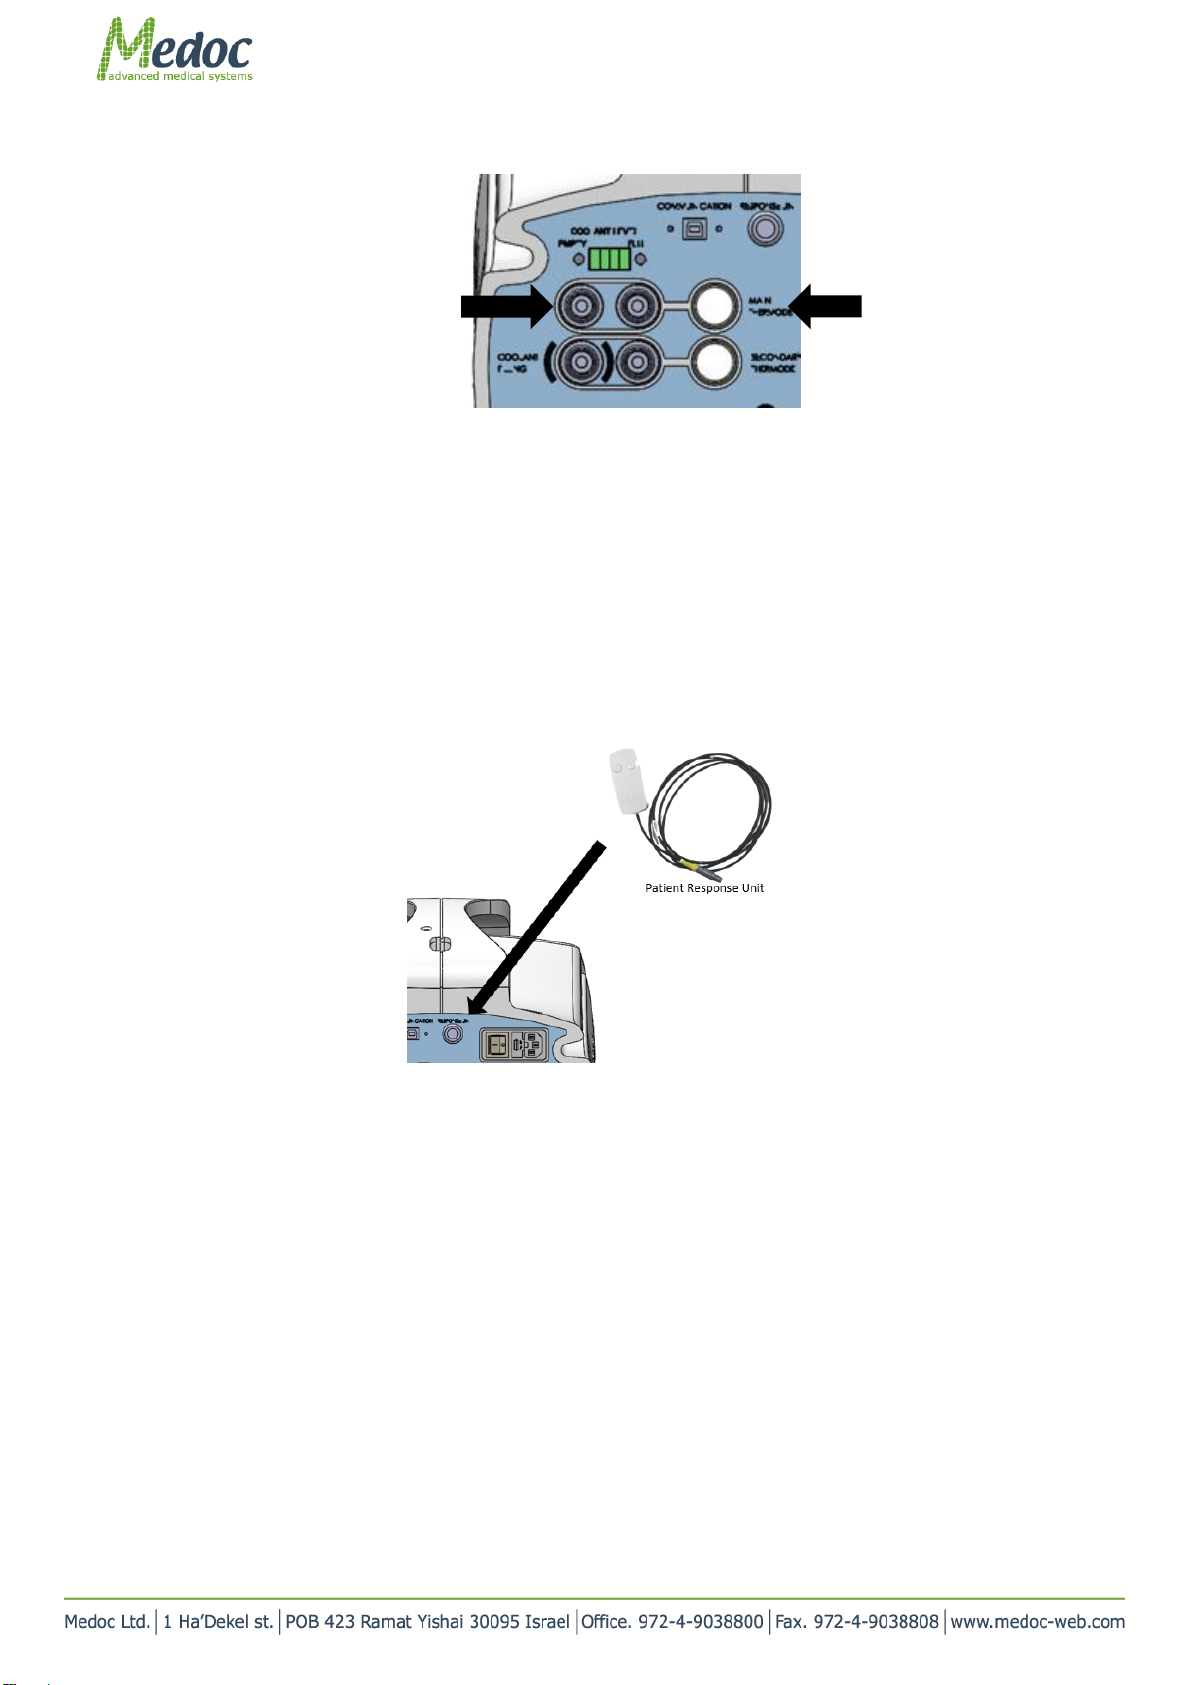
Thermode connections
1. The thermode plug, marked in green (1) is directional. The arrows indicate which side should face upwards. Make
sure you hear the click after inserting each connector.
2. The coolant connectors (2) should be inserted by pushing in the connector and rotated all the way clockwise.
3. If only one thermode is used, the thermode must be connected to the Main Thermode port, on top.
4. If there is an additional thermode, it should be connected to the Secondary Thermode port, on the bottom.
5. Make sure that both coolant connectors are connected.
DC 00573 TSA 2 Quick Set Up and Installation Overview Rev.1 Date of issue: 10.06. 2019 Page 2 of 9
Patient response unit connection
1. The Response Unit plug is colored yellow. It connects to the yellow port (marked Response Unit) in the system in
the upper quadrant.
2. Please make sure the arrows on the plug are facing up.
3. Make sure you hear a Click when inserting the plug.
4. When not in use, place the Response Unit in the middle holder position.
1 - Thermode Plug
2 –Coolant connectors
Figure 2: Thermode connection
Figure 3: Patient response unit connection

DC 00573 TSA 2 Quick Set Up and Installation Overview Rev.1 Date of issue: 10.06. 2019 Page 3 of 9
Software set up
Software Installation preparation
1. Insert the software USB drive to a USB port
2. Wait for the AutoPlay window to show
3. Click on “Open folder to view files”
OR
1. Click on the link you received
2. Download and unzip the installation files
3. Save the folder locally on your computer
4. Open the folder
Software Installation
1. Double click Setup.exe
2. Click Next all the way through
3. Additional info can be found in section 4.7in the TSA 2 operation Manual
TSA 2 is now ready for use.
Figure 4: Open SW folder
Figure 5: Software installation stages

DC 00573 TSA 2 Quick Set Up and Installation Overview Rev.1 Date of issue: 10.06. 2019 Page 4 of 9
Starting Up
1. Before starting - Always turn the system ON first, and then open the software
2. Start Medoc Main Station software by double-clicking the icon .
3. The home screen is displayed showing the devices available under your license . Choose TSA 2 (marked in red)
Figure 6: MMS main screen
4. When the login screen is displayed, enter your user name and password and select “TSA 2” in the “connect to”
field. Initial login Username and Password are both “admin”
Figure 7: Login Screen
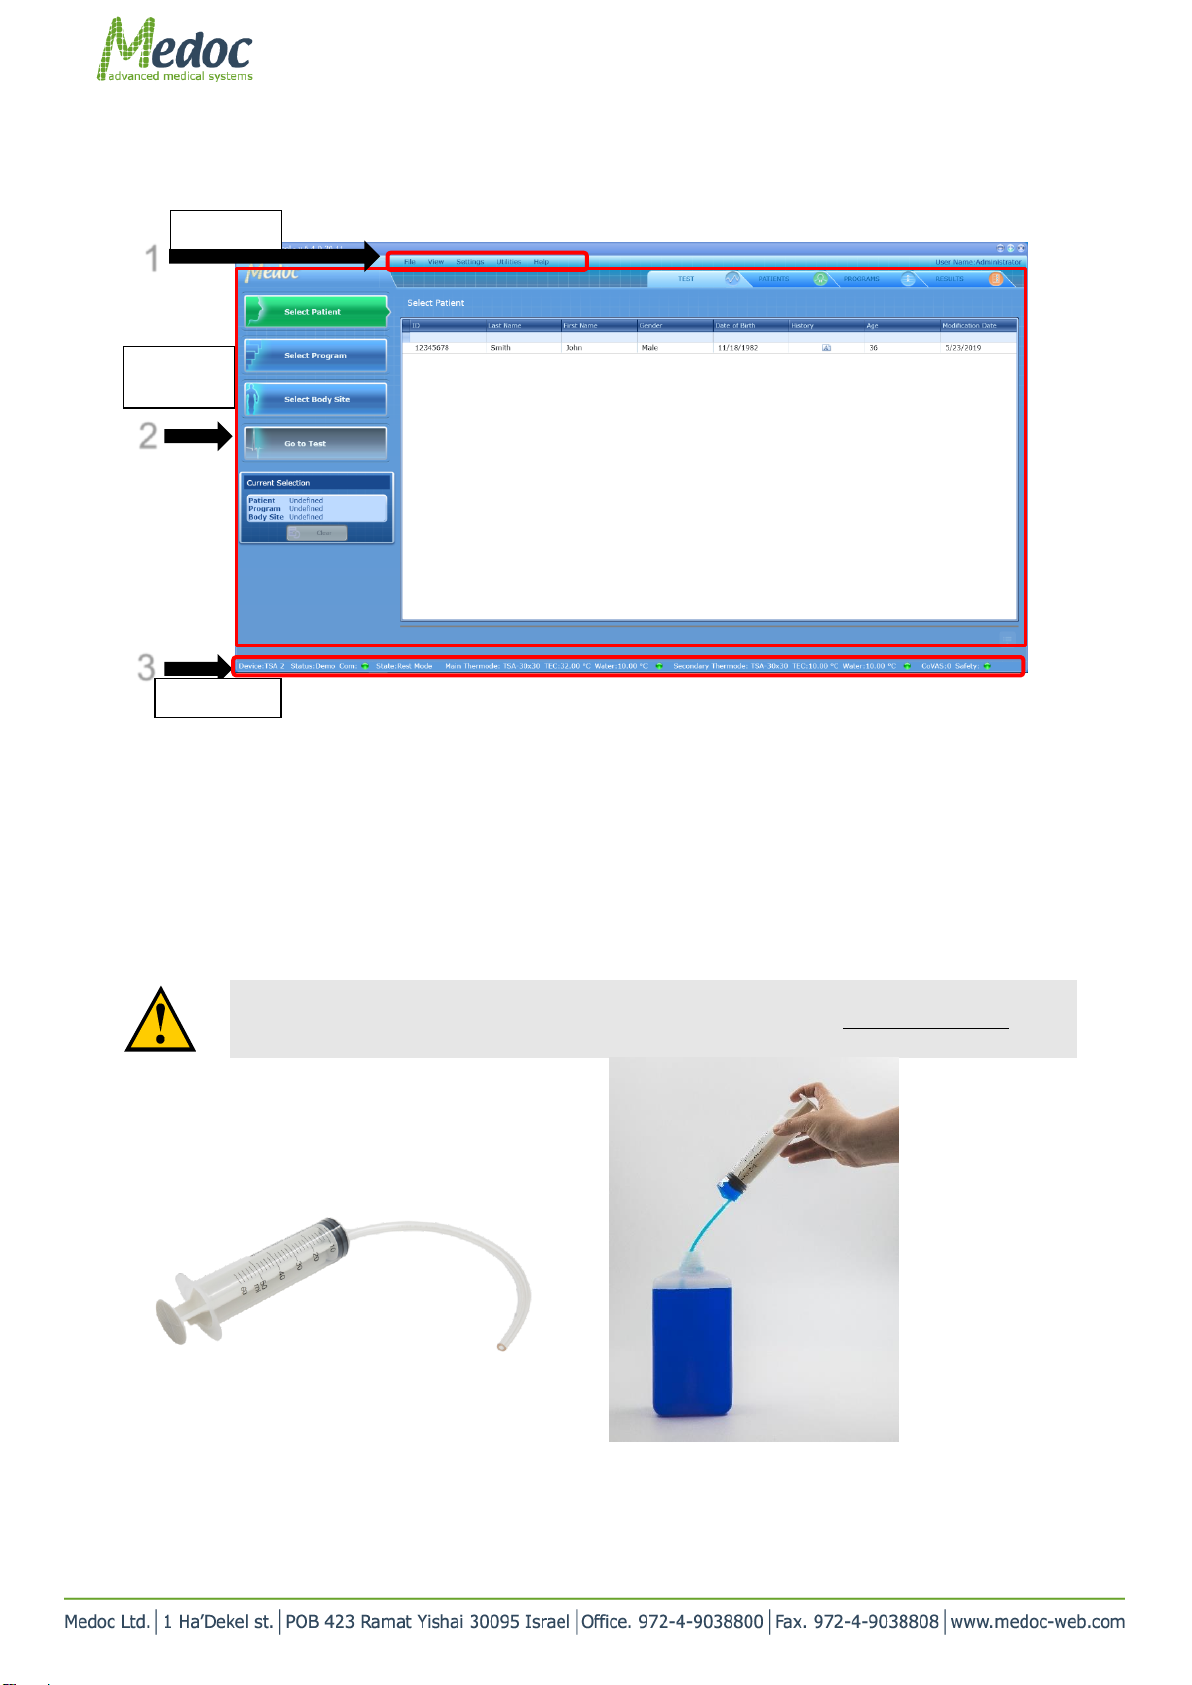
5. Software screen overview
The software screen is divided into 3 main areas:
1. Menu bar –consists of the following options: software/hardware/Test settings (under ‘Settings’ tab),
export /export data (under ‘File’ tab) ,operating manual (under ‘Help’ tab, etc. )
2. Main toolbar - consists of shortcuts to the different views:
a. Test –Select test parameters
b. Patients –Manage patient database
c. Programs –Manage program list
d. Results –View, export or print test results
3. Status bar - displays important information about the status of the connected device. Status (On-Line/
Demo), system state (rest, test, safe), safety status, etc.
DC 00573 TSA 2 Quick Set Up and Installation Overview Rev.1 Date of issue: 10.06. 2019 Page 5 of 9
Additional information can be found in the TSA 2 Operation Manual sections 6-10
Figure 8: Software Overview
System maintenance - Filling the Cooling unit
1. Use the kit AS 00171 to fill the cooling unit.
connect the syringe to the transparent tube without the connector, fill the syringe with coolant liquid
Use only coolant liquid from type Dowthern SR1 (or other coolant liquid approved by Medoc)
Figure 9: Filling the syringe with coolant liquid
1
2
3
Main Bar
Main
Toolbar
Status bar
DC 00573 TSA 2 Quick Set Up and Installation Overview Rev.1 Date of issue: 10.06. 2019 Page 6 of 9
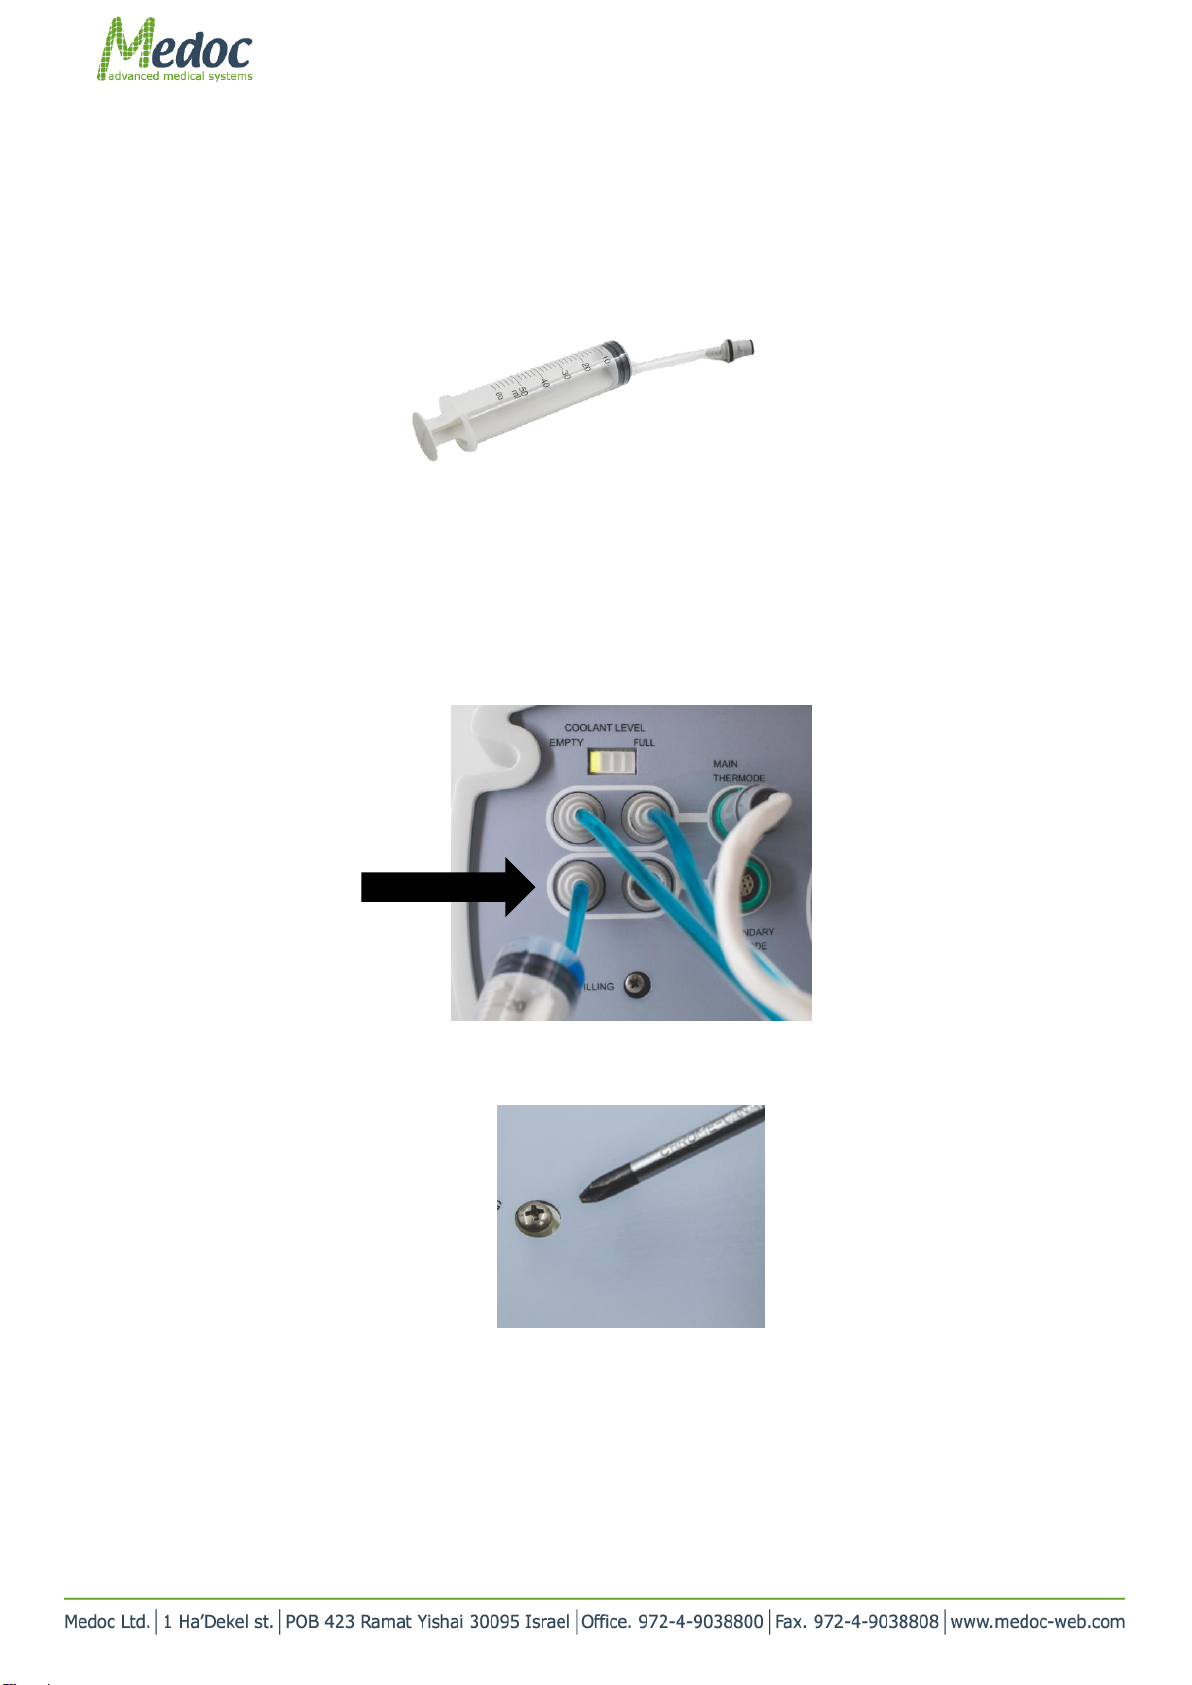
2. Switch the transparent tube to the one with the connector at the end (see below)
Figure 10
3. Attach the connector to the lower left coolant port in the system.
Main thermode should be connected and the system should be turned ON.
4. In case secondary thermode is to be used, complete the next steps with secondary thermode disconnected. Then
connect it and check that coolant level is still sufficient
Figure 2: Connecting syringe to system
5. Using a Philips head screw driver, open the vent screw, located below the coolant ports. Screw it out 3 turns
counter-clockwise
Figure 3: Air vent screw
6. Fill the system slowly with cooling liquid (ONLY) and check the Coolant Level LED lights indicator (located above
the thermode ports).
7. As soon as the fourth LED (full) lights up, stop filling the system.
DC 00573 TSA 2 Quick Set Up and Installation Overview Rev.1 Date of issue: 10.06. 2019 Page 7 of 9
Always allow 15-20 seconds for trapped air in the system to be pumped towards the air vent screw
between pushing the syringe plunger.
8. Disconnect the syringe from the system and keep it for future use.
9. Tight the vent screw back to the system. ( 3 turns clockwise)
10. Important notes:
10.1. It is recommended to fill the system before it reaches the lower indicator (most left of the four LED lights).
10.2.When the coolant level is too low (coolant level empty) safety precautions are activated and the system will
not allow work to continue before filling the system.
System Requirements: 1 GHZ CPU frequency. Windows 7,8 or 10. 2GB RAM.
see section 4.1 in TSA 2 Operation Manual.
Do not connect any equipment to the TSA 2 system that has not been specifically authorized and
approved by Medoc.
Note: Software installation can be performed only by Windows system administrators. Make sure
you have the appropriate administrator privileges on your computer. Or have your system
administrator to install the software for you.
DC 00573 TSA 2 Quick Set Up and Installation Overview Rev.1 Date of issue: 10.06. 2019 Page 8 of 9
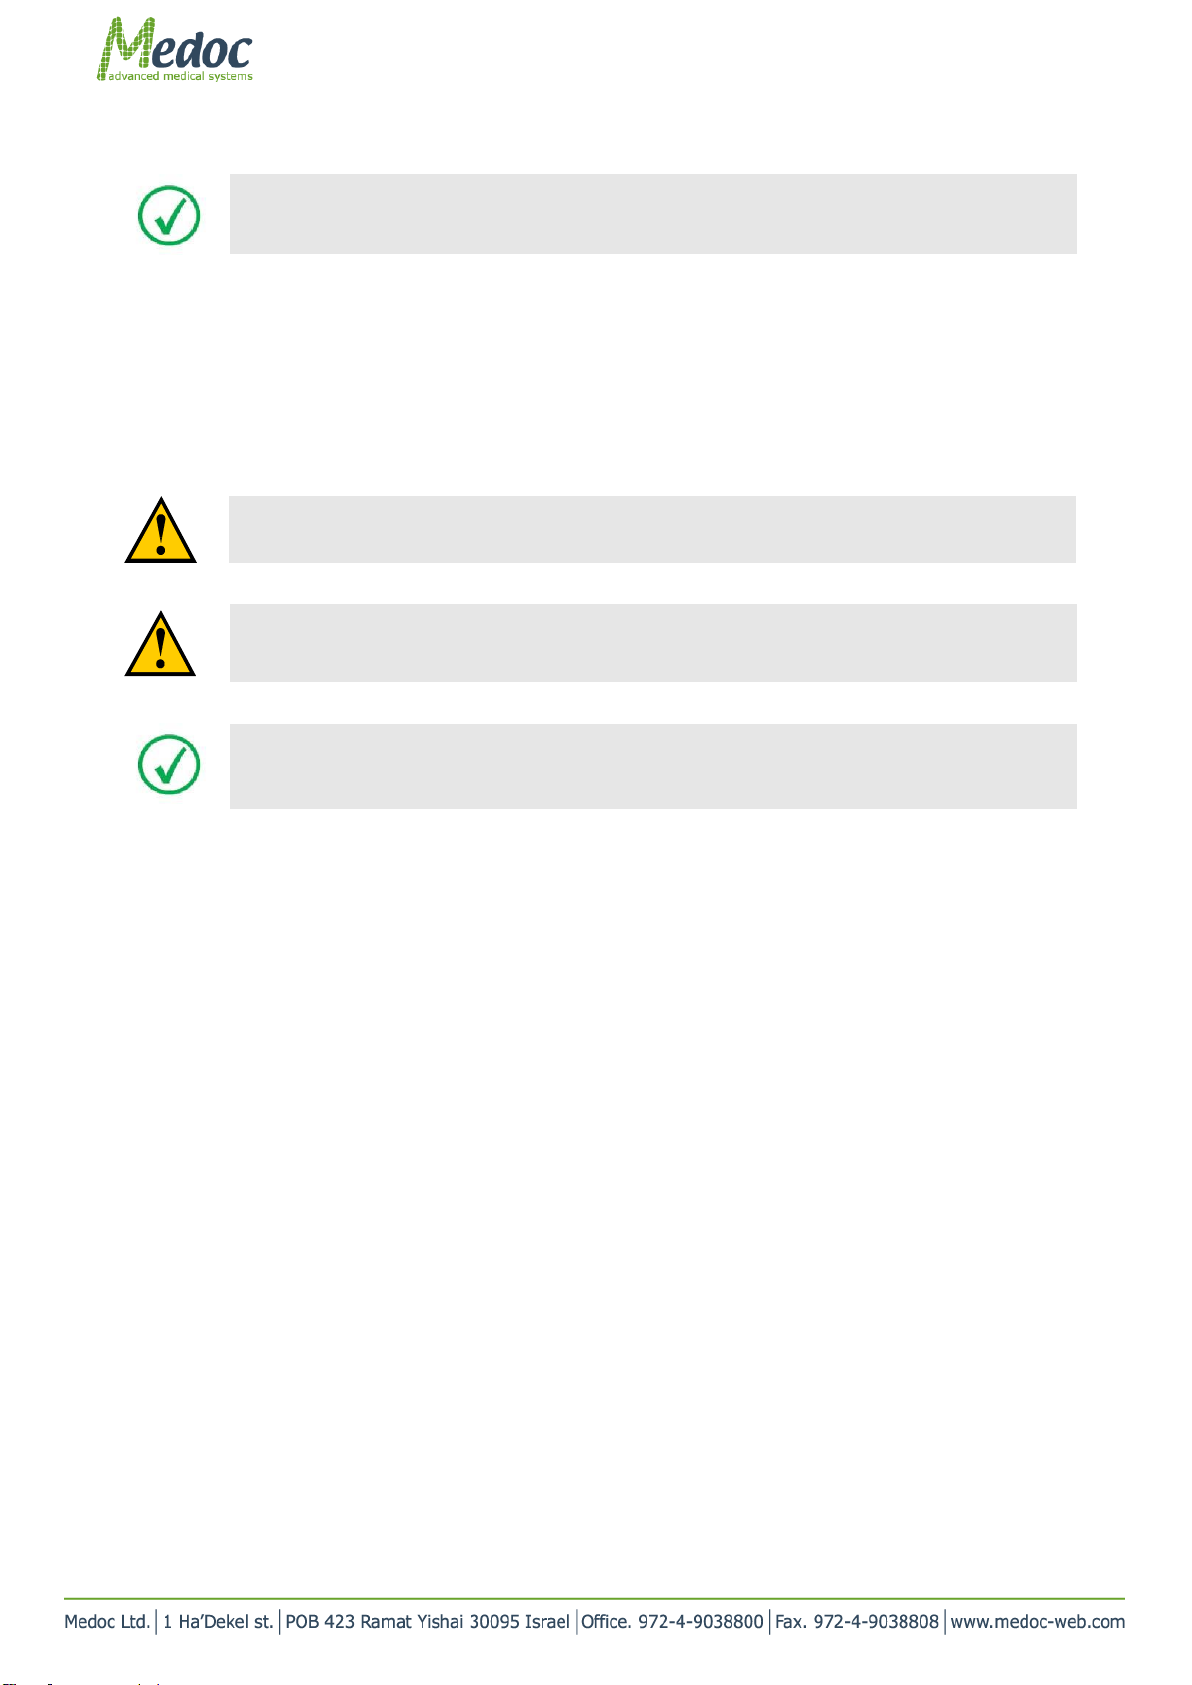
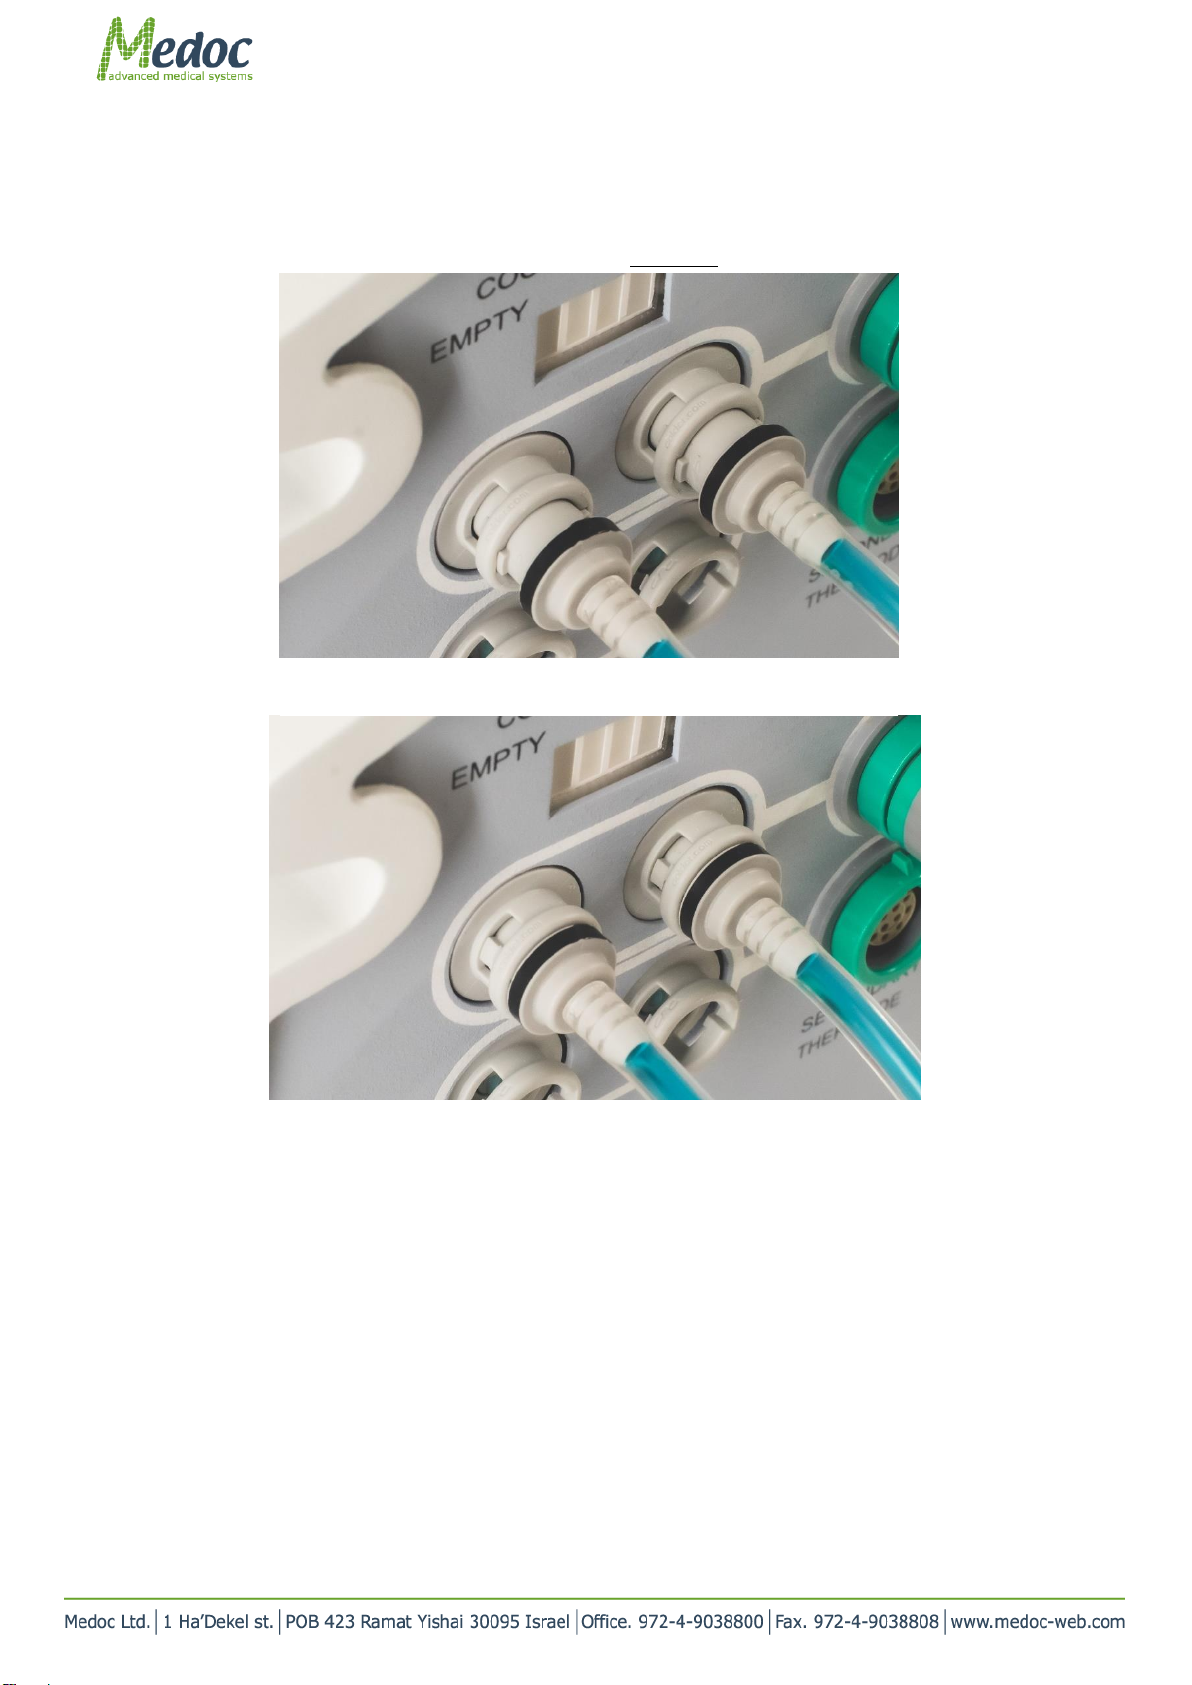
Common Troubleshooting
Thermode connection
Note that the thermode liquid connectors needs to be inserted all the way in and rotated clockwise
Figure 5: Wrong coolant connection –not rotated all the way clockwise
Figure 4 : Wrong coolant connectors connection
should be inserted all the way

DC 00573 TSA 2 Quick Set Up and Installation Overview Rev.1 Date of issue: 10.06. 2019 Page 9 of 9
Software
In case the software is in Demo mode –how can I re-connect to the system?
1. Make sure that the system is turned ON and that the communication cable is connected to the computer
2. Go to “utilities” and click “Device Recovery”
Figure 6: device recovery
Table of contents
Other Medoc Medical Equipment manuals


