manuals.online logo
Brands
  1. Home
  2. •
  3. Brands
  4. •
  5. MedViron
  6. •
  7. Indoor Furnishing
  8. •
  9. MedViron 39" Overbed Table User manual

MedViron 39" Overbed Table User manual

Service Manual
32” Medviron Overbed Table
Table of Contents
Section 1 Caster Replacement
Section 2 Plug Replacement
Section 3 Top Replacement
Section 4 Gas Spring Replacement
Section 5 Vanity Service
Section 1: Service Instructions for
MedViron Overbed Table Caster Replacement
This manual is intended for trained professionals for adjustment of the MedViron Overbed Table. Any
action not outlined in this manual may result in voiding of the warranty.
Tools required
Mallet
Straight slot screw driver
1.0 Turn the over bed table upside down
To replace casters that are worn or malfunctioning, first raise the unit to its fullest extension. Turn the
over bed table upside down and place on a protected surface such as a blanket (may require assistance).
1.1 Removing and replacing the caster and post
Using a straight slot screw driver, pry the existing caster off the caster post. Use a mallet to snap the new
caster on to the post. see Figure 1
Figure 1
Section 2: Service Instructions
MedViron Overbed Table Base Plug Replacement
This manual is intended for trained professionals for adjustment of the MedViron
Overbed Table. Any action not outlined in this manual may result in voiding of the
warranty.
Tools required
Soft Mallet or Hammer
Punch
2.0 Turn the over bed table upside down or on its side
To replace damaged or worn end plugs, first raise the unit to its fullest extension. Turn the
over bed table upside down or on its side and place on a protected surface such as a blanket
(may require assistance).
2.1 Removing and replacing the plug
Insert a punch through the caster hole (as shown) and tap on the back side of the plug.
Remove the plug. Insert a new plug carefully, inserting all sides evenly and equally. If
necessary, tap the plug with a soft mallet or hammer. See Figure 2
Figure 2
Section 3: Service Instructions OBT 32” Top Replacement
This manual is intended for trained professionals for adjustment of the Medviron Overbed Table.
Any action not outlined in this manual may result in voiding of the warranty.
Tools required
5/32” Allen wrench
#2 Square driver bit (Provided)
3.0 Remove the top
Raise the unit to its fullest extension. Remove (8) screws from the underside of the plate. Lift top up
and off of the plate. See Figure 3
3.1 Replace the top
Place the new top on the plate and align the holes. Replace the screws with care. Do not cross thread
or over-tighten.
Figure 3
Section 4: Service Instructions –Gas Spring Replacement
MedViron 32” Overbed Table
This manual is intended for trained professionals for adjustment of the MedViron Overbed Table. Any
action not outlined in this manual may result in voiding of the warranty.
The overbed table contains a single locking gas spring for height adjustment. This gas spring keeps the
table from being lowered until the handle is activated, but allows free rise. Gas springs can lose force
over time, which will cause the table to descend faster when activated.
Tools required
#2 & #3 Phillips Screwdriver (Powered driver not recommended except where noted)
7/16” socket or wrench
Block (provided)
4.0 Replacing the gas spring
4.1 Remove the top as shown in Section 3.
4.2 Remove the top plate by first removing (4) screws (Figure 4). A power driver may be required
for this operation.
Figure 4 Figure 5
4.3 Remove the top washer by removing the 2 screws that are attached to the upper column, NOTE:
keep hold of the upper column while removing the screws to prevent the column from dropping. Next
loosen the 2 nuts holding the gas spring to the top washer. Remove the top nut & the top washer & set
aside (Figure 5).
Figure 6
4.4 Remove the base. Place unit on a soft surface such as a blanket or carpet. Remove four bolts,
washers & Anti-mushroom plate (Figure 6).
4.5 Remove the bottom washer. Remove nut & two screws in the bottom of the column’s bottom
washer. Unscrew the bottom washer from the gas spring. Pull the gas spring out of the column.
(Figure 7).
Figure 7
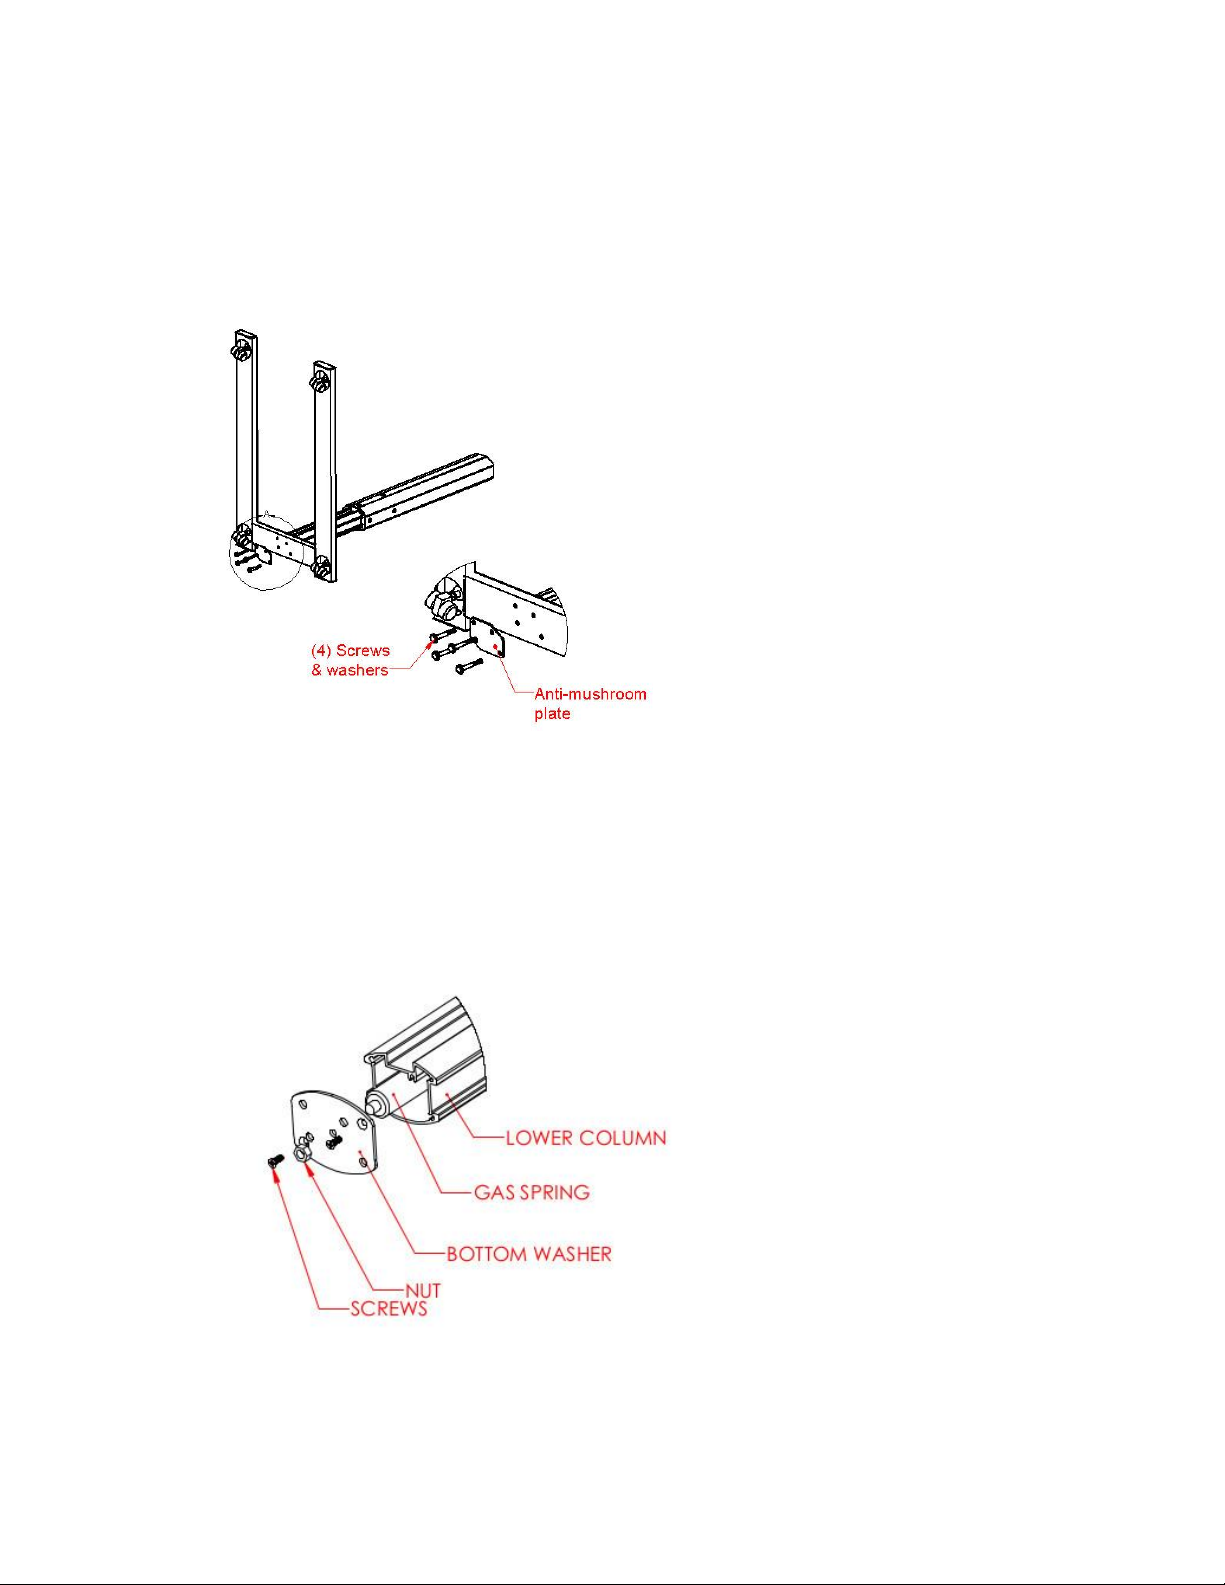
4.6 Assemble bottom washer to the new gas spring by screwing the bottom washer onto the gas
spring. Re-attach the nut onto the bottom washer/gas spring. (Figure 7).
4.7 Insert the gas spring into the column and attach the bottom washer to the column with the two
screws removed in step 5.7 making sure all bolt holes line up with screw boses in the column.
4.8 Attach the Base to the column using the screws, washers & anti-mushroom plate removed in step
4.4 (Figure 6).
4.9 Attach the top washer removed in step 4.3 to top of gas spring. Thread on the top nut. Adjust
the nut setting so that the top of the lever is parellel to the top washer (Figure 5).
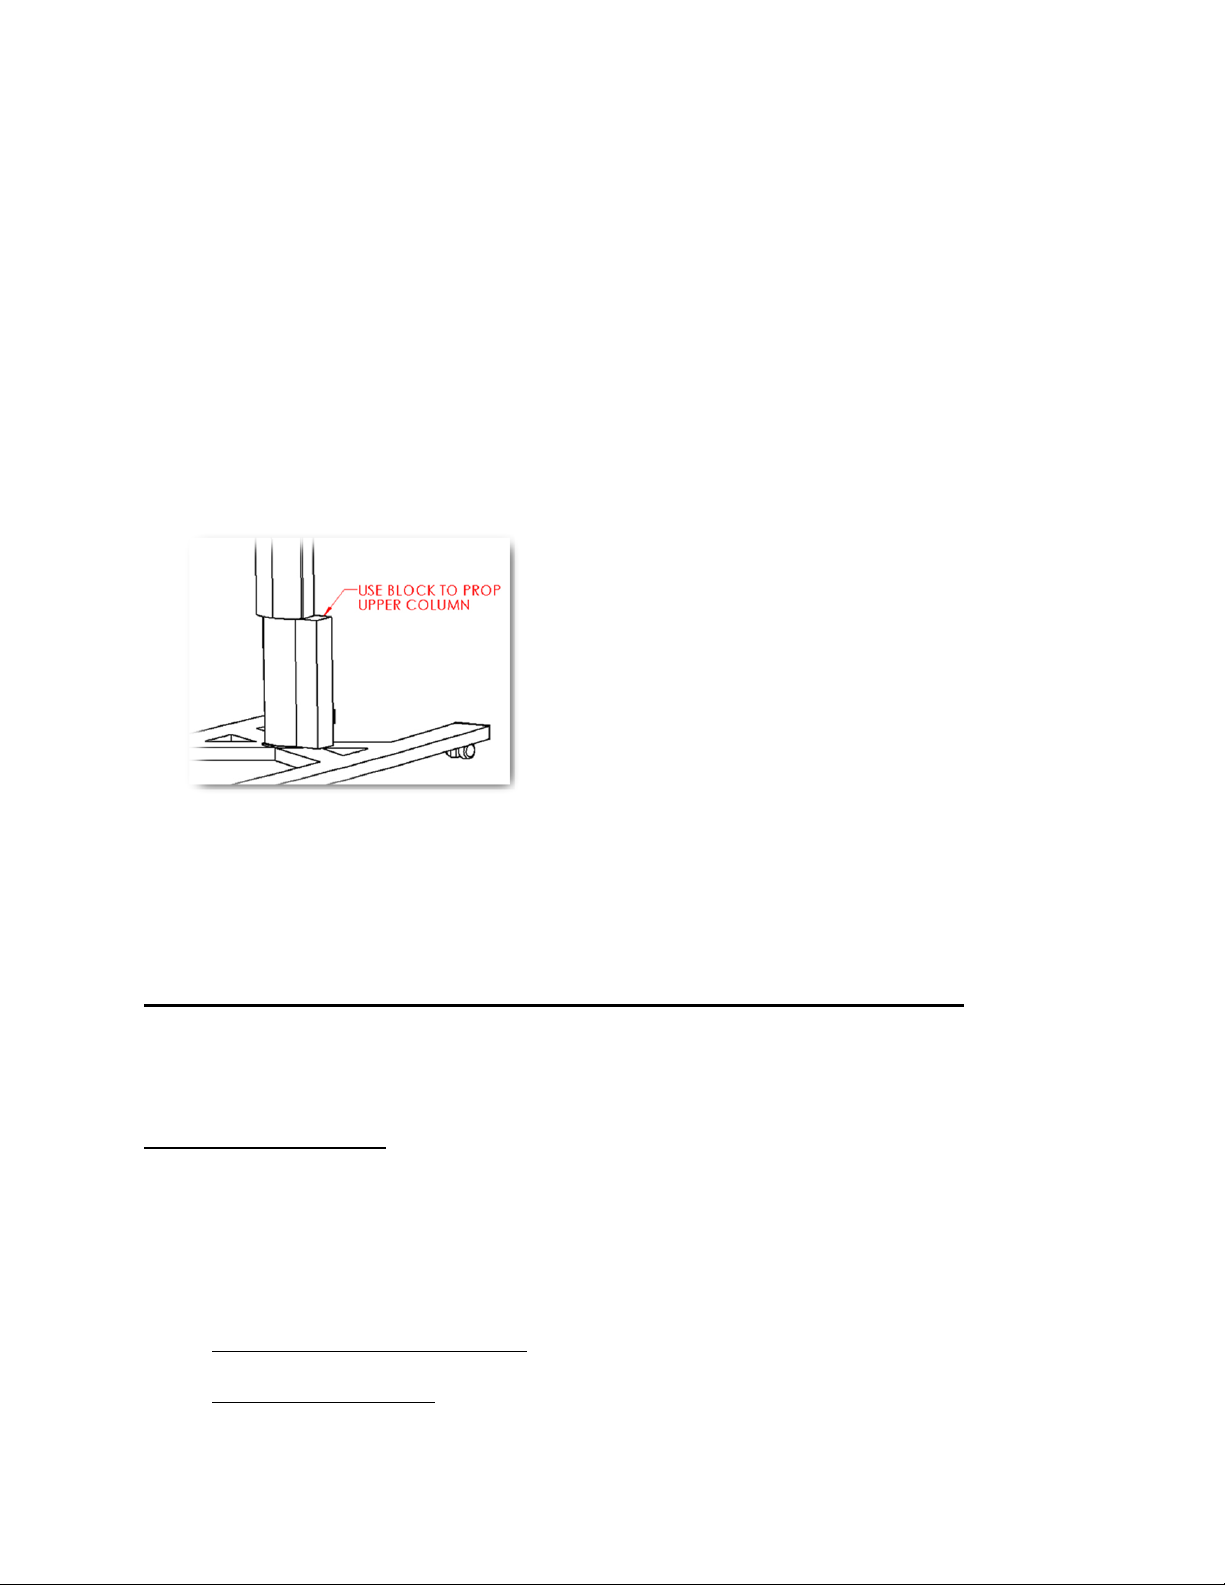
4.10 Attach the upper column to the top washer. Use the provided block to boost the upper column
(Figure 8). Activate the gas spring lever and push the top plate down, aligning the plate and column
holes. Attach with the 2 screws removed in step 4.3 (Figure 5).
Figure 8
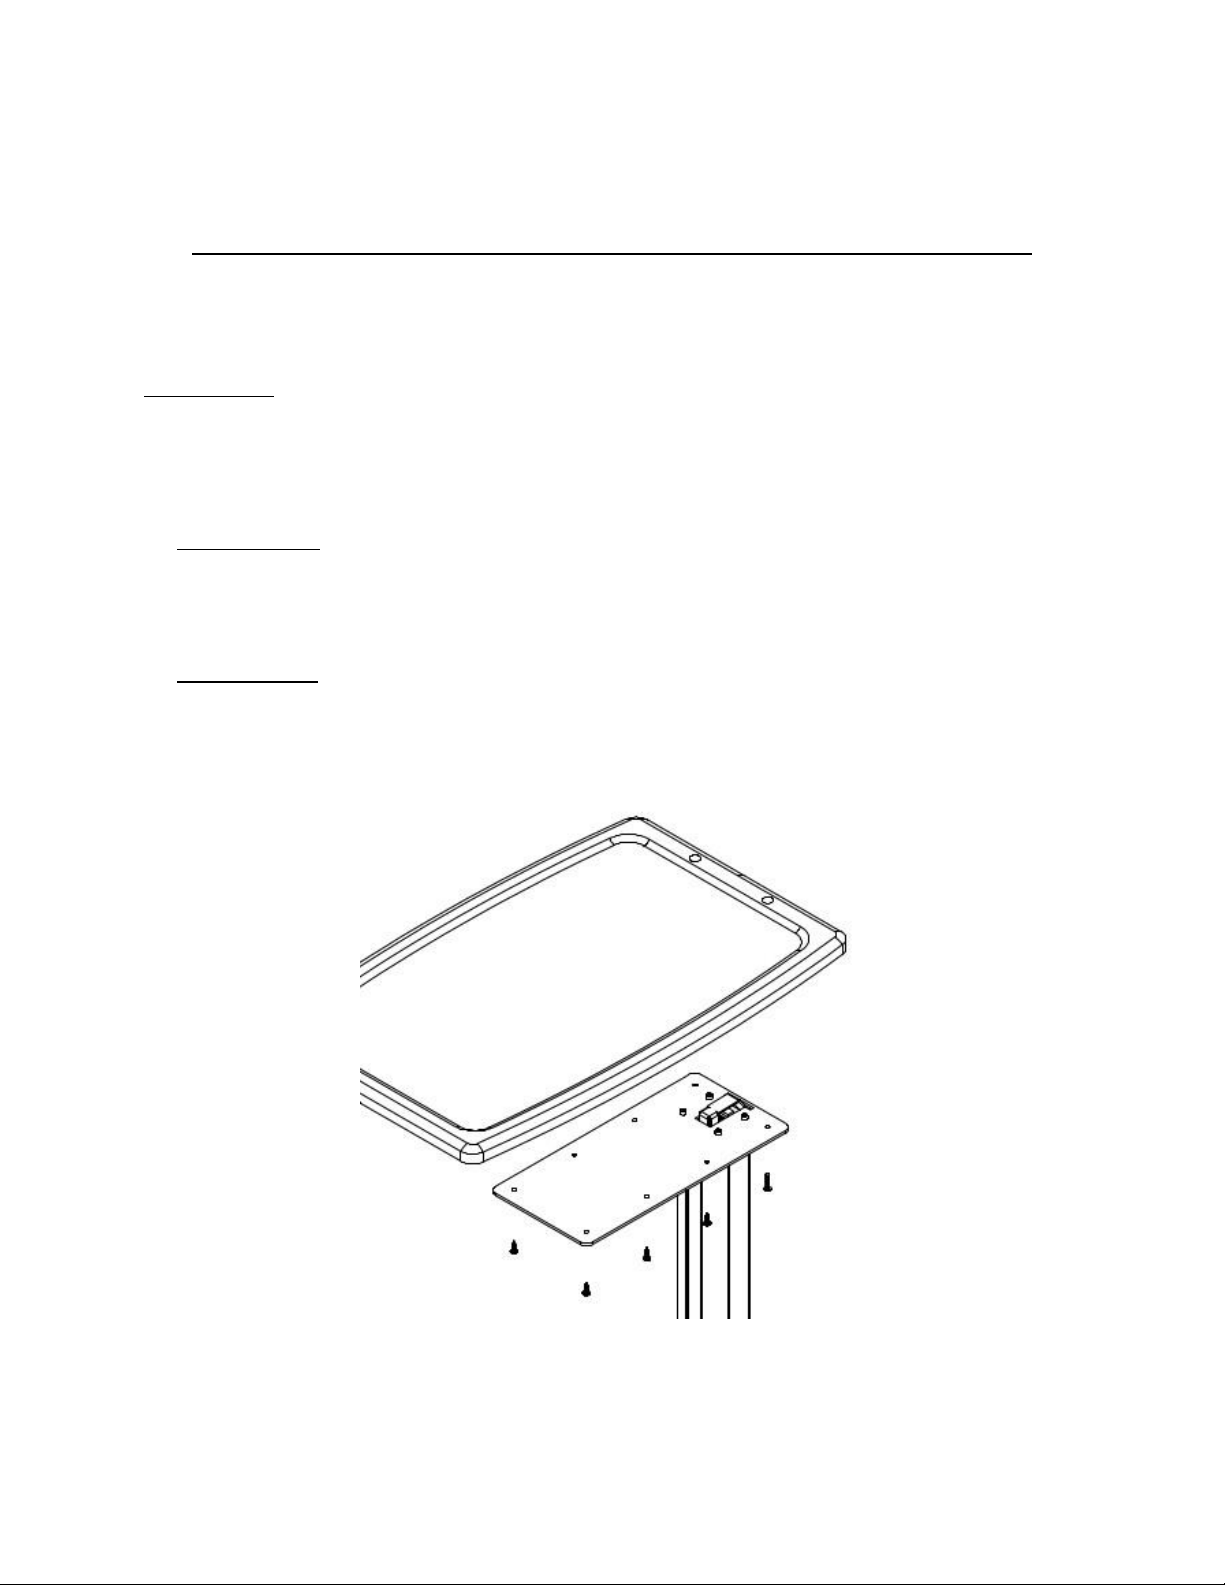
4.11 Attach the Top plate to the column with the 4 screws removed in step 4.2 (Figure 4).
4.12 Attach the top as shown in Section 3.
Section 5: Service Instructions Vanity Tray Replacement
This manual is intended for trained professionals for adjustment of the Medviron Overbed Table.
Any action not outlined in this manual may result in voiding of the warranty.
Tools that may be required
Straight or Slotted screwdriver
#2 Phillips screwdriver
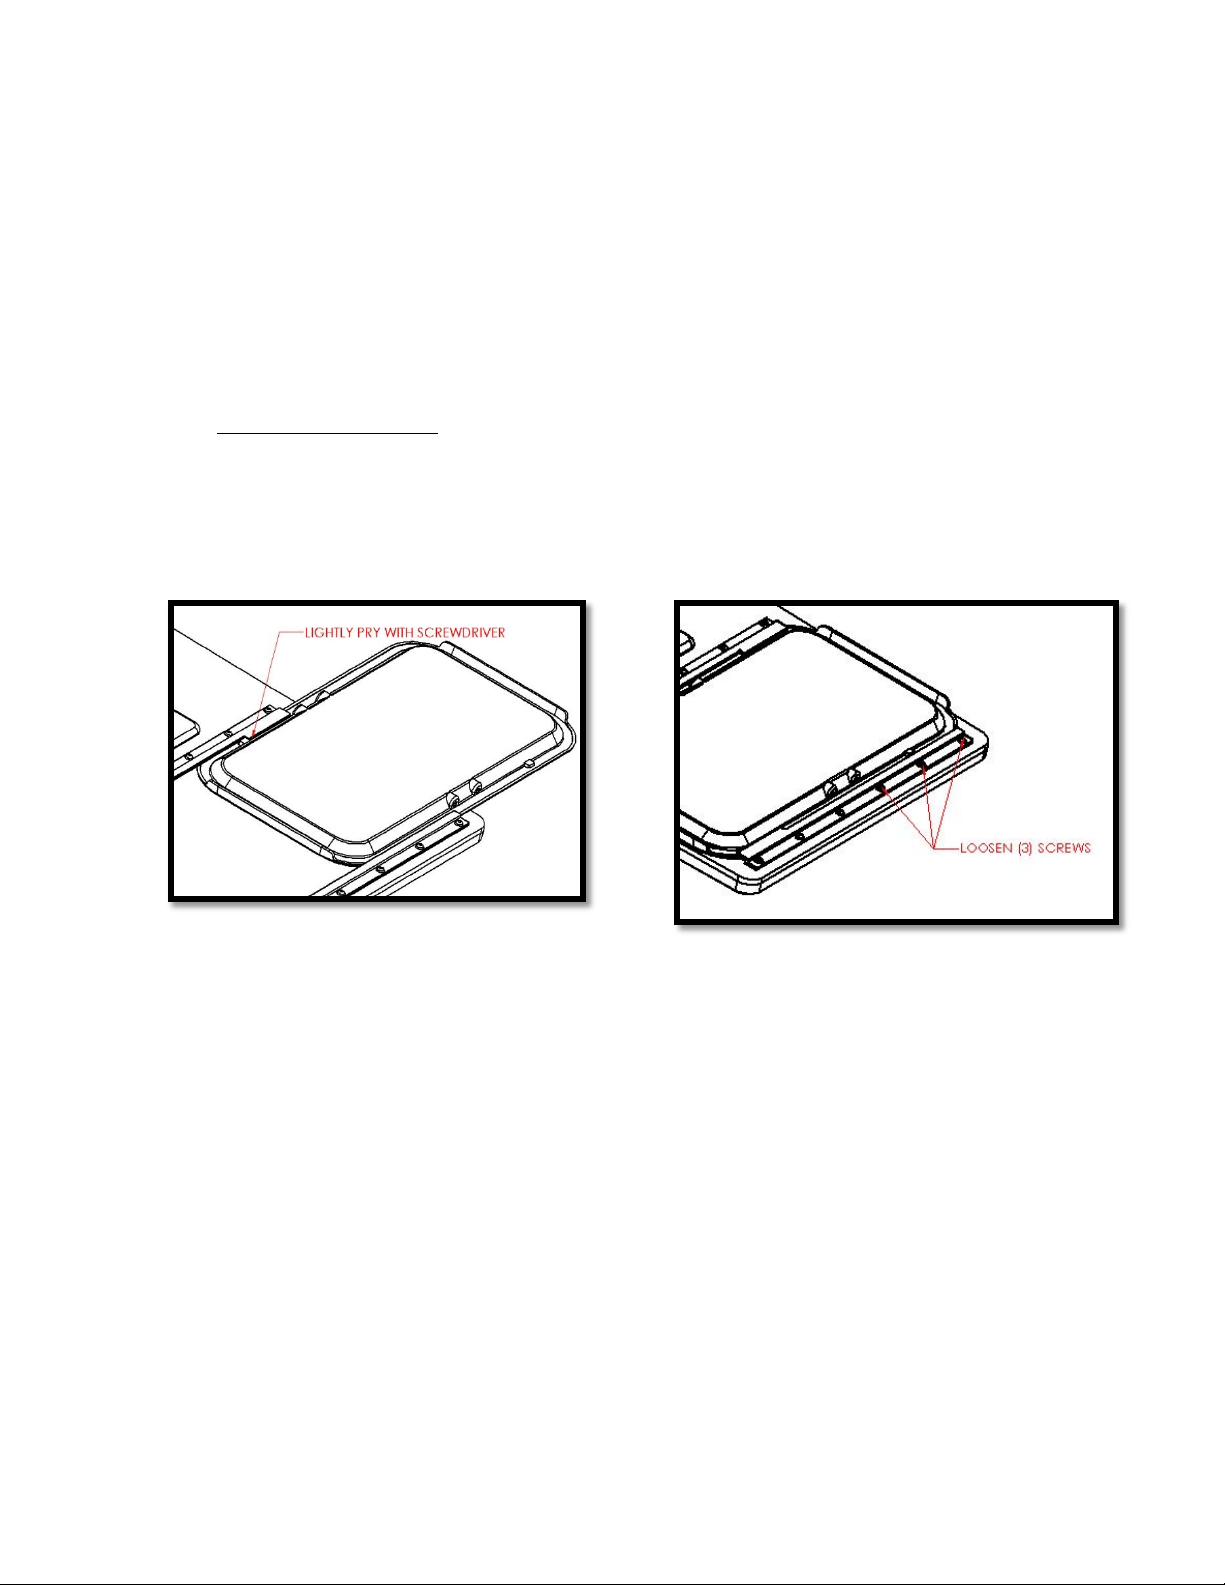
5.0 Removing or replacing a vanity tray
5.1 Removing the vanity tray
Raise the unit to its fullest extension. In most cases, the vanity tray can be removed by pulling
the tab past the stop. If the stop is too tight, a slotted screw driver may be used to lightly pry
the stop. The vanity can be replaced the same way it was removed.
5.2 Replacing the vanity tray
If replacing the vanity, the rails may need adjustment. Remove the old vanity as described in
5.1. Insert the new vanity.
If the vanity works well and does not slide too hard or easy, no adjustment is necessary. If the
vanity slides too hard or too easily adjustment may be required. If the vanity needs adjustment,
start by loosening (3) screws on the outer rail
with the vanity centered. If the vanity moved too easy, hold the rail slightly closer to the vanity
and retighten the screws. Repeat the process with the other (3) screws on the same rail. If the
vanity is too tight, use the same process but move the rail slightly farther away from the vanity.

Other manuals for 39" Overbed Table

2

Other MedViron Indoor Furnishing manuals

MedViron 39" Overbed Table User manual

MedViron

MedViron 39" Overbed Table User manual

MedViron OBT 46 User manual

MedViron

MedViron OBT 46 User manual

MedViron 32 Overbed Table User manual

MedViron

MedViron 32 Overbed Table User manual

Popular Indoor Furnishing manuals by other brands

Furniture of America CM-BK588 Assembly instructions

Furniture of America

Furniture of America CM-BK588 Assembly instructions

Cooper Lighting PM114obi Specification sheet

Cooper Lighting

Cooper Lighting PM114obi Specification sheet

SelectBlinds ROMAN installation guide

SelectBlinds

SelectBlinds ROMAN installation guide

Astonica 50104296 instruction manual

Astonica

Astonica 50104296 instruction manual

Kvik OU820 Assembly instructions

Kvik

Kvik OU820 Assembly instructions

Big Lots HARLOW 15160-5PK Assembly instructions

Big Lots

Big Lots HARLOW 15160-5PK Assembly instructions

Next PARIS 663843 Assembly instructions

Next

Next PARIS 663843 Assembly instructions

calligaris JAM CS/623 manual

calligaris

calligaris JAM CS/623 manual

physa REMISSIO 4025 user manual

physa

physa REMISSIO 4025 user manual

Lifely Coco Series Assemble instructions

Lifely

Lifely Coco Series Assemble instructions

Teknion HWBWBT Installation guides

Teknion

Teknion HWBWBT Installation guides

Argos Victoriana 244/5034 Assembly instructions

Argos

Argos Victoriana 244/5034 Assembly instructions

MALOW H4112 instruction manual

MALOW

MALOW H4112 instruction manual

Safavieh Furniture Siobhan AMH6611 quick start guide

Safavieh Furniture

Safavieh Furniture Siobhan AMH6611 quick start guide

THB Roupeiro Advance manual

THB

THB Roupeiro Advance manual

Artek KAARI REB 008 manual

Artek

Artek KAARI REB 008 manual

ofichairs Ergomax manual

ofichairs

ofichairs Ergomax manual

Artek KAARI REB 006 manual

Artek

Artek KAARI REB 006 manual

manuals.online logo
manuals.online logoBrands
  • About & Mission
  • Contact us
  • Privacy Policy
  • Terms and Conditions

Copyright 2025 Manuals.Online. All Rights Reserved.