Megaimpulse NRG1001 User manual

NANOSECOND HIGH VOLTAGE RECTANGULAR
WAVEFORM PULSE GENERATOR
NRG1001
USER MANUAL
v. 0.1
© 2018 Megaimpulse Ltd.

Copyright © 2018 MEGAIMPULSE Ltd. All Rights Reserved.
MEGAIMPULSE LTD. PROVIDES THIS MANUAL "AS IS" WITHOUT WARRANTY OF ANY KIND,
EITHER EXPRESS OR IMPLIED, INCLUDING BUT NOT LIMITED TO THE IMPLIED WARRANTIES OR
CONDITIONS OF MERCHANTABILITY OR FITNESS FOR A PARTICULAR PURPOSE. IN NO EVENT
SHALL MEGAIMPULSE LTD., ITS DIRECTORS, OFFICERS, EMPLOYEES OR AGENTS BE LIABLE FOR
ANY INDIRECT, SPECIAL, INCIDENTAL, OR CONSEQUENTIAL DAMAGES (INCLUDING DAMAGES
FOR LOSS OF PROFITS, LOSS OF BUSINESS, LOSS OF USE OR DATA, INTERRUPTION OF BUSINESS
AND THE LIKE), EVEN IF MEGAIMPULSE LTD. HAS BEEN ADVISED OF THE POSSIBILITY OF SUCH
DAMAGES ARISING FROM ANY DEFECT OR ERROR IN THIS MANUAL OR PRODUCT.
SPECIFICATIONS AND INFORMATION CONTAINED IN THIS MANUAL ARE FURNISHED FOR
INFORMATION ONLY, AND ARE SUBJECT TO CHANGE AT ANY TIME WITHOUT NOTICE, AND
SHOULD NOT BE CONSTRUED AS A COMMITMENT BY MEGAIMPULSE LTD. MEGAIMPULSE LTD.
ASSUMES NO RESPONSIBILITY OR LIABILITY FOR ANY ERRORS OR INACCURACIES THAT MAY
APPEAR IN THIS MANUAL, INCLUDING THE PRODUCTS AND SOFTWARE DESCRIBED IN IT.
Products and corporate names appearing in this manual may or may not be registered trademarks or copyrights of
their respective companies, and are used only for identification or explanation and to the owners' benefit, without
intent to infringe.
Megaimpulse Ltd. contact information
Address: 26 Polytechnicheskaya str., St. Petersburg, 194021 Russia
www: http://www.megaimpulse.com
fax: +7-812-297-3145

CONTENTS
Safety manual ...................................................................................................2
Description and general view of the generator .................................................3
Technical specification .....................................................................................5
Front and rear panels view ................................................................................6
Package content ................................................................................................7
Putting the generator into operation ..................................................................8
Triggering of the generator ...............................................................................11
SYNC OUT pulse .............................................................................................12
Fuse replacement ..............................................................................................13
Warranty ...........................................................................................................14
User manual of NRG1001 HV rectangular pulse generator 1

SAFETY MANUAL
Electrical safety
NRG1001 generator is high voltage equipment. Please be very careful and
operate by qualified personnel only.
There is a risk of electric shock, strong electromagnetic interference,
damage of generator or other electronic equipment in case of improper use.
Do not switch on the generator without proper grounding. We recommend
using grounding cable connected to the terminal on the rear panel of the
generator or three terminal power supply outlet with ground contact.
It is strongly prohibited to switch on the generator without output coaxial
cable. There is a risk of electrical arcing on the open coaxial connector and
damage of output circuit of the generator. Please use our special high
voltage coaxial connector and cable only.
When adding or removing generator to or from the system, ensure that the
power supply ON/OFF toggle is switched off and power supply cable is
unplugged before the output cable is connected or disconnected.
Please connect or disconnect any equipment while the generator is in high
voltage OFF state only by HV ON/HV OFF switch.
Operation safety
Please read this manual before installing and using of the generator.
Before using the product, make sure that all cables are applicable and not
damaged. High voltage connectors should be clean and dry, free from dust,
dirt and any obstacles.
To avoid short circuit, keep metal parts like clips, screws and staples away
from the generator.
The generator is designed to work in normal laboratory conditions. Avoid
dust, humidity and temperature extremes. Do not place the generator in any
place where it may become wet.
Place the generator on a stable surface.
If you encounter any technical problem with the generator, please contact
with Megaimpulse Ltd. Please, do not try to repair the generator by
yourself.
MEGAIMPULSE LTD. 2

DESCRIPTION AND GENERAL VIEW OF THE GENERATOR
NRG1001 generates rectangular-like pulses with up to 10 kV amplitude
and nanosecond rise/fall times. The output pulse amplitude can be adjusted
smoothly in three times, whereas the pulse width is fixed to 10 ns. The typical
output pulse waveform (at max amplitude) is shown in Fig.1.
Generator has 50 Ohm output impedance and is equipped with 50 Ohm
output coaxial cable. It means that the native load impedance should be equal to 50
Ohm, but NRG1001 can operate also with high impedance or non-linear load.
Special internal circuit damps the reflected pulses and limits the after pulse ringing
within the acceptable range. The maximum output pulse amplitude is 5 kV while
the generator operates with matched 50 Ohm load. However, the load impedance
is higher in most of practical applications which gives up to double output pulse
voltage on the load.
There are internal and external triggering operation modes, which can be
chosen by EXT/INT toggle switch. TTL level (+2.4V … +5V) external triggering
pulses should be applied to SYNC IN BNC connector in the first case. Maximum
repetition rate is limited to 1 kHz in both modes.
SYNC OUT pulse has +2.5V amplitude on 50 Ohm load and the leading
edge of sync pulse precedes output HV pulse by about 300 ns.
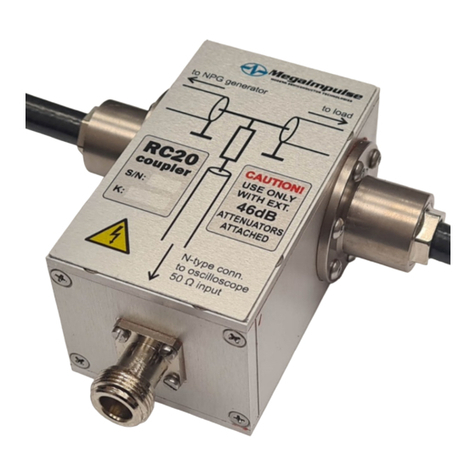
Two different output modules are included for the connection to the load.
The modules include 1:40 resistive coupler, which together with two 20dB
attenuators allows to apply the divided output pulse to the oscilloscope input for
registration. One module has 1:3 resistive divider, the second has no it. By the
way, it is possible 10 times smooth adjustment of the output pulse amplitude.
Fig.1. Typical output pulse waveform at max amplitude.
User manual of NRG1001 HV rectangular pulse generator 3

Fig.2. General view of NRG1001 nanosecond high voltage rectangular-like
waveform pulse generator.
Fig.3. Output modules with integrated 1:40 resistive coupler and with or without
1:3 divider.
MEGAIMPULSE LTD. 4

TECHNICAL SPECIFICATION OF NRG1001
PULSE GENERATOR
Output pulse waveform rectangular-like
Output pulse polarity positive
Output impedance 50 Ohm
Load any, including non-matched and non-linear
Output pulse amplitude
smooth regulated within:
●3.0 kV .. 10.0 kV on high impedance load,
output module without divider;
●1.0 kV .. 3.3 kV on high impedance load,
output module with 1:3 divider;
●1.5 kV .. 5.0 kV on 50 Ohm matched load
Output pulse width 10 ns, fixed (FWHM)
Output pulse rise/fall times 2.2 ns .. 4.5 ns / 2.5 ns .. 5.0 ns, depending on the
pulse amplitude and load impedance
Repetition rates from 1 Hz to 1 kHz (internal triggering)
from single pulse to 1 kHz (external triggering)
Output connector special HV coaxial type connector
External triggering BNC connector, +2.4 .. +5V amplitude
Output pulse monitoring BNC connector, TTL level
Power supply AC 110-230V / 50-60 Hz
Size 248 х90 х250 mm
3
Weight (without cables) 4.3 kg
User manual of NRG1001 HV rectangular pulse generator 5

FRONT VIEW
7 8
2 4 5 6 9
REAR VIEW
1 3
10 11
1- power supply ON/OFF switch
2- output coaxial connector
3- power supply connector and fuse holder
4- HV ON/HV OFF - high voltage on/off switch
5–EXT/INT - external/internal triggering toggle switch
6- BNC SYNC IN connector
7- AMPLITUDE regulation knob
8- FREQUENCY regulation knob
9- BNC SYNC OUT connector
10 - fans
11 - ground terminal
MEGAIMPULSE LTD. 6

PACKAGE CONTENT
Please check the package for the following items:
NRG1001 nanosecond rectangular waveform pulse generator
Power supply cable
High voltage coaxial cable assembly #1 consisting of RG214/U cable,
special HV coaxial connector and output module with integrated 1:40
resistive coupler
High voltage coaxial cable assembly #2 consisting of RG214/U cable,
special HV coaxial connector, output module with integrated 1:3 divider
and 1:40 resistive coupler
Semirigid coaxial cable assembly with SMA connectors
Two 20dB (1:10) attenuators with SMA connectors
SMA-to-BNC adapter
User manual
Optional item(s):
High voltage coaxial cable assembly consisting of RG214/U cable,
special HV connector and N-type connector
NPG-18/100k(N) nanosecond pulse generator user manual 7
MEGAIMPULSE LTD. 8
User manual of NRG1001 HV rectangular pulse generator 7

PUTTING THE GENERATOR INTO OPERATION
Please follow strictly the described steps. It helps to prevent damage of the
generator, other equipment, and personnel injury.
Step 1.
Unpack the generator and check the presence into the package of all the above
mentioned items.
Step 2.
Set up the generator. Ground it obligatory by connecting ground cable to terminal
on the rear panel (11) or use three terminal power supply outlet with grounding
contact.
Step 3.
Check the output coaxial female connector on the front panel of the generator and
co-pair male connectors of the HV cable assemblies. All the connectors should be
clean, free from dust, dirt and any obstacles. Clean the connectors by alcohol
and/or cotton bud if necessary. After cleaning, please apply a drop of pure silicon
oil before mating the connectors. Oil fills air gap between insulators of the co-pair
connectors and eliminates possible arcing.
Choose the cable assembly which you want to operate with, depending on the
required output pulse amplitude. Output module without the divider allows to get
3kV...10kV pulse amplitude on high impedance load; output module with 1:3
divider gives three times less amplitude. You can connect also cable assembly with
N-type connector together with your own sample holder or HV attenuator.
Attach the cable connector to the generator front panel connector (2). The tight and
firm contact of the connectors is very important for normal operation of the
generator. Even small air gap between the connectors may result in arcing, destroy
the generator and/or the cable.
To obtain good and tight contact the following procedure is recommended:
1. Align both connectors.
2. Hold the generator by one hand to prevent moving and press the cable
connector by other hand toward the generator connector.
3. Screw the cable connector nut by hand, usually one or two turns. Do not
rotate the cable connector body.
4. Press the cable connector toward the generator connector again.
5. Again screw the cable connector nut one or two turns.
6. Repeat steps 4 and 5 up to tight contact.
MEGAIMPULSE LTD. 8

It is highly recommended to check whether the tight contact obtained or not after
the first testing of the generator. Unscrew the cable connector; it should be no any
ozone or burnt smell from the connectors or any burnt traces.
During normal operation, please do not disconnect and connect again the high
voltage connectors many times to prevent the contacts wearing and contamination.
Silicon oil has been already applied to both connectors at the factory. It remains
inside the mating connector pair during very long time and prevent arcing.
Step 4.
Attach semirigid coaxial cable assembly to the output module SMA connector;
attach two 20dB attenuators and if required SMA-to-BNC adapter for the
connection to oscilloscope (see Fig.4). 1:40 coupler together with two 20dB
attenuators gives 4000 total division coefficient. 10 kV pulse divided by 4000
times results in 2.5V measured signal which can be directly applied to 50 Ohm
impedance oscilloscope input. Some of high bandwidth oscilloscopes allow up to
1V maximum input pulse amplitude only. Please install one more 20dB attenuator
(not included) in this case.
Fig.4. Output module connection to NRG1001 generator, sample and oscilloscope.
Attach the attenuators just to the oscilloscope input, but not to the SMA
coupler output of the module. This improve signal-to-noise ratio of the
registered signal.
User manual of NRG1001 HV rectangular pulse generator 9

200 MHz or more bandwidth oscilloscope is recommended for the output pulse
monitoring. Please set input impedance of the used oscilloscope channel to 50
Ohm, external division coefficient to 4000 (or keep this coefficient in mind to
calculate the measured pulse amplitude), vertical scale to 2 kV/div, time scale to 5
ns/div, edge triggering from the chosen channel.
Step 5.
You can operate without the load to test the generator, or please connect the load /
put the electrodes into Petri dish.
Step 6.
Toggle HV ON/HV OFF switch to HV OFF state (down position).
Toggle EXT/INT switch to INT state (down position).
Place "frequency" knobs to the most counterclockwise position, which corresponds
to minimum frequency about 1 Hz.
Connect power supply cable to wall power outlet.
Switch on the generator by power switch on the rear panel. The internal fan should
start to rotate.
Step 7.
Switch on the high voltage by HV ON/HV OFF toggle switch. The output high
voltage pulses should be generated. The internal red lamp in HV ON/HV OFF
switch lights on and indicates the triggering of the generator. Increase the
amplitude and frequency by corresponding knobs as necessary. The output pulses
frequency in internal triggering mode is about proportional to the rotation angle of
FREQUENCY regulation knob. The output pulses amplitude increases
proportionally to the rotation angle of AMPLITUDE regulation knob.
Register the pulse waveform by the oscilloscope.
Always stop the operation of the generator by HV ON/HV OFF switch,
after that you can switch off the generator by power switch.
MEGAIMPULSE LTD. 10

TRIGGERING OF THE GENERATOR
The generator can operate in internal and external triggering operation modes.
Internal triggering
Internal triggering mode is set by switching EXT/INT toggle switch in INT
position. No any additional triggering generator is required for operation in this
regime. Output pulse repetition rate can be adjusted by FREQUENCY regulation
knob at the front panel of the generator.
External triggering
External triggering mode is set by switching EXT/INT toggle in EXT position.
External triggering pulse should be applied to SYNC IN BNC connector on the
front panel. Recommended triggering pulse duration is 100ns…100µs,
recommended triggering pulse amplitude is +2.4V…+5V. The delay between
triggering pulse front and output pulse (internal generator delay) is about 400 ns.
In case of successful triggering the internal red lamp in HV ON/HV OFF switch
lights on.
The maximum allowable pulse repetition rate in this mode is limited by
FREQUENCY regulation knob at the front panel of the generator.
Therefore, internal generator frequency sets the upper limit for the external
triggering pulses frequency. Please rotate FREQUENCY regulation knob up to the
required position and set corresponding maximum repetition rate.
In case of external triggering the generator can operate in single pulse mode.
Burst mode
Burst operation mode can be simply set by using external pulse generator. Switch
EXT/INT toggle in EXT position and apply long external ENABLE signal to
SYNC IN BNC connector. Output pulse repetition rate is set by FREQUENCY
regulation knob on the front panel of the generator and burst length is determined
by duration of ENABLE signal. For example, if you need burst of ten pulses with
1 ms delay between them please set internal repetition rate to 1 kHz and apply 10
ms ENABLE pulse to SYNC IN connector.
User manual of NRG1001 HV rectangular pulse generator 11

SYNC OUT PULSE
NRG1001 generator has BNC output connector for SYNC OUT pulse. The pulse
amplitude is 2.5 V on 50 Ohm load and 5 V on high impedance load. The SYNC
OUT pulse precedes output HV pulse by about 300 ns.
The oscillograms of SYNC OUT pulse (Channel 1, yellow line) and output HV
pulse (Channel 4, magenta line) are shown in Fig.5.
Fig.5. Oscillograms of SYNC OUT pulse (Channel 1, yellow line) and output
HV pulse (Channel 4, magenta line).
MEGAIMPULSE LTD. 16
MEGAIMPULSE LTD. 12

FUSE REPLACEMENT
Type of the fuse - 4A/250V slow switching, cylindrical glass 5mm X 20mm
The fuse holder is located in three terminal power supply connector. Please use flat
screwdriver or other suitable tool to remove the fuse holder (see Fig.6.).
Fig.6. Removing of the fuse holder by flat screwdriver.
There are two fuses in the fuse holder including one spare (see Fig.7).
Fig.7. Two fuses in fuse holder including one spare (upper in the
figure).
User manual of NRG1001 HV rectangular pulse generator 13

WARRANTY
Please see your sales agreement to determine the warranty period and condition.
The generator has warranty seals on the front and rear panels (see Fig.8.)
Removing of the seals terminates the warranty.
Fig.8. Warranty seals on the front and rear panels.
MEGAIMPULSE LTD. 14
Table of contents
Other Megaimpulse Measuring Instrument manuals