Meijer Mini Multi-Purpose Crafting & Mending... User manual
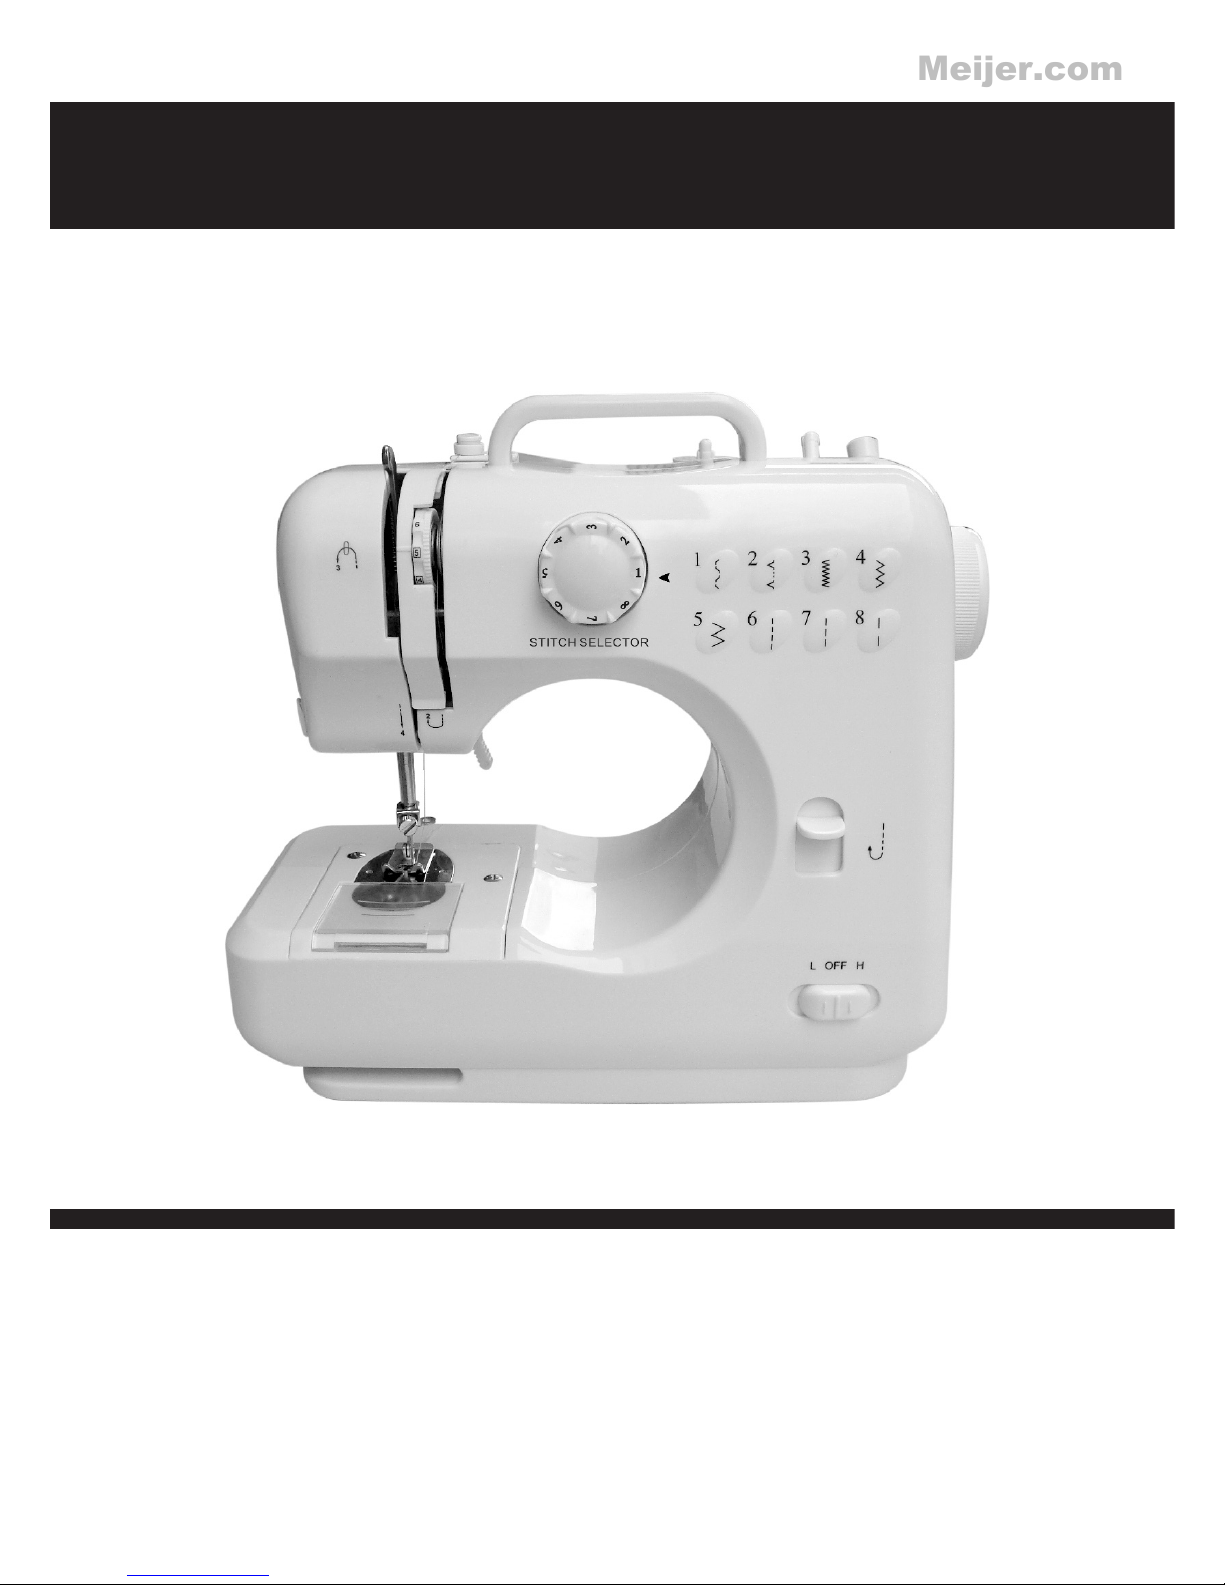
Mini Multi-Purpose Crafting & Mending Machine
Mini máquina para reparaciones y manualidades de usos múltiples
Mini machine à coudre tout-usage
New & Improved Instruction Manual!
¡Nuevo manual de instrucciones actualizado!
Nouveau manuel d’instructions amélioré!
Please read all instructions carefully before operating this machine. Keep this manual in a safe place for
future use. This machine is for household use only.
Sírvase leer todas las instrucciones cuidadosamente antes de poner la máquina en funcionamiento.
Guarde este manual en un lugar seguro para uso futuro. Esta máquina es para uso hogareño solamente.
Veuillez lire attentivement toutes les instructions avant d’utiliser cette machine. Conservez ce manuel
d’instructions en lieu sûr pour consultation future. Cette machine est réservée à un usage exclusivement
domestique.
Meijer.com

The machine must be switched off and the power
adaptor unplugged when:
threading the needle•
changing the needle•
changing the bobbin•
changing parts•
cleaning the machine•
after each use•
when removing/installing batteries, to prevent•
the Power Off/Speed Switch from being
activated
Important:
Never leave the machine unattended in the•
presence of children.
When operating the machine, keep your hands•
away from the needle, handwheel and pattern
selection dial.
To clean the machine, simply wipe it with a•
soft cloth and never use any harsh chemical
solutions.
This machine is suitable for domestic use only.•
Do not use this machine outdoors.
La máquina debe apagarse y el adaptador de
energía debe desenchufarse cuando:
se enhebra la aguja•
se cambia la aguja•
se cambia la bobina•
se cambian piezas•
se limpia la máquina•
luego de cada uso•
al retirar/instalar baterías, para evitar que el•
interruptor de Apagado/Velocidad se active
Importante:
Nunca deje la máquina sola al alcance de niños.•
Al hacer funcionar la máquina, mantenga sus•
manos lejos de la aguja, la manivela y el disco
de selección de patrón.
Para limpiar la máquina, simplemente frote con•
un paño suave y nunca utilice líquidos químicos
abrasivos.
Esta máquina es para uso hogareño solamente.•
No utilice esta máquina en espacios exteriores
abiertos.
La machine doit être déconnectée et l’adaptateur
de courant débranché pour:
Enfiler l’aiguille•
Changer l’aiguille•
Changer la cannette du bas•
Remplacer des pièces.•
Nettoyer la machine•
Après chaque utilisation•
Important:
Ne laissez jamais la machine à coudre sans•
surveillance en présence d’enfants.
Lorsque vous utilisez la machine à coudre,•
gardez vos mains loin de l’aiguille, du volant,
des leviers qui tirent le fil et du cadran de
sélection de motif.
Pour nettoyer la machine à coudre, essuyez-la•
simplement avec un chiffon doux et n’utilisez
jamais de solutions chimiques.
2
IMPORTANT SAFETY INSTRUCTIONS
INSTRUCCIONES DE SEGURIDAD IMPORTANTES
DIRECTIVES DE SÉCURITÉ IMPORTANTES
Meijer.com

1 Foot Controller
1 Controlador de pie
Pédale (réhostat) x 1
2 Thread Spools
2 Carretes para hilo
Bobines de fil x 2
2 Bobbins
2 Bobinas
Canettes de fil x 2
1 Needle Threader
1 Enhebrador de agujas
Enfile-aiguille x 1
1 Extra Needle
1 Aguja adicional
Aiguille supplémentaire x 1
1 Power Adaptor
1 Adaptador de energía
1 Adaptateur de courant
3
ACCESSORIES
ACCESORIOS
ACCESSOIRES
Meijer.com
4
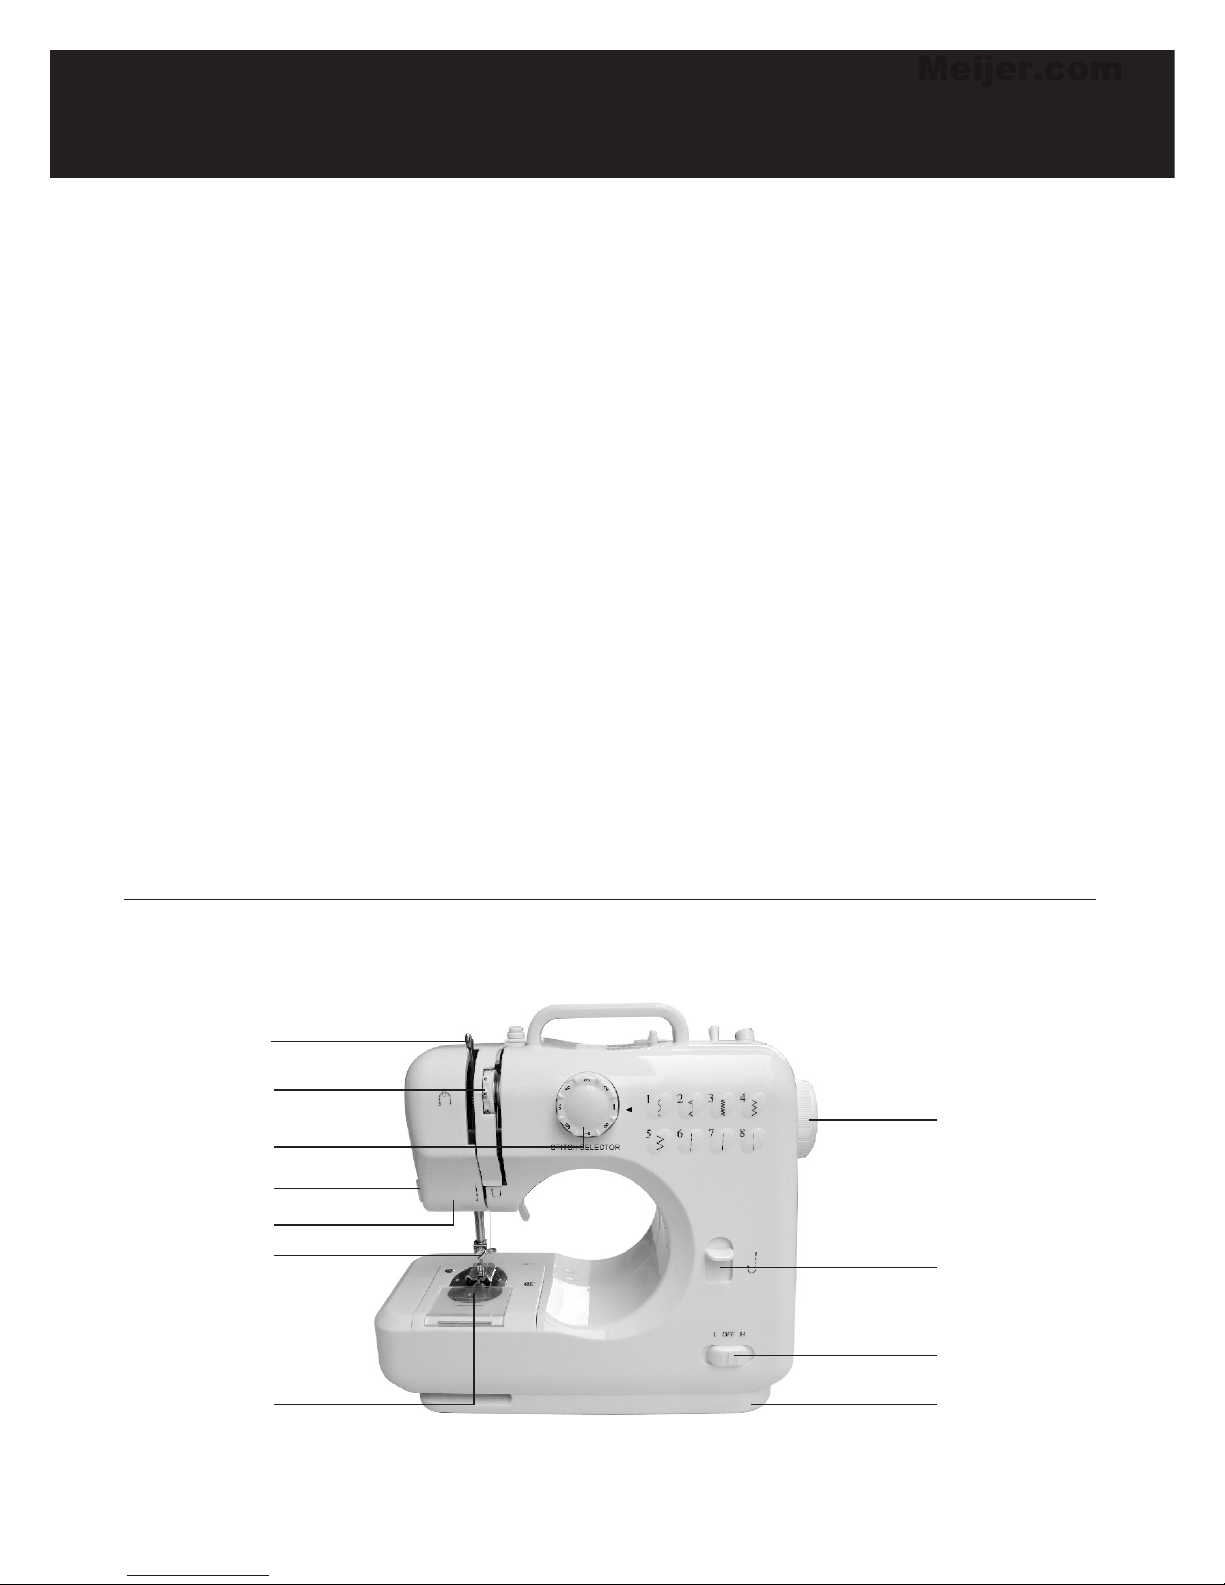
PARTS OF THE MACHINE – Front view
PARTES DE LA MÁQUINA – Vista de frente
NOM DES PIÈCES – Vue de L’avant
Releveur de fil1.
Bouton de tension du fil de2. dessus
Cadran sélecteur du point
3.
Coupe-fils4.
Lumière5.
Vis du pince-aiguille6.
Canette du dessous7.
Volant8.
Bouton de marche arrière9.
Interrupteur et contrôle de10. vitesse
Tiroir
11.
Take up lever1.
Upper thread tension dial2.
Pattern selection dial3.
Thread cutter4.
Light5.
Needle clamp screw6.
Bobbin7.
Handwheel8.
Reverse button9.
Power off & speed switch10.
Drawer11.
Palanca del prensatelas1.
Disco selector de tensión del2. hilo superior
Disco de selección de patrón
3.
Cortahilos4.
Luz5.
Tornillo del sujetador de la6. aguja
Bobina
7.
Manivela8.
Botón de reversa9.
Interruptor de apagado y de10. velocidad
Cajón
11.
1
2
3
4
5
6
7
8
9
10
11
Meijer.com
5
1
2
3
4
5
6
7
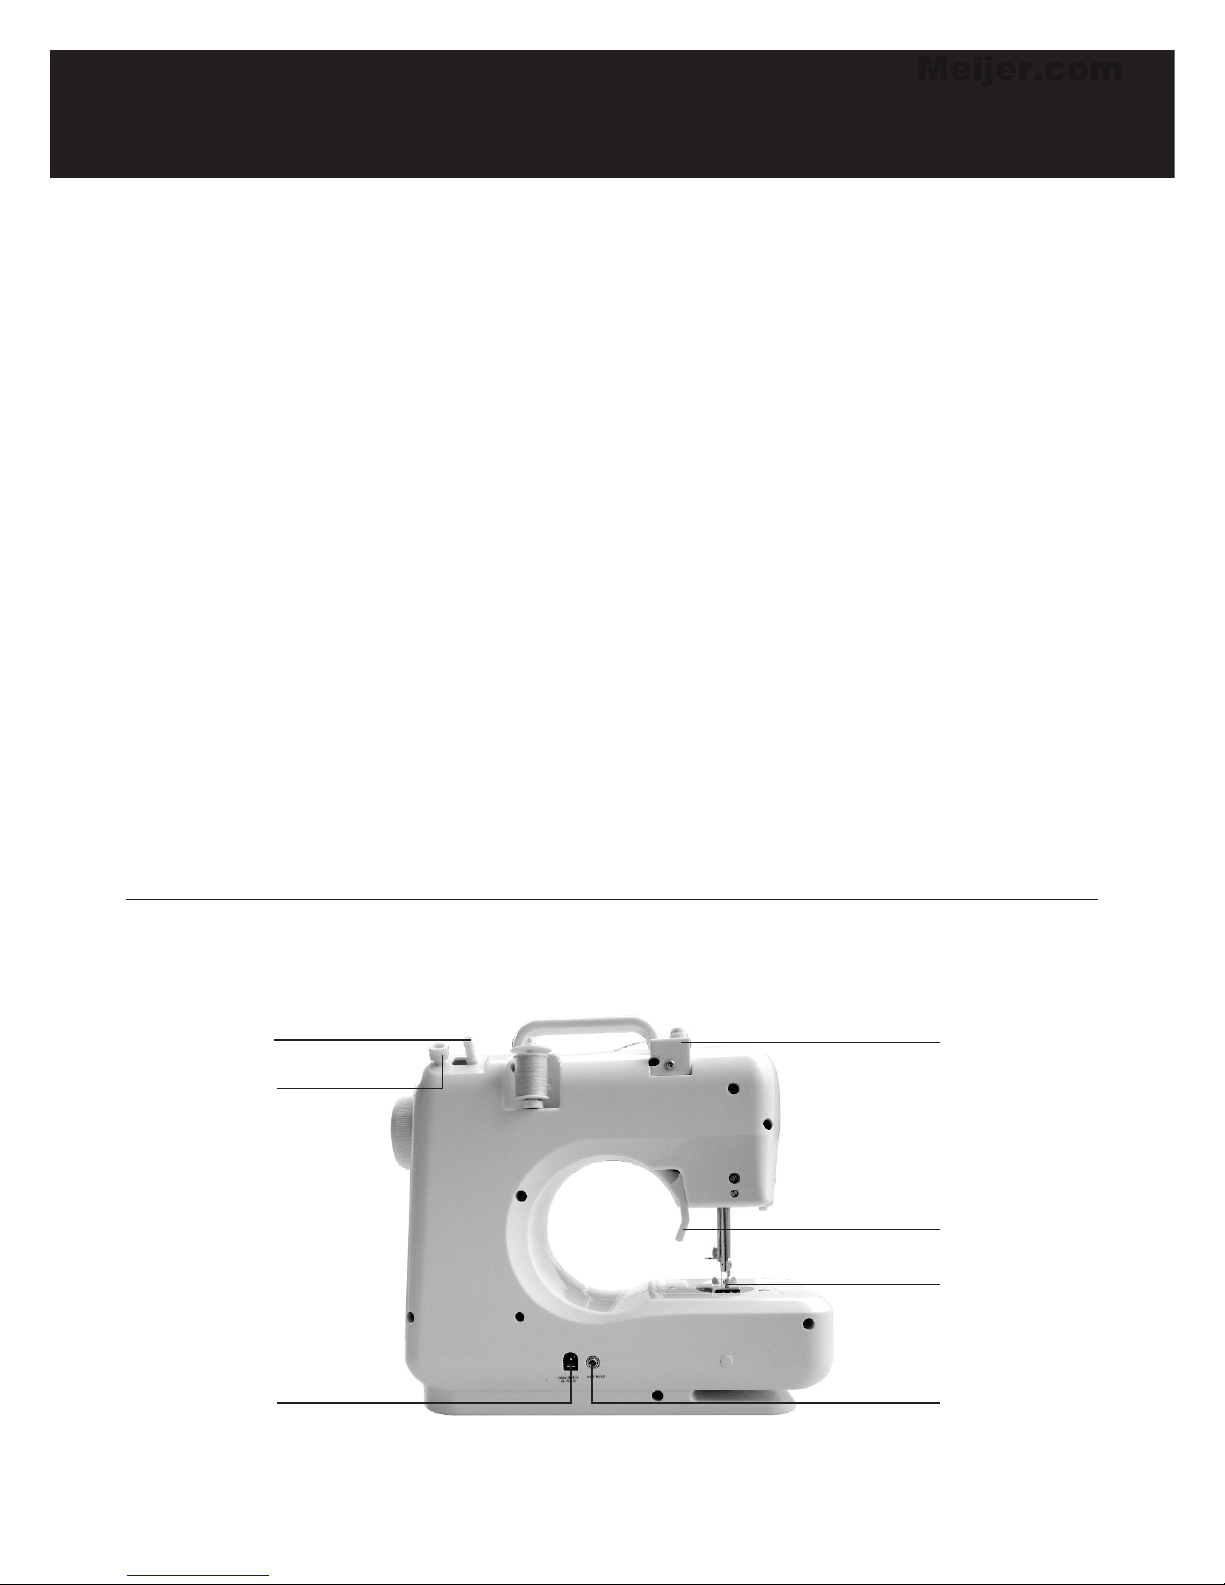
PARTS OF THE MACHINE – Back view
PARTES DE LA MÁQUINA – Vista de atrás
NOM DES PIÈCES – Vue de L’arrière
Tige du bobineur1.
Arrêt du bobineur2.
Entrée de l’adaptateur de3. courant
Disque de tension du
4. bobineur
Relève-presseur
5.
Pied-presseur6.
Entrée de la prise de la7. pédale (réhostat)
Bobbin winder pin1.
Bobbin winder stop2.
Power adaptor input3.
Bobbin winder tension disk4.
Presser foot lifter5.
Presser foot6.
Foot pedal input7.
Portacarrete para bobina1.
Tope del portacarrete para2. bobina
Entrada del adaptador de
3. energía
Disco de tensión del
4. portacarrete para bobina
Palanca del prensatelas
5.
Prensatelas6.
Entrada del pedal de pie7.
Meijer.com
6
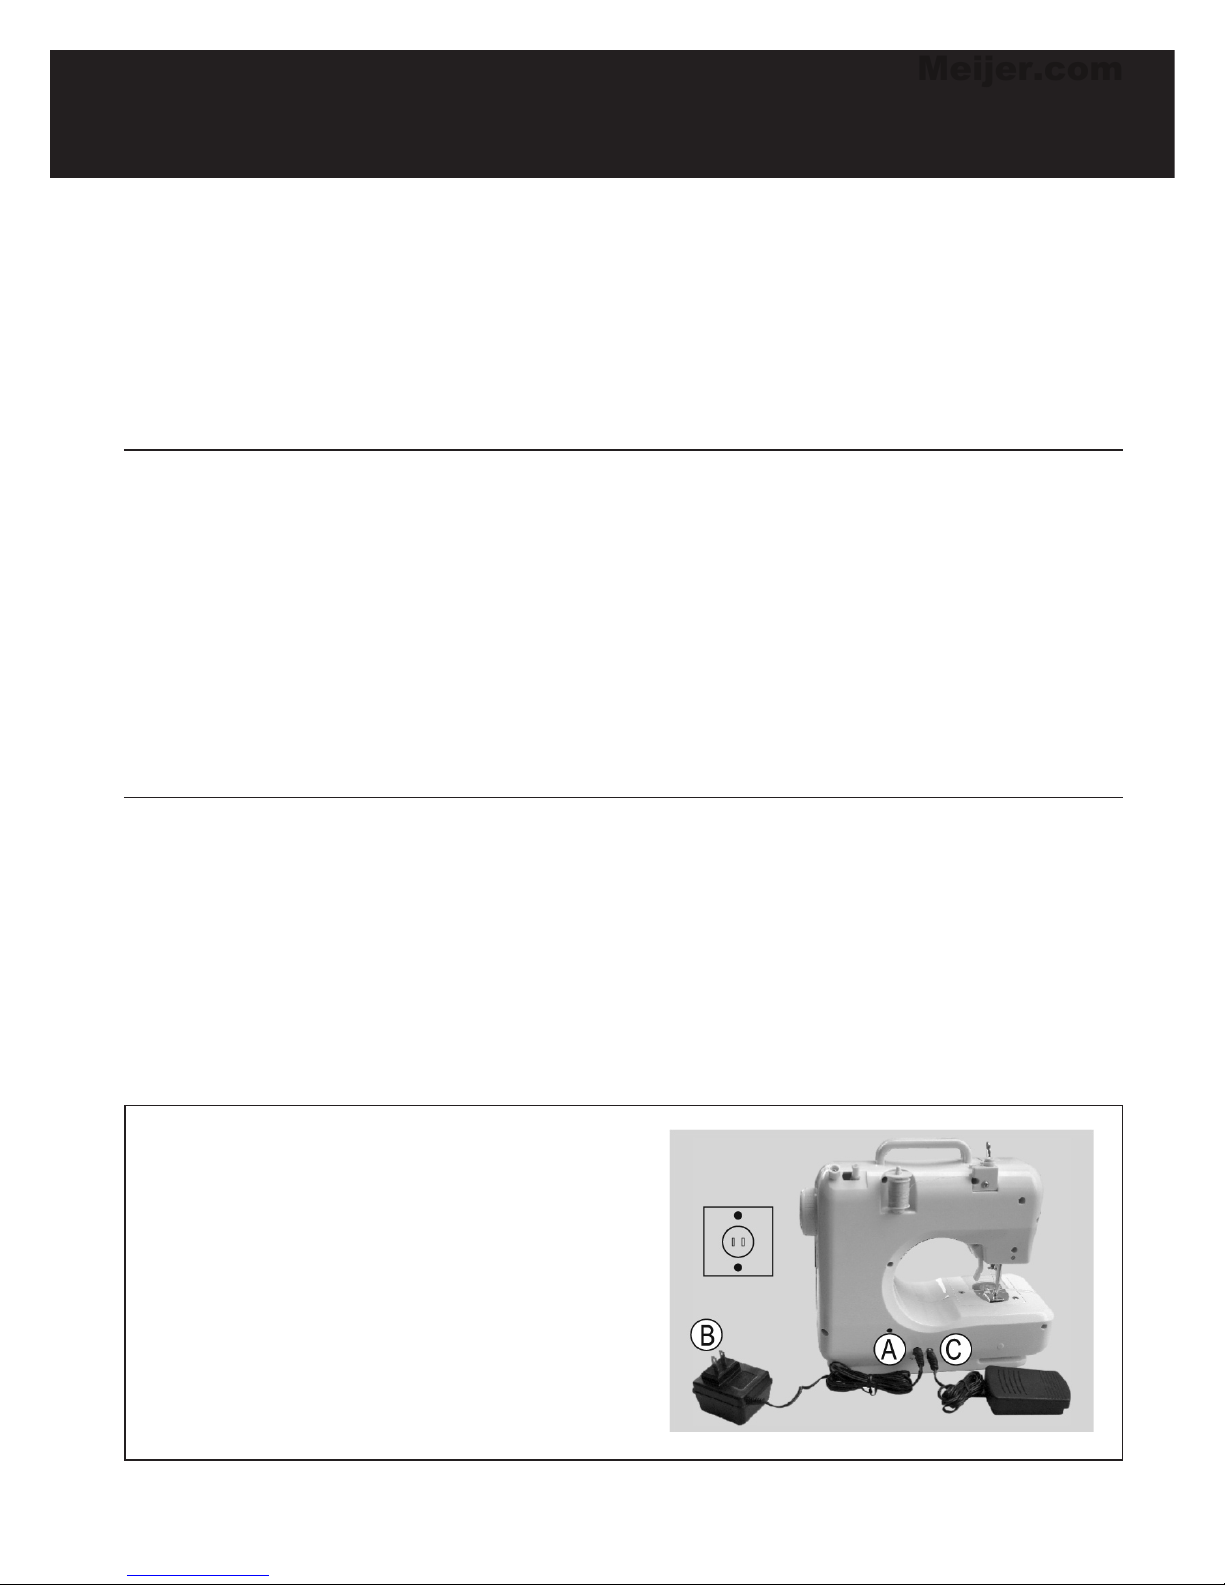
CONNECTING MACHINE TO MAIN POWER SUPPLY
CÓMO CONECTAR LA MÁQUINA AL SUMINISTRO DE ENERGÍA PRINCIPAL
BRANCHER LE BLOC D’ALIMENTATION À LA MACHINE À COUDRE
1. Make sure the Power Off/Speed Switch on the
front of the machine is in the OFF position.
2. Connect the jack (A) to the input socket on the
back of the machine. Connect the plug (B) into the
main power supply.
3. Connect the foot pedal (C) to the machine by
inserting the power jack into the foot pedal input
socket on the back of the machine.
4. There are two ways to operate the machine. You
can either use the foot pedal for operation (when
the Power Off/Speed Switch is in OFF position), OR,
you can set the Power Off/Speed Switch to the left
or to the right to run the machine without the foot
pedal once you have installed four AA batteries.
The left setting (L) is lower speed, while the right
setting (H) is higher speed.
1. Asegúrese que el interruptor de Apagado/Velocidad
que se encuentra en el frente de la máquina esté
en la posición APAGADO (OFF).
2. Conecte la clavija (A) en la entrada que se
encuentra en el lado posterior de la máquina.
Conecte el enchufe (B) en el suministro de energía
principal.
3. Conecte el pedal de pie (C) a la máquina
insertando la clavija de alimentación en la entrada
del pedal de pie que se halla en el lado posterior
de la máquina.
4. Existen dos formas de operar esta máquina. Usted
puede usar el pedal de pie para el funcionamiento
(cuando el interruptor de Apagado/Velocidad se
encuentra en posición APAGADO - OFF), O puede
colocar el interruptor de Apagado/Velocidad a la
izquierda o a la derecha para operar la máquina
sin el pedal de pie una vez que haya colocado
cuatro baterías AA. La posición hacia la izquierda
(L) es la velocidad baja, mientras que la posición
hacia la derecha (H) es la velocidad alta.
1. Assurez-vous que l’interrupteur power off/speed
situé sur le devant de la machine est à la position
OFF.
2. Branchez la fiche (A) dans la prise d’entrée CC
au dos de la machine et branchez la prise à
deux tiges (B) dans le bloc mural d’alimentation
principal.
3. Branchez la fiche “C” à la machine à coudre
en l’insérant dans la prise pour à l’arrière de la
machine à coudre.
4. Pour faire fonctionner la machine à coudre, vous
pouvez utiliser soit la pédale (l’interrupteur power
off/speed doit être en position OFF) pour faire
fonctionner avec le pied, OU vous pouvez faire
glisser l’interrupteur power off / speed vers la
gauche (L) ou vers la droite (H). Notez que les
deux réglages alimenteront la machine à coudre
et permettront le fonctionnement automatique.
Le réglage de vitesse bas (L) est lent, alors que le
celui haut (H) est rapide.
CAUTION: Whenever the machine is not in use,
make sure it is switched off and unplugged from
the main power supply.
PRECAUCIÓN: Siempre que la máquina no esté en
uso, asegúrese que esté apagada y desenchufada
del suministro de energía principal.
AVERTISSEMENT : Lorsque la machine à coudre
n’est pas utilisée, assurez-vous que l’interrupteur
est à “OFF” (arrêt) et débranchez la machine du
bloc mural d’alimentation principal.
Meijer.com

7
INSTALLING THE BATTERIES
CÓMO COLOCAR LAS BATERÍAS
INSTALLATION DES PILES
1. Make sure the Power Off/Speed Switch is in the OFF position.
2. Turn the machine over onto a flat surface and remove the battery compartment cover.
3. Insert four AA batteries into the compartment and then replace the battery cover.
1. Asegúrese que el interruptor de Apagado/Velocidad se encuentre en la posición APAGADO (OFF).
2. Recueste la máquina sobre una superficie plana y retire la tapa del compartimento de las baterías.
3. Inserte cuatro baterías AA en el compartimento y luego vuelva a colocar la tapa del compartimento.
1. Assurez-vous que l’interrupteur «power off/ speed » est à la position “Off”.
2. Retournez la machine à coudre sur une surface plane et enlevez le couvercle du compartiment des
piles.
3. Insérez 4 piles AA dans le compartiment et replacez le couvercle du compartiment des piles.
CAUTION: To prevent accidental start up of the
machine, always make sure the Power Off/Speed
Switch is in the OFF position when inserting or
changing the batteries.
PRECAUCIÓN: A fin de evitar el encendido accidental
de la máquina, siempre asegúrese que el interruptor
de Apagado/Velocidad esté en la posición APAGADO
(OFF) al insertar o cambiar las baterías.
AVERTISSEMENT : Pour prévenir le démarrage
accidentel de la machine à coudre, assurez-vous
toujours que l’interrupteur “power off/speed” est
dans la position “OFF” lorsque vous insérez ou
changez les piles.
Meijer.com

8
WINDING THE BOBBIN
CÓMO BOBINAR EL CARRETE
EMBOBINAGE DE LA CANETTE
NOTE: Bobbins and thread spools may be stored in
the small drawer on the side of the machine.
(Fig. 1)
1. Turn the machine so that you are facing the back
of it.
2. Place a spool of thread on the spool pin.
3. Guide the thread to the right of the bobbin winder
tension disk and slip it into the disk securely.
(Fig. 2)
4. Place the empty bobbin onto the bobbin winder
pin and push it to the left.
5. Wrap the end of the thread counter-clockwise
around the bobbin several times. (Fig. 3)
6. Set the Power Off/Speed Switch to the left (or set
the switch to the OFF position and press the foot
pedal) to start winding. (Fig. 4)
7. Stop winding after the desired amount of thread
is wound onto the bobbin. (Fig. 5)
8. Push the bobbin winder and bobbin back to the
right.
9. Remove the bobbin from the bobbin winder pin
and then cut the thread.
REMARQUE : Sur le côté de la machine à coudre
(vers l’arrière) vous découvrirez un tiroir pratique
pour le remisage des accessoires. (Fig. 1)
1. Tournez la machine de manière à faire face à
l’arrière de cette dernière.
2. Installez une bobine de fil sur la broche porte-
bobine.
3. Placez le fil à la droite du disque de tension du
bobineur de canette. (Fig.2)
4. Poussez la canette sur la tige du bobineur de
canette et déplaceza la vers la gauche.
5. Enroulez le fil plusieurs tours dans le sens des
aiguilles d’une montre. (Fig. 3)
6. Ouvrir l’interrupteur de vitesse pour commencer
à remplir. (Fig. 4)
7. Arrêtez le remplissage lorsque le volume de fil
enroulé sur la canette est suffisant. (Fig. 5)
8. Repoussez le bobineur et la bobine à droite.
9. Enlevez la canette de l’axe et coupez le fil.
NOTA: las bobinas y los carretes pueden guardarse
en el cajón inferior pequeño en el lado de la
máquina. (Fig. 1)
1. Dé vuelta la máquina de modo que usted quede
de frente al lado posterior.
2. Coloque un carrete de hilo en el portacarrete.
3. Lleve el hilo hacia la derecha del disco de
tensión del bobinador de carrete y deslícelo en el
disco en forma segura. (Fig. 2)
4. Coloque la bobina vacía en el bobinador y
empújela hacia la izquierda.
5. Envuelva el extremo del hilo en el sentido
contrario de las agujas del reloj alrededor de la
bobina varias veces. (Fig. 3)
6. Coloque el interruptor de Apagado/Velocidad
hacia la izquierda (o coloque el interruptor en la
posición APAGADO (OFF) y presione el pedal de
pie) para comenzar a bobinar. (Fig. 4)
7. Detenga el bobinado luego de que la cantidad de
hilo deseada haya sido bobinada en el carrete.
(Fig. 5)
8. Empuje el dispositivo de bobinado de carrete y la
bobina hacia la derecha.
9. Retire la bobina del portacarrete de bobinado y
luego corte el hilo.
Meijer.com

9
WINDING THE BOBBIN
CÓMO BOBINAR EL CARRETE
EMBOBINAGE DE LA CANETTE
Fig. 1 Fig. 2
Fig. 3 Fig. 4
Fig. 5
Meijer.com

10
THREADING THE MACHINE
CÓMO ENHEBRAR LA MÁQUINA
ENFILAGE DE LA MACHINE À COUDRE
1. Set the Power Off/Speed Switch to the OFF
position.
2. Raise the presser foot lifter.
3. Turn the handwheel counter-clockwise until the
needle is in its highest position.
4. Set the thread spool on the spool pin.
5. Bring the thread under the thread guide slot at the
top of the machine and then slip it into the tension
disk (1). Pass the thread into the tension disk,
making sure it slips into the disk securely.
6. Bring the thread down, go around the U-turn (2),
then bring it back up.
7. Pass the thread through the eye of the take-up
lever, from right to left (3).
8. Bring the thread back down and thread the
guide which is just above and to the right of the
needle (4).
9. Thread the needle from front to back (5).
1. Mettez l’interrupteur/régulateur de vitesse sur
ARRÊT (OFF).
2. Relevez le levier du relève-presseur.
3. Tournez le volant dans le sens antihoraire jusqu’à
ce que l’aiguille se trouve à sa position la plus
élevée.
4. Installez la bobine sur la broche porte-bobine.
5. Ramenez le fil sous le guide-fil au-dessus de la
machine puis insérez-le dans le disque de tension
(1). Passez le fil dans le disque de tension en vous
assurant qu’il s’y glisse correctement en place.
6. Faites descendre le fil, passez-le dans le coude (2)
puis ramenez-le vers le haut.
7. Passez le fil dans l’œil du releveur de fils, de droite
à gauche (3).
8. Ramenez de nouveau le fil vers le bas et enfilez-le
dans le guide-fil qui se trouve juste au-dessus et à
la droite de l’aiguille (4).
9. Enfilez l’aiguille de l’avant vers l’arrière (5).
1. Asegúrese de que el interruptor de Apagado/
Velocidad se encuentre en la posición APAGADO
(OFF).
2. Levante la palanca del prensatelas.
3. Gire la manivela en el sentido contrario de las
agujas del reloj hasta que la aguja se encuentre en
la posición más elevada.
4. Coloque el carrete para hilo en el portacarrete.
5. Lleve el hilo por debajo de la ranura de guía
del hilo que se halla en la parte superior de
la máquina y luego deslícelo por el disco de
tensión (1). Pase el hilo por el disco de tensión,
asegurándose de que se deslice en el disco en
forma ajustada.
6. Baje el hilo, rodee la vuelta en U (2), luego vuelva
a subirlo.
7. Pase el hilo por el ojo de la palanca del
prensatelas, de derecha a izquierda (3).
8. Vuelva a bajar el hilo y enhebre la guía que
se encuentra justo arriba y a la derecha de la
aguja (4).
9. Enhebre la aguja de adelante hacia atrás (5).
Meijer.com

11
THREADING THE MACHINE
CÓMO ENHEBRAR LA MÁQUINA
ENFILAGE DE LA MACHINE À COUDRE
Meijer.com

12
THREADING THE BOBBIN
CÓMO ENHEBRAR LA BOBINA
REMPLACEMENT DE LA CANETTE
1.Turn the handwheel counter-clockwise until the
needle is in its highest position. Raise the presser
foot lifter.
2. Pull the slide plate forward and remove the
empty bobbin. (Fig. 6)
3. Place the filled bobbin into the bobbin case
(Fig. 7), and pull about 4” of thread from the
new bobbin. Make sure that the bobbin turns
clockwise when the thread is pulled, or you will
not have correct tension when you begin to sew.
4. Hold the needle thread loosely with your left
hand. Turn the handwheel toward you, first
lowering the needle, and continuing to turn the
handwheel until the needle comes to its highest
position. (Fig. 8)
5. Lightly pull up the needle thread and pick up
the bobbin thread which will appear through the
needle plate slot. Then pull both threads to the
back of the machine leaving a 4” thread tail.
(Fig. 9)
1. Gire la manivela en el sentido contrario de las
agujas del reloj hasta que la aguja se encuentre
en la posición más elevada. Levante la palanca
del prensatelas.
2. Tire de la placa de deslizamiento hacia adelante
y retire la bobina vacía. (Fig. 6)
3. Coloque la bobina llena en el portabobina (Fig.
7), y tire alrededor de 4” (10 cm) de hilo de la
bobina nueva. Asegúrese que la bobina gire en
el sentido de las agujas del reloj cuando tira
del hilo, o no tendrá la tensión correcta cuando
comience a coser.
4. Sostenga el hilo de la aguja en forma holgada
con la mano izquierda. Gire la manivela hacia
usted, primero bajando la aguja, y continúe
girando la manivela hasta que la aguja llegue a
su posición más elevada. (Fig. 8)
5. Suavemente levante el hilo de la aguja y levante
el hilo de la bobina que aparecerá a través de la
ranura de la placa. Posteriormente tire de ambos
hilos hacia el lado posterior de la máquina
dejando un tramo de hilo de 4’’ (10 cm). (Fig. 9)
1. Tournez le volant dans le sens contraire aux
aiguilles d’une montre jusqu’à ce que l’aiguille
soit à la plus haute position. Levez le levier du
pied presseur.
2. Tirez la plaque d’aiguille vers l’avant et retirez la
canette. (Fig. 6)
3. Laissez dépasser 10 cm de queue de fil de la
nouvelle bobine et installez la canette dans le
casier de la canette. Assurez-vous que la canette
tourne dans le sens de l’aiguille d’une montre
(Fig. 7)
4. Tenez légèrement le fil de l’aiguille avec votre
main gauche. Tournez le volant vers vous,
en premier lieu en abaissant l’aiguille et en
continuant jusqu’à ce que l’aiguille arrive à la
position la plus haute. (Fig. 8)
5. Tirez délicatement le fil de l’aiguille et saisissez
le fil de la canette qui apparaîtra au travers de la
fente de la plaque de l’aiguille. Tirez ensuite les
deux fils vers l’arrière de la machine, en laissant
10 cm de queue du fil. (Fig. 9)
Meijer.com

13
THREADING THE BOBBIN
CÓMO ENHEBRAR LA BOBINA
REMPLACEMENT DE LA CANETTE
Fig. 6 Fig. 7
Fig. 8 Fig. 9
IMPORTANT: Always use a metal bobbin, or the magnetized bobbin
case will not be able to function properly, resulting in a lack of tension
on the bobbin thread.
IMPORTANTE: Siempre use una bobina de metal o el portabobina
magnetizado no podrá funcionar en forma correcta, lo que resultará en
falta de tensión en el hilo de la bobina.
IMPORTANT : Assurez-vous de toujours utiliser une canette en métal,
sinon le casier aimanté de la canette ne sera pas activé et il n’y aura
pas de tension sur votre fil de canette.
Meijer.com

14
SEWING
COSTURAS
COUTURE
1. Turn the handwheel counter-clockwise to raise the
needle to its highest position.
2. Lift the presser foot with the presser foot lifter, and then
place the fabric under the presser foot. (Fig. 10)
3. Lower the presser foot. (Fig. 11)
4. The machine can be operated in two ways: with the
food pedal or with the Power Off/ Speed Switch
(Fig. 12)
a) To operate the machine with the food pedal, simply
press your foot down on the pedal. Stop sewing any
time by releasing your foot from the pedal.
b) To operate the machine without the foot pedal, set
the Power Off/Speed Switch to either the left or right,
after four AA batteries have been installed. When set
in the left position (L), the machine will automatically
start sewing at a slower speed, and when set to the
right (H), the machine will automatically start sewing
at ah higher speed. To stop sewing in the automatic
mode, slide the Power off/Speed Switch to the OFF
position.
5. Turn the handwheel counter-clockwise to raise the
needle to its highest position. Lift the presser foot, then
gently remove the fabric from the machine (Fig. 13)
6. Cut the threads with the thread cutter at the side of the
machine.
1. Gire la manivela en el sentido contrario de las agujas
del reloj para levantar la aguja hasta su posición más
elevada.
2. Eleve el prensatelas con la palanca del prensatelas y
luego coloque la tela debajo del prensatelas. (Fig. 10)
3. Baje el prensatelas. (Fig. 11)
4. La máquina puede operarse de dos maneras diferentes:
con el pedal de pie o con el interruptor de Apagado/
Velocidad (Fig. 12)
a) Para operar la máquina con el pedal de pie,
simplemente presione con el pie sobre el pedal.
Cuando desee detener el proceso de costura,
levante el pie del pedal.
b) Para operar la máquina sin el pedal de pie,
coloque el interruptor de Apagado/Velocidad hacia
la derecha o hacia la izquierda, luego de haber
instalado cuatro baterías AA. Cuando se coloca
hacia la izquierda (L), la máquina automáticamente
comienza a coser a baja velocidad y cuando
se coloca hacia la derecha (H), la máquina
automáticamente comienza a coser a mayor
velocidad. Para dejar de coser en modo automático,
deslice el interruptor de Apagado/Velocidad a la
posición APAGADO (OFF).
5. Gire la manivela en el sentido contrario de las agujas
del reloj para levantar la aguja hasta su posición
más elevada. Levante el prensatelas, luego retire
suavemente la tela de la máquina (Fig. 13)
6. Corte los hilos con el cortahilos que se encuentra al
costado de la máquina.
1. Tournez le volant sur le côté de la machine en sens
inverse des aiguilles d’une montre afin d’élever
l’aiguille à sa plus haute position.
2. Levez le pied presseur et placez le matériel que vous
souhaitez coudre sous le pied presseur (Fig.10)
3. Rabaissez le pied presseur (Fig.11)
4. Vous pouvez faire fonctionner la machine à coudre de
deux façons : avec le rhéostat ou avec l’interrupteur
“Power Off/Speed” (Fig. 12)
a) Pour faire fonctionner la machine à coudre avec
le rhéostat, simplement pressez votre pied sur le
rhéostat, et pour cesser de coudre à n’importe quel
moment, simplement enlevez votre pied du rhéostat.
b) Autrement, quand vous êtes prêt à coudre, glissez
l’interrupteur “Power Off/Speed” vers la gauche à
la position basse (L) ou vers la droite à la position
haute (H) et la machine à coudre commencera
automatiquement à coudre. Afin d’arrêter de
coudre, glissez l’interrupteur “power off/speed” à la
position OFF.
5. Tournez le volant sur le côté de la machine à coudre
en sens inverse des aiguilles d’une montre afin
d’élever l’aiguille à sa plus haute position. Relevez le
pied presseur, et enlevez doucement le matériel de la
machine à coudre (Fig.13).
6. Coupez le fil en utilisant le coupe-fils.
Meijer.com

15
SEWING
COSTURAS
COUTURE
Fig. 10 Fig. 11
Fig. 12 Fig. 13
CAUTION: When the machine is running, do not touch or adjust the
Pattern Selection Dial.
PRECAUCIÓN: Cuando la máquina esté en funcionamiento, no toque ni
ajuste el disco de selección de patrón.
AVERTISSEMENT : Lorsque la machine à coudre fonctionne, ne touchez
pas au cadran de sélection du motif.
Meijer.com
16
ADJUSTING TENSION
AJUSTE DE LA TENSIÓN
AJUSTEMENT DU POINT
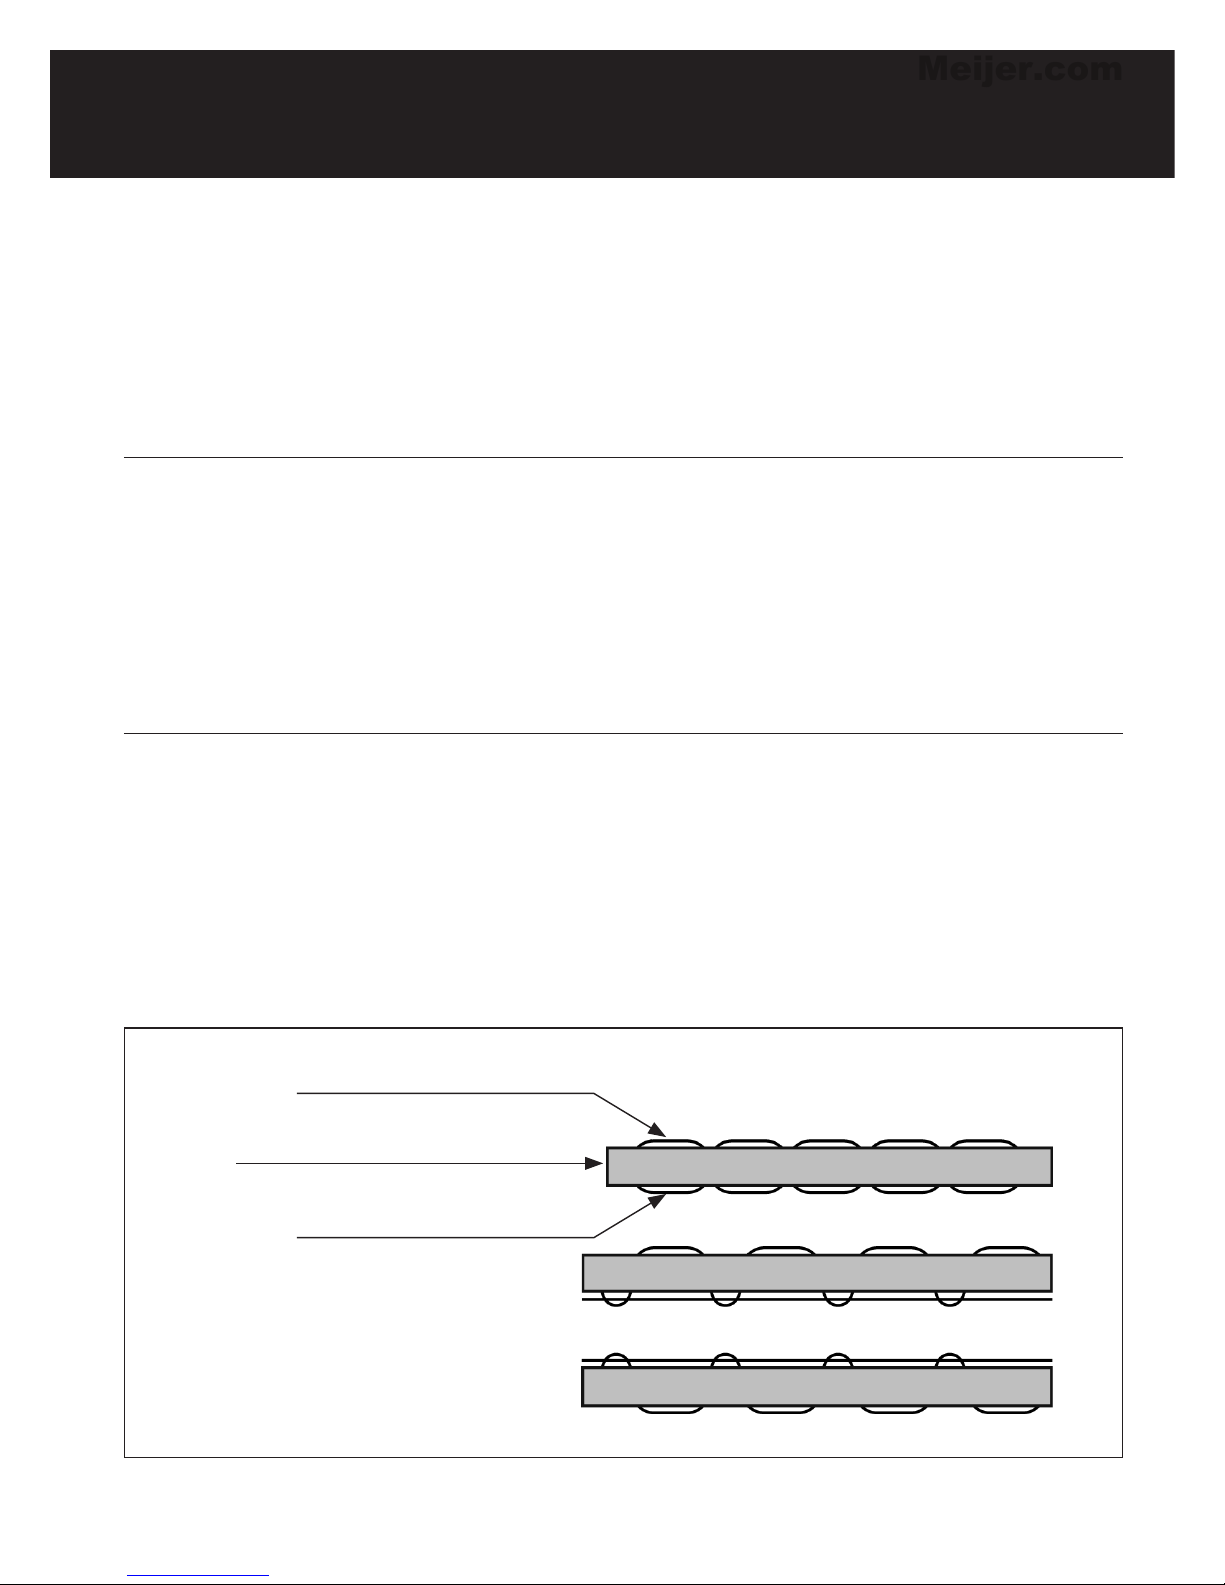
1. As shown in Figure A, a balanced stitch will have a top and bottom thread locking in the center of the
fabric. Neither thread is too loose or too tight.
2. If the bottom thread gives the appearance of a straight line (Figure B), this indicates that the upper thread
is too loose. Turn the Thread Tension Dial to a higher number to increase tension until the stitching is
balanced.
3. If the upper thread gives the appearance of a straight line (Figure C), this indicates that the upper thread
is too tight. Turn the Thread Tension Dial to a lower number to decrease tension until the stitching is
balanced.
1. Como se muestra en la Figura A, las puntadas parejas tienen un hilo superior y uno inferior que se integran
en el centro de la tela. Ninguno de los hilos está demasiado suelto ni demasiado ajustado.
2. Si el hilo inferior tiene la apariencia de una línea recta (Figura B), esto indica que el hilo superior está
demasiado flojo. Gire el disco de tensión del hilo hacia un número mayor para así aumentar la tensión
hasta que las puntadas sean parejas.
3. Si el hilo inferior tiene la apariencia de una línea recta (Figura C), esto indica que el hilo superior está
demasiado flojo. Gire el disco de tensión del hilo hacia un número menor para así disminuir la tensión
hasta que las puntadas estén parejas.
1. Comme démontré à la Figure A, un point normal doit avoir le fil du haut et du dessus ni trop serré, ni trop
lâche.
2. Si le fil du dessous est comme une ligne droite, cela indique que le fil du dessus est trop lâche. Tournez le
cadran de la tension du fil supérieur dans le sens des aiguilles d’une montre afin d’augmenter la tension
jusqu’à ce que le point redevienne normal.
3. Cependant, lorsque le fil du dessus est comme une ligne droite, cela indique que le fil du dessus est trop
serré. Tournez lentement le cadran de la tension du fil supérieur dans le sens contraire des aiguilles d’une
montre afin de réduire la tension jusqu’a ce que le point redevienne normal.
Top thread
Hilo superior
Fil du haut
Cloth
Tela
Tissus
Bottom thread
Hilo inferior
Fil du bas
Fig. A
Fig. B
Fig. C
Meijer.com

17
NEEDLE REPLACEMENT
CAMBIO DE AGUJA
REMPLACEMENT DE L’AIGUILLE
1. Turn the handwheel counter-clockwise to raise the needle to its highest position.
2. Hold the old needle and loosen the needle clamp screw. Remove the old needle and discard it. (Fig. 14)
3. Insert the new needle into the clamp with the flat side of the needle toward the back. Be sure to push the
needle all the way into the clamp before tightening the needle clamp screw. (Fig. 15)
4. Remove the old needle and discard it.
1. Gire la manivela en el sentido contrario de las agujas del reloj para levantar la aguja hasta su posición
más elevada.
2. Sostenga la aguja gastada y afloje el tornillo del sujetador de la aguja. Retire la aguja gastada y
deséchela. (Fig. 14)
3. Inserte la nueva aguja en el sujetador con el lado plano de la aguja hacia el lado posterior. Asegúrese de
empujar la aguja por completo en el sujetador antes de ajustar el tornillo del sujetador de la aguja.
(Fig. 15)
4. Retire la aguja gastada y deséchela.
1. Tournez le volant pour élever l’aiguille à sa plus haute position.
2. Tenez la vieille aiguille et dévissez la vis du pince-aiguille. (Fig.14) Enlevez la vieille aiguille et jetez-là de
façon sécuritaire.
3. Insérez la nouvelle aiguille dans le pince-aiguille avec le côté plat vers l’arrière. Poussez l’aiguille vers le
haut le plus loin possible. (Fig.15)
4. Resserrez la vis du pince-aiguille.
CAUTION: Remove the
batteries and disconnect the
power adaptor before starting
to replace the needle.
PRECAUCIÓN: Retire las
baterías y desconecte el
adaptador de energía antes
de comenzar con el cambio
de agujas.
AVERTISSEMENT : Enlevez
les piles et/ou déconnectez
l’adaptateur AC/DC avant de
remplacer l’aiguille.
Fig. 14 Fig. 15
Meijer.com

18
MACHINE FEATURES
CARACTERÍSTICAS DE LA MÁQUINA
CARACTÉRISTIQUES
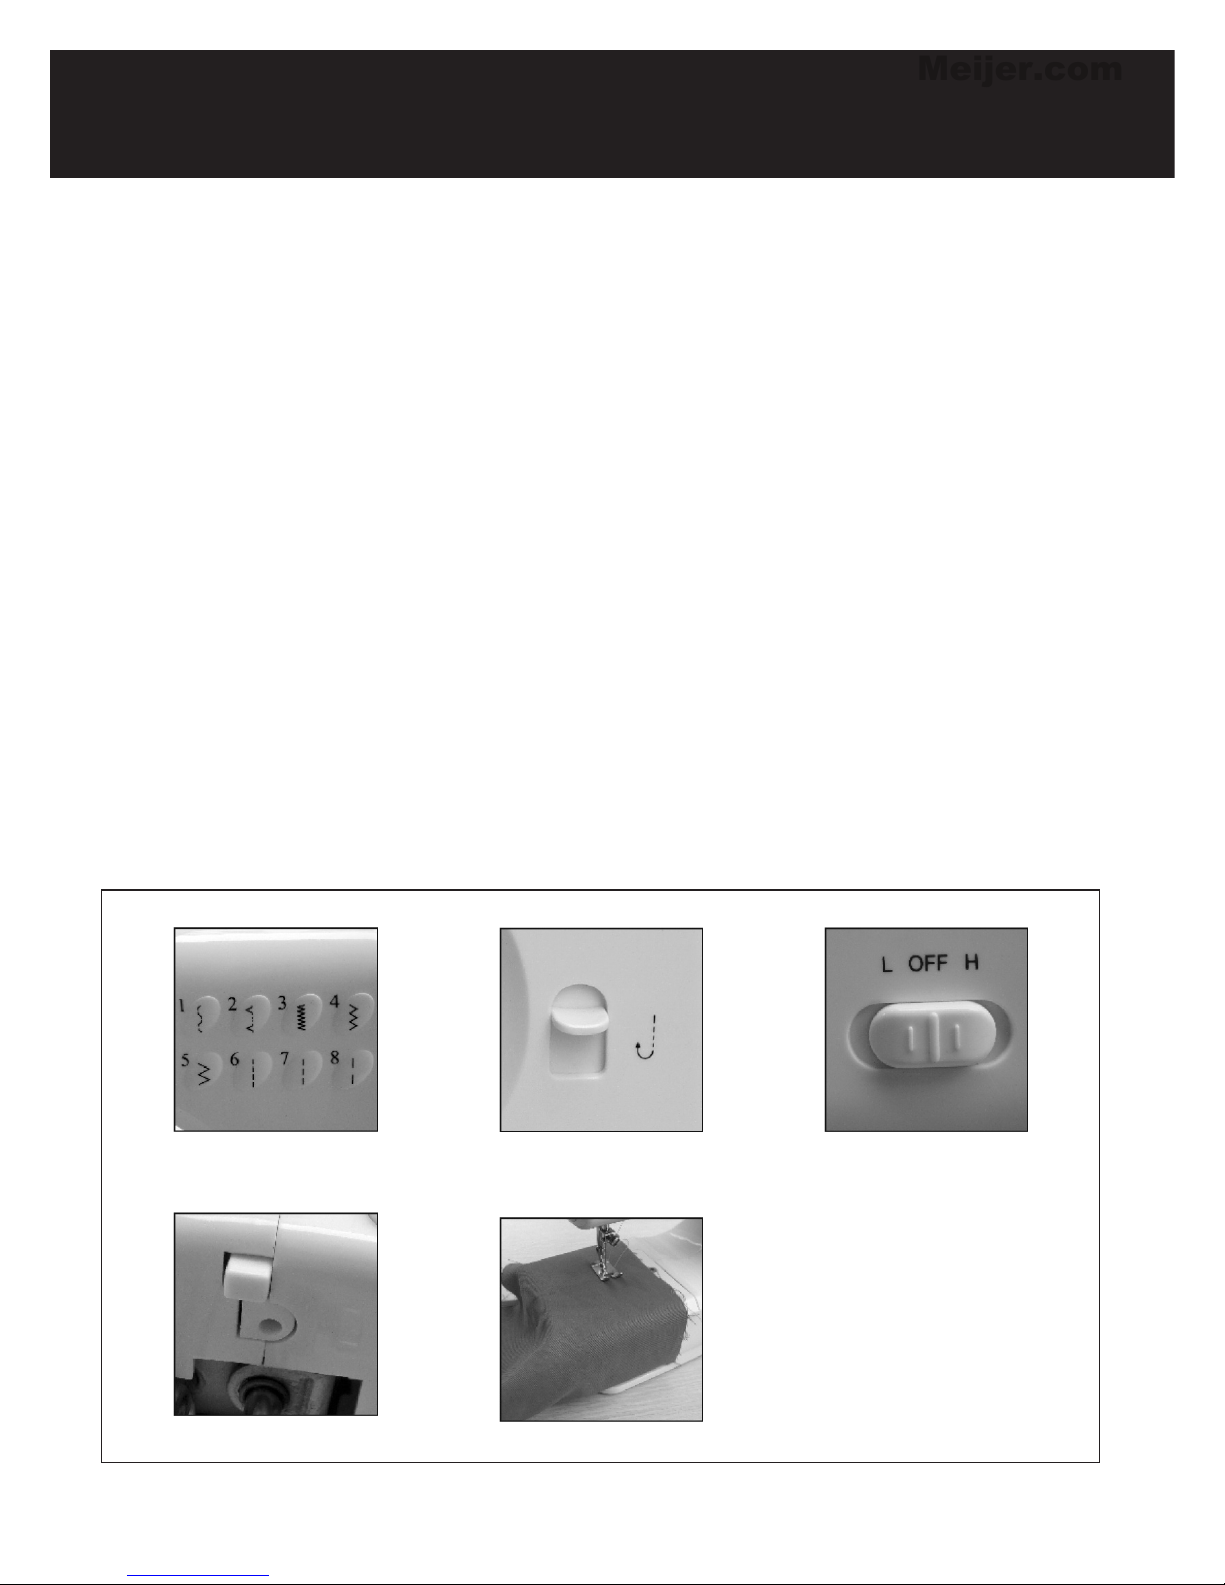
PATTERN SELECTION DIAL (Fig.16)
The machine has a choice of 8 different stitch types/
lengths.
1. To select the stitch you want to sew, look at the
diagrams numbered 1 through 8 on the front of the
machine. Choose the corresponding number on the
dial, lining up the number with the “arrow” marking on
the machine.
2. Proceed with sewing the stitch pattern.
3. When you wish to change the stitch type, turn the hand
wheel to raise the needle to its highest position and
then set the Pattern Selection Dial to the desired stitch
type.
REVERSE STITCH BUTTON (Fig.17)
Reverse sewing (back stitching) is useful for reinforcing
the beginning and end of seams.
1. Sew forward, as normal, and then press and hold down
the Reverse Stitch Button on the front of the machine
to sew backwards.
2. To sew forward again, simply release the Reverse
Stitch Button.
Important: When reverse stitching, turn the Thread
Tension Dial from “4” to “9” to increase the tension
on the upper thread while sewing in reverse. Turn the
upper thread tension dial to the normal setting for
sewing stitch patterns as normal.
SEWING SPEED CONTROL (Fig.18)
This machine has two sewing speeds when operated
by batteries. Push the OFF button to the right, the (H)
position, and the sewing speed will be increased. Push
the OFF button to the left, the (L) position, and the sewing
speed will be reduced.
SEWING LIGHT (Fig.19)
If additional light is needed, press the light switch to turn
the light on. Press the switch again to turn the light off.
FREE ARM (Fig.20)
This machine can also sew some hard-to-reach areas,
such as sleeve cuffs or pant legs.
1. Lift the presser foot with the presser foot lifter.
2. Position the project around the sewing arm.
3. Lower the presser foot and follow the regular sewing
instructions.
DISCO DE SELECCIÓN DE PATRÓN (Fig.16)
La máquina cuenta con 8 opciones diferentes de
longitud/tipo de puntadas.
1. Para seleccionar el tipo de puntada que usted desea
utilizar, observe los diagramas numerados del 1
al 8 en el frente de la máquina. Elija el número
correspondiente en el disco, alineando el número con
la “flecha” que se halla en la máquina.
2. Proceda a coser con el patrón de puntada escogido.
3. Cuando desee cambiar el tipo de puntada, gire la
manivela para levantar la aguja hasta la posición
más elevada y luego coloque el disco de selección de
patrón en el tipo de puntada deseado.
BOTÓN DE PUNTADA EN REVERSA (Fig.17)
La costura en reversa (costura hacia atrás) sirve para
reforzar el comienzo y el final de las costuras.
1. Cosa hacia adelante, como siempre, y luego presione
y sostenga presionado el botón de cambio a puntada
en reversa en el frente de la máquina para coser hacia
atrás.
2. Para coser nuevamente hacia adelante, simplemente
libere el botón de cambio de costura en reversa.
Importante: Cuando cosa en reversa, gire el disco de
tensión del hilo de “4” (10 cm) a “9” (23 cm), a fin de
aumentar la tensión en el hilo superior mientras cose
en reversa. Gire la perilla de tensión del hilo superior
hacia normal para coser patrones de puntadas en
modo normal.
CONTROL DE VELOCIDAD DE COSTURA (Fig.18)
Esta máquina cuenta con dos velocidades de costura
durante su funcionamiento a batería. Presione el botón
APAGADO (OFF) hacia la derecha, la posición (H), para
aumentar la velocidad de costura. Presione el botón
APAGADO (OFF) hacia la izquierda, la posición (L), para
reducir la velocidad de costura.
LUZ PARA COSER (Fig.19)
Si necesita luz adicional, presione el interruptor de la luz
para encenderla. Presione el interruptor nuevamente
para apagar la luz.
BRAZO LIBRE (Fig.20)
Esta máquina también puede coser algunas áreas de
difícil acceso, como puños de mangas o piernas de
pantalones.
1. Levante el prensatelas por medio de la palanca del
prensatelas.
2. Coloque su proyecto de costura alrededor del brazo
de costura.
3. Baje el prensatelas y siga las instrucciones de costura
normales.
Meijer.com
19
MACHINE FEATURES
CARACTERÍSTICAS DE LA MÁQUINA
CARACTÉRISTIQUES
Fig. 16 Fig. 17 Fig. 18
Fig. 19 Fig. 20
8 FONCTIONS DE POINT (Fig.16)
1. La machine à coudre a un choix de huit types de
points différents/longueurs. Pour sélectionner le point
que vous désirez, regardez le diagramme numéroté
1-8 sur le devant de la machine à coudre, choisissez
le nombre correspondant sur le cadran en l’alignant
avec la flèche. Par exemple, pour sélectionner le point
du zigzag (n° sur le diagramme), tournez simplement
le cadran de sélection jusqu’à ce que le nombre 2 du
cadran soit aligné avec la flèche.
2. Débutez la couture.
3. Lorsque vous souhaitez changer le type de point,
tournez le volant sur le côté de la machine à coudre
afin d’élever l’aiguille à la plus haute position et mettre
le cadran de la sélection de motif de la même façon
que mentionnée ci-dessus.
BOUTON POINT ARRIÈRE (Fig.17)
La couture vers l’arrière (point arrière) est utile pour
renforcer le début et la fin de la couture. Pour utiliser
cette fonction, procédez comme suit :
1. Coudre normalement vers l’avant et ensuite pesez et
maintenez vers le bas le bouton pour point arrière situé
sur le devant de la machine, afin de coudre des points
vers l’arrière.
2. Pour coudre vers l’avant de nouveau, relâchez
simplement le bouton du point arrière.
Avertissement : Lorsque vous désirez changer le type
de point, vous devez faire l’étape 3 en premier.
RÉGLEZ LA VITESSE DE LA MACHINE À
COUDRE (Fig.18)
Cette machine à coudre a deux vitesses de couture.
Glissez le bouton ‘OFF’ vers la droite, à la position ‘H’ et la
vitesse de couture sera rapide, alors que dans la position
‘L’, la vitesse sera lente.
LUMIÈRE DE TRAVAIL (Fig.19)
Si plus de lumière est nécessaire, appuyez sur
l’interrupteur de la lumière à ‘ON’. Appuyez à nouveau sur
l’interrupteur pour la fermer ‘OFF’.
COUTURE DE MANCHE (Fig.20)
Cette machine à coudre a été conçue pour coudre des
manches ou toutes ouvertures étroites dans un vêtement.
1. Levez le pied presseur.
2. Placez le vêtement sur le bras de couture.
3. Rabaissez le pied presseur et suivez les directives
régulières de couture.
Meijer.com
20
TROUBLESHOOTING
PROBLEM PROBLEM CAUSE AMENDMENT
No power or machine
runs slowly
Batteries installed incorrectly;
Batteries are low;
Adaptor power inadequate
Reinstall the batteries making
sure they are correctly inserted;
Use new batteries;
Use compatible adaptor
Skipping stitches
Needle eye not centered;
Needle is bent;
Presser foot is too loose
Remove and re-insert the needle with
the flat side of the needle to the back;
Remove and re-insert a new needle;
Tighten the presser foot
Bobbin thread cannot
be drawn up
Bobbin is empty;
Needle is threaded incorrectly
Replace with full bobbin;
Rethread the needle making
sure it is threaded from front
to back
Thread keeps breaking
Needle is bent;
Needle shank not properly seated;
Thread tension dial or thread guide
are too tight
Remove and re-insert new needle;
Remove and re-insert new needle;
Loosen the thread tension to a
setting between 3-5
Stitches too loose
or uneven
Threads are caught;
Upper thread is too loose or
too tight
Rethread the upper thread and bobbin
Needle breaks Needle bent or defective Remove and re-insert new needle
Correct Disposal of This Product
This marking indicates that this product should not be disposed with other household
wastes. To prevent possible harm to the environment or human health for uncontrolled
waste disposal, recycle it responsibly to promote sustainable reuse of material resources.
Meijer.com
Table of contents


