Meistergram PRO 150 Series User manual
Quick Reference Guide
PRO 150x Series
For models PRO1501, PRO1502,
PRO1504, PRO1506 and PRO1508

2

3
Contents
Overview
Machine Overview……………………..4
Initial Power Up………………………..6
Power Resume…………………………7
Controller Overview…………………...8
Keypad Overview……………………...9
Function Keys…………………………11
Screen Overview………………………12
Infomational Side Bar…………………13
Status Icons……………………………14
Controller Functions
Sewing Mode …………………………18
Idle (Float) Mode……………………...19
Thread Trim Function…………………20
Head Rotate Function…………………20
Needle Selection………………………21
Arrow Keys……………………………21
Design Rotate/ Mirror Image………….22
Go to Last Position…………………….22
Return to Start…………………………23
Color Change Mode…………………...24
“How To”
Load Designs from USB………………26
Select Design to Sew…………………..28
Changing Design Parameters………….30
Setting Color Sequence………………..32
Viewing a Design……………………...34
Deleting a Design……………………...35
Perimeter Trace………………………..36
Float through Design without Sewing…37
Move to Any Stitch…………………….38
Machine Functions
Thread Break detection………………...42
Machine Back Up………………………43
4
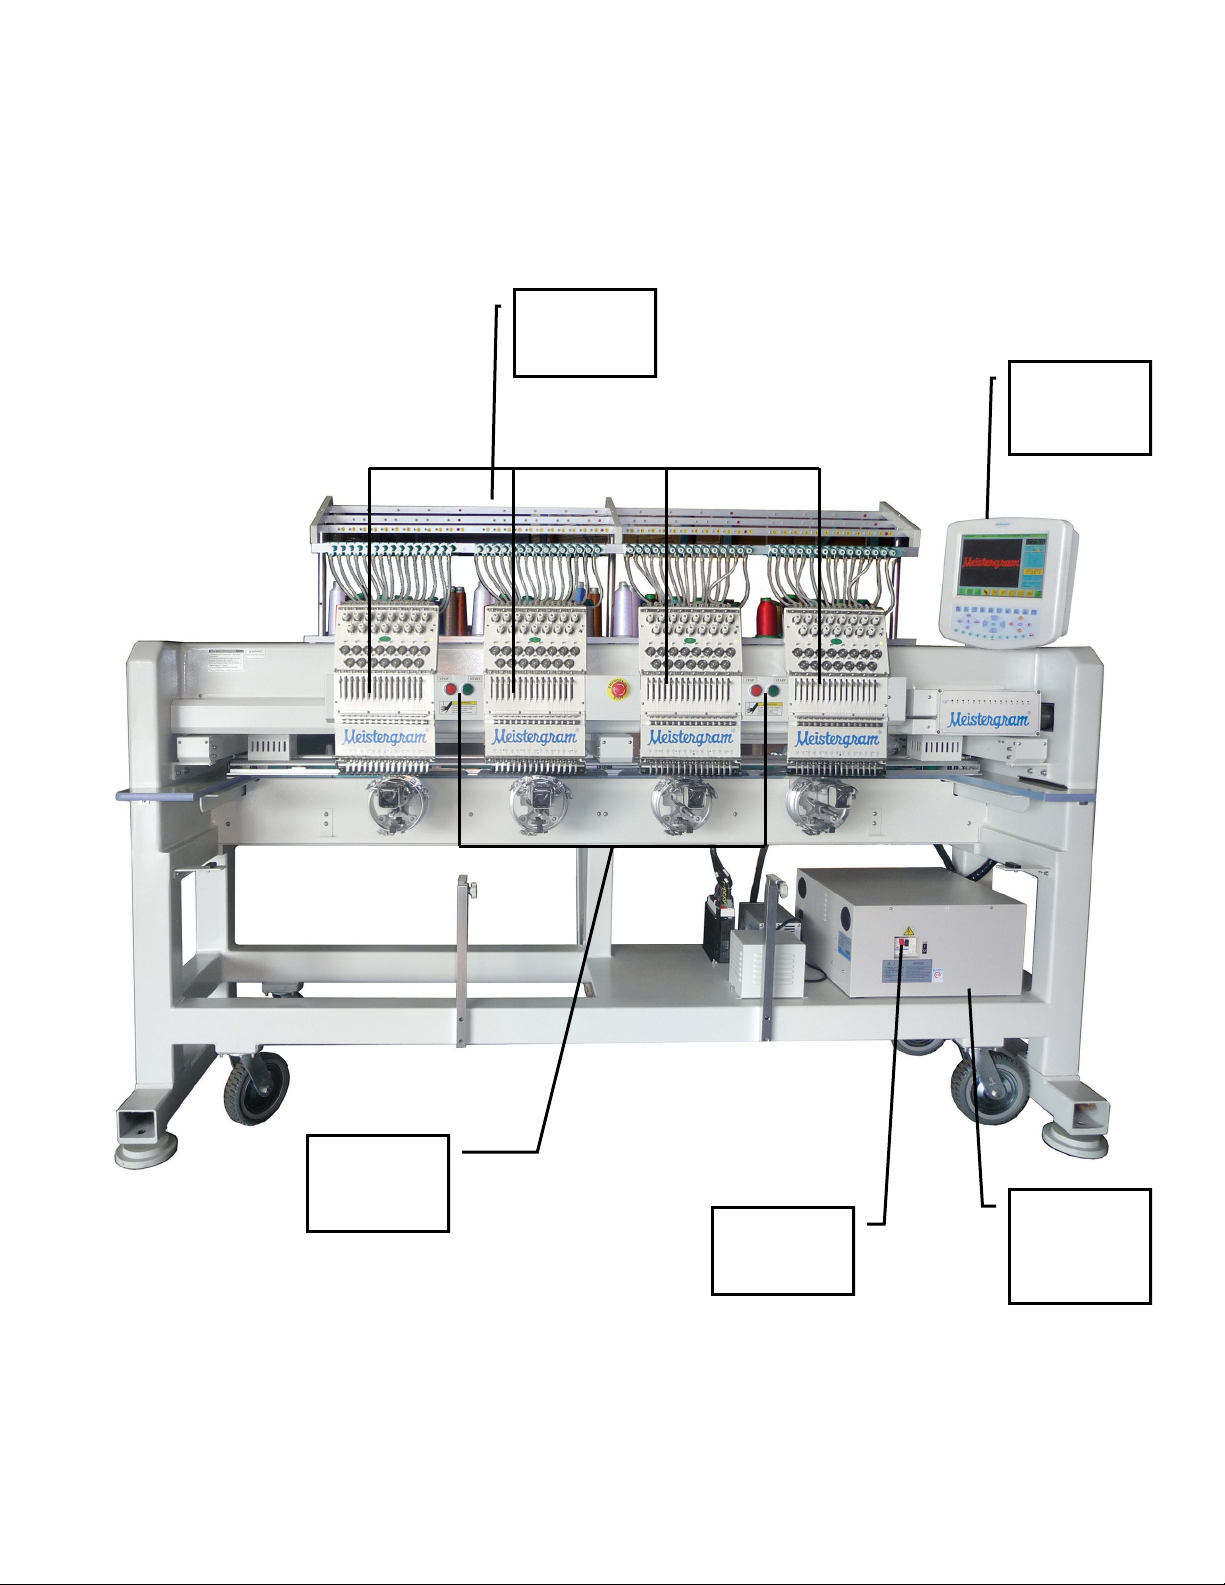
Machine Overview
Machine
Controller
Power
Control
Box
Power
Switches
Sewing
Heads
Start/ Stop
Switches
5
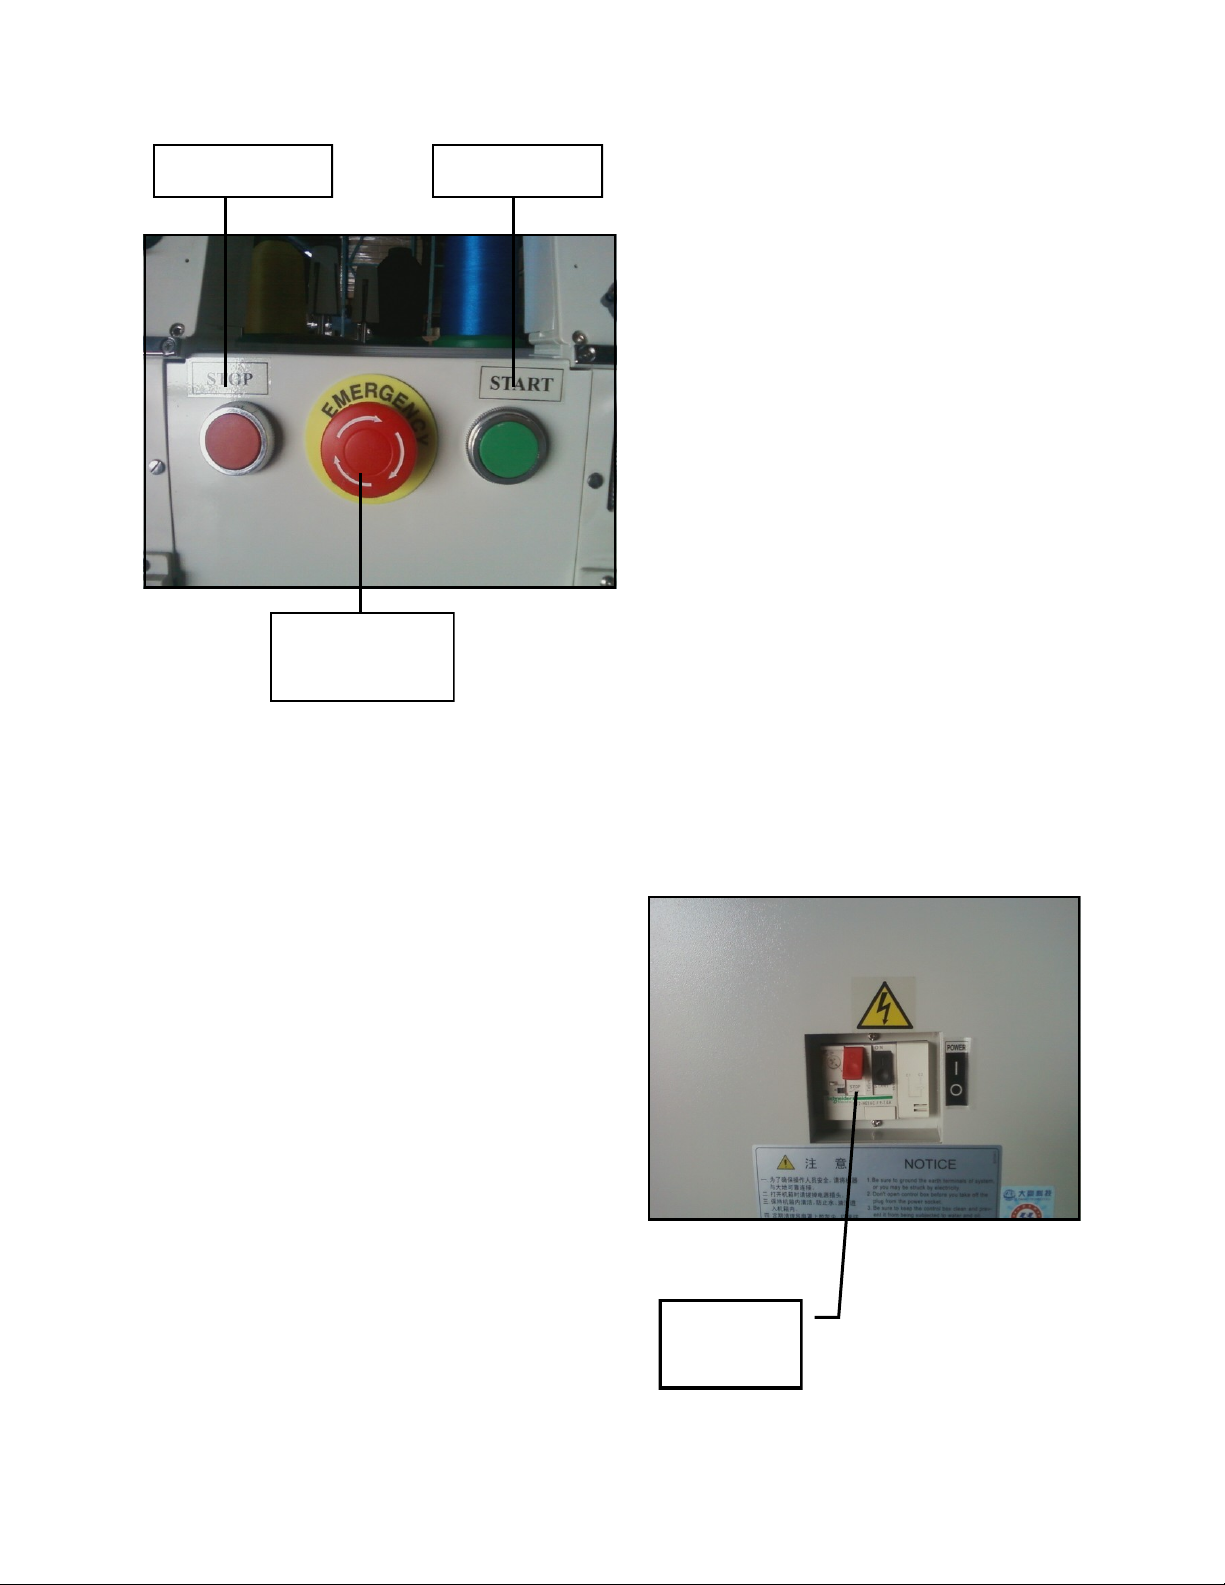
Stop Switch Start Switch
Emergency
Stop Switch
The Start and Stop Switches are used
to begin and end sewing.
Additionally:
The Start switch if it is pressed and
held at any time during sewing, will
make the machine sew in Slow
Speed.
The Stop switch is used to reverse or
back up the machine for mending.
The Emergency Stop switch is used
to cut power to the machine in case
of an emergency. To restore power to
the machine, the Emergency Stop
switch must be unlocked by turning
it clockwise. Then the machine may
be powered up normally.
Power
Switches
To turn on the machine, press in the
black Power Switch.
To turn off the machine, press in the
red Power Switch.

6
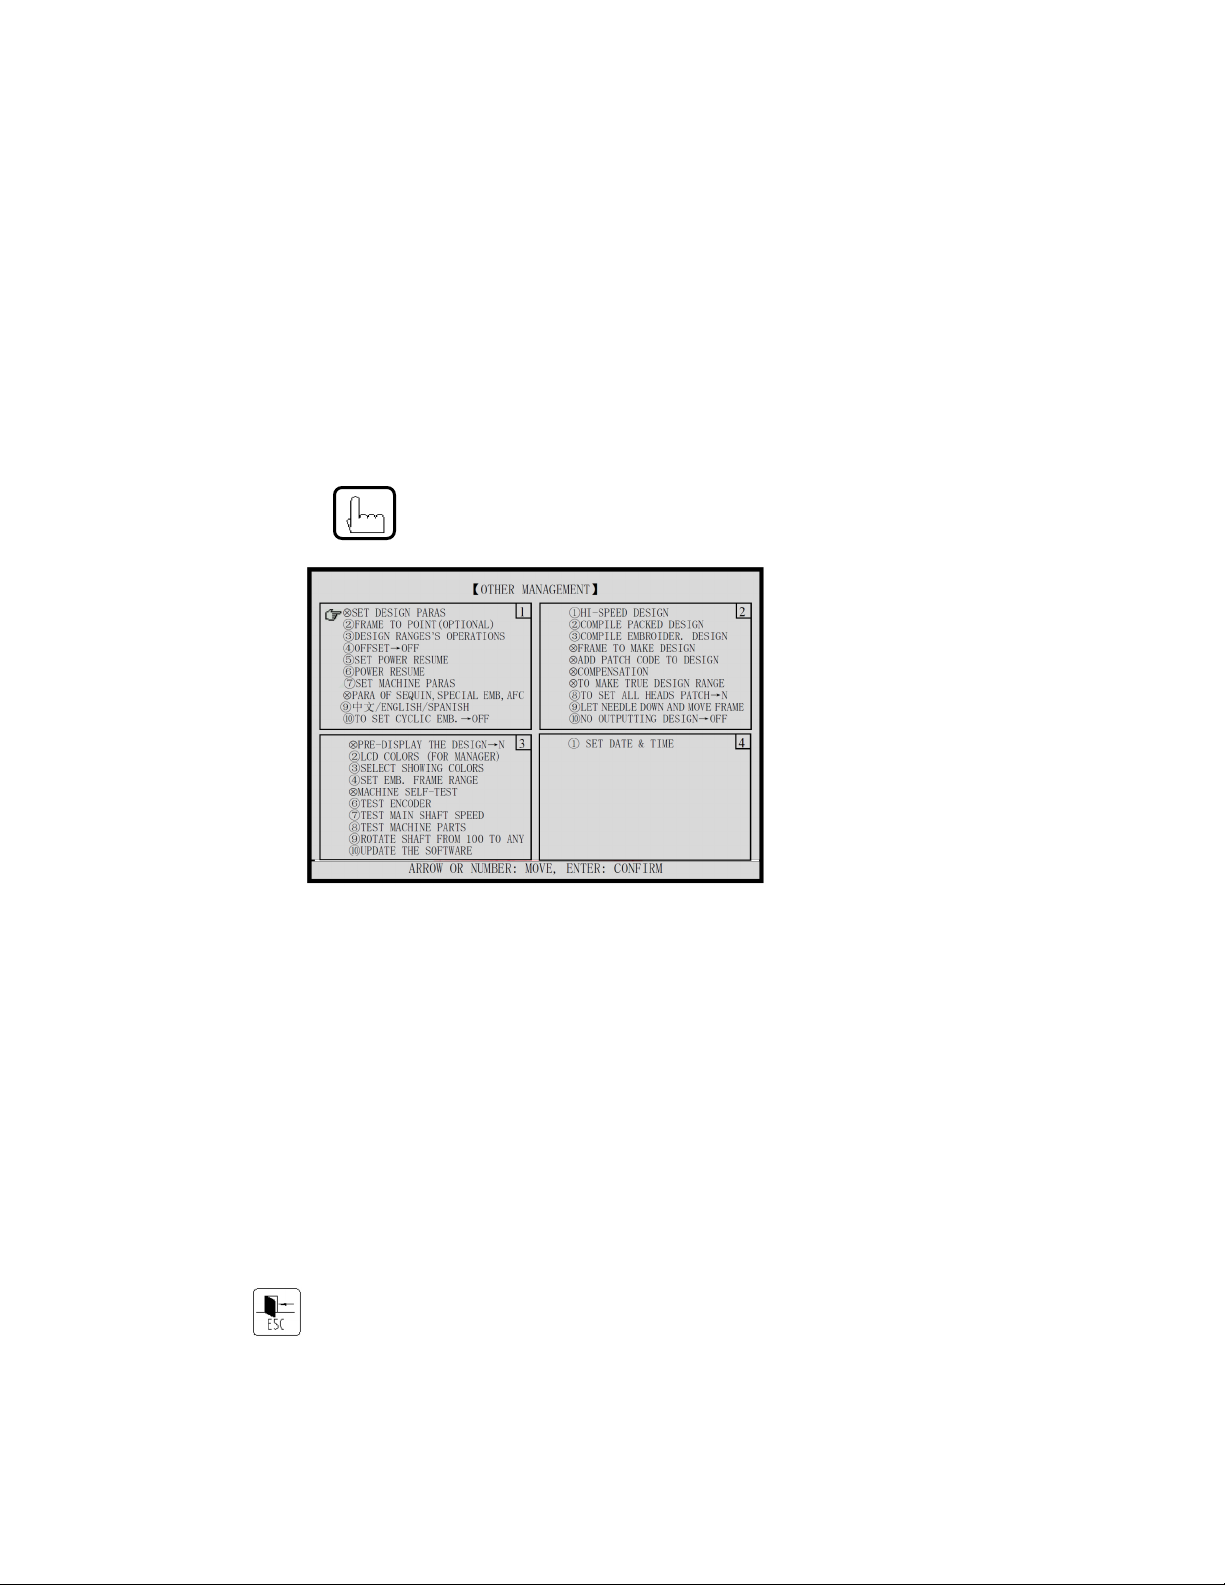
Initial Power Up
Upon initial power up of the machine, it is recommended that the Zero Point of
the machine is reset. The Zero Point is an electronic reference point for the
machine to base the frame movement calculations. It also allows the machine to
recover accurately from a power failure, even if the frame is moved while the
power is off.
To set the Zero Point on the machine, first be sure any hoops are
off of the machine and the table is clear.
Then press the key. The Assistant Menu will appear.
Press 5 to select SET POWER RESUME/ ZERO POINT and
press Enter. A prompt will appear on the bottom of the screen.
MANUALLY, SET “ZERO” POINT Y
Press the down Arrow Key to change the value to “N”.
Another prompt will appear.
ENTER: SET POWER RESUME AND FRAME
Press Enter to continue. The frame will move to the back right
corner of the machine and then return to its original spot.
Press the key to exit the Assistant Menu.
7
Power Resume
The machine can will return to the same stitch it left off in the event of a power
failure. However, if the frame has been moved while the power was disconnected,
the design placement may be off. To insure proper frame accuracy, use Power
Resume any time power is restored to the machine.
To activate the Power Resume feature, first be sure any hoops are
off of the machine and the table is clear.
Then press the key. The Assistant Menu will appear.
Press 6 to select POWER RESUME and then press Enter. A
prompt will appear on the bottom of the screen.
ENTER: SET POWER RESUME AND FRAME
Press Enter to continue. The frame will move to the back right
corner of the machine and then return to its original position of the
frame before the power was removed.
Press the key to exit the Assistant Menu.
8
Controller Overview
Function
Status
Indicators
LCD
Display
Funtction and
Control Keys
9
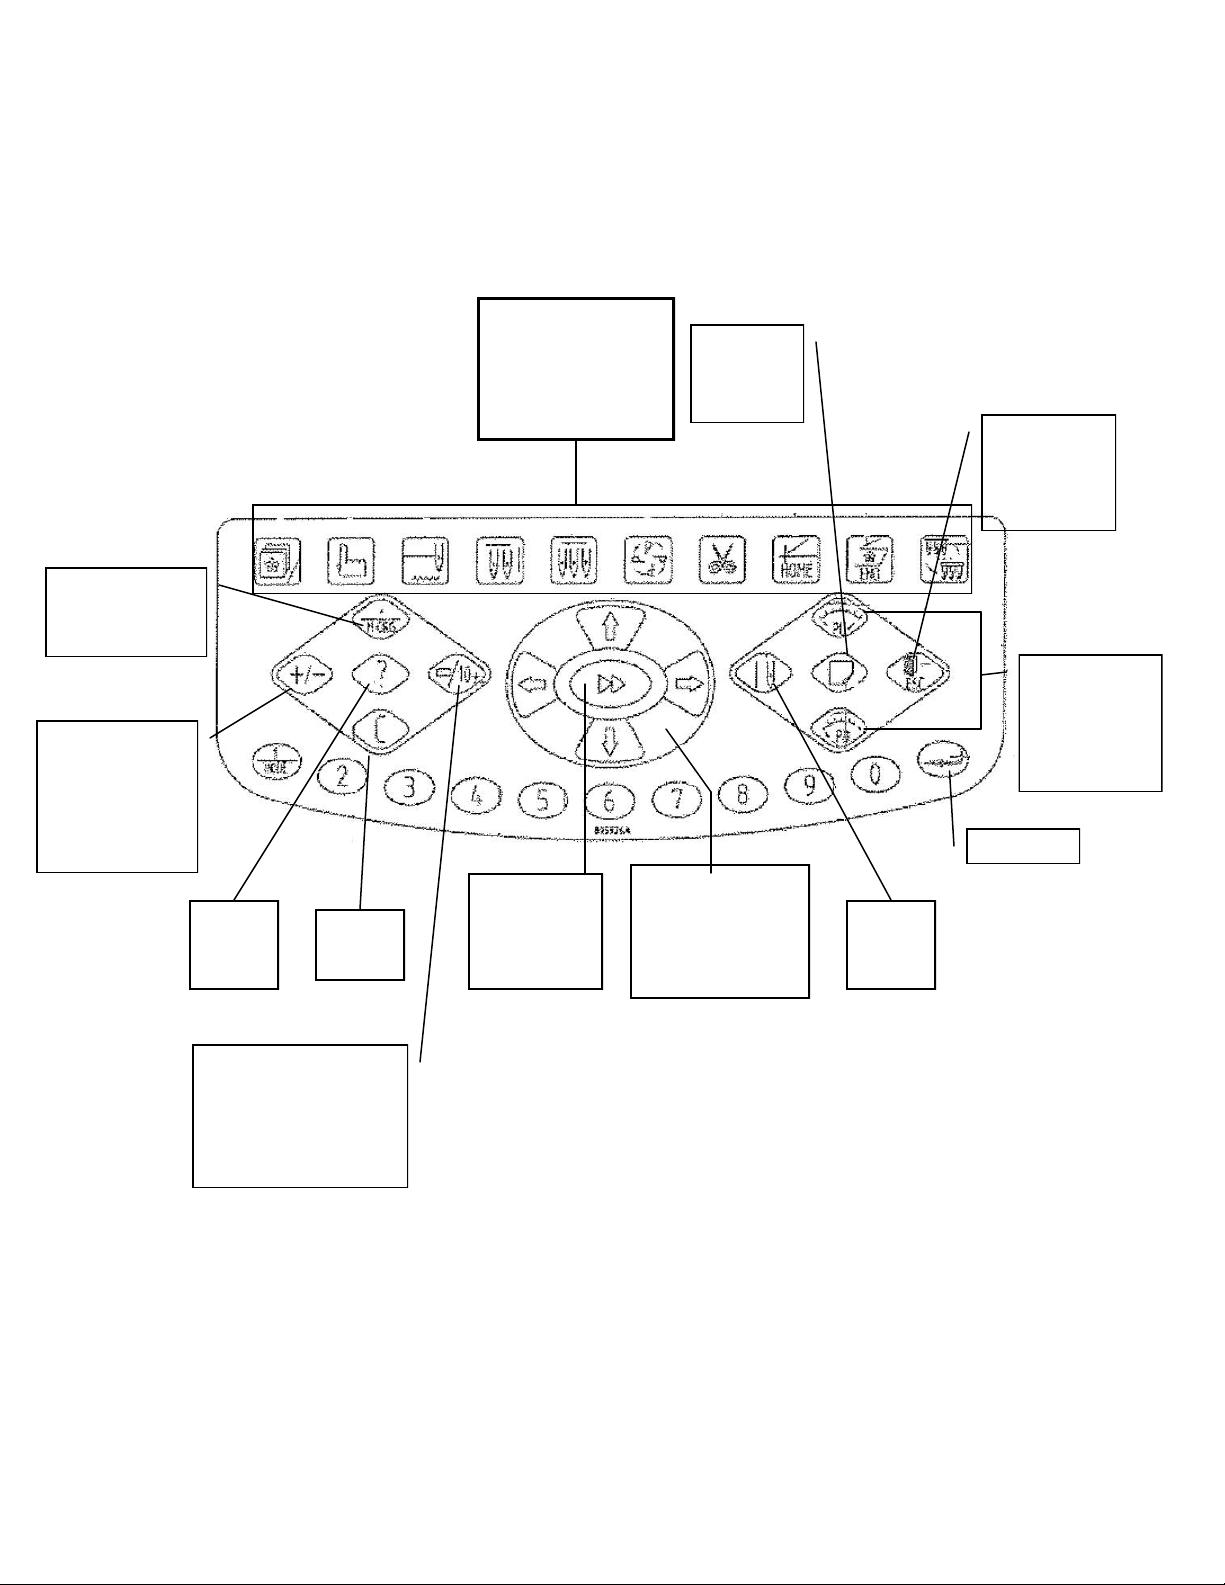
Keypad Overview
Function
Status
Indicators
Function Keys
See pages following
page for description
Access
Help
Menu
Enter Key
Toggle
between High
Speed and
Low Speed
3Arrow Keys.
Typically for
moving the frame.
Also used for
navigating menus
Speed Control
Also used to
Page Up and
Page down
menus
Cycle sewing
head to proper
position
Display
Production
information. Also
used to change
value in some
menus
Clear
Key
Set
Sewing
Mode
Escape Key
Used to escape
out of any
menu.
Display
Design
information
+10 Key
Use in conjunction with
the Numeric Keypad to
input values of 10 or
higher

10
11
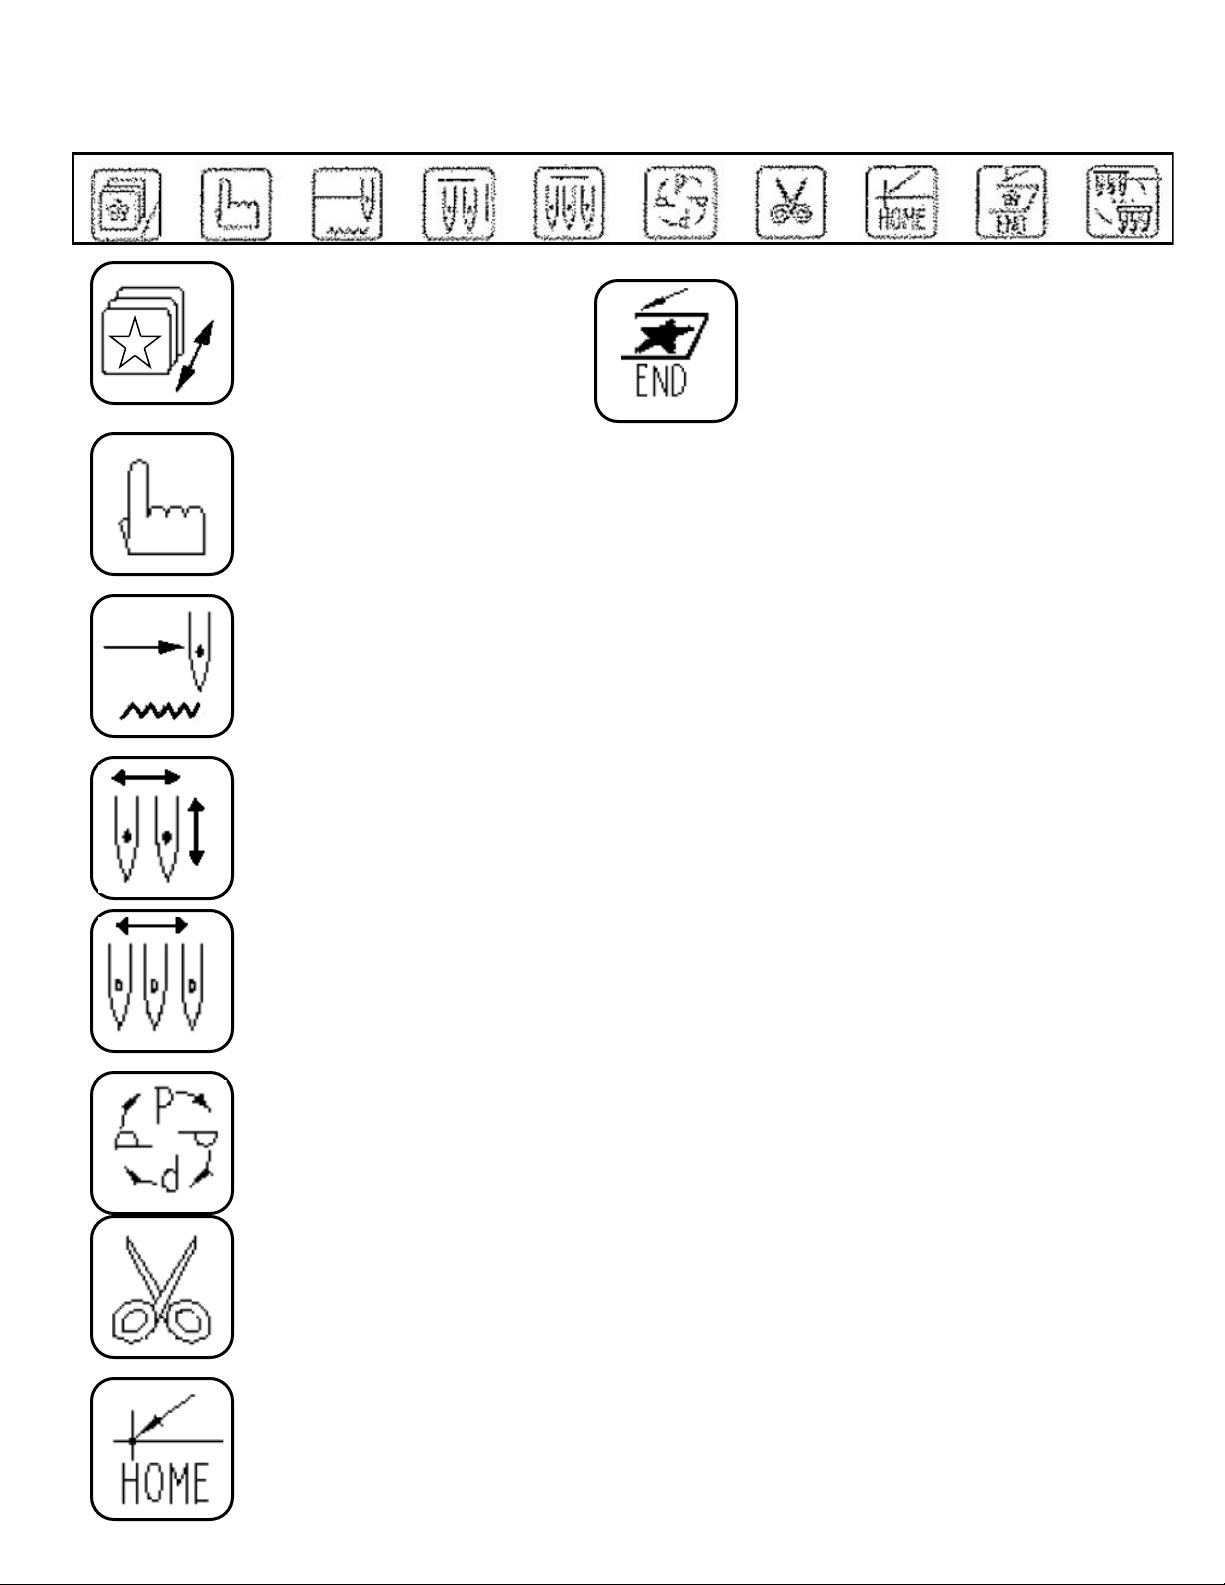
Design Management
Menu
Assistant Menu
Select Color Change Mode
Float (or Idling)
Design
Color Change Sequence
Rotate/ Mirror Design
Trim Thread
Return to Design Start
Menu
Return to last position (if
frame was moved while the
machine was stopped during
sewing)
Function Keys

12
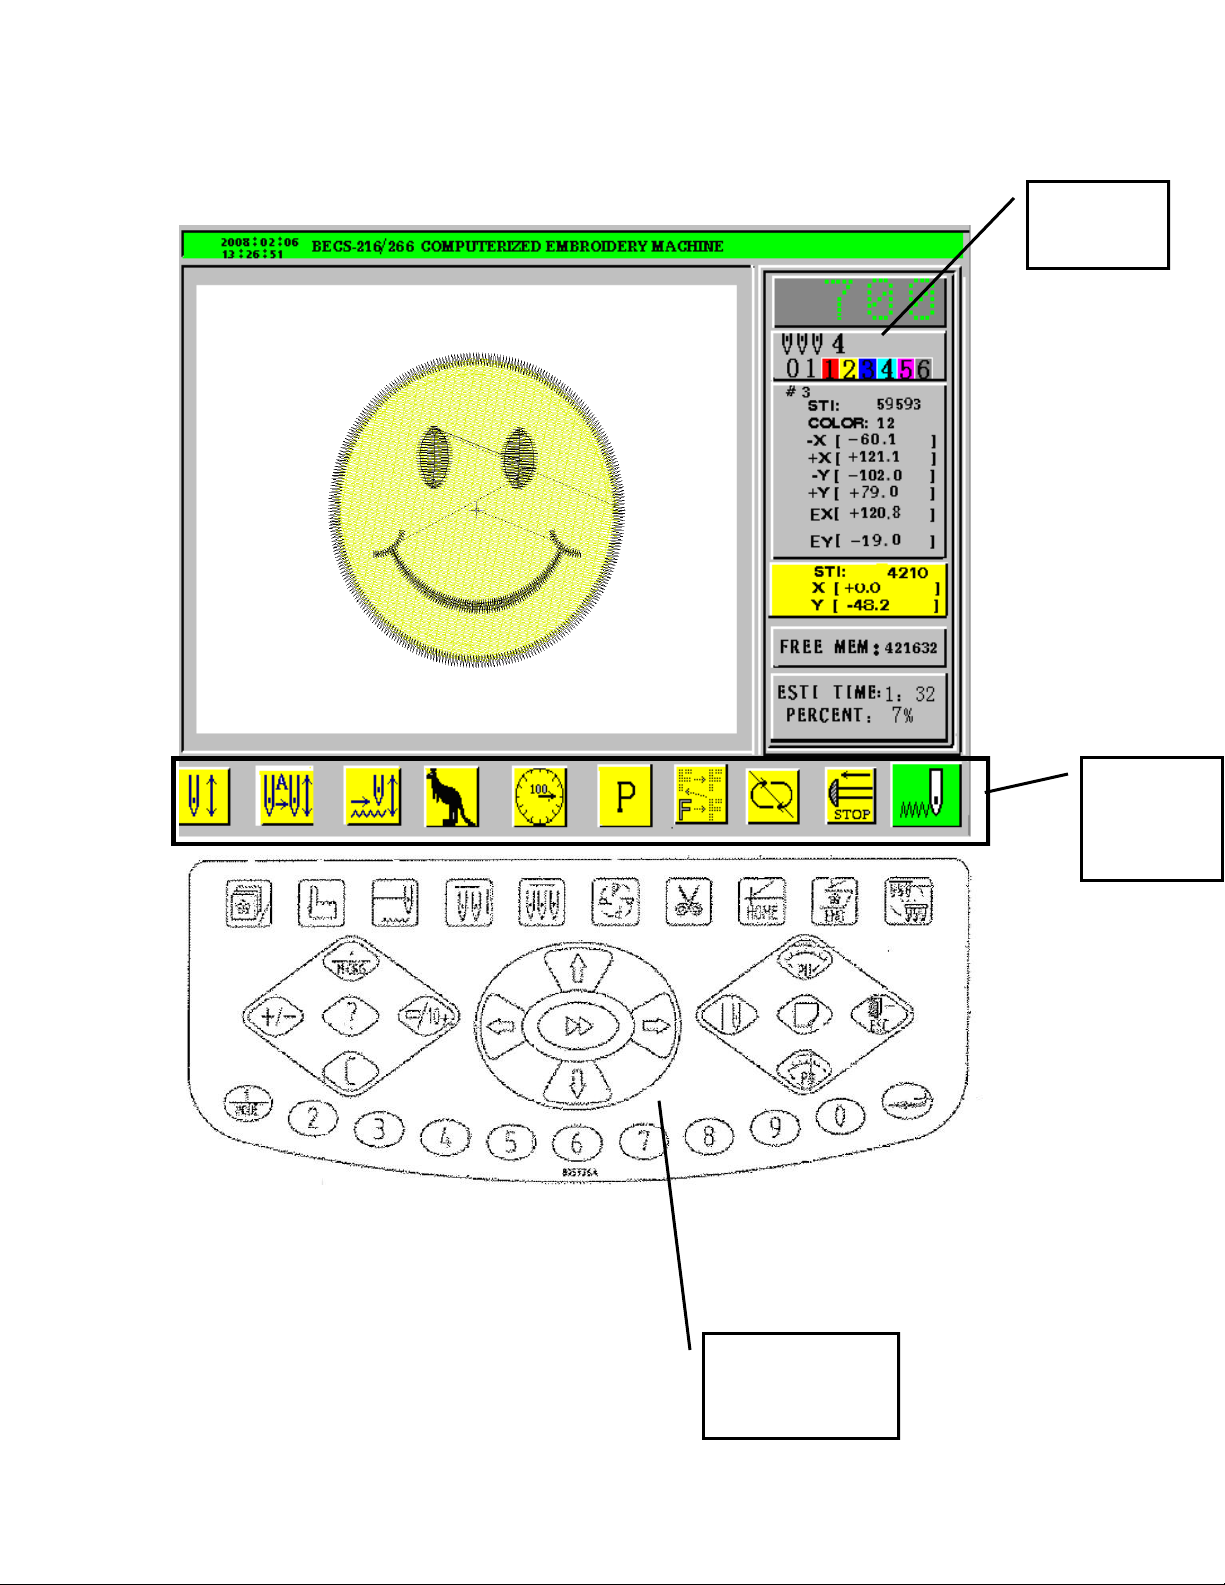
Screen Overview
Informational
Side Bar
Current
Needle
Machine Status Incicators
See following pages for icon descriptions
1 2 3 4 5 6 7 8 9 10

13
Machine
Speed
Current Needle
Color Change Sequence
Design
Number Total Stitches in Design
Total Number of
Color Changes Total Design Area and
Last Stitch Coordinate
Current Stitch Number
Frame Position
Available Memory
Estimated Running Time
Percentage of design
completed
Current Color
Number in Color
Sequence
Informational Side Bar Overview
14
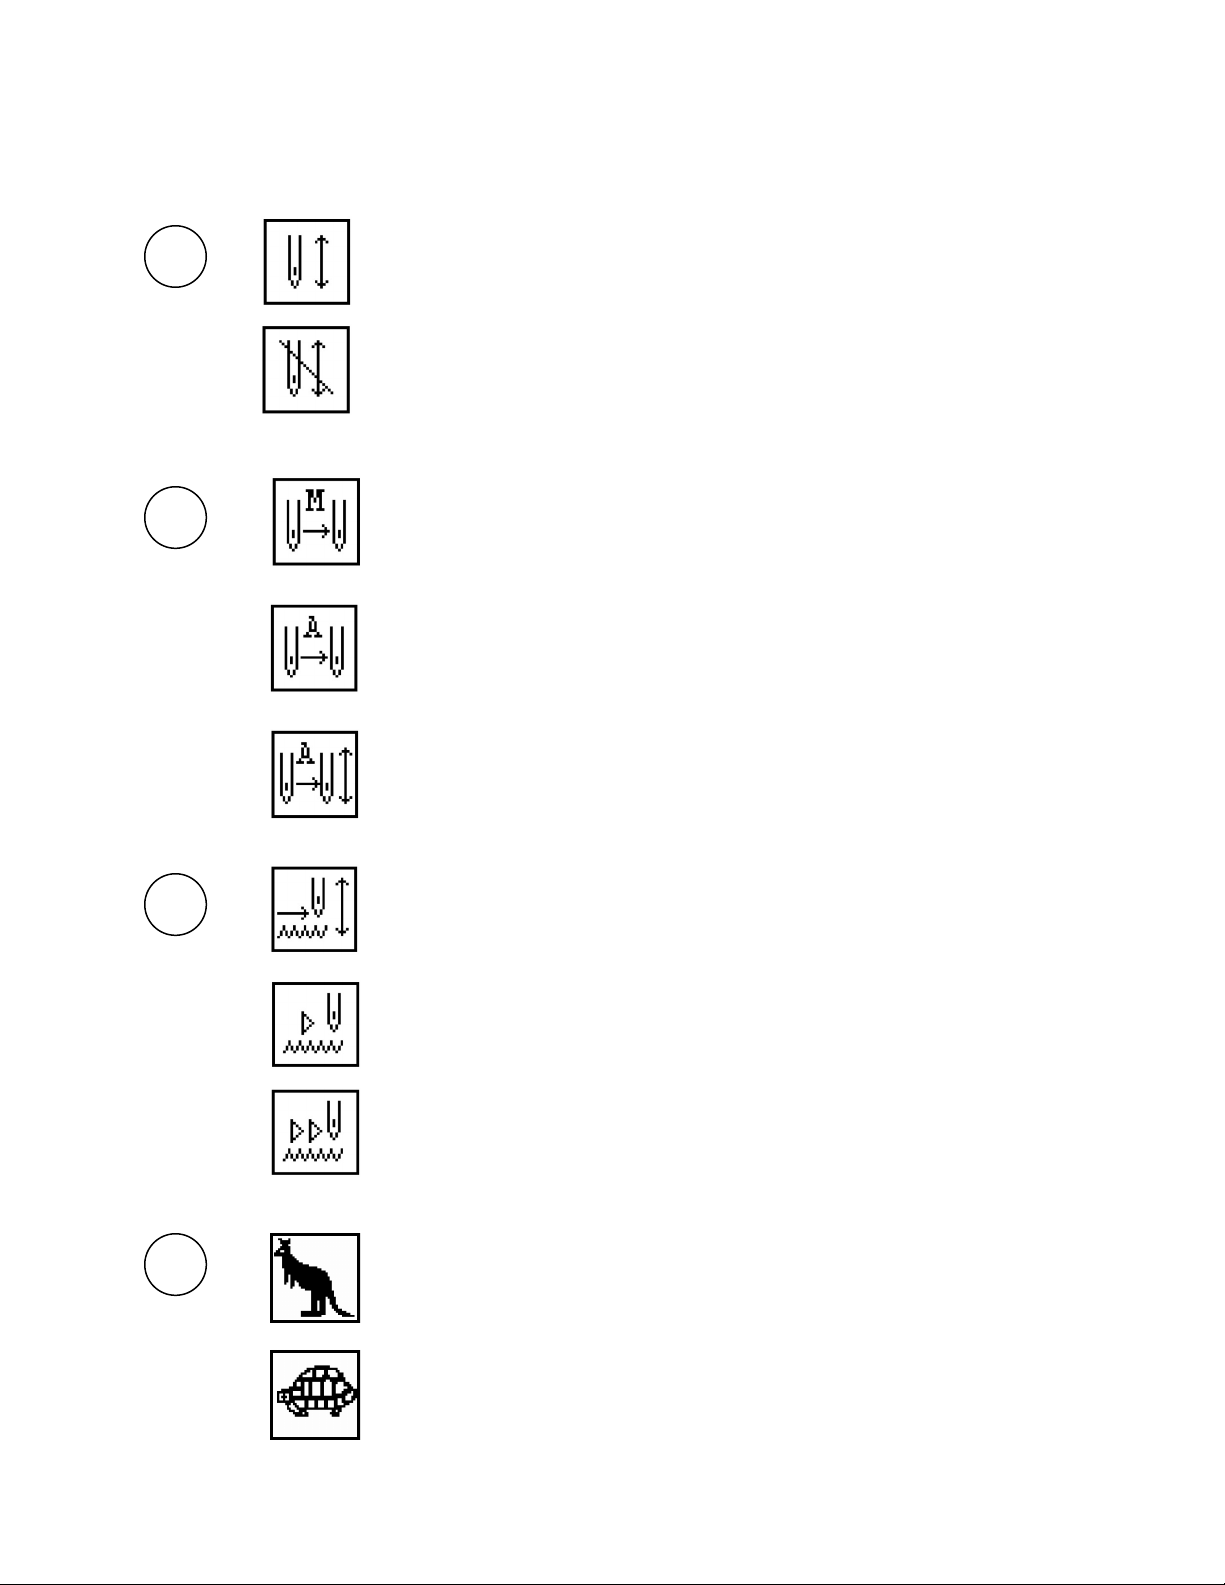
Machine Status Icons
1
Machine Embroidery Confirmation Status Icon
Machine is in Embroidery Mode (ready to sew)
If start button is pressed, the machine will begin sewing.
Machine is in Preparation Mode (not ready to sew)
2
Color Change Mode Icon
Manual Color Change Mode
Machine will stop at color changes and must be changed manually
Auto Color Change, Manual Start Mode
Machine changes colors automatically but stops after the color change and
must be restarted manually
Auto Color Change, Auto Start Mode
Machine changes colors and restarts automatically
3
Float Mode Icon
Normal Sewing Mode
Low Speed Float Mode
Machine traces through the design without sewing at normal sewing speed
High Speed Float Mode
Design draws on screen when start button is pressed and stops with stop
button. Frame then moves to the postion where the design stopped.
Manual Frame Move Speed
High Speed
Frame moves at high speed when arrow keys are pressed
Low Speed
Frame moves at lower speed when arrow keys are pressed
4
15
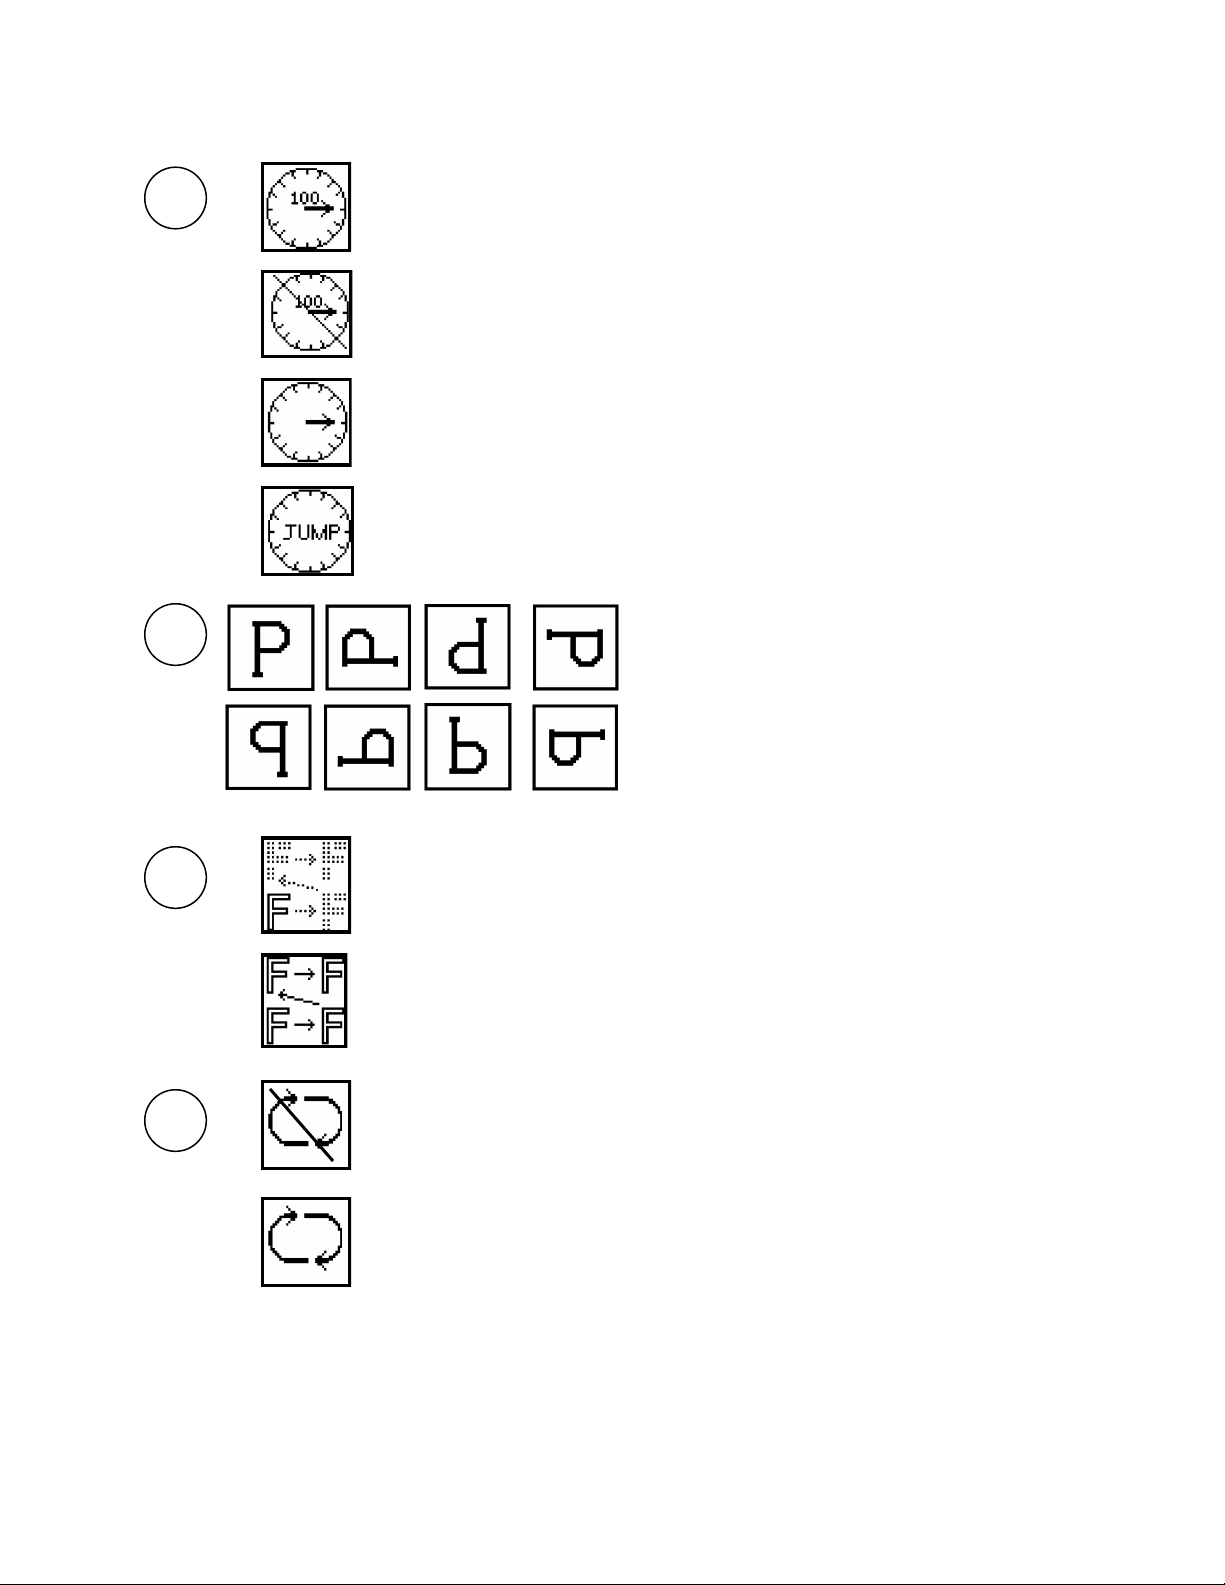
5
Sewing Head Indicator
Stopped at Normal Position (100°)
Sewing is not at Normal Stop Position
Machine will not operate
Machine is in operation
Icon is animated and spins during sewing
Sewing head is jump stitching
6 Design Orientation
Represents the orientation of the design if
it has been rotated or mirror imaged
7
Repeat Mode Status
Machine is not set to repeat
Machine is programmed to repeat in a grid pattern
8
Cyclical Mode Status
Machine is not set to cycle
Machine is programmed to cycle the design
Design will begin again automatically once it is finished.

16
Machine Status Icons (contd.)
9 Machine Stopped Status
Stopped by Stop Switch
Thread is Broken
Machine is changing colors
End of the design
10
Running ModeStatus
Normal Embroidery
(Icon can change if other attachments are utilized such as
cording, coiling, taping, sequins or boring devices)

17
Controller Functions
This section covers:
Sewing Mode
Idle (Float) Mode
Thread Trim Function
Head Rotate Function
Needle Selection
Arrow Keys
Design Rotate/ Mirror
Last Position
Return to Start
Color Change Mode

18
Sewing Mode Mode
Sewing mode sets the machine so that when the Start button is pressed, the
machine will begin sewing. If the machine is out of Sewing Mode, the Start
button is inactive. While in Sewing Mode, there are certain menu options that are
inaccessible. (I.e. You cannot switch designs while sewing) Additionally, there are
certain menu options that are only available while in Sewing Mode.
Menu options that are available are displayed in blue letters. Menu options that
are inaccessible are displayed in white letters.
To access Sewing Mode, first select the desired design from the
Design Management menu. (See section titled “Selecting Designs
from Memory”)
Press the button and then press the Enter key.
A prompt will appear at the top of the screen
PRESS [HOME] KEY TO SAVE ORIGIN
If the key is pressed, the machine will save the starting position
of the frame for this design. If the Enter key is pressed, it the start
position will not be saved.
To continue, choose the desired option. Another prompt will appear
at the top of the screen:
SAVE PARAMETERS N
Press Enter to continue or use the up and down arrow keys to save
the color change and rotational information to memory.
The Sewing Mode Status will change to indicating the machine is
in Sewing Mode.
19
Idle Mode
Idle mode, or Float, is the ability to move through the design without stitching.
The Idle Mode button has three settings: Normal Embroidery, Low-Speed Float
and High-Speed Float.
The display shows which mode is selected in the top right hand corner of the
machine display. Idle mode is only active while in Sewing Mode mode.
To Exit Sewing Mode, press the key then press the Enter key.
The Sewing Mode Status will change to
To change the Float or Idle mode, press the button on the
controller.
Each time the key is pressed, the Float Status Indicator will
change to reflect the Float Mode
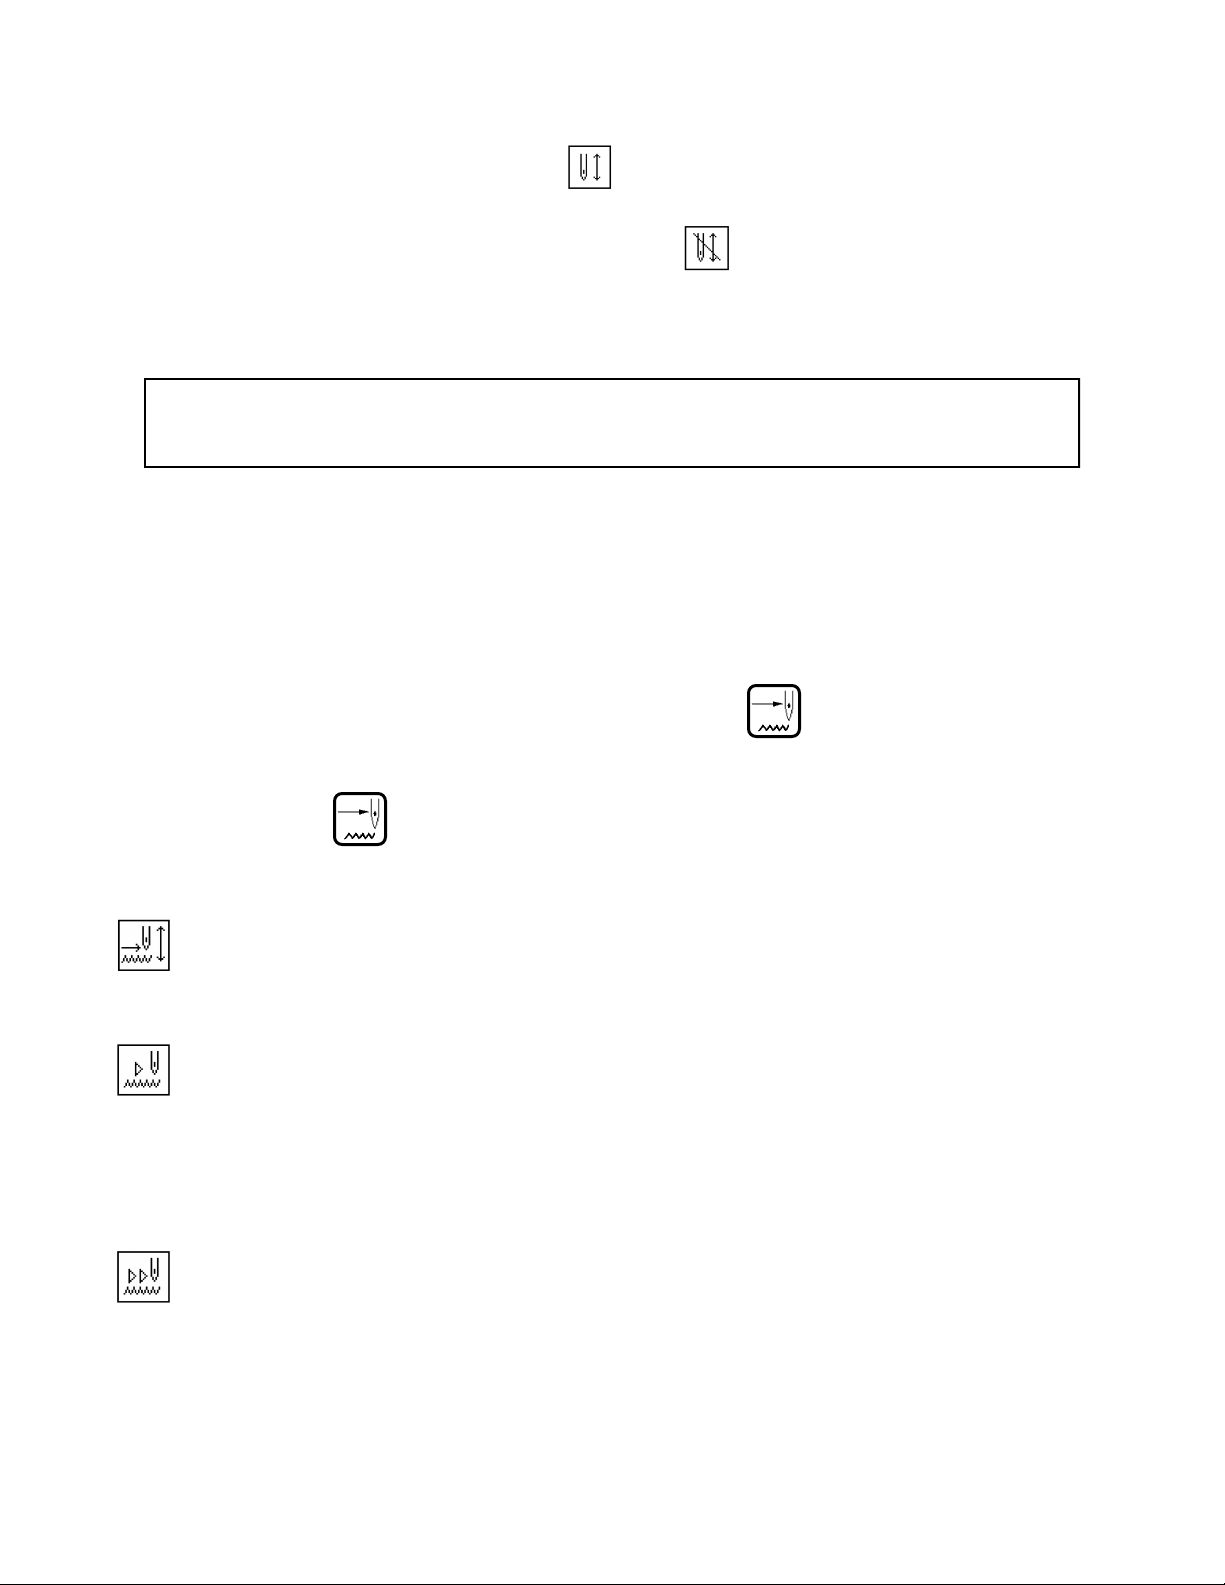
Is Normal embroidery mode. When this mode is selected the
machine will sew normally when the Start button is pressed.
Is Low-Speed Float. When this mode is selected and the Start
button is pressed, the frame will move through the design stitch by
stitch but the sewing head will not engage. To stop the machine, press
the Stop button.
Is High-Speed Float. When this mode is selected and the Start
button is pressed, the display will begin drawing the design and the
stitch count will increase. When the Stop button is pressed, the display
and stitch count will stop at that stitch and the frame will move to the
position that is indicated on the screen.
20
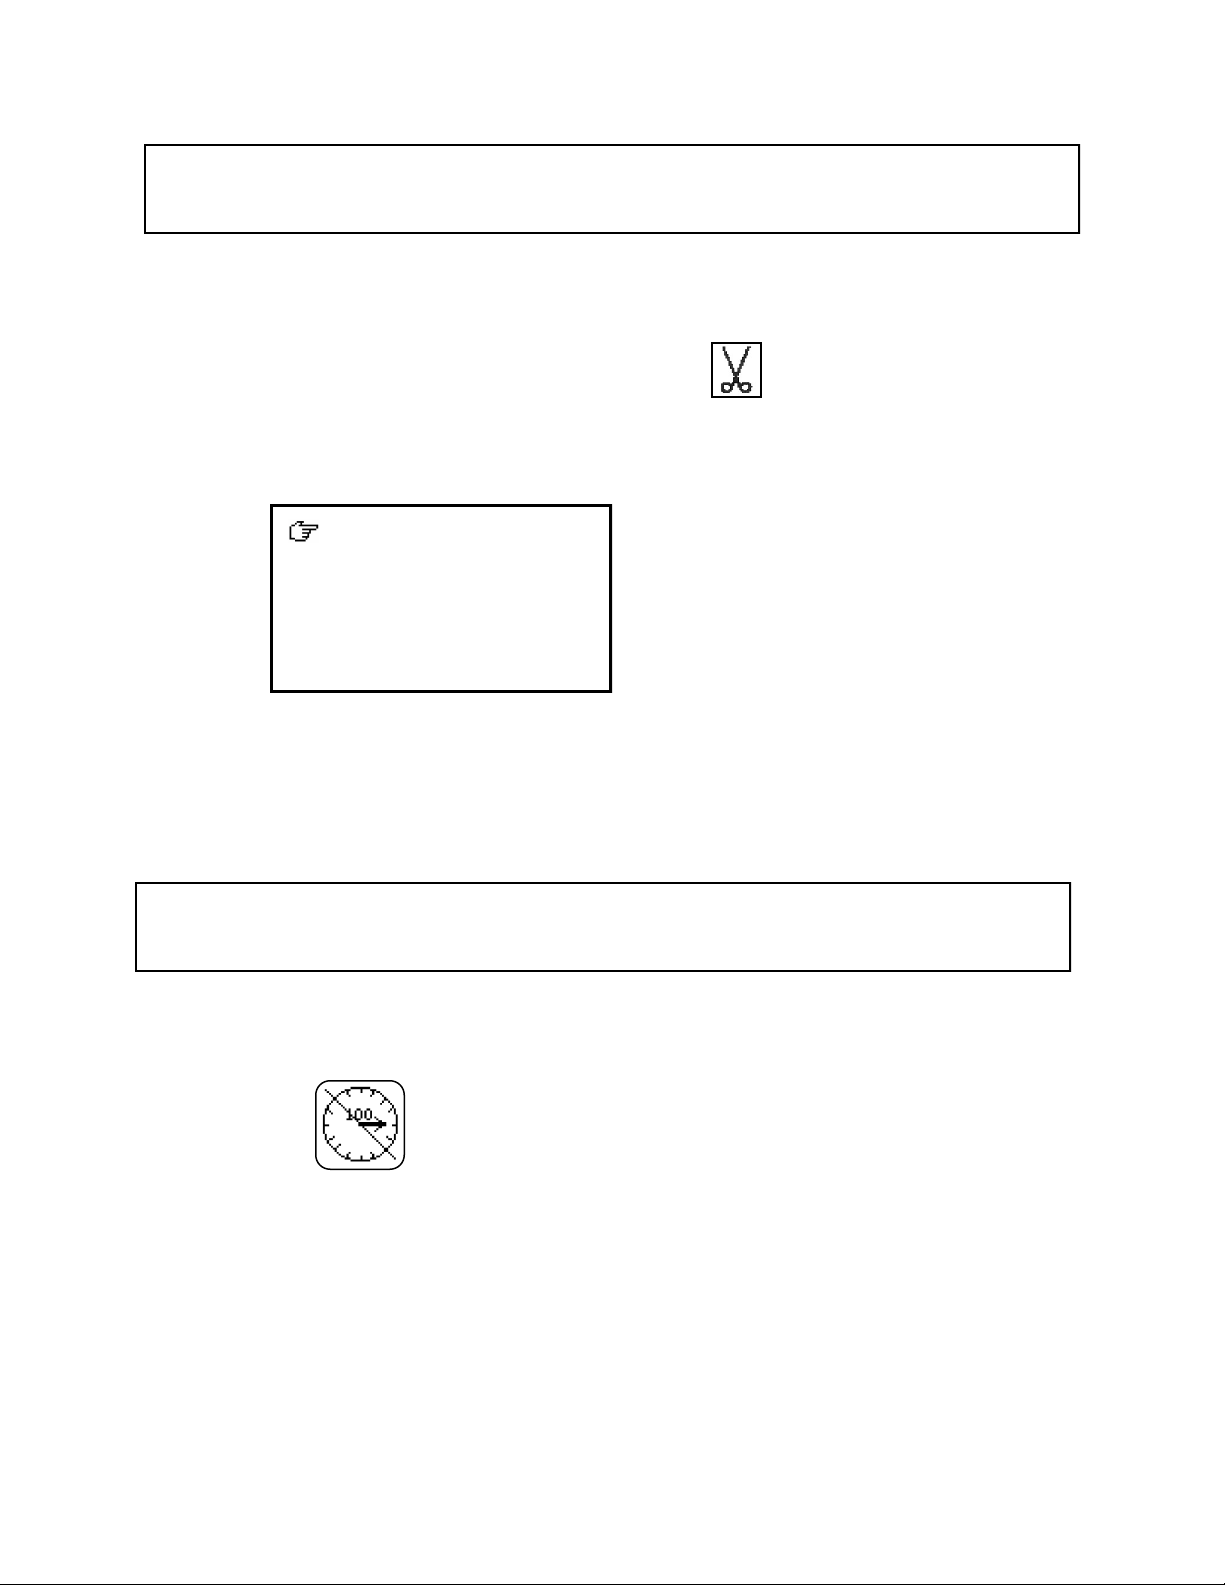
Thread Trim Function
The Thread Trim key will cause the machine to perform a
thread trim at any time. Simply press
A prompt will appear:
Press Enter and the machine will then perform a thread trim
instantly
If for some reason the sewing head is in a the wrong position,
the machine will not start. The Machine Shaft Position indicator
will blink.
Head Rotate Function
To correct this, or anytime the head needs to be cycled around
to insure the proper positioning, press the M-Org key. Then
Press Enter.
The sewing head will cycle around and stop at the proper
position.
1. TRIM TOP&BOT
2. TRIM BOT
This manual suits for next models
5
Table of contents
Other Meistergram Sewing Machine manuals


