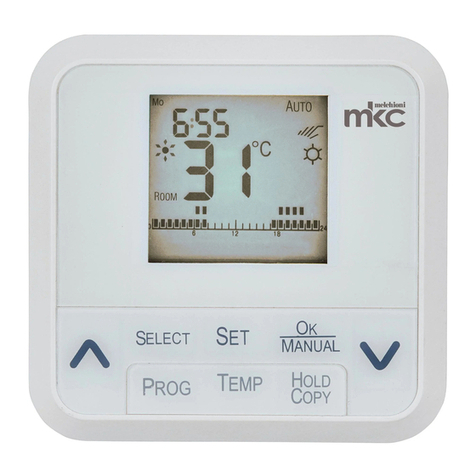
Melchioni MK932 User manual

MK932
Termostato Touch Screen Settimanale
Touch Screen Weekly Programmable Thermostat / Termostato touch screen
semanal programable / Thermostat touch screen hebdomadaire programmable
Cod. 493933762
Manuale / User manual / Manual de usuario / Mode d'emploi


ITALIANO.
Si prega di leggere con attenzione le seguenti istruzioni prima di utilizzare il prodotto.
IMPORTANTE
Non inserire un apparecchio in cui il carico superi 16 Amp. Assicurarsi sempre che la
spina di un apparecchio sia completamente inserita nella presa del timer. Se è necessaria
la pulizia del timer, togliere l'alimentazione elettrica e pulire il timer con un panno asciutto.
NON IMMERGERE IL TEMPORIZZATORE IN LIQUIDI DI NESSUN TIPO.
Tenere fuori dalla portata di bambini
In caso di surriscaldamento anomalo disconnettere dalla rete elettrica
Conforme alle direttive 2014/30/CE e 2014/35/CE
TERMOSTATO MK932 TOUCH SCREEN SETTIMANALE
PROGRAMMABILE
MANUALE DI ISTRUZIONI
1. Tasti e display

1) Orario
2) Giorno della settimana
3) Programma giornaliero 24 ore
4) Temperatura impostata
5) Simbolo antigelo
6) Simbolo impostazione ora
7) Simbolo impostazione PROGramma
8) Simbolo SETting (impostazione funzione)
9) Simbolo controllo riscaldamento
10) Simbolo controllo condizionamento
11) Simbolo HOLIDAY (vacanze)
12) Simbolo di HOLD (mantenimento) temporaneo
13) Simbolo disabilitazione manuale
14) Simbolo programma AUTOmatico
15) Simbolo batteria scarica
16) Simbolo regolazione Comfort
17) Simbolo regolazione Semi-Comfort
18) Simbolo regolazione Economic
19) Simbolo regolazione TEMPeratura
20) Simbolo COPY (copia) caratteristiche
21) Simbolo temperatura ROOM (stanza)
22) Simbolo OFF (spento)
23) Tasto touch SELECT (seleziona)
24) Tasto touch PROGramma
25) Tasto touch SET (imposta)
26) Tasto touch impostazione TEMPeratura
27) Tasto touch OK e MANUALe
28) Tasto touch HOLD (mantenimento) e COPY (copia)
29) Tasto touch per diminuire
30) Tasto touch per aumentare
2. Impostazione orologio e caratteristiche
Premere e tenere premuto il tasto SET per 3 secondi per entrare nell’impostazione.
Premere il tasto SELECT per selezionare “tI” per l’orologio o “St” per impostazione
funzioni, come da figura sottostante. Premere SET per selezionare la funzione desiderata.
Orologio Impostazione funzioni
A. Impostazione orologio
Prima impostare l’Anno, premere i tasti freccia SU o GIU per selezionare.

Premere SELECT per passare all’ impostazione successiva, Mese, premere i tasti freccia
SU o GIU per selezionare.
Premere SELECT per passare all’ impostazione successiva, Giorno, premere i tasti freccia
SU o GIU per selezionare.
Premere SELECT per passare all’ impostazione successiva, Ora, premere i tasti freccia
SU o GIU per selezionare.
Premere SELECT per passare all’ impostazione successiva, Minuto, premere i tasti freccia
SU o GIU per selezionare.
Premere SELECT per tornare all’Anno.
Premere OK per salvare ed uscire.
B. Impostazione funzioni
Utilizzare il tasto SELECT per scegliere tra Holiday (vacanze) e Heat/Cool (caldo/freddo):
“Ho” per vacanze, “Ht” o “CL” per caldo/freddo, come da figura sotto riportata. Premere
SET per entrare nell’impostazione.
Vacanze Controllo caldo/freddo
a. Vacanze, questa caratteristica permette di impostare la temperatura in funzione ECO
per un periodo da 1 a 199 giorni. Premere i tasti freccia SU o GIU per selezionare.
Premere OK per salvare e uscire.

b. Controllo caldo/freddo: imposta se controllare il caldo o il fresco e abilita o disabilita il
ritardo di avvio. Utilizzare il tasto SELECT per selezionare Riscaldamento o
Raffreddamento: “Ht” per riscaldamento e “CL” per raffreddamento, come da figura:
Riscaldamento Raffreddamento
Premere SET per confermare ed entrare nella selezione avvio ritardato abilitato o
disabilitato. Utilizzare il tasto SELECT per il ritardo abilitato “d:oN” o ritardo disabilitato
“d:oF” come da figura.
Premere OK per salvare ed uscire.
Controllo riscaldamento
Controllo condizionamento

3. Impostazione della temperatura
L’unità dispone di 4 temperature preimpostate: Comfort, SemiConfort, Economic e
Antigelo. Fare riferimento alla figura sotto riportata.
Premere e tenere premuto il tasto TEMP per 3 secondi. Utilizzare il tasto TEMP per
selezionare la temperatura reimpostata desiderata. Premere i tasti freccia SU o GIU per
selezionare. Premere TEMP per salvare le impostazioni ed entrare nella impostazione
successiva.
Premere OK per salvare ed uscire.
Comfort SemiConfort Economic Antigelo
4. Impostazione dei programmi
Premere PROG per entrare nella procedura di impostazione del programma.
A. La prima è l’impostazione del programma. Premere il tasto SELECT per selezionare la
modalità di programmazione come sotto descritto.
a. I programmi giornalieri della settimana sono differenti. Sulla parte bassa del display
appare “7dY”.
b. Programma per giorni della settimana e weekend. Sul display appare “5 2”
c. Programma per giorni della settimana, sabato e domenica. Sul display appare “5 1 1”
d. I programmi per i 7 giorni della settimana sono identici. Sul display appare “7”
Premere PROG per confermare e passare all’impostazione successiva.
Programma 7 giorni Settimana+sab+dom Settimana+weekend Programma giorn.
B. Quindi selezionare il giorno per impostare il programma. Premere il tasto SELECT. Ad
esempio, selezionare Monday (lunedì) come primo giorno da programmare nel
programma 7 giorni. Premere PROG per andare avanti.

C. Impostare il programma per il giorno selezionato.
1) L’impostazione è dalle ore 0:00 del giorno.
2) Utilizzare il tasto TEMP per selezionare uno dei 5 stati, per ciascuna ora.
Comfort (mostra due punti), SemiConfort (mostra un punto), Economic (nessun punto),
Antigelo (nessun punto), Off (nessun punto).
3) Premere i tasti UP o DOWN per andare avanti o indietro nelle ore. Il programma orario
selezionato sarà mantenuto finché non sarà utilizzato il tasto TEMP per selezionare
un’altra impostazione.
4) Premere PROG per l’impostazione per questo giorno e tornare indietro per selezionare
il giorno successivo.
5) Per impostare il programma per un nuovo giorno, si può utilizzare la funzione Copy
(copia) per copiare il medesimo programma su un altro giorno.
All’inizio dell’impostazione del nuovo giorno, premere il tasto Copy. Il simbolo relativo
lampeggerà sul display. Premere OK per confermare. Tornare indietro alla procedura
sopraindicata per selezionare la programmazione del giorno successivo.
6) Ripetere le procedure B e C per terminare tutti i giorni della settimana.
7) Premere OK per salvare ed uscire.
5. Funzionamento manuale
A. Lo stato manuale ha la precedenza sugli altri. Premere il tasto TEMP per cancellare lo
stato attuale e imporre questo. Questa priorità continuerà fino all’ora successiva. Il simbolo
di Controllo Manuale Temporaneo compare a display.

B. L’impostazione manuale della temperatura ha la priorità, premere i tasti UP o DOWN
per regolare la temperatura attuale. Questa priorità continuerà fino all’ora successiva. Il
simbolo del controllo manuale della temperatura viene indicato sul display.
C. Per mantenere temporaneamente l’impostazione della temperatura attuale, premere e
tenere premuto il tasto HOLD per 3 secondi. Premere i tasti UP o DOWN per impostare il
tempo desiderato, da 1 a 99 ore. Premere OK per salvare ed uscire. Sul display appare il
simbolo HOLD (mantieni) di impostazione temporanea.
D. Impostazione manuale AUTO/OFF/Antigelo, premere e tenere premuto il tasto
MANUAL per 3 secondi. Premere SELECT per selezionare:
a. AU-Auto, modalità di controllo programmata
b. AF-Antigelo,
c. oF-OFF, il sistema è spento
d. oN, il sistema è acceso sempre.
Premere OK per salvare ed uscire.
6. Allarme batteria scarica, compare sul display
l’indicazione lampeggiante della batteria. Sostituire la
batteria.

7. Specifiche:
Potenza gestibile: 230Vac 50Hz, 8A carico resistivo
Rapporto termico: Escursione misura temperatura: 0°C~35°C
Escursione temperatura impostabile: 5°C~30°C
Alimentazione: 2 batterie alcaline AA/AM3/LR6
MANUALE DI INSTALLAZIONE
MK932
MK932 è formato da due parti: pannello di controllo e base di commutazione
Pannello di controllo Base di commutazione
INSTALLAZIONE BASE DI COMMUTAZIONE A MURO
1. Per fissare la base di commutazione, utilizzare le 2 viti fornite e i fori più adatti alla
vostra installazione a muro.

2. Svitare le due viti sul coperchio della base di commutazione. Rimuovere il coperchio.
3. Estrarre i fili. Seguire lo schema per la connessione dei fili.
4. Riavvitare il coperchio.
INSTALLARE LE BATTERIE E IL PANNELLO DI CONTROLLO
1. Installare due batterie AA nel pannello di controllo, come indicato in figura, rispettando
la polarità.

2. Afferrare i lati sinistro e destro del pannello di controllo e premerli sulla base di
commutazione. Ricordare di prendere i lati sinistro e destro, NON utilizzare i lati Alto e
Basso.
RESET
In caso il sistema debba essere resettato, afferrare i lati sinistro e destro del pannello di
controllo ed estrarlo. Togliere una o due batterie ed attendere un minuto circa. Reinserire
quindi le batterie.
CONNESSIONI
NC= uscita fase, contatto Normalmente Chiuso
COM=ingresso fase
NO=uscita fase, contatto Normalmente Aperto

SPECIFICHE
Potenza gestibile: 230Vac 50Hz, 8A carico resistivo
Rapporto termico: Escursione misura temperatura: 0°C~35°C
Escursione temperatura impostabile: 5°C~30°C
Alimentazione: 2 batterie alcaline AA
SMALTIMENTO
La presenza del simbolo del bidone barrato indica che:
Questo apparecchio non è da considerarsi quale rifiuto urbano:
il suo smaltimento deve pertanto essere effettuato mediante raccolta
separata.
Lo smaltimento effettuato in maniera non separata può costituire un
potenziale danno per l’ambiente e per la salute. Tale prodotto può
essere restituito al distributore all’atto dell’acquisto di un nuovo
apparecchio.
L’uso improprio dell’apparecchiatura o di parti di essa può costituire un
potenziale pericolo per l’ambiente e per la salute. Lo smaltimento
improprio dell’apparecchio costituisce condotta fraudolenta ed è
soggetto a sanzioni da parte dell’Autorità di Pubblica Sicurezza.
Tenere fuori dalla portata dei bambini di età inferiore ai 36 mesi.

ENGLISH.
Please read the following instructions carefully before connecting this timer to electrical appliances.
IMPORTANT
Don't plug in an appliance where the load exceeds 16 Amp. Always ensure the plug of any
appliance is fully inserted into the timer outlet. If cleaning of the timer is required, remove
from mains power and wipe timer with a dry cloth.
DO NOT IMMERSE TIMER IN WATER OR ANY OTHER LIQUID.
Heaters and similar appliances should never be left unattended during operation. The
manufacturer recommends such appliances not be connected to timers.
Conform to directive 2014/30/CE e 2014/35/CE
MK932 TOUCH SCREEN WEEKLY PROGRAMMABLE
THERMOSTAT
INSTRUCTIONS MANUAL
MK932
1. Buttons and LCD Display

1) Time
2) Week day
3) 24 hours daily program
4) Setting Temperature
5) Anti-Frozen symbol
6) TIME setting symbol
7) PROGram setting symbol
8) Feature SETting symbol
9) Heating Control symbol
10) Cooling Control symbol
11) HOLIDAY symbol
12) Temporary HOLD symbol
13) Manual Override symbol
14) Program AUTO Contrl symbol
15) Battery Low symbol
16) Comfort Setting symbol
17) Semi-Comfort Setting symbol
18) Economic Setting symbol
19) TEMPerature Setting symbol
20) COPY feature symbol
21) ROOM Temperature symbol
22) OFF symbol
23) SELECT Touch Button
24) PROGram Touch Button
25) SET Touch Button
26) TEMPerature setting Touch Button
27) OK and MANUAL operation Touch Button
28) HOLD and COPY Touch Button
29) Decrease Touch Button
30) Increase Touch Button
2. Clock and Feature setting
Press and hold the SET button for 3 seconds, to enter the Clock and Feature settings.
Press SELECT button to select: “tI” for Clock, “St” for feature setting and as figure shown
below. Press SET to enter the selected setting.
Clock Feature Setting
A. Clock setting
First is the Year setting. Turn the setting dial at right side of the display to set.
Press SELECT button to the next step, Month setting. Press UP or DOWN button to set.
Press SELECT button to the next step, Day setting. Press UP or DOWN button to set.

Press SELECT button to the next step, Hour setting. Press UP or DOWN button to set.
Press SELECT button to the next step, Minute setting. Press UP or DOWN button to set.
Press SELECT back to Year setting.
Press OK button to save and quit this setting
.
B. Feature setting
Use SELECT button to choice the Holiday and Heat/Cool control setting: “Ho” for Holiday,
“Ht” or “CL” for Heat/Cool control setting and as figure shown below. Press SET to enter
the selected setting
.
Holiday Heat/Cool Control
a. Holiday, this feature allows the current temperature setting been kept for 1 to 199 days
of holiday period. Press UP or DOWN button to increase or decrease the days for setting.
Press OK button to save quit this setting.

b. Heat/Cool Control, this feature set the system is under Heating or Cooling control and
also set the system starting delay enable or disable. Use SELECT button to select Heating
or Cooling control: “Ht” for Heating and “CL” for Cooling and as figure shown below.
Heating Control Cooling Control
Press SET button to confirm and enter the system starting delay enable or disable setting.
Use SELECT button to select the system starting delay “d:oN”-enable or “d:oF”-disable
and as figure shown below.
Press OK button to save quit this setting.
Heating Control
Cooling Control
3. Temperature Setting
This Unit allow 4 preset temperatures: Comfort, Semi-Comfort, Economic and Anti-Frozen.
Please refer the figures shown as below:
Press and hold TEMP button for 3 seconds to enter. Use TEMP Button to select preset
temperature for setting. Press UP or DOWN button to adjust temperature setting. Press
TEMP button to save this setting and enter next temperature setting.
Press OK button to save quit this setting

Comfort Semi-Comfort Economic Anti-Frozen
4. Program Setting
Press PROG button to enter the program setting procedure.
A. First is the program Mode setting. Press SELECT button to select program mode as
below description.
a. 7 days programs of a week is different. The “7dY” appears at the bottom of the display.
b. Programs for Weekdays and Weekend. The “5 2” appears at the bottom of the display.
c. Programs for Weekdays, Saturday and Sunday. The “5 1 1” appears at the bottom of
the display.
d. Daily Programs for 7 days of week are the same. The “7” appears at the bottom of the
display.
Press PROG to confirm this selecting and to the next step.
7 days program Weekdays+Saturday+Sunday Weekdays+Weekend Daily Program
B. Then select day for Program Setting. Press SELECT button to select. For example, select
Monday for the first day program of 7 days program mode. Press PROG to the next step.
C. Then set the day program selected.
1) The program setting is from 0:00 of the day.
2) Use TEMP button to select any one of below 5 status for each hour program.
Comfort (shown two dots), Semi-Comfort (shown one dot), Economic (no dot)
Anti-Frozen (no dot) or Off (no dot)
3) Press UP or DOWN button to go forward or backward hour for setting. The select
hour program will keep the same until use TEMP button to select other setting.

4) Press PROG to finish this day program setting and back to above procedure to select
next day program for setting.
5) For a new day program setting, you can use Copy feature to set this day program
same as the one just set.
At the beginning of a day program setting, press COPY button. The COPY symbol flash on
the display. Press OK button for confirm it. And back to above procedure to select next day
program for setting.
6) Repeat procedure B and C to finish all the day program setting.
7) Press OK button to save quit this setting.
5. Manual Operations
A. Manual Overriding the current Program Temperature Status. Press TEMP
button to override different temperature status. This overriding will be continued to the next
hour. The Temporary Manual Control symbol appears on the display.
B. Manual Temperature Setting Override, Press UP or DOWN button to adjust
the current temperature setting. This overriding will be continued to the next hour. The
Temporary Manual Control symbol appears on the display.

C. Temporary Hold the current temperature setting, press and hold the HOLD
button for 3 seconds to enter. Press UP or DOWN button to set the holding time from 1 to
99 hours. Press OK button to save and quit this setting. The Temporary HOLD symbol
appears on the display.
D. Manual AUTO/OFF/Anti-Frozen setting, press and hold the MANUAL button
for 3 seconds to enter. Press SELECT button to select:
a. AU-Auto, program control mode.
b. AF-Anti-Frozen.
c. oF-OFF, system turn OFF
d. oN, system will be ON continuously.
Press OK button to save and quit this setting.
6. Battery low alarm, when battery is low, the battery low
Symbol displays and flashes. You need to replace the
battery.
7. Specifications:
Power Rating: 230Vac 50Hz, 8A Resistive Load
Thermal Rate: Measurement Temperature Range: 0’C to 35’C
Setting Temperature Range: 5’C to 30’C
Power: 2 x AA Alkaline Battery Operated
Table of contents
Languages:
Other Melchioni Thermostat manuals
Popular Thermostat manuals by other brands

Salus
Salus PH60 instruction manual

Johnson Controls
Johnson Controls T600HCN-3 Product bulletin

Heatmiser
Heatmiser PRT-W operating instructions

resideo
resideo RTHL111 Series owner's manual

AFG
AFG Arbonia FKS Series Instructions for use and installation instructions

TOTALINE
TOTALINE Signature owner's manual

White Rodgers
White Rodgers 1F87-0261 Installation and operating instructions

Warmup
Warmup PT502 Installation & operating instructions

Honeywell
Honeywell Round CT87B Installation and owner's manual

Drayton
Drayton MiTime T720R installation guide

TemperZone
TemperZone TTS-10 User operating instructions

Honeywell Home
Honeywell Home RLV450 user guide