Memorex NDC6005-SB - Npower Flash Micro SpongeBob Digital... User manual

A

Table of Contents.....................1
Important Information .............2
FCC Information .....................2
User Information .....................2
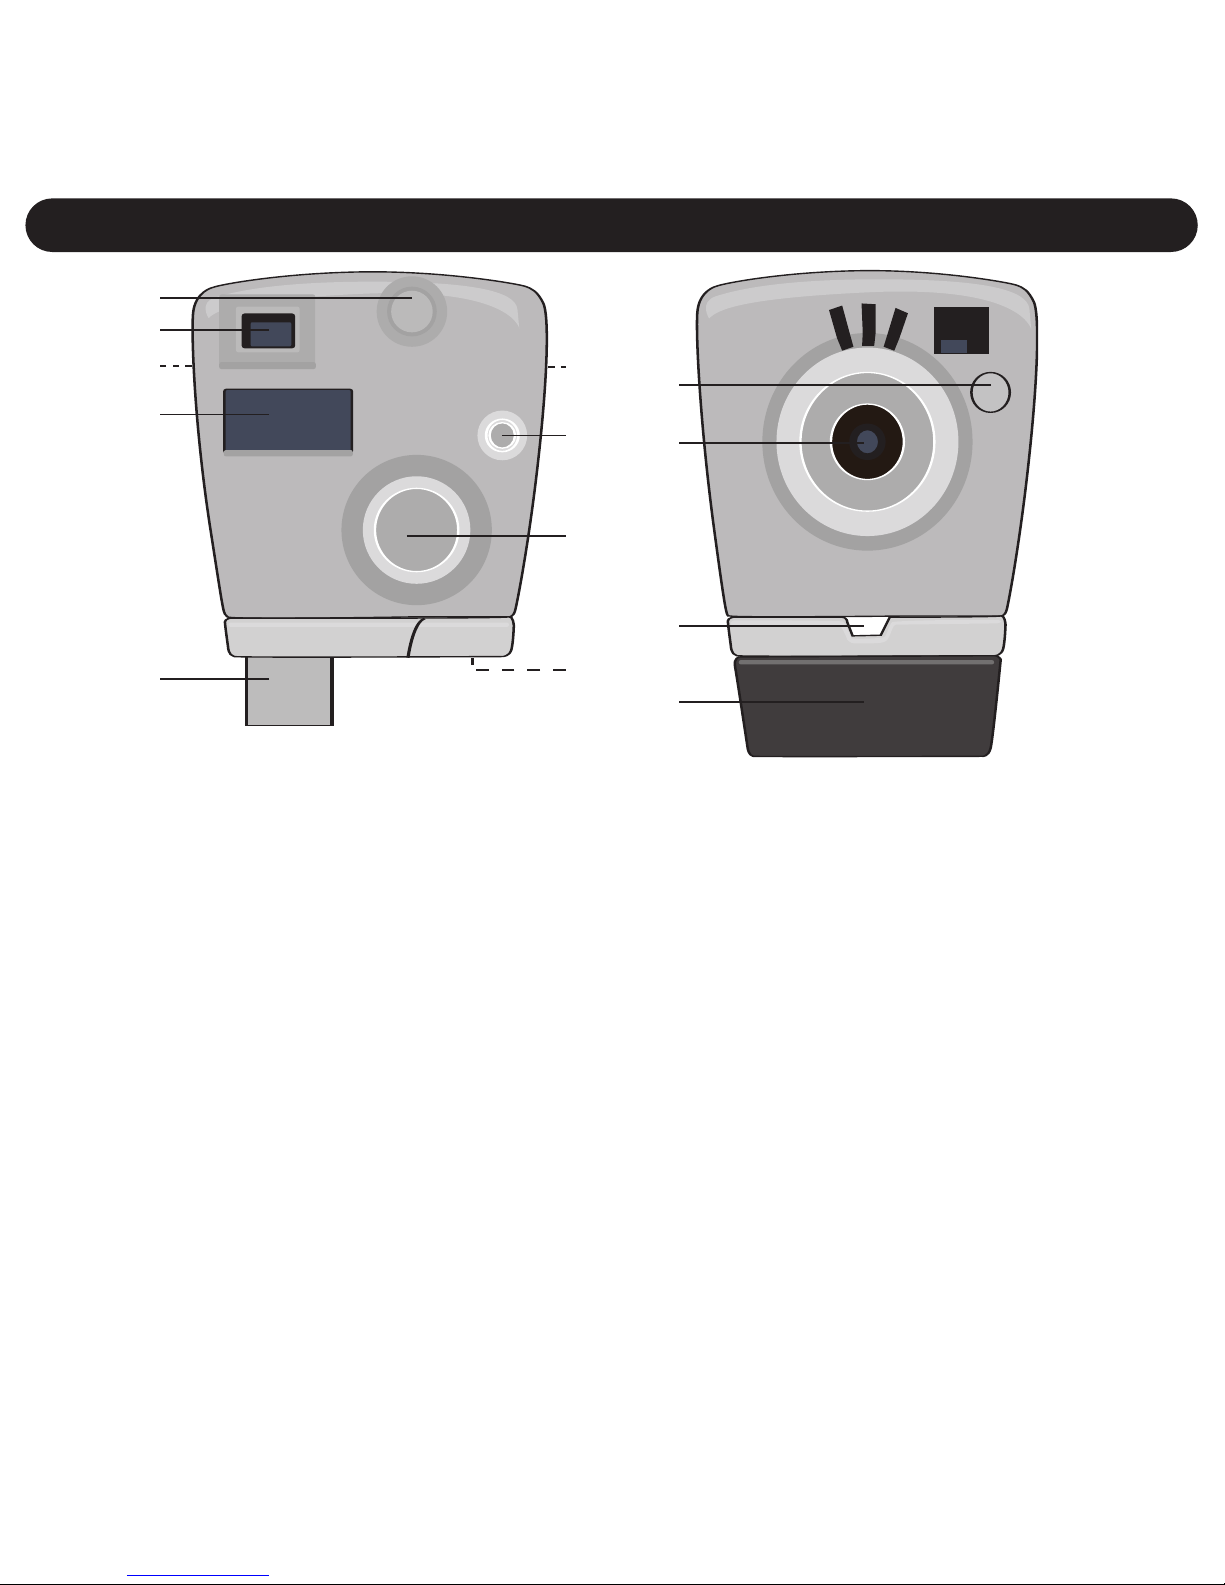
Location of Controls ...............4
Getting Started.........................5
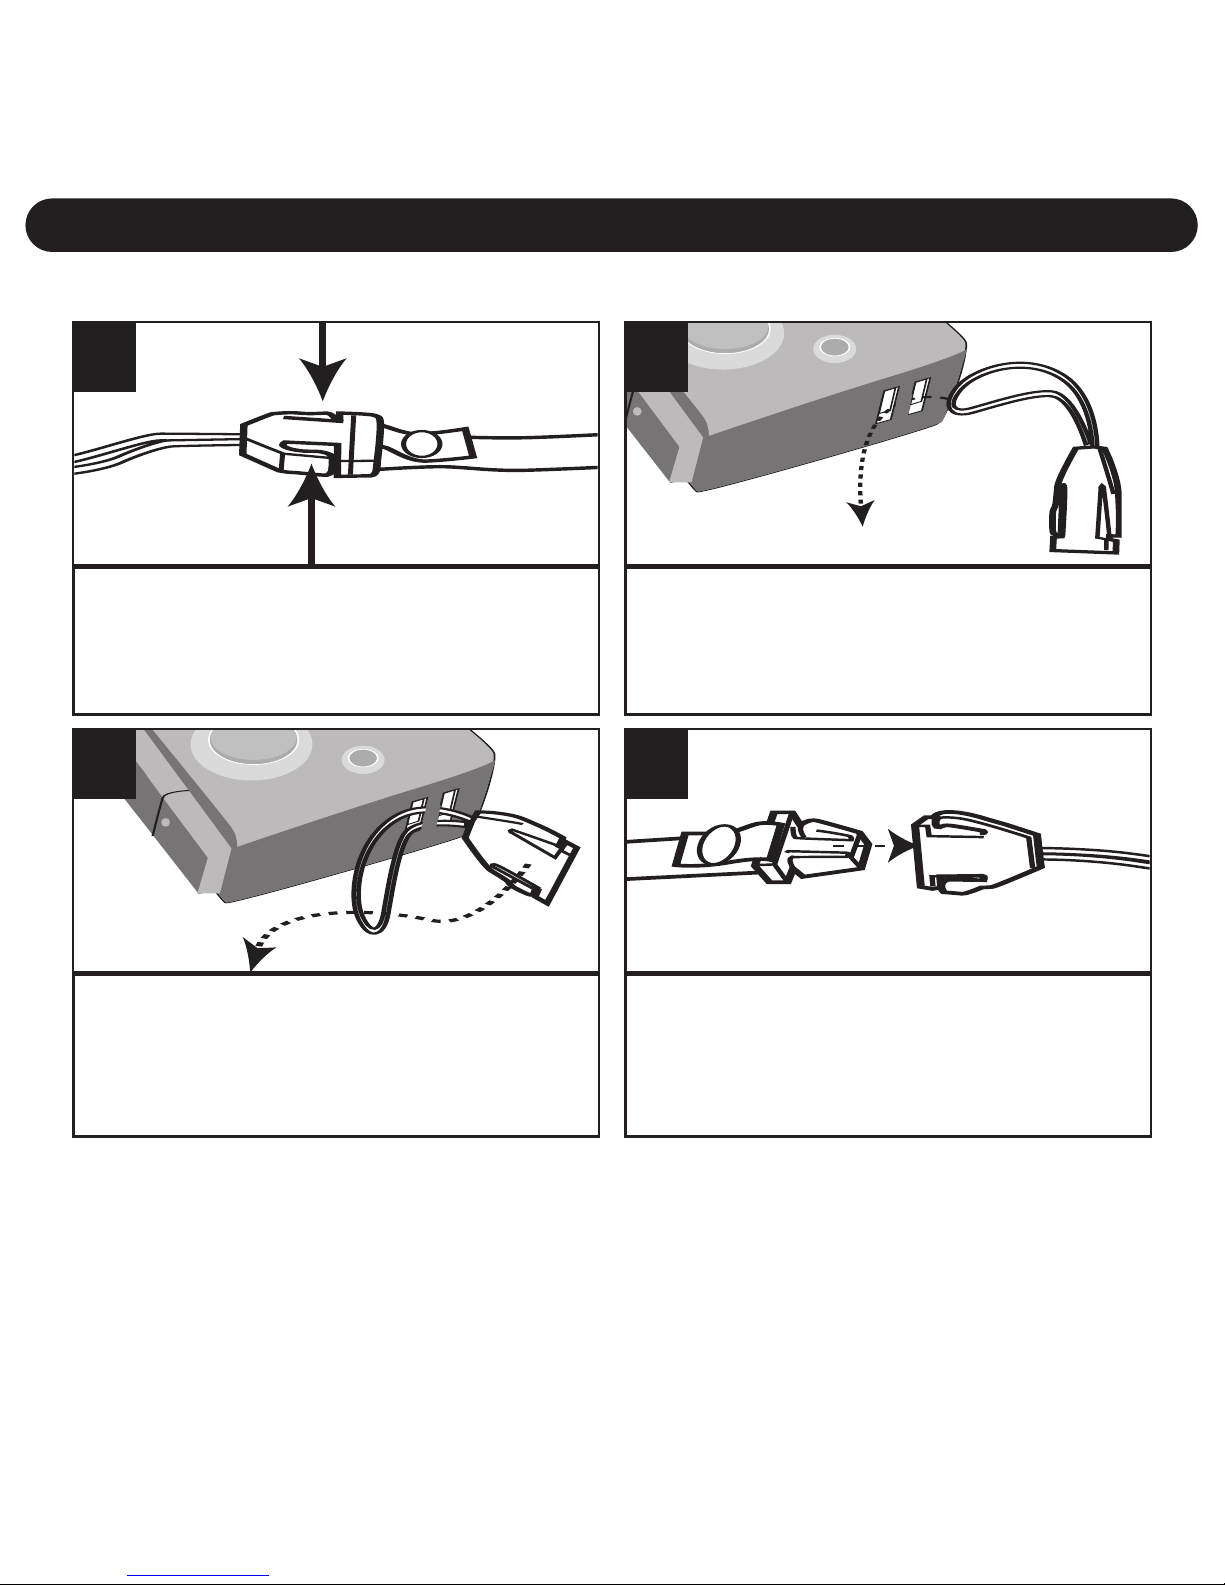
Using the Hand Strap .............5
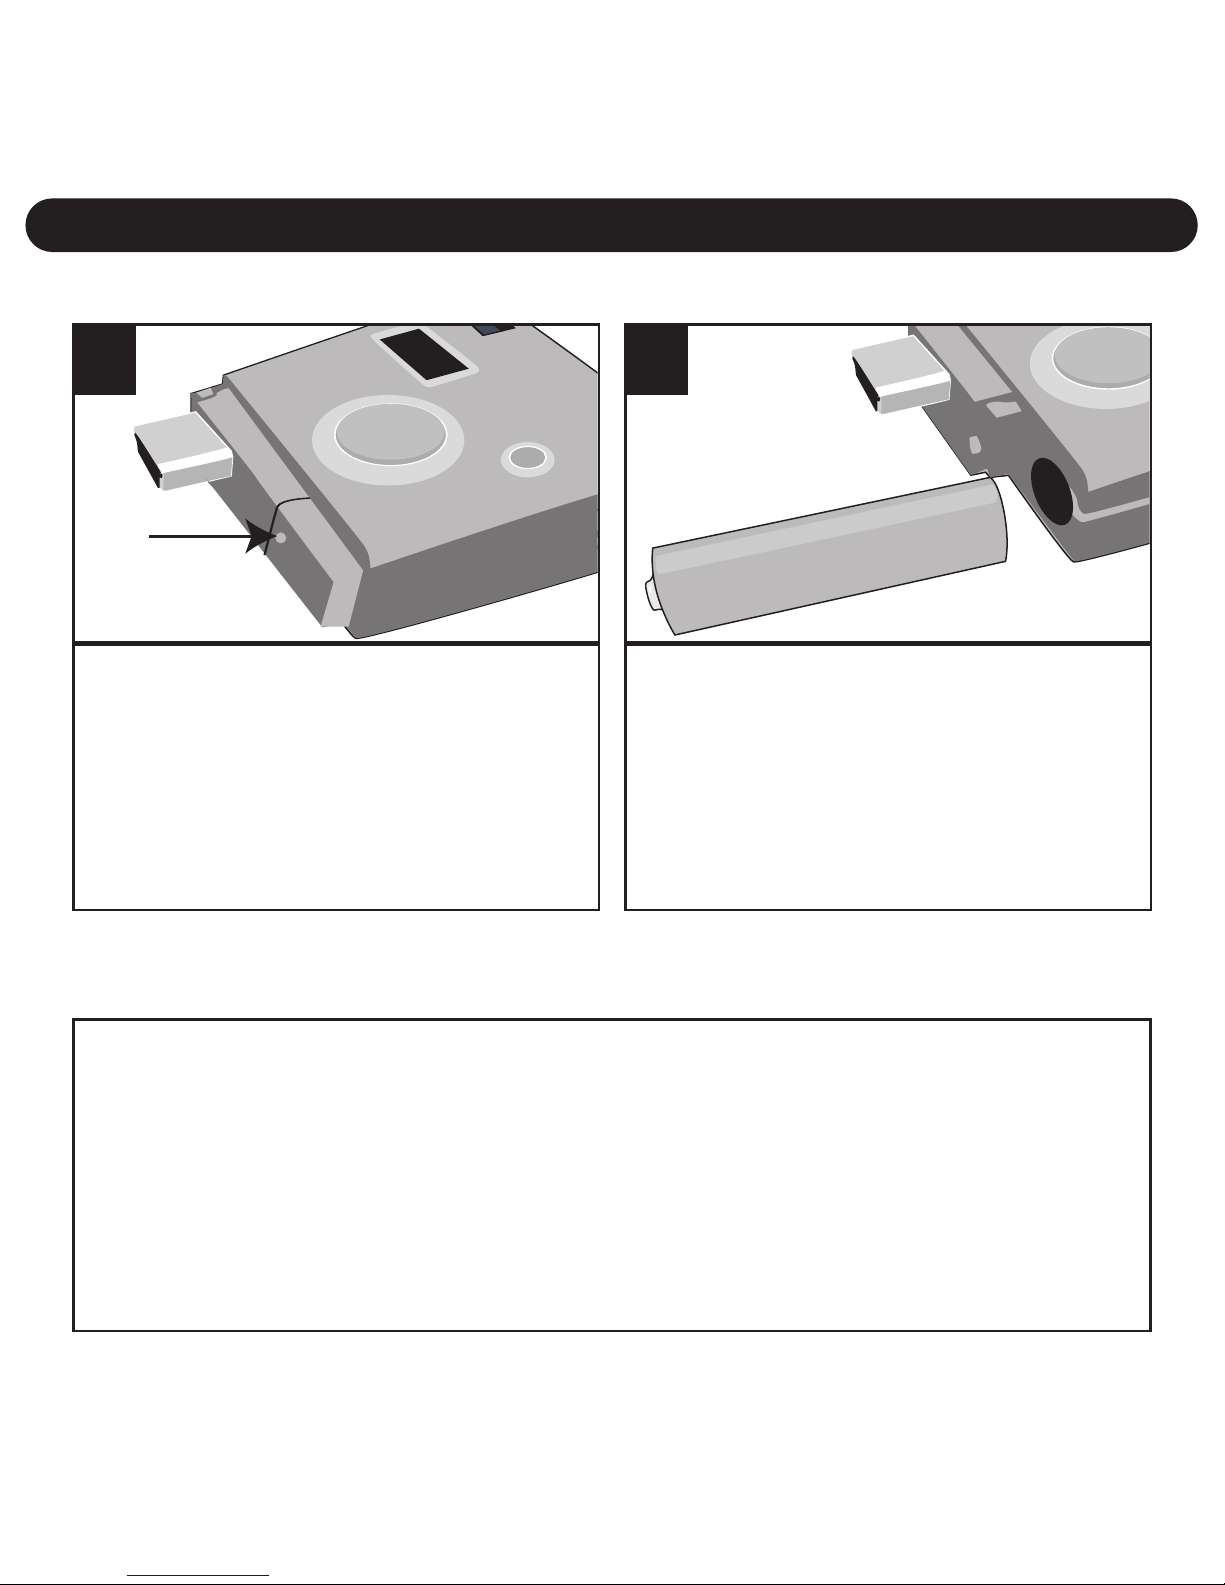
Loading the Batteries..............6
Checking the Battery Level ....7
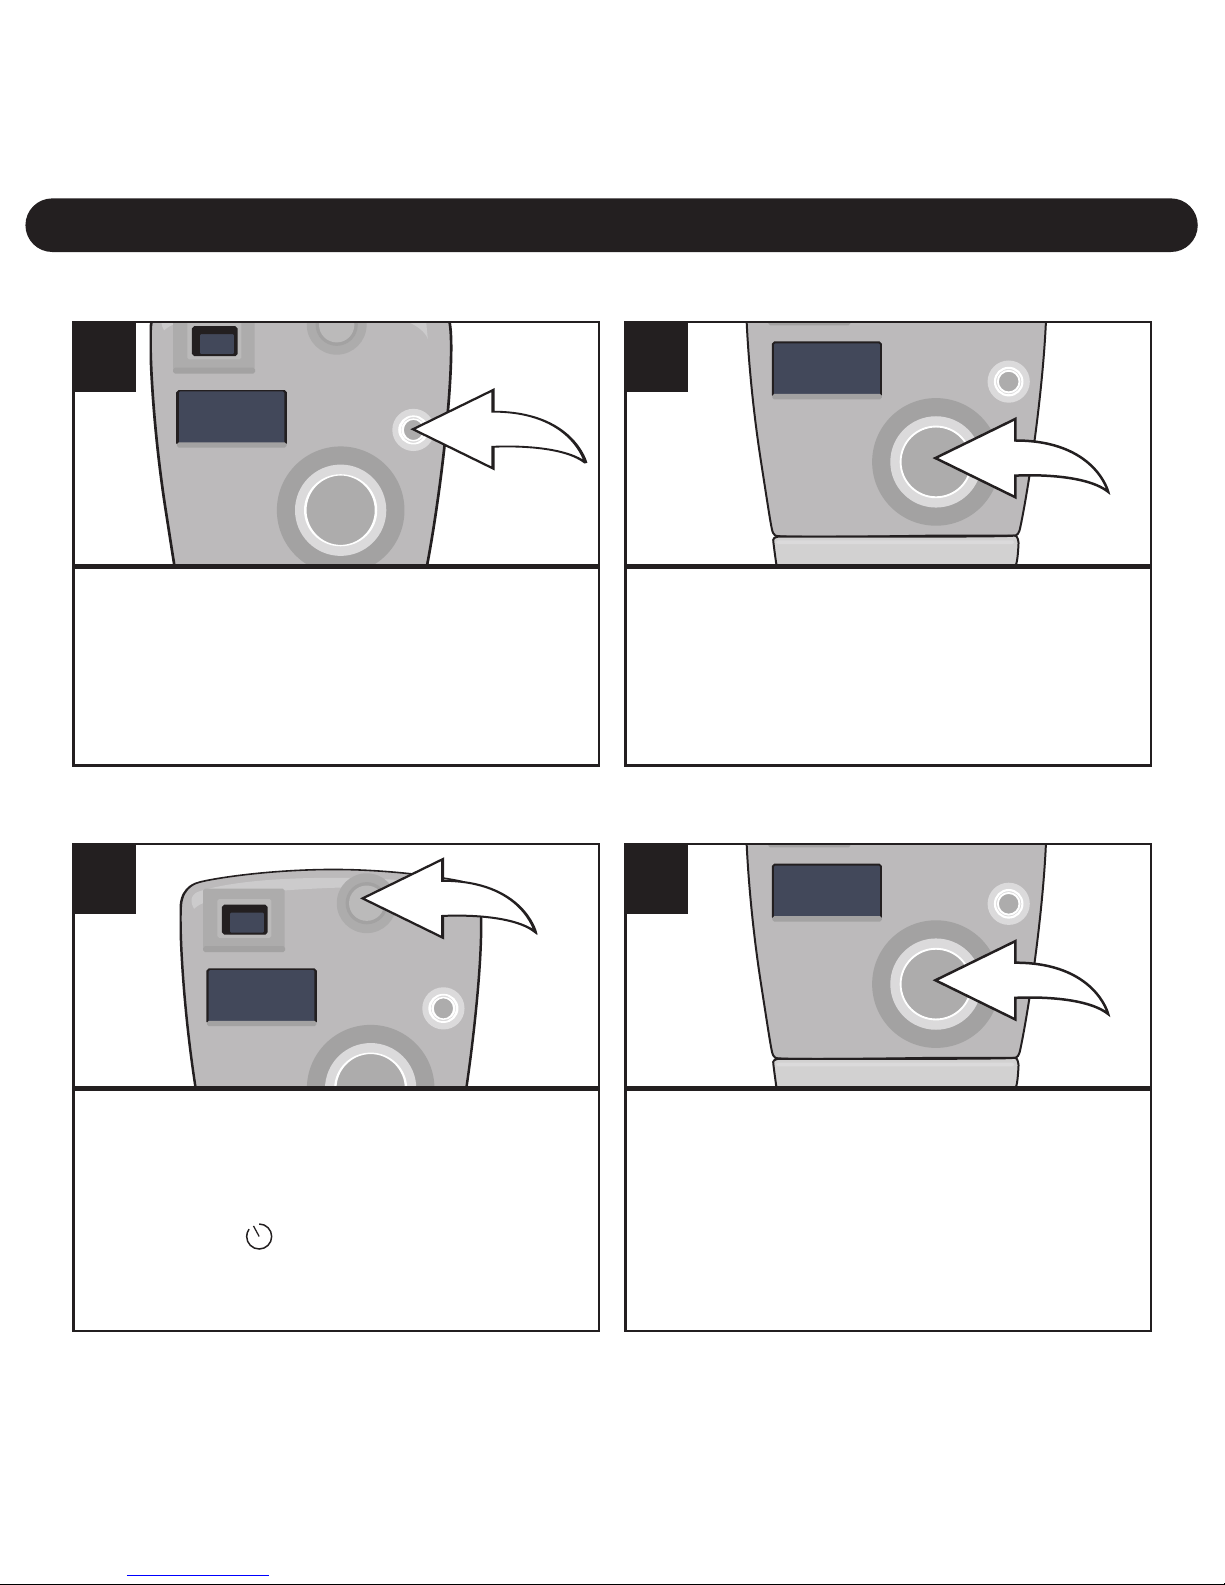
Turning the Power On/Off.......7
Operation..................................8
Taking A Single Picture...........8
Setting the Self-Timer Mode...8
Recording Video .....................9
Taking Three Continuous
Pictures...................................9
Deleting All Pictures/Videos..10
Deleting the Last Picture/
Video.....................................10
Setting the Image Quality
Mode .....................................11
Setting the Compression ......12
Setting the Video Frequency
Mode.....................................13
Computer Connection...........14
Software installation..............15
Installing the Camera
Software................................15
Installing the Camera Driver..15
Installing the Photo
Editing Program....................16
Uninstalling the Photo
Editing Program....................16
Downloading Pictures/Movies .17
To Use SpongeBob Camera
To Download Pictures/Movies..17
Using the Photo Editing
Program ..................................19
PCCam ....................................23
Troubleshooting Guide .........25
Specifications ........................26
TABLE OF CONTENTS
1

FCC INFORMATION
FCC WARNING: This equipment meets the limits for a class B digital
device, pursuant to Part 15 of FCC rules. Operation is subject to the
following two conditions:
1) This device may not cause harmful interference.
2) This device must accept any interference received, including
interference that may cause undesired operation.
Changes or modifications not expressly approved by the manufacturer
may void the user’s authority to operate this equipment.
USER INFORMATION
This equipment has been tested and found to comply with the limits for
aclass B digital device, pursuant to Part 15 of the FCC Rules. These
limits are designed to provide reasonable protection against harmful
interference in a residential installation. This equipment generates, uses
and can radiate radio frequency energy and, if not installed and used in
accordance with the instructions, may cause harmful interference to
radio communications. However, there is no guarantee that interference
will not occur in a particular installation. If this equipment does cause
harmful interference to radio or television reception, which can be
determined by turning the equipment on and off, the user is
encouraged to try to correct the interference by one or more of the
following measures:
• Reorient or relocate the receiving antenna.
• Increase the separation between the equipment and receiver.
•Connect the equipment into an outlet on a circuit different from that to
which the receiver is connected.
• Consult the dealer or an experienced radio/TV technician for help.
IMPORTANT INFORMATION
2

Be sure to observe the following precautions when using the camera:
•This camera works best when used in bright lighting, such as
sunlight or a brightly-lit room. Results in dimly-lit areas will vary.
• Never attempt your own repairs. Always leave service to authorized
repair facilities.
• Keep the camera away from water and other liquids, and never let it
get wet. Never use when it is raining or snowing.
• Should foreign matter or water get into the camera, immediately turn
the power off and contact your local authorized service center.
• Physical damage and malfunction of the camera can cause the image
data stored in its memory to be deleted. Be sure to always keep
backup copies of data by transferring to a personal computer.
•In an environment with electrostatic discharge, the user may have to
reset the unit.
•Use Alkaline batteries for best results; do not use re-chargeable
batteries.
• Do not leave the camera in places subject to extremely high
temperatures, such as a sealed vehicle or in direct sunlight.
• Do not place the camera in unstable locations, such as a sloping
surface or unstable table where the camera may fall.
• Do not touch or press on the display or lens.
IMPORTANT INFORMATION (CONTINUED)
3
This Class B digital apparatus complies with Canadian ICES-003.
Cet appareil numérique de la classe B est conforme à la norme NMB-003
du Canada.

1. Mode Button
2. Viewfinder
3. Neck Strap Hole (Side
of Unit) (NECK STRAP
PART NO.
120E6005SB01*)
4. Display
5. USB Plug (USB PART
NO. 180E0008*)
6. Power Button
7. SMILE Button
8. Battery Compartment
(Under Compartment
Cover)
9. Mirror
10. Lens
11. LED Indicator
12. Compartment Cover
SOFTWARE CD PART
NO. 110ENDC6005SB*
*Consumer Replaceable Part
(See page 26 to order.)
LOCATION OF CONTROLS
4
2
1
410
9
5
6
(without Compartment Cover)
3
7
8
3
11
12

GETTING STARTED
5
Press the Tabs to release the
Strap connector from the Neck
strap.
1
Insert the rope through the hole
in the main unit.
2
USING THE HAND STRAP
Insert the Strap connector
through the rope’s loop until
snug.
3
Connect the Neck strap back to
the Strap connector. Repeat for
the other side of the unit.
4

GETTING STARTED (CONTINUED)
6
Remove Compartment cover.
Loosen the screw using a Phillips
head screwdriver and lift offthe
Battery Compartment cover.
1
Insert an AAA battery into the
Battery Compartment, observing
the polarity marks (+/–) as
shown. Place the Battery
Compartment cover back on and
replace the screw.
+
–
2
LOADING THE BATTERIES
IMPORTANT! When the battery is empty or absent, the pictures/videos
will be erased. Make sure to backup onto a computer regularly.
BATTERY PRECAUTIONS
Follow these precautions when using a battery in this device:
1. Use only the size and type of battery specified.
2. Be sure to follow the correct polarity when installing the battery as indicated.
Reversed batteries may cause damage to the device.
3. If the device is not to be used for a long period of time, remove the battery to
prevent damage or injury from possible battery leakage.
4. Do not try to recharge batteries not intended to be recharged; they can
overheat and rupture. (Follow battery manufacturer’s directions.)

GETTING STARTED (CONTINUED)
7
TURNING THE POWER ON/OFF
Press the Power button 1once to turn the
unit on. To turn the camera off, press the
Power button 1until a beep is heard and
the display turns off. You can also turn off
the unit by pressing the MODE button 2,
“oFF” will appear in the display. Then,
press the SMILE button 3to confirm.
2
3
1
1
NOTES:
• To save the battery power, the unit will automatically turn off after
30 seconds of inactivity, but the pictures will remain in memory.
• For self portraits, use the mirror on the front of the camera.
• The power will automatically turn on when a USB cable is
connected to the computer and turn off when the USB cable is
removed.
CHECKING THE BATTERY LEVEL
If the battery is low, the display will blink; replace the batteries as
described on the previous page.

OPERATION
8
Press the Power button once to
turn the unit on.
The counter (i.e. '001', '018',
etc.) will appear in the display.
1
Press the SMILE button to take
apicture; the counter in the
display will increase by one.
2
TAKING A SINGLE PICTURE
Turn the camera on as described
on page 7. Press the Mode button
twice to select the Self-timer
mode; “ ” will appear in
the display.
1
Within three seconds, press the
SMILE button to select the Self-
timer mode. The LED indicator will
blink and the camera will beep
nine times. On the tenth beep, the
picture will be taken.
2
SETTING THE SELF-TIMER MODE

OPERATION (CONTINUED)
9
Turn the camera on as described on
page 7. Press the Mode button three
times to select the Video mode; “ ”
will appear in the display.
1
Press and hold the SMILE button
to record a video. Release when
you are done recording.
2
RECORDING VIDEO
Turn the camera on as described
on page 7. Press the Mode
button four times to select the
Continuous mode; “ ” will
appear in the display.
1
Within three seconds, press the
SMILE button to start taking three
continuous pictures. The LED
indicator will blink three times and
the counter will increase by three.
2
TAKING THREE CONTINUOUS PICTURES
NOTE: The Three Continuous Pictures function is only available for HI (High)
image quality mode. If you using this function while in Lo (Low) image quality
mode, when you take the pictures, the unit will change to Hi (High) image quality
mode to take 3 pictures automatically then revert to Lo (Low) image quality mode.

OPERATION (CONTINUED)
10
Turn the camera on as
described on page 7. Press the
Mode button five times; “ ”
will appear in the display.
1
Within three seconds, press the
SMILE button once and the
counter will blink. Press again to
delete all the pictures/videos.
2
DELETING ALL PICTURES/VIDEOS
Turn the camera on as
described on page 7. Press the
Mode button six times; “ ” will
appear in the display.
1
Within three seconds, press the
SMILE button to delete the last
picture/video and the counter
will decrease by one.
2
DELETING THE LAST PICTURE/VIDEO

OPERATION (CONTINUED)
11
Turn the camera on as described
on page 7. Press the Mode button
seven times; “Hi” or “Lo” will blink
and the "mode" appear in the
display.
1
Within 3 seconds, press the SMILE
button to select the Quality mode
as shown on the display i.e. if Lo
appears, press the SMILE button to
change the setting to High.
2
SETTING THE IMAGE QUALITY MODE
Select the desired resolution as shown below, Hi (640 x 480 pixels)
or Lo (320 x 240 pixels) as follows:
NOTES:
•Lo(w) Resolution file size is smaller, but the quality is not as
good as Hi(gh). Lo(w) is ideal for e-mailing.
•Image capacity
High image resolution and High Compression: 120 photos
High image resolution and Low Compression: 25 photos
Low image resolution and High Compression: 390 photos
Low image resolution and Low Compression: 100 photos

OPERATION (CONTINUED)
12
Turn the camera on as described on page
7. Press the Mode button eight times and
the display will show one of the following:
Hd (Hd means High compression): this
option will compress the pictures, allowing
more pictures to be stored in the camera.
Ld (Ld means Low compression): this
option will slightly compress the pictures.
1
SETTING THE COMPRESSION
TOSET TOHd (High
Compression)
If “Ld” appears in the display,
then the pictures are already
being highly compressed. If
“Hd” appears, then press the
SMILE button to change to Hd.
2a
TOSET TO Ld (Low
Compression)
If “Hd” appears in the display,
then the pictures are only being
compressed slightly. If “Ld”
appears, then press the SMILE
button to change to Ld.
2b

OPERATION (CONTINUED)
13
Turn the camera on as described on page 7. Press the Mode button
nine times and the display will show one of the following:
60 (60Hz): this option is used when the exposure light is natural.
50 (50Hz): this option is used when the exposure light is artificial.
1
SETTING THE VIDEO FREQUENCY (FOR VIDEO ONLY)
TO SET TO 60 (60Hz)
If “50” appears in the display, then
the option is already set. If “60”
appears, then press the SMILE
button to change to 60.
2a
TO SET TO 50 (50Hz)
If “60” appears in the display, then
the option is already set. If “50”
appears, then press the SMILE
button to change to 50.
2b

COMPUTER CONNECTION
14
Plug the camera into an available USB port on your computer. If
possible, install on the USB port available on the top of some
keyboards to utilize the Video Camera feature (see page 22).
To Computer’s
USB jack
1

INSTALLING THE CAMERA SOFTWARE:
IMPORTANT NOTES:
• This digital camera is for use with PCs only (ME, 2000, XP or Vista
operating systems) and Mac OS 10.2, 10.3, 10.4 (except iBook).
• Before and while installing the software, make sure that you do not
have the camera attached to your computer. This will adversely affect
the install process and will cause installation to fail.
INSTALLING THE CAMERA
DRIVER:
1. Insert the CD into your CD Rom
Drive.
2. The Install screen will appear. Click
“Install Camera Driver” to install the
driver.
3. Follow the on-screen instructions to
install the driver.
SOFTWARE INSTALLATION
15

INSTALLING THE PHOTO EDITING
PROGRAM:
1. Insert the CD into your CD Rom
Drive.
2. The Install screen will appear. Click
“Install Photo Editing Program” to
install the software.
3. The Installation progress will appear at the bottom of the screen.
When installation has been completed, “Installation Complete” will
appear at the bottom of the screen.
4. See the next page(s) to upload pictures and to use the Photo
Editing software.
UNINSTALLING THE PHOTO EDITING SOFTWARE:
1. To uninstall the “Photo Editing Program” software, insert the CD
and, at the Install screen, click “Uninstall Photo Editing Program”
to uninstall.
2. Click "Exit" to exit the installation program.
SOFTWARE INSTALLATION (CONTINUED)
16

DOWNLOADING PICTURES/MOVIES
17
To Use SpongeBob Camera to Download Pictures/Movies
1. Connect your camera to your computer as described on page 14.
2. Select the MyDSC2 icon from the MyDSC2 folder on the Desktop
or Select the MyDSC2 icon from the MyDSC2 program group on
the Windows Start Menu.
SEE THE NEXT PAGE FOR DETAILS
Downloaded
Images
Download
Photos icon
Downloaded
Videos
Help

You can then:
UPLOAD PICTURES/MOVIES:Click the “Download Photos”
icon.
VIEW PICTURES/MOVIES:SpongeBob Camera shows 12
pictures/movies on each page, click the “Select
Previous/Next Page” icon to view other pages. Right-click on
an image to preview.
EDIT IMAGES: Click the “Edit Images” icon.
SAVE PICTURES/MOVIES: Select the pictures/movies by
left-clicking on them or by clicking the “Select All Photos on
this Page” icon (to select all images on the current page).
Click the “Save Photos” icon to save your selected images.
After this, a "SAVE AS" pop-up window will appear, follow the
instructions to save the Picture/Movie.
UPLOADING PICTURES/MOVIES (CONT.)
18

1. Double-click “Shortcut to Flash PhotoTools” icon on your desktop
to open the Photo Editing Program.
2. Select one of the characters,
SpongeBob, Dora the Explorer or
Diego.
Note: Selecting different characters
will create different Frames, Stamps
and Backgrounds for the Projects
menu.
3. The screen to the right will
appear. Select an icon as shown
on the next page to perform the
various functions.
USING THE PHOTO EDITING PROGRAM
19
Table of contents
Languages:
Other Memorex Digital Camera manuals