manuals.online logo
Brands
  1. Home
  2. •
  3. Brands
  4. •
  5. Memphis
  6. •
  7. Extender
  8. •
  9. Memphis MEMBX User manual

Memphis MEMBX User manual

65
65
65
65
65
65
65
65
65
65
65
65
65
65
65
65
65
65
65
65
65
65
65
65
65
65
65
65
65
65
65
65
65
65
65
65
65
65
65
65
65
65
65
65
65
65
65
65
65
65
65
65
65
65
65
65
65
65
65
65
65
65
65
65
MEMBX
DIGITAL BASS EXPANDER
membx
WIDE
MIN MAX
MIN MAX
MAX BASS CONTROL
POWER
SWEEP
BALANCED
INPUT OUTPUT
DASH REMOTE REM +12v GND
DESIGNED AND DEVELOPED IN THE UNITED STATES, MEMPHIS, TENNESSEE, SINCE 1965
800.489.2300
www.memphisaudio.com
122 Gayoso Ave.
Memphis,TN, USA @MEMPHISCARAUDIOUSA
@MEMPHISAUDIO
D
E
S
I
G
N
E
D
A
N
D
D
E
V
E
L
O
P
E
D
I
N
T
H
E
U
S
A
|
M
E
M
P
H
I
S
,
T
N
,
U
N
I
T
E
D
S
T
A
T
E
S
,
S
I
N
C
E
1
9
6
5
|
D
E
S
I
G
N
E
D
A
N
D
D
E
V
E
L
O
P
E
D
I
N
T
H
E
U
S
A
|
M
E
M
P
H
I
S
,
T
N
,
U
N
I
T
E
D
S
T
A
T
E
S
,
S
I
N
C
E
1
9
6
5
|
D
E
S
I
G
N
E
D
A
N
D
D
E
V
E
L
O
P
E
D
I
N
T
H
E
U
S
A
|
M
E
M
P
H
I
S
,
T
N
,
U
N
I
T
E
D
S
T
A
T
E
S
,
S
I
N
C
E
1
9
6
5
|
MEMBX
DIGITAL BASS EXPANDER
Memphis Audio built a 50+ year legacy in the audio industry engineering the highest quality products to
produce the best possible listening experience for our fans and loyal supporters. To fully appreciate our
products we recommend taking the time to read and follow the instructions in this manual. As always, we
recommend all installations and service be performed by an authorized Memphis Audio dealer.
For optimal performance, Memphis recommends using only Memphis Connection accessories. Outfitting
your system with properly sized Memphis Connection wire and accessories will dramatically boost your
listening experience and increase the durability of your Memphis Audio products.
Ready to Turn It Up? Read This First!
Features
Specifications
NOTE:
Signal Connection
In a world of streaming compressed music, some low end frequencies are lost in translation compromising your
systems ability to perform to it's maximum potential. The MEMBX restores these lost frequencies returning
your system to peak performance during playback. The MEMBX offers high and low level inputs and a 9V output
allowing you to integrate the piece with a factory and aftermarket systems.
Bass Driver: The MEMBX contains a bass driver circuit that accurately recreates and injects low frequency
information back into the signal path. This gives more bass impact to any audio saved in a compressed format.
Bass Equalization Circuit: This feature accurately contours the restored bass to your speaker system.
Remote Control: A mountable remote is included allowing you to adjust the effects of the MEMBX remotely. The
LED indicator grows brighter as you add more bass or dimmer when you decrease the amount of bass.
Bass Maximizer Indicator: This indicator light on the MEMBX flashes when the bas maximization circuit is
activated.
For signal connection the output RCA connectors should be connected to the next component after the
MEMBX such as a crossover, equalizer or amplifier. Remember, the MEMBX should go inline before a crossover
Maximum Input Level
Maximum Output Level
Frequency Response
Total Harmonic Distortion
Signal To Noise Ratio
Balanced Input Noise Rejection
Input Impedance
Output Impedance
Power Supply
Power Draw
Recommended Fuse Rating
15V RMS
13.5V Peak
10Hz - 100KHz; +/-1dB
0.003%
-130dB
>60dB
10Kohm
150 Ohms
High Headroom PWM
150mA
1 Amp
MID RANGE
SPEAKERS
SUBWOOFER
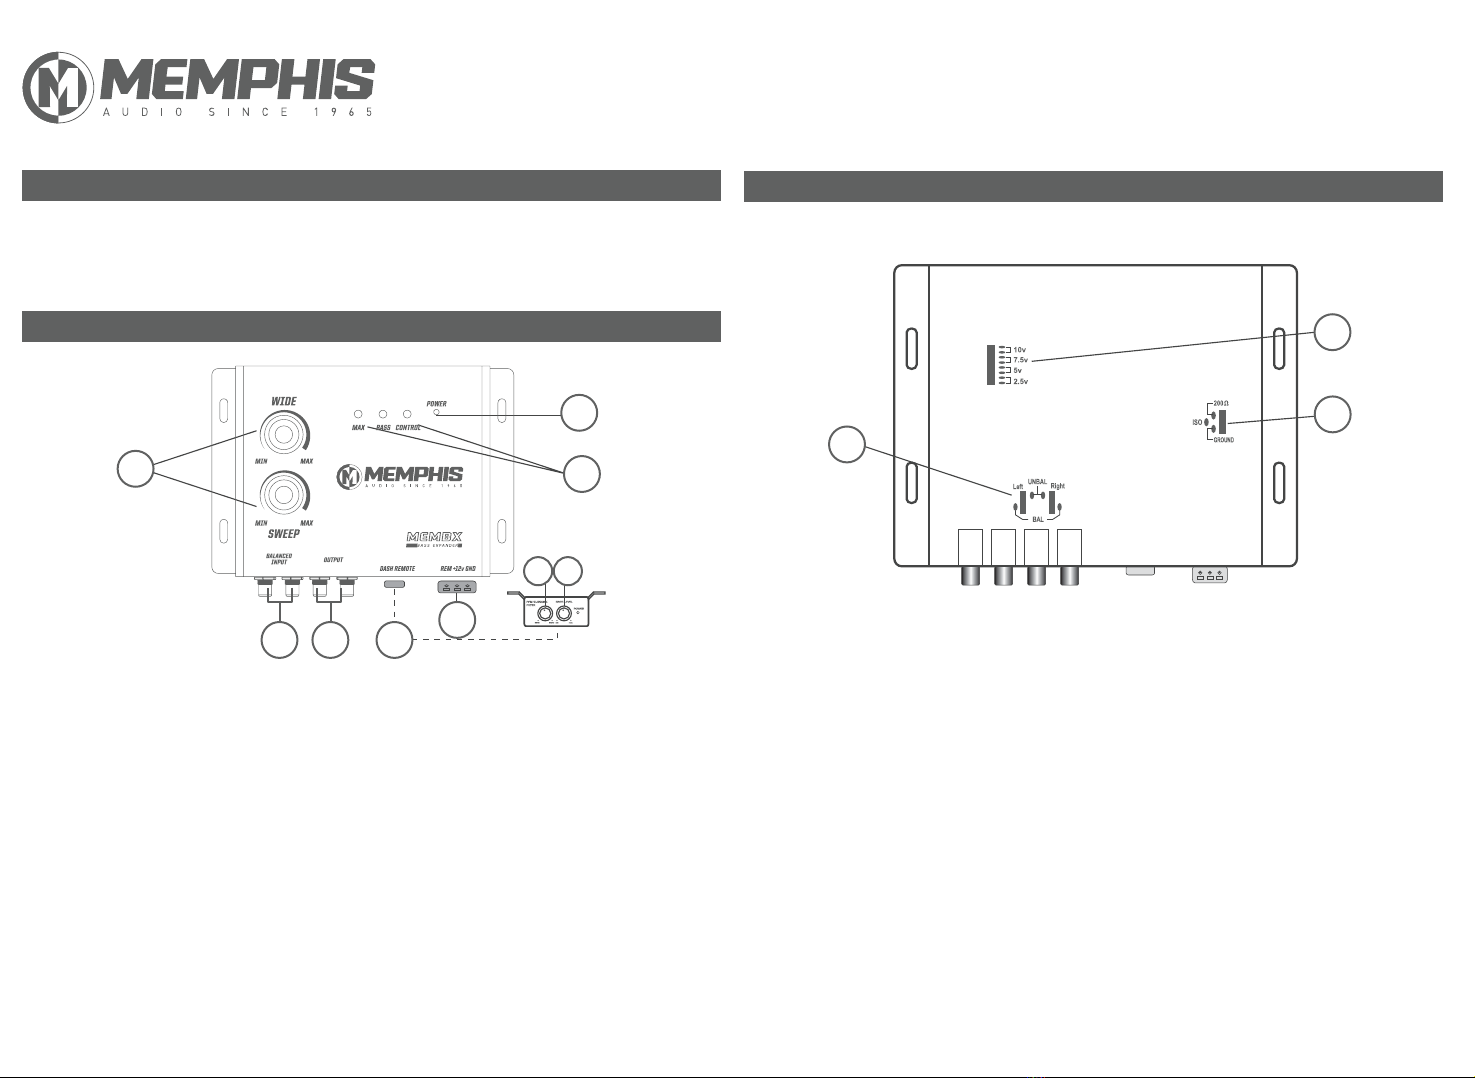
1. Inputs: The inputs of the MEMBX use a balanced input circuit to minimize induced noise. They are also designed
to handle very high signal voltages up to 15V
2. Outputs: These RCA connectors should be connected to the next component after the MEMBX such as a
crossover, equalizer or amplifier. Remember, the MEMBX should go inline before a crossover
3. Remote Control
3A. PMF Subsonic Filter Control: Control the PMF subsonic filter to eliminate unwanted noise. This
control allows you to set frequencies from 35Hz-80Hz. A setting of approximately 33Hz is typically used on most
systems. If you want to protect your system more you can adjust the frequency higher.
3B. Bass Level Control: Adjust the level of the bass produced by your system.
4. Power Connector: Be sure to secure your connections to prevent shorts and damage to your MEMBX unit.
5. Para-Bass Connector: These knobs control the para-bass functions of the MEMBX. The SWEEP knob allows you
to pick the center frequency that you want the MEMBX to maximize. The WIDE knob adjusts how wide of a
frequency range the MEMBX will impact.
6. Bass Maximizer Indicator: These LED indicators flash when the bass maximization circuit is activated
7. Power ON LED: Notifies that power to the unit is present.
8. Input Grounding: For most systems you can leave this jumper set in the BALANCED position. In some
systems, the source unit may look for a ground through the RCA connectors. If this is the case, you should
changed the jumpers to the UNBALANCED position.
9. Ground Isolation Jumpers: Occasionally alternator whine may appear in a system due to improper
grounding. To help resolve this situation the MEMBX provides alternative grounding connections. Make sure
your system is OFF before moving these jumpers.
10.Bass Output Control Jumpers: Not all systems are designed the same. Some systems are designed for
massive SPL performance, others are more refined. The Bass Maximizer can either increase or decrease the
signal voltage of the Bass Restoration Circuit. Depending on your system, you may change these jumpers to a
higher or lower setting to maximize your bass output and protect your speakers. In most systems the factory
settings are appropriate but feel free to adjust them to your preferred setting.
MEMBX
DIGITAL BASS EXPANDER
Signal Connection Continued
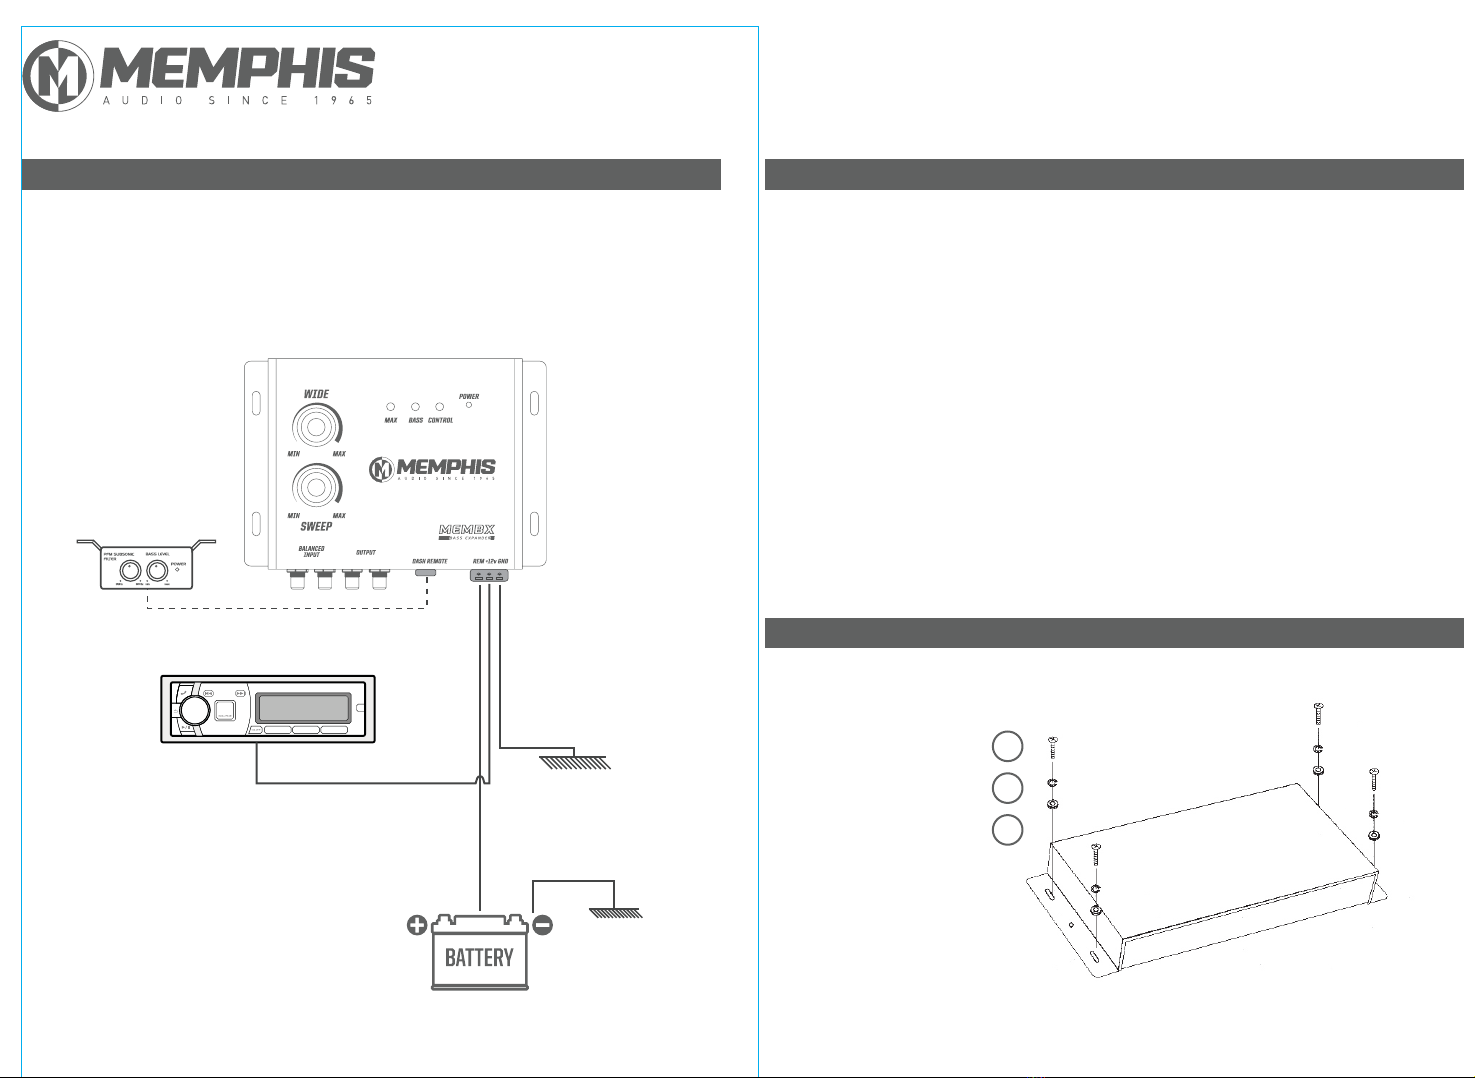
Functions
OUTSIDE CONTROLS
INSIDE CONTROLS
Functions Continued
PFM Subsonic Filter Control: Fine tune the bass response of any system. Eliminate subsonic interference
using this filter for enhanced clarity.
Bass Output Control: Throttle your bass up and down to produce deep clear bass. This control maximizes the
bass output of any system while limiting destructive bursts preventing damage to your speakers.
589
10
7
6
12 3 4
3a 3b
B+ (12V) Connect to car battery or other power source
REMOTE: Connect to a remote activating (12VDC) wire of car stereo or EQ
GND: Connect wire to car chassis for ground connection
If the unit does not turn on , and/or the power indicator LED is NOT illuminated, try this:
• Check and make sure the B+ and GND are not reversed
• Check that all power wires are properly connected and have the appropriate potential (11-16V)
• Check that the Fuse is in tact.
If you experience high audible distortion or low output volume:
• Check that the input and output levels are set correctly. Input should match the source and
output should match the sensitivity of the host.
• Check the crossover settings. Make sure they are correct. For high “Q” systems, set the crossover
half an octave above the desired point. For low “Q” systems set it 1 octave or more above the point.
If you experience whining or engine noise:
• Verify that the GND connection is secure and that the wire is not too thin or unnecessarily long.
• Check that the B+ wire is not too thin or unnecessarily long.
• Change the power source. Try taking the power from a different point.
MEMBX
DIGITAL BASS EXPANDER
Electronic Connections & Wiring Troubleshooting
Installation
Power Connection
Remote
12V +
Ground
Install hardware in the following order:
1. Plain Washer
2. Spring Washer
3. Tapping Screw
1
2
3

Popular Extender manuals by other brands

LITEWAY MidiExtender MIDI-2001 operating instructions

LITEWAY

LITEWAY MidiExtender MIDI-2001 operating instructions

Harman AKG SPC4500 User instructions

Harman

Harman AKG SPC4500 User instructions

ADDER AdderLink LPV154T Guide

ADDER

ADDER AdderLink LPV154T Guide

MuxLab 500041-WP-UK Quick installation guide

MuxLab

MuxLab 500041-WP-UK Quick installation guide

Eminent AB7811 instruction manual

Eminent

Eminent AB7811 instruction manual

Abtus CAT-HDX11T/AP2 User's operation guide

Abtus

Abtus CAT-HDX11T/AP2 User's operation guide

AFi MT-945SL instruction manual

AFi

AFi MT-945SL instruction manual

DigitaLinx DL-HDFO user manual

DigitaLinx

DigitaLinx DL-HDFO user manual

MuxLab 500770-TX Quick installation guide

MuxLab

MuxLab 500770-TX Quick installation guide

SureCall N-Range user guide

SureCall

SureCall N-Range user guide

Vanco EVEXHDARC product manual

Vanco

Vanco EVEXHDARC product manual

ATEN VE8900 Series user manual

ATEN

ATEN VE8900 Series user manual

Comm-Tec DaisyNET II manual

Comm-Tec

Comm-Tec DaisyNET II manual

Vanco Evolution EVEV4K70 manual

Vanco

Vanco Evolution EVEV4K70 manual

Devolo Audio Extender Specifications

Devolo

Devolo Audio Extender Specifications

PROLiNK PME200 Quick installation guide

PROLiNK

PROLiNK PME200 Quick installation guide

Vertiv AVOCENT HMX8000 Quick installation guide

Vertiv

Vertiv AVOCENT HMX8000 Quick installation guide

Patton CopperLink CL2300 user manual

Patton

Patton CopperLink CL2300 user manual

manuals.online logo
manuals.online logoBrands
  • About & Mission
  • Contact us
  • Privacy Policy
  • Terms and Conditions

Copyright 2025 Manuals.Online. All Rights Reserved.