MENDOR DISCREET User manual

Blood Glucose Monitoring System
芬捷™血糖监测系统
D I S C R E E T
User manual / 使用说明书

Thank you for choosing Mendor Discreet Blood Glucose Monitoring
System.
Access the user manual in different languages and see our video
tutorials about using the meter on our support page:
www.mendor.com/support
KEEP THESE INSTRUCTIONS!
EN
2-43
English
ZH
45-86
Chinese

3
Contents
Intended use of the product ............................................................ 4
Clarication of the symbols.............................................................. 5
Important information...................................................................... 6
Contents of the package................................................................. 7
Components of the meter ............................................................... 8
Display.....................................................................................9 – 11
Functions...................................................................................... 12
Settings .................................................................................13 – 15
Inserting and replacing the test strip cartridge ........................16 – 17
Inserting and replacing the lancet ...........................................18 – 19
Disposing of used lancets ............................................................. 20
Adjusting the lancet penetration depth .......................................... 21
Performing a control measurement.........................................22 – 23
Deleting a control test result .......................................................... 24
Product and safety information...............................................25 – 27
Blood glucose measurement..................................................28 – 34
Memory ........................................................................................ 35
Replacing the battery .................................................................... 36
Troubleshooting .....................................................................37 – 38
Technical specications..........................................................39 – 41
Customer support and manufacturers information ......................... 42
Warranty information and spare parts ............................................ 43

4
Intended use of the product
The Mendor Discreet Blood Glucose Monitoring System is a portable,
in vitro diagnostic device that is used for measuring the glucose
concentration of a capillary blood sample. The device is intended
for self-testing.
The device should not be used to diagnose diabetes. Only use
Mendor Discreet test strip cartridges, Mendor Discreet lancets and
Mendor Discreet control solution with this Mendor Discreet blood
glucose meter. The measurement system is electrochemical and it is
based on glucose oxidase.
Do not use the blood glucose meter for any other purpose than
instructed in this user manual.
Do not allow a small child or a disabled person to use this meter
without supervision.
NOTE! In order to interpret the meter, you should be able to read
the text on the display. The device is not suitable for users with
signicantly deteriorated eyesight.

5
Consult instructions
for use
Caution, consult instructions
for use
Temperature limitations
Use by
Do not reuse
Manufacturer
Batch code
In vitro diagnostic medical
device
Serial number
Recyclable package
Fragile
Keep away from sunlight
Do not use if package is
damaged
Sterilised using irradiation
Electric and electronic
waste
CE marking. The product
fullls the IVDD and MDD
requirements for directive
98/79/EC and 93/42/EEC.
Clarication of the symbols

6
Important information
Mendor Discreet Blood Glucose Monitoring System is for personal
use only.
If the package or seal are damaged, please contact our customer
support, please see “Customer Support and Manufacturers
information”.
Before using the product for the rst time, read all the instructions
carefully and practise testing with the control solution, please see
“Performing a control test” and “ Deleting a control test result”. If
these instructions are not followed, the device may not function
correctly.
Do not change your treatment based on the readings of the meter
alone. Always contact your physician or healthcare professional
rst.
Use a new lancet needle for every measurement.
It is important to set the correct date and time for the meter before
you use the meter for the rst time.
In case of any problems, please contact our Customer Support.

7
The package includes:
• Mendor Discreet blood glucose meter
• Mendor Discreet test strip cartridge, which includes 25 test strips
• 25 Mendor Discreet lancet needles
• Mendor Discreet control solution bottle (4ml)
• Battery (inside the meter)
• User manual
• Quick reference guide
• Logbook
If something is missing, contact our Customer Support.
In daily use, you will need a cloth and 70% isopropyl alcohol
(available at pharmacists) to clean the meter.
Contents of the package
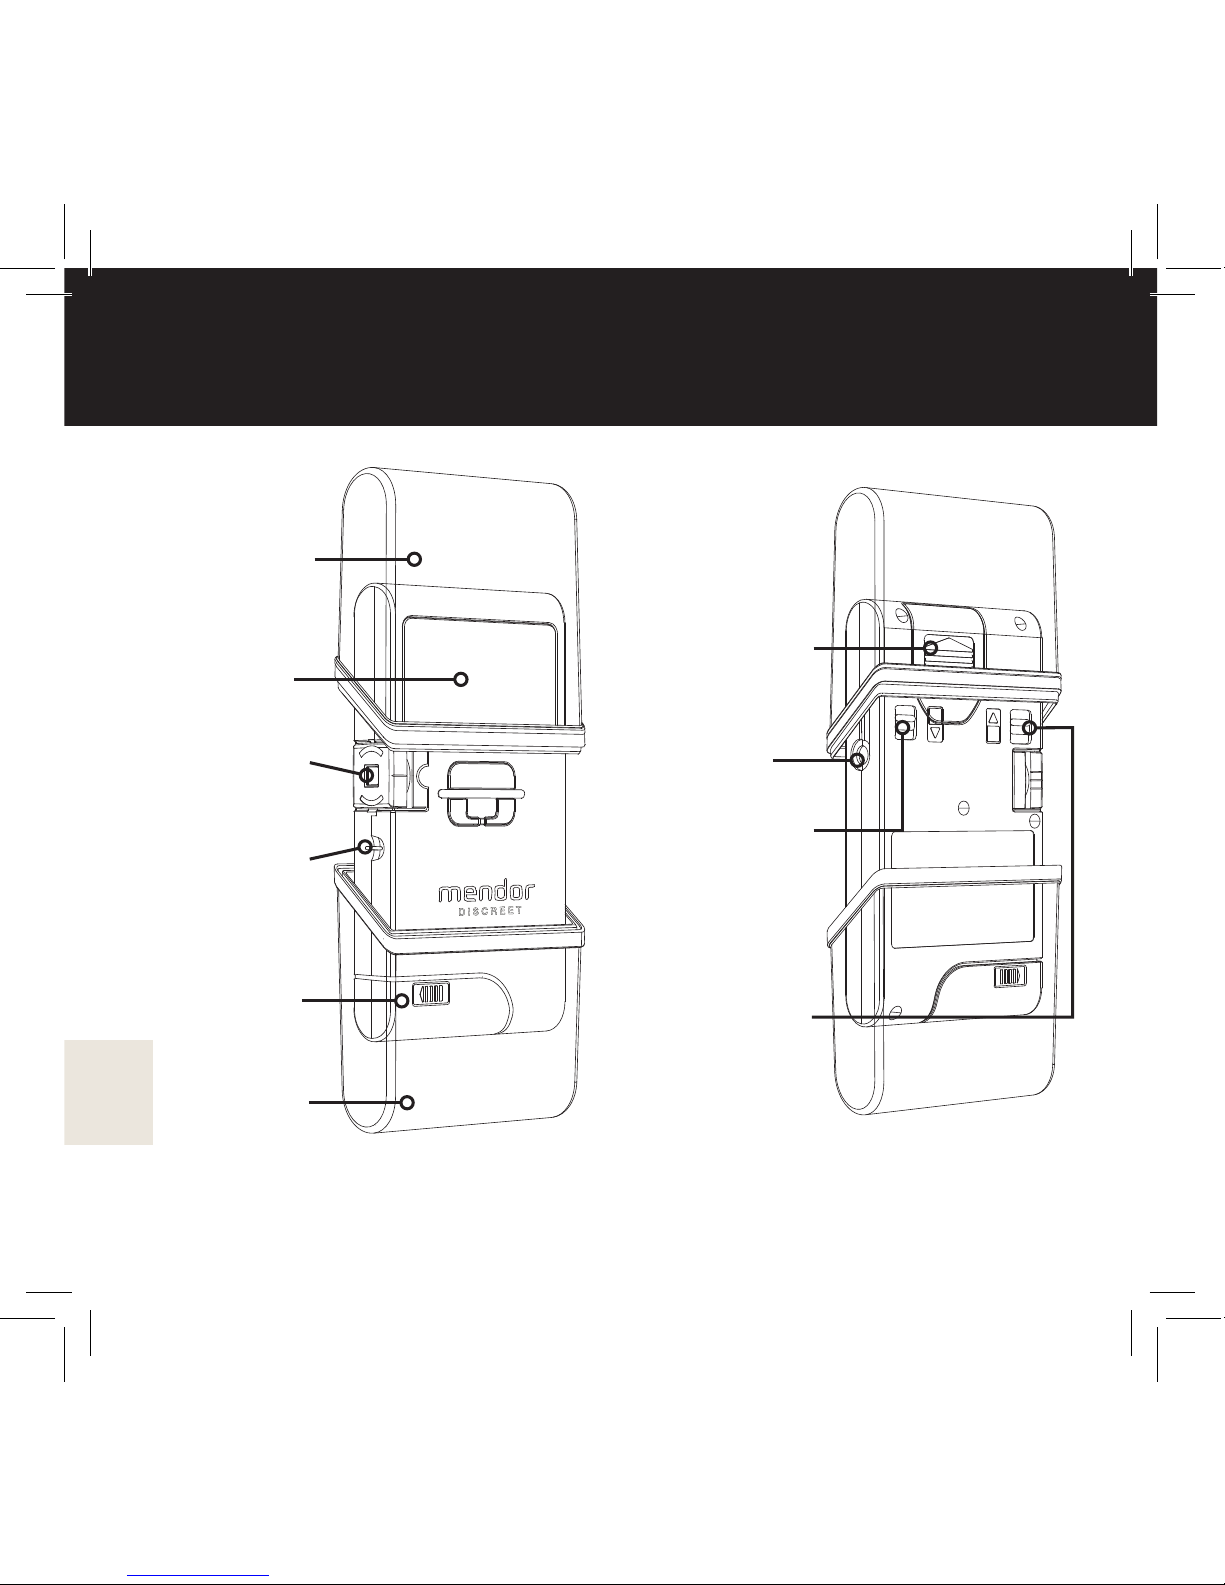
8
Top cover
(removable)
Display
Lancet holder
(removable)
Test strip
opening
Test strip
cartridge
compartment
Bottom cover
(removable)
Components of the meter
Battery container
(removable)
Data transfer port
Bottom cover
detachment lever
(use for replacing
the test strip
cartridge)
Top cover
detachment lever
(use for replacing
the battery)
9
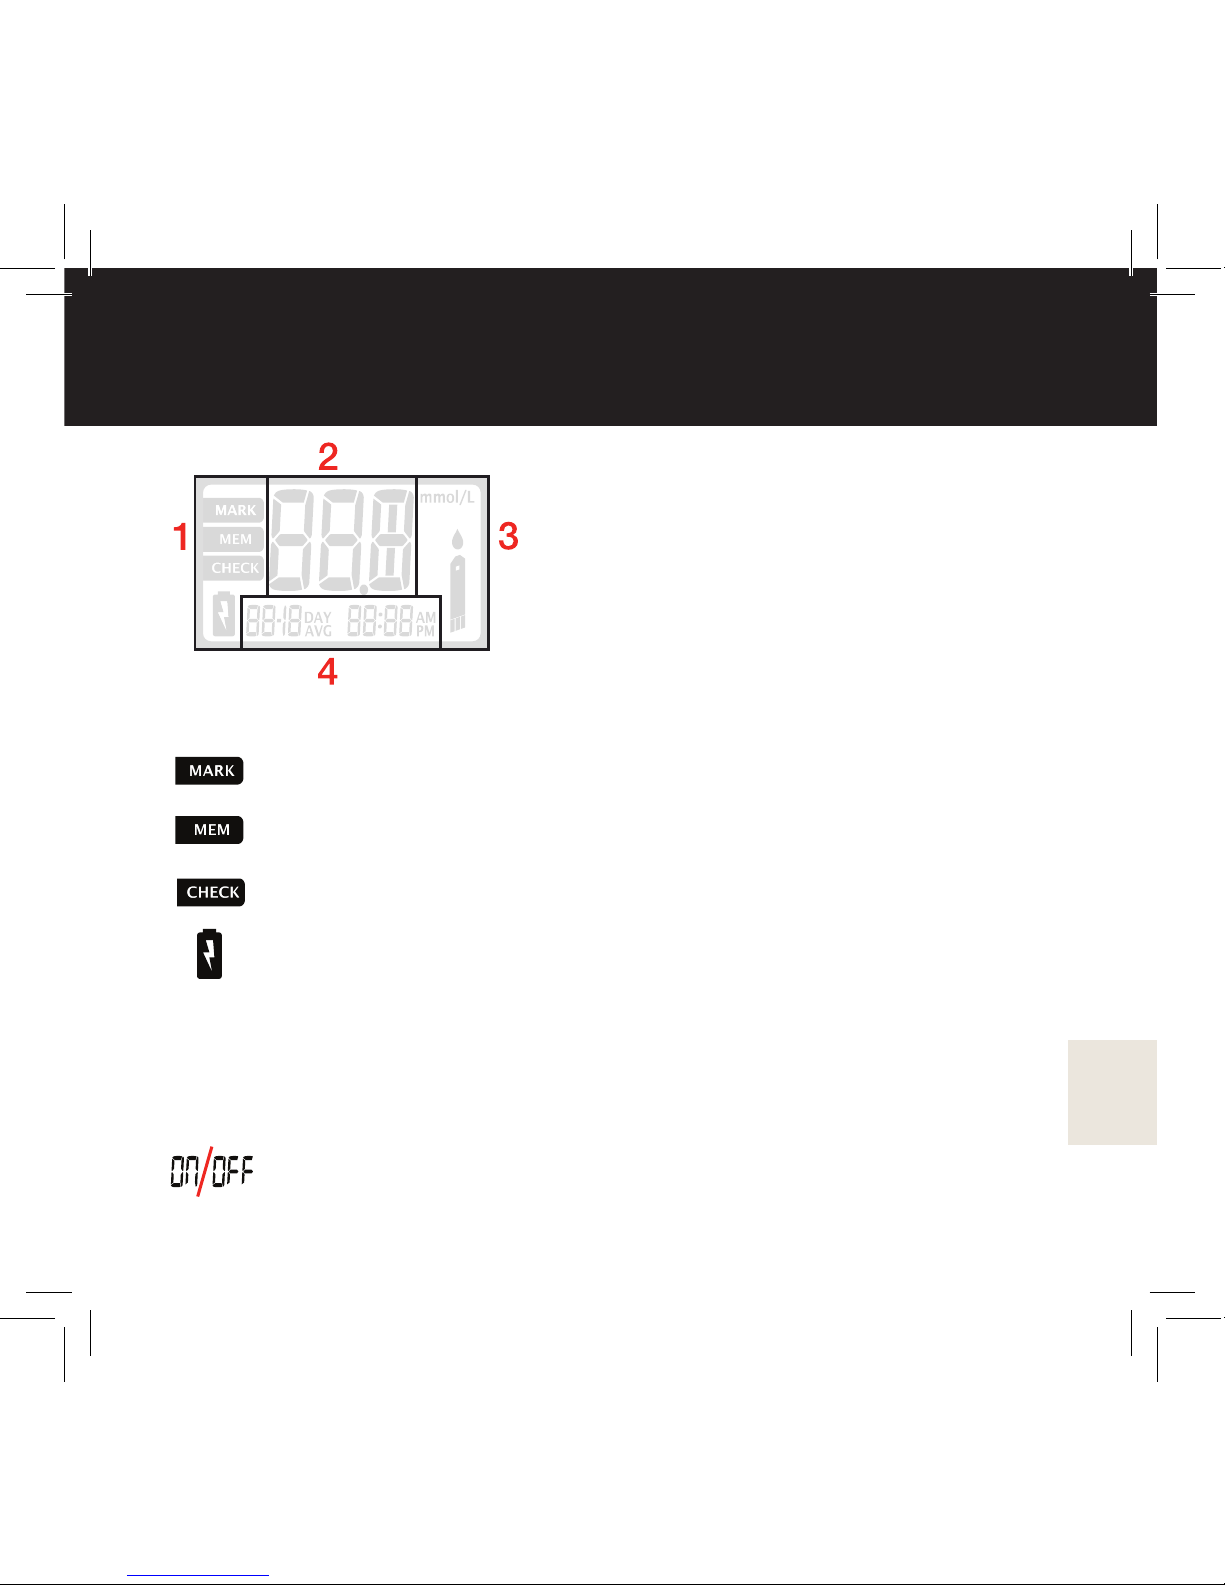
Display
1 Left area
MARK icon (marks a result for later review)
Memory icon
CHECK icon (visible when deleting a result)
Battery icon (appears when the battery should be replaced)
2 Upper middle area
Displays mainly test results. Other displayed items are:
Switching a function ON/OFF.
10
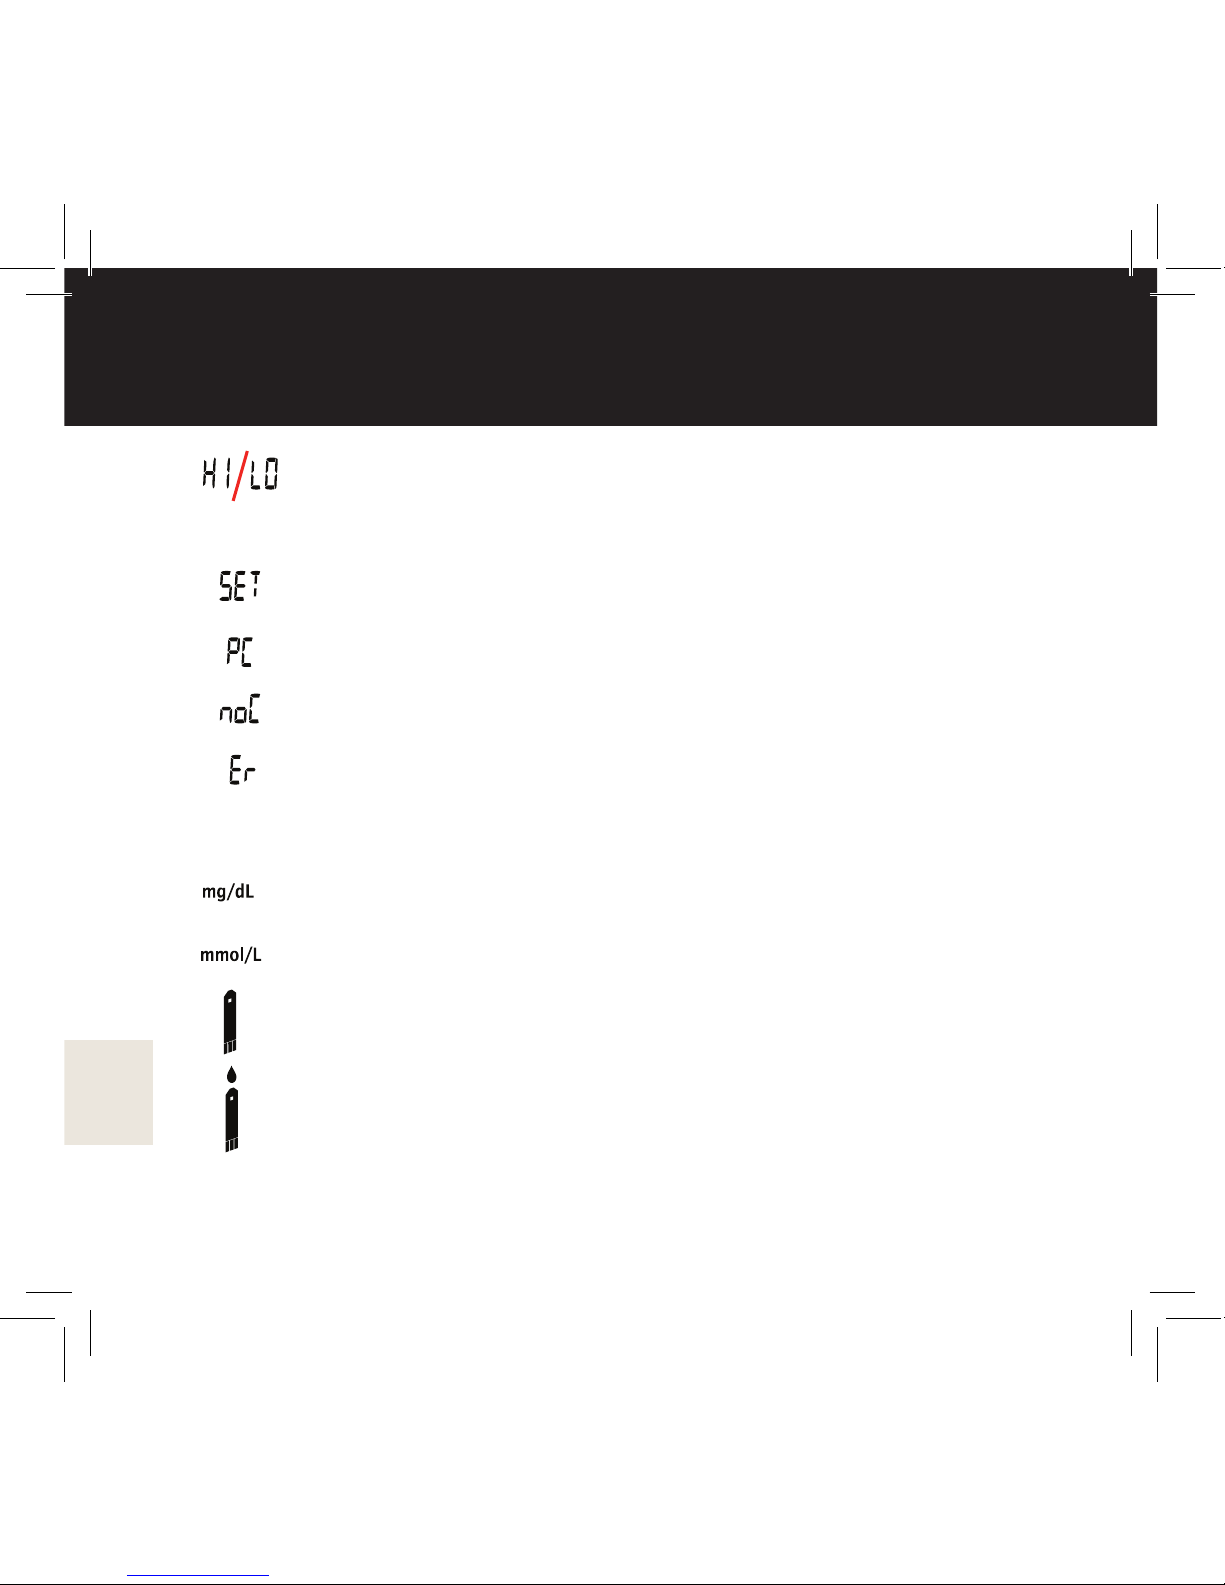
Display
HI icon: If the test result is above 33.3 mmol/L (600 mg/ dL), HI
appears on the display. LO icon: If the test result is below 1.1
mmol/L (20 mg/dL), LO appears on the display.
Settings menu
The data cable is connected to the device
No test strip cartridge inside the device
Error (followed by an error number, see “Troubleshooting”)
3 Right area
Units-of-measure
Units-of-measure
Test strip icon (the amount of remaining strips is displayed next
to the symbol)
“Apply sample” icon (blinks when the meter is ready for the
sample)

11
Display
4 Lower middle area
Displays mainly date and time. Other items displayed are:
14 day average is displayed on the screen when the top cover is
opened and the meter is turned on by briey pressing the power
button
Number of measurements in the 14 day average (0n means no
measurement, 1n means one, and so on)
Beeping sound (can be turned ON or OFF)
AM = before midday / PM= after midday (displayed on the
screen if the 12 hour clock is chosen)
12
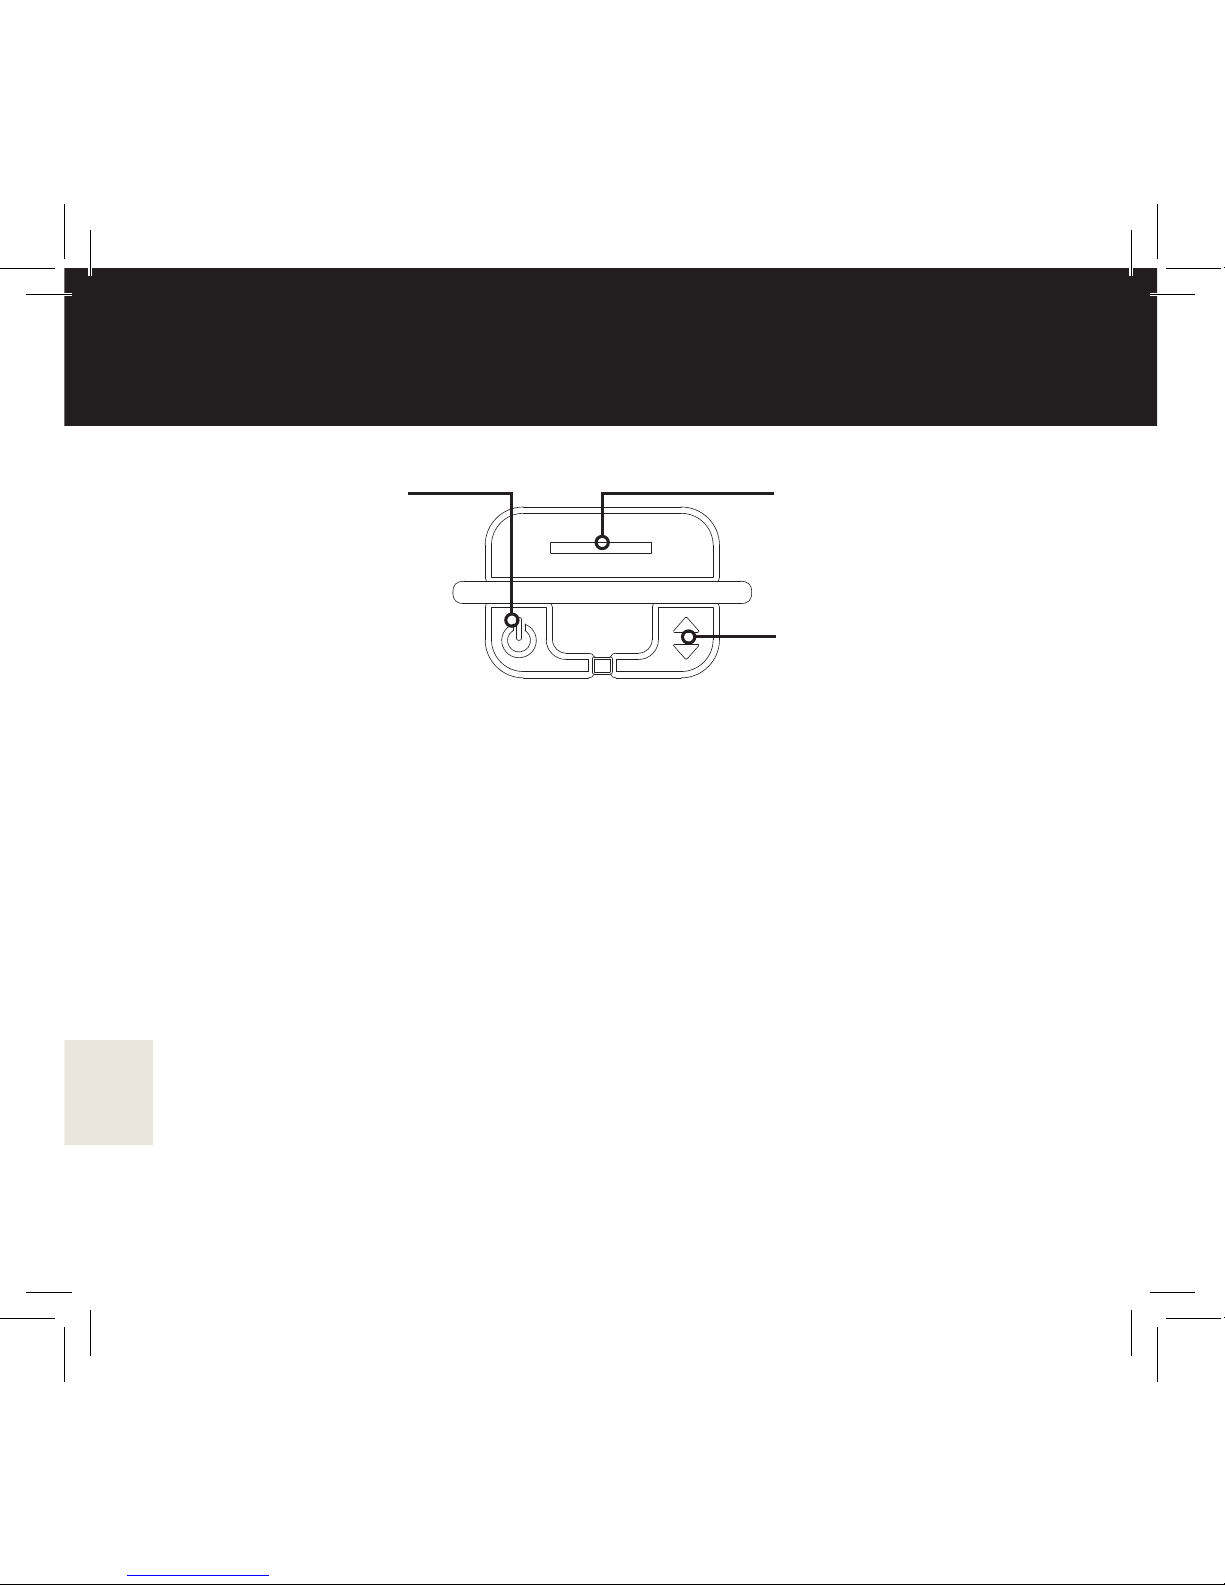
Lancet release
Triggers the lancing
device, if it has been
primed.
Arrow button
Short press: Browse
results or change
settings.
Long press: When
the result is displayed,
discard the result with
CHECK icon.
Power ON/OFF
Short press:
Power ON/OFF
Long press:
Settings menu
Long press
before the
measurement
when displaying
the test strip
icon: Will mark the
result with MARK
icon.
Functions
Bottom Cover
• When the bottom cover is pulled downwards, a test strip will come
out from the left hand side of the meter. The device turns itself on
automatically.
• When the bottom cover is pulled even further down, the lancing
device is primed. The bottom cover will return to the previous
position automatically.
• Please note that the bottom cover needs to be attached on the
meter, for the meter to function.

13
Settings
Adjust the following settings before rst use of the product. Check
settings every time you have changed the battery. Go to the settings
menu by holding the power button pressed down for three (3) seconds.
You can exit the settings menu at any time by holding the power button
down for three (3) seconds.
Settings menu
Press the power button again for the next
step. Exit the settings menu by pressing down
the power button for three (3) seconds.
Year
Set the year by pressing the arrow button
repeatedly until the current year appears.
Conrm the selection by pressing the power
button.
Month
Set the month by pressing the arrow button
repeatedly until the current month appears.
Conrm the selection by pressing the power
button.
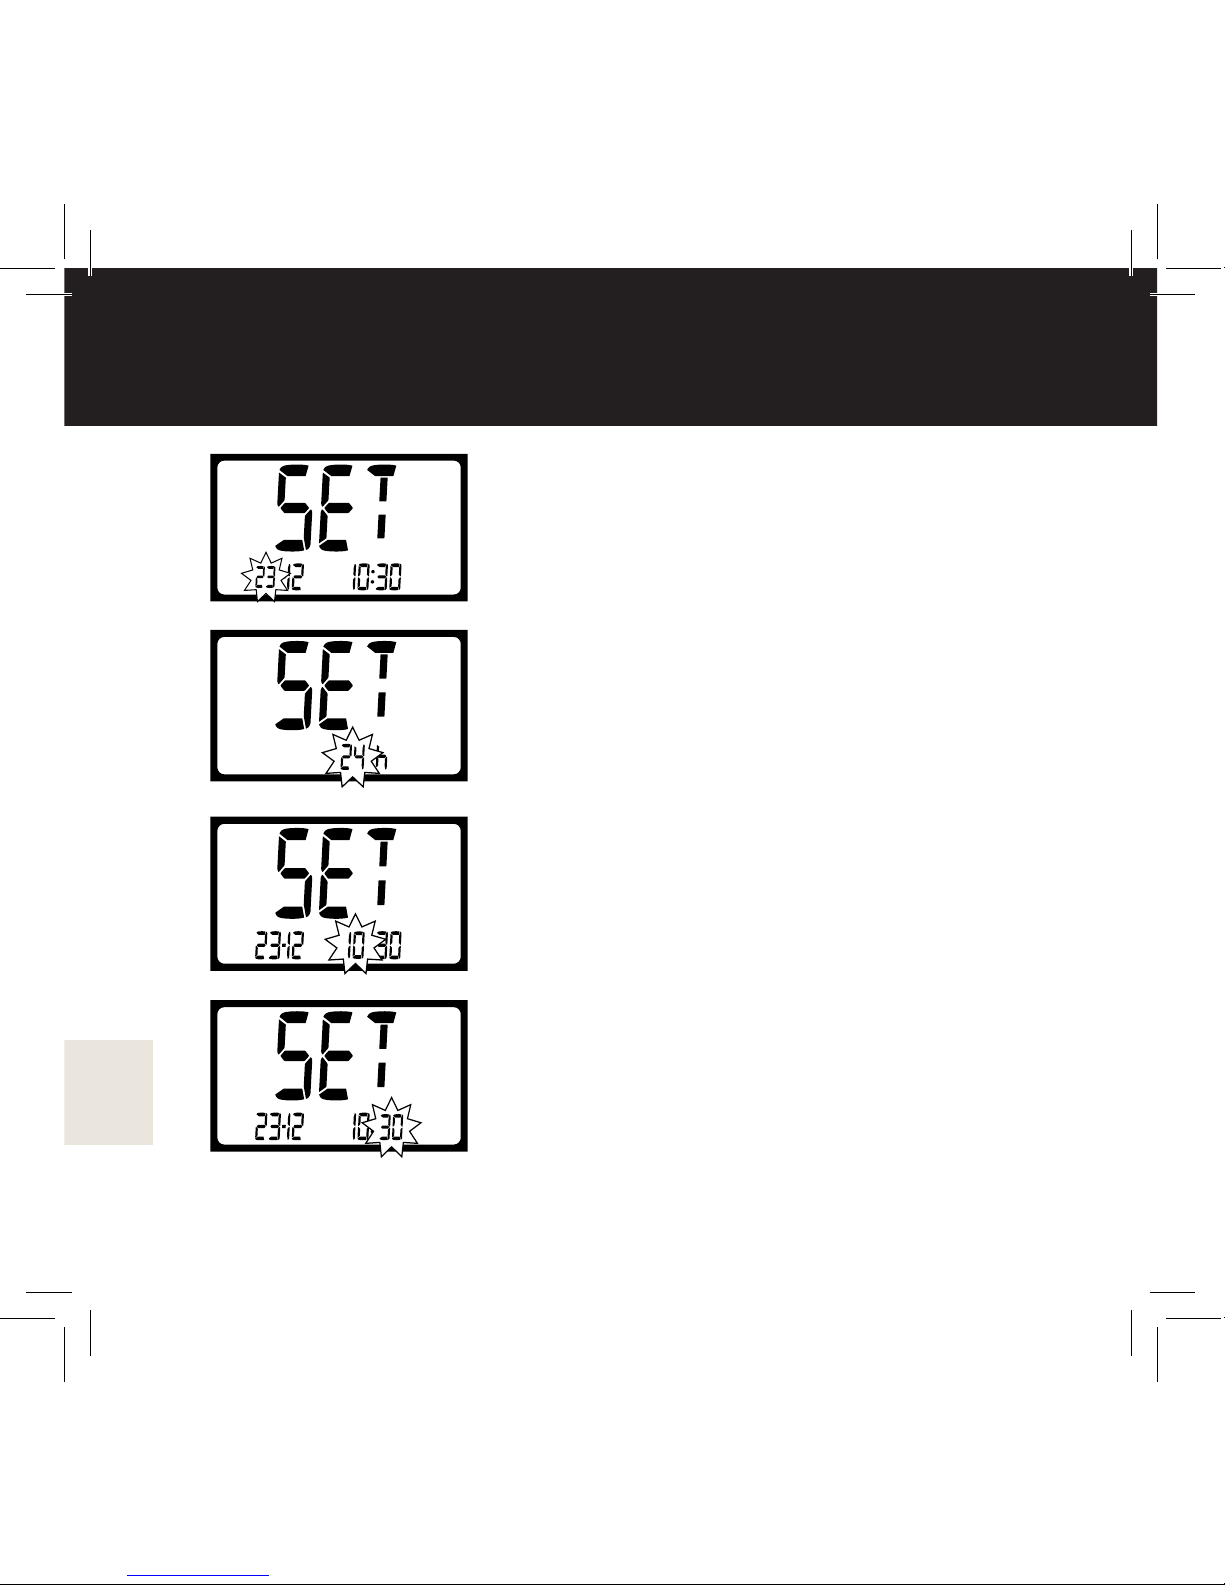
14
Settings
Date
Set the date by pressing the arrow button
repeatedly until the current date appears.
Conrm the selection by pressing the power
button.
Hour format
The meter can be set in an AM/PM 12-hour
or 24 hour format. Press the arrow button
to select the desired format. Conrm the
selection by pressing the power button.
Hour
Set the hour by pressing the arrow button
repeatedly until the current hour appears.
Conrm the selection by pressing the power
button.
Minute
Set the minute by pressing the arrow button
repeatedly until the current minute appears.
Conrm the selection by pressing the power
button.
NOTE! It is important to have correct settings for the interpretation of
the results.
15
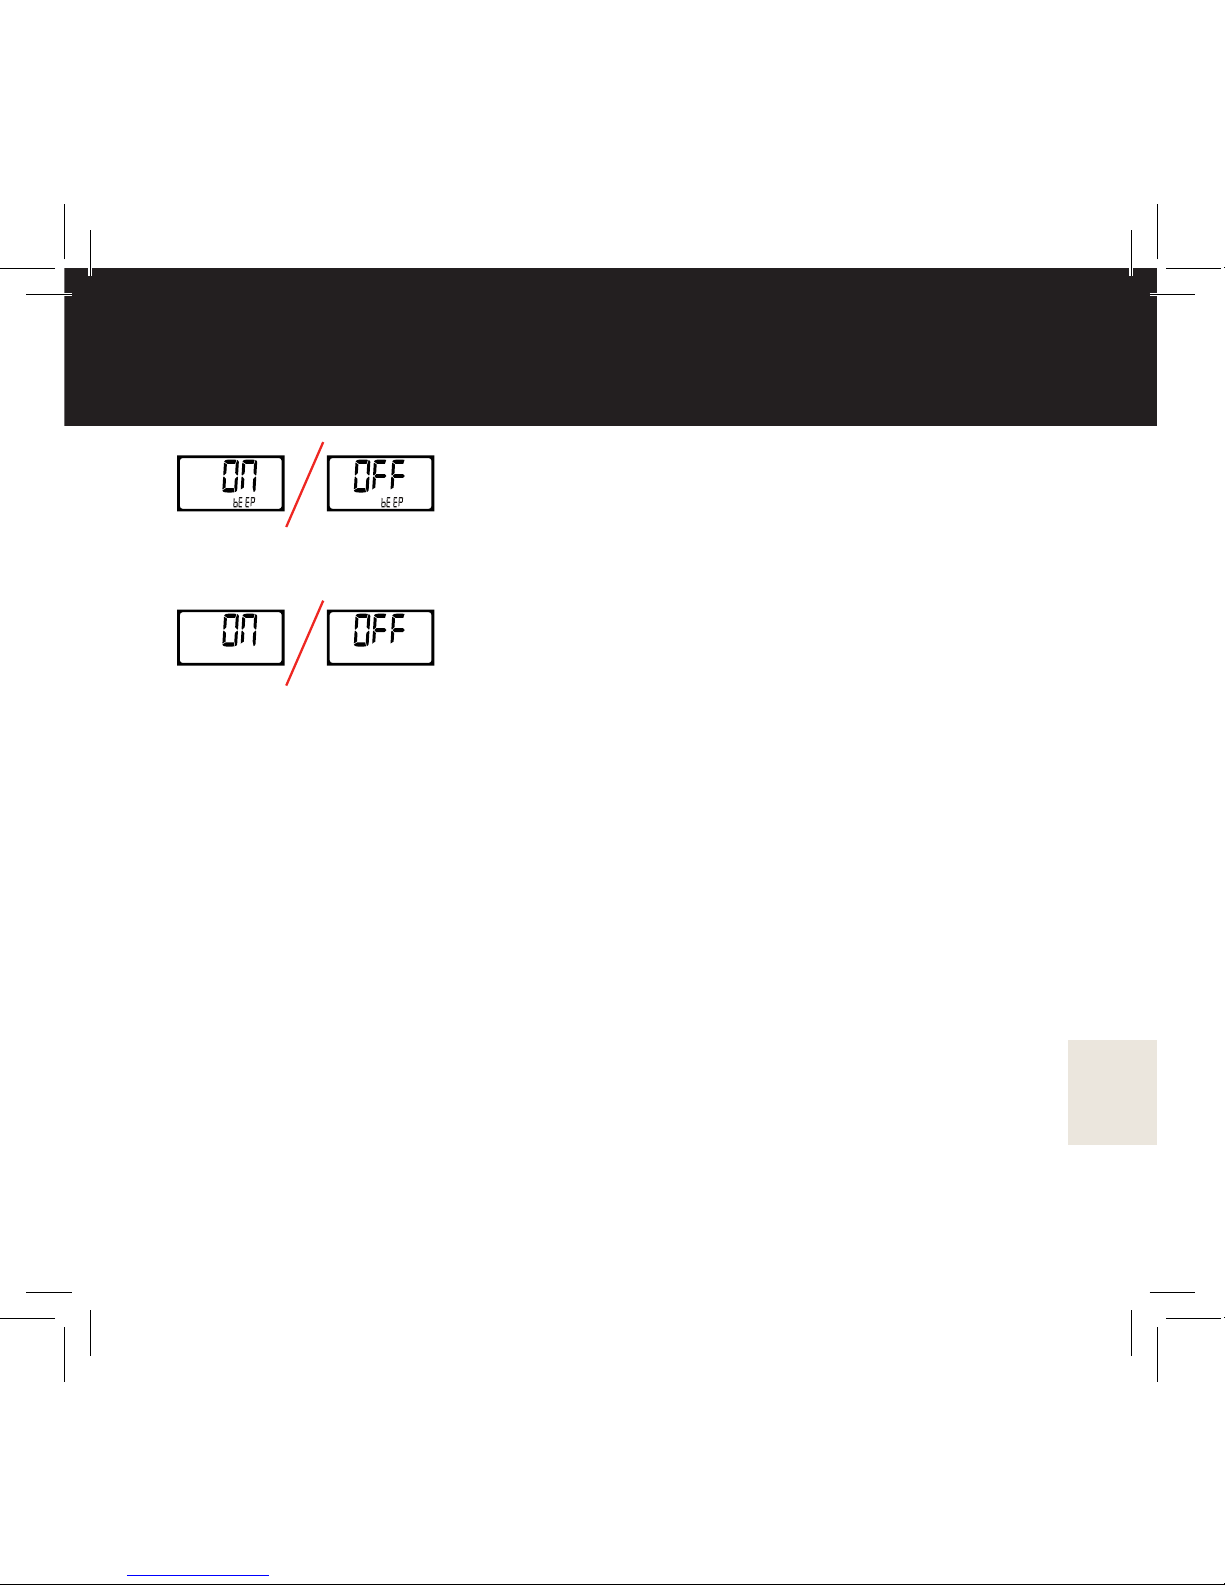
Settings
Sound
To set the sound ON or OFF, press the arrow
button. Conrm the selection by pressing the
power button.
Light for the display
To set the light ON or OFF, press the arrow
button. Conrm the selection by pressing the
power button.
When you have nished adjusting the settings, hold the power button
down for three (3) seconds to exit the settings menu.
16
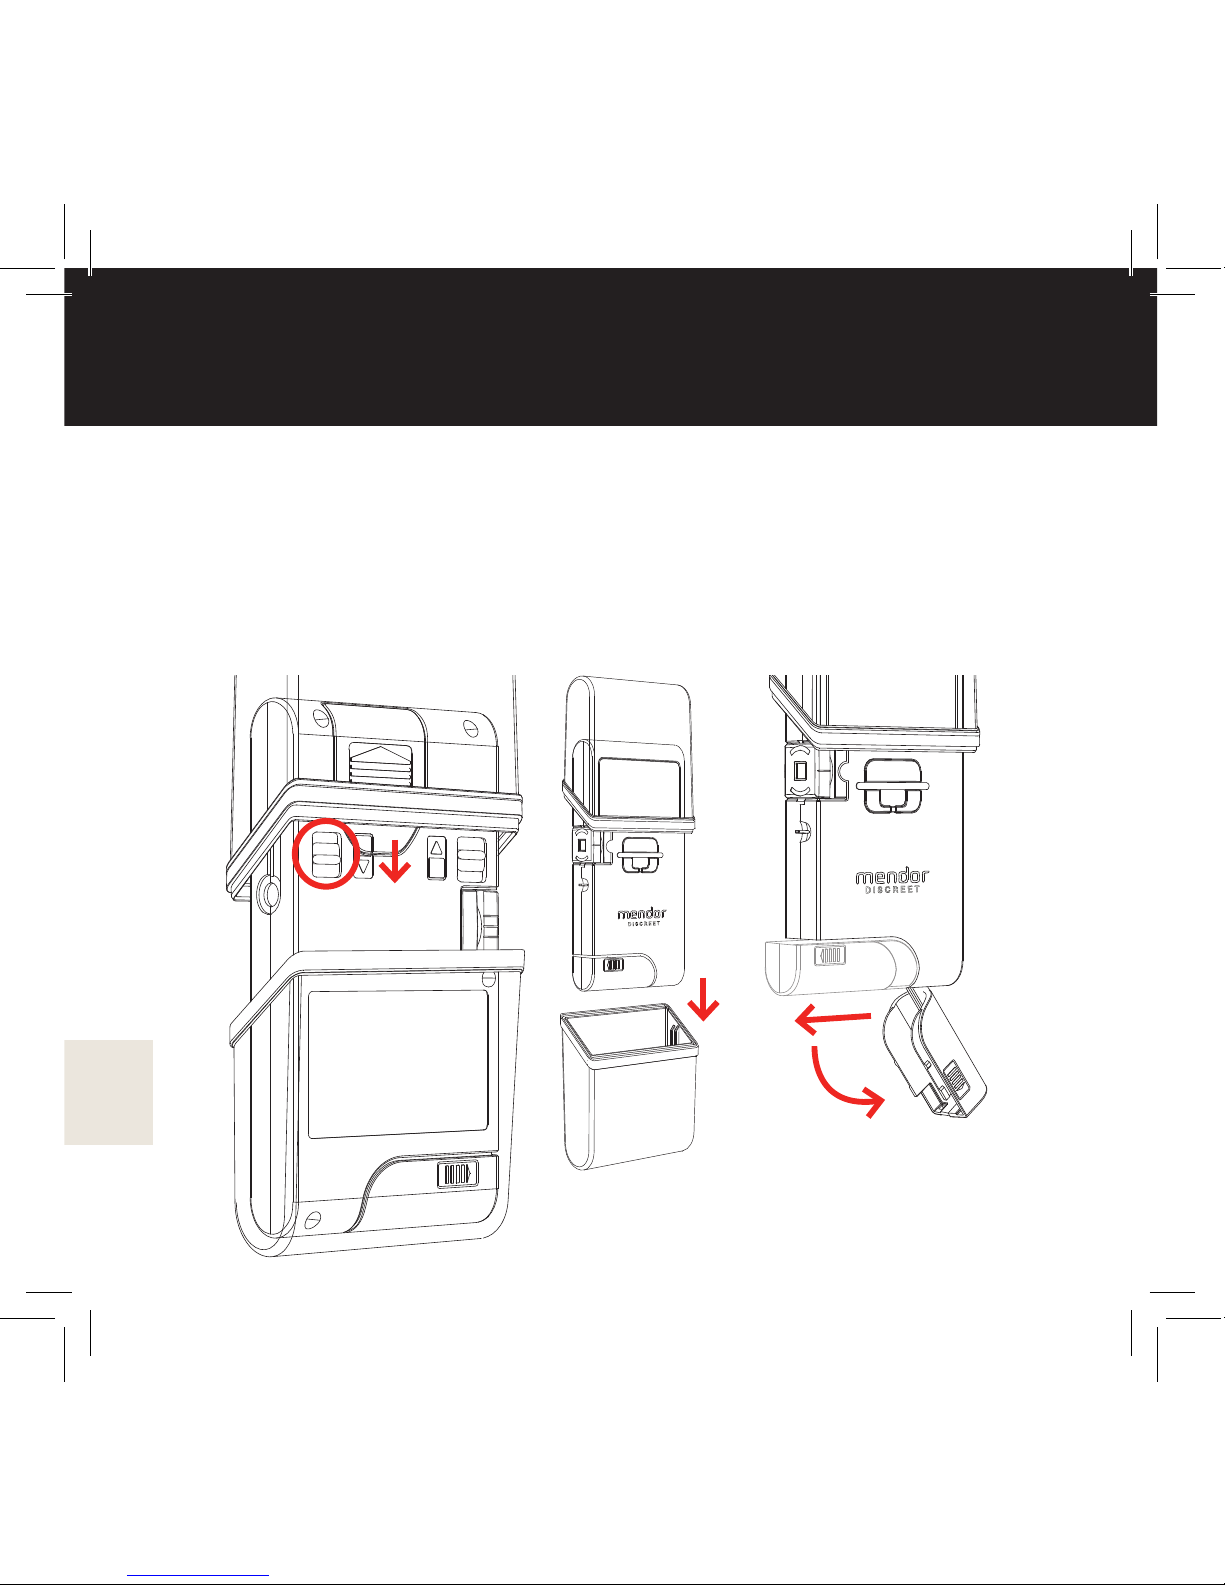
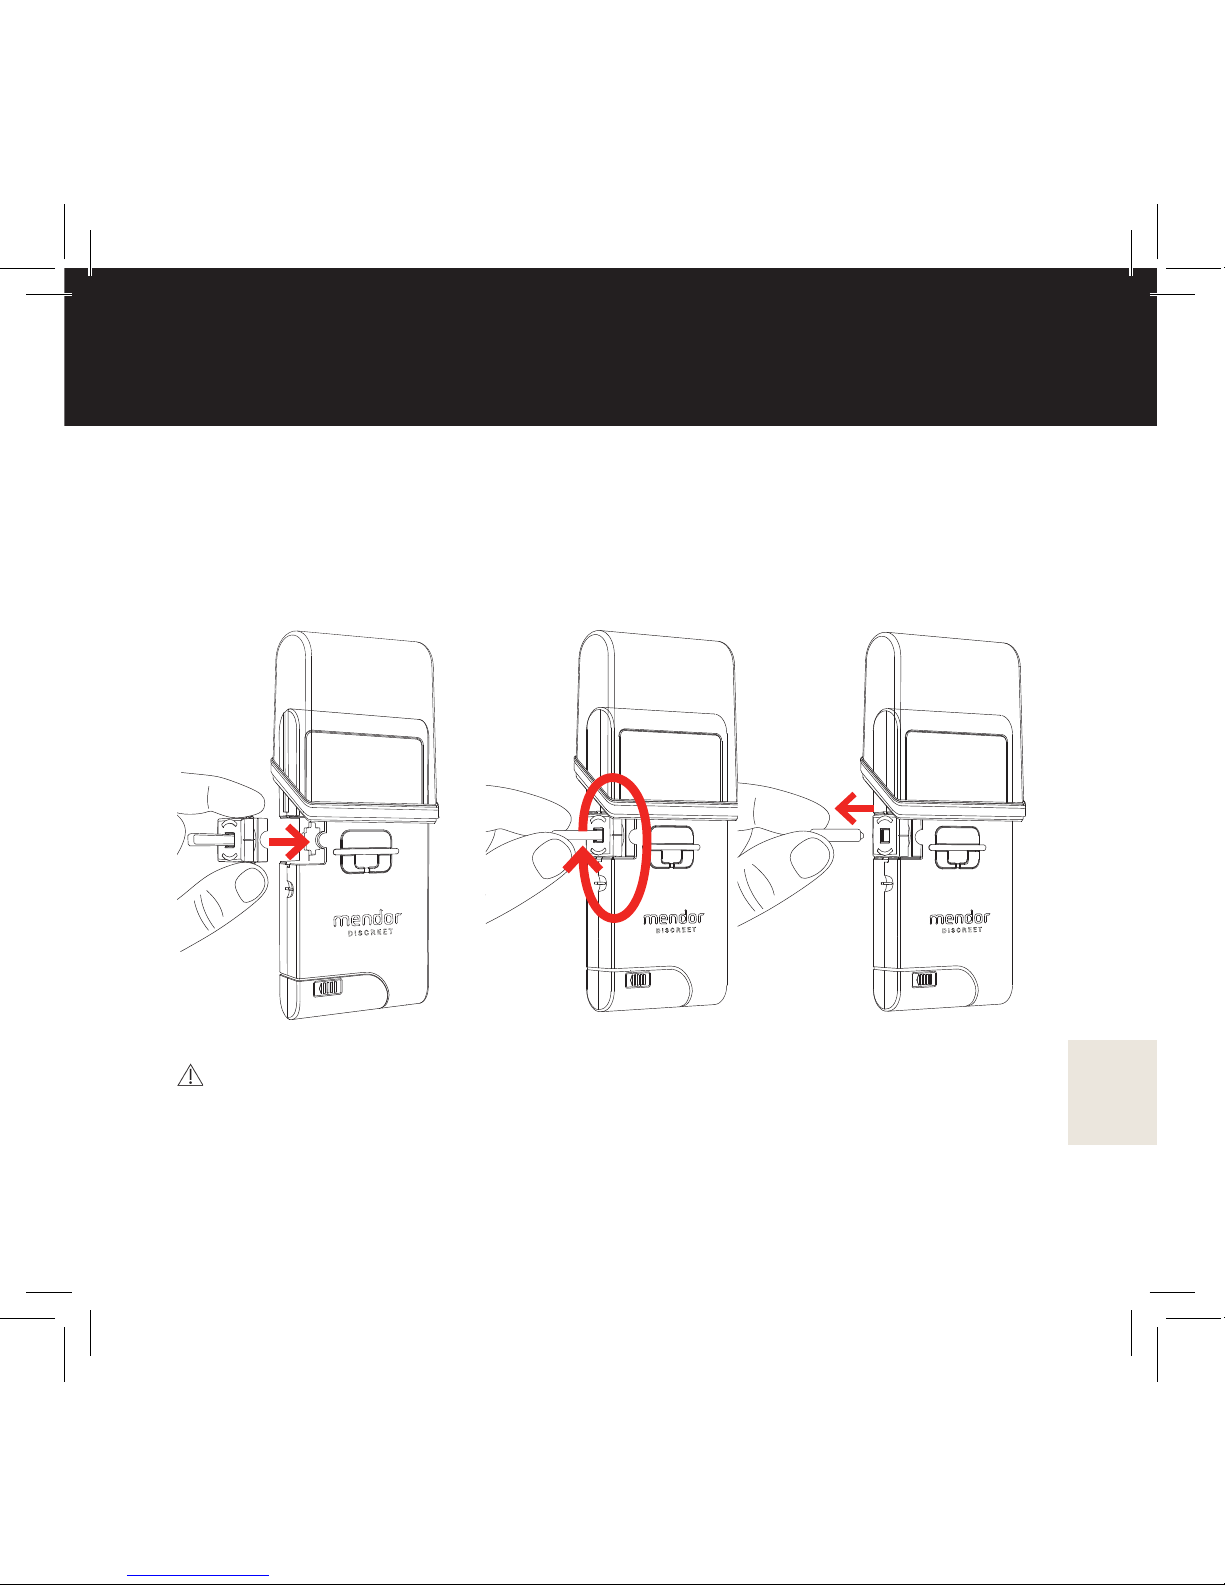
Inserting and replacing the test strip cartridge
To insert a test strip cartridge, rst make sure that the bottom cover
is in the closed position. The release latch only works when the cover
is closed. Remove the bottom cover by rst sliding the bottom cover
release latch on the back of the meter (1) and then pull the bottom
cover (2). Open the cartridge compartment by sliding the cartridge
compartment lid rst outwards from the meter (3), after which the lid will
open downwards (4).
12
3
4
NOTE! To protect the test strips inside
the meter, please close the covers on the
meter rmly for transportation and storage.

17
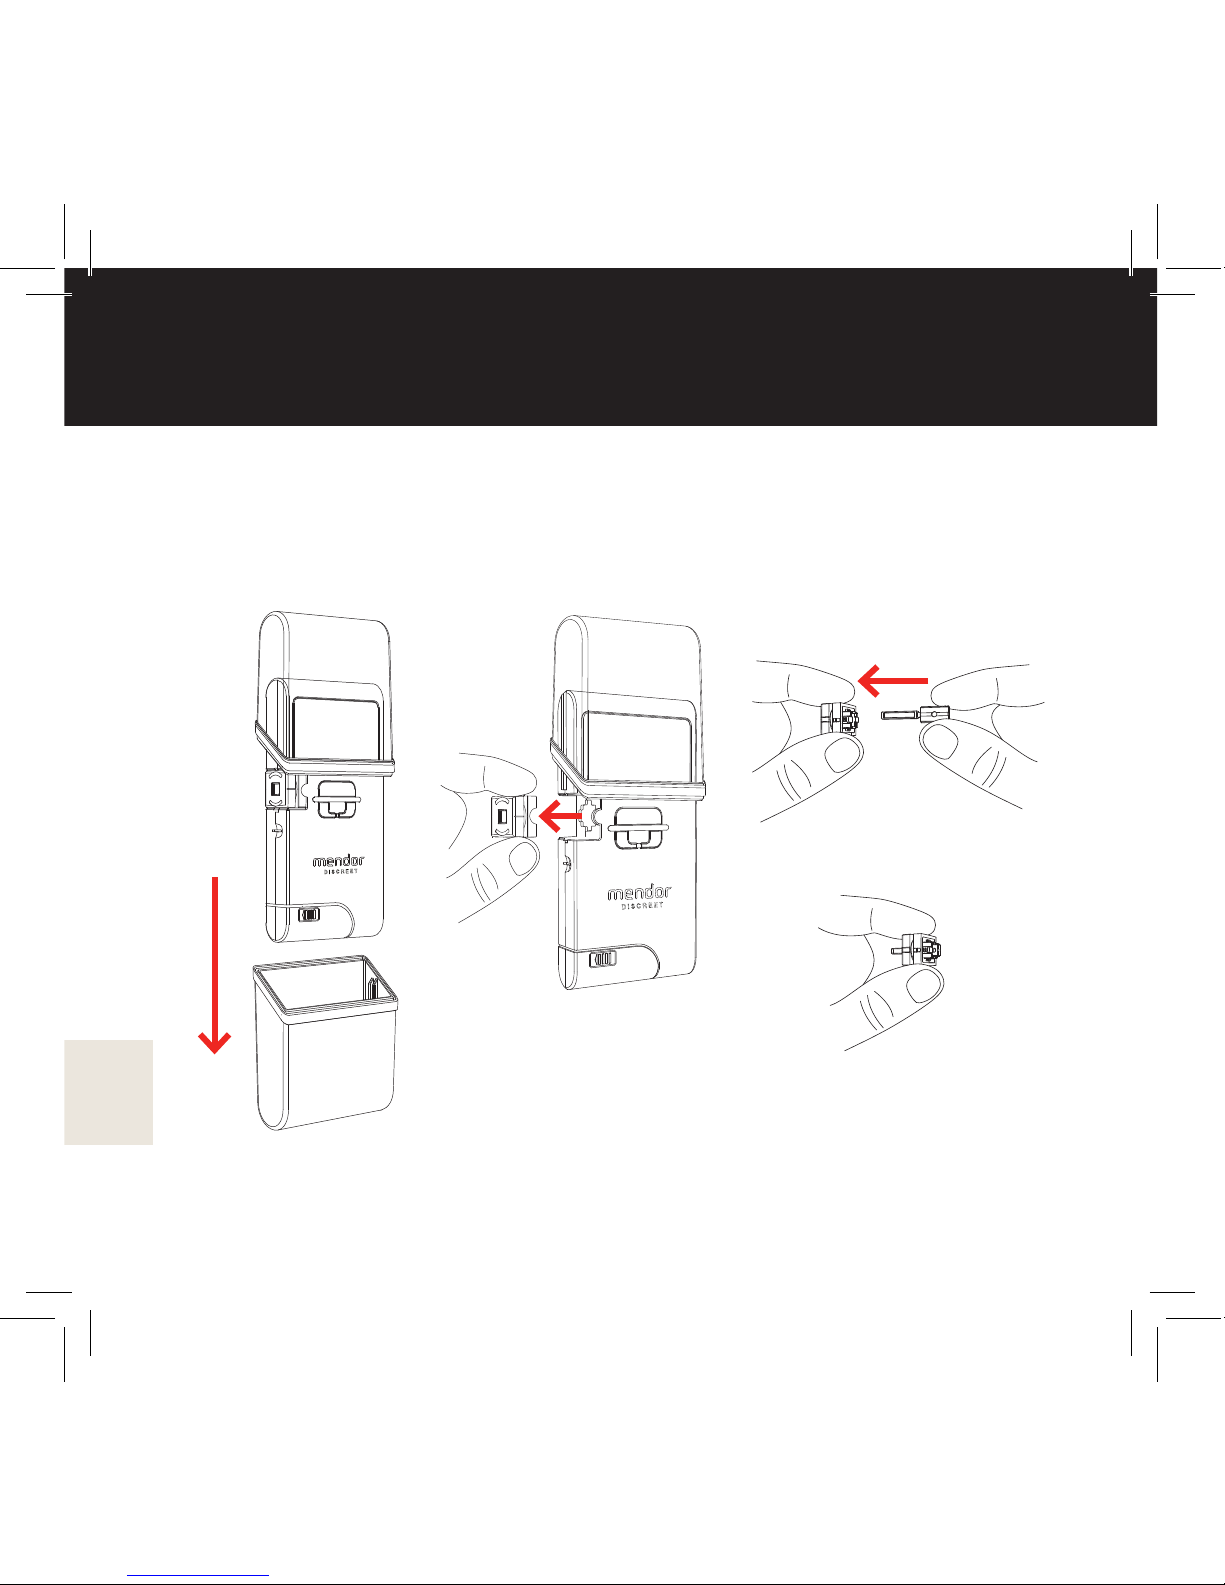
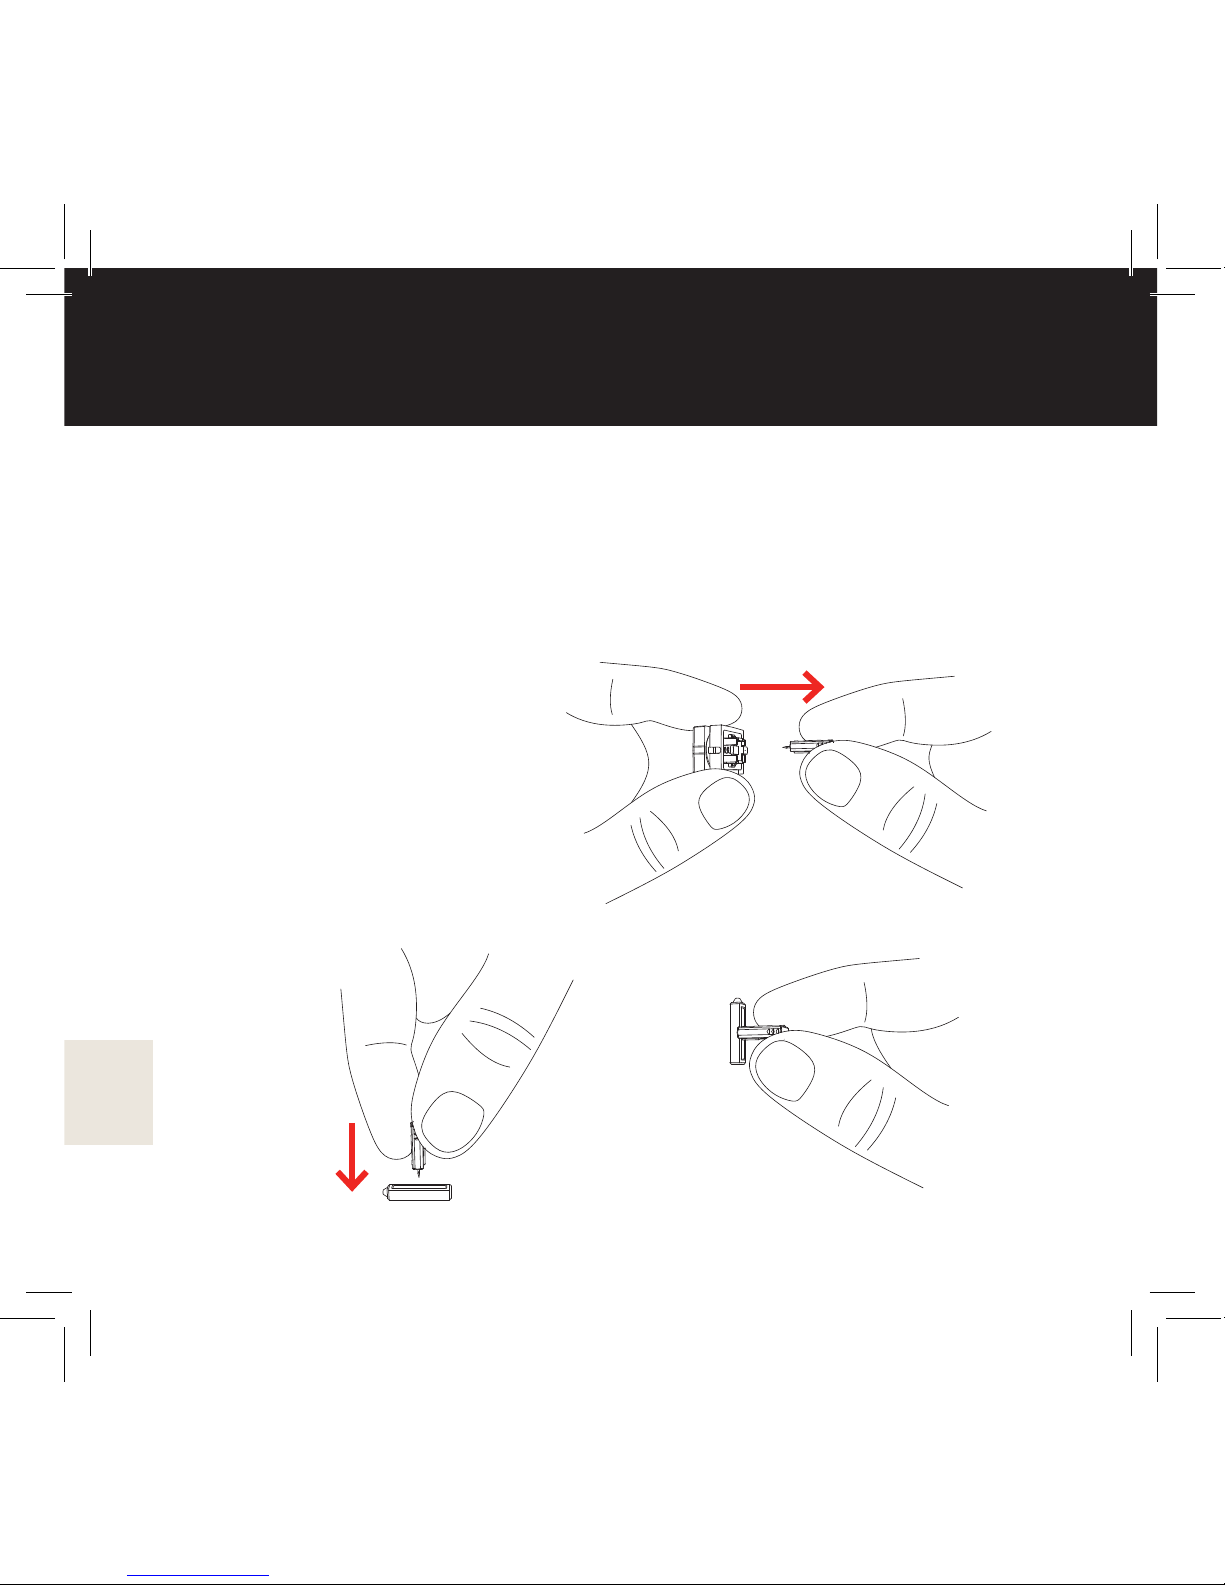
Inserting and replacing the test strip cartridge
Remove the aluminium package of the new Mendor Discreet test strip cartridge
and insert the cartridge in to the meter as shown in the pictures (5 and 6),
close the cartridge compartment (7) and close the cartidge compartment lid.
Close the covers rmly for transportation and storage by pushing the covers
together.
The test strip cartridge should be used within 30 days from opening the
package. Write down the use by-date.
Always perfom a control measurement with control solution before
you use a new test strip cartridge.
Do not use the cartridge if the aluminium package is damaged.
0537
675
18
Inserting and replacing the lancet
Start replacing the lancet by removing the bottom cover (1) Pull the
lancet holder from the meter (2) and insert the new lancet by pushing
it through the lancet holder until it cannot be pushed in any further (3).
1 2 3
19
Inserting and replacing the lancet
Place the lancet holder back into the meter (4). Detach the blue lancet
cap by twisting and pulling until the plastic seal breaks (5) and pull it
out (6). Keep the disposable cap of the new lancet needle for the safe
disposal of the used lancet (please see the next page). Place the lower
cover back on the meter.
Clean the lancet holder regularly with a cloth moisturised
with 70% isopropyl alcohol.
NOTE! The lancet needle is extremely sharp. The lancet
holder should be cleaned without a lancet needle in place.
4 5 6
20
Disposing of used lancets
Remove the lancet holder from the meter by pulling it out. Replace
the used lancet needle by pulling it from the holder (1) Insert a new
lancet into the lancet holder. Use the disposable cap to protect the
used needle, as shown in the picture (2). When the lancet needle is
protected, it can be disposed of according to local regulations (3).
2
1
3
Table of contents
Other MENDOR Blood Glucose Meter manuals

Popular Blood Glucose Meter manuals by other brands


Ascensia Diabetes Care
Ascensia Diabetes Care Contour next GEN user manual

Abbott
Abbott FreeStyle Libre 2 user manual

Ypsomed
Ypsomed mylife AVEO quick start guide

Freestyle
Freestyle FREEDOM LITE user manual

Hanna Instruments
Hanna Instruments HI 96803 instruction manual

Abbott
Abbott FreeStyle InsuLinx owner's booklet