MERIT INDUSTRIES Remote Sound System User manual

Remote Sound System™
Installation Manual
merit industries, inc. PM0397-02
Visit the Merit Industries, Inc. Web site
http://www.meritind.com

Table of Contents
Description.................................................................................................p. 1
Site Preparation ......................................................................................... p. 1
Sound Zones ..................................................................................... p. 1
Planning the Installation................................................................... p. 1
Installation ................................................................................................. p. 7
Connecting the Remote Sound System to a
MegaTunes™ Unit or Megatouch Combo Jukebox™ ................... p. 7
Installing Speakers ........................................................................... p. 7
Connecting Speakers........................................................................ p. 8
Replacement Parts List............................................................................. p. 9

Description
The Remote Sound System™ includes an
amplifier, subwoofer, (2) satellite speakers,
(2) 50-foot lengths of speaker wire, and an
RCA stereo cable. The cabinet housing the
amplifier and subwoofer measures 26 1/2”
H X 23” W X 23” D and is equipped with a
door allowing access to the components
inside (see Figure 1).
Site Preparation
In determining the location for your Remote
Sound System™, keep in mind that it must
be connected to a suitable, grounded elec-
trical outlet. As a basic guideline, never con-
nect the sound system to a circuit that also
supplies power to freezers, coolers or other
high power-consuming and electrical noise-
generating equipment. Familiarity with stan-
dard wiring practices, as recognized by a
government agency in your area, is neces-
sary.
Make sure the unit is not exposed to any
moisture or excessive heat and that there is
enough space to ensure proper ventilation.
The unit should also be located on a sturdy,
level surface.
1 REMOTE SOUND SYSTEM™ INSTALLATION MANUAL PM0397-02
Sound Zones
A sound zone is considered to be any set of
speakers that are controlled as a single unit.
A single set of speakers with the same vol-
ume control would be configured as ZONE
1, with an additional speaker set configured
as ZONE 2.
Planning the Installation
Consider the following as you decide on
speaker placement:
•volume required in the area
•the stereo image. The sound stage of
sound zones can vary depending on
speaker placement.
NOTE: Sometimes the physical layout
of a location makes it almost impos-
sible to create a good stereo image. For
example, if a location has many small
interconnected rooms or if a location
is very long and narrow. Under these
circumstances, it may be more advan-
tageous to operate all speakers in
mono. This would enable you to cover
small rooms with one speaker instead
of two and make placement much easier
to determine.
See Figures 2-5 for help with laying out the
sound system. Keep in mind that you will
need to supply any additional cabling nec-
essary for the desired speaker layout.
COPYRIGHT © 2003 MERIT INDUSTRIES, INC.

PM0397-02 REMOTE SOUND SYSTEM™ INSTALLATION MANUAL 2
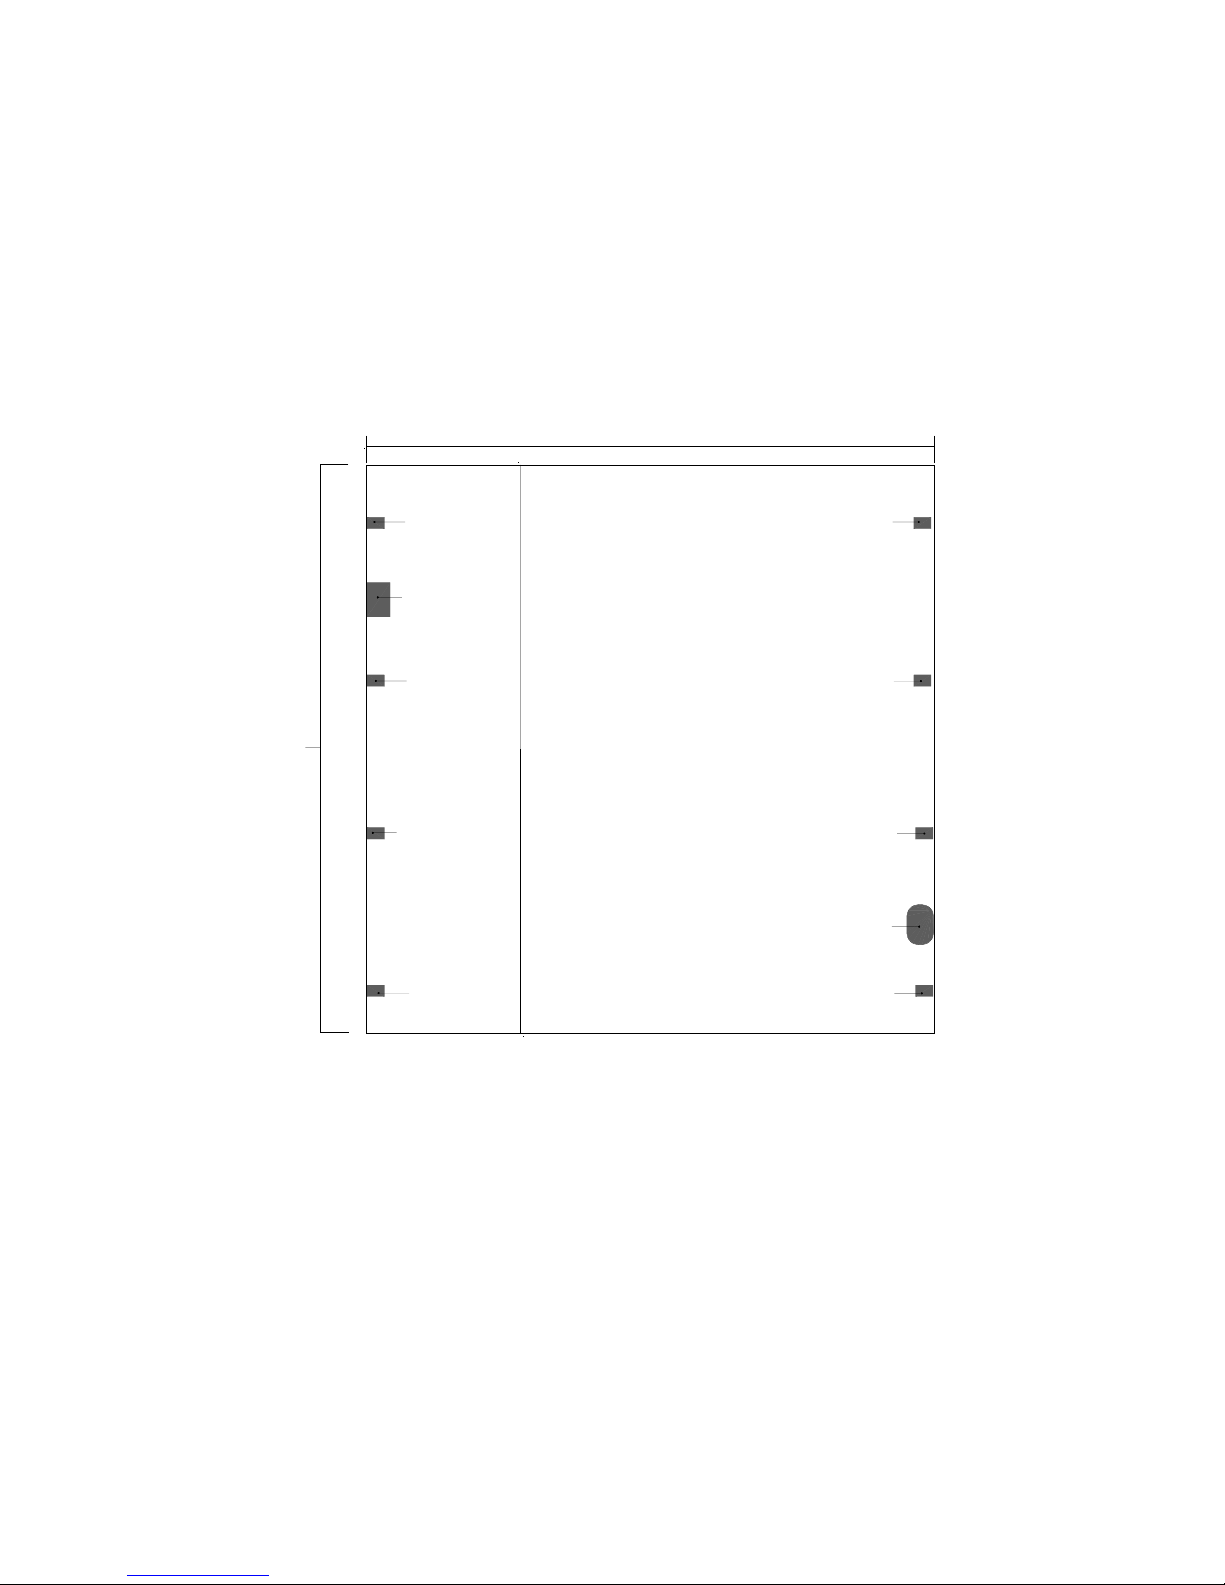
FIGURE 1 - REMOTE SOUND SYSTEM CABINET
EC9258-01
(subwoofer)
EC0066-01
(amplifier)
WD0041-01
(enclosure)
SW4025-01
(on/off switch
and receptacle)
COPYRIGHT © 2003 MERIT INDUSTRIES, INC.

RIGHT
REMOTE
SATELLITE
SPEAKER
LEFT
REMOTE
SATELLITE
SPEAKER
3600
SQUARE
FEET
RIGHT
SATELLITE
SPEAKER
MEGATOUCH
COMBO
JUKEBOX
LEFT
SATELLITE
SPEAKER
2ND RIGHT
REMOTE
SATELLITE
SPEAKER
2ND LEFT
REMOTE
SATELLITE
SPEAKER
ATTACHED TO REMOTE SOUND SYSTEM
SUBWOOFER
WITH AMP
2ND LEFT
SATELLITE
SPEAKER
2ND RIGHT
SATELLITE
SPEAKER
REMOTE SOUND SYSTEM
FIGURE 2 - BAR/RESTAURANT SOUND SYSTEM LAYOUT
3 REMOTE SOUND SYSTEM™ INSTALLATION MANUAL PM0397-02
COPYRIGHT © 2003 MERIT INDUSTRIES, INC.

2ND RIGHT
REMOTE
SATELLITE
SPEAKER
2ND LEFT
REMOTE
SATELLITE
SPEAKER
RIGHT
REMOTE
SATELLITE
SPEAKER
SUBWOOFER
WITH AMP
LEFT
REMOTE
SATELLITE
SPEAKER
30'-0"
RIGHT
SATELLITE
SPEAKER
MEGATOUCH
COMBO
JUKEBOX
LEFT
SATELLITE
SPEAKER
50'-0"
2ND
RIGHT
SATELLITE
SPEAKER
REMOTESOUNDSYSTEM
1500 SQUARE FEET
2ND
LEFT
SATELLITE
SPEAKER
FIGURE 3 - LARGE RECTANGLE ROOM (1) SOUND SYSTEM LAYOUT
PM0397-02 REMOTE SOUND SYSTEM™ INSTALLATION MANUAL 4
COPYRIGHT © 2003 MERIT INDUSTRIES, INC.

2ND LEFT
REMOTE
SATELLITE
SPEAKER
RIGHT
REMOTE
SATELLITE
SPEAKER
SUBWOOFER
WITH AMP
LEFT
REMOTE
SATELLITE
SPEAKER
RIGHT
SATELLITE
SPEAKER
1500 SQUARE FEET
MEGATOUCH
COMBO
JUKEBOX LEFT
SATELLITE
SPEAKER
2ND
RIGHT
SATELLITE
SPEAKER
50'-0"
2ND
RIGHT
REMOTE
SATELLITE
SPEAKER
REMOTESOUNDSYSTEM
30'-0"
2ND
LEFT
REMOTE
SATELLITE
SPEAKER
FIGURE 4 - LARGE RECTANGLE ROOM (2) SOUND SYSTEM LAYOUT
5 REMOTE SOUND SYSTEM™ INSTALLATION MANUAL PM0397-02
COPYRIGHT © 2003 MERIT INDUSTRIES, INC.
50'-0"
50'-0"
2ND
RIGHT
REMOTE
SATELLITE
SPEAKER
2ND LEFT
REMOTE
SATELLITE
SPEAKER
RIGHT
REMOTE
SATELLITE
SPEAKER
SUBWOOFER
WITH AMP
LEFT
REMOTE
SATELLITE
SPEAKER
RIGHT
SATELLITE
SPEAKER
MEGATOUCH
COMBO
JUKEBOX
LEFT
SATELLITE
SPEAKER
2500 SQUARE FEET
2ND
RIGHT
SATELLITE
SPEAKER
2ND
LEFT
SATELLITE
SPEAKER
REMOTESOUNDSYSTEM
FIGURE 5 - LARGE SQUARE ROOM SOUND SYSTEM LAYOUT
PM0397-02 REMOTE SOUND SYSTEM™ INSTALLATION MANUAL 6
COPYRIGHT © 2003 MERIT INDUSTRIES, INC.

Installation
Once you’ve selected a suitable location,
you are ready to install the Remote Sound
System™.
Connecting the Remote Sound
System to a MegaTunes™ Unit or
Megatouch Combo Jukebox™
1. Connect one end of the supplied RCA
connectors (white to left, red to right)
to the left and right stereo inputs on
the Remote Sound System™ cabinet
(see Figure 6).
2. Connect the other end of the supplied
RCA connectors to the left and right
ZONE 1 (or ZONE 2 if you already have
one sound system connected) out-
puts on the Single Board Computer in-
side the Megatunes™ unit or
Megatouch Combo Jukebox™ (see
Figure 7).
FIGURE 6 - REMOTE SOUND SYSTEM AUDIO CONNECTIONS
Right Speaker
Left Speaker
L
R
SPEAKER
CONNECTORS
LEFT AND RIGHT
STEREO INPUTS
7 REMOTE SOUND SYSTEM™ INSTALLATION MANUAL PM0397-02
COPYRIGHT © 2003 MERIT INDUSTRIES, INC.

FIGURE 7 - SINGLE BOARD COMPUTER CONNECTIONS
Installing Speakers
Follow the instructions below to install the
(2) supplied speakers once you’ve decided
on an appropriate location.
NOTE: The supplied speakers will be
configured as ZONE 1 in the
TouchTunes® software if you do not
have an existing sound system
connected, or ZONE 2 otherwise.
Connecting Speakers
3. Connect one end of a length of speaker
wire to the input terminals on one of
the speakers and take note which
sides of the wire are connected to the
(+) and (-) connectors. See Figure 6.
4. Connect the other end of the speaker
wire to the cabinet so the (+) and (-)
speaker connectors run to the red and
black connectors on the cabinet, re-
spectively. See Figure 6.
NOTE: To avoid short-outs, make sure
all strands of the exposed wire are prop-
erly connected to the speakers and
subwoofer.
5. Repeat steps 3-4 to connect the other
speaker.
6. Plug in and turn on the Remote Sound
System.
PM0397-02 REMOTE SOUND SYSTEM™ INSTALLATION MANUAL 8
COPYRIGHT © 2003 MERIT INDUSTRIES, INC.
REMOTE
CONTROL
BOARD
PHONE LINE
ETHERNET
HUB
SPEAKERS

For additional assistance, after contacting your distributor, contact:
TouchTunes® Technical Support
1-888-711-JUKE (5853)
Merit Product Support and Services
USA and Canada call toll-free:
1-800-445-9353
Outside the USA and Canada call:
(215) 639-4700
FAX: (215) 639-5346
Merit Industries, Inc. P.O. Box 5004, Bensalem, PA 19020-8529.
You can also visit our Web site
www.meritind.com
Remote Sound System Parts List
QTY PART NUMBER DESCRIPTION
1 WD0041-01 REMOTE SOUND SYSTEM ENCLOSURE
1 EC9258-01 12" SUBWOOFER
1 EC0066-01 250W AMPLIFIER
2 EC9259-01 200W SPEAKER
2 WR0003-02 50' SPEAKER WIRE
1 EC0081-01 2000MM RCA CONNECTOR
9 REMOTE SOUND SYSTEM™ INSTALLATION MANUAL PM0397-02
COPYRIGHT © 2003 MERIT INDUSTRIES, INC.

NOTES:
__________________________________________________________________
_______________________________________________________________
________________________________________________________________
___________________________________________________________________
_______________________________________________________________
________________________________________________________________
__________________________________________________________________
_________________________________________________________________
______________________________________________________________
________________________________________________________________
___________________________________________________________________
__________________________________________________________________
_________________________________________________________________
_____________________________________________________________________
___________________________________________________________________
___________________________________________________________________
__________________________________________________________________
___________________________________________________________________
__________________________________________________________________
________________________________________________________________
_________________________________________________________________
_________________________________________________________________

REMOTE SOUND SYSTEM INSTALLATION MANUAL
PM0397-02
Table of contents
Popular Media Converter manuals by other brands

Precision Power
Precision Power PowerClass DAC348 owner's manual

MSB Technology
MSB Technology The Reference DAC user guide

Cisco
Cisco Cisco Aironet 1100 quick start guide

Moxa Technologies
Moxa Technologies TCF-142-M-ST Quick installation guide

Omega Engineering
Omega Engineering IP210 user guide

Sundrax
Sundrax ArtGate Series user manual


