Merits Roadster S4 User manual

1
www.meritsusa.com
Owner’s
Manual
S741
Roadster S4

2
S741
Table of Contents
Introduction
Practice before Operating ...............................................................................................................4
Safety Instructions Safety
Safety
Considerations ................................................................................................................ 6
Driving Outdoors ....................................................................................................................... 9
Use caution when driving on inclines ...........................................................................................11
Familiarize Yourself with your Scooter
The Batteries ..................................................................................................................... 13
Terminology....................................................................................................................................15
Diagram ..........................................................................................................................................16
Disassembly and Assembly ...........................................................................................................17
Operating your Scooter
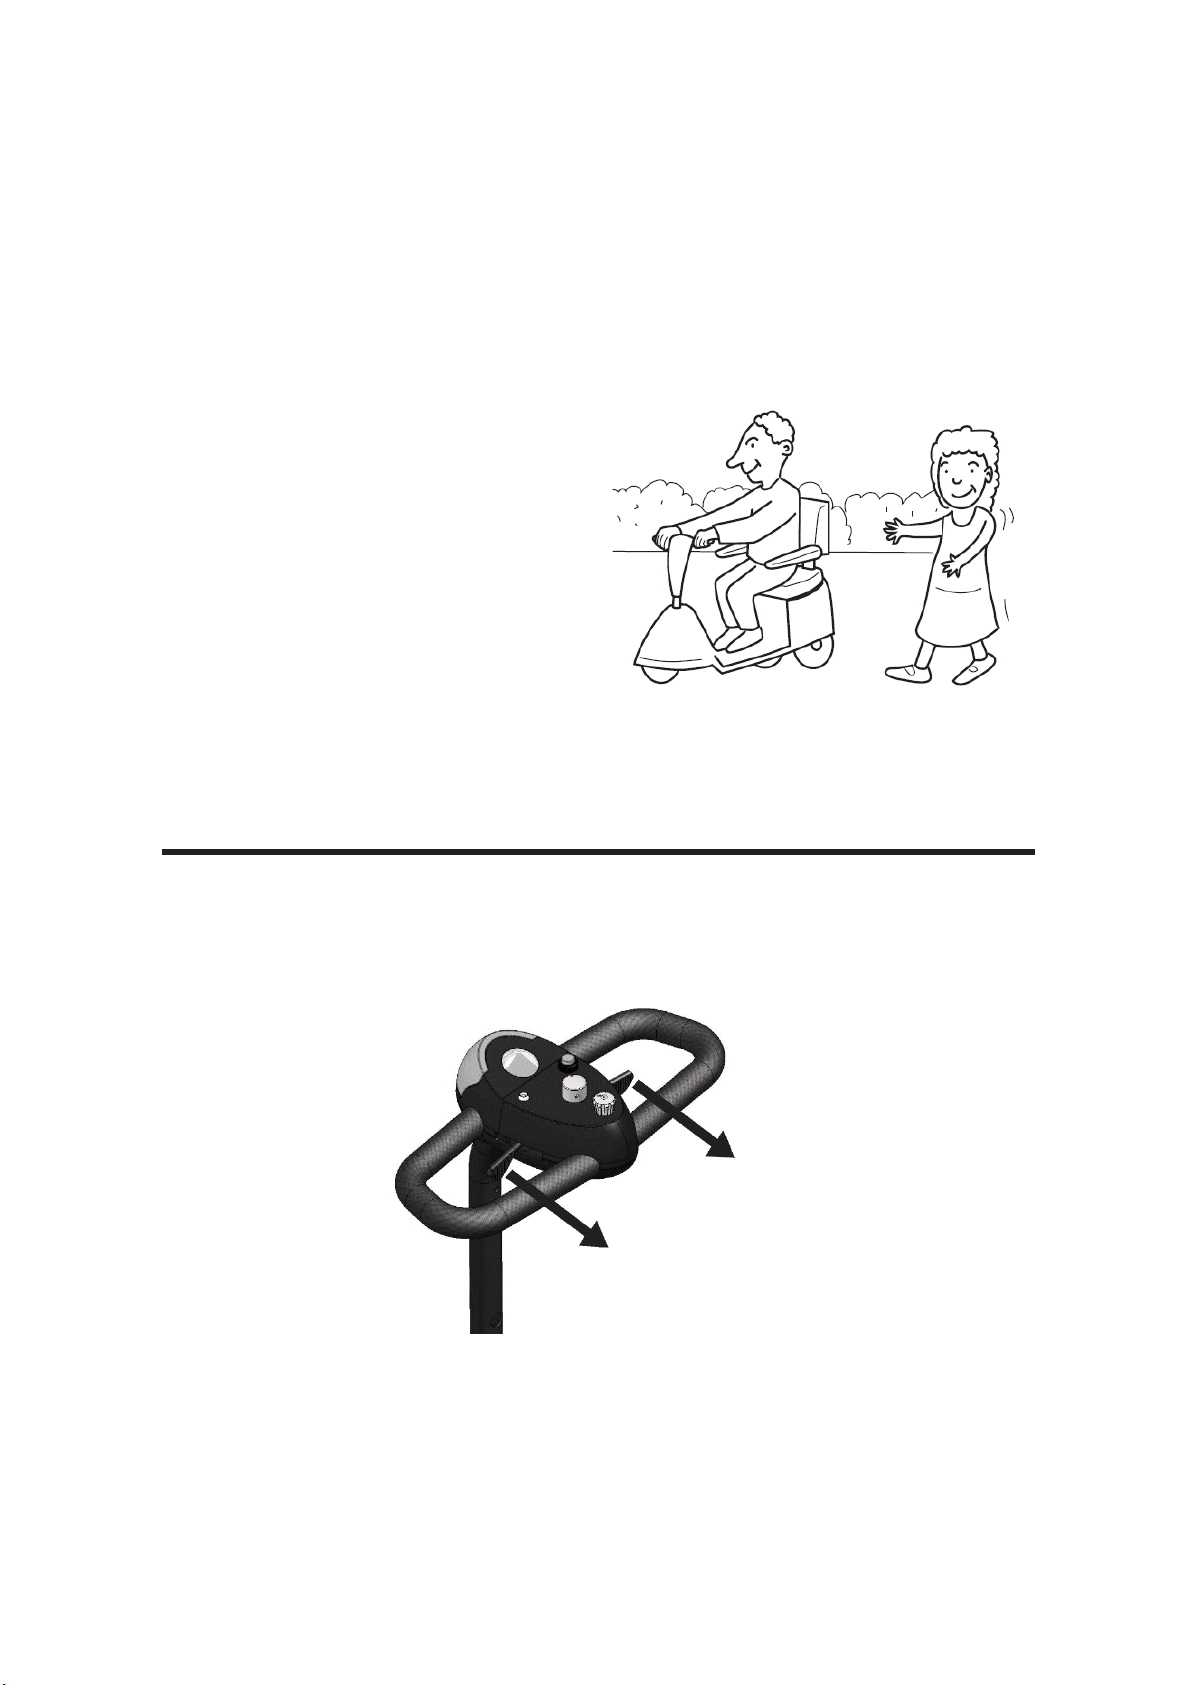
Controls .........................................................................................................................................19
Seat ................................................................................................................................................20
Tiller Angle Adjustment ..................................................................................................................22
Technical Specifications –S741 ....................................................................................................23
ICE Symbols ......................................................................................................................................14
Warranty ............................................................................................................................................25

3
Welcome aboard your new scooter and thank you for choosing our product. Please read
this manual carefully and follow all instructions before attempting to operate your scooter
for the first time. If there is anything in this manual that you do not understand, or if you
require additional assistance for setting up your scooter, please contact your local dealer.
This latest model is designed for specific practical user needs, combining solid, rugged
construction, and modern high-tech electronics, to enhance safety and performance.
With a state-of-the-art, programmable electronic control system, your scooter can be
programmed and adjusted within a given range of its performance
characteristics, to suit
your individual needs. The controller is set up at the factory
to give the scooter nominal
operating performance characteristics.
After becoming familiar with the basic operation of the scooter, you may wish to
customize the settings to fit your own personal preferences. A wide range of
customization options can be adjusted such as acceleration, deceleration, maximum
speed, turning speed, safety controls, and so on. Contact your local dealer for advice on
additional equipment you may need.
Having your scooter checked regularly by your local dealer is the best way to ensure
smooth operation and safety.
This manual provides users practical tips and information on safety issues, operation, and
maintenance. Please read it very carefully to ensure your maximum enjoyment and to fully
benefit from your independence and mobility.
Whenever special advice or attention is needed, please contact your local dealer, who has
the tools and knowledge to provide expert servicing for your scooter.
Your satisfaction and opinions are highly valued by both your local dealer and Merits.
Please be sure to fill out the enclosed warranty registration form and return it to your local
dealer. The information is necessary for providing you with the best service, and to be
sure all your needs are met.
4
Practice Before Operating
Find an open area such as a park and have an assistant help you practice until you have
confidence operating this vehicle.
Make sure the unit is OFF before getting on
or off. Set the speed control knob
according to your driving ability.
We recommend that you keep the
speed at the slowest position
(fully
counterclockwise) until you are
familiar with the driving characteristics
of this vehicle.
Stop, forward, and reverse operation practice
Push the lever forward on the
right side to move FORWARD
Push the lever forward on the
left side to move BACKWARD

5
Getting familiar with this vehicle
First, practice moving forward.
Be sure to set the speed to the lowest setting.
二
After becoming familiar with moving forward,
practice making "S" turns.
辶[
Once you are familiar with "S" turns, practice
moving in reverse. Note that at any speed control
setting, the vehicle moves more slowly in reverse
than forward.

6
Safety Considerations
NO!
Do not carry any passengers
NO!
Do not drink and drive
Consult your physician to
determine if your medications
impair your ability to control
this vehicle
NO!
Do not drive across a slope
NO!
Do not tow a trailer
NO!
Do not turn on or use hand-held personal
communication devices such as citizens band (CB)
radios and cellular phones

7
This vehicle has an immunity level of 20 V/m which should protect it from
Electromagnetic interferences (EMI) from Radio Wave Sources. The rapid development
of electronics, especially in the area of communications, has saturated our environment
with electromagnetic (radio) waves that are emitted by television, radio and
communication signals. These EM waves are invisible,
and their strength increases as one
approaches the source. All electrical conductors act as antennas to the EM signals and, to
varying degrees, all power wheelchairs
and scooters are susceptible to electromagnetic
interference
(EMI). This interference
could result in abnormal, unintentional movement
and/or erratic control of the vehicle. The United States requires the proceeding statement
be incorporated into the user manuals for all electric powerchairs and scooters.
Powered wheelchairs and electric scooters (in this text, both will be referred to
as
powered wheelchairs) may be susceptible to electromagnetic interference (EMI),
which is
interfering electromagnetic energy emitted from sources such as radio stations, TV
stations, amateur radio (HAM) transmitters, two-way radios and cellular phones. The
interference (from radio wave sources) can cause the powered wheelchair to release its
brakes, move by itself or move in unintended directions. It can also permanently damage
the powered wheelchair's control system. The intensity of the EM energy can be
measured in volts per meter (V/m). Each powered wheelchair can resist EMI up to a
certain intensity. This is called the "immunity level." The higher the immunity level, the
greater the protection. At this time, current technology can provide at least 20 V/m of
immunity level which would provide useful protection against common sources of
radiated EMI.
Following the warnings listed below should reduce the chance of unintended
brake
release or powered wheelchair movement that could result in severe injury:
1) Do not turn on hand-held personal communication devices such as citizens
band
(CB) radios and cellular phones while the powered wheelchair is turned on.
2)
Be aware of nearby transmitters such as radio or TV stations and try to avoid
coming close to them.

8
3) If unintended movement or brake release occurs, turn the powered wheelchair off as
soon as it is safe.
4)
Be aware that adding accessories or components, or modifying the powered
wheelchair, may make it more susceptible to interference from radio wave sources.
(Note: there is no easy way to evaluate their effect on the overall immunity of the
powered wheelchair).
5)
Report all incidents of unintended movement or brake release to the powered
wheelchair manufacturer and note whether there is a radio wave source nearby.
TURN OFF YOUR SCOOTER AS SOON AS POSSIBLE WHEN EXPERIENCING ANY
OF THE FOLLOWING:
1.
Unintentional
motions.
2.
Unintended or uncontrollable direction.
3.
Unexpected brake release.
The FDA has written to the manufacturers of power wheelchairs, asking them to test
their new products to ensure they provide a reasonable degree of
immunity against
EMI. The letter states that powered wheelchairs should have
an immunity level of at
least 20 V/m, which provides a reasonable degree of protection against the more
common sources of EMI. The higher the level, the greater the protection.

9
Driving Outdoors
NO!
Do not drive in traffic.
\
丶
NO!
Do not drive beside a river,
port or lake without a fence
or railing.
NO!
If possible, do not drive in the rain.
NO!
If possible, do not drive
in or on the snow.
NO!
Do not drive off-road or
on uneven surfaces.
NO!
If possible, do not drive
at night
\
丶
10
NO!
Make sure there are no obstacles behind you
when in reverse.
We recommend setting the speed knob at the lowest
speed for reversing.
NO!
Do not
make sudden stops, weave erratically,
or make sharp turns.
NO!
Keep your arms on or inside the armrests and
feet on the footrest at all times.
NO!
Do not attempt to climb curbs greater that 1.5"(4cm).
NO!
Do not attempt to cross over a gap greater than
3"(7.5cm).
11
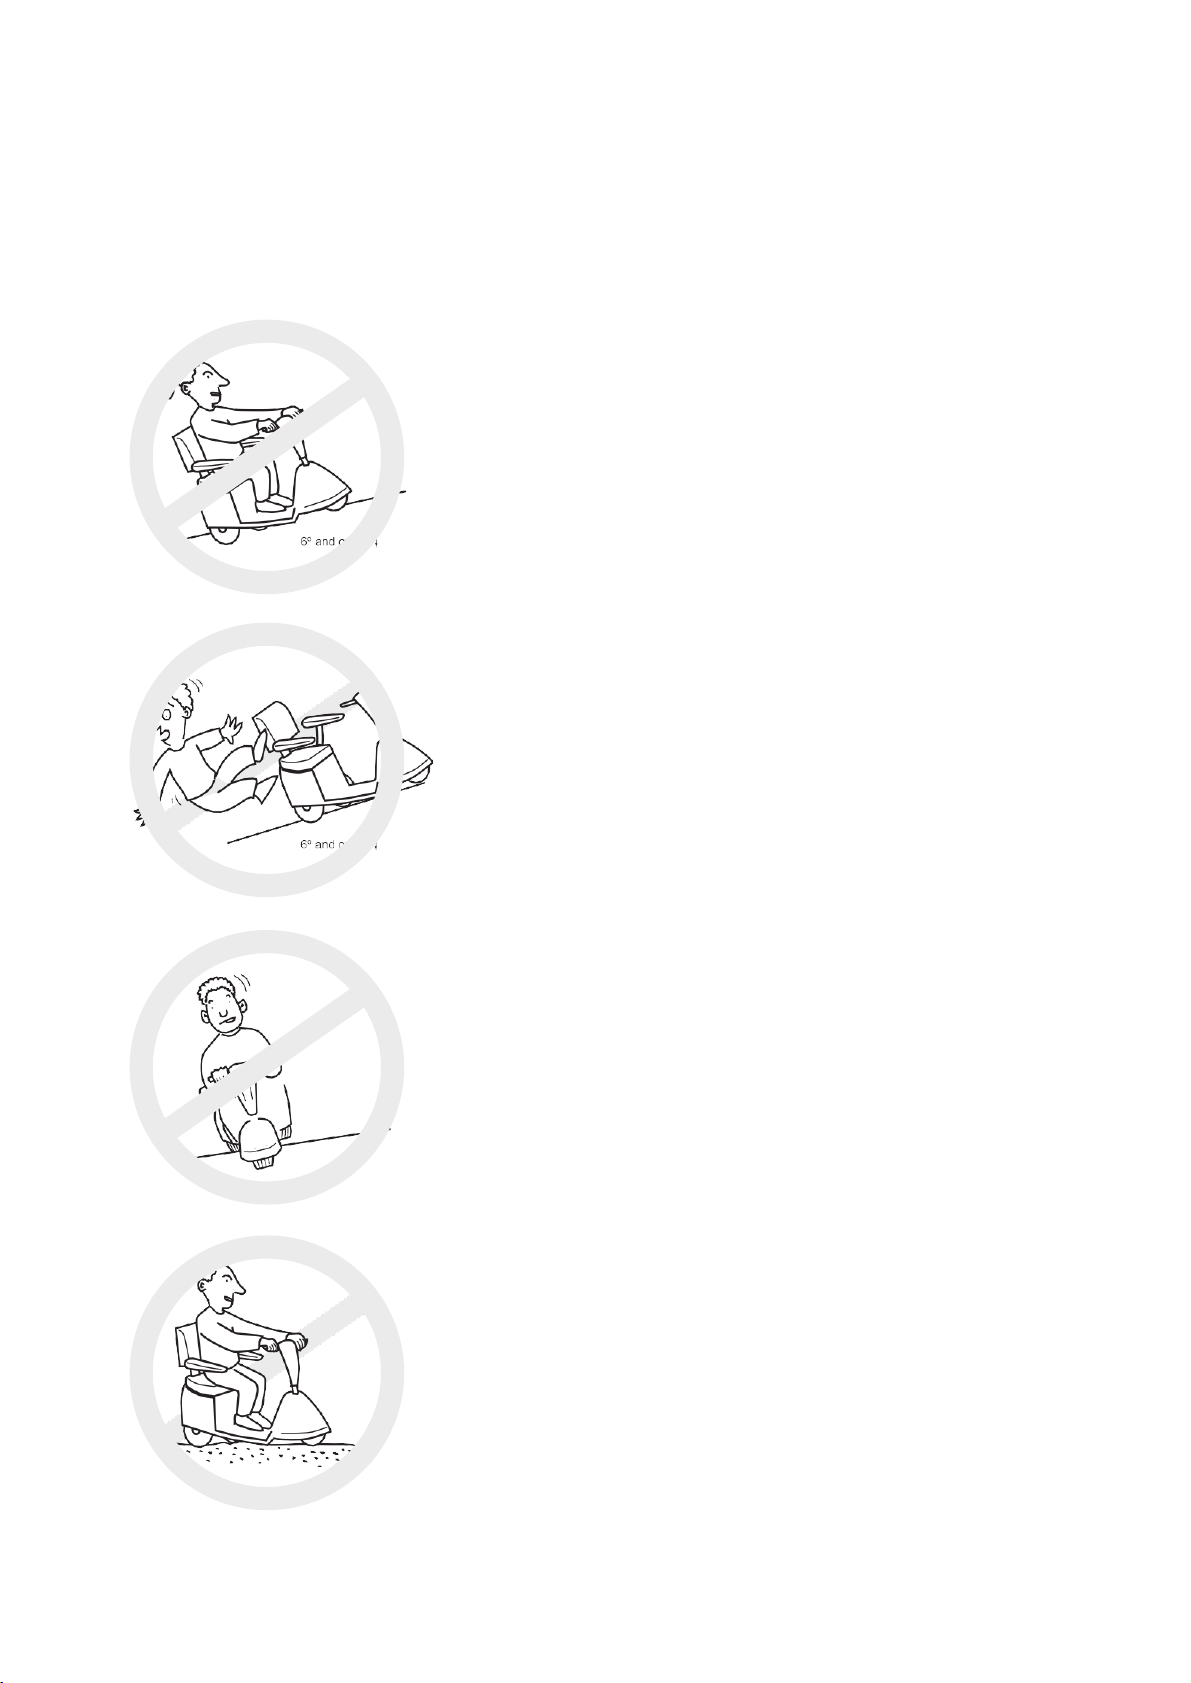
Use caution when driving on inclines
NO!
Do not attempt to climb an incline greater than 6°
NO!
Do not reverse while driving up an incline.
Forward only. If you reverse while moving up an incline,
it may cause the vehicle to tip over.
丶
3° and over I
NO!
Do not attempt to drive across a sloping surface
greater than 3°
Driving across a slope greater than 3° is very dangerous
and may cause the vehicle to tip over.
NO!
Use caution when driving over soft, uneven, or
unprotected surfaces such as grass, gravel, and
decks.

12
NO!
Do not get on or off on an incline.
Always stop on a level surface to get on or off
the vehicle.
NO!
Use low speed while driving down an incline.
When going down an incline, the tiller will become
harder to reach and handle. When braking while moving
down an incline, the scooter will take longer to come
to a complete stop.
NO!
Do not load or carry heavy items in the basket
while driving down an incline.
YES!
Always climb or descend gradients perpendicular
to the slope or ramp.
13
The Batteries
Your scooter is equipped with a removable battery pack, which contains two
maintenance free, sealed lead-acid batteries. These batteries require no
maintenance other than ensuring they are properly charged. If other batteries
are
used, check with your battery supplier for proper battery care and maintenance
instructions.
To Charge
1.
Plug the charger’s power cord into the battery pack.
2.
If required, remove the battery pack.
3.
Pull the end of the rubber cover on the battery pack (as shown in photo). Then connect
the charger’s round plug into the charging socket.
4.
Switch on the plug socket.
The battery pack can be charged on-board the scooter (as shown) Alternatively, the batter
pack can be removed from the scooter and charged away from the scooter.
To Remove Battery Pack
1. Switch the ignition key off.
2. Lift the scooter battery pack up by the handle.
To Install Battery Pack
1. Remove the charger from the battery pack.
2. Drop the battery pack into the void on the scooter.
3. Press down lightly on the battery pack to ensure
it is securely installed.
Onboard Charging
Off board Charging
Removing battery

14
4. Ensure the charger is removed from the mains and the scooter or battery pack after charging. Failure to
do this may flatten he battery. Do not remove the battery pack while the scooter is switched on.
1.
Do not disconnect the
charger cord
until charging
is completed and the
light is
lit Green.
2.
When fully charged the battery
charger will still trickle charge the
battery for optimum range.
3.
Even when not in use, the scooter
should be charged at least every
week
to ensure battery longevity.
4.
Ambient temperature will affect
charging time. Charging time will be
longer in cold environments.
5.
The batteries carry a 1-year
warranty
which covers
manufacturing defects
only. It does
not cover battery faults
as a result of
not following the
guidelines herein.
1.
Only use the charger supplied with the
scooter. Using the wrong type of
charger may cause damage. Never
disassemble or modify the scooter.
2.
Always charge the scooter in a well
-
ventilated
space. Avoid direct
sunlight
or contact with water and
moisture.
3.
Do not charge or operate the scooter
in temperatures below -10ºC or above
50ºC. Do not expose the battery pack
to these temperatures.
If battery pack loses contact with the
scooter during operation switch the key
ignition off, re-insert the battery pack
and switch the ignition back on.
About the Battery Pack
•
The battery pack contains two 12V
12ah
batteries. The batteries are sealed
lead acid type
and are maintenance
free and are non-spillable.
They are
fitted with spade terminals.
•
The batteries require charging every
week to
ensure battery longevity.
•
The batteries supplied as standard
with the
battery pack are classified
as safe for air
transport under IATA
special provision A67.
Battery Care
1. You should recharge the batteries after
each time the scooter is used to ensure
maximum battery range. The batteries
should be charged at least once a week
even if the scooter is not used.
2. After charging or replacing a new
battery, drive the scooter for a short
period to ensure battery capacity is
sufficient.
3. In cold environments, the battery may
respond more slowly, and range will be
reduced.
4. When driving on a gradient, the battery
gauge will fluctuate. This is a normal
occurrence.
5. Battery range is reduced when driving
up gradients or on rough terrain, as the
scooter uses more power.
6. The batteries should not be charged for
more than 24 hours.
Battery Replacement
It is natural for the battery capacity to
reduce with
time, even if the battery is
charged as directed
above. When the
battery range is about half of its peak
performance, we recommend that the
batteries are changed. Continuing to
use an old
battery will result in a rapid
reduction in the range
of the scooter
and can cause excessive wear and
tear
on other parts of the scooter.

15
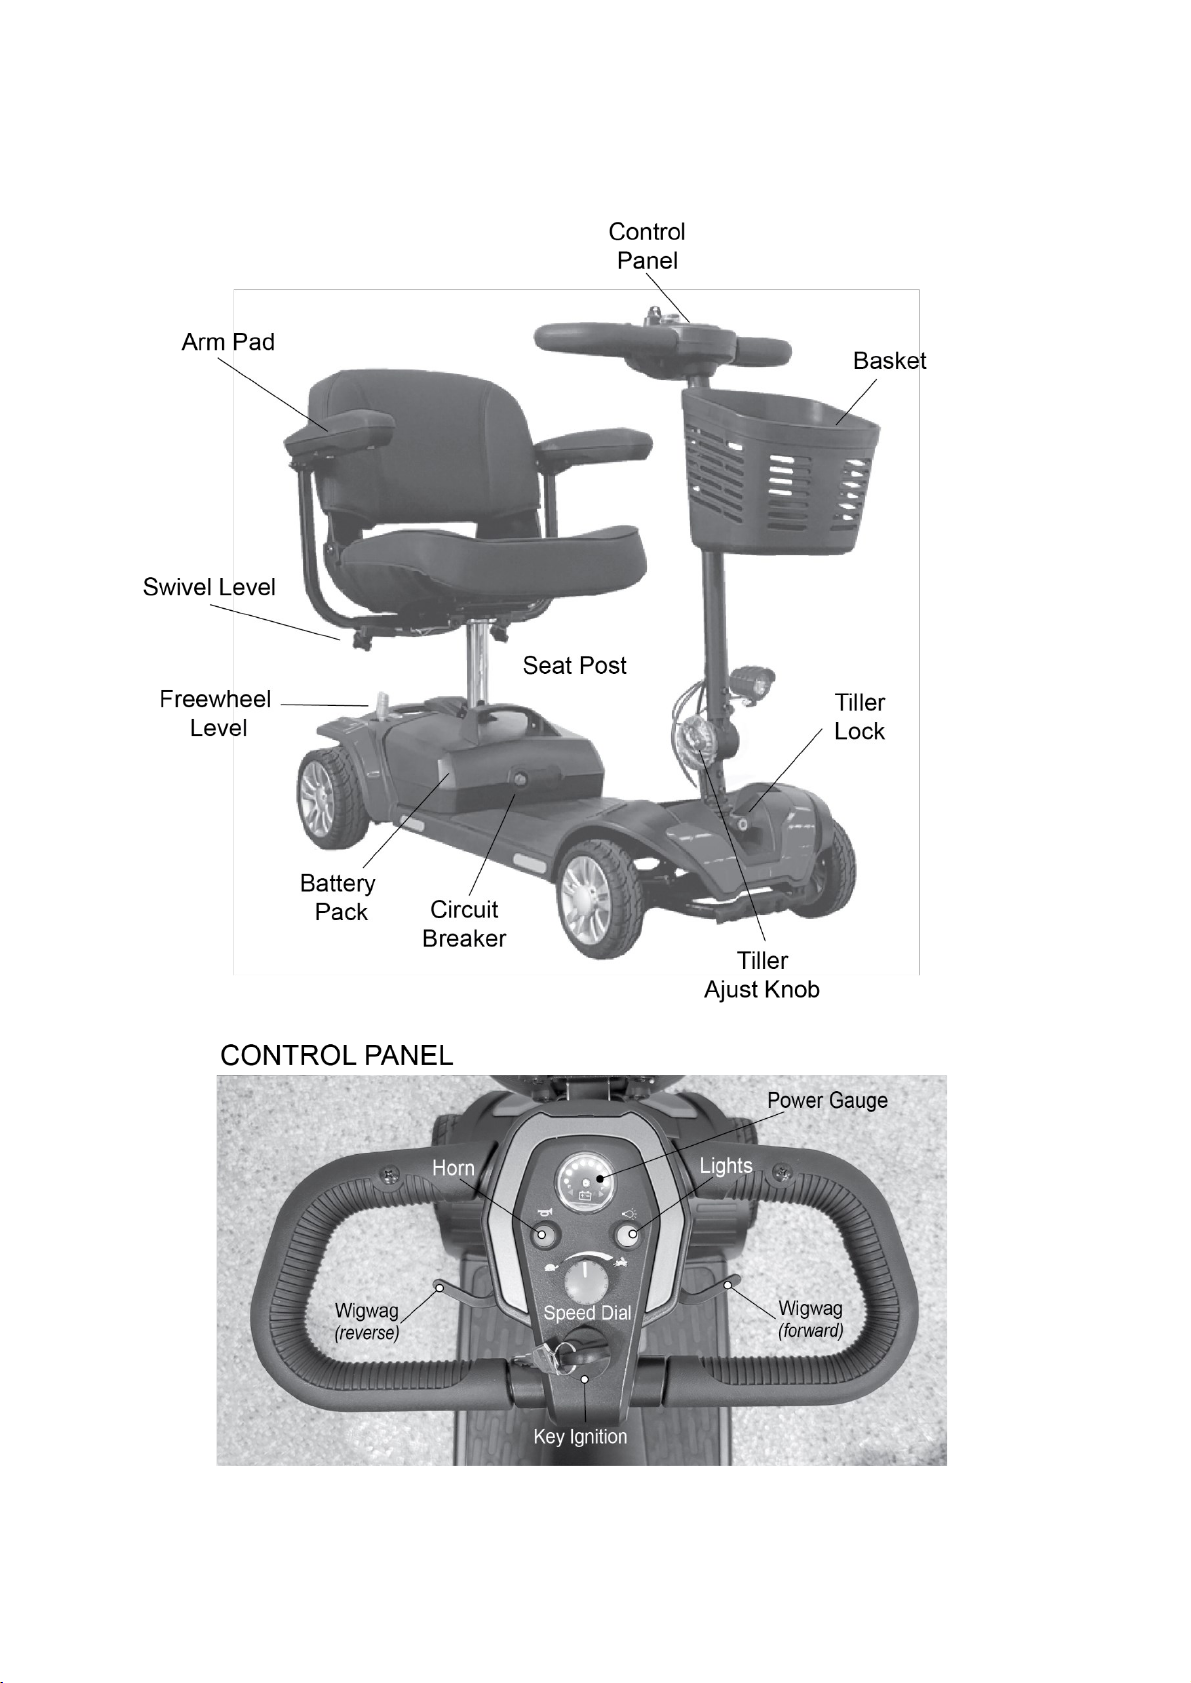
Terminology
1. Tiller - Similar in operation to the handlebars of a bicycle, this device is used to
steer the vehicle. It also contains the controls necessary to propel and control the
vehicle.
2. Tiller angle Adjustment Knob - When loosened, allows the tiller angle to be set
for optimum driver comfort. During operation of the vehicle, this lever must be fully
tightened.
3. Operator's Seat - This adjustable seat can be swiveled to ease mounting
and dismounting to / from the vehicle and can be removed for easier
transportation of the vehicle.
4. Anti-tip Wheels - Not visible in figure but positioned one each side of the vehicle at
the rear, these wheels prevent a tip-over backwards.
5.
Pin Key - "Plug in" is on, "Pull up" is off.
6. Wig-Wag Control Lever - this is used to control the speed and direction of drive.
7. Manual brake Release - This lever must be in the lower position to drive the vehicle.
In this position the electric brake is controlled by the vehicle controller, will be
released for drive, and engaged when stopped. On occasions when it is desirable
to push the vehicle, this lever is moved to the upper position to permanently hold
the brake release. When the Manual Brake Release lever is in the upper position,
the vehicle cannot be driven under power.
8.
Removable Battery Pack - This pack holds the two 12-volt batteries and the battery
charger. This module can be removed from the vehicle to reduce the vehicle weight
when you intend to lift the vehicle. i.e.- into the trunk of a vehicle.
9.
Removable Front Basket - This basket clips to the front of the tiller and is used
to carry small personal items.
10. Arm-Rests - are width and angle adjustable. (See seating adjustments later in this
manual).
11. Anti-tip Wheels - Not visible in figure but positioned one each side of the vehicle at
the rear, these wheels prevent a tip-over backwards.
16
Diagram
17
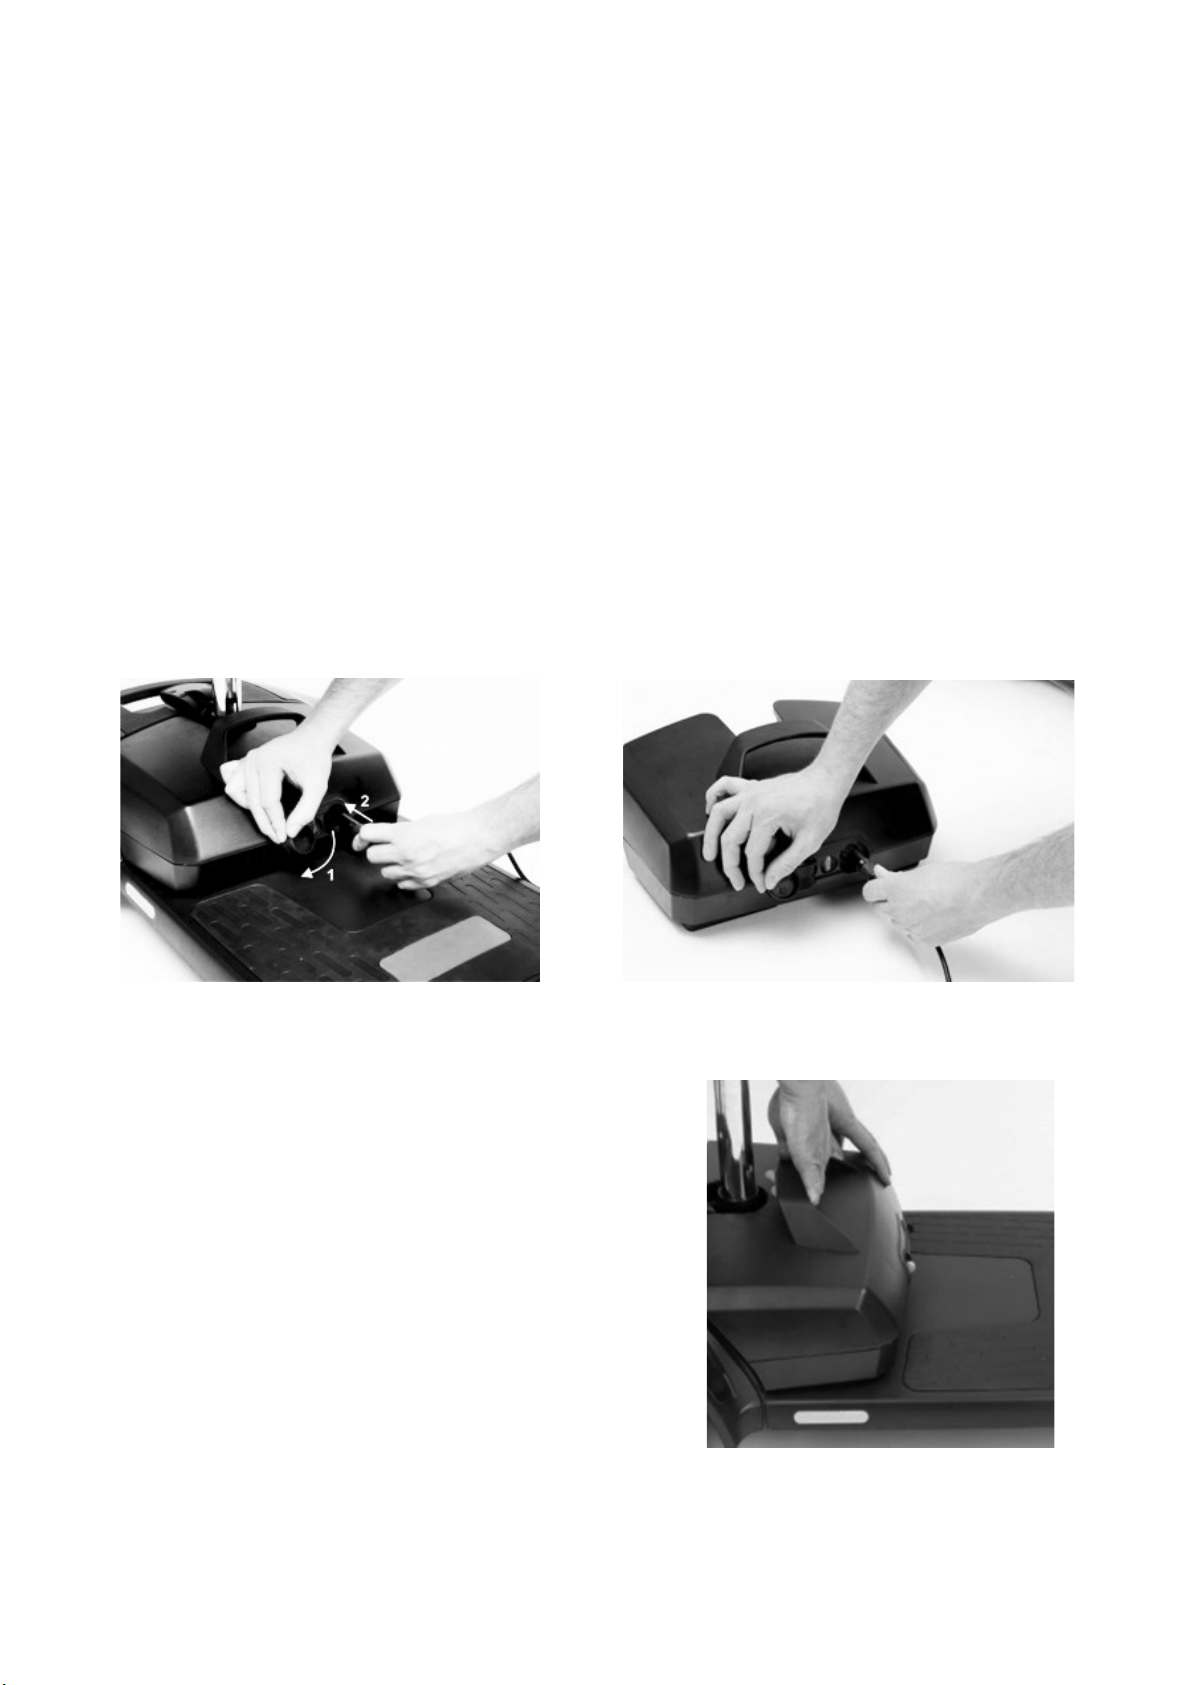
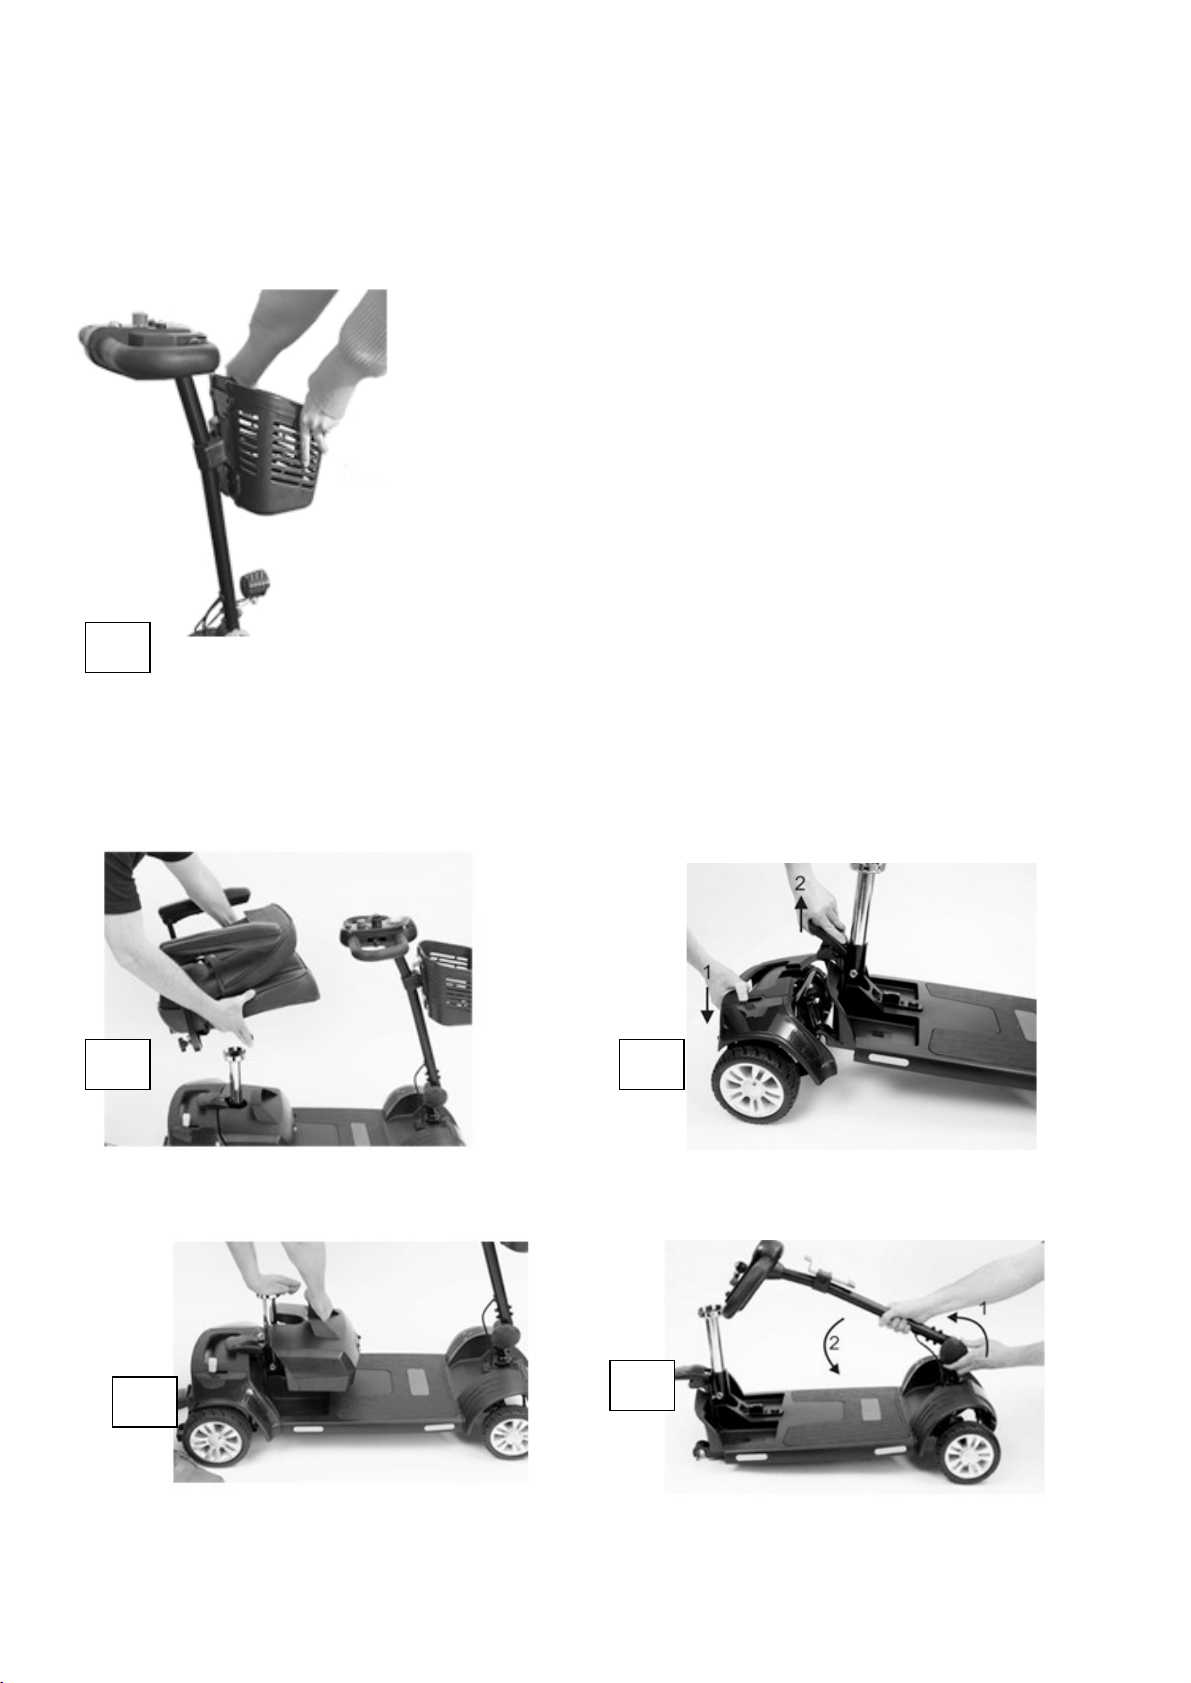
Disassembling the Scooter
The scooter can be disassembled into five parts for easy transportation and/or storage:
1. Lift basket up to remove it from front tiller.
2. Remove the seat. Push the seat swivel lever forward and
then pull on the seat whilst rotating the seat.
3. Remove the Battery Pack. Pull up on the battery pack
handle to remove.
4. Separate the front and rear sections. Press down on the
handle of the rear section whilst pulling up using the lever on
the front section.
5. Lower the tiller on the front section. Turn the tiller adjustment
knob to loosen then lower the tiller. Turn the Tiller slightly so
the Tiller will fold flat without hitting the seat post.
1
2
3
4
5
18
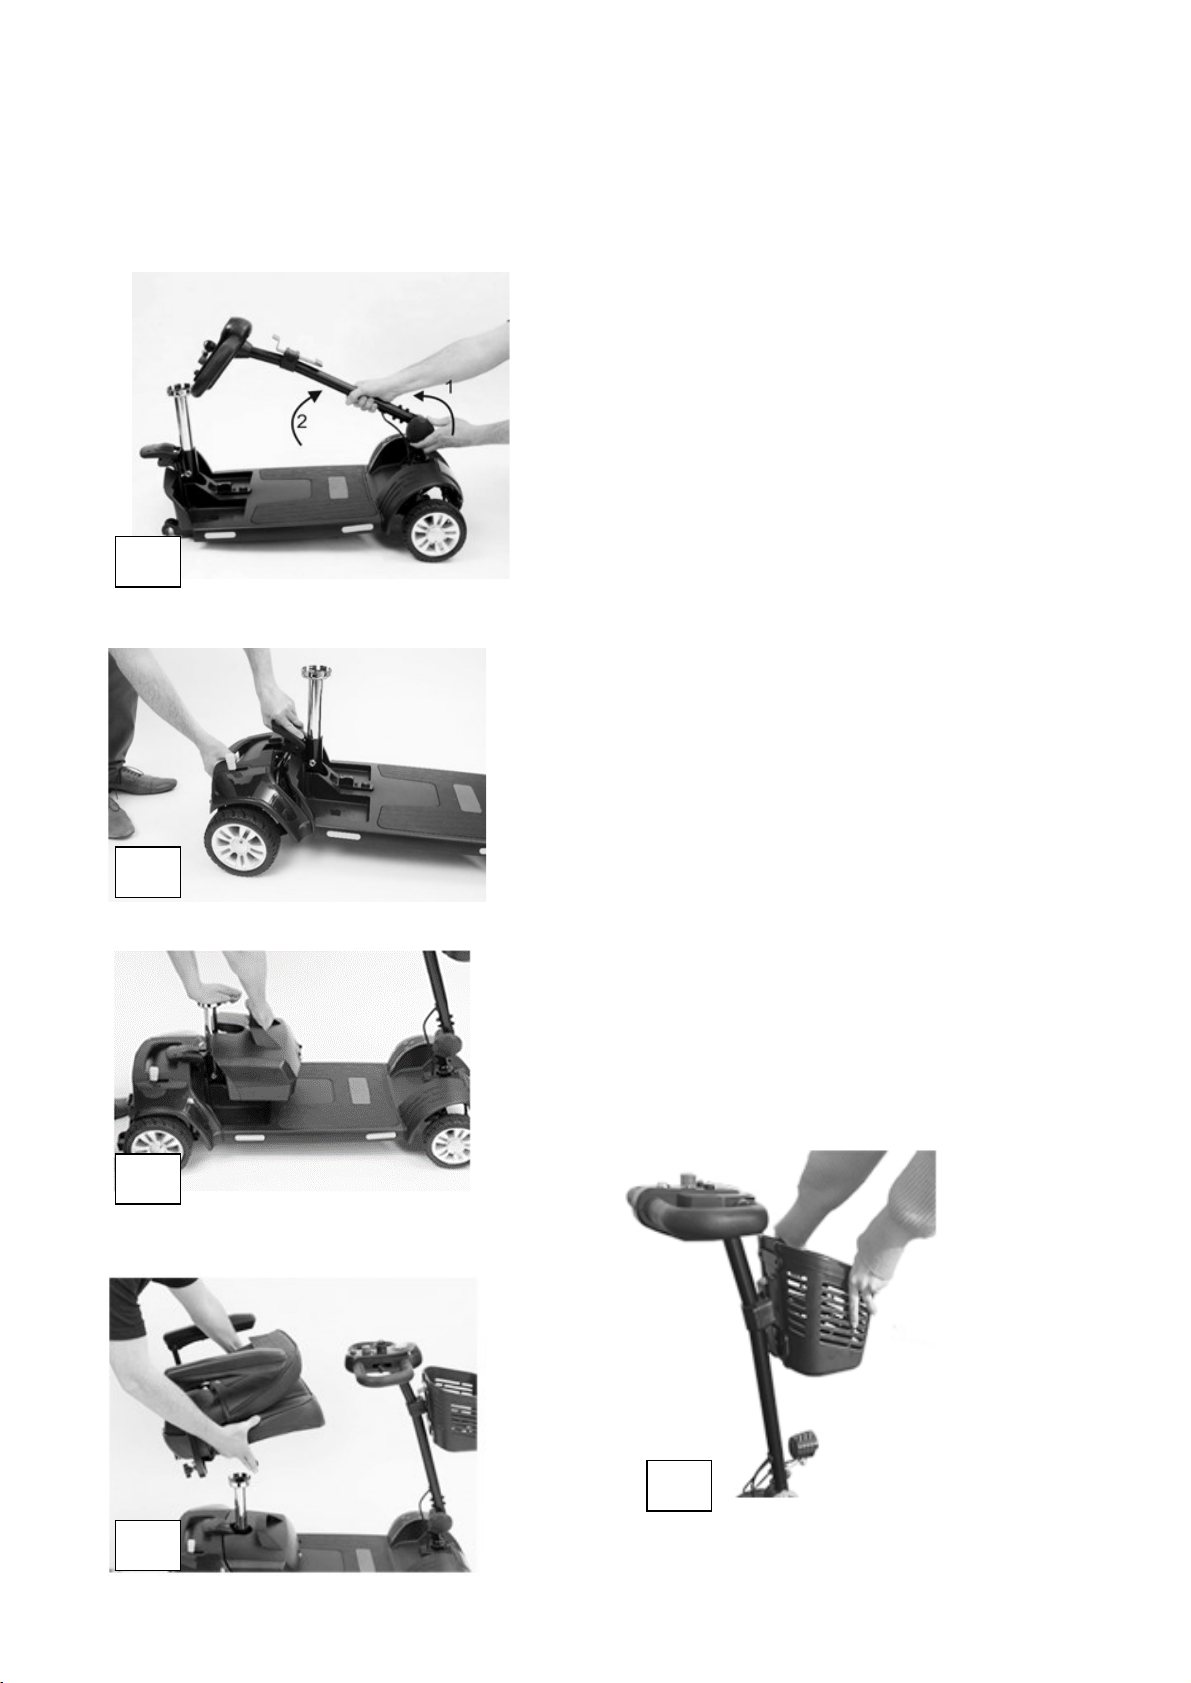
Assembling the Scooter
Use the procedure below to assemble the scooter:
1. Raise the tiller on the front section. Turn the
tiller adjustment knob towards the rear of the
scooter and then lift up on the tiller by turning
the knob towards the front of the scooter.
2. Connect the front and rear sections together.
Hold the back of the rear section and lift the
front section into place using the lever. Then
release the rear section and lower the front
section with the lever. Release the lever and
ensure the sections are securely linked.
3. Drop the battery pack into the void in the
scooter. Press lightly on the top of the battery
pack to ensure the battery pack is fully installed.
4. Insert the seat into the seat post. Push the seat
lever forward and swivel the seat until it locks
into position.
5. Place the basket into the front of the tiller.
1
2
3
4
5

19
How to Operate Your Scooter
Key Ignition. The key ignition acts as the power switch for the scooter. To switch the power
on, turn the key clockwise and the battery gauge should illuminate. To switch the power off,
turn the key counterclockwise, and the key can be removed.
DO NOT turn the ignition off while driving as this will lead to an emergency stop and possible
risk of damage or injury.
Speed Dial. Turn the Speed Dial to determine the maximum speed of the scooter. Turn the
dial clockwise to increase the speed setting and turn the dial counterclockwise to decrease
the speed setting.
DO NOT adjust the speed dial while driving. DO NOT set to the highest speed for indoors.
Moving and Braking. To move forward, squeeze the right-hand side of the wigwag paddle
towards you. To move backwards, squeeze the left-hand side of the wigwag paddle toward
you (audible alarm). To brake, release the wigwag paddle which will return to neutral and
activate the electromagnetic brake automatically and bring the scooter to a prompt stop.
The wigwag paddle allows you to control the speed of the scooter up to a max speed
determined by Speed Dial. The further the wigwag paddle is deflected, the faster the
scooter will go (up to 4mph).
NOTE: wait at least 2 seconds before operating the wigwag paddle after starting the scooter
with the key. Operating the wigwag paddle at the same time as the key switch will cause the
scooter to diagnose an error.
DO NOT push both left- and right-hand sides of the wigwag simultaneously. You will not be
able to control the scooter.
Horn Button. Press the horn button to sound the horn. Release the button to stop the horn.
The horn is the yellow button located on the control panel.
Braking –Electromagnetic Brake. Release the wigwag paddle completely, and the
electromagnetic brake will be activated automatically, and the scooter will stop.
When on a gradient, never set the vehicle to freewheel mode. The brakes will not be applied.
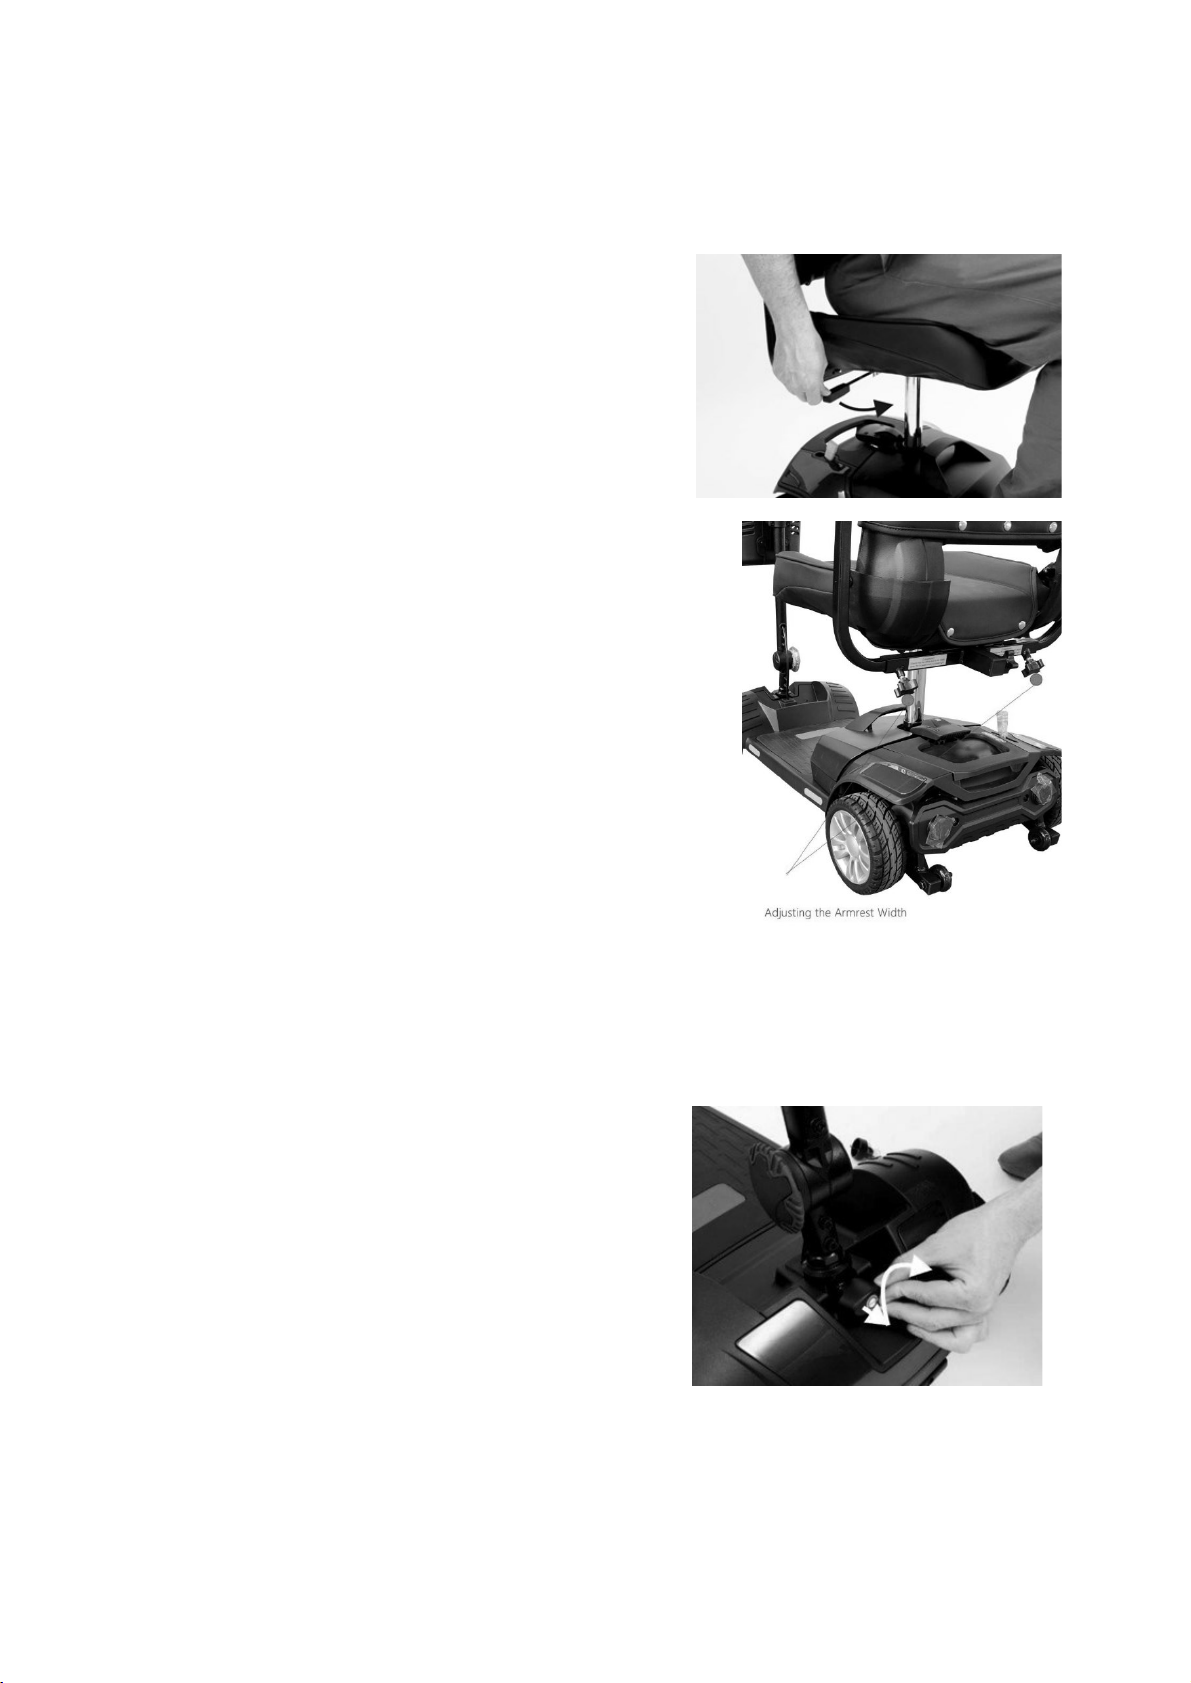
Seat. The seat can be rotated and locked in position at 45º intervals. Push the seat lever
forward and swivel the seat. Release the lever and then continue swiveling the seat until it
locks in position.
NOTE: Return the seat to the forward position before driving.
20
Adjusting the Seat Height
Remove the seat by rotating the seat by pushing
the seat swivel lever forward while pulling up on the
seat. Remove the nut and bolt securing the chrome
post into the chassis of the scooter. Reposition the
seat post to the required height and then secure by
reattaching the nut and bolt.
Adjusting the Armrest Width
Insert the armrest tubing into the seat so that the
armrest is positioned at the required width.
Tighten the threaded knob to securely hold the
armrest in place. Repeat for the other armrest.
Ensure that the armrests are equally positioned
on both sides of the seat.
Ensure the yellow line on the armrest is not visible outside the seat frame, when the
threaded knob is locked tight.
Tiller Lock
When the tiller is centered, pull the tiller lock out
and twist to secure the tiller for transportation.
Push the tiller lock up to release.
Always ensure the tiller lock is disengaged
when driving the scooter. Always check the
tiller moves and turns freely before driving.
This manual suits for next models
1
Table of contents
Other Merits Scooter manuals

Merits
Merits S-342 User manual

Merits
Merits S539 User manual

Merits
Merits S941L User manual

Merits
Merits S337 User manual

Merits
Merits S2455 User manual

Merits
Merits S742A User manual

Merits
Merits S941A User manual

Merits
Merits Pioneer 5 User manual

Merits
Merits S335 User manual

Merits
Merits S836 User manual

Merits
Merits S542 User manual

Merits
Merits Roadster S3 User manual

Merits
Merits S139 User manual

Merits
Merits S-534 PIONEER 5 User manual

Merits
Merits S742 User manual

Merits
Merits S941 User manual

Merits
Merits Pioneer II User manual

Merits
Merits S941 User manual

Merits
Merits S538 User manual

Merits
Merits S930A User manual


