MERRICK Genetix Setup guide

R
RE
EM
MO
OT
TE
E
U
US
SE
ER
R
I
IN
NT
TE
ER
RF
FA
AC
CE
E
w
wi
it
th
h
B
Bl
lu
ue
et
to
oo
ot
th
h®
®
MERRICK Industries, Inc.
10 Arthur Drive
Lynn Haven, FL 32444
+1.850.265.3611
www.merrick-inc.com
SAFETY,
INSTALLATION,
OPERATION AND
MAINTENANCE
MANUAL
Page 2 of 15
Revision History
Rev No. Date Comments
0 21 Oct, 2009 Initial publication
PROPRIETARY NOTE
The information in this manual, including technical data and copies of drawings, embodies information proprietary to
MERRICK Industries, Inc. and this manual is provided to the user of equipment purchased from MERRICK Industries,
Inc. for use only in operation or maintenance of such equipment. Such information in this manual is not to be used,
disclosed, copied, or reproduced in whole or part for any use other than that indicated above, or for any other purpose
detrimental to the interests of MERRICK Industries, Inc. Patents owned by MERRICK Industries, Inc. have been
issued or are pending on at least some of the information in this manual, and unauthorized use of this subject matter
of such patents is a violation of such patents and is prohibited.
Genetix® and WinMerik® are registered trademarks of Merrick Industries, Inc.
Bluetooth® and the Bluetooth logo are the property of the Bluetooth SIG, Inc.
All other registered trademarks are the property of their respective owners.

Page 3 of 15
Table of Contents
INTRODUCTION ..................................................................................................4
SAFETY................................................................................................................5
In General .........................................................................................................5
Special Precautions...........................................................................................5
Technical Support .............................................................................................6
OPERATION.........................................................................................................7
Remote User Interface..........................................................................................7
Standard Operation...............................................................................................8
Powering up the Unit .....................................................................................8
Powering down the Unit.................................................................................8
Connection Menu...........................................................................................8
Connect to <name>....................................................................................9
Select from list............................................................................................9
Add Feeder(s) to List..................................................................................9
Scan for Merrick Feeders .....................................................................10
Enter Bluetooth Address.......................................................................10
Delete Feeder(s) from List........................................................................11
Sort Feeders in List ..................................................................................11
A Note about Feeder Names....................................................................11
Charging the Batteries ........................................................................................13
Checking the Battery Voltage ..........................................................................14
APPENDIX A...................................................................................................15
Bluetooth Interface Card ..........................................................................15

Page 4 of 15
INTRODUCTION
The Genetix Remote Handheld User Interface is a device that allows you to completely
interact with your Genetix controlled Feeder or Scale in a wireless manner. It is intended
to provide you a means to temporarily control your feeder for calibration, maintenance,
or diagnostic purposes in the absence of a locally mounted, wired User Interface.
The Remote User Interface is battery powered for maximum portability. It operates
wirelessly using the Bluetooth protocol and can connect to any Merrick feeder within
range, so only one Remote User Interface is needed for any number of Merrick feeders.
Note: Each Merrick feeder to which you wish to connect must be equipped with its own
optional Bluetooth interface.
The Remote User Interface utilizes the exact same menu system as the Genetix LCD
Interface, and detailed instructions for this can be found in the appropriate Merrick
Operating Manual. The following sections in this Manual will instruct you in the proper
use of the Remote User Interface, including connection to Merrick feeders.

Page 5 of 15
SAFETY
The Genetix Remote Handheld User Interface is used to interface with the Merrick
Genetix Core Module (“GCM”) and provide the user a means to operate the connected
feeder, usually in a temporary manner. To insure personnel safety please read the
following instructions and precautions carefully.
In General
Observe all standard precautions that pertain to moving machinery. Because this is a
wireless device, it may not be obvious to other personnel that you have control of the
feeder. The range of the Remote User Interface is intentionally limited to a few meters,
so that you must be close by the feeder while operating it. Also, because it is possible to
connect to different feeders with one Remote User Interface, it is very important you
know which feeder you are actually connected to. Normally there is a blue “connected”
light supplied with the GCM that lights when that GCM is connected to the Remote unit.
Observe all standard precautions that pertain to electrical drives and electrical controls.
Note that it is possible to start a feeder using the Remote User Interface and then not be
able to stop it if you lose the wireless connection. The batteries may go dead, you may
move out of range, or there may be some other failure. The Remote User Interface is not
intended to be the sole means of feeder control, nor as a safety device.
Before undertaking work on the electrical system, the drives, or the Controller, insure
power is disconnected and locked out. Work should never be performed on the
Controller with power on the unit.
Pay particular attentions to special notes and precautions that appear throughout this
manual.
Please read and become familiar with this entire manual and the appropriate Genetix
Feeder Controller manual. If you have any questions or problems, please call the
Merrick Customer Support Department for assistance.
Special Precautions
The Genetix Remote User Interface is battery operated, and is rechargeable. The
following precautions must be followed:
•Do not attempt to charge the batteries with any charger other than the one
provided by Merrick. The batteries must be charged within the unit itself.
•Do not replace the batteries except with batteries supplied by Merrick. Observe
the correct polarity when replacing batteries.
•NEVER attempt to charge non-rechargeable batteries (i.e. alkaline)
WARNING!
The Remote User Interface is not rated, nor intended for use in areas classified
as Hazardous. Never operate the Remote User Interface in areas where there is
any kind of explosion risk.

Page 6 of 15
Technical Support
Merrick provides customer technical and spare part support 24 hours a day, seven days
a week. Our normal business hours are Monday through Friday 7:30 AM until 4:30 PM
Central Time. During normal hours call 1-888 MERRICK (637-7425) and ask for
service. The call will be routed to the next available phone support technician.
After normal hours and on holidays and weekends, technical assistance is available by
calling 1-888 MERRICK extension 7878. Follow the instructions and be sure to enter the
area code and the phone extension where you can be reached. Someone will return
your call as soon as possible.
When you call Merrick for Technical Support, please have your machine serial number
or a controller serial number. This information will better help us to serve you.
Note: Do not attempt to service or repair the Remote User Interface. If the unit does not
appear to be operating correctly, call Merrick Technical Support for assistance.

Page 7 of 15
OPERATION
Remote User Interface
The wireless Remote User Interface assembly is one of many User Interface options for
the Genetix controller. It functions exactly the same as the wired Genetix LCD Interface,
once the Bluetooth connection is made. This Manual will explain how to connect to
Merrick feeders. For more information about operating the feeder via the User Interface
please refer to the relevant LCD User Interface Manual, supplied separately.
Page 8 of 15
Standard Operation
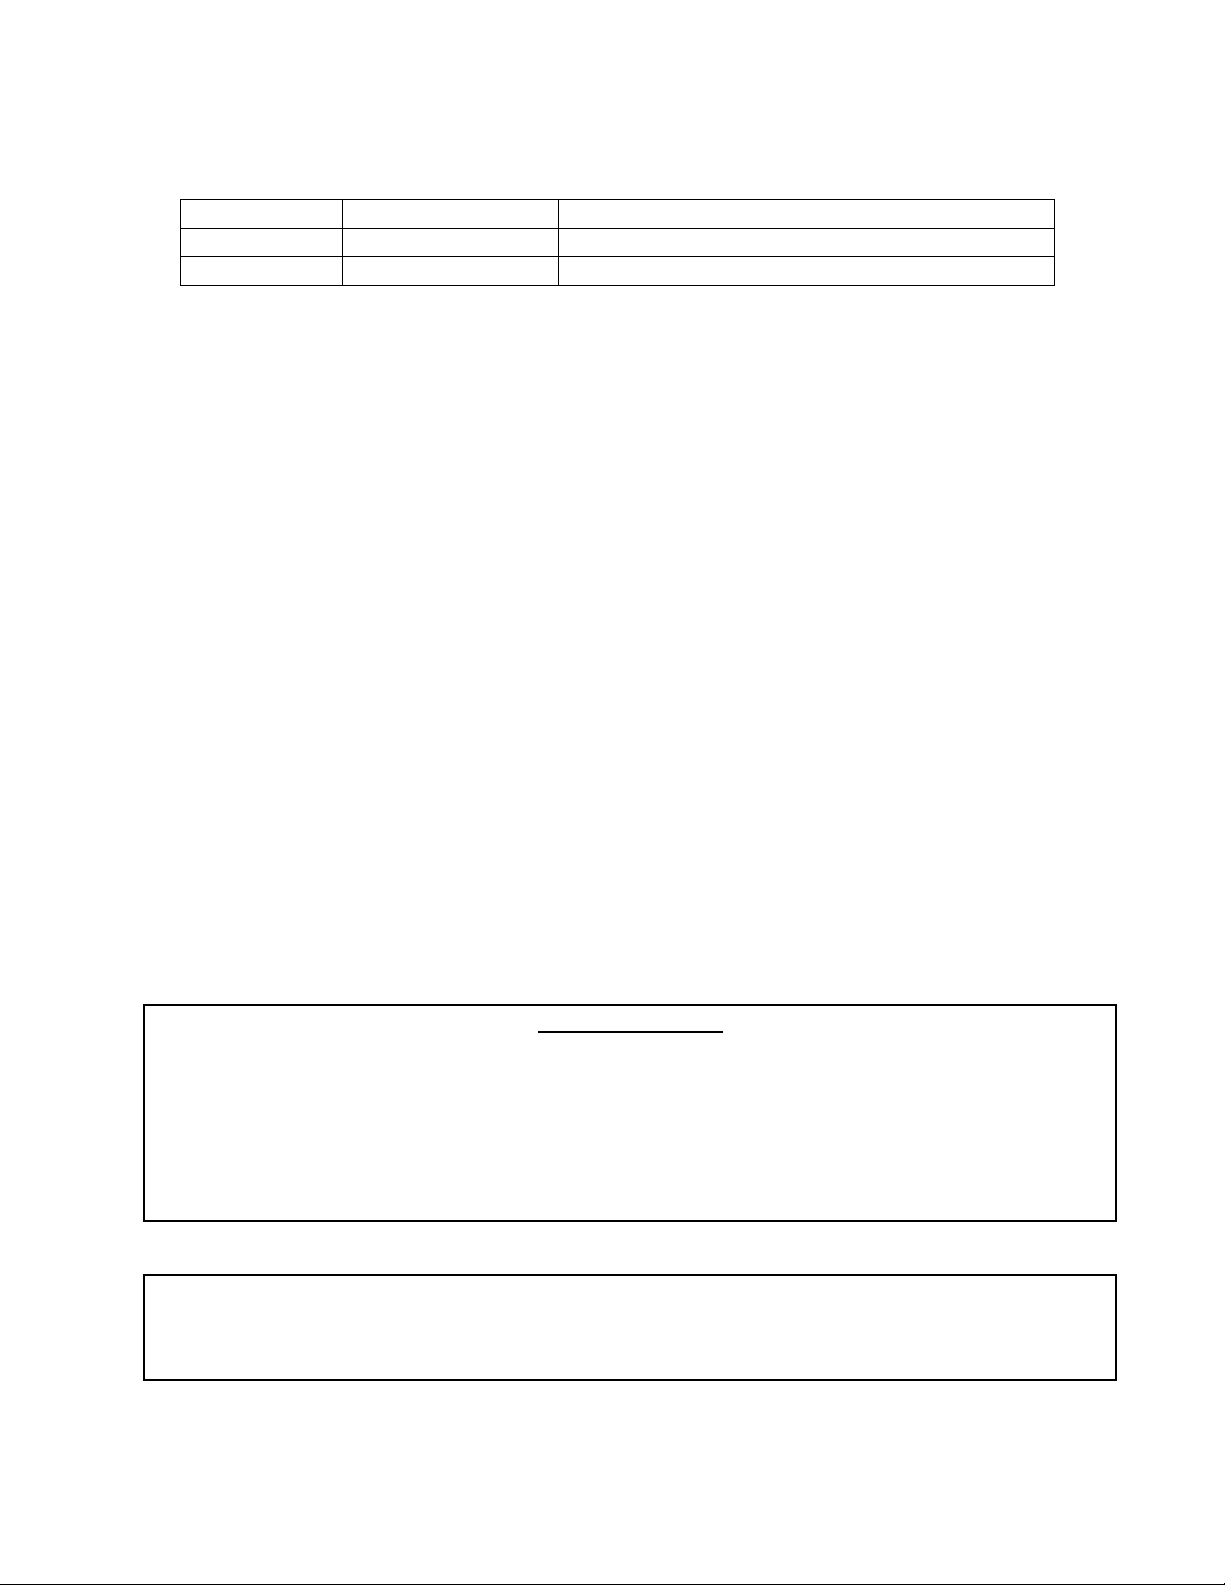
Powering up the Unit
Power up the Remote User Interface by momentarily pressing the power button. The
power button is the round orange button as shown below:
The screen should light up, and you should see the Merrick identification screens
followed by the Connection Menu (see below).
Powering down the Unit
Turn off the Remote User Interface by pressing and holding the power button until the
display goes blank. This takes 1- 2 seconds. You will see a “powering down” graphic
while the unit powers down. Note: Powering down the unit disconnects the Bluetooth
connection if there is one.
Connection Menu
When powered up, you should see the Connection Menu. This menu allows you,
using the Bluetooth protocol, to find and connect to the correct Merrick Feeder and/or
to manage the stored list of feeders utilizing one of the following options:

Page 9 of 15
Connect to <name>… ↑
Select from List…
Add Feeder(s) to List…
Delete Feeder(s) from List…
Sort Feeders in List… ↓
Connect to <name>
This menu item shows the name of the last feeder connected to, and allows you to
connect to it again without performing a scan. Select this item with the Enter key,
and you will see another screen asking you to confirm. Press the Enter key again
to connect to the feeder. Once connected, the connect light (i.e. the Bluetooth
logo) in the upper right corner of the unit will light, and the remote unit will start
continuous communication with the feeder. You now have complete control of the
connected feeder. For instruction in feeder operation see the appropriate Merrick
Feeder Control manual.
Note: If this menu item is not present, the Remote User Interface has never been
connected to a Merrick feeder. Once this is done for the first time, it will always
show the last feeder connected to.
Select from list
This menu item allows you to see a stored list of feeders found in previous scans
and allows you to connect to one of them without performing a scan. Select this
item with the Enter key to see the list. Select one from the list to connect to and
you will see another screen asking you to confirm. Press the Enter key again to
connect to the feeder. Once connected, the connect light (i.e. the Bluetooth logo)
in the upper right corner of the unit will light, and the remote unit will start
continuous communication with the feeder. You now have complete control of the
connected feeder. For instruction in feeder operation see the appropriate Merrick
Feeder Control manual.
Note: Up to 32 different feeders may be stored in the list. The list can be updated
and managed with the following menu options.
Add Feeder(s) to List
This section of the menu allows you to add feeders to the stored list though two
different methods. Note: The Bluetooth protocol will only return a maximum of 10
feeders in any one scan, so populating the entire list of 32 can be a multi-step
process.
When you select this menu option you will be presented with two choices:

Page 10 of 15
Scan for Merrick Feeders… ↑
Enter Bluetooth Address…
↓
Scan for Merrick Feeders
This menu item allows you scan the immediate area for Bluetooth devices and
identify the Merrick feeders. This is done with a typical Bluetooth “discovery”
process and will therefore see any Bluetooth radios in the immediate area that
have their visibility property turned on. However, only Merrick feeders will be
shown in the list that you can connect to. Select this item with the Enter key to
create the list. Note this may take up to a minute to find all the feeders. If you
press the Escape key during a scan, it will terminate the scan without adding
any feeders to the list. Once the scan is finished, you may add all feeders to the
list, or select those you wish to add. To add all the feeders, scroll to the bottom
of the list, and select “Add all to list”. You will be asked to confirm by pressing
the Enter key again. Once the selected feeders have been added, you will go
back to the Connection Menu, from where you may perform another scan,
connect to a feeder, etc.
Note: Whenever you perform a scan, only feeders that do not currently exist in
the stored list will be shown.
Enter Bluetooth Address
Every Bluetooth device, including the interface card that must be mounted to
each feeder’s Genetix Core Module (GCM), has a unique Bluetooth address
that is permanently stored in the card’s memory. It is a 6 byte hexadecimal
code in the form of:
“00:00:00:00:00:00”
This is different than the “friendly” name that you are allowed to enter for every
feeder. Names are changeable, the Bluetooth address is not. If you know the
Bluetooth address of the interface card that you wish to add to the list, you may
enter it with this menu item. Once you’ve entered the address, the remote unit
will scan for it and retrieve the name, allowing you to add it to the list.
Note: Its unlikely that you will you need to use this option. The Bluetooth
address for any given interface card is not easily determined by the user, but
can be provided by Merrick, if needed.

Page 11 of 15
Delete Feeder(s) from List
Selecting this menu item will present the entire stored list, plus at the bottom you
will see an entry called, “Delete all from list…”
Select a feeder to delete from list (or all feeders) and press the Enter key. You will
be asked to confirm the delete by pressing the Enter key again.
Sort Feeders in List
Selecting this menu item will allow you to sort the entire stored list, alphabetically
by feeder name. You will be asked to confirm the sort by pressing the Enter key
again.
A Note about Feeder Names
Each feeder can have a unique name, set by the user. This can be done through
the user interface, including the Remote User Interface (see relevant LCD
Operating Manual for specific instructions). Usually, this is also the Bluetooth
“friendly” name for that feeder, which will appear in scans performed by the
Remote User Interface. However, if the feeder name is changed, the Bluetooth
name does not automatically change with it. You must cycle the power on the
GCM (Genetix Core Module) that is connected to the feeder to set the Bluetooth
name to be the same.
Likewise if you move a Bluetooth interface from one feeder to another, the card will
retain the old Bluetooth name until the power is cycled, at which time the new
feeder name will be loaded into the Bluetooth card. Since you should only do this
with the power off, this is normally not a problem.
It is not possible to set the Bluetooth name independently of the feeder name.
Following is an example of changing a feeder name, and re-doing the list in the
Remote User Interface:
1. Change the Feeder name, using a User Interface. This is referred to as
the “GCM Name” and is found in the Advanced Setup menu (see relevant
Operating Manual for specific instructions). Note this can be done with the
Remote User Interface the same as any other User Interface. In our
example here we will assume the old feeder name is “OldName”, and the
name we just changed it to is “NewName”.
2. Once the name is changed, cycle the power on the feeder’s GCM
(Genetix Core Module). This is will load the new feeder name
(“NewName”) into the Bluetooth interface on that GCM. Make sure the
unit is still powered up for the scan (see below).
3. On the Remote User Interface, go to the Connection Menu and select
“Delete Feeder(s) from List”. You should find “OldName” in the list. Delete
this feeder.

Page 12 of 15
4. Again from the Connection menu, select “Add Feeder(s) to List”, and then
select “Scan for Merrick Feeder”. Perform the scan and you should find
“NewName”. Add this feeder to the list.
5. The list is now updated with the new feeder name. You may either
connect to it now, or just leave it in the list; it will be automatically saved.
Page 13 of 15
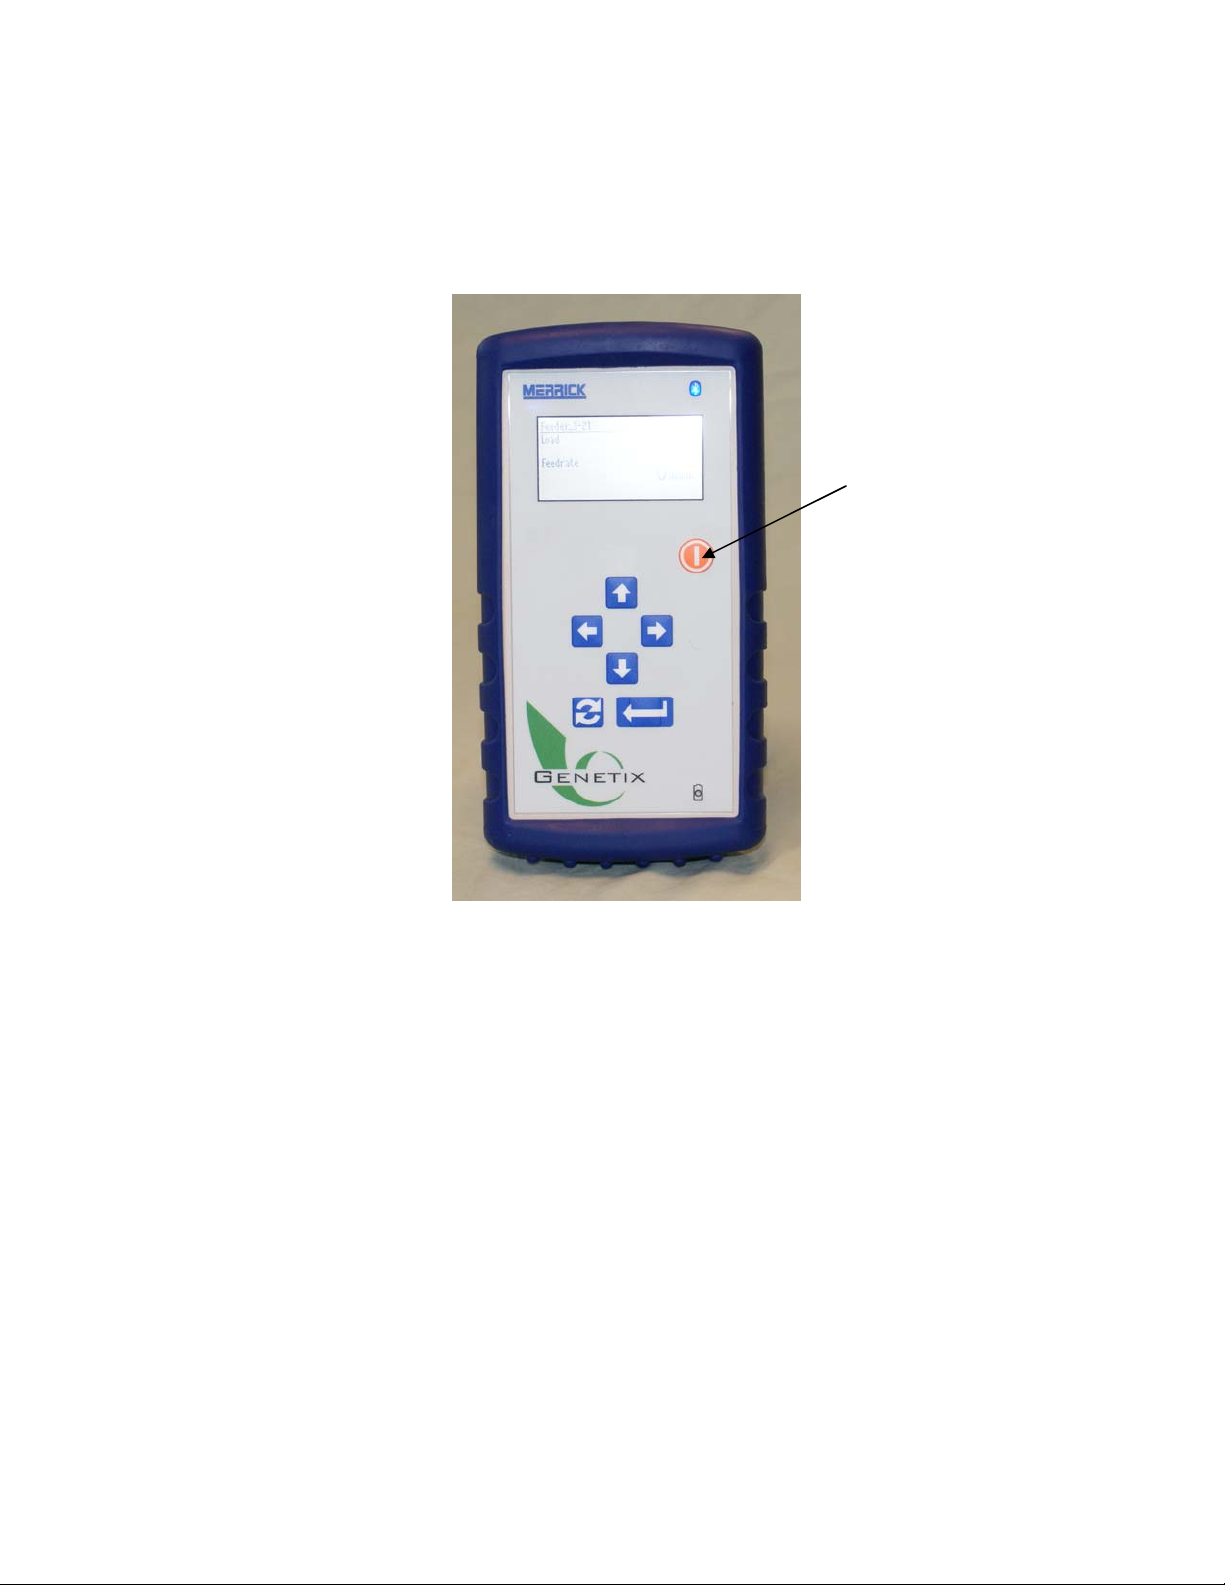
Charging the Batteries
Charging the batteries in the Remote User Interface can be done at any time by simply
plugging the wall transformer provided into the back of the remote unit (see photo
below). The wall transformer may be plugged into any AC outlet, 100-240VAC, 50/60Hz.
When the unit is charging properly, the yellow “battery” light at the bottom right of the
front of the unit will flash about 1 time per second (see photo below). When charging is
complete, the flashing will stop and the light will be off.
Notes:
•Do not attempt to charge the batteries with any charger other than the one
provided by Merrick. The batteries must be charged within the unit itself.
•Do not replace the batteries except with batteries supplied by Merrick. Observe
the correct polarity when replacing batteries.
•NEVER attempt to charge non-rechargeable batteries (i.e. alkaline)
•Do not charge the unit in a hot area

Page 14 of 15
Checking the Battery Voltage
The current battery can be seen in a Diagnostics menu. From the Main Menu, select
“Diagnostics” and then “Misc Data”. Press the right arrow key twice to get to Misc Data
pg 3. The current average battery cell voltage is shown as the “Live” value.
Note: The unit will display a “Low Battery” warning when the live value is below 1.10 but
the unit will continue to operate. Once the battery voltage dips below 0.9 volts however,
the unit will shut itself down. You should have between 20 and 30 minutes from the “Low
Battery” indication to shutdown.
A fully charged set of batteries should allow about 20-30 hrs of operation when new. If
after time, the usable life of a charged set of batteries becomes unacceptably low, you
should order new batteries from Merrick.
Note: Do not attempt to service or repair the unit. If the unit does not appear to be
operating correctly, call Merrick Technical Support for assistance.

Page 15 of 15
APPENDIX A
Bluetooth Interface Card
Each feeder to which you wish to connect must have its GCM (Genetix Core
Module) fitted with a Bluetooth interface card, also known as the “XDC”. This is a
picture of the card, which must be mounted on top of the GCM.
The part number of the card is M22647-1.
Other manuals for Genetix
1
Table of contents


