Merritt HOPE User manual

HOPE Car Bed
Merritt Manufacturing Inc.
P.O. Box 17152
Indianapolis, IN 46217-0152
Phone: 317-409-0148
ax: 317-893-2567
www.eztether.com
E-Mail: info@eztether.com
Made in USA
PN-8026 (Rev – 5) 4-26-11
Merritt Manufacturing Inc
Instruction Manual to be Stored in Pocket on the Front of Car Bed
Instructions for Use
HOPE Car Bed

Message to Medical Personnel and Caregivers
• This car bed is designed for children with special healthcare needs.
• It is critical that a child be fully evaluated by his or her medical
professional before using this car bed. Use of the supine, prone or side
position and method of restraint must be approved by the medical
professional.
• If a premature infant is transported in this car bed, they must be
evaluated per the American Academy of Pediatrics recommendations for
“Safe Transportation of Premature and Low Birth Weights
Infants” (RE9617).
Page 2
Message to Medical Personnel and Caregivers ........................................ 2
Warnings ................................................................................................... 3
Weight and Height Restrictions ................................................................ 5
Vehicle Seat Belt Compatibility ................................................................. 6
Hope Car Bed eatures.............................................................................. 9
Car Bed Accessories................................................................................. 10
Restraint Bag Selection and Sizing........................................................... 12
3-Point Harness Sizing ............................................................................. 13
Attaching Cummerbund and Restraint Bag ............................................ 14
Attaching Cummerbund and 3-Point Harness......................................... 20
Locking the Vehicle Seat Belt .................................................................. 24
Locking the Vehicle Lap-Shoulder Belt .................................................... 25
Locking the Vehicle Lap Only Belt ........................................................... 31
Installation of Car Bed in Vehicle............................................................. 32
Leveling of Car Bed.................................................................................. 38
Securing Child in Restraint Bag................................................................ 40
Securing Child in 3-Point Harness............................................................ 43
Securing Child in Side acing Restraint Bag ............................................ 45
Care and Cleaning.................................................................................... 46
Additional Information............................................................................ 47
Vehicle Accident - Replacement Policy ................................................... 48
Part Replacement.................................................................................... 49
Limited Warranty .................................................................................... 50
Table of Contents Limited Warranty
LIMITATIONS OF WARRANTI S AND OTH R WARRANTY
T RMS AND STAT S’ LAW
MERRITT FULLY DISCLAIMS AND MAKES NO IMPLIED WARRANTIES
OF ANY KIND, INCLUDING, BUT NOT LIMITED TO IMPLIED WARRAN-
TIES OF MERCHANTABILITY AND FITNESS FOR A PARTICULAR
USE, AND MAKES NO EXPRESS WARRANTIES BEYOND THOSE
STATED HERE. NOTWISTHSTANDING THE FOREGOING, IF ANY
IMPLIED WARRANTIES ARE DEEMED
TO BE GIVEN BECAUSE THE APPLICABLE LAW PROHIHBITS THEIR
EXCLUSION, THEN ANY SUCH IMPLIED WARRANTIES, INCLUDING
IMPLIED WARRANTIES OF MERCHANTABILITY AND FITNESS FOR A
PARTICULAR PURPOSE, SHALL BE LIMITED TO THE DURATION
AND TERMS OF THE EXPRESS WRITTEN WARRANTY. SOME
STATES DO NOT ALLOW THE LIMITATION OF IMPLIED WARRAN-
TIES, LIMITATIONS ON HOW LONG AN IMPLIED WARRANTY LASTS
OR THE EXCLUSION OR LIMITATION OF INCIDENTAL OR CONSE-
QUENTIAL DAMAGES. THEREFORE, IN THOSE STATES, THE LIMI-
TATIONS LISTED ABOVE MAY NOT APPLY TO YOU. THIS WAR-
RANTY AFFORDS YOU WITH SPECIFIC LEGAL RIGHTS AND YOU
MAY HAVE ADDITIONAL RIGHTS, DEPENDING ON THE STATE IN
WHICH YOU RESIDE.
BINDING ARBITRATION
Any d spute, controversy or cla m (whether n contract, tort or otherw se,
whether pre-ex st ng, present or future, and nclud ng statutory, common
law, ntent onal torts and equ table cla ms) aga nst Merr tt, ts agents, em-
ployees, successors, ass gns or aff l ates (collect vely for purposes of th s
warranty, “Merr tt”), ar s ng from or relat ng to th s warranty and agree-
ment, ts nterpretat on, or the breach, term nat on or val d ty thereof, the
relat onsh ps wh ch result from th s warranty and agreement ( nclud ng, to
the full extent perm tted by appl cable law, relat onsh ps w th th rd part es
who are not part es to th s warranty and agreement), SHALL BE RE-
SOLVED EXCLUSIVELY AND FINALLY BY BINDING ARBITRATION
ADMINISTERED BY THE AMERICAN ARBITRATION ASSOCIATION
under ts code of procedure then n effect. Any award of the arb trator
shall be f nal and b nd ng on each of the part es and may be entered as a
judgment n any court of competent jur sd ct on. Informat on for subm tt ng
cla ms w th the Amer can Arb trat on Assoc at on may be obta ned at
www.adr.org.
Page 51

Limited Warranty
Merritt Manufacturing, Inc. (Merritt) provides the following limited war-
ranty on the HOP car bed.
Merr tt warrants to the or g nal purchaser of the HOPE car bed that, f prop-
erly used str ctly n accordance w th the nstruct ons and spec f cat ons n-
cluded n the or g nal packag ng, t shall be free from defects n mater als or
workmansh p for a per od of one (1) year from the date of or g nal pur-
chase. Proof of purchase s requ red, nclud ng, but not l m ted to furn sh ng
to Merr tt proof that the owner reg strat on card was returned to Merr tt
w th n th rty days of the or g nal purchase or furn sh ng to Merr tt proof of
purchase that dent f es the cla mant as the or g nal purchaser. If any com-
ponent covered by th s warranty fa ls for reasons covered by th s warranty,
Merr tt w ll, at ts opt on, prov de the or g nal purchaser w th repa r or re-
placement components for the covered product or component. Th s l m ted
warranty s ava lable only for purchasers n the Un ted States and Canada.
Merr tt reserves the r ght to d scont nue or change fabr cs, parts, models or
products, or to make subst tut ons. Please note that the upholstery fabr c s
subject to some degree of wear as a result of normal use. Th s k nd of
normal wear s not covered under warranty.
To make a cla m under th s warranty, you must contact Merr tt v a tele-
phone at (317) 409-0148 or wr te to the company us ng the address on the
back cover of th s booklet. PLEASE COMPLETE AND MAIL THE OWNER
REGISTRATION CARD WITHIN THIRTY DAYS OF PURCHASE TO PRE-
SERVE YOUR WARRANTY RIGHTS.
WARRANTY LIMITATIONS
Th s warranty does not nclude damages due to external sources, nclud-
ng, but not l m ted to acc dent, negl gence, m suse, neglect, alterat on, re-
pa r, mproper nstallat on, mproper test ng or use that s not n confor-
mance w th the nstruct ons and spec f cat ons n the nstruct on booklet.
LIMITATION OF LIABILITY AND DAMAG S
THE WARRANTY AND REMEDIES SET FORTH ABOVE ARE THE SOLE
AND EXCLUSIVE REMEDIES AND ARE PROVIDED IN LIEU OF ALL
OTHERS, ORAL OR WRITTEN, EXPRESS OR IMPLIED. IN NO EVENT
WILL MERRITT, OR THE RETAILER/DISTRIBUTOR SELLING THIS
PRODUCT, BE LIABLE TO THE PURCHASER, OR ANY USER OF THIS
RESTRAINT OR OTHER THIRD PARTY, FOR ANY DAMAGES; INCLUD-
ING LOST PROFITS, LOST BUSINESS, INCIDENTAL, INDIRECT, SPE-
CIAL, CONSEQUENTIAL DAMAGES OR PUNITIVE DAMAGES. IN NO
EVENT SHALL MERRITT OR ITS AFFILIATED COMPANIES BE LIABLE
OR RESPONSIBLE FOR ANY
AMOUNT OF DAMAGES ABOVE THE AGGREGATE DOLLAR AMOUNT
PAID BY THE CUSTOMER FOR THE PURCHASE OF THE PRODUCT
COVERED BY THIS WARRANTY.
Page 50
WARNING!
FAILURE TO COMPLY WIT T E
FOLLOWING WARNINGS CAN RESULT IN
DEAT OR SERIOUS INJURY TO YOUR
C ILD:
• Use only with children who weigh between 4.5 and 35 pounds (2.0 and
15.9 kg) and whose height is between 13 and 29 inches (33 and 73.7 cm).
• Snugly adjust the belts provided with this child restraint around your
child.
• Secure this child restraint with a vehicle belt.
• ollow all instructions on this child restraint and in the written
instructions located in the storage area on the front of the car bed.
• Register your child restraint with the manufacturer.
• Always position car bed (child restraint) with child’s head toward the
center of the vehicle.
• Add-on child restraint systems should be securely belted to the vehicle,
even when they are not occupied, since in a crash an unsecured child
restraint system may injure other occupants.
• When using the 3-point harness, make sure that the straps are snug. A
snug strap should not allow any slack. It lies in a relatively straight line
without sagging. It does not press on the child’s flesh or push the child’s
body into an unnatural position.
• This child restraint conforms to all applicable ederal motor vehicle safety
standards. This Restraint is not Certified for Use on Aircraft.
• Child restraints could be recalled for safety reasons. You must register
this restraint to be reached in a recall. Send your name, address, e-mail
address if available, and the restraint’s model number and manufacturing
date to P.O. Box 17152 Indianapolis, IN 46217 or call 1-317-409-0148. or
recall information, call the U.S. Government’s Vehicle Safety Hotline at 1-
888-327-4236 (TTY: 1-800-424-9153), or go to http://www.NHTSA.gov.
• According to accident statistics, children are safer when properly
restrained in the rear seating positions than in the front seating positions.
Page 3

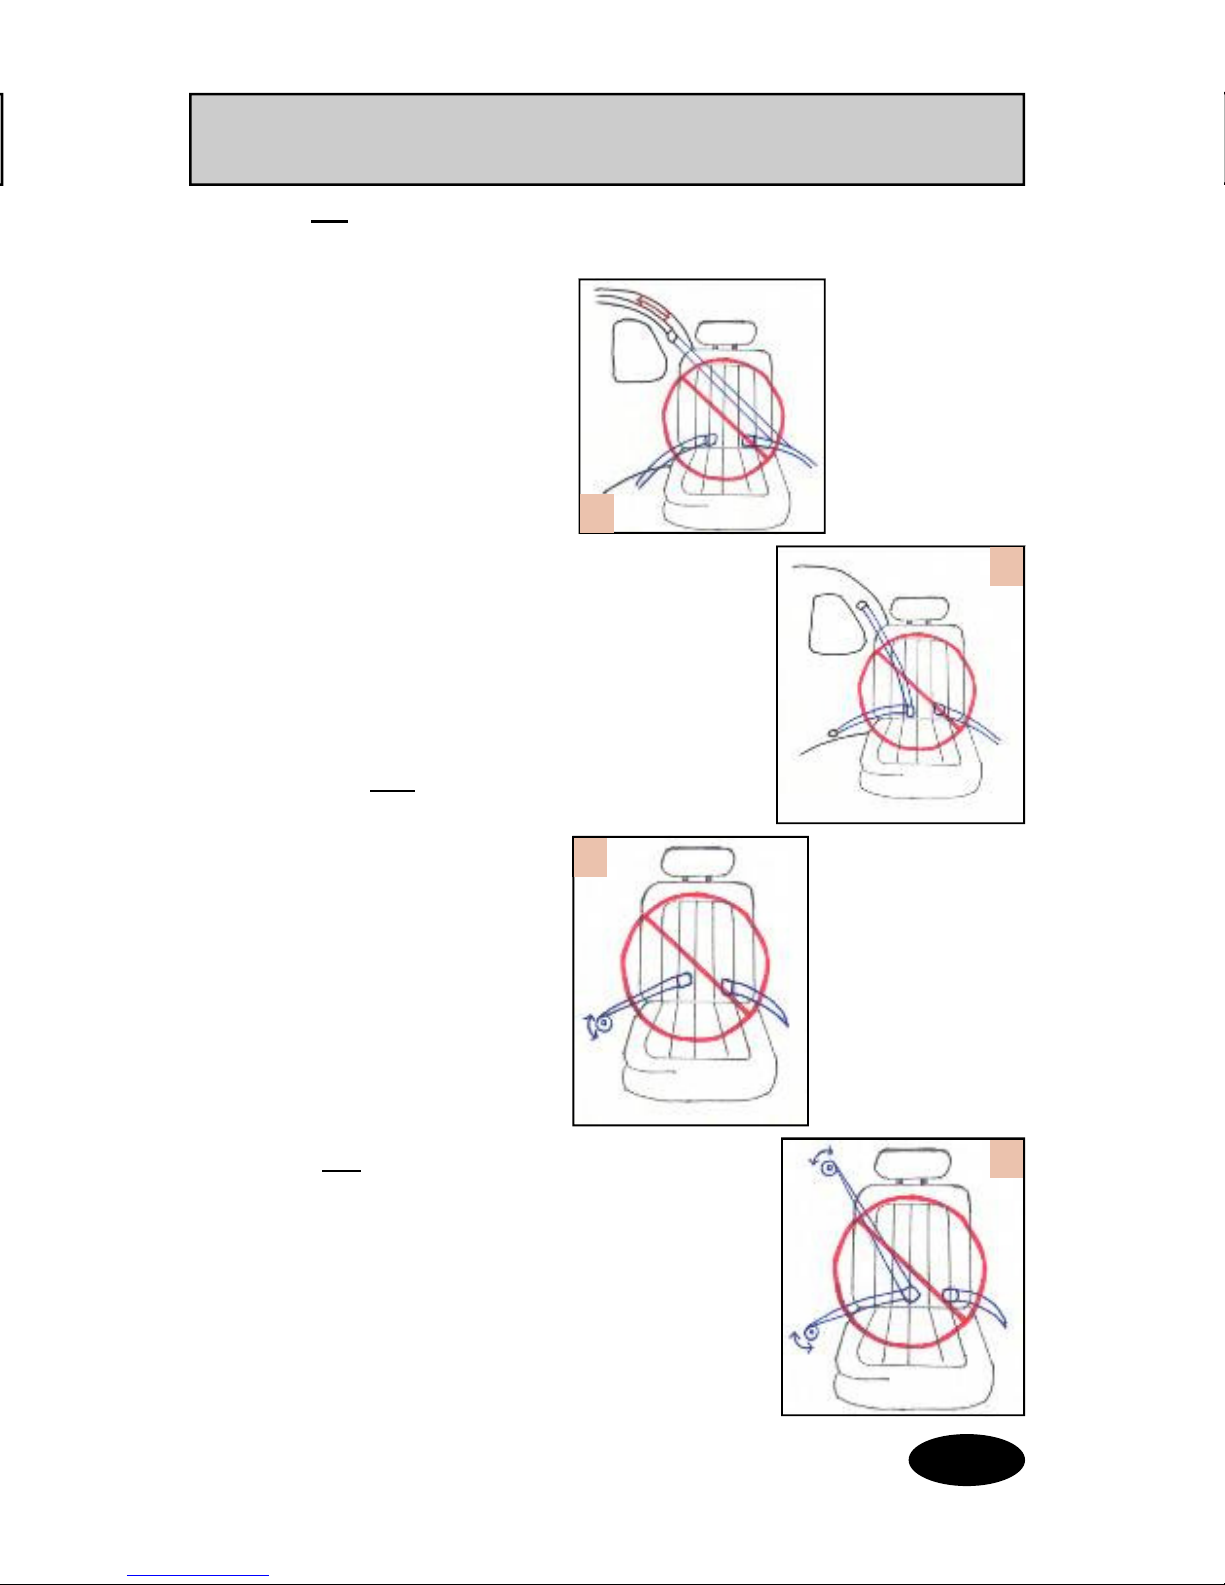
WA NINGS, Cont.
• You must use two vehicle belts to attach car bed to vehicle seat. Use two
lap/shoulder belts, or one lap/shoulder belt and center lap belt, or two
lap belts.
• Before using the HOPE car bed — a Healthcare Professional must be
consulted and agree that the child can be safely transported in this car
bed and the restraint type and position selected has been approved for
the medical condition of the child.
• Do not install or use this car bed until instructions have been read and
fully understood. Call Customer Service at 317-409-0148 with questions.
• Car bed must be installed in the rear seating position located behind the
front seat passenger position.
• Do not install the car bed in the front seat of the vehicle or close to an
active frontal air bag.
• Never transport a child in this car bed without an attendant or parent’s
observation and supervision.
• Never leave a child un-attended in this car bed.
• If this car bed is involved in a vehicle accident crash, it must be evaluated
and pass the NHTSA criteria for “Child Restraint Re-use after Minor
Crashes” before continued use. Information at: www.nhtsa.gov (For
details see page 48 of this manual).
• Never install car bed on a rear facing or side facing seating position.
• Never use the car bed if parts are missing.
• Proper installation of car bed and use of restraint systems listed in these
instructions must be strictly followed.
• Pillows, extra bedding or blankets are not permitted as part of the
restraint system.
All edical equip ent in the
vehicle ust be properly secured.
Page 4
Part eplacement
Page 49
Part Nu ber Replace ent Part Description
8017A Small Cummerbund
8017B Large Cummerbund
8016A Small Restraint Bag
8016B Large Restraint Bag
8016C Small Side acing Restraint Bag
8016D Large Side acing Restraint Bag
8008 3 Point Harness
with Shoulder Pads and Buckle Pad
8034 Shoulder Pad
8032 Buckle Pad
8011 Leveling Strap
8012-15 Bottom Cushion
8020-21 .5” EPS Covered Side Panel
8042-14 1” EPS Covered End Panel
8018-19 1.5” EPS Covered Side Panel
8035-36 oam Leveling Wedge
8043 Installation DVD
8038 Medical Tube Control Strap
8099 Locking Clip
8026 Instruction Manual
Parts List
Call Merritt Manufacturing for pricing and delivery (317)-409-0148

Vehicle Accident — eplacement Policy
HOPE Car Bed Replacement Policy
If your car bed is involved in a vehicle accident/crash,
it must be evaluated and pass the NHTSA criteria for
“Child Restraint Re-use after Minor Crashes”
before continued use. See NHTSA test below:
Call Merritt Manufacturing customer Service at
(317) 409-0148 for clarification of inspection steps and
EPS foam evaluation for continued use or possible replacement.
Car beds involved in an accident that fail one or more of the NHTSA
minor crash criteria below must be replaced.
Merritt Manufacturing will provide a new car bed at a 15% discount.
The car bed involved in the accident must be returned to Merritt
Manufacturing to receive the discount.
NHTSA Minor Crash Evaluation
Minor crashes are those that eet ALL the following criteria:
• The vehicle was able to be driven away from the crash site;
• The vehicle door nearest the safety seat (Car Bed) was undamaged;
• There were no injuries to any of the vehicle occupants;
• The airbags (if present) did not deploy; AND
• There is no visible damage to the safety seat (Car Bed).
Page 48
WA NINGS, Cont.
• The HOPE car bed, at this time, cannot be installed and transported on a
hospital gurney in an emergency vehicle or hospital aircraft.
• It is recommended that children be transported on their back (supine
position) in the restraint bag or in 3-point harness.
• If a child must be transported on his or her stomach (prone) position
because of a medical condition, it must be approved by a healthcare
professional.
• If a child must be transported on their side because of a medical condition,
it must be approved by a healthcare professional. A side facing restraint
bag must be used when transporting a child on their side. The right side is
the only side position that can be used. Never transport a child on his or
her left side.
• The cummerbund must always be used with the restraint bag and 3-point
restraint system.
• Parents and caregivers must be instructed by medical professionals on
how to properly monitor a child during the use of this car bed.
• Car bed shell must be replaced after 10 years from date of manufacture.
All pads, cushions, restraints, and components are replaceable and need
to be serviced and replaced as needed during the 10 year life of the
product.
Child Weight and Height estrictions
Use only for children who weigh between
4.5 and 35 pounds (2.0 and 15.9 kg.)
Small Restraint Bag 4.5 to 10 pounds (See Page 13 for Clarification)
Large Restraint Bag over 10 to 35 pounds
3-Point Harness over 10 to 35 pounds
Use only for children whose height is between
13 and 29 inches (33.0 and 73.7cm)
taller if legs are permitted to bend.
Page 5

Do not install car bed in the
front seat of a vehicle or near a
frontal air bag.
Do not install car bed on a
rear facing vehicle seat.
Vehicle Seat Belt Compatibility
NOTE: Two vehicle seat belts ust be used to attach car bed to vehicle seat.
Options are:
• 2 lap/shoulder belts, or
• 1 lap/shoulder belt and center lap belt, or
• 2 lap belts
NOTE: Never use the seat belt position behind the driver. Always use the
seat belt positions behind the passenger and the center position.
Two Lap-Shoulder Belts
One Lap-Shoulder Belt /Center Lap Belt
Do not install car bed on a
side facing vehicle seat.
Two Lap Belts
Page 6
Additional Information
How your car bed is identified
Your car bed has a unique identification number that can be found on
the inside of the car bed shell, at the head end underneath the foam
pad. This ID number must be used for any inquires or returns of the car
bed.
Vehicle installation assistance available
Vehicle installation assistance is available. If for any reason you experi-
ence vehicle installation difficulties, call Merritt Manufacturing:
(317)-409-0148. We will assist you with specific vehicle installation in-
formation.
Instruction Manual
The instruction manual is stored in the pocket on the front of the car
bed. If lost or misplaced, a replacement can be secured from Merritt
Manufacturing, Inc. Call: (317)-409-0148 (See page 49).
Use of Locking Clips
The locking clip is for use in older vehicles that do not have seat belts
with switchable retractors or locking latch plates.
If you have a vehicle requiring a locking clip, see page 29 for appropriate
installation instructions or call Merritt Manufacturing (317-409-0148)
for installation assistance.
Use of Leveling Wedge
The most effective way to level the car bed is with the gray leveling
straps connected to the front seat frame. If the front seat frame is not
available or the vehicle manufacturer does not allow the use of the seat
frame to attach the leveling straps, the foam leveling wedge can be
used as a possible option to help level the car bed on the vehicle’s seat
(See Page 39). The leveling wedge can also be used with the leveling
straps to level the car bed on a more severely sloped vehicle seat.
Use of Medical Tube Control Strap
The medical tube control strap is designed to assist in guiding the venti-
lator hose and feeding tube.
Page 47
Care and Cleaning
Infection Control
Cu erbunds, Cushions and Side Panel Covers
EPS side panels and the bottom cushion are covered with medical grade
anti-microbial naugahyde material and can be cleaned by wiping down
with mild soap an water or bleach free approved hospital disinfectants.
Do not use bleach. The side panels and cushion must not be submerged
in water or cleaner. Do not iron.
Plastic Shell
The shell can be cleaned with mild soap and warm water. Wipe dry.
Do not use strong che icals or bleach.
Harness Webbing
Harness webbing can be cleaned with mild detergent and warm water
Do not machine wash — Do not use bleach. The Harness webbing must
not be submerged in water or cleaner. Do not machine dry. Do not iron.
Buckle and Chest Clip
Rinse under warm water only. Allow to drain and dry before reusing.
Never lubricate or use bleach or any type of detergents.
Restraint Bag
Hand wash with mild soap in warm water, allow to drip air dry.
Do not machine dry. — Do not iron. — Do not dry clean.
Do not use bleach.
New Patient Kits
Based on hospital replacement and infection control policies, new pa-
tient kits are available.
New Patient Kit Options
1) Small Restraint Bag, Small Cummerbund and Bottom Cushion
2) Large Restraint Bag, Large Cummerbund and Bottom Cushion
3) 3-Point Harness, Large Cummerbund and Bottom Cushion
4) Three covered EPS side panels
All co ponents are available and can be purchased separately.
See page 49 for part nu bers and replace ent infor ation.
Page 46
Vehicle Seat Belt Compatibility, Cont.
Page 7
• Automatic motor driven
vehicle belts ( igure A).
• Vehicle belts with the top
and/or bottom anchor
attached to the vehicle
door ( igure B).
• Lap belt with an emer-
gency locking retractor
(ELR), which means the
lap belt will only lock in a
sudden stop or crash
( igure C).
• Combination lap-
shoulder belt with two
retractors. The best way
to identify this condition
is to observe the latch
plate (see arrow). Both
the lap and shoulder belt
portions will be sewn to
it so that it cannot slide
( igure D).
NOTE: Do not use the following types of vehicle seat belts with this
car bed:
B
A
C
D

Vehicle Seat Belt Compatibility, Cont.
Page 8
NOTE: The following types of seat belts can be used. Read your
vehicle owner’s anual and Pages 24-31 of this anual to
deter ine the correct way to lock your seat belt.
• Combination lap-shoulder belt
with a sliding latch plate.
This type of seat belt has a
latch plate ( igure A) that
slides freely up and down
the webbing. The latch plate
does not lock.
• Combination lap-shoulder belt
with a locking latch plate.
This type of seat belt has a
latch plate ( igure B, yours
may differ) that locks into
place for securing child re-
straints.
• A lap belt with a locking latch
plate ( igure C).
This type of seat belt stays
locked after the seat belt is
tightened by pulling the free
end (See Arrow).
A
B
C
Page 45
Securing Child in Side Facing estraint Bag
1. Side facing restraint bag to be in-
stalled in car bed using same
method outlined in installation
steps found on pages 16 - 19.
Note: There is only one zipper
in the side facing restraint
bag. ( ig. A)
2. Place child on her right side in side
facing restraint bag.
Position the left arm through
the top arm slot and close the
zipper. ( ig. B)
3. Position the child’s right arm
through the lower arm slot
so the child is not laying on
their arm ( ig. C)
4. Once child is securely positioned in
the side facing restraint bag, posi-
tion the cummerbund around child
and attach Velcro in place.
( ig. D)
I portant Notes:
Small side facing restraint
bag rated 4.5 to 10 pounds
See I portant Caution regarding
restraint bag selection on Page 13.
Large side facing restraint
bag rated 10 to 35 pounds
Never position child on their left
side in side facing restraint bag.
A
B
C
D
CAUTION:
If the zipper beco es broken, or
does not function properly, do not
use car bed and call custo er ser-
vice i ediately.
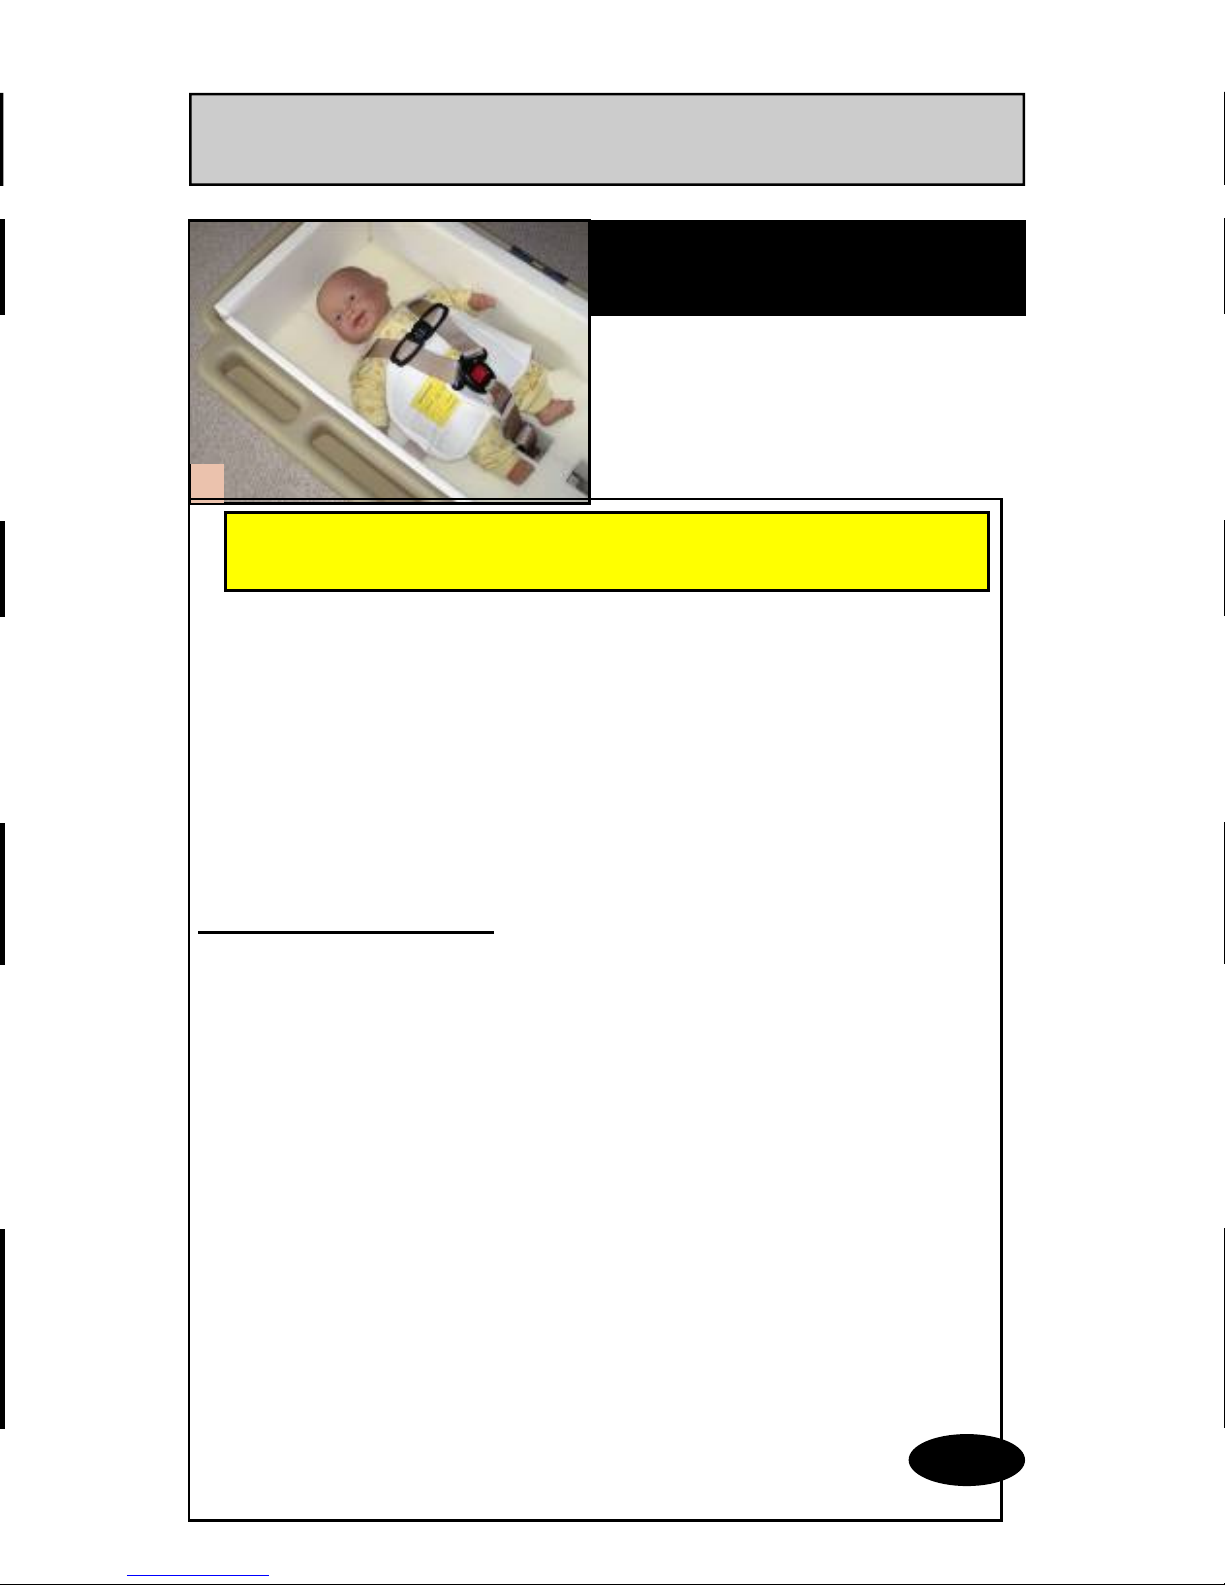
Securing Child in 3-Point Harness, Cont.
Page 44
5. Adjust buckle to desired location
on child (per medical professional).
Pull free end of strap to shorten.
Push button and pull other end of
strap to lengthen ( ig. E).
NOTE: In Step 6, ake sure that the
straps are snug. A snug strap
should not allow any slack. It lies
in a relatively straight line without
sagging. It does not press on the
child’s flesh or push the child’s
body into an unnatural position.
6. Tighten harness by pulling the
adjuster strap located at lower end
of bottom cushion under fabric flap
( ig ).
7. Be sure harness is positioned on
child’s shoulders and snugly
adjusted around child ( ig G).
8. Be sure buckle is securely
attached and chest clip adjusted
to arm pit level ( ig. G).
F
H
G
CAUTION:
The reco ended position for the
child is on his or her back (Fig. G). If
child’s edical condition requires that
child ust be positioned on his or her
sto ach (Fig. H), then you ust con-
sult and receive approval for such po-
sitioning fro your child’s edical
professional.
E
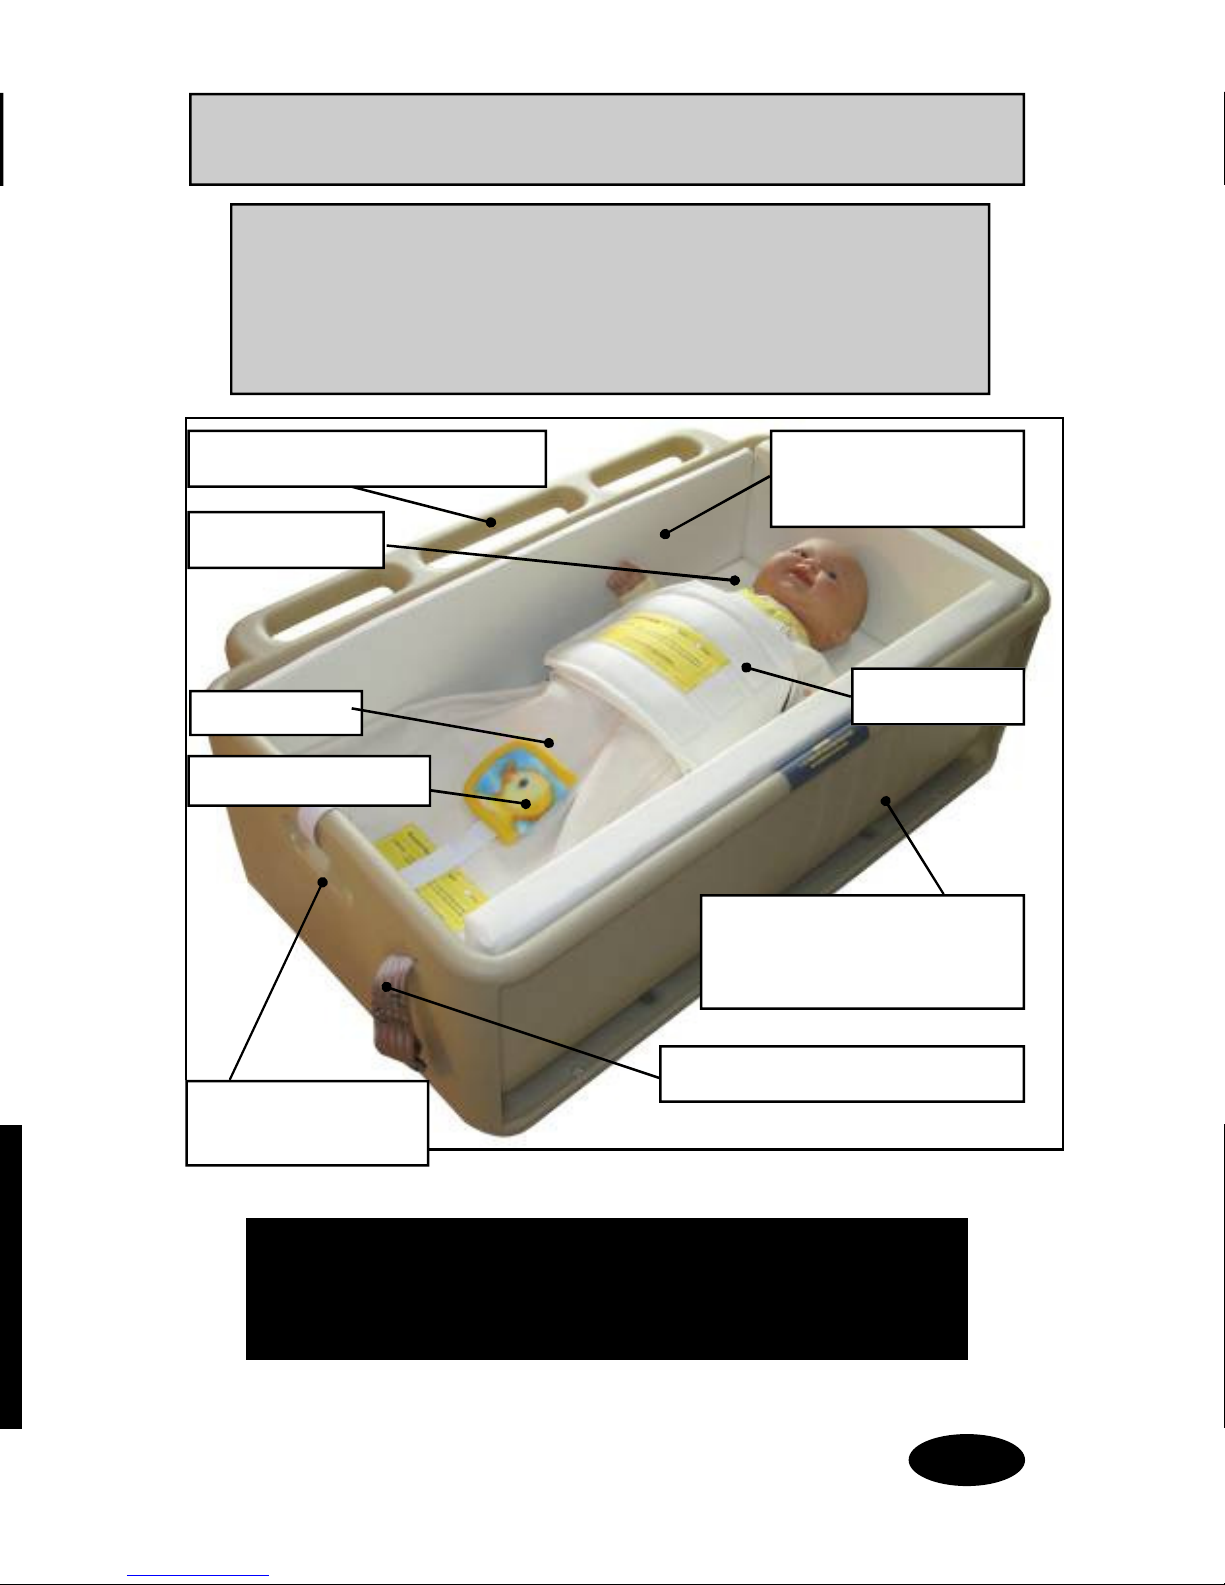
HOPE Car Bed Features
Car Bed size: 14.25” width X 29” long
Child’s Weight Range: 4.5 to 35 lbs.
Child’s Height Range: 13” and 29”
(Taller, if legs are permitted to bend)
Dual wall shell
Outer shell for strength
Inner wall to prevent injury
Restraint Bag
Inside lined with
EPS oam
irm Cushion
Cummerbund
Vehicle Seat Belt Attachment
Handles to carry car
bed outside vehicle
Leveling Straps
Page 9
Medical Tube Strap
This child restraint confor s to all applicable Federal
otor vehicle safety standards. This Restraint is not
Certified for Use on Aircraft.
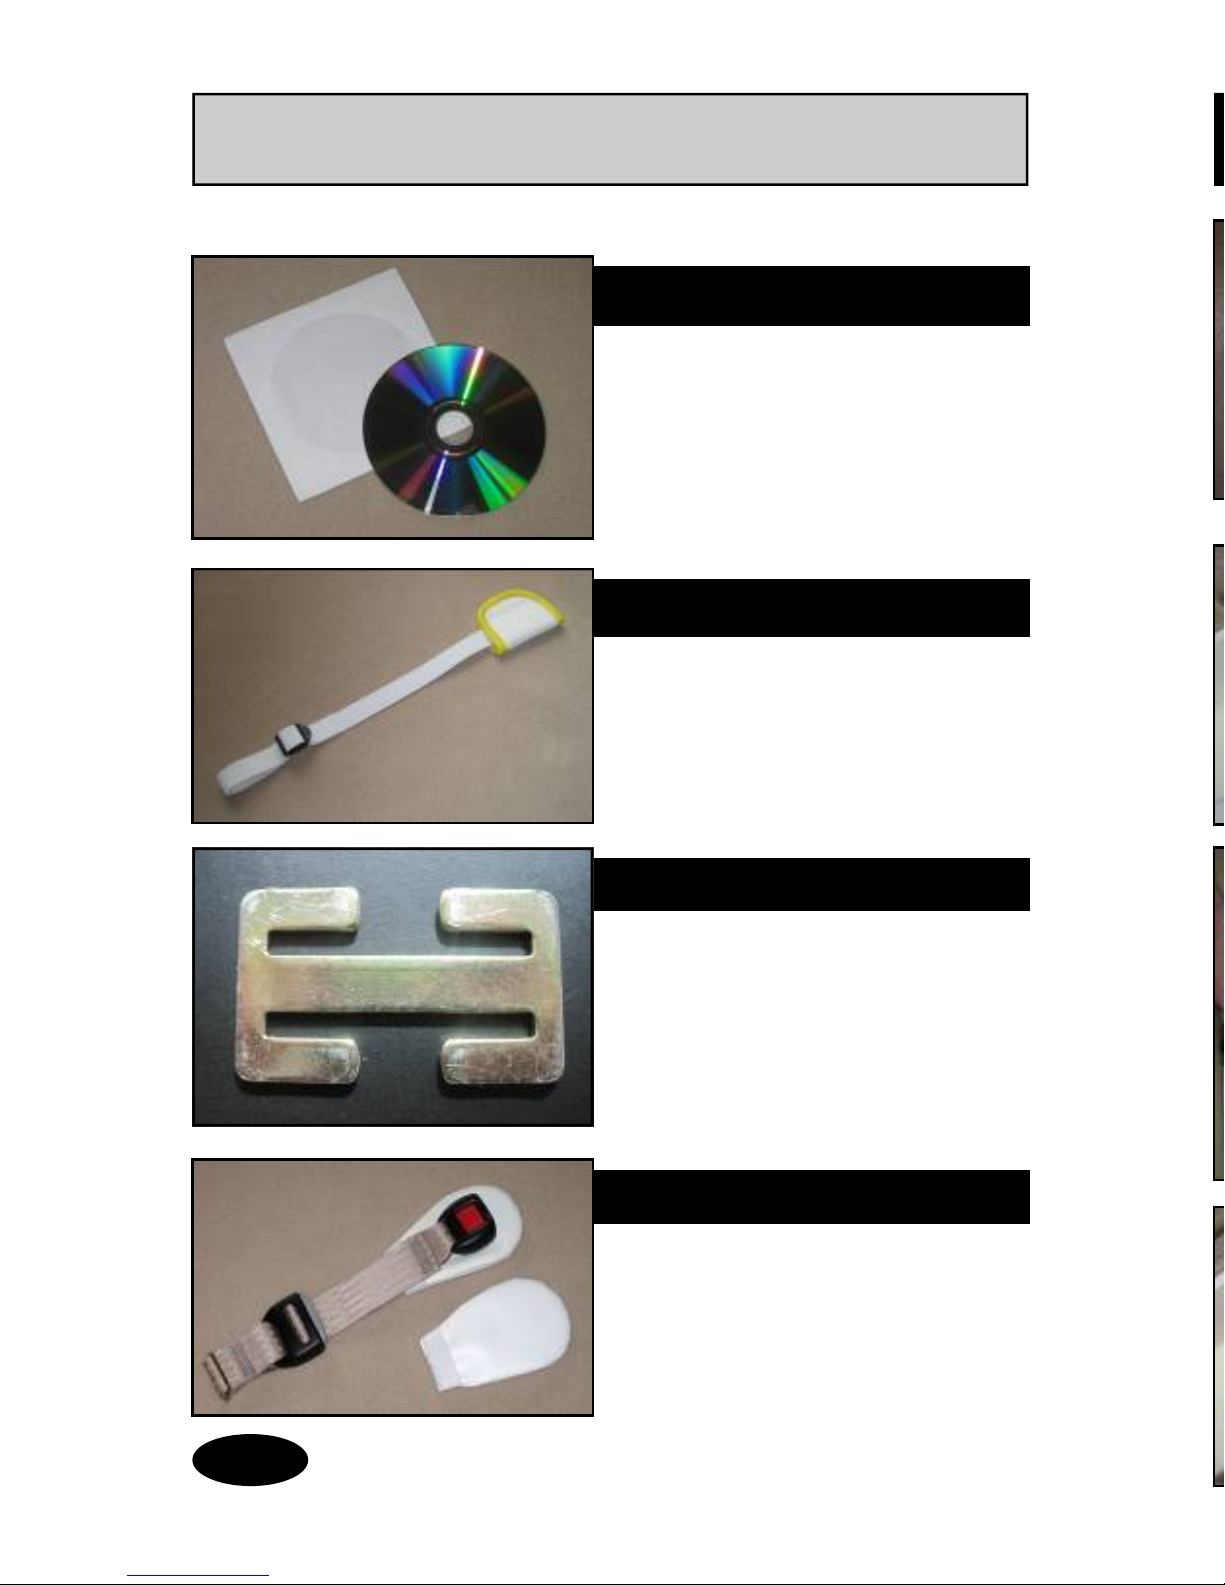
Car Bed Accessories
Locking Clip
Two locking clips provided with car
bed as a standard part.
Replacements available.
(See Page 49)
Page 10
Installation Video
Available Upon Request.
(Page 49).
Medical Tube Control Strap
Provided with car bed as a standard
part.
Replacements available.
(See Page 49)
Buckle Pad
Provided with car bed as a standard
part.
Replacements available.
(See page 49)
Securing Child in 3-Point Harness
NOTE: Verify that the cu erbund
and 3-point harness have been
installed according to Pages 20 - 23.
I portant: Child must be at least 10
pounds and not more than 35
pounds to use the 3-pt harness. The
large cummerbund must also be
used with the 3-point harness.
1. Open cummerbund and 3-pt
harness ( ig. A).
2. Place child in car bed. Place
large cummerbund firmly
around child. asten Velcro in
place ( ig. B).
3. Lengthen harness by lifting the
lever (See arrow— igure C)
located at lower end of
bottom cushion under
fabric flap ( ig C) and pull
harness to desired length.
4. Place shoulder straps over the
shoulders. Connect buckle and
chest clip. Cummerbund will
provide cushion between child
and buckle/chest clip ( ig. D).
Note: Proceed to Step 5
on next page.
Page 43
A
B
D
3-Point Harness
with cummerbund
Weight Range: Over 10 Pounds to
35 Pounds
Height Range: Car bed will transport
a child up to 29 inches in height. If
the child’s legs are permitted to
bend, the car bed can transport a
child taller than 29 inches.
C

Securing Child in estraint Bag, Cont.
5. Tighten the shoulder straps by
pulling the adjuster strap lo-
cated at the lower part of the
bottom cushion under the flap
( ig. H).
Child’s Height.
Car bed will transport a child up to
29 inches in height. If the child’s legs
are permitted to bend, the car bed
can transport a child taller than 29
inches.
Medical Tube Control
If child’s condition requires a venti-
lator, the medical tube control strap
can be used ( ig. K). There are also
two openings in the bottom of the
restraint bag for monitor lead wires.
There is a slot in the middle of the
restraint bag for G-Tube access.
Ventilator tubing must remain out-
side of the restraint bag and cum-
merbund.
Page 42
I
K
H
CAUTION: The reco ended
position for the child is on his or
her back (Fig. K). If child’s edi-
cal condition requires that child
ust be positioned on his or her
sto ach (Fig. I) or on his or her
side (Fig. J), then you ust con-
sult and receive approval for
such positioning fro your
child’s edical professional.
J
Car Bed Accessories, Cont.
Page 11
Leveling Wedge
oam leveling wedge can be used to
help level car bed on a more
severely sloped seat.
Replacement Available - See Page 49
3-Point Harness
3-point harness provided with car
bed as a standard part.
Replacement harness is available.
(See Page 49)
Shoulder Pads
Two shoulder pads provided with
car bed as a standard part.
Replacement shoulder pads are
available.
(See Page 49)
Leveling Straps
Leveling Straps provided with car bed
as a standard part.
Replacement Available (See Page 49)

estraint Bag Selection and Sizing
Small Side Facing estraint Bag
with small cummerbund
Large Side Facing estraint Bag
with large cummerbund
Right side position only ( igure C)
Only with Medical Professional Ap-
proval
Small Size - 4.5 - 10 Pounds
Large Size - Over 10 - 35 Pounds
See I portant Caution regarding
restraint bag selection on Page 13.
Page 12
Small estraint Bag
with small cummerbund
Weight Range: 4.5 to 10 Pounds
( igure A).
See I portant Caution regarding
restraint bag selection on Page 13.
Large estraint Bag
with large cummerbund
Weight Range: Over 10 Pounds to 35
Pounds ( igure B).
See I portant Caution regarding
restraint bag selection on Page 13.
A
B
C
E
F
G
Securing Child in estraint Bag, Cont.
NOTE: You MUST select the type of
restraint (restraint bag or 3-point
harness) that is appropriate for
your child’s size (See Pages 12 and
13) and edical condition (Consult
with your edical professional).
NOTE: Verify that the cu erbund
and restraint bag have been
installed according to Pages 14 - 19.
1. Open both zippers to provide
opening for child ( ig. D).
2. Place child in restraint bag.
Make sure arms and neck are
properly inserted ( ig. E).
3. Close both zippers fully ( ig ).
4. Place cummerbund firmly
around child. asten Velcro in
place ( ig. G).
Page 41
D
CAUTION:
If either zipper beco es broken,
or does not function properly,
do not use car bed and call cus-
to er service i ediately.
Securing Child in estraint Bag
Page 40
Small estraint Bag
with small cummerbund
Weight Range: 4.5 to 10 Pounds
( igure A).
See I portant Caution regarding
restraint bag selection on Page 13.
Large estraint Bag
with large cummerbund
Weight Range: Over 10 Pounds to 35
Pounds ( igure B).
See I portant Caution regarding
restraint bag selection on Page 13.
B
A
Small Side Facing estraint Bag
with small cummerbund
Large Side Facing estraint Bag
with large cummerbund
Right side position only ( igure C)
Only with Medical Professional Ap-
proval
Small Size - 4.5 - 10 Pounds
Large Size - Over 10 - 35 Pounds
See I portant Caution regarding
restraint bag selection on Page 13.
C
CAUTION:
If child’s edical condition requires that child ust be positioned on
his or her sto ach (prone position) or on his or her side, then you
ust consult and receive approval for such positioning fro your
child’s edical professional.
3-Point Harness Sizing
Page 13
3-Point Harness
with cummerbund
Weight Range: Over 10 Pounds to 35
Pounds ( igure D).
D
Always consult a edical professional before the selection of
the type of restraint used.
It is reco ended that the child be transported in the supine
(on his back) position using the restraint bag or 3-point har-
ness, unless the edical condition requires that the child be
transported in the prone position (on her sto ach). The
prone position ust have edical approval.
Restraint Bag Selection
The strength of the s all and large restraint bags are the
sa e. Restraint bag selection ust be based on child’s body
and shoulder size. The child’s head size, body type, or pres-
ence of a cast can cause his weight to reach 10 lbs. before he
is physically ready to be oved to the large restraint bag.
The s all restraint bags (including side facing) are labeled
with a weight range of 4.5 to 10 lbs. However, the child ust
stay in the s all bag (even if above 10 lbs.) until the bag can
no longer be zipped all the way up co fortably because of
body, neck, or shoulder size.
Questions about restraint bag selection, edical conditions,
and size can be addressed by calling:
Merritt Manufacturing at 317-409-0148.
I portant Cautions

Attaching Cummerbund and estraint Bag
Page 14
ASSEMBLY
Cu erbund Installation
NOTE: Installation of the cu er-
bund and restraint bag ust be
done before installing the car bed
in vehicle.
1. Remove the 1 ½” and 1/2” side
EPS panels ( igure A) to expose
the attachment slots ( ig. A).
2. Cummerbund must be positioned
with the identification label right
side up (When facing child, care-
giver should be able to read cum-
merbund label ( ig. B).
3. Insert the metal anchor on right
side of cummerbund into the side
attachment slot ( ig. C). Lock an-
chor in place from the bottom
( ig. D).
D
A
C
ead end
of Car Bed
B
Page 39
Leveling of Car Bed, Cont. INSTALLATION
5. Repeat Steps 2-4 for the lev-
eling strap on the other side
of the car bed.
6. Tighten both leveling straps
by pulling on the free end of
each strap ( igure E).
7. igure shows the car bed
with the leveling straps in-
stalled.
E
F
NOTE: If it is not possible to use the
leveling straps, then the optional
Leveling Wedge ay be used in-
stead.
1. Simply center the wedge under-
neath the car bed with the thick
end against the vehicle seat
back ( igures G and H) prior to
the installation steps on Page
33.
2 Proceed with the installation
steps on Page 32.
H
G

Leveling of Car Bed
Page 38
INSTALLATION
NOTE: The car bed can be leveled
by installing the leveling straps to
the lower fra e of the front pas-
senger seats. (See Arrow—Fig. A)
Note: Do not attach to the vehi-
cle seat fra e if vehicle anufac-
ture prohibits this type installa-
tion (See Vehicle Owners Man-
ual).
1. Move the front vehicle seats
forward so that each seat
frame is exposed ( ig. A).
2. Wrap the looped end of the
leveling strap around the bot-
tom of the seat frame ( igure
B).
3. Insert the combo adjuster
through the loop ( igure B)
and pull the webbing all the
way through allowing the
loop to tighten around the
vehicle seat frame ( ig. C).
4. Attach the snap hook on the
leveling strap to the d-ring on
the short strap attached to
the side of the car bed ( igure
D).
D
A
C
B
Attaching Cummerbund and estraint Bag, Cont.
Page 15
ASSEMBLY
4. Repeat step 3 for left side of
cummerbund ( ig. E). It is nec-
essary to compress bottom
cushion to insert metal anchor
on left side of cummerbund.
Insert anchor and lock in place
( ig. E and ).
5. igure G shows the cummer-
bund’s metal anchors locked
into place after completing
Steps 1-4.
6. Open cummerbund to install
restraint bag ( ig. H).
F
G
E
H
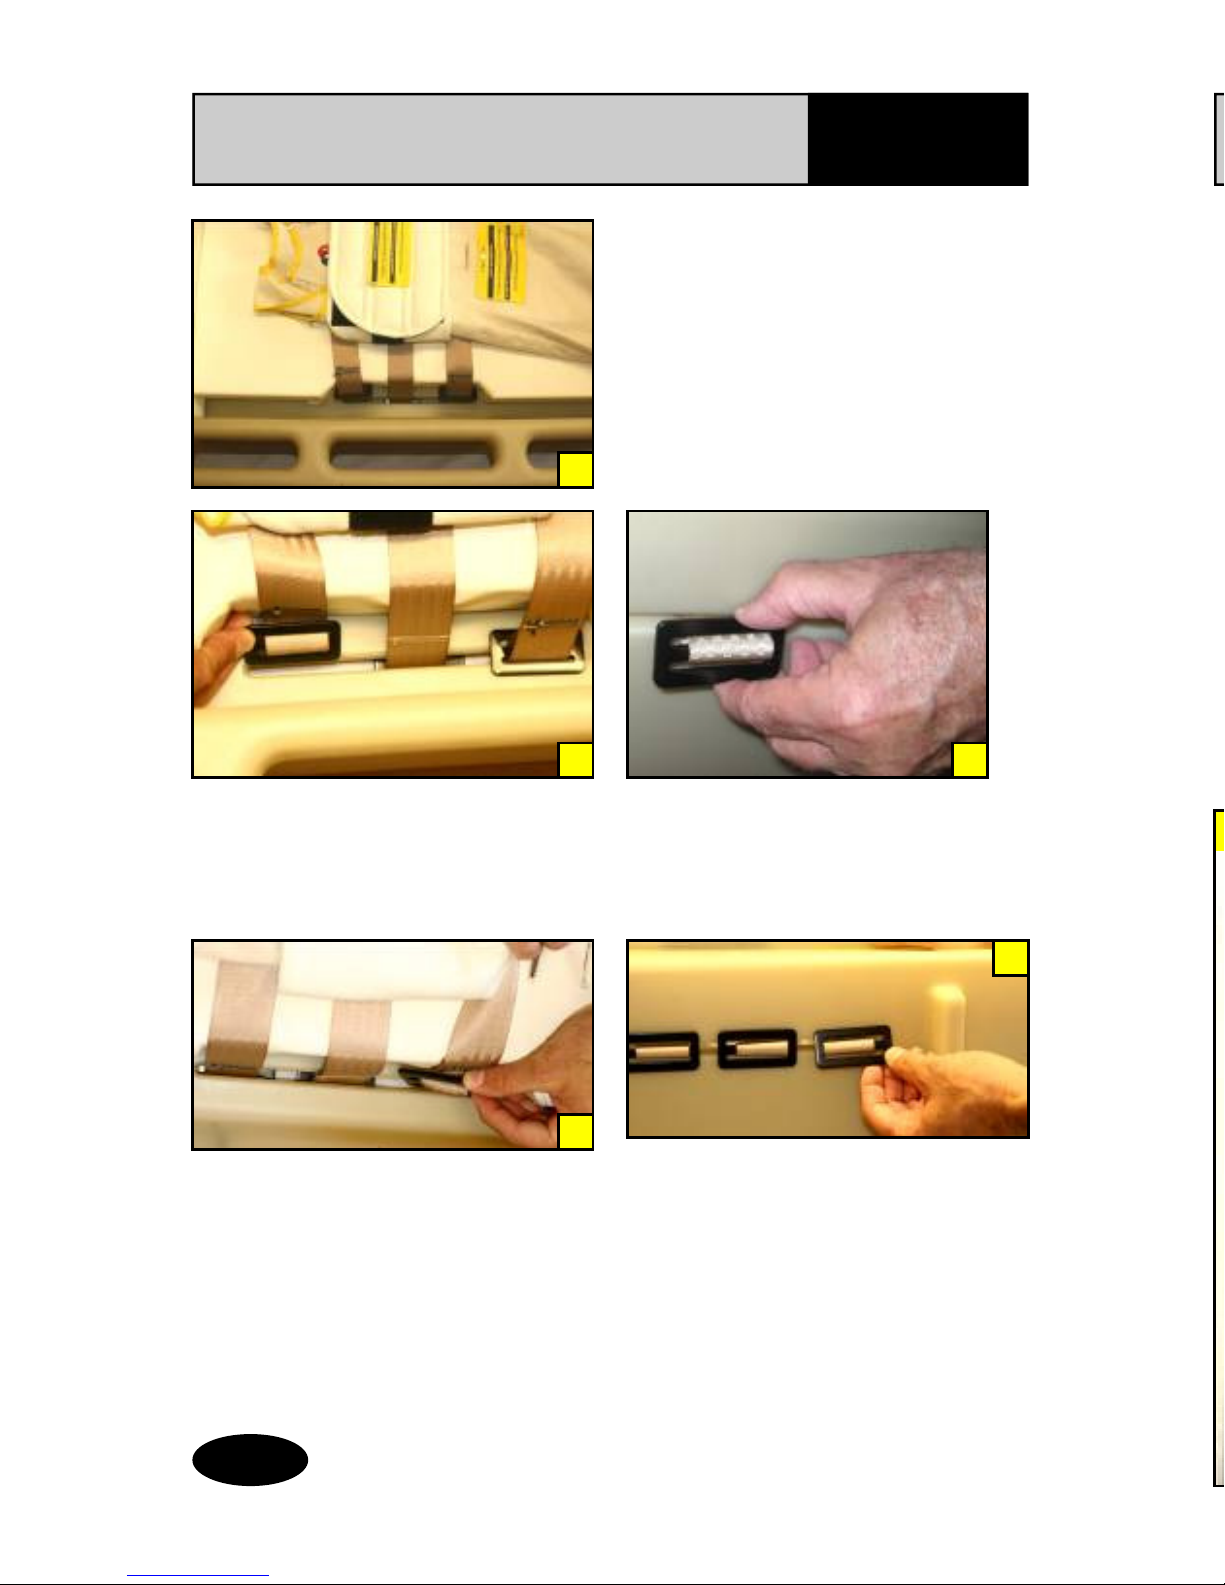
Attaching Cummerbund and estraint Bag, Cont.
Page 16
ASSEMBLY
Restraint Bag Installation
1. Lay restraint bag on top of open
cummerbund. Then close cum-
merbund for ease of installation
of restraint bag ( ig. A).
C
D
E
B
A
2. Insert one of the two metal anchors on the right side of the restraint bag
( ig. B). Lock the anchor in place from the bottom of the car bed ( ig. C).
3. Repeat Step 2 for the other metal anchor (See igs. D and E).
Installation of Car Bed in Vehicle, Cont.
Page 37
INSTALLATION
3. Grasp the center lap belt and pull it down through the belt slot (nearest
the head end of the car bed— igure C) to its mating buckle ( igure D).
D
C
4. Attach the lap belt to the buckle
( igure D).
5. Review pages 24 - 31 to deter-
mine the appropriate method
for locking both vehicle seat
belts and proceed to lock them
now.

Installation of Car Bed in Vehicle, Cont. INSTALLATION
Page 36
Steps 1– 5 de onstrate a lap only belt installation.
1. Grasp the lap belt located closest to the vehicle door and pull it down
through the belt slot (nearest the foot end of the car bed— igure A) to its
mating buckle ( igure B).
B
2. Attach the lap belt to the buckle
( igure B).
A
Attaching Cummerbund and estraint Bag, Cont.
Page 17
ASSEMBLY
Restraint Bag Installation, Cont.
4. Repeat Steps 2 and 3 for the left
side of the restraint bag (Whose
metal anchors are shown in ig.
). It is necessary to compress
bottom cushion to insert metal
anchors on the left side of re-
straint bag. Lock anchors in
place from the bottom of the
car bed.
5. Replace the 1/2” and 1 ½” side
EPS panel ( igure G).
6. Push each of the restraint bag
shoulder straps through the
bottom slots in the bottom
cushion ( ig. I) and then
through mating slots (second
from bottom) in plastic shell
( ig. J).
7. Continue to pull straps through
the bottom of the shell ( ig J).
J
F
Bottom Slots (Cushion) Bottom of Plastic Shell
NOTE:
Verify that the 1 1/2” (thicker)
EPS pad is positioned on side of
car bed next to the label in
Figure H—See arrow).
I
G
H

Attaching Cummerbund and estraint Bag, Cont.
Page 18
ASSEMBLY
K
L
Restraint Bag Installation, Cont.
8. Turn the car bed on its side.
Connect the two shoulder
straps to the metal connector
plate ( ig. K).
9. Tighten the shoulder straps by
pulling the adjuster strap
located at the lower part of the
bottom cushion under the flap
( ig. L).
Review the bottom of the car bed
to verify the following:
• 4 Metal Anchors for Restraint
Bag locked in place (2 on each
side)
• 2 Metal Anchors for Cummer-
bund locked in place (1 on
each side)
• Shoulder straps attached to
the metal connector plate.
Asse bly Verification
Metal Anchors for
Restraint Bag locked
in place
Metal
Anchors for
Cummerbund
locked in place
Metal Anchors for
Restraint Bag locked
in place
Metal
Connector
Attached to
Shoulder
Straps
Installation of Car Bed in Vehicle, Cont.
Page 35
INSTALLATION
4. Grasp the center lap-
shoulder belt and pull it
down through the belt slot
(nearest the head end of the
car bed— igure D) to its mat-
ing buckle ( igure E).
5. Attach the seat belt to the
buckle ( igure E).
6. Review pages 24 - 31 to de-
termine the appropriate
method for locking each ve-
hicle seat belt and proceed
to lock them now.
D
E
NOTE: Seat belts ust be locked
for secure installation of car bed.

Installation of Car Bed in Vehicle, Cont. INSTALLATION
Page 34
1. Place the car bed on the vehicle
seat with the vehicle belt path
attachment contacting the vehi-
cle seat back (See Arrow - ig-
ure A).
NOTE: The car bed ust be in-
stalled using two vehicle seat
belts. Each belt can be a “lap
only” or a “lap-shoulder” belt.
Steps 2– 6 de onstrate a lap-
shoulder belt installation.
See Page 36 for Lap Belt Only
2. Grasp the lap-shoulder belt lo-
cated closest to the vehicle
door and pull it down through
the belt slot (nearest the foot
end of the car bed— igure B) to
its mating buckle ( igure C).
A
C
B
3. Attach the seat belt to the buckle
( igure C).
Page 19
IMPORTANT
Verify that the shoulder straps are properly connected to the etal
connector plate by pulling the strap as indicated in Figure M.
M
Attaching Cummerbund and estraint Bag, Cont.
ASSEMBLY
Attaching Cummerbund and 3-Point Harness
Page 20
ASSEMBLY
Cu erbund Installation
NOTE: Installation of the cu er-
bund and 3-point harness ust be
done before installing the car bed
in vehicle.
NOTE: Large cu erbund ust be
used with 3-point harness.
1. Remove the 1 ½” and 1/2” side
EPS panels ( igure A) to expose
the attachment slots ( ig. A).
2. Cummerbund must be positioned
with the identification label right
side up (When facing child, care-
giver should be able to read cum-
merbund label ( ig. B).
3. Insert the metal anchor on right
side of cummerbund into the side
attachment slot ( ig. C). Lock an-
chor in place from the bottom
( ig. D).
D
C
A
ead end
of Car Bed
B
Installation of Car Bed in Vehicle, Cont. INSTALLATION
Page 33
Two Vehicle Lap/Shoulder Belts
One Vehicle Lap/Shoulder Belt
and center Lap Belt
Two Lap Belts
Installation Options
The car bed must be installed using
two vehicle seat belts. Select your
vehicle seat belt routing options.
(See ig A-B-C)
A
B
C
IMPORTANT
Review Pages 24 - 31 to
deter ine the appro-
priate ethod for lock-
ing your vehicle seat
belt.
NOTE:
For questions or con-
cerns about the type of
belts or locking
ethod.
Call: Merritt Manufac-
turing, Inc.
Phone: 317-409-0148
NOTE:
See Page 31 for Verifi-
cation of Installation.
Table of contents
Other Merritt Car Seat manuals


