merten merten MEG5755-04 series User manual

V5755-581-02 01/15
1
Display time r moduleArt. no. MEG57 55-03../-04..© Schne ider-Electric 2014 V5755-581-0201/15
– Complete the display timer module with:
• Corresponding inserts (see function overview)
• Frame in design System M
¼DANGER
Risk of serious damage to property and per-
sonal injury, e.g. from fire or electric shock,
due to incorrect electrical installation.
Safe electrical installation can only be ensured if
the person in question can prove basic knowl-
edge in the following areas:
• Connecting to installation networks
• Connecting several electrical devices
• Laying electric cables
These skills and experience are normally only
possessed by skilled professionals who are
trained in the field of electrical installation technol-
ogy. If these minimum requirements are not met
or are disregarded in any way, you will be solely li-
able for any damage to property or personal inju-
ry.
|From version 1.5 the following functions are avail-
able:
• Two global scenes can be retrieved via push-
buttons
• Automatic deactivation of display lighting can
be selected
After plugging the module onto the insert for the first
time, information on the module type and module version
are displayed for one second each.
Display timer module
Operating instructions
Art. no. MEG5755-03../-04..
Necessary accessories
For your safety
Module version
en
In combination with different inserts, you can carry out
various functions with the display timer module (referred
to below as module), such as:
• switching, dimming and controlling blinds manually
• time-controlled switching and controlling of blinds
Product features:
• Simple operation using five push-buttons
• Adjustable date and time
• Number of switching cycles (switching on/off, raising/
lowering):
–Switching, dimming, blind inserts:
per channel: 2 switching cycles/day
–Central unit insert:
per PL line: 2 switching cycles/day
• Switching times preset at the factory, but can be
changed later
• Switching to manual mode possible
• Global control (max. 4 PL lines) and separate line con-
trol
• Saving scenes is possible
• Two global scenes can be retrieved via push-buttons
(from version 1.5)
• Astro function (control by astronomical pre-calculation
of sunrise and sunset)
• Adaptation of astro function using specific astro time
shift
• Random function ranging from 0-30 minutes
• Evaluating DCF timer
• Automatic summer/winter time switchover
• Individually adjustable blind movement time
• Adjustable brightness threshold for sun protection
function
• Adjustable response for wind alarm
• Adjustable display brightness
• Automatic deactivation of display lighting can be se-
lected (from version 1.5)
• Power reserve of at least 6 hours in the event of a pow-
er failure
• Reset (restore default settings)
Ta b l e o f C o n t e n t
Getting to know the display timer module 1
Connections, displays and operating elements 2
Mounting the module 2
Getting to know the basic functions 3
Getting to know the menu 3
Setting module: Basic menu settings 3
Setting module: Advanced menu 4
Notes on advanced functions 6
Operating the module 7
Blind control 8
Light control 8
Global blind and light scenes 8
Controlling loads from another location via PlusLink 8
What should I do if there is a problem? 8
Technical data 9
Getting to know the display timer
module
Overview of module functions on re-
ceiving inserts
Complete the module with the receiving inserts for
switching, dimming or controlling blind/roller shutter in
order to carry out local light and blind control.
Function overview of the module on
sending insert
Complete the module with the sending central unit insert
in order to carry out global light and blind control via the
PlusLink (PL).
Switching:
• Electronic
switch insert
• Relay switch in-
sert
• switching on/off manually
• time-controlled switching on/off
• evaluating DCF timer
• Electronic
switch insert, 2-
gang
• Relay switch in-
sert, 2-gang
• manually switching on/off both
channels together
• time-controlled switching on/off of
both channels separately or to-
gether
• evaluating DCF timer
Dimming:
•Universaldim-
mer insert
• Control insert
1-10 V
•DALIinsert
• switching and dimming manually
• time-controlled switching
• evaluating DCF timer
•Universaldim-
mer insert, 2-
gang
• manually switching and dimming
both channels at the same time
• time-controlled switching of both
channels separately or together
• evaluating DCF timer
Controlling blinds/roller shutter:
• Blind control in-
sert
• raising/lowering manually
• time-controlled raising/lowering
• Sun protection function
• Wind alarm function
• disabling blind movement (with
magnetic contact)
• evaluating DCF timer
Global light and blind control:
• Central unit in-
sert
• manual control for all PL lines to-
gether:
switching, dimming, lowering/
raising (push-button function) or
retrieving scenes (scene function
from version 1.5)
• time-controlled for all PL lines to-
gether or each PL line separately:
switching, raising/lowering
• evaluating DCF timer

V5755-581-02 01/15
2
Front:
*Can only be selected as alternative in combination with
a central unit insert (from version 1.5).
Rear:
AModule interface
Connections, displays and operating
elements
ADisplay
BMenu button
CManual push-button
DOK button
EUP arrow button
• Push-button function (factory setting): Raising/
switching on
• Scene function*: Scene 1
FDOWN arrow button
• Push-button function (factory setting): Lower-
ing/switching off
• Scene function*: Scene 2
GLEDs
A
B
C
E
D
F
G
A
Display elements
|The displayed symbols depend on the inserts
used and the sensors connected via PlusLink.
Individual display elements
You will see the following symbols on the display:
Standard display
Example of the standard display during operation:
AInsert (see function overview)
BFrame
CDisplay timer module
Time, value and information display
Display of the weekdays
1=Mondayto7=Sunday
Automatic mode
Astro function
Random function
• Status display with switched
load: Light on or raising the blind
• Switching times for raising/
switching on
• Status display with switched
load: Lowering the blind
• Switching times for lowering/
switching off
Setting the time
Setting the day, month and year
Switching time 2
Sun protection function activated,
Setting the brightness threshold
Wind alarm is executed,
Setting the behaviour for wind
alarm
Switching between summer and
winter time
DCF timer is evaluated
Mounting the module
B
C
A
Initialising the module
After plugging the module onto the insert for the first
time, information on the module type and module version
are displayed for one second each. A standard display
follows this, either with a flashing clock symbol or a DCF
symbol.
Module type display: Display timer module
Standard display with flashing clock symbol
Set time and date (see Section "Setting module: Basic
menu settings").
Standard display with DCF symbol
|The DCF timer is detected 5 minutes after con-
necting to the mains supply.
Time and date were received via a DCF timer.
Error message after changing over the module
If the module is plugged onto an insert that differs in func-
tionality from the previous one, the error message "FAIL"
appears and all LEDs flash red.
For initialisation, reset the module to the default settings.
|When you do a reset to the default settings, previ-
ously saved settings are lost! The set time and
date are not reset.
1Press the push-buttons and simultaneously for
10 seconds.
The standard display appears after resetting.
10 s
Menu
OK
Man
V5755-581-02 01/15
3
|"Blind/roller shutter" will be referred to below as
just "blind".
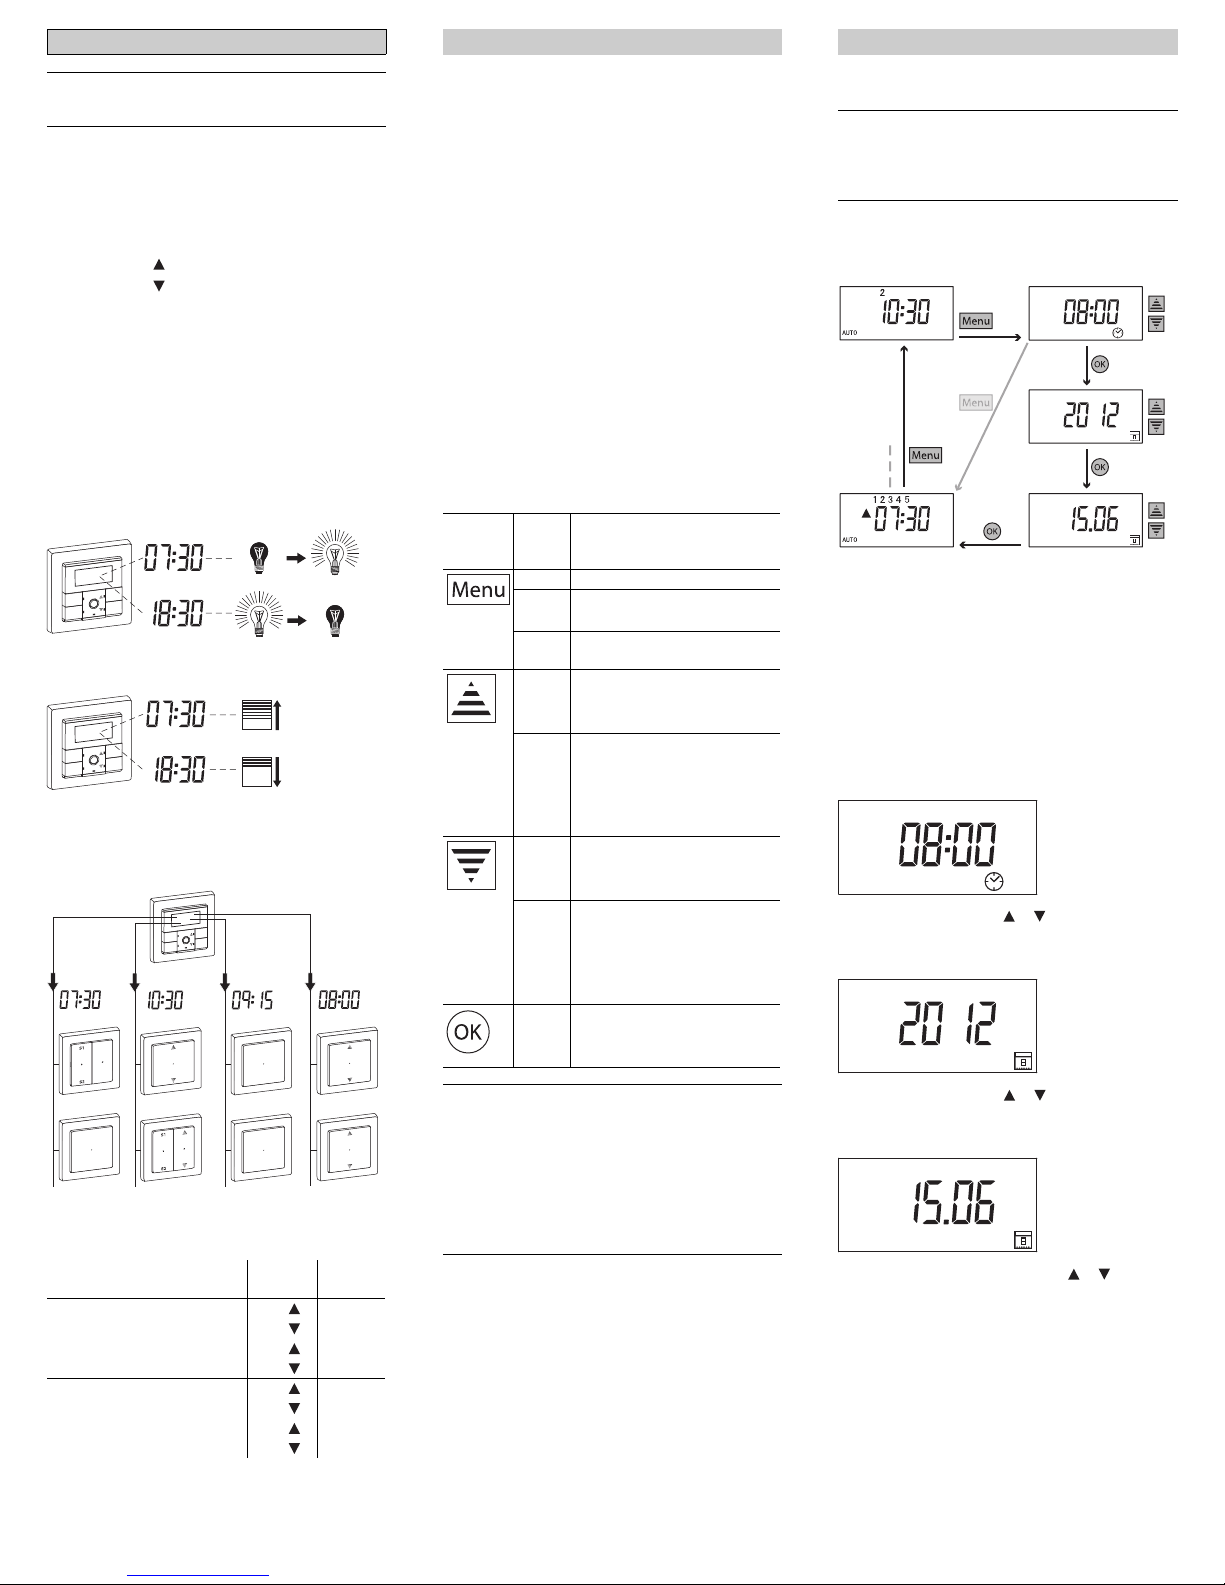
Switching times
The module has a program memory that contains stand-
ard switching times that can be changed anytime.
The switching times perform specific actions:
• Switching time : Raise blind, switch on light
• Switching time : Lower blind, switch off light
Both switching times together result in a switching cycle.
You can combine weekdays to form a group. In that case
the switching times apply to all the days in this group. A
weekday group consists of 1-7 days. You can create up
to 7 different groups. In the default settings, the working
days (Monday - Friday) form a group, and the weekend
(Saturday + Sunday) forms a group.
Module in combination with switchable/dimmable
inserts
Two switching cycles per day are available for each
channel.
Module in combination with a blind control insert
Module in combination with a central unit insert
Two switching cycles per day are available for each PL
line.
The standard switching times and weekday groups
per channel or PL line are:
Getting to know the basic functions
Weekday groups Switch-
ing cycle
Switch-
ing times
Gr. 1 Monday - Friday (1-5) 1 07:30
18:30
2 --:--
--:--
Gr. 2 Saturday - Sunday (6-7) 1 09:30
22:00
2 --:--
--:--
Menu
OK
Man
Menu
OK
Man
PL4
C
PL3
BC
PL2
PL1
B
A
Menu
OK
Man
The module has two menu levels:
1. Menu level:
– Set time and date
– Set switching times
2. Menu level: Advanced menu
– Selecting arrow button function
– Save scenes
– Set astro time shift
– Activating/deactivating automatic summer/winter time
switchover
– Set individual blind movement time
– Setting brightness threshold for sun protection func-
tion
– Setting the blind position for sun protection function
– Set response for wind alarm
– Set display brightness
– Set automatic deactivation of display lighting
The following push-buttons are used to operate the
menu:
|With a long press of [Menu], the menu for setting
the time and switching time appears after 2 s.
To open the advanced menu, hold the [Menu]
push-button down.
|If you do not press any push-button in the menu
for more than 2 minutes, the standard display ap-
pears. Changes that are not confirmed with [OK]
are not saved.
Getting to know the menu
Push-
button
Push
button
action
Action
short • Skip submenu
long (2
s)
• Open menu
• Quit menu
long (4
s)
• Open advanced menu
short • Increase values (+1)
• Add/keep weekdays
• Browse submenu
press
and
hold
• Increase values cyclically
(fast mode):
+5: Astro time shift
+10: Brightness threshold
+15: Time/date data
short • Decrease values (-1)
• Remove weekdays
• Browse submenu
press
and
hold
• Decrease values cyclically
(fast mode):
-5: Astro time shift
-10: Brightness threshold
-15: Time/date data
short • Save settings
• go to next menu command
Set time and date
|When receiving a DCF time signal via PlusLink,
the "Set time and date" menu is no longer dis-
played. Setting is done automatically (see "Notes
on advanced functions" for more information).
Menu structure
AStandard display
BSet the time
CSet year
DSet day and month
ESet switching times
Fsee "Set switching times"
Setting
1Open menu: Press [Menu] push-button for 2 s.
The time display flashes.
2Set current time using or push-button.
3Confirm setting with [OK].
The year display flashes.
4Set current year using or push-button.
5Confirm setting with [OK].
The day and month display flashes.
6Set current day and month using or push-but-
ton.
7Confirm setting with [OK].
The "Set switching times" display appears.
To quit the menu: Press [Menu] push-button for 2 s.
Setting module: Basic menu settings
2s
2s
A
E
F
B
C
D
V5755-581-02 01/15
4
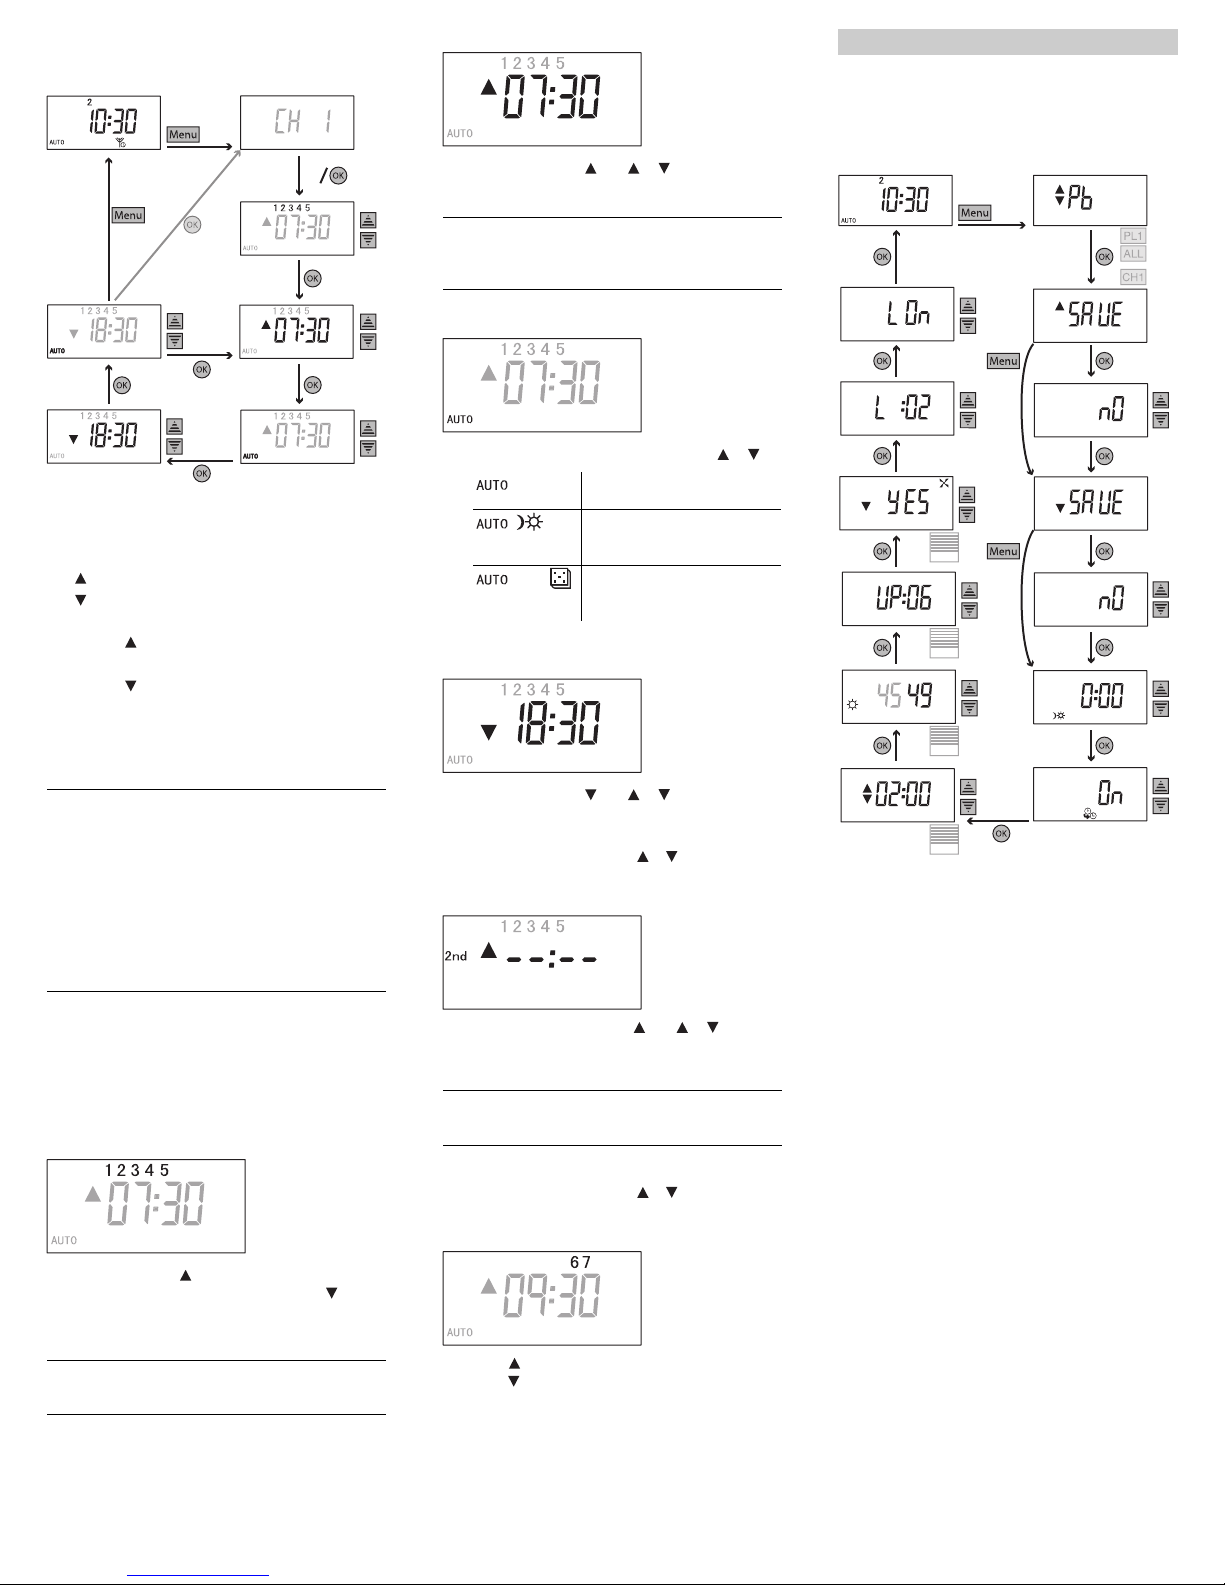
Set switching times
Menu structure
|In combination with a 2-gang insert you can set
the switching times separately for each channel.
The menu briefly displays the corresponding
channel (CH 1/ CH 2) when it is started and every
time the weekday group is changed.
In combination with a central unit insert you can
set the switching times separately for each PL
line. The menu briefly displays the corresponding
PL line (PL 1-4) when it is started and every time
the weekday group is changed.
Setting
1Open menu: Press [Menu] push-button for 2 s.
If the module does not receive a DCF time signal via
PlusLink, "Set time" will appear on the display. To set the
switching time, briefly press the [Menu] push-button.
The first day of weekday group 1 flashes.
2Use push-button to add days to group individual-
ly/keep days in group or use push-button to re-
move from group.
3Confirm setting with [OK].
|Days removed from an existing group form a new
group. You can create up to 7 weekday groups.
AStandard display with DCF time signal
BDisplay of the channel / the PL line
CSelect weekday (1st group)
D: Add day to group/keep day in group
E: Remove day from group
FSet switching cycle 1
GSet switching time
HSelect operating mode
ISet switching time
JSelect operating mode
KSet switching cycle 2
LSetting switching times for further weekday groups
2s
2s
2s
G
F
H
C
D
E
B
A
I
J
L
K
The time display flashes.
4Set switching time with or push-button.
5Confirm setting with [OK].
|You can delete the switching time with the [Man]
push-button. If you press the push-button again,
the previously set switching time is displayed.
The operating mode display flashes.
6Select operating mode with push-button or .
7Confirm setting with [OK].
The time display flashes.
8Set switching time with or push-button.
9Confirm setting with [OK].
The operating mode display flashes.
0Select operating mode with or push-button and
confirm with [OK].
The time display flashes.
^Set second switching time with or push-but-
ton.
<Confirm setting with [OK].
|If you press the [Man] push-button a switching
time set previously appears.
The operating mode display flashes.
+Select operating mode with or push-button and
confirm with [OK] .
The first day of weekday group 2 flashes.
#Press to add/keep individual days in the group or
press to remove from group.
[Confirm setting with [OK].
The time display flashes.
Repeat the individual steps for setting the switching time
(see weekday group 1).
Automatic mode
Astro function (see "Notes on
advanced functions")
Random function (see "Notes
on advanced functions")
The possible settings in the advanced menu depend on
the respective insert (see overview of functions).
Structure of the advanced menu
Setting module: Advanced menu
AStandard display
only in combination with a central unit insert
BSelecting arrow button function
CDisplay of PL line / ALL (separate scenes for
PL lines / then global scenes for all PL lines to-
gether can be set)
only in combination with switchable/dimma-
ble inserts
DChannel display (scenes can be set separate-
ly for two channels)
EScene 1
FSave scene 1
GScene 2
HSave scene 2
ISet astro time shift
JActivate/deactivate automatic summer/winter time
switchover (not possible when receiving DCF time
signal via PL)
only in combination with a blind control insert
KSetting individual blind movement time
LSetting brightness threshold for sun protection
function
MSetting the blind position for sun protection
function
NSet response for wind alarm
OSet display brightness
PSet automatic deactivation of display lighting
4s
I
JK
O
P
L
M
N
H
F
G
E
B
D
C
A

V5755-581-02 01/15
5
Selecting arrow button function
Only in combination with a central unit insert (from ver-
sion 1.5)
If the push-button function has been preset at the factory,
you can use the arrow buttons to move the blinds up and
down or turn the light on and off. Alternatively, you can
use a central unit insert to retrieve scenes via the arrow
buttons. You can individually save one scene per arrow
button (see "Save scenes"). In order to do this switch the
configuration of the arrow buttons from push-button
function to the scene function.
1Open advanced menu: Press [Menu] push-button
for 4 s.
The display for the arrow button function appears.
2Select function with push-button or .
3Confirm setting with [OK].
|Configuration of the arrow buttons with scene
function applies in automatic mode and in manual
mode.
Save scenes
The module allows you to save two scenes that are acti-
vated by switching times.
In addition to this, you can save two global scenes (PL 1-
4) that can be retrieved with the arrow buttons. These
global scenes are only possible in combination with a
central unit insert and the respective scene function se-
lected for the arrow buttons (from version 1.5, see "Se-
lecting arrow button function").
|Display of the corresponding channel (CH 1/ CH
2), of the corresponding PL line (PL 1-4) and all
PL lines (ALL)
• In combination with a 2-gang insert you can set
two scenes separately for each channel. The
menu briefly displays the corresponding chan-
nel (CH 1/ CH 2) when it is started and every
time the weekday group is changed.
• In combination with a central unit insert you can
set two scenes separately for each PL line. The
menu briefly displays the corresponding PL
line (PL 1-4) when it is started and every time
the weekday group is changed.
• In combination with a central unit insert and the
scene function for the arrow buttons you can
set two global scenes for all PL lines. The menu
briefly displays "ALL" (from version 1.5).
Push-button function /
Pb
Scene function /
SCn
ARaise blind / switch on light Scene 1
BLower blind / switch off light Scene 2
Menu
OK
Man
OK
A
B
1Set brightness of lamps, and desired position of
blind (any values possible) with push-button or
.
|Saving blind scenes:
Raise blind to the uppermost position and wait for
2 minutes (running time) until the status display
disappears from the display. Then set the desired
position of the blind.
2Open advanced menu: Press [Menu] push-button
for 4 s.
Scene 1 display appears.
3Confirm setting with [OK].
The "no" display appears.
4Select save option ("yes") with push-button or .
5Confirm setting with [OK].
• Light scene: All lamps are switched off briefly and then
back on again to indicate that the saving procedure
has been successful. Then the lamps adopt the saved
brightness value.
• Blind scene: The blinds are lowered and raised by one
step to indicate that the saving procedure was suc-
cessful.
Scene 2 display appears.
Repeat the individual steps of scene 1.
Setting the astro time shift
(More information in "Notes on advanced functions")
1Open advanced menu: Press [Menu] push-button
for 4 s.
2Press [Menu] push-button repeatedly until the fol-
lowing display appears.
The time display for astro time shift flashes.
3Set astro time shift (max. ±2 hours) with or
push-button.
4Confirm setting with [OK].
The following table tells you by how many minutes your
local time deviates from standard time (Central Europe-
an Time CET). This deviation represents your astro time
shift.
Activating/deactivating automatic sum-
mer/winter time switchover
(Not possible if DCF signal was sent via PL, see "Notes
on advanced functions")
1Open advanced menu: Press [Menu] push-button
for 4 s.
2Press [Menu] push-button repeatedly until the fol-
lowing display appears.
"On" flashes.
3Use the or push-button to select between "On"
(switchover activated) and "Off" (switchover deacti-
vated).
4Confirm setting with [OK].
Additional settings for blind control
If the module is combined with a blind control insert, fur-
ther functions are available (for more information see
"Notes on advanced functions")
Setting individual blind movement time
1Open advanced menu: Press [Menu] push-button
for 4 s.
2Press [Menu] push-button repeatedly until the fol-
lowing display appears.
The time display for the individual blind movement time
flashes.
3Set the movement time (30 seconds to 3 minutes)
with push-button or .
4Confirm setting with [OK].
Setting brightness threshold for sun protection
function
(Only in combination with blind control insert, brightness
sensor interface flush-mounted and sun/twilight sensor)
1Open advanced menu: Press [Menu] push-button
for 4 s.
2Press [Menu] push-button repeatedly until the fol-
lowing display appears.
City Degree of longi-
tude (approx.)
Astro time
shift
Warsaw 21° east +24 Min
Budapest 19° east +16 Min
Vienna 16° 30‘ east +6 Min
Goerlitz 15° east 0 Min
Berlin 13° 30‘ east -6 Min
Munich 11° 30‘ east -14 Min
Schwerin 11° 30‘ east -14 Min
Hamburg 10° east -20 Min
Frankfurt/Main 8° 45‘ east -25 Min
Cologne 6° 57‘ east -32 Min
Aachen 6° east -36 Min
Amsterdam 5° east -40 Min
Brussels 4° 20‘ east -43 Min
Paris 2° 20‘ east -50 Min
Madrid 3° 35‘ west -74 Min

V5755-581-02 01/15
6
The brightness threshold (right-hand value) flashes. The
left-hand value shows the currently measured bright-
ness.
3Set the brightness threshold on a scale from 00
(dark) to 99 (bright) with push-button or .
4Confirm setting with [OK].
Setting the blind position for sun protection func-
tion
1Open advanced menu: Press [Menu] push-button
for 4 s.
2Press [Menu] push-button repeatedly until the fol-
lowing display appears.
The time taken for the blind to move up is displayed in
seconds in order to completely release the sensor (here
default setting):
3Set the blind position on a scale from 2 (raise fast)
to 16 (raise slow) with push-button or .
4Confirm setting with [OK].
Setting the behaviour for wind alarm
(Only in combination with blind control insert, brightness
sensor with wind sensor interface and DCF and wind
sensor)
1Open advanced menu: Press [Menu] push-button
for 4 s.
2Press [Menu] push-button repeatedly until the fol-
lowing display appears.
The display "Lower in the event of wind alarm" flashes.
3Set the behaviour of the blind in the event of wind
alarm using the push-button or the push-but-
ton.
4Confirm setting with [OK].
Display settings
Setting display brightness
1Open advanced menu: Press [Menu] push-button
for 4 s.
2Press [Menu] push-button repeatedly until the fol-
lowing display appears.
The display brightness display flashes.
3Set the display brightness on a scale from 00 (off) to
04 (bright) with the or push-button.
4Confirm setting with [OK].
YES Blind is raised in the event of wind alarm
(standard setting).
nO Blind does not react to wind alarm.
YES Blind is lowered in the event of wind
alarm.
Set automatic deactivation of display lighting
(The setting option is not shown if the display brightness
is set to "0".)
1Open advanced menu: Press [Menu] push-button
for 4 s.
2Press [Menu] push-button repeatedly until the fol-
lowing display appears.
The current setting appears (here default setting: Display
lighting is on permanently):
3Change setting with push-button or .
4Confirm setting with [OK].
Astro function
In addition to setting switching times, you can adjust the
lowering/raising behaviour of your blind and the switch-
ing on/off behaviour of your lighting to actual sunrise/
sunset using the Astro function. For this purpose the
module contains an integrated astronomical calendar
that calculates the sunrise and sunset for every day of
the year.
|The following explanations apply to Central Euro-
pean Time (CET). In the case of Central Europe-
an Summer Time (CEST) the Astro curves vary
by +/- 1h. This is automatically taken into account
by the module.
You can activate the astro function separately for each
switching time (see "Set switching times").
If the activated astro function has calculated that it will
still be dark outside at the set switching time (e.g."Raise
blind at 6:30 a.m."), it will not raise the blind until the sun
rises.
Likewise, the blind will be lowered at sunset, if the acti-
vated astro function has calculated that it will be dark be-
fore the set switching time (e.g."Lower blind at 7:10
p.m."). The lighting behaviour is identical.
Other switching times set for daylight hours are not af-
fected by the astro function.
LOn: Display lighting is on permanently.
Lt: Display lighting switches off automatically
10 seconds after the last input.
Notes on advanced functions
Astro function - application examples
ASet UP time 6:30 a.m.
BExecuted UP time
CExecuted DOWN time
DSet DOWN time 7:10 p.m.
Example 1:
You want the blind to be raised at sunrise and lowered at
sunset each day.
• Switching time : Monday - Sunday 4:00 a.m., astro
function activated.
• Switching time : Monday - Sunday 10:30 p.m., astro
function activated.
Example 2:
You want the lighting (e.g. outside lights) to be switched
off each day at sunrise and to be switched on each night
at sunset.
• Switching time : Monday - Sunday 4:00 a.m., astro
function activated.
• Switching time : Monday - Sunday 10:30 p.m., astro
function activated.
|If you want to control the blind and lighting with
the astro function only, you must be sure to set the
switching times for a time in which it is guaranteed
to be dark outside.
Example 3:
You want the blind to be raised each morning at sunrise,
yet not before 6:30 a.m. At night you want the blind to be
lowered no later than 7:10 p.m. or at sunset, if sunset is
before 7:10 p.m.
• Switching time : Monday - Sunday 6:30 a.m., astro
function activated.
• Switching time : Monday - Sunday 7:10 p.m., astro
function activated.
When it is still dark outside at 6:30 a.m., the astro func-
tion intervenes, and the blind is only raised at the actual
time of sunrise. If it is already dark before 7:10 p.m., the
astro function causes the blind to be lowered earlier, at
the actual time of sunset.
However, when the actual time of sunrise is before 6:30
a.m. the astro function will not intervene, and the blind is
raised at 6.30 a.m. If it is still light at 7:10 p.m., the astro
function will not intervene, and the blind is lowered at
7:10 p.m.
Astro time shift
The integrated astronomical calendar is designed for the
centre of the Central European Time (CET) zone. The
astro time shift takes into account the actual times of
sunrise and sunset at different locations. You can adapt
the astro function with astro time shift to the specific lo-
cation and correct the astro times calculated by the mod-
ule by max. ±2 hours (see "Setting the astro time shift").
16
2
4
6
8
10
12
14
18
20
21
22
23
24
121234567891011
A
B
C
D

V5755-581-02 01/15
7
Example of blind control:
Set -32 minutes for the location Cologne. This has the
consequence that the blinds are lowered in accordance
with the later sunset time (32 minutes later than Görlitz).
Random function
This enables you to give any external observer the im-
pression that you are at home. The random function uses
an integrated random generator to vary the times you set
by between 0 minutes and 30 minutes every day.
ASet UP time 7:30 a.m.
BSet DOWN time 6:30 p.m.
CRandom range 0-30 minutes
You can activate the random function separately for each
switching time (see "Set switching times").
Additional functions for blind control
Individual blind movement time
The module is preset at the factory so that the blind takes
2 min. to be lowered (and, where necessary, stops auto-
matically when the lower limit position is reached). You
can adjust this time freely between 30 seconds and 3
minutes. This means scenes can be performed faster.
(see "Setting individual blind movement time").
Sun protection function
The sun protection function is activated as soon as the
brightness at the window measured by the sun/twilight
sensor exceeds the set limit value for 2 minutes. The
blind is lowered to below the sensor and moves back up
again for the movement time set. The time the blind
moves back up needs to be set so that the blind stops
just above the sensor. If the measured brightness falls
below the limit value for 15 minutes, the blind is raised
again.
The brightness limit value and the raising time can be set
in the advanced menu of the module (see "Setting the
brightness threshold for sun protection function" and
"Setting the blind position for sun protection function").
1. The sun/twilight sensor measures the brightness. The
limit value is exceeded.
2. The blind is lowered. The sensor is now in the shade,
the blind stops below the sensor.
3. Blind is raised for the duration set and stops above the
sensor.
|Manual operation of the module deactivates the
sun protection function. The sun symbol is not
visible on the display.
The sun protection function is only active when
the blind is completely raised.
18.00
0 7.00 8.00 19.00
0...30 min
0...30 min
AB
C C
21
3
Disabling blind movement with magnetic contact
(Only in combination with blind control insert, brightness
sensor interface flush-mounted and magnetic contact)
Raising/lowering the blind via PlusLink commands or via
switching times of the display timer module is disabled
by a magnetic contact when the window or door is open.
Manual operation is still possible with the and push-
buttons.
AMagnetic contact
½CAUTION
Risk of burglary!
Please bear in mind that the blind will not close
while the window/door is open when using the
magnetic contact.
Wind alarm
In order to protect blinds or awnings from damage
caused by strong wind, you can set a blind behaviour for
wind alarm.
As soon as the wind speed set on the wind sensor has
been steadily exceeded for a period of at least 15 sec-
onds, the blind reacts according to the set behaviour
(see "Setting the behaviour for wind alarm"). There are
three possible settings:
• Blind is lowered in the event of wind alarm (standard
setting).
• Blind is raised in the event of wind alarm.
• Blind does not react to wind alarm.
During this time and until the wind speed drops, lowering
and raising the blind via PL or module switching times is
disabled. Manual operation is still possible with the
and push-buttons. The blind is not automatically low-
ered or raised after the wind alarm is over.
1. Blind is partially lowered.
2. The wind is increasing and exceeds the limit value. Af-
ter 15 s the sensor interface triggers a wind alarm via
the PL.
3. The blind behaves according to its settings.
Evaluating DCF timer
(Only in combination with brightness sensor with wind
sensor interface and DCF)
The module can receive a DCF time signal via a sensor
interface connected to the PlusLink. The DCF time sig-
nal is sent to the module via PL once a day (approx. at 2
o'clock in the morning). The module uses this to auto-
matically set the current date and time.
With the DCF time signal the changeover from summer
to winter time occurs automatically.
Response to mains voltage failure and
recovery / power reserve
In the event of mains voltage failure the display goes out.
The following menu settings are saved permanently:
• Switching times
• Arrow button function
• Scenes
• Blind position for the sun protection function
• Display settings
•Operatingmode
Menu
OK
Man
A
132
15 s
The set time and date are saved for at least 6 hours
thanks to the power reserve (no batteries required).
After mains voltage recovery the next switching time is
carried out. Missed switching times are not carried out.
Deactivate the time and PlusLink control
Press the [Man] push-button to switch the module to
manual mode and deactivate the control via set switch-
ing times and via PlusLink commands. Loads can then
only be controlled manually with the and push-but-
tons.
|Exceptions:
• The panic scene is being executed.
• In combination with a blind control insert, the
module reacts to sensor values via PlusLink
and controls the blind accordingly.
To s w i t c h b a c k , p r e s s t h e [Man] push-button for 2 s.
After switching to manual mode, "Auto" disappears from
the display and the LED next to the [Man] push-button
lights up red.
Basic functions
Status LEDs for the module
Resetting to default settings
Operating the module
Operation Status feedback
– green LED briefly
lights up upon ac-
tuation
–Arrowsymbolap-
pears when load
is activated (light
on / blind is
raised)
– green LED briefly
lights up upon ac-
tuation
–Arrowsymbolap-
pears when load
is activated (blind
is lowered)
Operation Status feedback
all LEDs briefly flash
red and all display
symbols appear
2 s
Menu
OK
Man
Menu
OK
Man
Menu
OK
Man
10 s
Menu
OK
Man
V5755-581-02 01/15
8
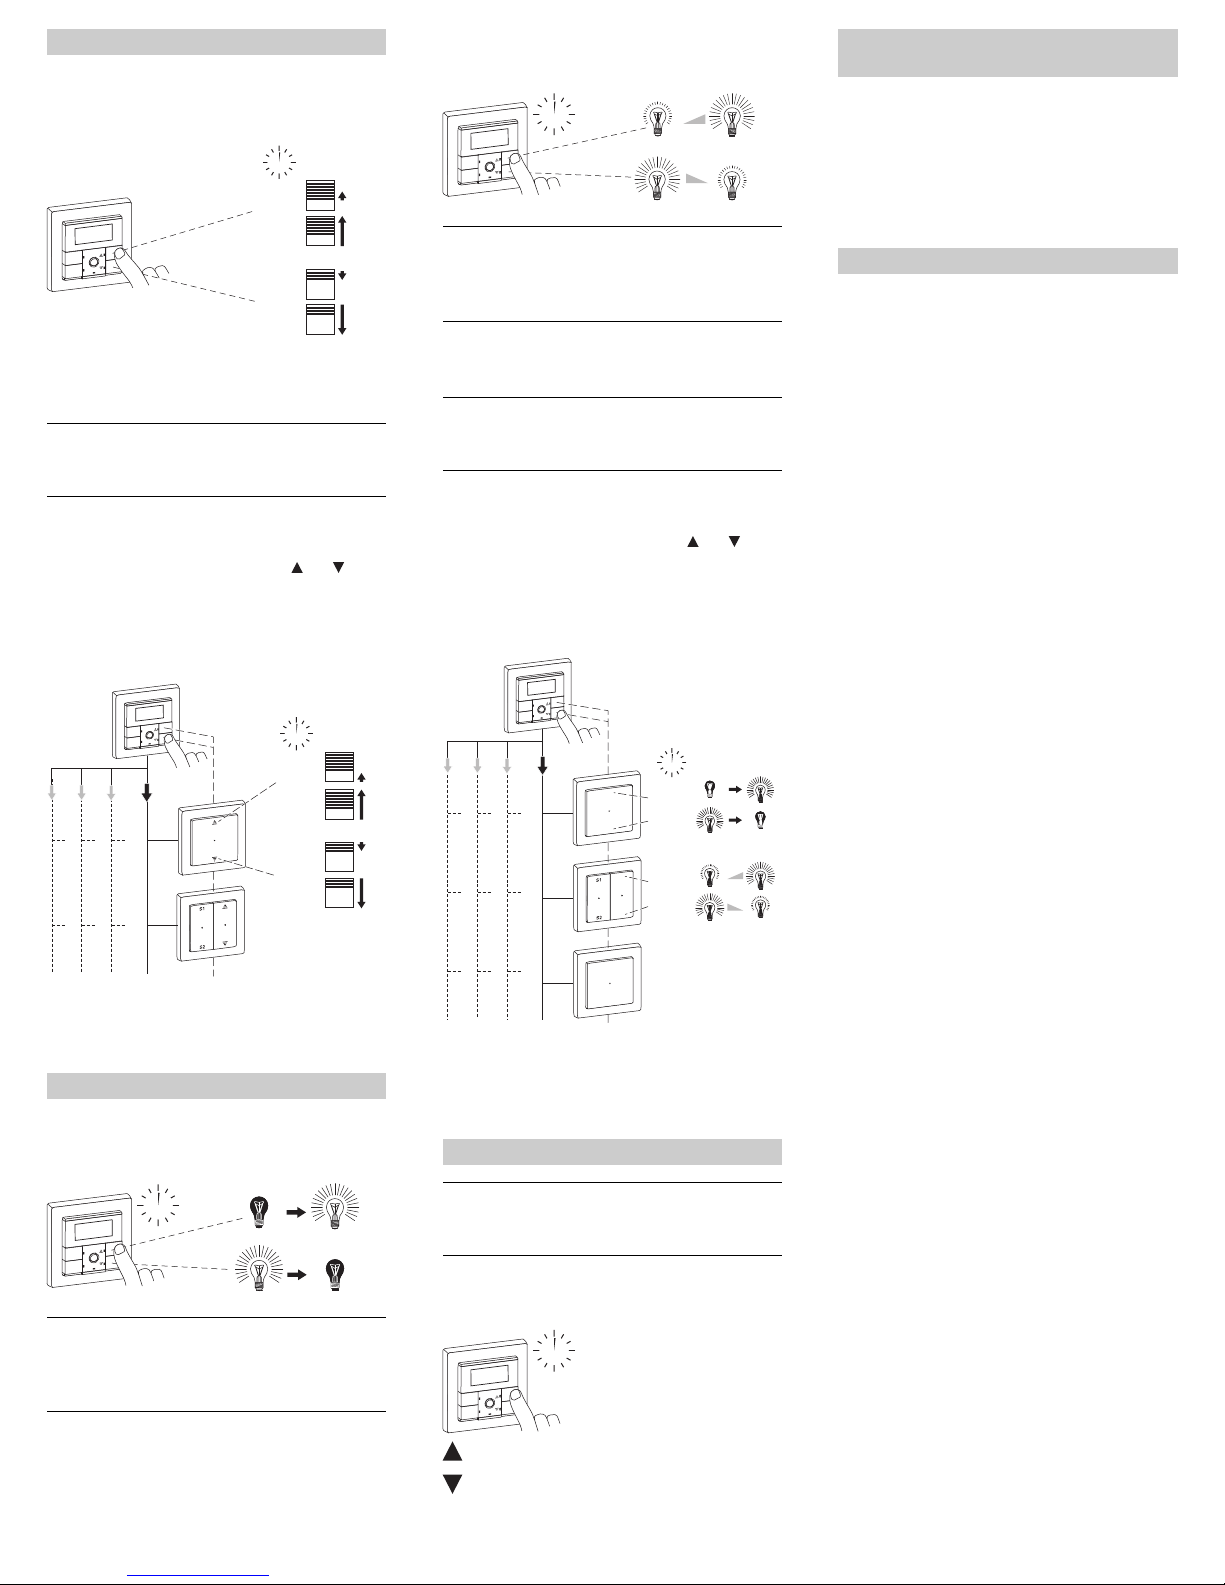
Controlling blinds
• raising/lowering (> 0.5 s)
• up/down in steps (< 0.5 s)
Global blind control
|Global control via PlusLink is possible in combi-
nation with the central unit insert and the display
timer module.
Example of global raising/lowering and gradual up/
down of 1-4 PL lines
Following activation of the push-buttons and of the
module on the central unit insert, all loads in the PL lines
are controlled together.
Arrow buttons with push-button function:
• Long push-button action (> 0.5 s): raising/lowering
• Short push-button action (< 0.5 s): up/down gradually
AModule on central unit insert
BBlind control insert
Switching load on/off
In combination with 1-gang / 2-gang insert
|In combination with a 2-gang insert both channels
are switched together.
Display of the status arrow in the display only re-
fers to channel 1.
Blind control
Light control
<
0,5 s
>
>
0,5 s
<
0,5 s
>
0,5 s
Menu
OK
Man
A
B
B
PL4 PL3 PL2 PL1
<
0,5 s
>
>
0,5 s
<
0,5 s
>
0,5 s
Menu
OK
Man
<
0,5 s
Menu
OK
Man
Dimming load
In combination with 1-gang / 2-gang insert
|In combination with a 2-gang insert both channels
are dimmed together.
Display of the status arrow only refers to channel
1.
Global light control
|Global control via PlusLink is possible in combi-
nation with the central unit insert and the display
timer module.
Example of globally switching on/off and dimming
the 1-4 PL lines
Following activation of the push-buttons and of the
module on the central unit insert, all loads in the PL lines
are controlled together:
Arrow buttons with push-button function
• Short push-button action (< 0.5 s): turn on/off
• Long push-button action (> 0.5 s): dimming
AModule on central unit insert
BInserts for switching and dimming (see function
overview)
|Global scenes are possible via the arrow buttons
in combination with the central unit insert and the
display timer module (from version 1.5).
Arrow buttons with scene function:
• Short push-button action (< 0.5 s): Retrieve scene 1/2
Global blind and light scenes
Retrieve scene 1
Retrieve scene 2
>
0,5 s
Menu
OK
Man
A
B
B
B
PL4 PL3 PL2 PL1
<
0,5 s
<
0,5 s
>
>
0,5 s
>
>
0,5 s
Menu
OK
Man
<
0,5 s
Menu
OK
Man
• Central unit insert or side controller Plus, 1-gang/2-
gang:
switching, dimming, controlling blinds and retrieving
scenes
• Mechanical push-button/double push-button
• Sensor interface + sensors
"FAIL" flashes on the display, all LEDs flash red.
• Module was plugged onto an insert that differs in func-
tionality from the previous one.
– Reset module to default settings.
The blind or lighting does not react to a set switch-
ing time.
• PlusLink commands deactivate the switching times.
– The panic scene is being executed.
– Wind alarm is active.
– Window / door with magnetic contact is open.
– Sun/twilight sensor is performing sun protection
function.
– All other PlusLink commands and switching times
are performed when levels 1 - 4 are not carried out.
• The module is in manual mode.
While the astro function is activated, the blind and
the lighting activities deviate significantly from the
actual times of sunrise or sunset.
• Date/time settings and astro time shift are not set cor-
rectly.
• Switching between summer/winter time is not activat-
ed.
The sun protection function is not performed.
• The brightness threshold is set too high.
– Reduce brightness threshold in advanced menu.
• Blind is not in the top limit position. Any manual actua-
tion deactivates the sun protection function.
– Bring blind into top position with a long push of the
button and wait for max. 2 min. (running time).
• Wind alarm is active and disables lowering of the
blind. The wind symbol is shown on the display.
– Await wind alarm.
• The sun/twilight sensor is in the shade and cannot de-
tect sunlight.
– Install sun/twilight sensor on the window in such a
way that sunlight is reliably detected.
– Raise the blind position for the sun protection func-
tion in the advanced menu.
• The window / door is open. The magnetic contact dis-
ables lowering of the blind.
– Close window / door.
• The panic scene is being executed.
• The module is in manual mode.
When the window / door with magnetic contact is
open, the blind moves up or down.
• Wind alarm is active, causing the blind to be raised to
top position.
– Await wind alarm.
– Change the blind's behaviour for wind alarm in the
menu.
Controlling loads from another location
via PlusLink
What should I do if there is a problem?

V5755-581-02 01/15
9
Gothaer Straße 29, 40880 Ratingen
www.merten.com
www.merten-austria.at
Customer care centre:
Technical data
Number of switching cycles (switching on/off, raising/
lowering):
Switching, dim-
ming, blind inserts:
per channel: 2 switching cycles /
day
Central unit insert: per PL line: 2 switching cycles /
day
Functions
Drift: < 1 s / day
Power reserve: > 6 hours (no battery required)
Connectable ran-
dom generator:
0-30 minutes
Astro function
Astro time shift: ±2 hours
Standard blind
movement time:
2 minutes
Display elements: • 5 LED
•LCDdisplay
Operating elements: • Menu push-button
• Manual push-button
• OK push-button
• arrow push-button UP
• arrow push-button DOWN
Connection: module interface with 8 contact
pins
Schneider Electric GmbH c/o Merten
Phone: +49 2102 - 404 6000
This manual suits for next models
1
Table of contents
Other merten Timer manuals


