Metagenics Fitness PowerJog User manual
1/ 18
PowerJog Self-Propelled Treadmill with
Resistance
Owner’s manual
!
!
!
Metagenics Fitness Inc
www.metagenics.ca
!

2/ 18
!
Important Safety Instructions
Please read all the instructions before using the Powerjog. These
instructions will ensure user safety and protection of the treadmill.
Always consult a physician prior to starting any exercise program or
using the treadmill, especially if you have a history of heart disease,
high blood preasure, diabetes, respiratory disease, elevated
cholesterol, smoker, etc. Only under the supervision of qualified
personnel, children and disabled people can come to close or use
the treadmill. The product can be used only as specified in the User
Manual. Any other improper use,may cause danger.
Don't touch any moving parts. Don't put your feet under the moving
parts. Don’t soak the treadmill surfaces with any liquid; just use a
damp cloth to clean the treadmill and maintain the running surface
clean and clear of obstructions. Don't let objects fall or insert the
openings. Don't use the treadmill if you are too tired or exhausted.
Wrong training or excessive exercise may result in serious injury or
death. When suffering from pain or abnormal symptoms, stop
exercising and consult a doctor. Wear only suitable clothes and
shoes when training; Don't wear loose clothes that could get caught
in the moving parts.Tidy up long hair. Keep clothing or towels away
from moving parts. Tie your shoe laces.When the product is in use,
third parties must maintain a safe distance.
Fitness center staff should clearly clarify to the user the correct use
of equipment to avoid improper use.
The product can only be used after fully installed. Please vidually
inspect the Powerjog before use to check for abnormal wear and
tear. Keep a safe space of two meters behind the treadmill. Do not
expose the product to the direct sunshine. Do not use the treadmill
outdoor or in a humid environment, such as a swimming pool,
bathtub and sauna room. Keep the Powerjog in good operating
condition. If you find wear, please consult Metagenics Fitness
technical support services.
The installation and service of the Powerjog shall be carried out by a
qualified mechanic or authorized representative. Don't put anything
on the rack or display.
Metagenics will not be responsible for the loss caused by the
following reasons: maintenance without authorization, improper
use, accident, negligence, improper assembly or installation, any
modifications or adjustments without the written authorization of
Metagenics Fitness Inc. and users do not comply with the user
manual when using, running and maintenance of the product.

3/ 18
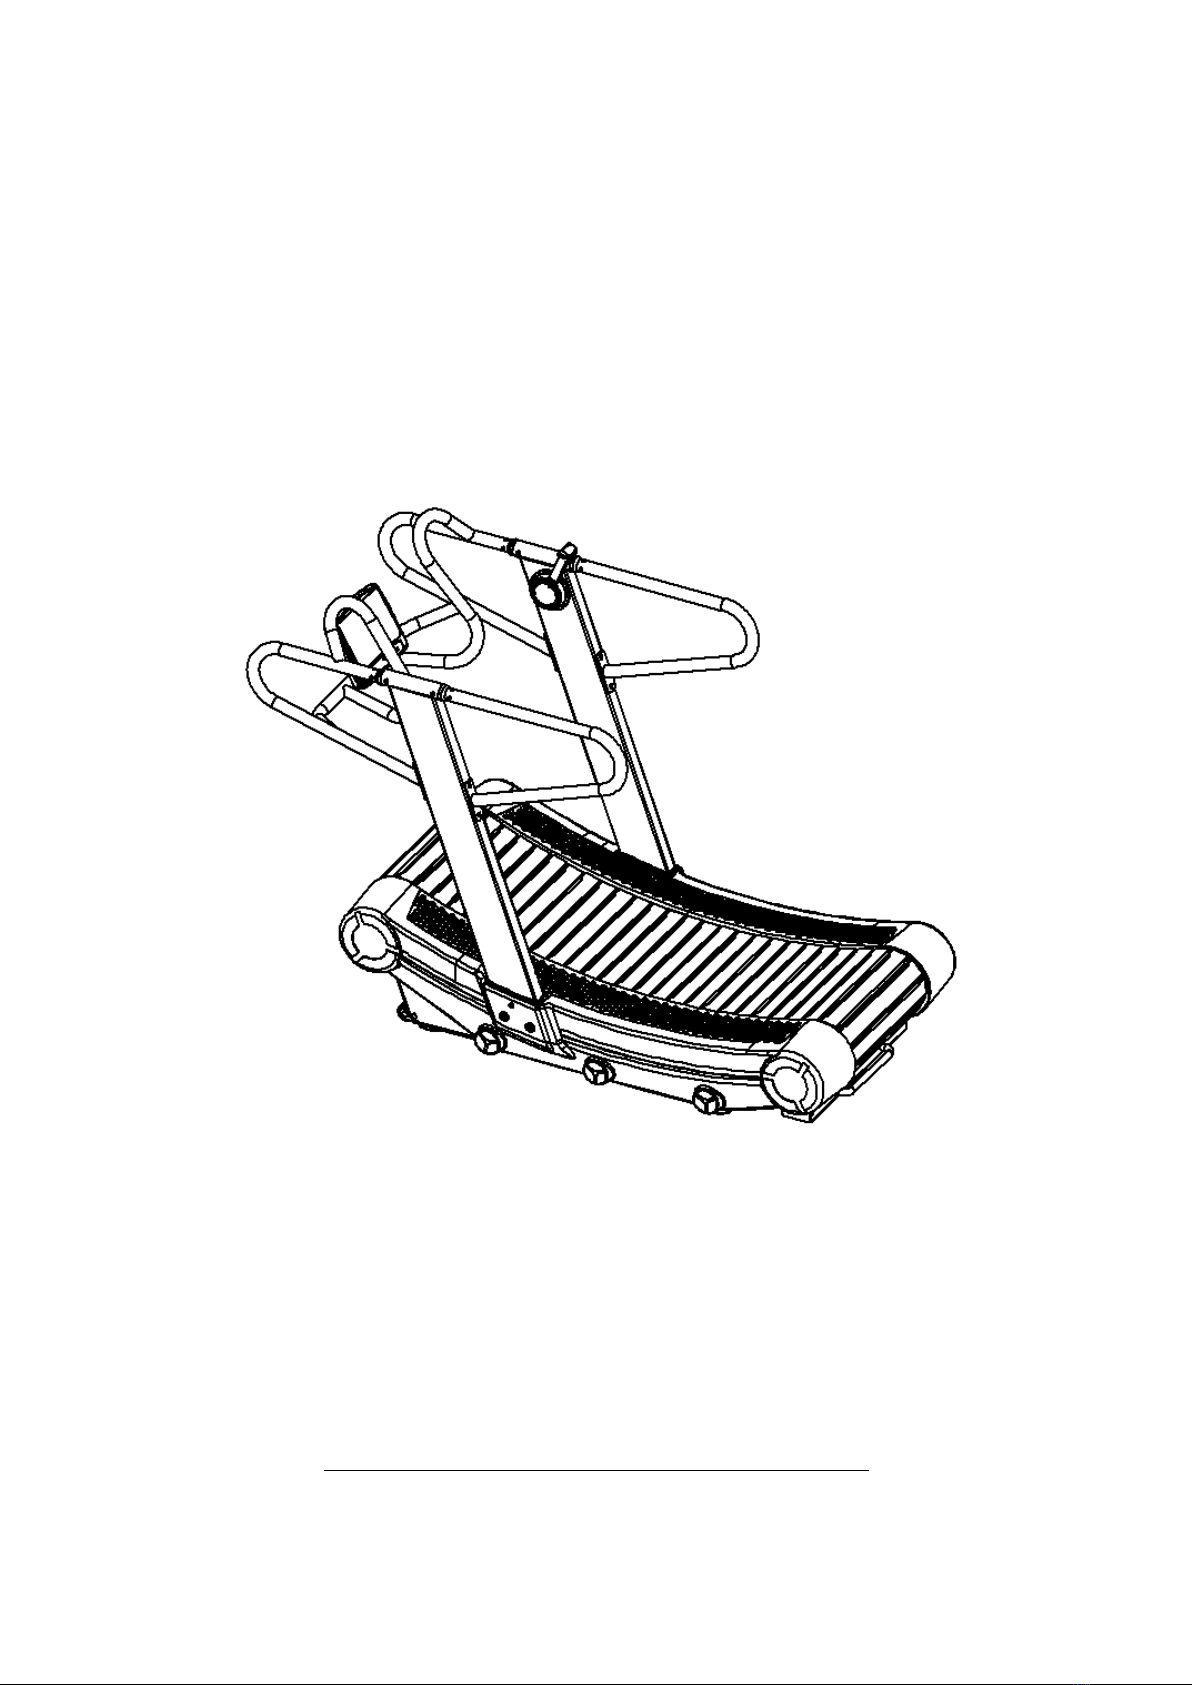
Product Description
Display(A): Powerjog is equipped with an LCD console.
Running Belt (B): Surface is composed by rubber slats with
aluminum backing that will ease the impact on the joints.
Lateral Handles(C): Long handrails for safety.
Central Handle (D): When using the Powerjog as a sled, this is the
handle to grab for pushing
Side rails (E): When the user is in danger or feel tired, he can put
his feet on the boards for a short pause, in addition, it can be used
as a tool for single foot exercise.
Magnetic Resistance (F): The Powerjog is a heavy-duty commercial
treadmill, which has resistance, and several levels of magnetic
resistance can be controlled with the metal handle.
We have found out that having resistance in the Powerjog is
extremely important for users that only want to walk as adding a bit
of resistance can stabilize the belt and give an excellent walk. The
levels of resistance are so high that the Powerjog can also be used
as a sled.
!
!
!

4/ 18
Powerjog Installation Instructions
Hardware kit
1- Completely remove both plastic shrouds 01 and 02 in
(Picture1) together with the top plastics and keep all the bolts
to put them back on once the treadmill is assembled (these
are all small bolts # 5) and there are more small bolts for
shrouds #5 in the hardware kit.
2- Attach the right pedestal that has the handle with the
resistance cable, finger tighten all bolts using two large bolts
#1 (B1) and two bolts #2 with washers (B3) (Picture 2).
3- On the right side of the treadmill (Picture 5), route the
resistance steel cable clockwise around the plastic pulley (03)
and secure the cable to the peg (d) in the magnet. Set the
resistance handle to minimum and verify that the magnet is
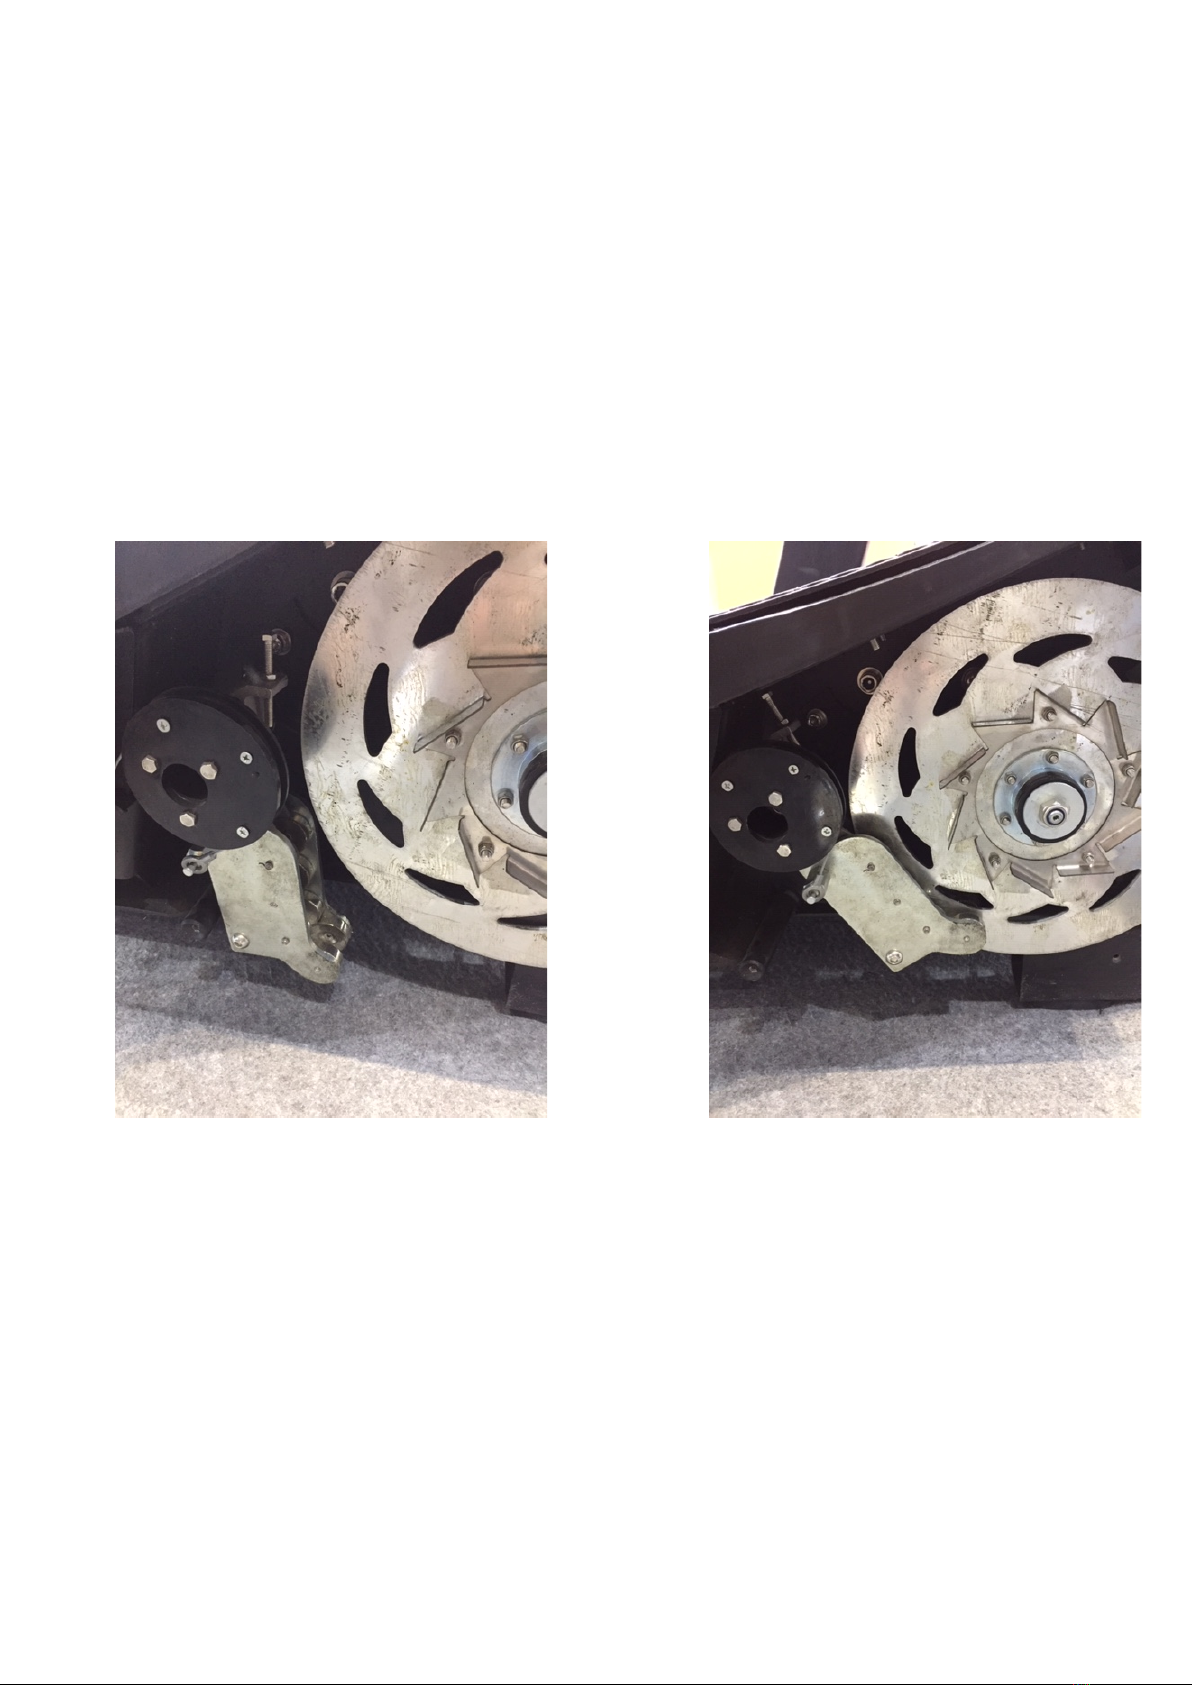
5/ 18
away from the flywheel. Set the resistance handle to
maximum and verify that the magnet is on top of the flywheel
but not too much so it does not touch the flywheel. See
pictures below for proper set up. The steel cable can be
shortened or enlarged by moving the two little nuts up and
down the threaded bolt, when the resistance is properly
adjusted please fit the cable in the U shape slot leaving one
nut on top and the other nut below the slot and fully adjust
the two nuts securing the fitting to the frame in the U shape
slot.
No Resistance Max Resistance
4- Attach the left pedestal in the same manner using two large
bolts#1 and two bolts #2 with washers. Connect the data
cable on the lower left side to the cable going up the pedestal.
All bolts finger tighten at this time.
5- Connect the V shape handle-bars (Pictures 4,5 & 6) using
bolts#3 provided in the hardware kit.
6- Attach and connect the console and put the batteries in the
compartment. At this point, fully tighten all bolts.
7- Only when the console is working and the resistance is
working you are ready to put the shrouds back again.

6/ 18
8- You will have to use all bolts #5 and four longer bolts #4 in
the middle of the top plastics where they connect, two
bolts#4 for each side.
9- IMPORTANT: Make sure the rubber covers that slide on the
handrails don’t stay under the top plastics as those will go on
top of the plastics.
!
!
! !
!!!!!!!!!!
!Picture!4!!!!!!!!!!!!!!!!!!!!!!!!!!!!!!!!!!!!!!!!!!!!!!!!!!!!!!!!!!!!!!!!!!!!!!Picture!3!!
!
Picture!5!!!!!!!!!!!!!!!!!!!!!!!!!!!!!!!!!!!!!!!!!!!!!!!!!!!!!!!!!!!!!!!!!!Picture!6!!

7/ 18
!
Instructions!for!use!
The PowerJog is a non-motorized treadmill with magnetic resistance
where the user drives the running surface at will and controls the
speed. For safety the treadbelt rotates backwards only and will not
rotate forward. The belt is very slick so we suggest stepping on the
side rails to access the Powerjog. Hold the side handle, first step on
the side rails and from the side rails to the running belt. If this is
your first time, we recommend that you adjust the resistance
handle to maximum resistance so the treadbelt will not move.
Standing firm on the running belt start lowering the resitance and
start walking but leave the resistance handle in 1 or 2 of resistance
according to your body weight.
The Powerjog is a completely new concept of treadmill very
different from conventional motorized treadmills so exercise caution
when using this new treadmill and start slow walking to learn the
proper use, after some time you will be use to it and jogging or
running at high speeds will come naturaly.
Because the running surface is slightly curved, to accelerate, move
forward and to slow down move to the flatter part of the curve.
You can finish running by drifting positioning your body to the
flatter part of the curve, grab the handrails and step on the side
rails.
WARNING
The magnetic brake might not be able to fully stop the
treadbelt.
A NEW EXPERIENCE : The Powerjog will give you amazing muscle
activation compared to conventional electric flat treadmills so don't
get frustrated if you run for one hour on an electric treadmill but
can only do 20 minutes on the Powerjog. You are getting a more
efficient workout and with the use of resistance and the long
handrail, many different workouts can be achieved. The Powerjog is
excellent for interval training where you are constantly changing the
speed, but almost impossible to do in a conventional electric flat
treadmill.
8/ 18
!
!
!
!
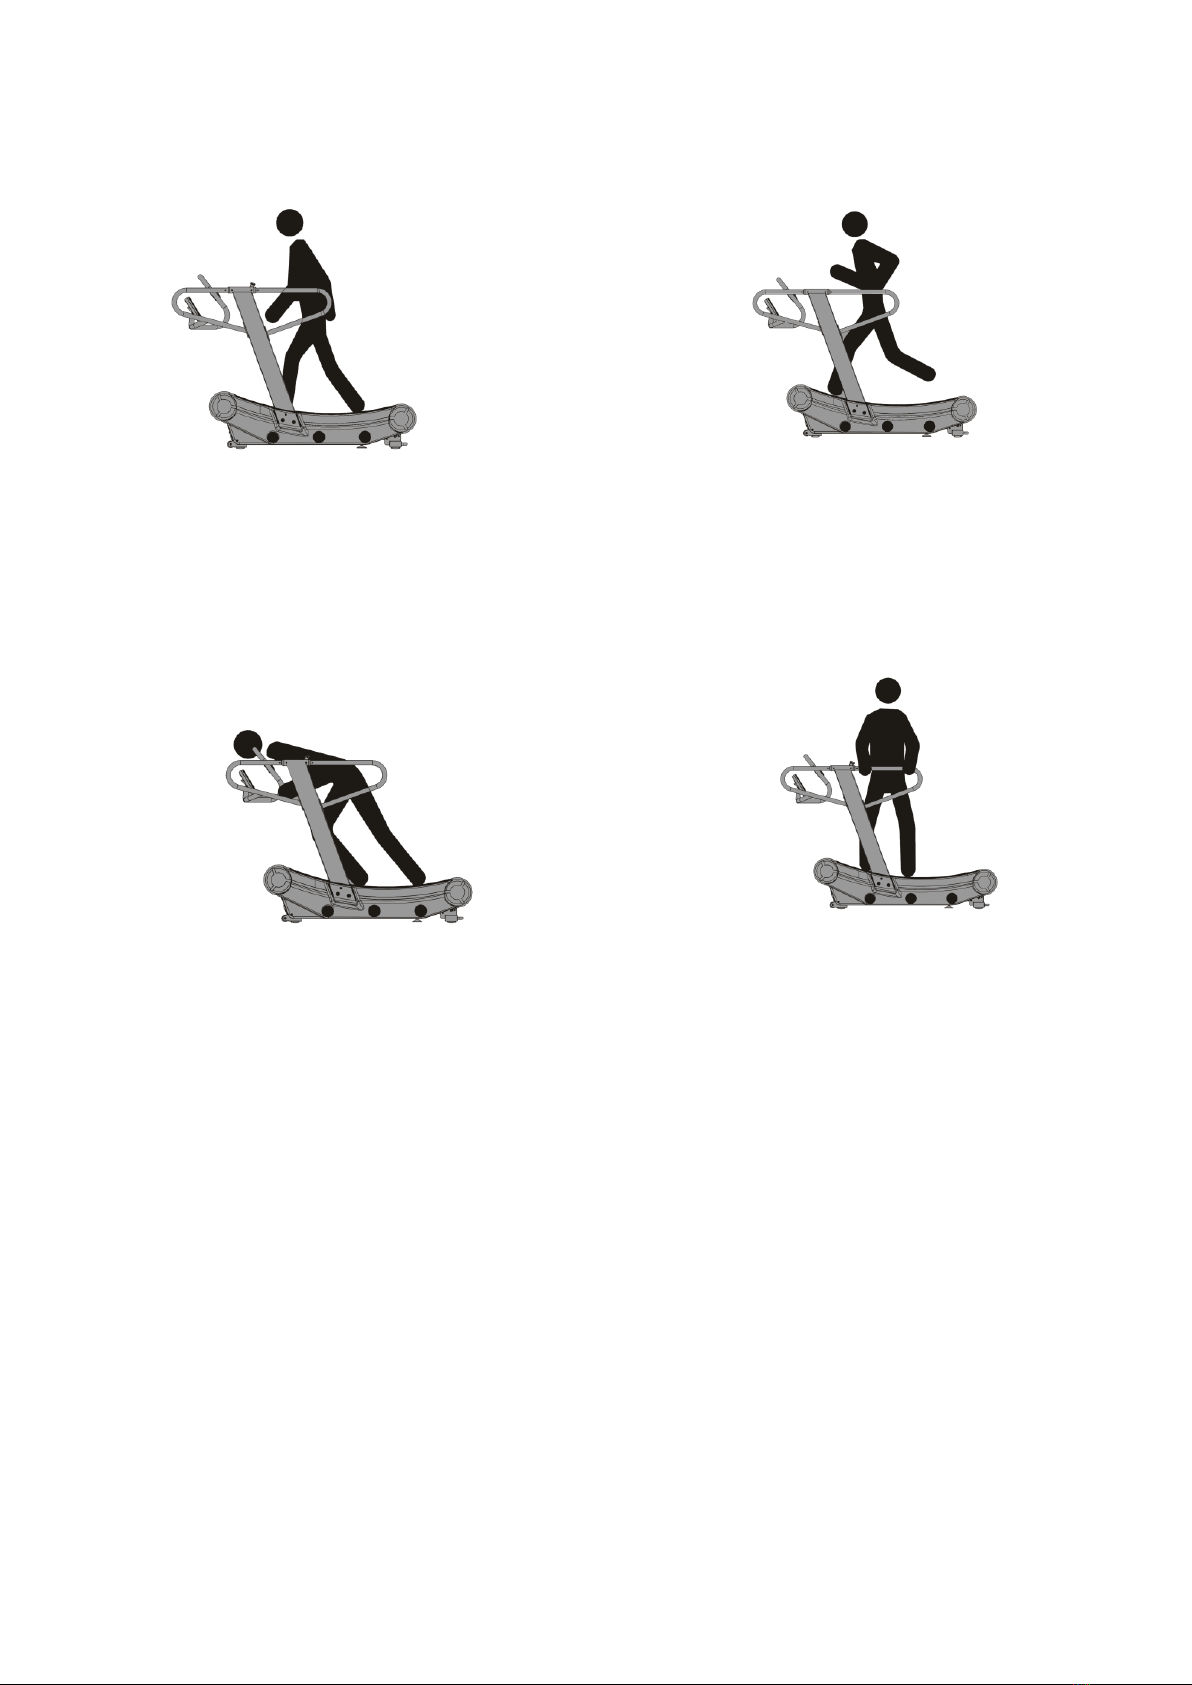
!!!!!!!!!!!!!Brisk!walking!!!!!!!!!!!!!!!!!!!!!!!!!!!!!!!!!!!!!!!!!!!!!!!!!!!!!!!!!!!!!!!!!!!!!!!!!!!!!!!!!!!Fast!running!!
!
!
!
!
!
!!!!!!!!!!!!!!!!!!!!!!!!!!Propel!!!!!!!!!!!!!!!!!!!!!!!!!!!!!!!!!!!!!!!!!!!!!!!!!!!!!!!!!!!!!!!!!!!!!!!!!!!!!!!!!Side!shuffle!step!
!
!
!
!
!
!

9/ 18
PowerJog Console Manual
I、Functional Display Description::
1、SPEED:0.0~99.9 KM / ML。
2、TIME:1:00:00~1:59:59,Can count from beginning or
countdown
3、DISTANCE:0.00~999.9 K / M,Can count from beginning or
countdown
4、CALORIES:0~999,Can count from beginning or countdown
5、WATT:0~1999。
6、PULSE:P~30~230。
7、INTERVAL:Intermittent rest exercise mode。
8、TARGET HR:Heart rate control mode。
9、KM/M:KILO/ML。
II、Key function description:
1、START KEY:
A、Pause function during exercise
B、Restore exercise after pausing
2、STOP KEY:
A、Stop function during exercise
B、Press total 3 s to reset any time
3、UP KEY:
A、Each function can be set for TIME, DISTANCE, CAL and AGE
after clicking UP KEY during display.
B、Press UP KEY more than 1 second during all function’s
display period, it can be carried continuously (8 steps per
second).Stop pressing, the process will stop.
4、DOWN KEY:

10 / 18
A. Each function can be set for TIME, DISTANCE, CAL and AGE
after clicking DOWN KEY during display
Press DOWN KEY more than 1 second during all function’s
display period, it can be carried continuously (8 steps per
second).Stop pressing, the process will stop.
5、ENTER KEY:
Enter key is the main function selection button and have the same
function with Set key
6、INTERVAL 20-10 KEY:
Press this key and enter interval function menu
7、INTERVAL 10-20 KEY:
Press this key and enter interval function menu
8、INTERVAL CUSTOM KEY:
Press this key and enter interval function menu
9、TARGET TIME KEY:
Press this key and enter interval function menu
10、TARGET DISTANCE KEY:
Press this key and enter interval function menu
11、TARGET CALORIES KEY:
Press this key and enter interval function menu
12、TARGET HR KEY:
Press this key and enter interval function menu
13:ML and KM can be switched when press Enter and Start key at
the same time
14:Press the Enter and Down key makes a quick turn off
III、Operation setting instructions:
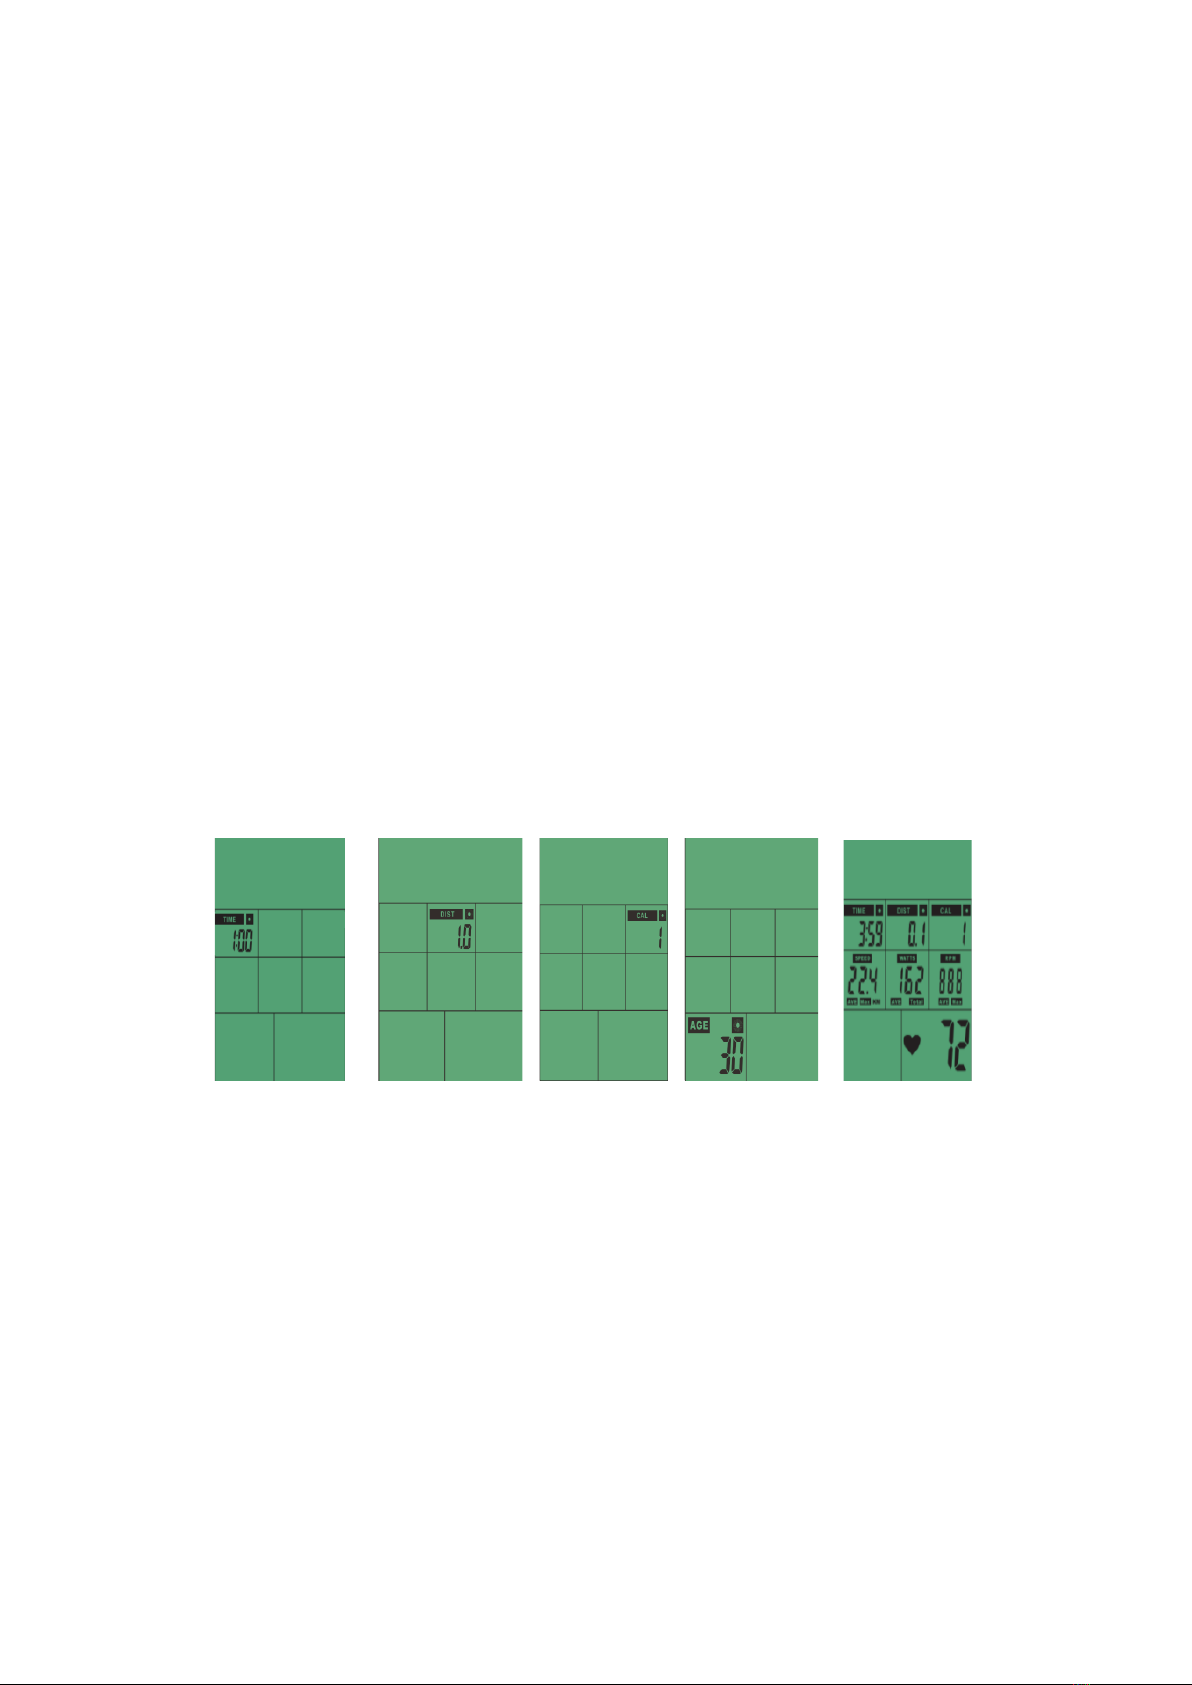
1. After installing the battery (POWER ON), the LCD will display 2
seconds (Fig. 1) and a BI long tone at the same time, the wheel
diameter value will be displayed 1 second (Fig. 2) in the DIST field,

11 / 18
and the AGE setting will be entered. The age value will flicker. Press
UP/DOWN to adjust, then press ENTER into the standby screen.
Fig1 Fig 2 Fig3
2. INTERVAL10/20、READY、WORK、REST、TARGET、TIME、
DISTANCE、CALORIES、TIME、DISTANCE、CALORIES、WATTS、
SPEED、RPM、HEART RATE flicker for 1 second in sequence in
SCAN mode (similar to Figure 2).
3. Entering sleep mode automatically after 60 seconds without
pressing any key, RPM signal or heartbeat signal.
1. Fast motion mode:
A. Quick START immediately when RPM signal is input while standby,
buzzer sound for 1 second at the same time.
B. TOTAL TIME、TIME、DISTANCE、CALORIES、WATTS、SPEED、
RPM start counting by operation value (Figure 3)
C. The heartbeat symbol flickers when heartbeat input,and
symbol flickers and displays the current heartbeat value (Figure
4);Heartbeat input P continues to light without heartbeat inputting.
D. After 30 seconds without any signal input, the buzzer goes into
wake-up mode for 1 second.
E. Press START key one time, enter pause mode within 30 seconds
buzzer rings 0.5 seconds. When entering pause mode, all the
display will remain on the screen for 3 seconds and then flicker
every four seconds (3 bright/1 out). After 5 minutes of continuous
pause, buzzer rings 2seconds then entering wake-up mode, press
START to continue running.
F. Press STOP key for 1 second, TIME display total time, DISTANCE
display total distance, CALORIES display total heat consumption
display for 30 seconds, WATT, SPEED, RPM exchange and display
average and maximum every five seconds.
G. 85% and 65% heartbeat values are displayed every five seconds
with heartbeat input, but not displayed without heartbeat input.

12 / 18
H. If you press any PROGRAM key to perform the action
INTERVAL:INTERVAL option:
This function can be accessed by pressing the UP/DOWN during
power-on, or by selecting the shortcut key in the pause mode
5.1.Select INTERVAL20/10:
A. Press INTERVAL Key to select INTERVAL20/10. After pressing
Enter Key, enter this mode and INTERVAL20/10 will light up. The
buzzer rings 1 second at the same time.
B. CYCLE TIME. After three seconds countdown then start, the
buzzer sounds once every second and READY flashes once per
second (0.75 light / 0.25 off), the count shows 00/08 (Figure 5).
C. CYCLE TIME. Starts counting down for 20 seconds and WORK
flashes once every second (0.75 light / 0.25 off). The buzzer rings
synchronously. At this time, the rim will have a rotation animation
and count down from the four- minute, TOTAL TIME, DISTANCE,
CALORIES , WATTS, SPEED, RPM start counting according to the
operation value, and the count shows 01/08.
D. CYCLE TIME. starts counting down 10 seconds and REST flashes
every second (0.75 light / 0.25 off),buzzer rings synchronously, and
the last 3 seconds READY also flashes synchronously. This
animation is still.
E. C, and D continue to repeat the cycle, adding 1 to each cycle
count until CYCLE TIME begins to count down 10 seconds after the
08/08WORK motion is displayed and REST flashes once per second
(0.75 light / 0.25 off).
F. After 30 seconds without any signal input, buzzer rings 1 second
to enter the wake mode.
G. Press the START key once to enter the pause mode. The buzzer
rings 0.5 seconds every 30 seconds. When entering the pause mode,
all the displays will remain on the screen for 3 seconds and then
flash every 4 seconds (3 lights / 1 off). After 5 minutes of pause,
the buzzer sounds for 2 seconds to enter the wake mode, press
START to continue running.
H. Press the STOP key or the buzzer rings 1 second after the end,
TIME shows the total time, DISTANCE shows the total distance,
CALORIES shows the total calorie consumption for 30 seconds,
WATT, SPEED, RPM exchanges the average and maximum values
every five seconds.

13 / 18
I. When there is a heartbeat input, the 85% and 65% heartbeat
values are exchanged with the maximum value every five seconds.
If no heartbeat input is displayed, it is not displayed.
J. If you press any PROGRAM button to perform this action
Fig4 Fig5 Fig6 Fig7
5.2 Select INTERVAL 10-20
A. Press INTERVAL Key to select INTERVAL10/20. After pressing
Enter Key, enter this mode and INTERVAL10/20 will light up. The
buzzer rings 1 second at the same time.
B. CYCLE TIME START countdown after 3 seconds, buzzer rings
every second and READY flashes once per second (0.75 light / 0.25
off), the count shows 00/08 (Figure 5).
C. CYCLE TIME starts counting down 10 seconds and WORK flashes
every second (0.75 light / 0.25 off), buzzer rings synchronously,
REMAINING lights up and counts down from four-minute, TOTAL
TIME, DISTANCE, CALORIES, WATTS, SPEED, RPM The count starts
from the operation value, and the count shows 01/08.
D. CYCLE TIME starts counting down for 20 seconds and REST
flashes every second (0.75 light / 0.25 off). The buzzer rings
synchronously, and the last 3 seconds READY flashes synchronously.
E. C, and D continue to repeat the cycle, adding 1 to each cycle
count until CYCLE TIME begins to count down 20 seconds after the
08/08WORK motion is displayed and REST flashes per second (0.75
light / 0.25 off).
F. After 30 seconds without any signal input, buzzer rings 1 second
to enter the wake mode.
G. Press the START key to enter the pause mode. Within 30
seconds, buzzer rings 0.5 second every 1-second. When entering
the pause mode, all the display will remain on the screen for 3
seconds and then flash every 4 seconds (3 lights / 1 off). After 5

14 / 18
minutes of continuous pause, buzzer rings 2 seconds to enter the
wake mode, press START to continue running.
H. Press the STOP button or buzzer rings 1 second after the end,
TIME shows the total time, DISTANCE shows the total distance,
CALORIES shows the total calorie consumption for 30 seconds,
WATT, SPEED, RPM exchanges the average and maximum values
every five seconds.
I. When there is heartbeat input, the 85% and 65% heartbeat
values are exchanged with the maximum value every five seconds.
If there is no heartbeat input, will not display.
5.3 INTERVAL CUSTOM:
A. Press INTERVAL Key to select INTERVAL CUSTOM, press Enter
Key, enter this mode INTERVALCUSTOM, 00/XX flashes, buzzer
rings 1 second at the same time, press UP or DOWN to set 00/XX,
the setting range is 1~99, can be cycled, press ENTER to confirm
buzzer rings 1 second to enter the next option setting (Figure 6-7).
B. TIME continues to light, WORK and 0:01 flashes, press UP or
DOWN to set the working time, the setting range is
0:00~9:59,recycled setting, press ENTER to confirm buzzer rings
0.75 seconds and enter next option to set.
C. TIME continues to light, REST and 0:01 flashing, press UP or
DOWN to set the working time, the setting range is 0:00~9:59,
recycled setting, press ENTER to confirm the buzzer sounds for 1
second INTERVALCUSTOM continues Light up.
D. CYCLE TIME START countdown after three seconds, buzzer rings
every second and READY flashes every second (0.75 light / 0.25
off), the count shows 00/XX.
E. CYCLE TIME starts counting down and WORK flashes every
second (0.75 light / 0.25 off). The buzzer rings synchronously,
REMAINING lights up and starts counting down according to the
total set time, TOTAL TIME, DISTANCE, CALORIES, WATTS, SPEED,
RPM start counting based on calculated value, and the count shows
01/XX.
F. CYCLE TIME starts counting down and REST flashes every second
(0.75 light / 0.25 off) the buzzer rings synchronously, the last 3
seconds
G. C and D continue to repeat the cycle, each cycle count is
incremented by 1, until the set value WORK moves CYCLE TIME
begins to count down and REST flashes every second (0.75 light /
0.25 off).
15 / 18
H. After 30 seconds without any signal input, the buzzer sounds for
1 second to enter the wake mode.
I. Press the START button once to enter the pause mode. Within 30
seconds, the buzzer will sound for 0.5 second every 1-second.
When entering the pause mode, all the displays will remain on the
screen for 3 seconds and then flash every 4 seconds (3 bright / 1
off) After 5 minutes of continuous pause, the buzzer rings 2 seconds
to enter the wake mode, press START to continue running.
J. Press the STOP button or the buzzer rings 1 second after the end,
TIME shows the total time, DISTANCE shows the total distance,
CALORIES shows the total calorie consumption for 30 seconds,
WATT, SPEED, RPM exchanges the average and maximum values
every five seconds.
K. When there is heartbeat input, the 85% and 65% heartbeat
values are exchanged with the maximum value every five seconds.
But not displayed without heartbeat input.
L. If you press any PROGRAM key to perform the action
Fig8 Fig9 Fig10 Fig11 Fig12
6. TARGET TIME:
A. Press the key to enter the mode, value flashes, and the buzzer
rings1 second at the same time.
B. TIME continues to light, the TIME value will flash and press UP
or DOWN to set the time (Fig. 8). Press ENTER to confirm and
the buzzer rings 1 second. Start counting down, DISTANCE,
CALORIES, WATTS, SPEED, RPM start counting according to the
calculated value (Figure 12)

16 / 18
7.TARGET DISTANCE:
A. Press key to enter this mode, value flashes, and buzzer rings
1second
B. TIME continues to light, TIME value flashes. Press UP or DOWN to
set up time (Fig 9). After pressing ENTER to confirm, buzzer rings
1s. Countdown time begins, DISTANCE, CALORIES, WATTS, SPEED,
SPM will count by operation value r (Fig 12)
8.TARGET CALORIES:
A. Entering this mode, TARGET、CALORIESflashes, buzzer rings
1second at the same time
B. CALORIES continues on , CAL value flashes. Press UP or DOWN
to set CAL(Fig 10) .Press ENTER to confirm ,buzzer rings
1s,TARGET、CALORIES begins counting down,. TIME,
DISTANCE ,WATTS, SPEED, RPM begin to count by operation
value(Fig 12)
9. TARGET HR:
A. Press key to enter this mode, TARGET HEART RATE flashes and
buzzer rings 1 second
B. AGE continues to light on ,age value flashes and press UP or
DOWN to set up AGE(Fig13) . Press ENTER to confirm ,buzzer rings
for 1s,TARGET HEART RATE、HEART RATE continues to light on,
MAX HR continues to light on and shows heart beat at 65% and
85% .TIME、DISTANCE、CALORIES、WATTS、SPEED、RPM start to
count by operation value
C. When Hear beat drops to 65%, and 65% value will light on ,
buzzer rings every 10s, till Heart rate reaches above 65%
D. When Hear beat exceeds 85%, and 85% value lights on,
buzzer rings every 10s, till Heart rate drops below 85%
E. When heart beat maintains 65%--85%, hear beat symbol flashes,
And it enters 65%-85% when it does not show MAX/65%/85%

17 / 18
Fig13
Press START one time despite any other keys, entering pulse mode.
Within 30s, buzzer rings 0.5s every 1s. When the system enters in
PULSE mode, all display will save on the screen after 3s, light on
every 4s( 3 lights /1off).After 5minutes of pulsing , buzzer rings 2s
to enter wake mode, press START to continue running
30s after without single input, buzzer rings 1s to enter wake mode
When the display is fade, means the battery electricity is not
enough, you have to replace the battery. If there is no input signal,
please check whether the wire is connected or not.
Technical data
Model No.
Powerjog
Power Supply
Not needed
N.Weight
195KG
Max User Weight
500 lbs running 800 lb
walking
Noise Degree
Below 80dB (A)
Running Temperature
From +5°C to +40°C
Product Dimension(L*W*H)
1950*960*1600 mm
Package Dimension(L*W*H)
2000*1100*900mm

18 / 18
Movement and adjustment of equipment
The equipment is equipped with two front wheels and a rear handle
to roll it in place. If you need to move the Powerjog, just lift from
the handle and push forward to roll.
The Powerjog can be leveled as following method:
(Note: Powerjog must to be placed horizontally before using)
A, unscrew the nut (B);
B, screwing or unscrewing the rear feet (A) until the equipment
stable and firm.
C, after adjustment, tighten the nut (B).
Maintenance
Before maintenance, select maximum resistance so treadbelt does
not move.
Very little maintenance is required; only vacuum the rubber slats
regularly if necessary. With neutral and mild detergent wipe the
handrails and console.
Warning
Be careful not to wipe instructions and label.
In order to ensure the equipment can be used safely,it should be
inspected every two weeks for product damage or wear.
Other manuals for PowerJog
1
Table of contents
Other Metagenics Fitness Treadmill manuals


