Metalworks HAE 31508 User manual
HAE - NLFRENES - v1.1 - 09102013 ®
HANDLEIDING - MODE D’EMPLOI - MANUAL
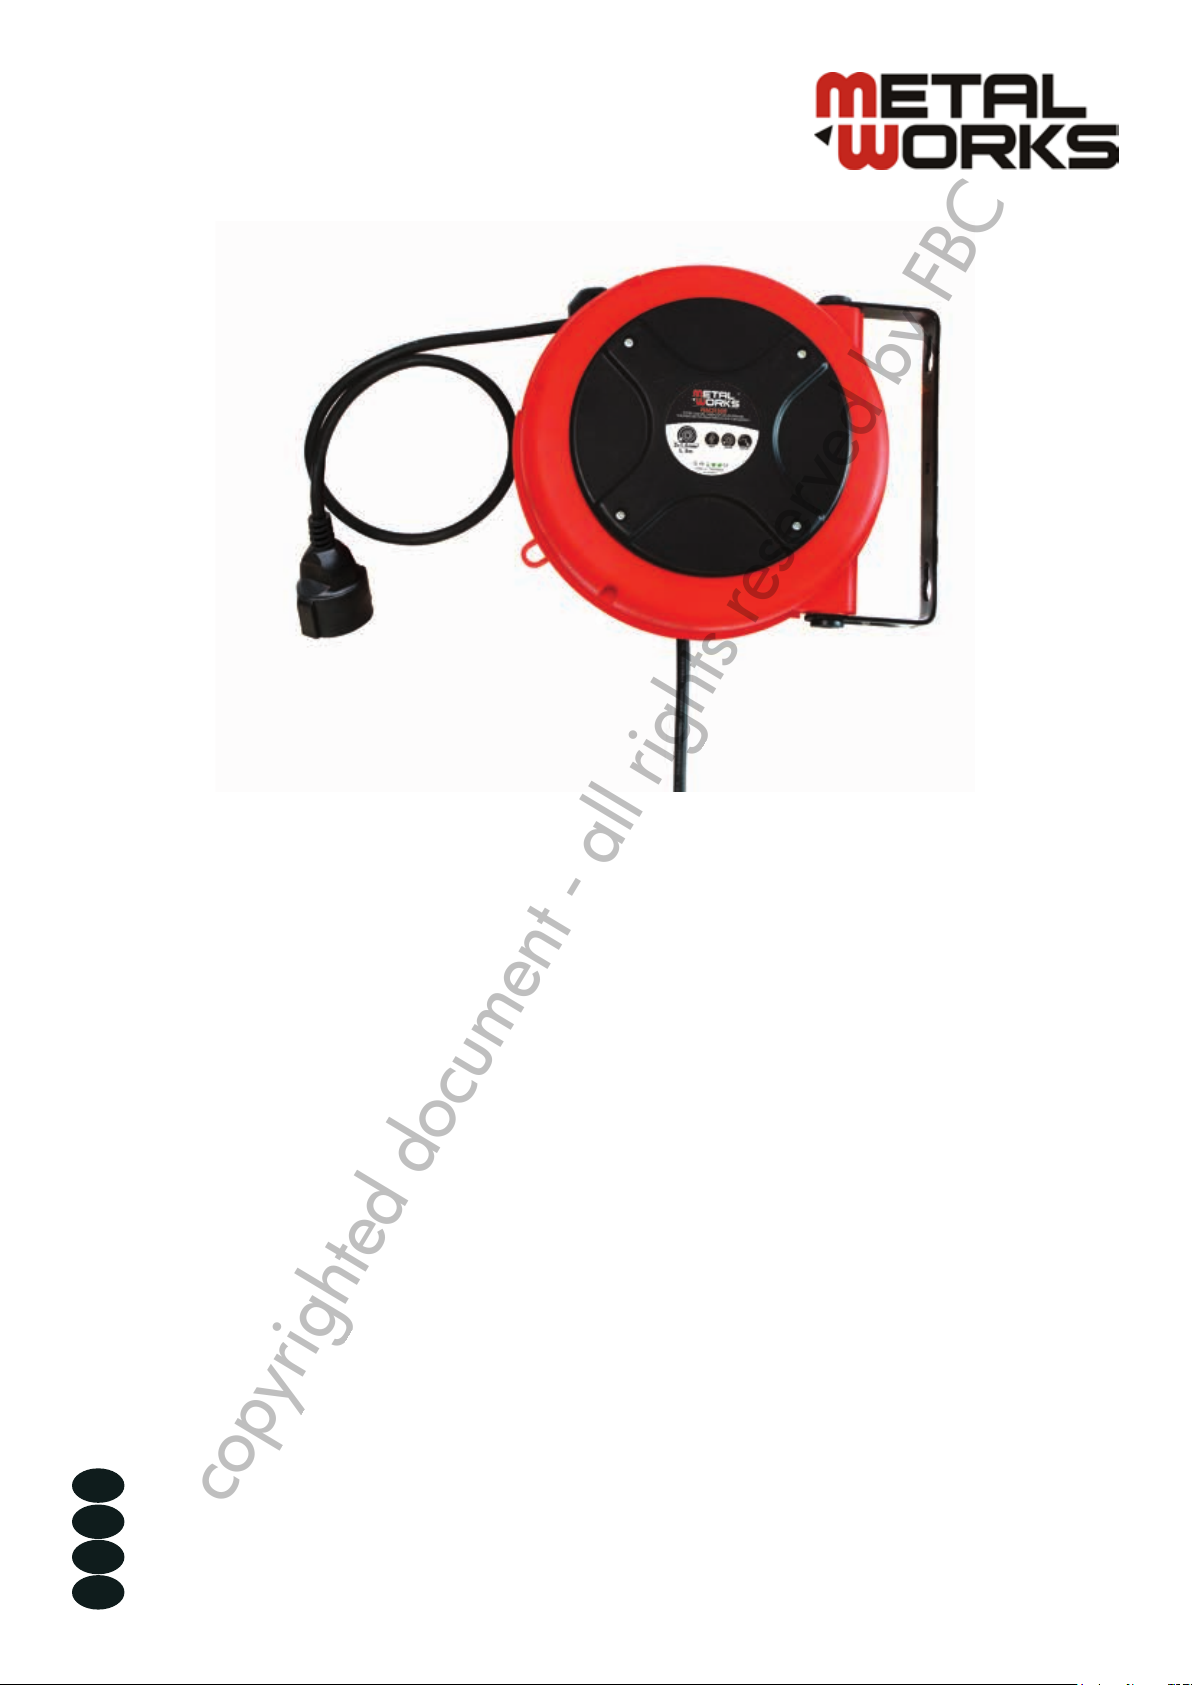
HAE 31508 (756200625)
HAE 31515 (756200605)
HAE 31520 (756200620)
HAE 32520 (756202520)
Elektrische kabelhaspel
Enrouleur de câble électrique
Electric cable reel
Enrollador eléctrico
P.02 Gelieve te lezen en voor later gebruik bewaren
P.04 Veuillez lire et conserver pour usage ultérieur
P.06 Please read and keep for future reference
P.08 Leer y guardar para posteriores consultas
FR
EN
NL
ES
copyrighted document - all rights reserved by FBC

HAE - NLFRENES - v1.1 - 09102013
2
NL
®
Waarschuwing!
Lees aandachtig volgende voorschriften en richtlijnen alvorens de oprolhaspel te gebruiken.
Het niet-naleven van deze richtlijnen kan leiden tot lichamelijke letsels of materiële schade.
Bewaar deze instructies op een geschikte plaats voor later gebruik.
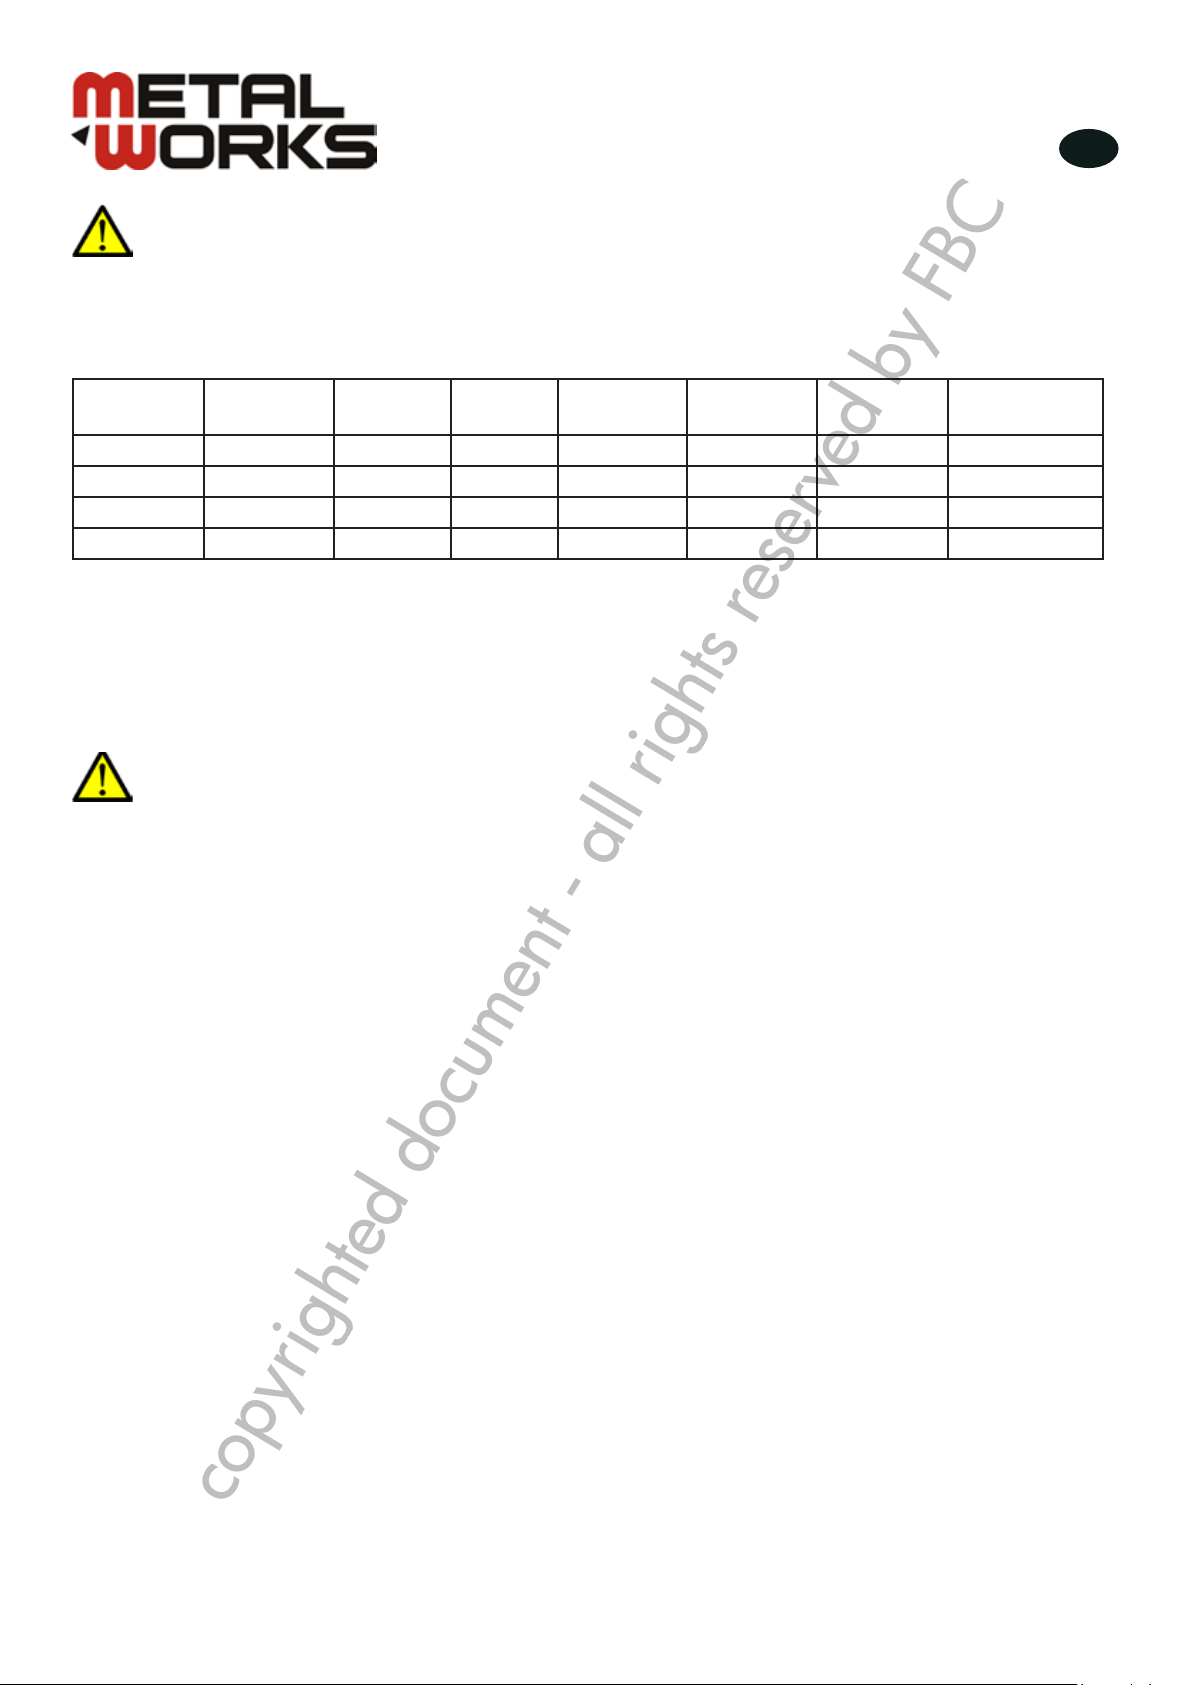
Technische gegevens
Kabel-
doorsnede
Aantal
draden Type Kabel-
lengte Spanning
Toegelaten
vermogen
opgerold
Toegelaten
vermogen
ontrold
HAE31508 1,5 mm23 H07RN-F 8 m 230 V 1000 W 2000 W
HAE31515 1,5 mm23 H07RN-F 15 m 230 V 1000 W 2000 W
HAE31520 1,5 mm23 H07RN-F 20 m 230 V 1000 W 2000 W
HAE32520 2,5 mm23 H07RN-F 20 m 230 V 1600 W 3200 W
Afmetingen: zie pagina’s 10 - 11
Onderdelen: zie pagina’s 12 - 14
Veiligheidsvoorschriften
Waarschuwing: De waarschuwingen, de gevaren, en de instructies in deze handleiding
besproken kunnen niet alle mogelijke situaties behandelen die zouden kunnen voorkomen.
Het spreekt voor zich dat het gezond verstand en de voorzichtigheid van de gebruiker
factoren zijn die niet in dit product kunnen worden gebouwd, maar door de gebruiker
moeten worden geleverd.
1. Zorg ervoor dat slechts een gekwaliceerde elektricien deze kabelhaspel instaleert. Het mag niet door kinderen of
ongeschoolde personen worden gebruikt.
2. Zorg ervoor dat het voltage van de spanningstoevoer niet de maximumvoltageclassicatie van de spoel overschrijdt.
3. Zorg ervoor dat de kabelhaspel behoorlijk geïnstalleerd is alvorens met het stroomnet te verbinden.
4. Zorg ervoor dat alle elektrische spanning afgeschakeld is van de kabelhaspel alvorens onderhoudswerken te doen.
5. Controleer voor elk gebruik op gebrekige en gebroken draden.
6. Wanneer u de kabel van de haspel trekt, trek dan altijd de kabel zelf, niet het werkstuk.
7. Verwijder de spanningstoevoer onmiddellijk uit de kabelhaspel wanneer om het even welk defect voorkomt.
8. Verwijder nooit of knoei niet met de veiligheidsvoorzieningen die door de fabricant worden geplaatst.
9. Gebruik de kabelhaspel niet in vochtige of natte condities. Houd de werkplek schoon. Vermijd dat kleine deeltjes in
de haspel terechtkomen.
10. Uw blootstelling aan de risico’s variëert, afhankelijk van hoe vaak u dit type werk doet. Om uw blootstelling aan
deze chemische producten te verminderen : werk in een goed-geventileerde omgeving, en werk met goedgekeurd
veiligheidsmateriaal, zoals stofmaskers die speciaal worden ontworpen om microscopische deeltjes uit te lteren.
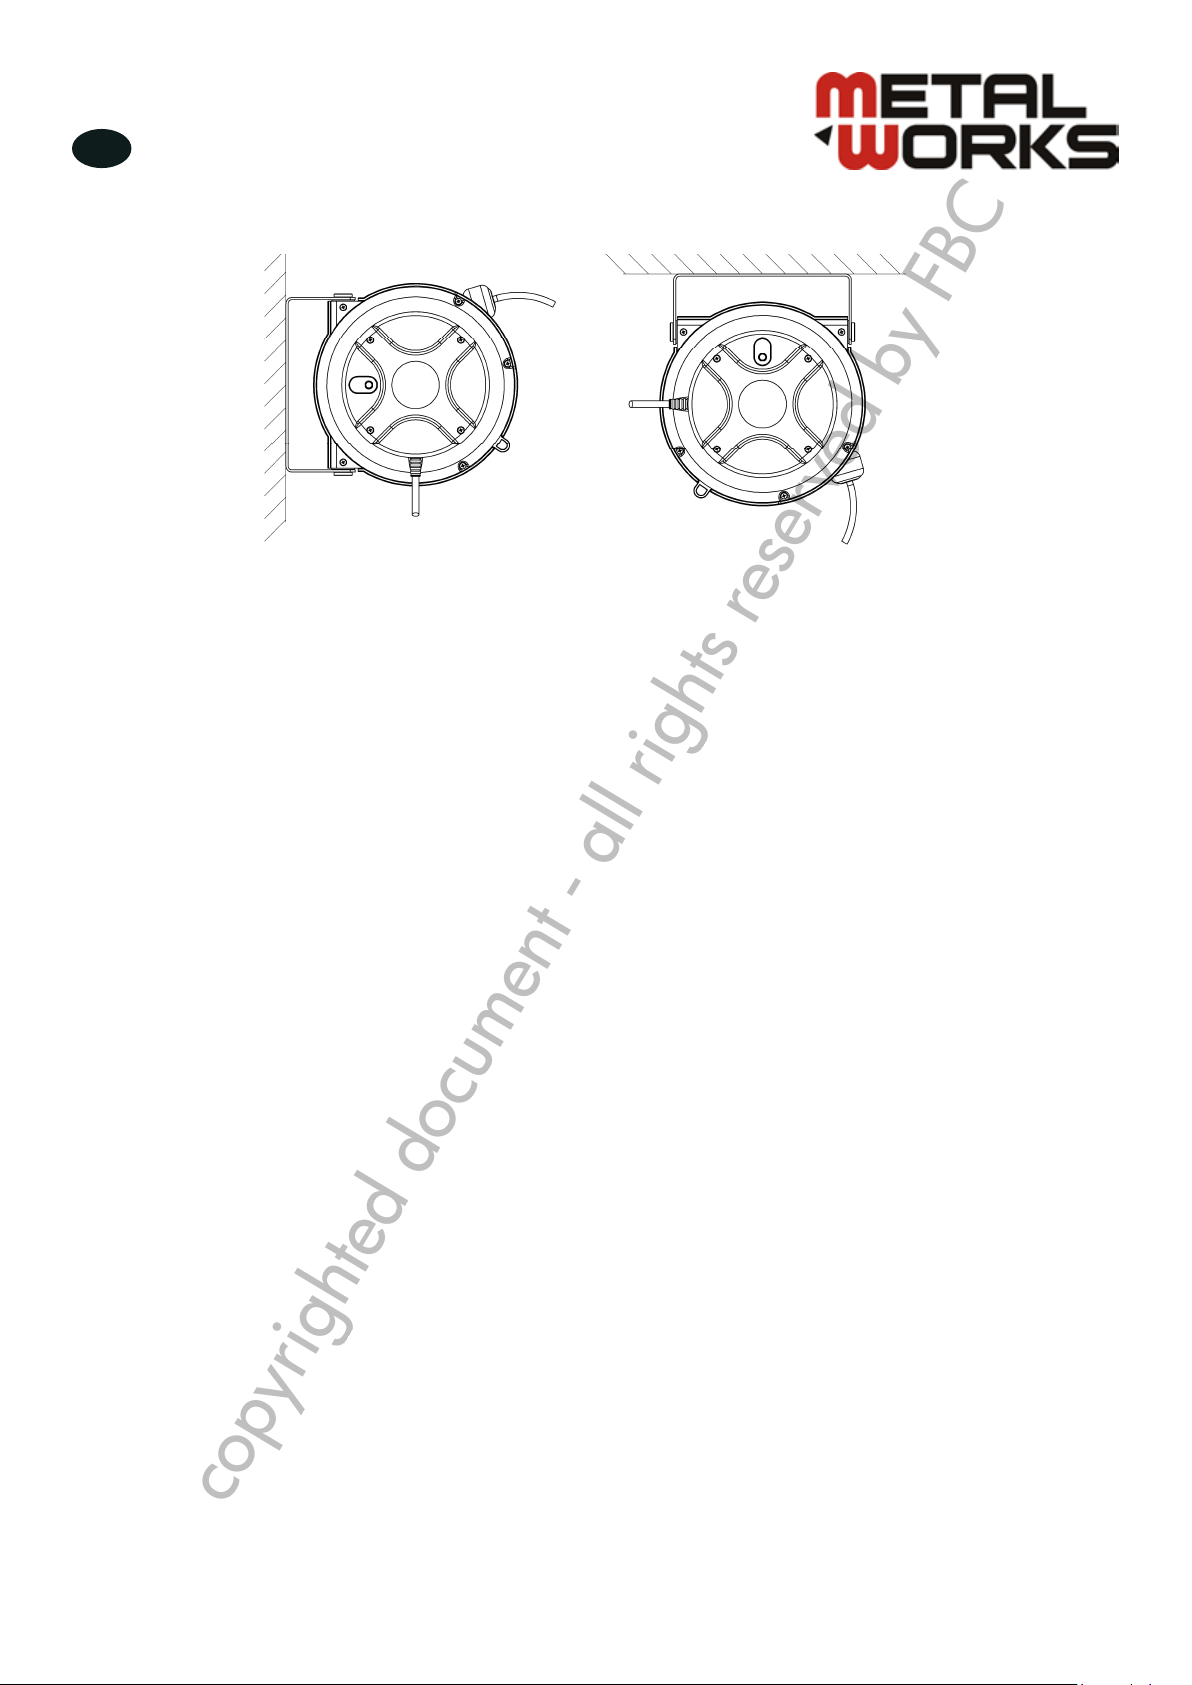
Installatie
1. De kabelhaspel moet in een gebouw worden geïnstalleerd die met huidige regelgeving en normen in
overeenstemming is die elektrosystemen en werkmilieu’s behandelen.
2. Pak de haspel uit en inspecteer deze op schade. Draai met de hand om de vlotte werking te controleren. Controleer
op volledigheid.
3. Voor bevestiging aan het plafond : installeer de haspel hoogstens 3 m boven de vloer.
4. U zult bijkomende materialen moeten kopen voor het opzetten van uw nieuwe haspel.
5. De haspelbasis heeft drie 8,5 mm geboorde gaten voor montage op een geschikte vlakke ondergrond
6. Gebruik de drie gaten in de basis om de haspel op de gewenste plaats te monteren. Wees er zeker van om
geschikte materialen te gebruiken en veilig vast te maken.
7. Pas de kabelstop tot de geschikte positie aan wanneer dit vereist is.
copyrighted document - all rights reserved by FBC

HAE - NLFRENES - v1.1 - 09102013
3
NL
®
0.0
- 4 -
5)The reel base has three 8.5mm (21/64”) drilled holes for mounting on a suitable
flat surface.
6)Using the three holes in the base, mount the reel in the desired location. Be
sure to use appropriate hardware and tighten securely.
7)Adjust the cable stopper to the suitable position when required.
Wall Ceiling
Operation
1. Check reel for correct operation by slowly pulling out the hose. A “clicking” noise
will be heard every half revolution of the drum.
2. To latch the reel, pull out the cable and allow it to retract after hearing the first
second or third “click”.
3. To unlatch, slowly pull out the hose until the “clicking” noise stops, then let the
cable retract until the cable stopper rests against the cable guide.
4. When over loading, the thermal cut-out will cut off automatically, then push the
red button until restore.
Note: To avoid damage to the reel, always hold on to the cable while it is rewinding.
Gebruik
1. Controleer de haspel op een correcte werking door langzaam de kabel uit te trekken. U zal elke halve omwenteling
een “klikkend” geluid horen van de trommel.
2. Trek de kabel uit en laat deze toe om terug te trekken na het horen van de eerste, tweede of derde “klik”.
3. Trek langzaam de kabel tot het “klikkende” geluid stopt, laat dan de kabel teruglopen tot de stop tegen de
kabelgeleiding rust.
4. Wanneer u overlaadt, zal de thermische zekering automatisch afslaan, druk vervolgens op de rode knop om te
herstarten.
Nota : Om schade aan de haspel te vermijden, laat de kabel nooit los tijdens de terugloop om beschadigingen aan de
kabelhaspel te voorkomen.
Onderhoud
Verzeker u ervan dat de kabelhaspel correct werkt en dat de isolatie niet beschadigd of gesneden is, wat dit kan tot een
gevaar leiden en de werking verstoren.
Reinig de kabel met een doek gedrenkt in warm water om het vuil te verwijderen en een correcte terugspoeling te
verzekeren.
Gebruik geen detergenten of oplosmiddelen die niet compatibel zijn met de materialen van de kabelhaspel.
Contacteer de dienst na verkoop van uw verdeler om het onderhoud aan elektrische of mechanische onderdelen uit te
voeren of het wisselen van de kabel. Het ontmantelen van de inrichting door niet-gekwaliceerd personeel kan gevaarlijk
zijn; in hoofdzaak ontstaat het risico bij de voorgespannen veren.
Beperkte garantie
1. De garantieperiode bedraagt 24 maand vanaf datum van aankoop, de kabel en stekker niet inbegrepen.
2. De aansprakelijkheid van de fabrikant is beperkt tot vervanging of herstelling van het defecte materiaal, wanneer de
vracht voorafbetaald teruggestuurd wordt naar de distributeur of hun aangewezen service depot.
3. De garantie omvat niet de schade veroorzaakt door ongeval, verkeerd gebruik of verkeerde installatie.
4. De haspel moet onderhouden en geïnstalleerd worden volgens de instructies.
Muur Plafond
copyrighted document - all rights reserved by FBC

4
®HAE - NLFRENES - v1.1 - 09102013
FR
Avertissement!
Lisez et comprenez toutes les instructions avant utilisation. Le non-respect des consignes de
sécurité peut être à l’origine de dommages corporels ou matériels. Gardez ces instructions
dans un endroit sûr et accessible pour consultation ultérieure.
Données techniques
Section du
câble
Nombre
de ls Type Longueur
du câble Tension
Puissance
admise
enroulé
Puissance
admise
déroulé
HAE31508 1,5 mm23 H07RN-F 8 m 230 V 1000 W 2000 W
HAE31515 1,5 mm23 H07RN-F 15 m 230 V 1000 W 2000 W
HAE31520 1,5 mm23 H07RN-F 20 m 230 V 1000 W 2000 W
HAE32520 2,5 mm23 H07RN-F 20 m 230 V 1600 W 3200 W
Dimensions : voir pages 10 - 11
Pièces détachées : voir pages 12 - 14
Consignes de sécurité
Avertissement: Lisez et comprenez toutes les instructions. Les instructions de ce manuel ne
peuvent pas couvrir toutes les conditions ou situations possibles qui pourraient se produire.
L’utilisateur doit comprendre que le bon sens et l’attention sont des facteurs qui ne peuvent
pas être établis dans ce manuel, mais doivent être fournis par l’utilisateur.
1. Assurez-vous que seul un électricien qualié installe/entretient cet enrouleur de câble. Il ne doit pas être utilisé par
des enfants ou des personnes non qualiées.
2. Assurez-vous que la tension de l’alimentation électrique ne dépasse pas la limite de tension de l’enrouleur de câble.
3. Assurez-vous que l’enrouleur de câble est correctement installé avant de le brancher à l’alimentation électrique.
4. Assurez-vous que le courant électrique de l’enrouleur de câble est coupé avant son entretien.
5. Vériez les ls abîmés ou cassés avant chaque utilisation.
6. Lorsque vous tirez le câble, prenez le câble électrique lui-même, pas le dispositif de travail
7. Retirez le courant de l’enrouleur immédiatement lorsqu’un défaut de fonctionnement se produit.
8. Ne jamais enlever, modier ou couper les dispositifs de sécurité installés par le fabricant.
9. Ne pas utiliser l’enrouleur dans des conditions humides. Gardez la zone de travail propre.
10. Votre risque d’exposition varie, selon de nombre de fois que vous faites ce type de travail. Pour réduire votre
exposition aux produits chimiques, travaillez dans un environnement bien aéré et travaillez avec des protections
appropriées tel qu’un masque à poussière spécialement conçu pour ltrer des particules microscopiques.
Installation
1. L’enrouleur de câble doit être installé dans un lieu répondant aux normes concernant le courant, les systèmes
électriques et les environnements de travail.
2. Déballez et inspectez l’enrouleur pour déceler les dommages. Tournez-le à la main pour vérier son bon
fonctionnement.
3. Pour l’accrocher au plafond : installez l’enrouleur à maximum 3 m au-dessus du sol.
4. Vous devrez acheter le matériel approprié pour monter votre nouvel enrouleur.
5. La base de l’enrouleur est percée de 3 trous de 8,5 mm pour monter l’enrouleur sur une surface plate appropriée.
6. En utilisant les 3 trous dans la base, montez l’enrouleur à l’endroit souhaité. Soyez sûr d’utiliser le matériel approprié
et serrez solidement.
7. Ajustez l’arrêt de câble à la position requise si nécessaire.
copyrighted document - all rights reserved by FBC

5
®
HAE - NLFRENES - v1.1 - 09102013
FR
0.0
- 4 -
5)The reel base has three 8.5mm (21/64”) drilled holes for mounting on a suitable
flat surface.
6)Using the three holes in the base, mount the reel in the desired location. Be
sure to use appropriate hardware and tighten securely.
7)Adjust the cable stopper to the suitable position when required.
Wall Ceiling
Operation
1. Check reel for correct operation by slowly pulling out the hose. A “clicking” noise
will be heard every half revolution of the drum.
2. To latch the reel, pull out the cable and allow it to retract after hearing the first
second or third “click”.
3. To unlatch, slowly pull out the hose until the “clicking” noise stops, then let the
cable retract until the cable stopper rests against the cable guide.
4. When over loading, the thermal cut-out will cut off automatically, then push the
red button until restore.
Note: To avoid damage to the reel, always hold on to the cable while it is rewinding.
Utilisation
1. Contrôlez l’enrouleur pour vous assurer de son utilisation correcte en tirant lentement sur le câble. Un bruit de “clic”
sera entendu à chaque fois qu’il fera un demi-tour.
2. Pour verrouiller l’enrouleur, retirez le câble et laissez-le se rétracter après avoir entendu le premier, deuxième ou
troisième “clic”.
3. Pour débloquer, tirez lentement le câble jusqu’à ce que le “clic” s’arrête, puis laissez le câble se rétracter jusqu’à ce
que le taquet du câble soir posé contre le guide-câble.
4. Quand vous dépassez la charge autorisée, le coupe-circuit thermique l’arrêtera automatiquement, poussez alors sur
le bouton rouge pour restaurer.
Note : Pour éviter d’endommager l’enrouleur, retenez toujours le câble pendant qu’il se rembobine.
Entretien
Assurez-vous que le câble est bien entretenu et que l’isolation n’est pas coupée ou usée, car ceci pourrait représenter un
danger et empêcher l’utilisation.
Nettoyez le câble avec un tissu plongé dans de l’eau chaude pour enlever la saleté ou les dépôts et pour assurer un
rembobinage correct.
N’employez pas de détergents ou de dissolvants qui pourraient être incompatibles avec des matériaux de l’enrouleur de
câble.
Pour effectuer un entretien sur les pièces électriques et mécaniques ou pour remplacer le câble, prenez contact avec le
service après-vente de votre fournisseur.
Le démontage de l’unité par du personnel non qualié peut être dangereux : principalement pour les ressorts
précontraints.
Garantie limitée
1. Le fabricant garantit cet enrouleur de câble contre les défauts de fabrication pendant une période de 24 mois à
partir de la date d’achat, mais pas le câble ou la douille.
2. La responsabilité du fabricant est limitée au remplacement ou à la réparation du matériel défectueux pendant la
période de garantie, le transport étant payé d’avance.
3. La garantie ne couvre pas les dommages causés accidentellement, ou une installation défectueuse.
4. L’enrouleur doit être installé et entretenu conformément aux instructions.
Mur Plafond
copyrighted document - all rights reserved by FBC

6
®HAE - NLFRENES - v1.1 - 09102013
EN
Warning!
Read carefully and understand all instructions before operating. Failure to follow the safety
rules and other basic safety precautions may result in serious personal injury.
Save these instructions in a safe place and on hand so that they can be read when required.
Technical data
Sectional
area
Number
of core Type Cable
length Voltage Full rolled
Watts
Full
extended
Watts
HAE31508 1.5 mm23 H07RN-F 8 m 230 V 1000 W 2000 W
HAE31515 1.5 mm23 H07RN-F 15 m 230 V 1000 W 2000 W
HAE31520 1.5 mm23 H07RN-F 20 m 230 V 1000 W 2000 W
HAE32520 2.5 mm23 H07RN-F 20 m 230 V 1600 W 3200 W
Dimensions : see on pages 10 - 11
Spare parts : see on pages 12 - 14
Safety precautions
Warning: Read and understand all instructions. The warnings, cautions, and instructions
discussed in this instruction manual cannot cover all possible conditions or situations that
could occur. It must be understood by the operator that common sense and caution are
factors which cannot be built into this product, but must be supplied by the operator.
1. Ensure that only the qualied electrician can installs/services this cable reel. And it must not be used by children or
unskilled persons.
2. Ensure that power supply voltage does not exceed maximum voltage rating of reel.
3. Ensure that reel is properly be installed before connecting to power supply.
4. Ensure that all electrical power is removed from reel before servicing.
5. Check for frayed and broken wires before each use.
6. When pull electrical cable from the reel always grasp the electrical cable itself, not the work device.
7. Remove power from the reel immediately when any malfunction occurs.
8. Never remove, tamper with or cut out the safety devices tted by the manufacture.
9. Do not use the reel in damp or wet conditions. Keep the work area is clean. Avoid put in sundries in cable reel.
10. Your risk from these exposures varies, depending on how often you do this type of work. To reduce your exposure to
these chemicals: work in a well ventilated area, and work with approved safety equipment, such as those dust masks
that are specially designed to lter out microscopic particles.
Installation
1. The cable reel must be installed in premises conforming to current regulation and standards covering electrical
systems and work environments.
2. Unpack and inspect reel for damage. Turn by hand to check for smooth operation. Check for completeness
3. For overhead ceiling mounting: Install reel at most 10 feet / 3 m above the oor.
4. You will need to purchase appropriate hardware for mounting your new reel.
5. The reel base has three 8.5 mm (21/64”) drilled holes for mounting on a suitable at surface.
6. Using the three holes in the base, mount the reel in the desired location. Be sure to use appropriate hardware and
tighten securely.
7. Adjust the cable stopper to the suitable position when required.
copyrighted document - all rights reserved by FBC

7
®
HAE - NLFRENES - v1.1 - 09102013
EN
0.0
- 4 -
5)The reel base has three 8.5mm (21/64”) drilled holes for mounting on a suitable
flat surface.
6)Using the three holes in the base, mount the reel in the desired location. Be
sure to use appropriate hardware and tighten securely.
7)Adjust the cable stopper to the suitable position when required.
Wall Ceiling
Operation
1. Check reel for correct operation by slowly pulling out the hose. A “clicking” noise
will be heard every half revolution of the drum.
2. To latch the reel, pull out the cable and allow it to retract after hearing the first
second or third “click”.
3. To unlatch, slowly pull out the hose until the “clicking” noise stops, then let the
cable retract until the cable stopper rests against the cable guide.
4. When over loading, the thermal cut-out will cut off automatically, then push the
red button until restore.
Note: To avoid damage to the reel, always hold on to the cable while it is rewinding.
Operation
1. Check reel for correct operation by slowly pulling out the cable. A “clicking” noise will be heard every half revolution
of the drum.
2. To latch the reel, pull out the cable and allow it to retract after hearing the rst second or third “click”.
3. To unlatch, slowly pull out the hose until the “clicking” noise stops, then let the cable retract until the cable stopper
rests against the cable guide.
4. When over loading, the thermal cut-out will cut off automatically, then push the red button until restore.
Note: To avoid damage to the reel, always hold on to the cable while it is rewinding.
Maintenance
Make sure the cable is in proper working order and that the insulation is not cut or worn as this could represent a hazard
and jeopardize operation.
Clean the cable with a cloth dipped in warm water to remove dirt or deposits and ensure correct rewinding.
Do not use detergents or solvents which could prove incompatible with cable-winder materials.
If the event of having to perform maintenance on the electrical, mechanical parts or replace the cable, contact an
authorized after-sale service center.
Dismantling of the unit by unskilled personal could prove hazardous; the risk involved mainly concern the preloaded
springs.
Limited warranty
1. The manufacturer warrantees this cable reel against defects in material and craftsmanship, for a period of 24 months
from date of purchase, but not including cable, socket.
2. Manufacturer’s liability is limited to replacement or repair of defective material within the warranty period, when
returned freight prepaid to the distributor or their designated service depot.
3. The warranty does not cover damage caused by accident, misuse or faulty installation.
4. The reel must be installed and maintained in compliance with the instructions.
copyrighted document - all rights reserved by FBC
8
®HAE - NLFRENES - v1.1 - 09102013
ES
Advertencia!
Lea atentamente y comprenda todas las instrucciones antes de operar. No seguir los
consejos y otras precauciones básicas de seguridad puede dar lugar a lesiones personales
graves. Guarde estas instrucciones en un lugar seguro y a mano para futuras consultas.
Detalles técnicos
Secciones Números Tipo Longitud Voltios Capacidad
enrollado
Capacidad
desenrollado
HAE31508 1,5 mm23 H07RN-F 8 m 230 V 1000 W 2000 W
HAE31515 1,5 mm23 H07RN-F 15 m 230 V 1000 W 2000 W
HAE31520 1,5 mm23 H07RN-F 20 m 230 V 1000 W 2000 W
HAE32520 2,5 mm23 H07RN-F 20 m 230 V 1600 W 3200 W
Dimensiones : consulte las paginas 10 - 11
Despiece : consulte las paginas 12 - 14
Precauciones de seguridad
Advertencia: Lea y comprenda todas las instrucciones. Las advertencias, precauciones e
instrucciones que se describen en este manual no pueden cubrir todas las condiciones y
situaciones que pueden ocurrir. Se debe entender que el sentido común y la prudencia son
factores que no pueden ser incorporados en este manual, sino que debe ser utilizado por el
operador.
1. Asegúrese de que sólo un electricista cualicado pueda instalar/utilizar este enrollador. Y no debe ser utilizado por
niños o personas no cualicadas.
2. Asegúrese de que la tensión de alimentación no exceda los valores de tensión máxima del enrollador.–
3. Asegúrese de que el enrollador está correctamente instalado antes de conectar a la red eléctrica.
4. Asegúrese de que toda la energía eléctrica se retira del enrollador antes de darle servicio.
5. Revise si hay cables pelados y rotos antes de cada uso.
6. Cuando tire del cable eléctrico de la bobina agarre el cable eléctrico en sí, no el dispositivo de trabajo.
7. Desconecte la alimentación de la bobina de inmediato cuando se produzca alguna avería.
8. Nunca quite, manipule o corte los dispositivos de seguridad instalados por el fabricante.
9. No utilice el enrollador en lugares húmedos o mojados. Mantenga el área de trabajo limpia. Evite poner artículos en
el enrollador.
10. El riesgo derivado de estas exposiciones varía, dependiendo de la frecuencia con la que realice este tipo de trabajo.
Para reducir la exposición a estas sustancias químicas: trabaje en un área bien ventilada y trabaje con equipos
de seguridad aprobados, tales como máscaras contra el polvo especialmente diseñadas para ltrar las partículas
microscópicas.
Instalación
1. El enrollador debe estar instalado en los locales que se ajusten a la reglamentación y las normas relativas a los
sistemas eléctricos y entornos de trabajo actual.
2. Desembale e inspeccione el enrollador. Gire con la mano para comprobar su buen funcionamiento. Compruebe la
integridad
3. Instalación del enrollador en techo de 3 m.
4. Usted tendrá que comprar el equipo adecuado para el montaje de su nuevo enrollador.
5. La base del enrollador tiene tres agujeros perforados 8,5 mm para el montaje sobre una supercie plana adecuada.
6. Uso de los tres agujeros en la base, monte el enrollador en la posición deseada. Asegúrese de utilizar el equipo
apropiado y apretar bien.
7. Ajuste el tope del cable a la posición adecuada cuando sea necesario.
copyrighted document - all rights reserved by FBC
9
®
HAE - NLFRENES - v1.1 - 09102013
ES
0.0
- 4 -
5)The reel base has three 8.5mm (21/64”) drilled holes for mounting on a suitable
flat surface.
6)Using the three holes in the base, mount the reel in the desired location. Be
sure to use appropriate hardware and tighten securely.
7)Adjust the cable stopper to the suitable position when required.
Wall Ceiling
Operation
1. Check reel for correct operation by slowly pulling out the hose. A “clicking” noise
will be heard every half revolution of the drum.
2. To latch the reel, pull out the cable and allow it to retract after hearing the first
second or third “click”.
3. To unlatch, slowly pull out the hose until the “clicking” noise stops, then let the
cable retract until the cable stopper rests against the cable guide.
4. When over loading, the thermal cut-out will cut off automatically, then push the
red button until restore.
Note: To avoid damage to the reel, always hold on to the cable while it is rewinding.
Operación
1. Compruebe el enrollador para la operación correcta tirando lentamente de la manguera. Un “clic” se oye cada
media revolución del tambor.
2. Para enganchar el enrollador, tire del cable y deje que se retraiga después de escuchar el primer, segundo y tercer
“clic”.
3. Para destrabar, tire lentamente de la manguera hasta que el ruido de “clic” pare, a continuación, deje que el cable
se retraiga hasta que el tope del cable se apoye en la guía.
4. En caso de sobrecarga, la protección térmica se cortará automáticamente después de pulsar el botón rojo hasta su
restauración.
Nota: Para evitar daños en el enrollador, sostenga siempre el cable mientras se enrolla.
Mantenimiento
Asegúrese de que el cable está en buen estado de funcionamiento y que el aislamiento no es cortado o desgastado, ya
que podría representar un peligro y poner en peligro la operación.
Limpie el cable con un paño humedecido en agua tibia para eliminar la suciedad o los restos y garantizar el correcto
rebobinado.
No utilice detergentes o disolventes que podrían ser incompatibles con los materiales de cable enrollador.
Si el caso de tener que realizar el mantenimiento de las partes eléctricas, mecánicas o reemplazar el cable, póngase en
contacto con un centro de servicio post-venta autorizado.
La manipulación de la unidad por personal no cualicado podría resultar peligrosa, el riesgo que implica reere
principalmente a los muelles precargados.
Garantía limitada
1. El fabricante garantiza la garantía por defectos de materiales y mano de obra, por un período de 24 meses a partir
de la fecha de compra, pero no incluye el cable, enchufe.
2. La responsabilidad del fabricante se limita a la sustitución o reparación del material defectuoso dentro del período
de garantía, en el distribuidor o el taller.
3. La garantía no cubre daños causados por accidentes, mal uso o instalación incorrecta.
4. El enrollador debe ser instalado y mantenido de acuerdo con las instrucciones.
Pared Techo
copyrighted document - all rights reserved by FBC
10
®HAE - NLFRENES - v1.1 - 09102013
NL
FR
EN
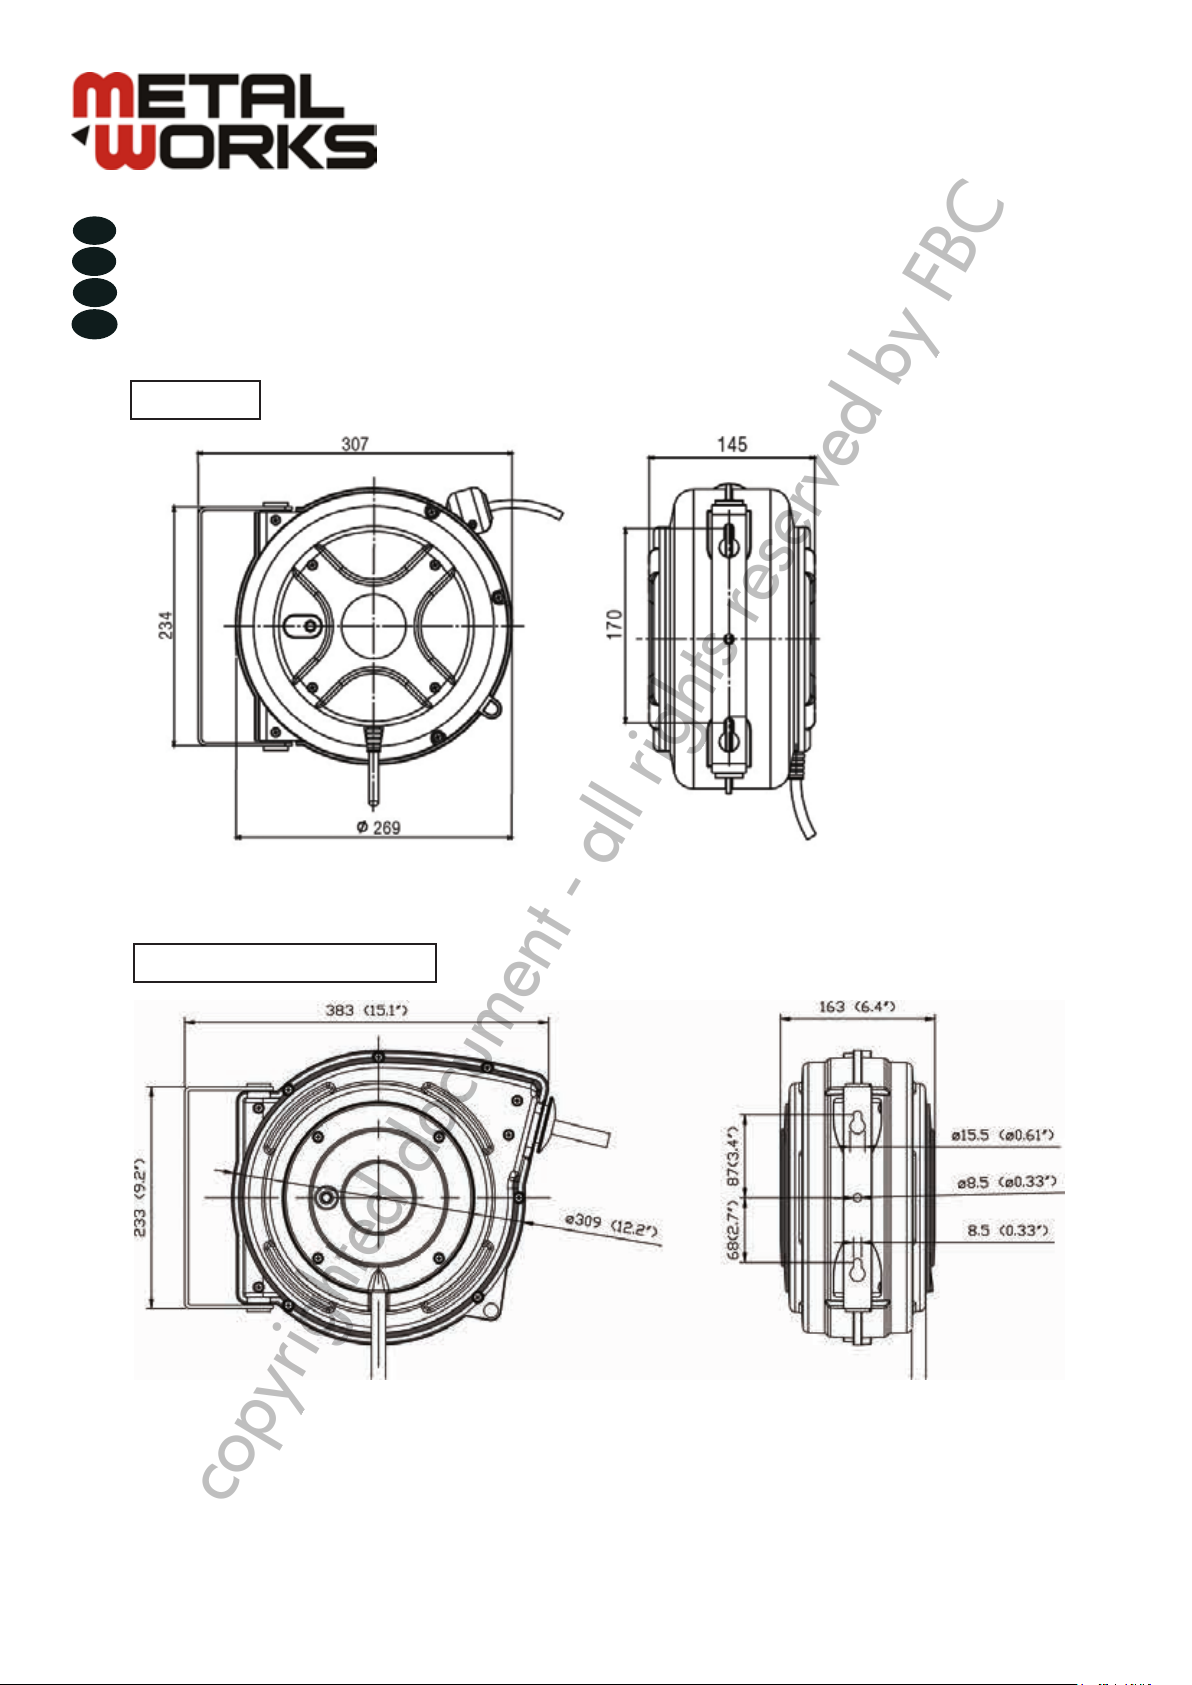
Afmetingen
Dimensions
Dimensions
Dimensiones
HAE31515 + HAE31520
HAE31508
ES
copyrighted document - all rights reserved by FBC

11
®
HAE - NLFRENES - v1.1 - 09102013
HAE32520
copyrighted document - all rights reserved by FBC
12
®HAE - NLFRENES - v1.1 - 09102013
NL
FR
EN
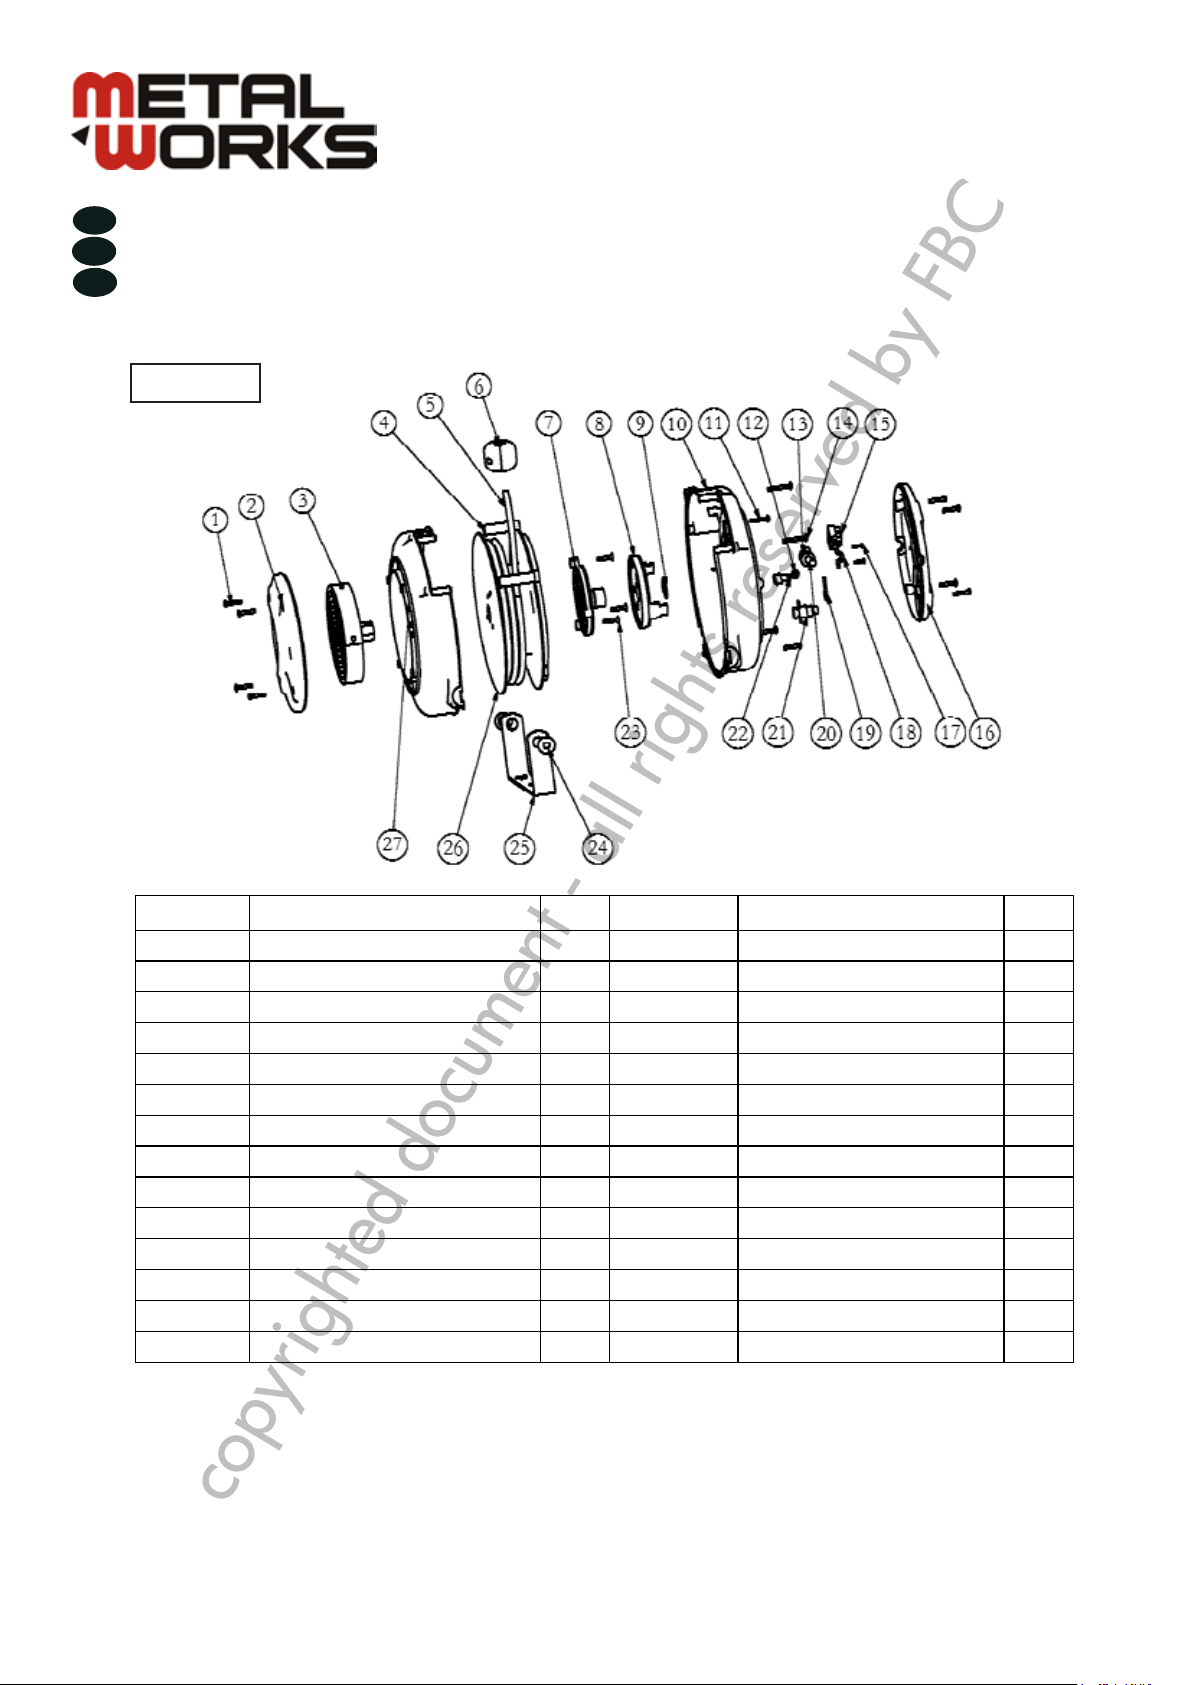
Spare parts
Onderdelen
Pièces détachées
0.0
- 6 -
Explore and Parts list
Part No. Description Q’ty Part No. Description Q’ty
1 Screw 10 15 Terminal 1
2 Ri
g
ht Cove
r
1 16 Left Cove
r
1
3 Main S
p
rin
g
Assembl
y
1 17 Screw 2
4 Rolle
r
2 18 Cable bloc
k
2
5 Cable with Socket 1 19 Connect Wire 1
6 Sto
pp
er Assembl
y
1 20 Lead-in Cable
A
ssembl
y
1
7 Movable Plate Assembl
y
1 21 Thermal Cut-out 1
8 Fixed Plate Assembl
y
1 22 Ratchet Paw 1
9 Retaine
r
1 23 Screw 3
10 Outer Casin
g
1 24 Pin 2
11 Screw 1 25 Bracket 1
12 Ratchet S
p
rin
g
1 26 Drum 1
13 Protecto
r
1 27 Outer Casin
g
1
14 Screw 2
WARNING
Your risk from these exposures varies, depending on how often you do this type of work. To reduce
your exposure to these chemicals: work in a well ventilated area, and work with approved safety
equipment, such as those dust masks that are specially designed to filter out microscopic particles.
HAE31508
copyrighted document - all rights reserved by FBC

13
®
HAE - NLFRENES - v1.1 - 09102013
V1-09122010
756200620-756200605-756202520GBNLF
Parts list - Onderdelen Tekening - Vue éclatée HAE31520 - HAE31515
Part No. Description Quantity Part No. Description Quantity
1 Fixed Base 1 18 Screw 3
2 Washer 1 19 Lead-in Cable Assembly 1
3 Fixed Plate 1 20 Protect sheath 1
4 Small Left Cover 1 21 Clamp 2
5 Thermal cut-out 1 22 Screw 4
6 Movable Plate 1 23 Connect Wire 1
7 Left Cover 1 24 Screw 2
8 Bracket 1 25 Pin 2
9 Main Spring 1 26 Ratchet Spring 1
10 Small Right Cover 1 27 Screw 1
11 Axle 1 28 Ratchet Base 1
12 Drum 1 29 Ratchet Paw 1
13 Right Cover 1 30 Screw 4
14 Cable Assembly 1 31 Roller 2
15 Retainer 1 32 Stopper Assembly 1
16 Terminal Block 1 33 Screw 12
17 Screw 3 34 Screw 4
HAE31515 + HAE31520
copyrighted document - all rights reserved by FBC

14
®HAE - NLFRENES - v1.1 - 09102013
756200620-756200605-756202520GBNLF
V1-09122010
Parts list - Onderdelen Tekening - Vue éclatée HAE32520
HAE32520
copyrighted document - all rights reserved by FBC
15
®
HAE - NLFRENES - v1.1 - 09102013
Elektrische kabelhaspel
Enrouleur de câble électrique
Electric cable reel
Enrollador eléctrico
2006/95/EC
EN 61242:1997 + A1:2008
HAE 31508 (756200625)
HAE 31515 (756200605)
HAE 31520 (756200620)
HAE 32520 (756202520)
Fabrikant/Invoerder
Fabricant/Importateur
Manufacturer/Retailer
Fabricante/Importador
Verklaart hierbij dat het volgende product :
Déclare par ceci que le produit suivant :
Hereby declares that the following product :
Declara que los siguientes productos:
Product
Produit
Product
Producto
Order nr. :
Geldende CE-richtlijnen
Normes CE en vigueur
Relevant EU directives
Normativas de la CE
Overeenstemt met de bestemming van de hierboven aangeduide richtlijnen - met inbegrip van
deze betreffende het tijdstip van de verklaring der geldende veranderingen.
Répond aux normes générales caractérisées plus haut, y compris celles dont la date correspond
aux modications en vigueur.
Meets the provisions of the aforementioned directive, including, any amendments valid at the
time of this statement.
Cumple las disposiciones de dicha Directiva, incluyendo las modicaciones vigentes en el
momento de esta declaración.
Bart Vynckier, Director
VYNCKIER TOOLS NV
Aslak S.L.
Salvador Gil i Vernet, 5
Pol. Ind. Can Torres i Can Llobet
ES-08192 Sant Quirze del Vallès - Barcelona
Vynckier Tools nv.
Avenue Patrick Wagnon, 7
ZAEM de Haureu
B-7700 Mouscron - Moeskroen
EG conformiteitsverklaring
Déclaration de conformité CE
EC declaration of conformity
Declaración de conformidad según la CE
FR
EN
NL
ES
Moeskroen/Mouscron, 09/10/2013
copyrighted document - all rights reserved by FBC
This manual suits for next models
7
Table of contents
Languages:


