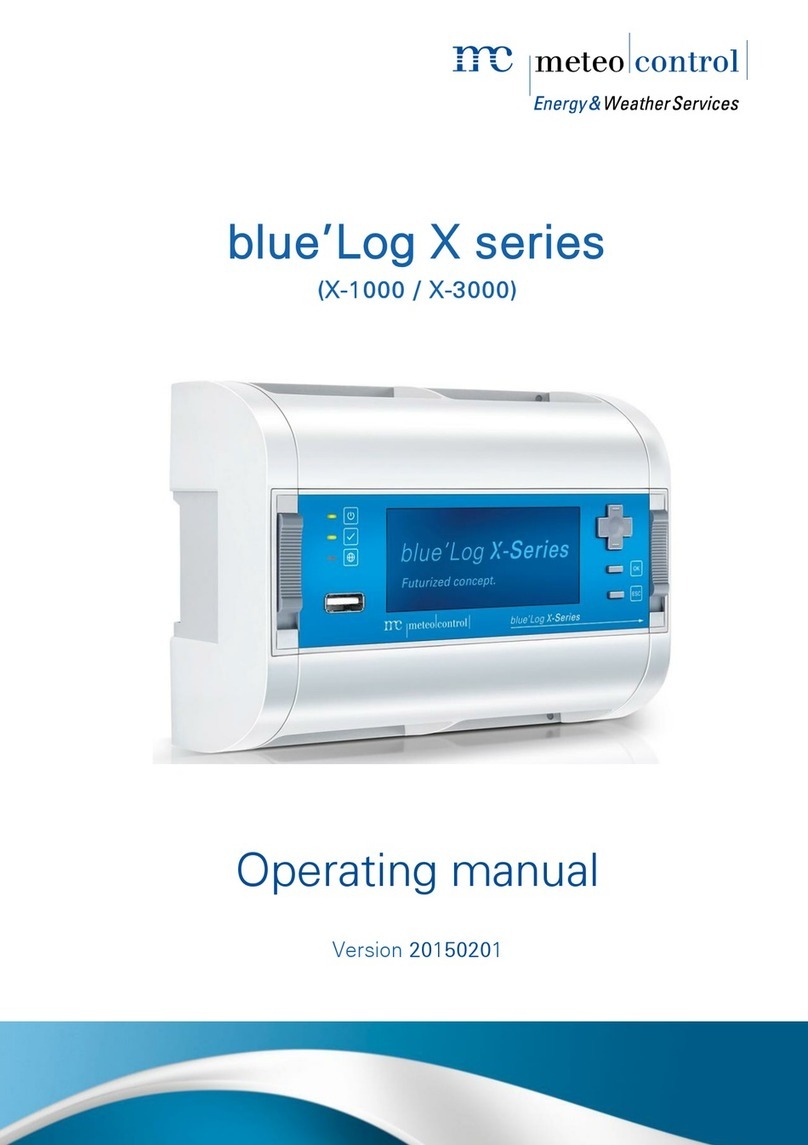
Meteo Control blue'Log XM User manual

blue’Log XM / XC
User manual
Version 20230619
Copyright
Copyright for this manual remains with the manufacturer. No part of this manual may be
reproduced or edited, duplicated or distributed using electronic systems without written
permission from meteocontrol GmbH.

blue’Log XM / XC
2 | 23
Compensation shall be payable in the event of any copyright infringements.
All brand names mentioned in this manual are the property of their respective
manufacturers and are hereby acknowledged.
Contact data
The manufacturer of the device described in this documentation is:
meteocontrol GmbH
Pröllstr. 28
D-86157 Augsburg
Tel.: +49 (0) 821 / 3 46 66-0
Web: www.meteocontrol.com
Technical support:
Tel.: +49 (0) 821 / 3 46 66-44
Fax: +49 (0) 821 / 3 46 66-11
Details regarding the user manual
The original user manual is written in German. All other language versions are
translations of the original user manual and are hereby identified as such.
© 2023 meteocontrol GmbH
All rights reserved.
All information in this user manual has been compiled and checked with the greatest
care and diligence. Nevertheless, the possibility of errors cannot be entirely excluded.
meteocontrol GmbH therefore cannot accept any liability for errors or any
circumstances resulting from errors.
Subject to technical alterations.

blue’Log XM / XC
3 | 23
Release notes
Date
Changes
2023-04-13
Format and safety instructions updated
Cables and wiring, bus cabling updated
Images updated

Contents
1. General notes .......................................................................................................3
1.1 Safety instructions.......................................................................................3
1.2 Warning notices ..........................................................................................3
1.3 Additional information..................................................................................4
2. Advice on using the user manual.......................................................................4
2.1 Purpose of this user manual .......................................................................4
2.2 Target group and qualification.....................................................................4
2.3 Warranty and liability...................................................................................5
3. Product description .............................................................................................5
4. Transport and storage .........................................................................................6
5. Safety ....................................................................................................................6
5.1 Intended use...............................................................................................6
5.2 Personnel....................................................................................................6
5.3 Internal battery............................................................................................7
6. Device overview ...................................................................................................8
6.1 blue’Log front panel.....................................................................................8
6.2 blue’Log rear panel .....................................................................................9
6.3 Status LEDs................................................................................................9
7. Mounting and installation..................................................................................10
7.1 Safety instructions for installation..............................................................10
7.2 Installation.................................................................................................11
7.2.1 Installing the device on a top-hat rail...........................................11
7.2.2 Dismounting the device...............................................................11
7.2.3 Mounting MX modules on the device..........................................12
7.2.4 Multiple MX modules...................................................................15
7.2.5 Connection sequence for MX modules .......................................16
7.3 Installation.................................................................................................16
7.3.1 Cables and wiring .......................................................................16
7.3.2 Permitted wire and cable types for blue’Log power supply .........16
7.3.3 Wire and cable types for device connection................................16
7.3.4 Shielding.....................................................................................18
7.4 Interfaces..................................................................................................18
7.4.1 Power supply ..............................................................................18
7.4.2 Voltage output.............................................................................18
8. Commissioning and configuration ...................................................................19
8.1 Requirements............................................................................................19
8.2 Commissioning .........................................................................................19
8.3 Establishing and checking the connection ................................................19
8.3.1 Ethernet connection....................................................................19
8.3.2 Connecting bus devices..............................................................19
8.3.3 Connections to analog and digital inputs.....................................20
8.4 Configuring the blue’Log ...........................................................................21

blue’Log XM / XC
2 | 23
9. Care and maintenance.......................................................................................21
10. Technical data....................................................................................................21
11. Environmental protection and disposal...........................................................21
12. Appendix.............................................................................................................22
12.1 CE declaration of conformity.....................................................................22
12.2 RoHS statement .......................................................................................23

blue’Log XM / XC
3 | 23
1. General notes
1.1 Safety instructions
Safety instructions warn of dangers when using the devices and explain how they can
be avoided.
The safety instructions are classified according to the severity of the risk and are
subdivided into four groups:
DANGER
Imminent danger
Failure to comply with the warning notice will lead to an imminent risk of
death or serious physical injury!
WARNING
Possible danger
Failure to comply with the warning notice may lead to a risk of death or
serious physical injury!
CAUTION
Hazard with low risk
Failure to comply with the warning notice may lead to minor injuries!
NOTICE
Hazard with a risk of material damage
Failure to comply with the warning notice will lead to material damage!
1.2 Warning notices
Particular dangers are highlighted using warning symbols.
RISK OF ELECTRIC SHOCK
Electric shock hazard!
Danger to life and limb! Failure to comply with the warning notice will lead to
an imminent risk of serious injury or death.

blue’Log XM / XC
4 | 23
1.3 Additional information
This symbol can be found next to notes, additional information and tips.
2. Advice on using the user manual
2.1 Purpose of this user manual
This user manual is a key aid when it comes to ensuring proper operation of the device.
It contains important information and safety notes to help you use the devices correctly,
economically and in the intended manner.
The user manual helps to avoid dangers, to reduce repair costs and downtimes, and to
increase the reliability and operating life of the devices. Read this user manual carefully
and attentively before you start work on the blue’Log.
The user manual is continuously updated. The current version can be found on our
website: www.meteocontrol.com
2.2 Target group and qualification
This manual is intended for persons who are responsible for planning the installation,
installing, starting up, operating, and maintaining the blue’Log. The activities described
in this document may only be carried out by qualified personnel. Qualified personnel
must meet the following criteria:
•Training in the installation and configuration of IT systems
•Training in hazards and risks when installing, repairing and operating electrical
equipment and systems.
•Training for the installation and commissioning of electrical equipment and
systems
•Knowledge of the relevant laws, standards and guidelines
•Knowledge of and compliance with this document with all safety instructions

blue’Log XM / XC
5 | 23
DANGER
Danger due to improper handling
•The staff responsible for the installation, operation and maintenance
of the system must have read and understood this user manual
before the devices can be installed and used safely!
•The manuals and documentation must be kept by the system and
be available at all times as required.
meteocontrol GmbH accepts no liability for personal injury, damage to property, or
system malfunctions and their consequences, insofar as these result from non-
observance of this user manual.
2.3 Warranty and liability
The scope, period and form of the warranty are specified in the general terms and
conditions of meteocontrol GmbH. Further information on warranty and liability can be
found at www.meteocontrol.com
meteocontrol rejects any liability for damage arising from the non-observance of the
user manual.
This applies, in particular, for damage from:
•Unintended use
•Faulty operation
•Wrongly chosen materials and tools
•Faulty or non-executed maintenance and repairs
In cases of control and regulation (“Power Control”), meteocontrol GmbH accepts no
liability for events and occurrences outside of its control, such as:
•The correctness of control commands given by an energy supply company or
failure to implement control commands
•Hardware and/or software faults on the part of the system operator
•End-user switching processes
•Any liability for damages caused by events and occurrences such as lost
profits, grid instability, damage to parts of the customer’s system, for instance
of an inverter, shall remain expressly excluded.
3. Product description
Data loggers of the blue’Log X-series record all the data of your PV system to ensure
the function of the system as well as its performance capabilities. Data such as current,
voltage, temperature, output and yield from each individual inverter are measured, as

blue’Log XM / XC
6 | 23
well as values from externally connected sensors. The blue’Log is the interface for grid-
compliant feed-in for PV systems. The X-series is available in two variants: blue’Log
XM and blue’Log XC. blue’Log XM is intended for monitoring purposes. blue’Log XC is
intended for control and regulation ("power control") purposes.
See the blue’Log data sheet for further technical details. Further information about our
licenses can be found at www.meteocontrol.com .
4. Transport and storage
Every product leaves our factory in perfect electrical and mechanical condition.
Special packaging ensures safe transport.
On delivery, unpack the device and all accessories and check them for any damage.
NOTICE
•To avoid possible damage, always use the original packaging when
transporting or shipping the device.
•Protect the device against dust and moisture.
5. Safety
This chapter contains general safety regulations that must be followed during
installation, operation, and maintenance of the blue’Log. Failure to do so can result in
injury or death and/or damage the blue’Log. Read these safety regulations carefully
before you start work on the blue’Log.
5.1 Intended use
Only the permitted signals and signal strengths may be applied to the connections of
the data logger (blue’Log) and the expansion modules (MX modules) used here.
Installation is only permitted indoors. For installation outdoors or in a dusty
environment, the device must be installed in a standardized protective enclosure.
5.2 Personnel
Installation, commissioning and maintenance of the device may only be performed by a
qualified electrician.
Given their specialist training, knowledge, experience, and familiarity with the relevant
standards and regulations, a qualified electrician is in a position not only to carry out
work on electrical systems but also to recognize and avoid possible dangers unaided.

blue’Log XM / XC
7 | 23
The qualified electrician must comply with the occupational health and safety laws in
force.
Please note in particular:
•All national installation and set-up regulations (e.g. VDE in Germany)
•The generally accepted codes of practice
•Information on transport, installation, operation, service, maintenance and
disposal given in this user manual
•Specific values, limits, and information relating to operating and ambient
conditions on type plates and in data sheets.
Protection concepts
•The memory card (SD memory) must not be removed while the blue’Log is in
operation.
•The blue’Log may not be opened.
•The blue’Log may not be modified.
•Damaged devices must be taken out of operation immediately and checked by
a qualified electrician.
•Local regulations must be observed when using the devices.
•The safety of the blue’Log and the user cannot be guaranteed if the safety
precautions described are violated.
5.3 Internal battery
The blue’Log data logger contains an internal lithium battery (button cell) which ensures
that the time and date remain stored in the device in the event that the power supply is
interrupted.
NOTICE
The housing may only be opened by qualified personnel.
•The battery may only be replaced by the meteocontrol repair
service, since the blue’Log housing needs to be opened.
•meteocontrol GmbH accepts no liability for material damage owing
to non-compliance with this warning notice!

blue’Log XM / XC
8 | 23
6. Device overview
6.1 blue’Log front panel
Fig. 1: Overview of the blue’Log front panel
(1)
Digital input (DI1–DI4)
(9)
Termination RS 485 - 2
(2)
CAN
(10)
RS485- 2
(3)
CAN termination
(11)
Power out (24V DC / 500mA)
(4)
Reset
(12)
Power in (24 V DC)
(5)
Digital output / multi input
(DO1 –DO4, MI1 –MI4)
(13)
LEDs: Power, status, Online
(14)
USB interface
(6)
Ethernet
(15)
Display
(7)
RS485 -1
(16)
Control pad
(8)
Termination RS 485 - 1
(17)
Buttons: OK, ESC

blue’Log XM / XC
9 | 23
6.2 blue’Log rear panel
Fig. 2: Overview of the blue’Log rear panel
(1)
Clamp for top-hat rail
6.3 Status LEDs
The front panel features three LED displays with the following meanings:
Icon
LED
Explanation
Green: blue’Log is supplied with power
Off: No power supply
Green: System loaded successfully: normal operation
Orange: System booting: boot phase
Red: System error
Green: Connected to VCOM
Orange: Connection setup to VCOM
Red: No connection to VCOM

blue’Log XM / XC
10 | 23
7. Mounting and installation
During installation, all the manuals for system modules and components must be taken
into account.
7.1 Safety instructions for installation
DANGER
Electric shock hazard!
Fatal injuries or death from contact with cables and terminals.
•Only connect or disconnect cables while they are de-energized.
•Take measures to prevent the power cable from being reactivated.
NOTICE
Damage due to improperly connected wires and cables!
Incorrectly connected cables can lead to damage or destruction of the
measuring inputs and the device.
•Connect cables only to the sockets provided for this purpose.
•Observe the polarity while connecting cables.
NOTICE
Damage due to overvoltage!
Overvoltages or surge voltages may damage or destroy the device.
•Protect the power supply against overvoltages.
Voltages of more than 24 V DC and currents of more than 20 mA on the
analog and digital inputs can destroy the respective measuring inputs.
•Ensure that voltages only up to 24 V DC and currents up to 20 mA
are applied.

blue’Log XM / XC
11 | 23
7.2 Installation
7.2.1 Installing the device on a top-hat rail
Step
Action
1.
Hang the blue’Log on the top-hat rail using the clamp provided (rear panel).
2.
Push the top-hat rail latch on the front side of the device from bottom (latch
open) to top (latch closed). This will attach the blue’Log to the top-hat rail. The
icons (open/closed lock) above and below the top-hat rail latch indicate whether
the device is attached.
3.
Check that the blue’Log is securely attached to the top-hat rail.
Fig. 3: Secure mounting on a top-hat rail
7.2.2 Dismounting the device
To remove the blue’Log from the top-hat rail, push the top-hat rail latch from top to
bottom. The device can now be lifted off from the top-hat rail.
NOTICE
For installation within a control cabinet, ensure at least 3 cm of free space
above and below the device for air circulation.

blue’Log XM / XC
12 | 23
7.2.3 Mounting MX modules on the device
The blue’Log can be expanded to provide additional interfaces using various add-on
modules (MX modules).
Fig. 4: MX module (example: RS485/422)
NOTICE
Risk of damage when installing add-on modules
Installing MX modules while the blue’Log is operating can damage or
destroy the blue’Log and the MX modules.
•Before installing MX modules to provide additional interfaces,
disconnect the blue’Log from the power supply.
1. If necessary, remove the blue’Log from the top-hat rail.
2. In order to add an MX module to the blue’Log, remove the cover on the right-
hand side. For this, unlock the four fasteners and pull off the cover on the
right-hand side.

blue’Log XM / XC
13 | 23
Fig. 4: Unlocking the fasteners
Fig. 5: Pulling off the right-hand side cover
Set the side cover aside, as you will need to reattach it to the right side
of the MX module later. This is required in order to fasten the blue’Log
and MX modules to the top-hat rail.
3. You can now see the expansion socket on the right-hand side of blue’Log
housing.
Fig. 6: Expansion socket

blue’Log XM / XC
14 | 23
4. Insert the desired MX module into the expansion socket of the blue’Log.
Fig. 7: Plugging the MX module into the blue’Log
5. Close the fasteners again in order to attach the MX module to the device to its
left.
Fig. 8: Attached MX module

blue’Log XM / XC
15 | 23
6. Reattach the side cap to the right-hand side of the MX module and close the
fasteners.
Fig. 10: blue’Log and MX module attached with side covers mounted
7.2.4 Multiple MX modules
The blue’Log can be expanded with several MX modules of the same type or with
different MX modules. See the data sheet for your basic device for details on the
maximum number of expansion modules.
Fig. 9: blue’Log with various MX modules

blue’Log XM / XC
16 | 23
7.2.5 Connection sequence for MX modules
When connecting MX modules to the basic device, observe the prescribed connection
sequence in order to ensure correct functionality of the modules.
The number of arrows and lines on the bottom front panels of the blue’Log and MX
modules indicates the connection sequence. Modules with a greater number of
arrows/lines may not be installed before a module with fewer lines (e.g. two
arrows/lines). For example, a module with three arrows/lines must not be connected
before a module with two arrows/lines.
Fig. 10: Connection sequence for MX modules
7.3 Installation
7.3.1 Cables and wiring
Recommended cable types for wiring the individual system components are given
below. Wiring restrictions are also listed.
7.3.2 Permitted wire and cable types for blue’Log power supply
Connecting cable
Voltage range
Cable cross
section
Type
•Finely stranded
conductor
U < 24 V DC
1 mm2
H05V-K
•Finely stranded
conductor
U >= 24 V DC
0.75 mm2
H05V-K
7.3.3 Wire and cable types for device connection
Recommended wire and cable types for wiring the individual system components are
given below. Wiring restrictions are also listed.

blue’Log XM / XC
17 | 23
Type
Product designation
Item number
Max.
permissible
length
Bus cabling (inverter)
•Recommended: Data cable
(twisted and shielded)
•Data cable RS485
UNITRONIC Li2YCYv
(TP) data cable
2x2x0.50 mm² 2) 1)
200.116
1200 m2) 3)
UNITRONIC Li2YCYv
(TP) data cable 3x2x0.50
mm² 2) 1
200.117
UNITRONIC Li2YCYv
(TP) data cable
4x2x0.50 mm² 2) 1
200.118
Analog signals (irradiance
sensor, temperature sensor)
•Sensor cable
•Voltage signal 0 V –10 V
UNITRONIC Li2YCYv
(TP) data cable
2x2x0.50 mm² 2) 1)
200.116
100 m
UNITRONIC Li2YCYv
(TP) data cable 3x2x0.50
mm² 2) 1
200.117
UNITRONIC Li2YCYv
(TP) data cable
4x2x0.50 mm² 2) 1
200.118
Digital signals (status
messages, remote control
systems)
•Sensor cable
•Current signal 4 mA –
20 mA
UNITRONIC Li2YCYv
(TP) data cable
2x2x0.50 mm² 2) 1)
200.116
600 m4)
UNITRONIC Li2YCYv
(TP) data cable 3x2x0.50
mm² 2) 1
200.117
UNITRONIC Li2YCYv
(TP) data cable
4x2x0.50 mm² 2) 1
200.118
Temperature sensor (PT 1000)
Meter with S0 (digital pulse)
signal
UNITRONIC Li2YCYv
(TP) data cable
2x2x0.50 mm² 2) 1
200.116
30 m
Ethernet network
•Network (shielded)
•
At least CAT 5/6 S/FTP
n/a
100 m3)
1) This cable is suitable for laying in the ground.
2) Repeaters must be used for longer cable lengths.
3) A hub is required if multiple separate cables of this length are used.
4) Power supply of 24 V DC is required.
This manual suits for next models
1
Table of contents
Other Meteo Control Data Logger manuals
