Meteotronic START User manual
6
WEATHER FORECAST CENTER
Instruction manual
INTRODUCTION
The Meteotronic START Weather Forecast Center provides a professional weather forecast for the
current and the next three days. The weather forecasts are made by professional meteorologists and are
sent out with the radio-time signal generator DCF77 in ermany and HB in Switzerland and can be
received in almost all of Europe. The reception area for the radio-time signal generator is divided into a
total of 90 meteorological regions (60 regions with 4 day forecast, 30 regions with 2 day forecast). The
desired region for the local or holiday location is simply selected and the respectively current weather
forecast is shown on the display. This gives you a quick overview of the weather situation for the following
days at any time. Updating the weather data is done every day.
This weather station allows the reception of weather data of the private provider Meteotime via DCF or
H B signal without time limit and additional costs.
Meteotime is responsible for the dispatch and the correctness of the transmitted data.
60 regions with 4 days forecast
30 regions with 2 days forecast.
Please read the o erating instructions carefully and com letely before using for the first time, to
revent function errors and incorrect o eration. Kee the instructions handy for consulting.
WEATHER FORECAST CENTER
7
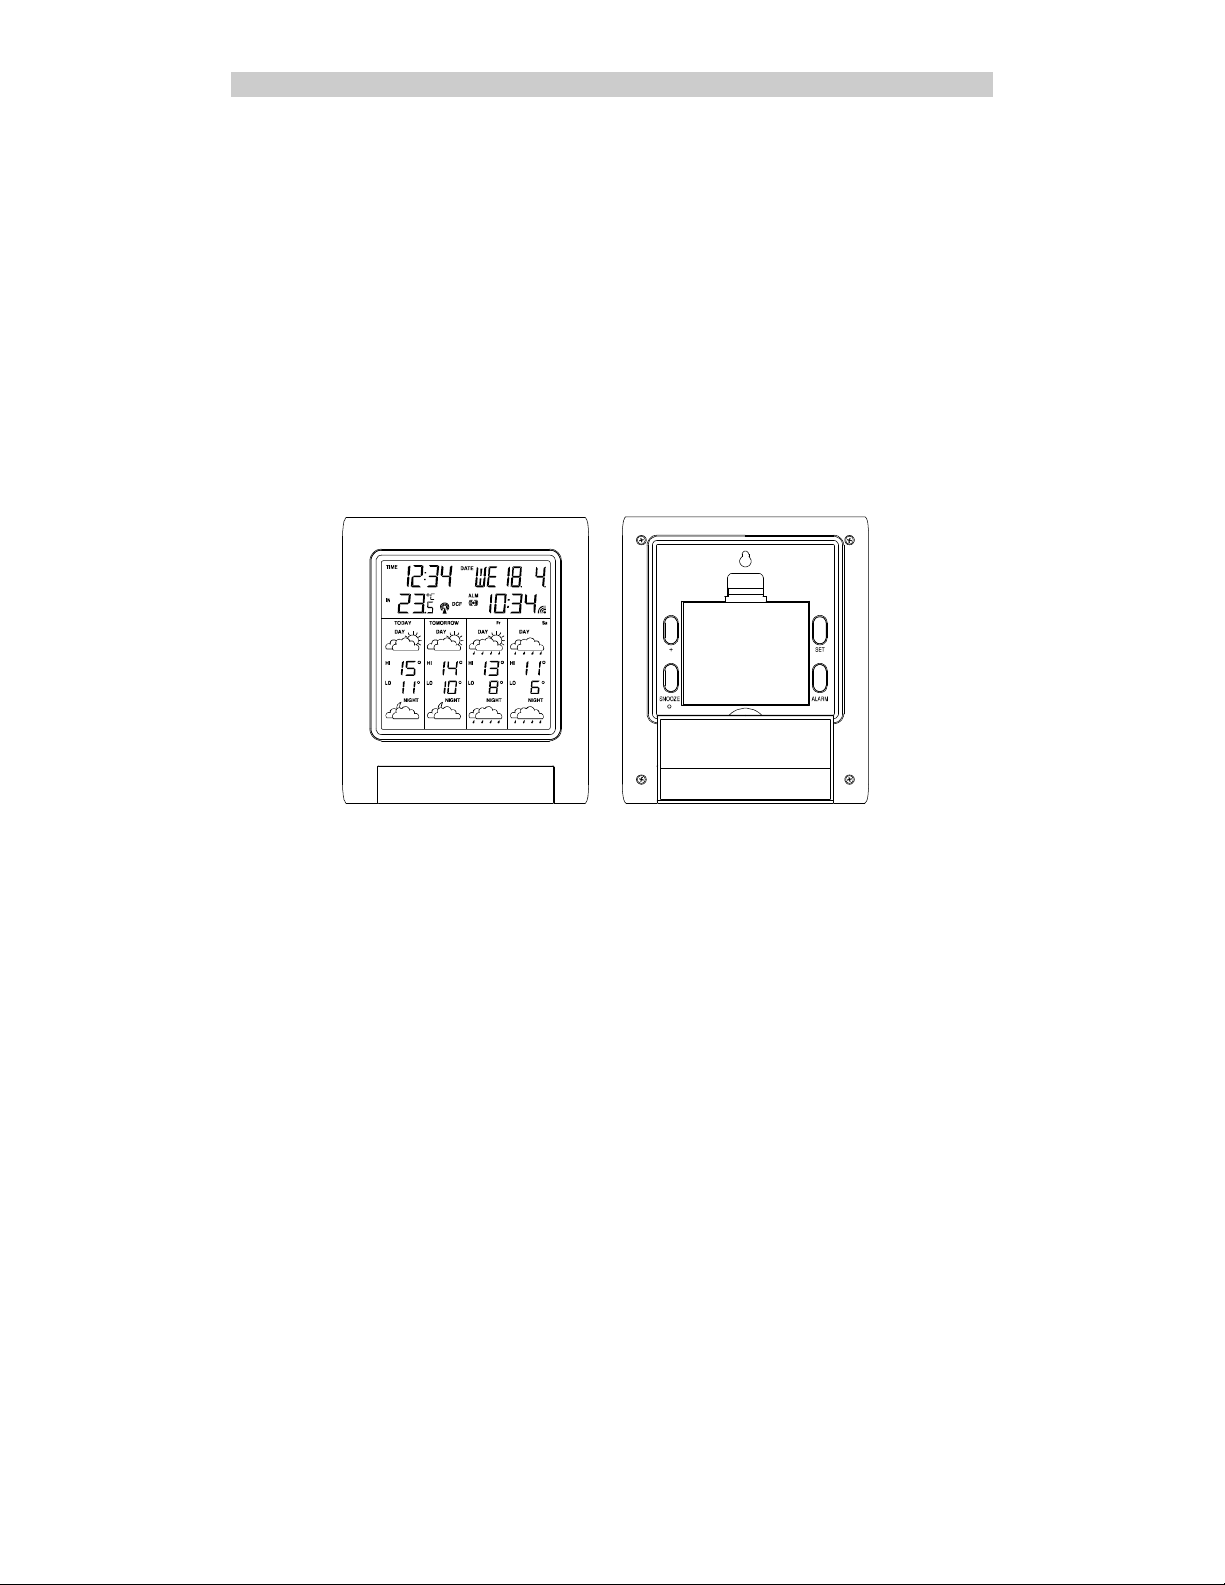
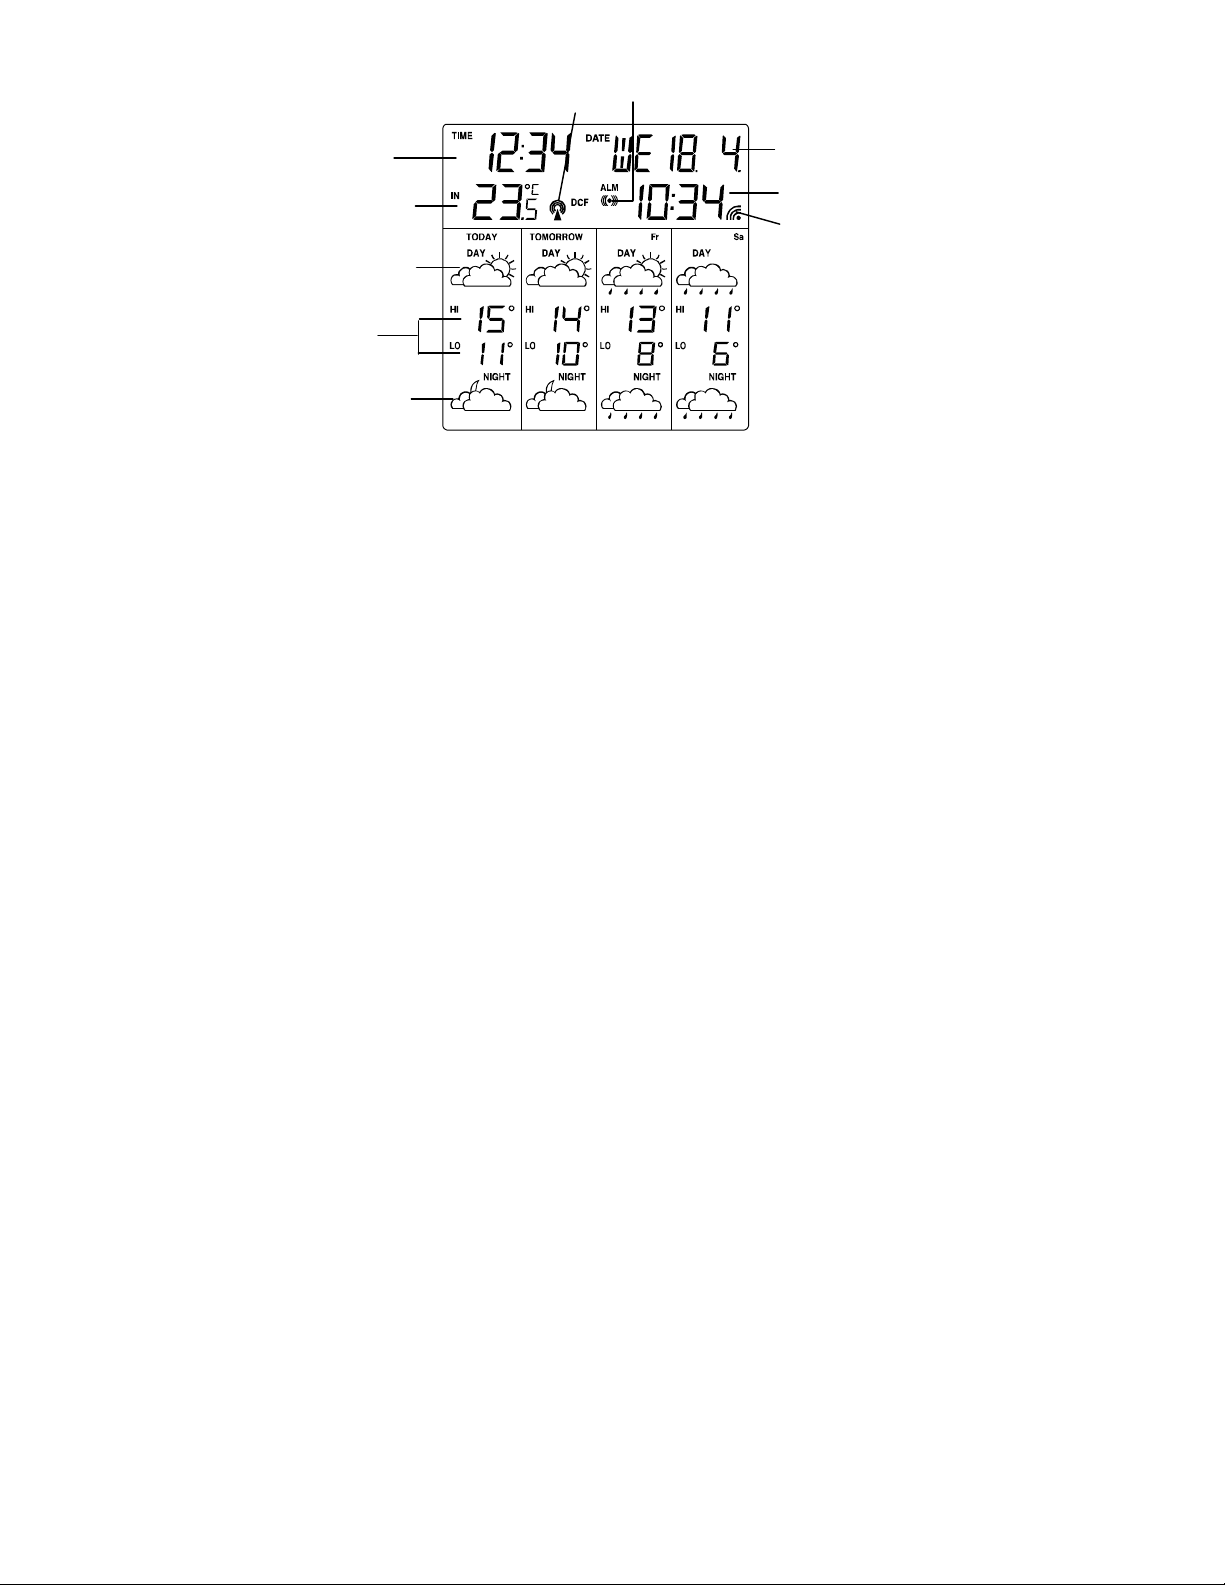
DISPLAY
Rece tion indicator for weather data
• Symbol on Weather data completely received
•
Symbol flashing Weather data incomplete
Rece tion indicator for radio-time signal generator
• Symbol flashing Initial reception of date and time
• Symbol on Time and date are current
•
Symbol off Time and date have not been updated
Alarm symbol
• Symbol on Alarm function switched on
• Symbol off Alarm function switched off
•
Symbol flashing Alarm active or temporarily switched off (Snooze)
CHOOSING THE INSTALLATION LOCATION
Similar to a mobile telephone network or radio/TV reception, the reception of the radio-time receiver may not be
perfect in all locations. Just a couple of notes to make sure that your device works with no problems.
The location of the weather station is very important. This is the reason for the new test function that allows the
quality of reception to be checked in the surrounding area and to position the device in a location that has the best
possible conditions.
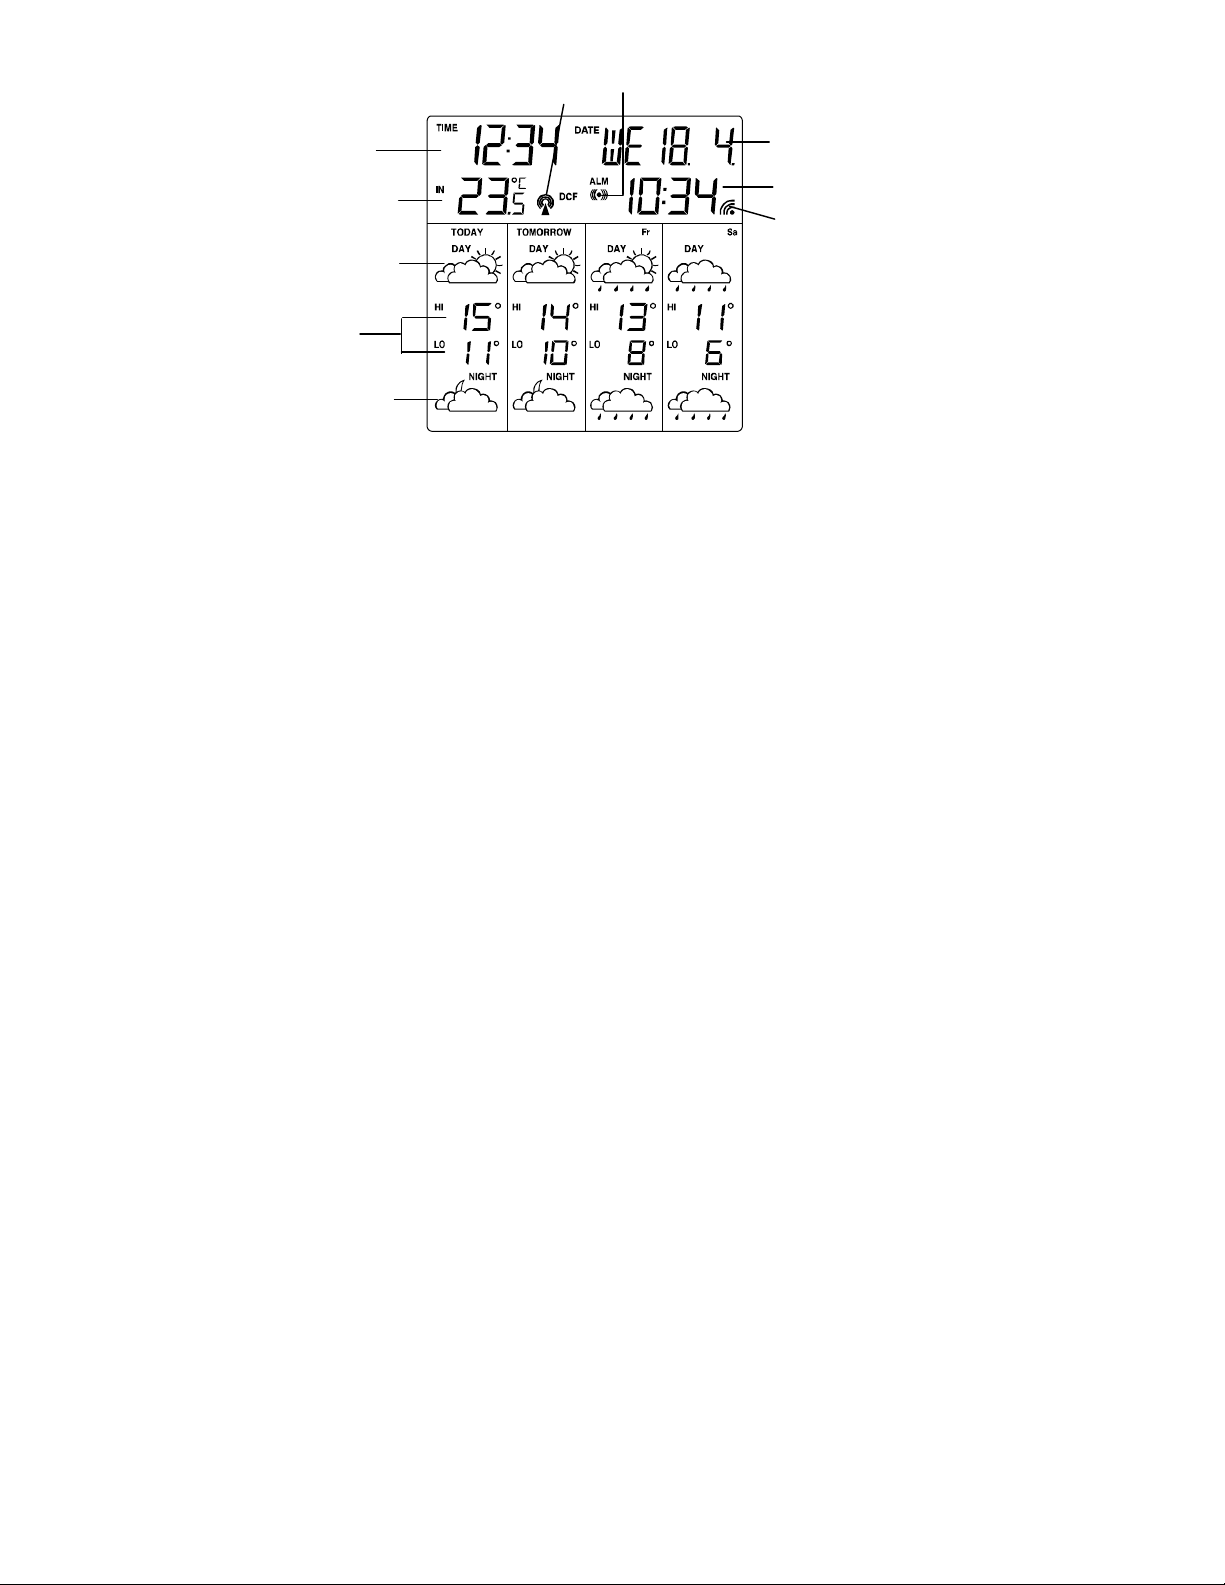
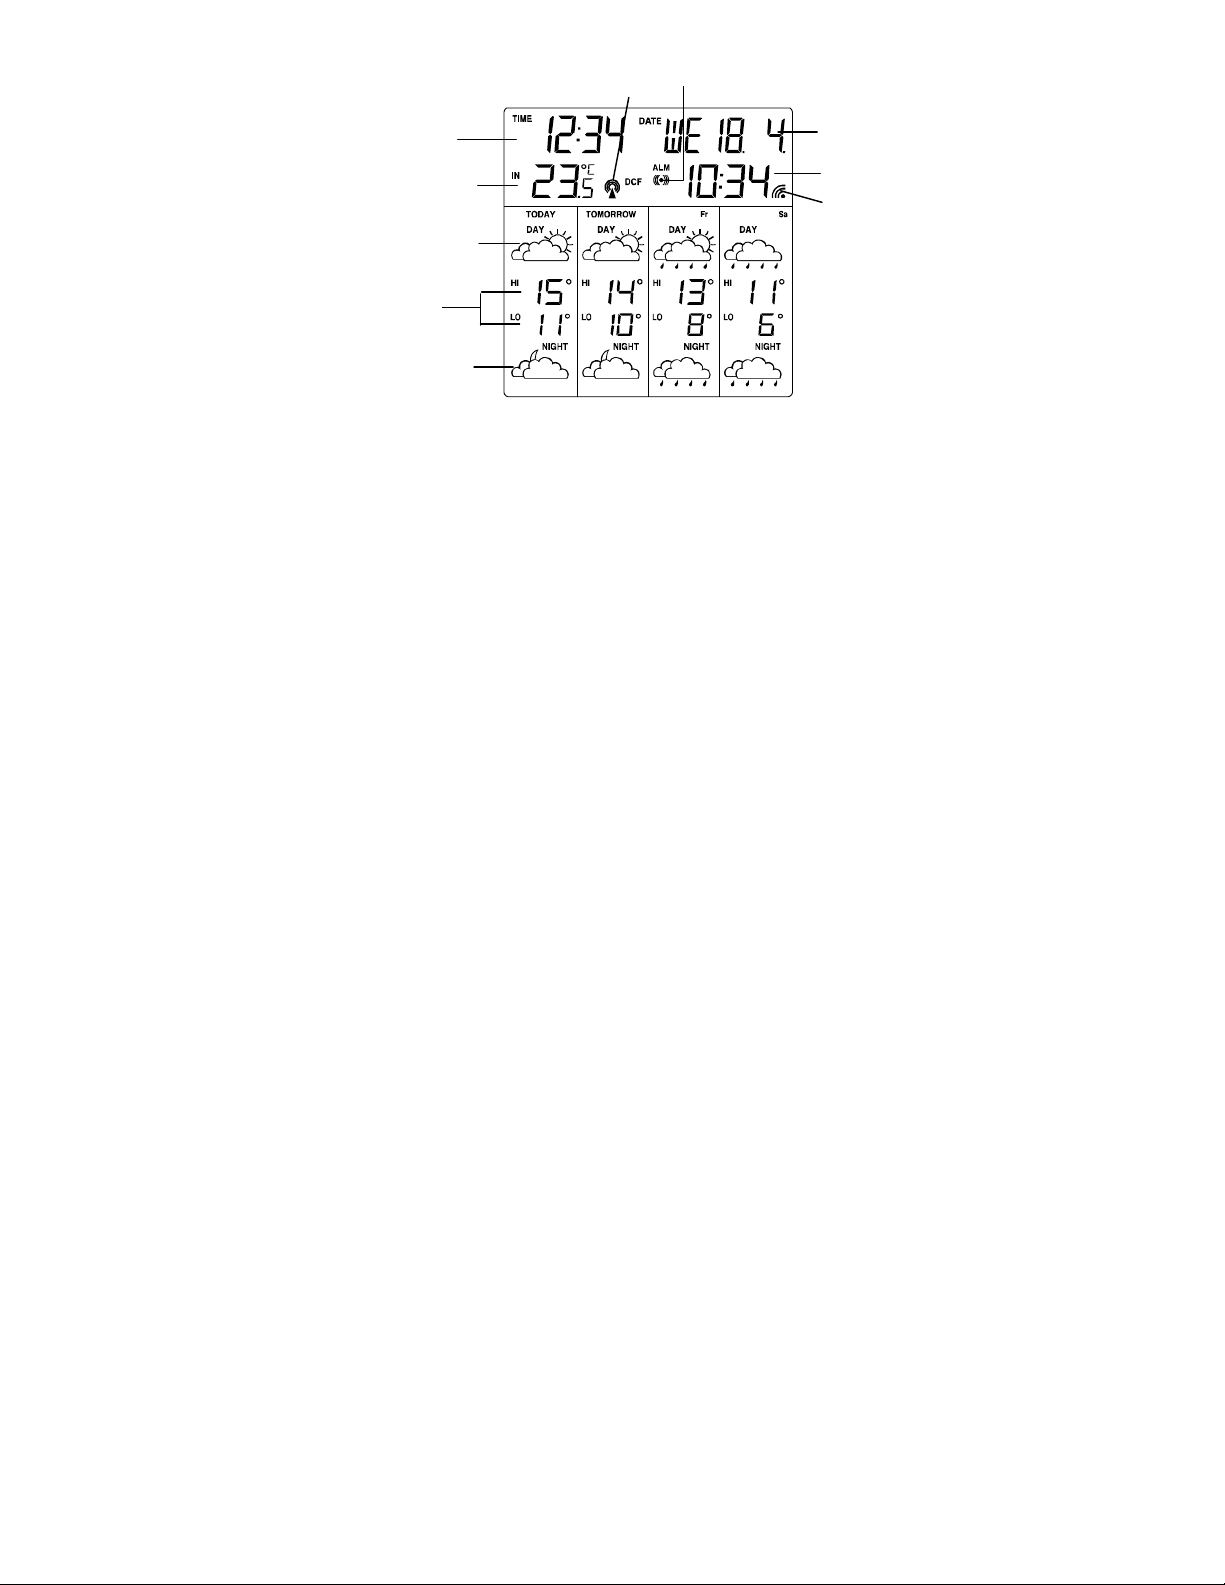
Calendar
Alarm time
Reception indicator
for weather data
Alarm ON icon
Time
Indoor
temperature
Time reception signal
Weather forecast
icon (day)
MIN/MAX
temperature
Weather forecast
icon (night)
Today
Tomorrow
(Day 1)
Day 2
Day 3

8
• Switch on all potential sources of interference (e.g. television) in the area that you want to install the station
during the test!
• Position the device in the location, oriented as you prefer, but at least one meter from the possible source of
interference.
• Activate test mode as described.
•
Monitor the reception display on the weather station. If you have found a location that has good reception,
you can leave the device there and it will retrieve data automatically from the transmitter.
Note!
• The time and date appear within a few minutes.
• The transfer of larger quantities of data for the forecast takes much longer: In order to receive all data, the
station requires 24 hours after start-u .
POSSIBLE SOURCES OF INTERFERENCE
Interferences as with a radio transmitter can occur and could be caused by the following influences:
• In buildings with a lot of concrete, metal parts and electrical systems, reception problems can occur (e.g.
Mall).
• Electrical devices such as television, computer, house-hold devices, etc. or transformers, land lines, radio
transmitters and railways are possible direct sources of interference.
• Atmospheric influences and geographical features (mountains, etc.) can affect the propagation of the radio
waves.
• The distance from the transmitter does also influence the reception. Areas such as Southern Italy or
Northern Scandinavia are also critical areas because of the great distances from the transmitter.
• In all regions, so-called “dead spots” can occur making reception impossible.
•
Weak batteries in the device decrease the quality of reception.
COMMISSIONING AND CONFIGURATION
Inserting batteries/Changing batteries
• Open the battery compartment at the rear of the weather station and insert the three batteries (LR6/ Mignon/
AA), ensuring proper polarity, into the battery compartment.
When disposing of dead batteries, see note on the disposal information.
Note!
All internal data is deleted when you change the batteries. The configuration arameters (weather region,
time zone and contrast) must be entered again (see the following cha ter). Receiving all weather data
requires a eriod of at least 24 hours.
Calling u /exiting the configuration menu
Calling u the configuration menu
• Press the <SET> button for at least three seconds. The first point in the configuration menu (weather region)
is called up.

9
Exiting the configuration menu
• Press the <SET> button as often as required to reach the normal display again.
Setting the weather region
• After calling up the configuration menu, the setting mode is active for the weather region. The text “loc” is
shown on the display. The currently defined region is shown directly to the right. Use the <+> button to
select the desired region now (see A endix).
Note!
For regions 60 – 89, the forecast is limited to 2 days. Both fields for the following days (the far right on the
display) remain empty.
The data is synchronized again after changing the region. The reception of the new weather data requires at least
24 hours.
Setting the time zone
• From the start of the configuration, press the <SET> button again for the time zone setting mode. The text
“ti” is shown on the display. The currently defined time zone is shown directly to the right. Use the <+>
button to select the desired time zone.
Note!
The time received from the radio-time signal generator DCF or HBG is Central Euro ean Time (CET,
CEST). Setting the time zone is therefore only required for other time zones (e.g. in Portugal or Great
Britain).
Contrast setting
• From the start of the configuration, press the <SET> button twice for the display contrast setting mode. The
text “con” appears. The currently set value is displayed in the field on the right. The contrast can be set
within a range from 1 to 16 using the <+> button.
•
Pressing the <SET> button again ends configuration mode.
Rece tion test
• Press the <+> button for at least 3 seconds to activate the test for the reception of weather data. The text
“test” is shown on the display. The reception indicator for the weather data shows the quality of reception.
The reception is good if the indicator is shown, otherwise a new location must be found for installing the
weather station.
•
The reception test is either ended after approx. 1 minute automatically or by actuating the <+> button.
OPERATIONS
Alarm function
• Press the <ALARM> button for at least three seconds to set the alarm time. The text “ALM” and the hours
display flash. Use the <+> button for the hour setting. By pressing the <ALARM> button again, the minute
setting is activated. The minute display flashes. Use the <+> button for the minutes setting. Press the
<ALARM> button again to end the setting mode for the alarm time.
• Use the <ALARM> button to activate or deactivate the alarm. When the alarm is active, the alarm symbol
"(((
))) “ is shown on the display.

10
•
The alarm signal can be interrupted with the <ALARM> button. Use the <SNOOZE> button to stop the alarm
signal for five minutes. During this time, the alarm signal "(((
))) “ flashes.
Show current weather region
Press the <SET> button to show the current weather region. The text „loc“ appears with the currently defined
region on the display. An overview of the coding of all available regions can be found under A endix.
INTENDED USAGE, EXCLUSION OF WARRANTY, AND SAFETY INFORMATION
• This weather station is intended for private usage as an indicator for future weather. The forecasts of this
device are to be used as orientation values and do not represent absolute, precise forecasts.
• The manufacturer or distributor of this weather station assumes no responsibility for incorrect values or any
results that may occur because of these values.
• The weather station is not intended for medical purposes or for the information to the public.
• The manufacturer or distributor has no influence on the transferred weather data or forecasts.
• The capabilities of the weather station depend on the operational functionality of the transmission media,
which the manufacturer or distributor has no influence on. Failures in the transmission media cannot be
ruled out.
• This device is not a toy and contains breakable and small parts. Install the device out of the reach of
children.
• Improper handling or unauthorized opening of the device voids the guarantee.
• These instructions are not to be reproduced in whole or in part without the written authorization from the
manufacturer.
DISPOSAL INFORMATION
Do not dis ose off the device as art of household garbage!
Electronic devices are to be disposed of in accordance with the guidelines concerning electrical
and electronic devices via the local collecting point for old electronic devices!
Observe battery regulations
According to the regulations pertaining to batteries, you are required to send used or defective batteries back to
us or to hand them in to the respective local business or battery collection point.
Batteries do not belong in the household waste!
Technical s ecifications
Indoor temperature:
Range:...................................... 0 to 50°C
Accuracy:.................................. ±1°C
Resolution: ............................... 0,1°C
Weather data updating:............. Every 24 hours
Power consumption: ................. 3 x Battery LR6/ Mignon/AA
Dimensions (L x W x H) : .......... 142 mm x 26 mm x 136 mm

21
STAZIONE METEOTRONIC
Manuale delle istruzioni
INTRODUZIONE
Il Meteotronic START Stazione MeteoSsatellitare fornisce previsioni professionali per il giorno corrente
e per i tre giorni successivi. Le previsioni del tempo sono fornite da meteorologi professionisti e sono
inviate tramite il segnale radio DCF77 in Germania e HBG in Svi era, e possono essere ricevute in tutta
l'Europa. La ona della rice ione del segnale radio è divisa in un totale di 90 aree meteorologiche (60 aree
con previsioni per 4 giorni, 30 aree con previsioni per 2 giorni). Si deve sele ionare l’area desiderata (il
luogo di residen a o la destina ione delle vacan e) e il vostro apparecchio visuali a le previsioni del
tempo corrispondenti sullo schermo. Questo fornisce in qualsiasi momento un panorama rapido della
situa ione del tempo nei giorni successivi. L'aggiornamento dei dati meteorologici è eseguito ogni giorno.
La sta ione meteorologica consente di ricevere in tempo reale e sen a costi aggiuntivi dati meteo della
società privata Meteotime tramite il segnale orario DCF o HGB.
Meteotime è responsabile dell'invio e della precisione dei dati trasmessi.
60 regioni con previsione meteorologica per 4 giorni
30 regioni con previsione meteorologica per 2 giorni
Leggere attentamente e in maniera completa il manuale delle istruzioni prima di usare
l apparecchio per la prima volta, per evitare errori di funzione o avarie di funzionamento.
Conservare il manuale delle istruzioni per riferimenti futuri.
STAZIONE METEOTRONIC
22
SCHERMO
Indicatore della ricezione dei dati meteorologici
• Simbolo acceso Dati meteorologici ricevuti completamente
•
Simbolo lampeggiante Dati meteorologici incompleti
Indicatore della ricezione del generatore del segnale radio
• Simbolo lampeggiante Rice ione ini iale della data e dell'ora
• Simbolo acceso Ora e data correnti
•
Simbolo spento Ora e data non aggiornati
Simbolo dell’allarme
• Simbolo acceso Fun ione di allarme attivata
• Simbolo spento Fun ione di allarme disattivata
•
Simbolo lampeggiante Allarme attivo o temporaneamente disattivato (Snoo e)
SCELTA DEL LUOGO DI INSTALLAZIONE
In maniera simile a quella di una rete per telefoni cellulari o per la rice ione a radio/TV, la rice ione del ricevitore
dell'ora radiocontrollata potrebbe non essere perfetta in tutte le posi ioni. Qui di seguito troverete qualche
informa ione utile per assicurarsi che il vostro dispositivo fun ioni in maniera corretta.
La posi ione di sistema ione della sta ione meteorologica è molto importante. Questo è il motivo della nuova
fun ione di destra (indicatore della rice ione dei dati meteorologici), che permette di controllare la qualità della
rice ione nella ona e di sistemare il dispositivo in una posi ione che disponga delle migliori condi ioni possibili.
• Accendere tutte le poten iali fonti di interferen a (p.e. la televisione) nella ona in cui si desidera installare la
sta ione durante il test!
Calendario
Ora di allarme
Indicatore della
rice ione per i dati
meteorologici
Simbolo dell’allarme
Ora
Temperatura
interna
Indicatore della rice ione del segnale radiocontrollato
Previsioni del tempo (giorno)
MIN/MAX
Temperatura
Previsioni del tempo (notte)
Oggi Domani
(
Giorno 1
)
Giorno 2
Giorno 3

23
• Mettere il dispositivo in posi ione, orientato nella maniera che preferite, ma almeno ad un metro dalla
possibile fonte di interferen a.
• Attivare il modo test come descritto nel capitolo Fun ionamento e Configura ione
•
Monitorare la visuali a ione della rice ione sulla sta ione meteorologica. Se avete trovato una posi ione in
cui la rice ione è buona, potete lasciare il dispositivo in quella posi ione, in modo tale che cominci a
scaricare i dati automaticamente.
Nota
• L'ora e la data appaiono entro pochi minuti.
•
Il trasferimento di una grande quantità di dati per le previsioni potrebbe prendere molto più tempo: per
ricevere tutti i dati, la stazione necessita di ventiquattr ore di tempo dopo l accensione.
POSSIBILI FONTI DI INTERFERENZA
Le interferen e come possono verificarsi, e possono essere causate dai fattori elencati qui di seguito:
• In edifici costruiti con grandi quantità di cemento, parti metalliche e sistemi elettrici, si possono verificare dei
problemi di rice ione (p.e. grandi maga ini).
• Dispositivi elettrici quali televisioni, computer, elettrodomestici, ecc. o trasformatori, linee telefoniche,
trasmettitori radio e linee ferroviarie, sono possibili fonti di interferen a dirette.
• Le influen e atmosferiche e caratteristiche geografiche (montagne, ecc.) possono influen are la
propaga ione delle onde radio.
• Anche la distan a dal trasmettitore influen a la rice ione. Aree quali il sud Italia o la Scandinavia del nord
sono aree critiche, a causa dell'ampia distan a dal trasmettitore.
• In tutte le aree, ci possono essere dei “punti morti”, che possono rendere la rice ione impossibile.
•
La scarsità di energia nelle batterie diminuisce la qualità della rice ione.
FUNZIONAMENTO E CONFIGURAZIONE
Inserimento/sostituzione delle batterie
• Aprire il vano batterie sulla parte posteriore della sta ione meteorologica, e inserire tre batterie (LR6/
Mignon/ AA), prestando atten ione alla polarità.
Quando si eliminano le batterie scariche si prega far riferimento al capitolo “informa ioni sul riciclaggio”
Nota
Tutti i dati interni vengono cancellati quando si sostituiscono le batterie. I parametri di configurazione
(l’area meteorologica, il fuso orario e il contrasto) devono essere inseriti di nuovo (consultare il capitolo
successivo). La ricezione di tutti i dati meteorologici richiede un periodo di almeno 24 ore.
RICHIAMARE/USCIRE DAL MENU DELLA CONFIGURAZIONE
Richiamare il menu della configurazione
• Premere il tasto <SET> per almeno tre secondi. Il primo punto del menu della configura ione (la regione
meteorologica) è richiamato.
Per uscire dal menu della configurazione
• Premere il tasto <SET> il numero di volte necessario per tornare alla visuali a ione normale.

24
Impostazione dell’area meteorologica
• Dopo aver richiamato il menu della configura ione, il modo di imposta ione è attivato per quell’area
meteorologica. Sul display si visuali a “loc”. L’area sele ionata si visuali a a destra. Usare adesso il tasto
<+> per sele ionare l’area desiderata
Nota
Per le aree 60 – 89, le previsioni sono limitate a 2 giorni. Entrambi i campi per i giorni seguenti (sull'estrema
destra del display) rimangono vuoti.
La data è sincroni ata di nuovo, dopo aver cambiato l’area. La rice ione dei nuovi dati meteorologici richiede
almeno ventiquattr'ore.
Impostazione del fuso orario
• Dall'ini io della configura ione premere il tasto <SET> di nuovo per entrare nel modo d'imposta ione del
fuso orario. Sul display si visuali a “ti”. Il fuso orario sele ionato si visuali a a destra. Usare il tasto <+>
per sele ionare il fuso orario desiderato.
Nota
L'ora ricevuta dal generatore del segnale radio/orario DCF o HBG è l'ora dell'Europa centrale [Central European
Time] (CET, CEST). Si richiede quindi un'altra imposta ione solamente per un altro fuso orario (p.e. in Portogallo
o Gran Bretagna).
Impostazione del contrasto
• Dall'ini io della configura ione premere il tasto <SET> due volte per entrare nel modo d'imposta ione del
contrasto del display. Sul display si visuali a “con”. Il valore impostato adesso si visuali a nel campo alla
destra. Il contrasto può essere impostato entro una gamma da 1 a 16 usando il tasto <+>.
•
Premendo il tasto <SET> si esce dal modo di configura ione.
Test della ricezione
• Premere il tasto <+> per almeno tre secondi per attivare il test della rice ione dei dati meteorologici. Sul
display si visuali a “test”. L'indicatore dei dati meteorologici visuali a la qualità della rice ione. La
rice ione è buona se l'indicatore si visuali a, altrimenti si deve trovare una nuova posi ione per installare la
sta ione meteorologica.
•
Il test della rice ione s'interrompe dopo circa 1 minuto automaticamente, o premendo il tasto <+>.
FUNZIONI
Funzione di allarme
• Premere il tasto <ALARM> per almeno tre secondi, per impostare l'ora di allarme. Si visuali a “ALM” e le
cifre delle ore lampeggiano. Usare il tasto <+> per l'imposta ione dell'ora. Premendo il tasto <ALARM> di
nuovo, si attiva l'imposta ione dei minuti. Le cifre dei minuti lampeggiano. Usare il tasto <+> per
l'imposta ione dei minuti. Premere il tasto <ALARM> di nuovo per interrompere il modo di imposta ione per
l'ora di allarme.
• Usare il tasto <ALARM> per attivare o disattivare l'allarme. Quando l'allarme è attivo, il simbolo dell'allarme
“(((
))) “ è visuali ato sul display.
25
• La suonerie dell'allarme può essere interrotta con il tasto <ALARM>. Usare il tasto <SNOOZE> per
interrompere l'allarme per cinque minuti. Durante questo periodo, il segnale d'allarme “(((
))) “ lampeggia.
Visualizzare l’area meteorologica attuale
• Premere il tasto <SET> per visuali are l’area meteorologica attuale. Si visuali a „loc“ con l’area
sele ionata. Un panorama dei codici di tutte le aree disponibili può essere trovato più avanti.
USO DESIGNATO, LIMITAZIONI DI GARANZIA, INFORMAZIONI SULLA SICUREZZA
• Questa sta ione meteorologica è stata progettata per uso domestico, come indicatore delle previsioni
meteorologiche. Le previsioni di questo dispositivo devono essere considerate come valori orientativi, e non
rappresentano previsioni assolutamente precise.
• Il fabbricante o il distributore di questa sta ione meteorologica non si assume nessuna responsabilità per i
valori scorretti che l'apparecchio dovesse produrre, o conseguen e di qualsiasi genere che si possano
verificare a causa dei valori forniti dall'apparecchio.
• La sta ione meteorologica non è intesa per scopi medici, o per fornire informa ioni al pubblico.
• Il fabbricante o il distributore non hanno alcuna influen a sui dati meteorologici trasferiti o sulle previsioni.
• La capacità della sta ione meteorologica dipende dalla fun ionalità operativa dei me i di trasmissione,
sulla quale il fabbricante o il distributore non hanno alcuna influen a. Non si può escludere la possibilità di
avarie dei me i di trasmissione.
• Questo dispositivo non è un giocattolo, e contiene pe i frangibili e di piccole dimensioni. Installare il
dispositivo al di fuori della portata dei bambini.
• L'incorretta manipola ione o l'apertura non autori ata dell'apparecchio invalida la garan ia.
• Queste istru ioni non possono essere riprodotte interamente o in parte sen a l'autori a ione scritta del
fabbricante.
INFORMAZIONI SUL RICICLAGGIO
Non eliminare il dispositivo come un rifiuto domestico!
I dispositivi elettronici devono essere eliminati in accordo con le disposi ioni concernenti i
dispositivi elettrici ed elettronici, ma attraverso i punti di raccolta locali per i dispositivi elettronici
usati!
Regolamenti da osservare sulle batterie
Secondo i regolamenti concernenti le batterie, si richiede di inviare le batterie usate o difettose alla fabbrica o di
portarle dal rivenditore o al punto di raccolta delle batterie usate.
Le batterie non devono essere parte delle scorie domestiche!
SPECIFICHE TECNICHE
Temperatura interna
Gamma:.....................................................Da 0 a 50 °C
Precisione:.................................................+/- 1 °C
Risolu ione................................................0,1 °C
Aggiornamento dei dati meteorologici:........Ogni 24 ore
Alimenta ione: ........................................... 3 batterie tipo LR6/ Mignon/AA
Dimensioni (L x W x H): ............................. 142 mm x 26 mm x 136 mm

57
METEOROLOGICKÁ STANICE
Návod k obsluze
ÚVOD
Meteorolo ická stanice START MeteoTronic Vám nabízí profesionální předpověď počasí na aktuální
den a tři následující dny Předpovědi počasí jsou stanovovány meteorology, vysílány vysílačkou
s časovým signálem DCF77 v Německu a HBG ve Švýcarsku a lze je přijímat takřka v celé Evropě
Rozsah příjmu vysílačky s časovým signálem zahrnuje celkem 90 meteorologických regionů (60 regionů
s předpovědí počasí na 4 dny, 30 regionů s předpovědí počasí na 2 dny) Stačí navolit požadovaný region
a odpovídající místo v tuzemsku nebo v zahraničí a příslušná aktuální předpověď počasí se zobrazí na
displeji Tak lze mít kdykoli rychlý přehled o průběhu počasí během příštích dnů Aktualizace údajů o
počasí probíhá každý den
Meteorologická stanice umožňuje po neomezenou dobu a bez dalších nákladů přijímat údaje o počasí
soukromého poskytovatele Meteotime přes DCF nebo HGB časový signál
Za přenos a správnost zasílaných dat odpovídá Meteotime
60 regionů se čtyřdenní předpovědí počasí
30 regionů s dvoudenní předpovědí počasí
Před prvním uvedením zařízení do provozu si důkladně a úplně pročtěte tento návod k obsluze,
abyste se vyvarovali případných poruch funkce a chybné obsluhy. Návod uložte na bezpečném
místě pro pozdější konzultace.
METEOROLOGICKÁ STANICE

58
DISPLEJ
Indikátor příjmu pro údaje o počasí
• Symbol zapnutý Údaje o počasí byly kompletně přijaty
•
Symbol bliká Údaje o počasí jsou neúplné
Indikátor příjmu pro vysílačku s časovým si nálem
• Symbol bliká První příjem data a času
• Symbol zapnutý Čas a datum jsou aktuální
•
Symbol vypnutý Čas a datum nebyly aktualizovány
Symbol alarmu
• Symbol zapnutý Funkce buzení je zapnutá
• Symbol vypnutý Funkce buzení je vypnutá
•
Symbol bliká Alarm je aktivní, popř pouze dočasně vypnutý (Snooze)
VOLBA MÍSTA INSTALACE
Podobně jako v případě mobilních sítí nebo příjmu radio- a TV signálu může i u přijímačů s radiovými hodinami
nastat situace, že příjem nebude vždy a všude dostatečný Následně uvádíme několik pokynů, které byste měli
dodržovat, aby Váš přístroj bezvadně fungoval
Indikátor příjmu pro
údaje o počasí
Kalendář
Čas buzení
Symbol alarmu
Čas
Teplo
ta uvnitř
Indikátor příjmu pro vysílač s čas signálem
Předpověď
počasí den
Teplota -
minimální a
maximální hodnoty
Předpověď
počasí noc
Dnes Zítra
(den 1)
Den 2
Den 3

59
Místo instalace meteorologické stanice je velmi důležité Zařízení je proto vybaveno novou testovací funkcí, která
umožňuje zjistit kvalitu příjmu ve Vašem okolí a umístit přístroj na takovém místě, kde budou zaručeny optimální
podmínky
• Během testu zapněte v prostoru, ve kterém chcete stanici instalovat, všechny potenciální zdroje rušení
(např televizor)!
• Postavte přístroj na zvolené místo v požadovaném směru, avšak stále ve vzdálenosti minimálně jeden metr
od možného rušivého zdroje
• Aktivujte testovací mód podle popisu
•
Pozorujte zobrazování příjmu na meteorologické stanici Jakmile naleznete místo s dobrým příjmem, tak na
něm můžete přístroj nechat stát a ten si nyní bude sám přebírat data od vysílače
Upozornění!
• Datum a čas se objeví během několika málo minut
•
Přenos dat předpovědí velkého rozsahu trvá podstatně déle: aby byla data kompletně přijata, tak stanice
potřebuje po uvedení do provozu alespoň 24 hodin.
RUŠIVÉ FAKTORY
Případné poruchy mohou vznikat podobně jako u radiovysílačky a jejich příčiny jsou především následující:
• V budovách s velkým množstvím betonu, kovových částí a elektrických rozvodů může docházet
k problémům s příjmem (např nákupní centra)
• Elektrické přístroje, jako např televizory, počítače, přístroje pro domácnost, atd , popř transformátory,
nadzemní vedení, radiové vysílače nebo železnice, představují možné přímé zdroje rušení
• Na šíření radiových vln mohou mít negativní vliv rovněž atmosférické vlivy a geografické podmínky
• Vzdálené oblasti, jako např jižní Itálie nebo severní Skandinávie, mohou být bez příjmu
• Ve všech regionech mohou vznikat tzv „vysílací díry“, které znemožňují příjem
•
Kvalita příjmu je rovněž snižována slabými bateriemi v přístroji
UVEDENÍ DO PROVOZU
Vložení baterií / výměna baterií
• Otevřete prostor pro baterie na zadní straně meteorologické stanice a vložte dovnitř tři baterie (LR6 /
tužkové baterie / AA) se správnou orientací
Při likvidaci vybitých baterií dbejte na odpovídající pokyny pro likvidaci
Při výměně baterií se smažou veškerá uložená data. Data je poté třeba znovu zadat. Příjem údajů o počasí
vyžaduje alespoň 24 hodin.
Vyvolání / ukončení nastavovacího módu
Vyvolání nastavovacího módu
• Stiskněte tlačítko <SET> na dobu minimálně tří sekund Nyní se vyvolá první bod menu nastavení
(meteorologický region)
Ukončení nastavovacího módu
• Tiskněte tlačítko <SET> tak dlouho, až se opět objeví normální zobrazení

60
Nastavení meteorolo ického re ionu
• Po vyvolání menu nastavení si můžete zvolit požadovaný meteorologický region Na displeji je vidět nápis
„loc“ Vedle něj vpravo je zobrazen aktuálně nastavený region Pomocí tlačítka <+> můžete nyní navolit
odpovídající region (viz Dodatek)
Upozornění!
Pro re iony 60 - 89 je k dispozici pouze omezená předpověď na 2 dny. Obě pole pro následující dny (zcela
vpravo na displeji) zůstávají prázdná
Po změně regionu proběhne opětovná synchronizace Příjem nových údajů o počasí trvá minimálně 24 hodin
Nastavení časového pásma
• Nyní opět stiskněte tlačítko <SET>, čímž vyvoláte mód nastavení časového pásma Na displeji se objeví
nápis „ti“ Vpravo vedle něj je zobrazeno aktuálně nastavené časové pásmo Pomocí tlačítka <+> můžete
nyní navolit požadované časové pásmo
Upozornění!
Čas přijímaný přes vysílačku s časovým signálem DCF nebo HBG odpovídá středoevropskému času (MEZ,
MESZ) Nastavování časového pásma je tedy nutné pouze pro odlišné pásmo (např Portugalsko nebo Velká
Británie)
Nastavení kontrastu
• Nyní opět stiskněte tlačítko <SET>, čímž vyvoláte mód nastavení kontrastu displeje Objeví se nápis „con“
Aktuálně nastavená hodnota je vidět v pravém poli Pomocí tlačítka <+> můžete nyní nastavovat kontrast v
rozsahu 1 až 16
• Opakovaným stiskem tlačítka <SET> ukončíte tento nastavovací mód
Test příjmu
• Stiskněte tlačítko <+> minimálně na dobu 3 vteřin, čímž se aktivuje test příjmu údajů o počasí Na displeji se
objeví nápis „test“ Indikátor příjmu údajů o počasí zobrazuje kvalitu příjmu Příjem je dobrý v případě, kdy je
zobrazen indikátor; v opačném případě je nutno najít jiné místo instalace meteorologické stanice
•
Test příjmu se ukončí buď automaticky po uplynutí cca jedné minuty, nebo stiskem tlačítka <+>
OBSLUHA
Funkce buzení
• Pro nastavení času buzení držte tlačítko <ALARM> stisknuté po dobu tří sekund Nápis „ALM“ a zobrazení
hodin blikají Pomocí tlačítka <+> můžete nyní nastavit hodiny Opakovaným stiskem tlačítka <ALARM>
vyvoláte nastavení minut Zobrazení minut bliká Pomocí tlačítka <+> nyní můžete nastavit minuty
Opakovaný stisk tlačítka <ALARM> ukončí mód pro nastavení času buzení
• Pomocí tlačítka <ALARM> lze aktivovat nebo deaktivovat alarm buzení V případě aktivovaného alarmu se
na displeji objeví symbol buzení „(((
))) “
• Signál buzení můžete přerušit tlačítkem <ALARM> Tlačítkem <SNOOZE> zastavíte signál buzení na pět
minut (funkce dodatečného buzení) Během této doby bliká symbol buzení „(((
))) “
61
Zobrazení nastaveného meteorolo ického re ionu
• Stiskněte tlačítko <SET> pro zobrazení nastaveného meteorologického regionu Na displeji se objeví nápis
„loc“ včetně aktuálně nastaveného regionu Přehled kódování všech možných regionů je uveden v dodatku.
BEZPEČNOSTNÍ POKYNY
• Tato meteorologická stanice je určena pro soukromé použití jako indikátor budoucího počasí Předpovědi
tohoto přístroje je třeba chápat jako orientační hodnoty, které nezaručují absolutně jistou předpověď
• Výrobce, popř prodejce této meteorologické stanice neručí za případné nesprávné hodnoty a následky,
které by z toho mohly vzniknout
• Tato meteorologická stanice není určena k lékařským účelům nebo k poskytování informací pro veřejnost
• Výrobce, popř prodejce nemá vliv na přenášené hodnoty a předpovědi počasí
• Použitelnost této meteorologické stanice závisí na provozní připravenosti přenosových médií, kterou
výrobce, popř prodejce nemůže nijak ovlivnit Případné výpadky přenosových médií nejsou vyloučeny
• Tento přístroj není hračka a obsahuje rozbitné a drobné části Postavte jej na takové místo, kam nemají
přístup děti
• Neodborná manipulace nebo neschválené otevírání přístroje mají za následek zánik záruky
•
Tento návod je bez písemného souhlasu výrobce zakázáno kopírovat – i formou výpisu
LIKVIDACE
Tento přístroj nepatří do domovního odpadu!
Elektronické přístroje je třeba likvidovat v souladu s příslušnou směrnicí o starých elektrických a
elektronických přístrojích v místních sběrnách použitých elektronických přístrojů!
Dodržujte příslušnou vyhlášku o bateriích!
Vybité nebo vadné baterie a akumulátory jste podle příslušné vyhlášky o bateriích povinni zaslat nám nebo
odevzdat místním obchodům nebo sběrnám starých baterií
Baterie a akumulátory nepatří do domovního odpadu!
TECHNICKÉ ÚDAJE
Vnitřní teplota:
Rozsah: 0 až 50 °C
Přesnost: ±1°C
Rozlišení: 0,1 °C
Aktualizace údajů o počasí: každých 24 hodin
Napájení: 3 x baterie LR6 / tužkové / AA
Rozměry (D x Š x V): 142 mm x 26 mm x 136 mm

16
WEERPROGNOSE- CENTRUM
Handleiding
INLEIDING
Het Meteotronic START Weerprogno ecentrum levert een professionele weerbericht voor de huidige en
de komende drie dagen. De weervoorspellingen worden geleverd door professionele meteorologen en
worden via de generator van het DCF77-radioti dsignaal in Duitsland en HBG in Zwitserland uitgezonden
en kan in bi na heel Europa worden ontvangen. Het ontvangstgebied van de generator van de
radioti dsignaal is onderverdeeld in totaal 90 meteorologische streken (60 streken met 4-daagse prognose,
30 streken met 2–daagse prognose). De gewenste streek voor de locale of vakantiebestemming kan
eenvoudig geselecteerd worden en de respectieveli ke weerprognose wordt op het scherm weeergegeven.
Dit biedt de gebruiker op elk gegeven moment een snel overzicht van de weersituatie voor de komende
dagen. De weergegevens worden elke dag geaktualiseerd.
Met het weerstation kunt u via DCF- of HGB-ti dsignaal onbeperkt en zonder extra kosten weergegevens
van de private aanbieder Meteotime ontvangen.
Meteotime zorgt voor het zenden en de correctheid van de aangeboden gegevens.
60 regio’s met 4-daagse voorspelling
30 regio’s met 2-daagse voorspelling
Lee deze handleiding a.u.b. zorgvuldig en volledig alvoren het toe tel voor de eer te keer te
gebruiken om malfunctioneren en incorrecte bediening te vermijden. Houd deze in tructie bij de
hand voor raadplegen later.
WEERPROGNOSECENTRUM
17
DISPLAY
Ontvang tindicator van weerdata
• Symbool aan Weerdata completely received
•
Symbol knippert Weerdata incomplete
Ontvang tindicator voor generator van radiotijd ignaal
• Symbool knippert eerste ontvangst van datum en ti d
• Symbool aan Huidige ti d en datum
•
Symbool uit Ti d en datum niet geaktualiseerd
Alarm ymbool
• Symbool aan Alarmfunctie uitgeschakeld
• Symbool uit Alarmfunctie uitgeschakeld
•
Symbool knippert Alarm actief of ti deli k uit (sluimer)
POTENTIËLE STORINGSBRONNEN
Net als bi een draadloos telefoonnetwerk of radio/tv-ontvangst kan het mogeli k zi n dat de ontvangst van de
radioti d niet op alle locaties perfect is. Hieronder volgen een aantal tips om ervoor te zorgen dat uw toestel
zonder problemen werkt.
Kalender
Alarmti d
Ontvangstindicator
van weerdata
Alarmsymbool
Ti d
Binnentemperatuur
Ontvangstindicator voor
generator van radioti dsignaal
Weervoorspelling
(Dag)
MIN/MAX
temperatuur
Weervoorspelling
(nacht)
Vandaag
Morgen
(Dag 1)
Dag 2
Dag 3

18
De locatie van het weerstation is van groot belang. Met het oog hierop kan de ontvangstkwaliteit in de omgeving
gecontroleeerd worden met de nieuwe testfunctie, zodat het toestel kan worden opgesteld op de plek met de
beste onvangst.
• Schakel alle potentiële storingsbronnen uit (b.v. televisies) in de omgeving waar het station getest wordt!
• Installeer het toestel op de gewenste plek en in de gewenste richting, maar op zi n minst één meter uit de
buurt van een mogeli ke storingsbron.
• Activeer teststand zoals beschreven.
•
Lees de ontvangst af op het scherm van het weerstation. Als u een geschikte plaats met goede ontvangst
heeft gevonden kunt u het toestel hier laten en worden automatisch data van de zender ontvangen.
Let op!
• Ti d en datum verschi nen binnen enkele minuten.
•
Transmissie van grote databestanden voor de weersvoorspelling duurt veel langer: het tation heeft na het
op tarten 24 uur nodig om alle data te ontvangen.
POTENTIËLE STORINGSBRONNEN
Eventuele interferentie van radiozender kan veroorzaakt worden door de volgende factoren:
• In gebouwen met veel beton, metaal en elektrische systemen (b.v. winkelcentrum) kunnen
ontvangstproblemen optreden.
• Elektrische apparaten zoals televisie, computer, huishoudeli ke apparatuur, enz., of transformers,
telefoondraden, radiozenders en spoorbanen kunnen de directe oorzaak van vaninterferentie zi n.
• Atmospherische invloeden en geografische kenmerken (bergen, enz.) kunnen de radiogolven ook nadelig
beïnvloeden.
• De afstand van de zender heeft ook invloed op de ontvangst. Gebieden zoals zuid-Italië of noord-
Scandinavië moeten ook beschouwd als randgevallen worden geschouwd vanwege de grote afstand van de
zender.
• In sommige gebieden komen zogenaamde ‘dode punten’ voor waar ontvangst onmogeli k is.
•
Zwakke batteri en in het toestel verminderen de ontvangstkwaliteit.
IN WERKING STELLEN & CONFIGURATIE
Plaat en van batterijen/Verwi elen batterijen
• Open het batteri vak aan de achterkant van het weerstation en plaats de drie batteri en (LR6/ Mignon/AA),
let daarbi op de uiste polariteit, zie batteri vak.
Let bi het
zie opmerkingen onder
wegwerpen van lege batteri en.
Let op!
Bij het wi elen van batterijen gaan alle interne data verloren. De parameter van de configuratie
(weergebied, tijdzone en chermcontra t) moeten weer opnieuw ingevoerd worden (zie volgende
hoofd tuk). Ontvang t van alle weerdata neemt tenmin te 24 uur in be lag.
OPROEPEN/VERLATEN VAN HET INSTELMENU
In telmenu oproepen
• Druk tenminste drie seconden op <SET> knop. Het eerste punt van het configuratiemenu (weergebied)
wordt opgeroepen.

19
In telmenu verlaten
• Druk zo vaak als nodig op de <SET> knop om terug te keren naar normale weergavestand.
Weergebied in tellen
• Na het oproepen van het instelmenu is de instelstand voor het betreffende weergebied actief. Op het
scherm wordt “loc” weergegeven. Het ingestelde gebied wordt rechts weergegeven. Stek net de <+> knop
het gewenste gebied in (zie Appendix).
Let op!
Voor regionen 60 – 89 i de progno e beperkt tot 2 dagen. Beide velden van de volgende dagen (rechts op
het scherm) bli ven leeg.
Na het wi zigen van het gebied worden de data weer gesynchroniseerd. Ontvangst van de nieuwe weerdata
neemt tenminste 24 uur in beslag.
Tijdzone in tellen
• Bi het begin van het instellen eerst op de <SET> knop drukken om naar de regelstand van de ti dzone te
gaan. Nu wordt de tekst “ti” weergeven. De op dat moment ingestelde ti dzone wordt rechts weergegeven.
Stel met de <+> knop de gewenste ti dzone in.
Let op!
De ontvangen tijd van de DCF-radiotijdgenerator of HBG i Centraal-Europe e Tijd (CET, CEST). Het
in tellen van de tijdzone i daarom alleen nodig in andere tijdzone (bijv. Portugal of Groot-Britannië).
Regel tand contra t
• Bi het begin van het instellen eerst tweemaal op de <SET> drukken om naar de regelstand van het
schermcontrast te gaan. Nu wordt de tekst “con” weergegeven. De op dat moment ingestelde waarde wordt
rechts weergeven. Het contrast kan met de <+> knop ingesteld worden op een bereik van 1 t/m 16.
•
Druk nogmaals op de <SET> knop om de regelstand te verlaten.
ONTVANGSTTEST
• Druk tenminste 3 seconden op de <+> knop om de ontvangsttest van weerdata te starten. Nu wordt de tekst
“test” op het scherm weergegeven. De ontvangstindicator van de weeerdata (zie Appendix) geeft de
ontvangstkwaliteit weer. Als de indicator wordt weergegeven is de ontvangst goed, anders moet een nieuwe
plek worden gevonden om het weerstation op te stellen.
•
De ontvangsttest wordt ofwel na ongeveer 1 minuut automatisch beëindigd of door het indrukken van de
<+> knop.
BEDIENING
Alarmfunctie
• Druk tenminste drie seconden op de <ALARM> knop om de alarmti d in te stellen. Nu gaat de tekst “ALM”
en de uren knipperen. Stel de uren in met de <+> knop. Door nogmaals de <ALARM> knop in te drukken
wordt de minutenstand geaktiveerd. De minuten gaan knipperen. Stel met de <+> knop de minuten in. Druk
nogmaals op de <ALARM> knop om de regelstand van de alarmti d te verlaten.
•
Gebruik de <ALARM> knop om het alarm aan- of uit te schakelen. Als het alarm aktief is wordt het
alarmsymbool “(((
))) “ weergegeven.
20
• Het alarmsignaal kan worden uitgezet door op de <ALARM> knop te drukken. Druk de <SNOOZE> knop in
om het alarmsignaal vi f minuten te laten sluimeren. Gedurende deze periode knippert het alarmsignaal
“(((
))) “.
Weergave actieve weergebied
Druk de <SET> knop in om het actieve weergebied af te lezen. Vervolgens verschi nt de tekst „loc“ met het op dat
moment ingestelde gebied. Onder “Appendix “ kan een overzicht van de codes van alle mogeli ke gebieden
worden verkregen.
GESCHIKT GEBRUIK, GARANTIEBEPERKINGEN EN VEILIGHEID
• Dit weerstation is bedoeld voor privégebruik ter indicatie van toekomstig weer. De weervoorspellingen van
dit toestel zi n slechts indicatief en niet geheel accuraat.
• De fabrikant of distributeur van dit weerstation aanvaardt geen verantwoordeli kheid voor on uiste waarden
of eventuele gevolgen van deze waarden.
• Het weerstation is niet geschikt voor medische doeleinden of voor informatie aan het publiek.
• De fabrikant of distributeur heeft geen invloed op de verzonden weerdata en weervoorspellingen.
• De functionaliteit van dit weerstation is mede afhankeli k van de ontvangen media, waarover de fabrikant
geen invloed heeft. Fouten in de verzonden media kunnen niet worden uitgesloten.
• Dit toestel is geen speelgoed en bevat breekbare en kleine onderdelen. Installeer het toestel op een plek
waar kinderen er niet bi kunnen.
• Bi foutieve behandeling of ongeoorloofd openen van dit toestel komt de garantie te vervallen.
• Deze handleiding of delen daaruit mogen niet gereproduceerd worden zonder schrifteli ke toestemming van
de fabrikant.
INFORMATIE OVER INLEVEREN WIT- EN BRUINGOED
Dit toe tel niet met het hui vuil wegwerpen!
Afgedankte elektronische apparaten dienen te worden ingeleverd in overeenstemming met
geldende regulaties betreffende het wegwerpen van elektrische en elektronische toestellen, bi v.
inleveren bi afvalpunt of ophaaldienst.
Inleveren batterijen (klein chemi ch afval)
Volgens de voor reglementen voor klein chemisch afval dienen lege of defecte batteri en naar ons te worden
geretourneerd of ingeleverd worden bi de chemokar of of bi afvalpunten die herkenbaar zi n aan de sticker met
het KCA-logo. Batteri en horen niet in het huisvuil!
TECHNISCHE SPECIFICATIES
Binnentemperatuur:
Bereik: ...................................... 0 t/m 50°C
Precisie:.................................... ± 1°C
Resolutie: ................................. 0.1°C
Aktualiseren weerdata:.............. Elke 24 uur
Voeding: ................................... 3 x batteri LR6/ Mignon/AA
Afmetingen (L x B x H):............. 142 mm x 26 mm x 136 mm
Table of contents
Languages:
Other Meteotronic Weather Station manuals

Popular Weather Station manuals by other brands


La Crosse Technology
La Crosse Technology WS-8157U-IT instruction manual

Vion
Vion A4000.2 instructions

Oregon Scientific
Oregon Scientific PSL02A user manual

Oregon Scientific
Oregon Scientific WMR928NX user manual

brennenstuhl
brennenstuhl WID 550 owner's manual

Oregon Scientific
Oregon Scientific 086L005036-017 user manual