METOLIUS Bomb Shelter User manual
Rev. 2/04
Whether youre spending just one night or multiple weeks in the vertical
world, you need to know that your home on the wall wont let you down.
hats why the Metolius Bomb Shelter is designed to be the most bombproof
portaledge available.
Features:
Innovative spreader bar keeps the frame rigid and the bed tight.
1 1/8" aircraft-quality 6061- 6 tubing gives maximum strength
and rigidity.
CNC milled corner fittings provide high strength, light weight
and easy set-up.
Anodized poles and corner fittings keep the parts from galling and sticking
for easy set-up, corrosion resistance and durability.
All tubing ends and joints are double or triple-walled for
maximum strength.
he heavy-duty (960/1080d Montana Polyester) bed is doubled in the
high-stress center section, and employs our super-tough Durathane
haul bag fabric for wall-side abrasion guards.
he custom, billet aluminum bed-tensioner buckles are
virtually unbreakable.
Color-coded webbing risers are doubled at the frame attachment for
durability and employ cam lock buckles for super-smooth operation, even
when weighted.
he riser straps gather to a gusseted yoke to keep them free of tangles,
and then attach to a free-floating, full-strength, master clip-in loop.
Dual gear loops on the riser yoke provide convenient storage
and organization.
Includes Durathane haul sack
Care and Maintenance
Inspect your ledge before and after every use. Return your ledge for repair if:
Any tubing is cracked, bent or crushed
Any corner fittings, tubing butts or collars have worked loose or become damaged
Any buckles are broken or not functioning properly
Any webbing, bungy cord or stitching is showing excessive wear
he bed fabric is torn or punctured
You doubt the integrity of your ledge for any reason
ry to keep all joints and fittings as clean as possible. Even a small amount of dirt in
the joints will make it difficult to assemble. You can wash your ledge with water and
mild soap. Dry your ledge completely before storing it for extended periods of time.
Store it in a clean, dry place. Keep it away from heat sources and chemicals. Acids are
exceptionally bad for nylon climbing equipment. Even fumes from a car battery can
reduce the strength of nylon webbing by as much as 90%. If your Bomb Shelter comes
into contact with any corrosive substances or solvents, retire it immediately.
Do not file, cut, grind, or otherwise modify your Bomb Shelter in any way.
If you have any doubt about the safety of your Bomb Shelter or any other Metolius
gear, send it to us for inspection. Destroy retired gear to prevent any possibility of
further use.
If you do not completely understand any of the above or if you
have questions, contact Metolius at (541 382-7585 or
Bomb Shelter Single:
Platform size: 2'6" x 7' (.76 M x 2.2 M)
Portaledge weight: 11 lbs. 7 oz. (5.2 Kg)
Haul Sack weight: 1 lb. 5 oz. (0.6 Kg)
Bomb Shelter Double:
Platform size: 3'9" x 7' (1.2 M x 2.2 M)
Portaledge weight: 13 lbs. 12 oz. (6.2 Kg)
Haul Sack weight: 1 lb. 5 oz. (0.6 Kg)
Metolius Climbing metoliusclimbing.com
(541) 382-7585 Made in USA
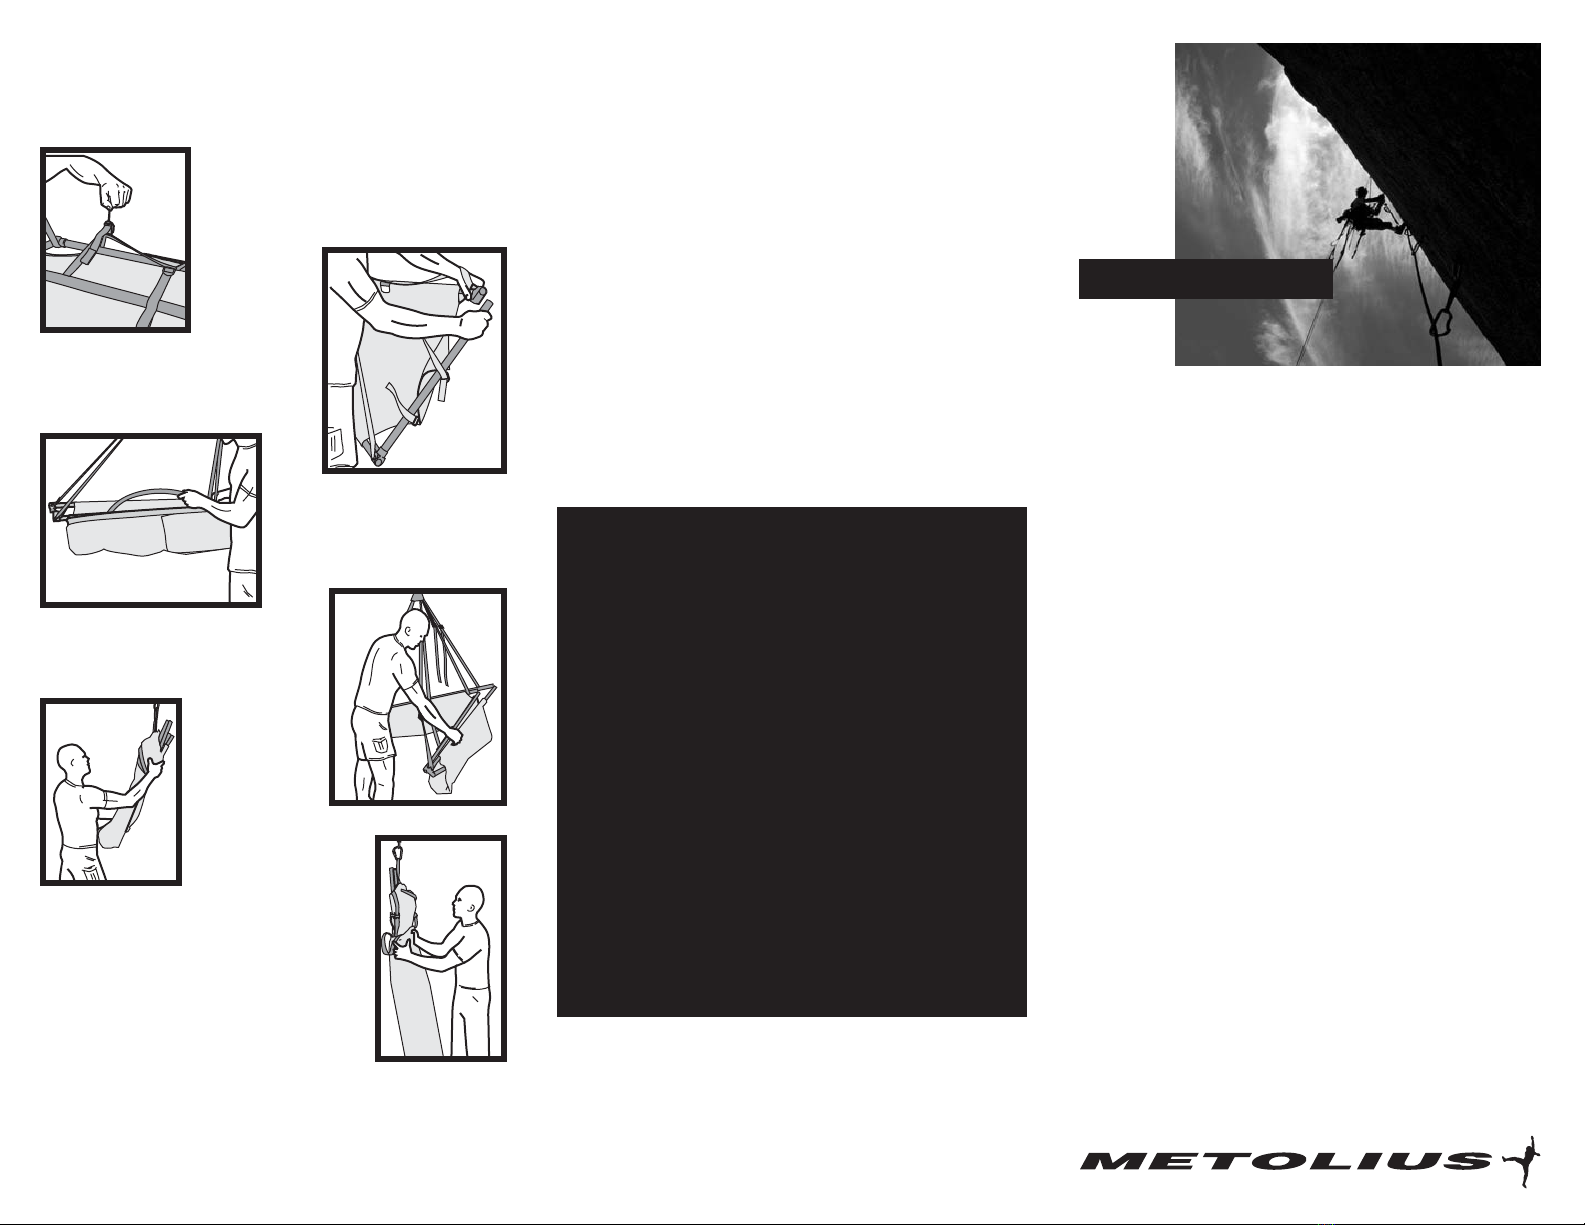
Takedown
Proper takedown and packing is essential to facilitate a quick and easy setup. Practice
the takedown and packing procedure on the ground and follow it rigidly on the wall.
In the following illustrations, the climber has been shown without rigging for clarity.
2. Pop the end poles out of the open end-fittings,
pull them out of the shock-corded end-fittings, and
fold them into the bed, parallel to the long poles.
6. Slide the ledge into its bag, leaving
the locking carabiner at the top.
7. Clip the carabiner into both of the
sacks haul loops, fasten the haul sack
closure, and youre ready to haul.
1. Release the bed tensioners. If this is difficult, you can
yank up on the pull loops on the buckles. Loosen the
tensioners all the way, but do not unthread them.
3. Remove the spreader bar and tuck
it into the bed. Make sure to keep it
to one side so it wont interfere with
folding the ledge in half.
4. Pull the long poles
apart and fold the
ledge in half.
5. Roll the ledge upward
in the riser straps, leaving
the locking carabiner
about a foot past the end
of the roll.
WARNING
his guide does not replace proper instruction by a qualified professional
Failure to follow these warnings increases the risk of injury or death
Climbing and mountaineering are inherently dangerous
You are responsible for your own actions and decisions
his product is designed for climbing and mountaineering use only
Special knowledge and training are required to use this product
Always stay clipped in directly to the primary structural anchor while
on the Bomb Shelter.
he master clip-in loop is the only anchor-strength clip-in point on
the Bomb Shelter. Do not suspend the ledge from any other point.
Do not clip yourself, your partner, or any other load into any other
point on the Bomb Shelter.
Never place your stove or any other heat or flame source in or near
your Bomb Shelter.
Dont overload the Bomb Shelter. It is rated for a maximum load of
250 lbs. (Single Bomb Shelter) or 450 lbs. (Double Bomb Shelter).
Always know the maintenance and use history of your climbing and
mountaineering equipment. he use of secondhand equipment is
strongly discouraged.
Tip: Always roll the ledge up with the center joints toward the top. The center risers
are shorter than the corner risers, so the ledge will pack better and deploy more
easily if the center joints are at the top of the haul sack. Also, this protects the bungy
cord where it is exposed at the center joints. If you pack your Bomb helter with
these joints facing downward, the bungy cord is impacted forcefully against the pole
openings each time you set the haul bag down.
Bomb Shelter

Hauling
Clip a locking carabiner through the master loop on the Bomb
Shelter and through both haul loops of the Bomb Shelter haul
sack. hat way, the ledge will always be correctly oriented and
ready to deploy, and if the haul sack should fail for any reason,
you wont lose your ledge. Haul your Bomb Shelter from the
clip-in points on the bottom of your main haul bag to protect
it from abuse and make it less likely to hang up.
Setup
It is important to thoroughly familiarize yourself with the Bomb Shelter setup procedure
before going up on a wall. Assemble the Bomb Shelter on the ground repeatedly until
youre confident that you will be able to deploy it in a storm or in darkness. In the
following illustrations, the climber has been shown without rigging for clarity.
1. Unclip the haul sack loops from the locking
carabiner and clip the Bomb Shelter into the
anchor. Make sure the black riser straps are
toward the wall and the colored risers are away
from the wall.
2. Pull the haul sack downward
off the Bomb Shelter (making
sure not to drop the sack),
allowing the ledge to unroll and
hang from the risers.
Tip: If youre having difficulty getting the spreader bar in place, make sure that the
bed is straight and centered on the frame and not snagged or turned on the poles. If
youre still having trouble, you can place your foot on the wall-side pole beside the
spreader bar and pull on the other pole to stretch the bed enough to snap the spreader
bar in place.
4. Position the spreader bar end-fitting on the wall-side pole. Note that the middle
riser strap should be to one side of the junction in the poles (silver collar) and the
spreader bar should attach on the other side. Pull the long poles away from each other
(stretching the bed widthwise) and snap the other end of the spreader bar in place on
the other long pole. Make sure the spreader bar is attached on the same side of the
pole junction on both sides of the ledge. It is essential to position the spreader bar
before putting the end poles in place! If you position the end poles first, the bed will
be under too much tension to insert the spreader bar.
3. Unfold the ledge lengthwise
and assemble the two long poles
on either side. Verify that the
abrasion guards are wall-side
and the risers are free of tangles.
Tip: Because most of your weight is concentrated in the middle of the ledge, the bed
will be more comfortable if you shorten the center risers somewhat to introduce a slight
upward bow in the long poles.
6. Adjust the riser buckles so they are
tensioned evenly and the ledge is
level. he camlock buckles make riser
adjustment easy even if the bed is
weighted. Shortening the risers is a
snap, but if you have to lengthen the
risers while weighting the ledge, be
sure to pull on the free end of the
strap while releasing the buckle so
you can control the amount of slack
that feeds through and avoid shock
loading the system.
5. Once the spreader bar is in place, it will hold
the frame together, allowing you to insert the
end poles easily. Assemble the end poles by
inserting the shock-corded end into its fitting
first. hen stretch the bed (just as you did for
the spreader bar) and snap the end pole into
the other corner fitting. Snug the bed tensioners
down on the first end but do not tighten them
all the way. Once the other end pole is in place,
you can tighten the bed tensioners evenly to
get the bed taught and centered on the frame.
Tip: If the corner riser straps are twisted,
spin the long pole attached to the twisted
riser until it is untwisted. Make sure you
route the riser strap correctly on the inside
of the corner fitting when youre done.
Popular Camping Equipment manuals by other brands

Wechsel
Wechsel AURORA Assembly & installation manual

Quest Leisure Products
Quest Leisure Products Lakeland Ambleside instructions

Primus
Primus OMNIFUEL 3289 Instructions for use

Zempire
Zempire FURNITURE Series quick start guide

Coleman
Coleman 16'x7' instructions

ERGODYNE
ERGODYNE SHAX 6094 Instructional guide


