Metos START S50 L User manual

KYLSKÅP / FRYS
START
S50 L/R, S25/25, S35/35, S70 L/R, S140
TN,TNN,TNV / BT, BTV / RC
6LIBD001 – 1709 SUT
(17.1.2019)
Översättning av tillverkarens engelskspråkiga anvisningar
Installations- och bruksanvisningar
4247077, 4247151, 4247152, 4247153, 4247154, 4247155, 4247156, 4247157, 4247158, 4247330, 4247332, 4247334, 4247336, 4247338, 4247342, 4247344, 4247346,
4247413, 4247414, 4247415, 4247416, 4247417, 4247419, 4247420, 4247421, 4247422, 4247423, 4247424, 4247425, 4247426, 4247427, 4247428, 4247431, 4247432,
4247433, 4247434

2|
6LIBD001 - 1709
METOS START
INNEHÅLLSFÖRTECKNING
Allmänt............................................................................................................................4
Användningsområde och säkerhetsföreskrifter ................................................................4
Transport och förvaring.....................................................................................................4
Uppackning av apparat .....................................................................................................4
Övriga faromoment ..........................................................................................................4
Ljudnivå ............................................................................................................................4
Avställning och demontering ............................................................................................4
Användning.....................................................................................................................5
Förberedelser ...................................................................................................................5
Granskning av elanslutningen...........................................................................................5
Användning.......................................................................................................................5
Styrpanel.........................................................................................................................6
Brytare och funktioner......................................................................................................6
Dämpning av eventuell ljudsignal .....................................................................................6
Inställning av temperaturens börvärde.............................................................................6
Signallampor.....................................................................................................................6
Displaytexter ....................................................................................................................6
Displayen..........................................................................................................................7
Inställning av tid och datum (beroende på skåpets utrustning) ........................................7
HACCP Funktioner............................................................................................................7
Visning av larmen .............................................................................................................7
Radering av HACCP-larmlistan..........................................................................................8
Larm och felsökning.......................................................................................................8
Hälytykset ja viat ..............................................................................................................8
Konfiguration ....................................................................................................................8
Felsökning ........................................................................................................................9
Rengöring och underhåll..............................................................................................10
RENGÖRING ..................................................................................................................10
Rutinunderhåll ................................................................................................................10
Tillfällig ur bruktagning....................................................................................................10
Byte av lampa (beroende på utrustning).........................................................................10
Hyllornas max kapacitet .................................................................................................10
Tekniset tiedot ..............................................................................................................12

|3
6LIBD001 - 1709
METOS START
Typskylt
1. Tillverkare 2. Tillverkningsnummer
3. Kod 4. Modell
5. Spänning
6. Strömförbrukning
8. Energiförbrukning
9. Avfrostningselementets effekt
10. De övriga elementens nominella effekt
11. Lampans effekt
12. Maximi och minimi tryck (§)
13. Kylmedia, typ och mängd
15. Isoleringsmaterialets drivgas
16. Tillverkningsår
17. Klimatklass (#)
# 4 = 32°C, 55%RH – 5 = 43°C, 40%RH (IEC/EN 60335-2-89) - 4 = 30°C, 55%RH – 5 = 40°C, 40%RH (EN

4|
6LIBD001 - 1709
METOS START
Allmänt
Användningsområde och säkerhetsföre-
skrifter
• Apparaten är avsedd för kylförvaring av livsmedel och
drycker och avsedd endast för inomhusbruk.
• Apparaten är planerad och kondensorns effekt
är dimensionerad för förvaring av på förhand
nedkylda/djupfrysta produkter.
• Personer (inberäknat barn) vars fysiska eller psy-
kiska färdigheter eller kunnande inte är tillräckli-
ga bör inte använda apparaten utan övervakning
av en för säkerheten ansvarig person.
• Barn bör övarvakas så de inte kommer åt att leka
med apparaten.
• Ställ aldrig heta maträtter eller drycker i appara-
ten och fyll aldrig behållare med lock helt.
• Förvara inte explosiva ämnen, t.ex. aerosolburkar
med brandfarligt drivmedel i apparaten. De kan
explodera.
• Apparaterna har ytor på vilka det bildas is. Bero-
ende på modell sker avfrostningen automatiskt
eller manuellt. Försök aldrig avlägsna isen med
vassa föremål, det kan åstadkomma skador som
inte kan repareras.
• Använd inga mekaniska apparater eller konst-
gjorda medel för att påskynda avfrostningen.
• Tillverkaren frånsäger sig allt ansvar och garantin
upphör att gälla om mekaniska och/eller elekt-
riska ändringar gjorts på apparaten.
Transport och förvaring
Försäkra dig att truckens lyftkapacitet är tillräcklig
innan skåpet flyttas.
Flytta skåpet med hjälp av en gaffeltruck. Försäkra
dig också om att skåpet står i balans så det inte
tippar över.
Undvik att luta skåpet under transporten.
Om skåpet har lutats kraftigt, bör man vänta
minst 2 timmar innan det startas.
Förvara apparaten på ett torrt ställe.
Inget får staplas ovanpå apparaten.
Uppackning av apparat
Tag skåpet ur transportförpackningen och granska att
inga skador skett under transporten. Tag också bort
plastfilmen som skyddar väggarna.
Förpackningsmaterial (plastpåsar, polystyrenskum, spi-
kar mm.) bör förvaras utom räckhåll för barn. Förpack-
ningsmaterialen bör lämnas till avfallssortering enligt
lokala bestämmelser och direktiv.
• Granska att apparatens tillverkningsnummer överens-
stämmer med det som anges i transportdokumenten.
Övriga faromoment
• Dessa kylapparater är utrustade med alla vederbör-
liga funktioner för att säkra användarens säkerhet
och hälsa. Apparaten har inga farliga hörn eller vassa
kanter.
• Apparaten är stabil även då dörren står öppen. Det
är dock förbjudet att hänga i dörren.
• Om apparaten är utrustad med lådor; förhindra att
apparaten tippar över och skadas genom att dra ut
endast en låda i gången.
• OBS: Om apparaten är utrustad med glasdörr; dra
ut endast en låda eller ett galler i gången för att inte
äventyra apparatens balans.
• Om apparaten är utrustad med hjul; förhindra att
apparaten tippar över och skadas genom att skjuta
på den försiktigt då den flyttas. Tag golvets möjliga
ojämnheter i beaktande.
• LÅS ALLTID HJULENS BROMSAR DÅ APPARATEN
INTE FLYTTAS.
Ljudnivå
Den A-vägda ljudnivån överstiger inte 70dB(A)
Avställning och demontering
• Kylmediet i apparaten har enligt direktiven (EC)
No. 2037/2000 uppgetts på typskylten. Appara-
ten är dessutom tillverkad av återanvändbart
material.
• Då apparaten når slutet av sin livslängd bör man vid
avställning och demontering följa gällande lokala
direktiv och anvisningar.
• Om en avlagd apparat förvaras i ett obevakat ut-
rymme är det skäl att försäkra sig om att de lufttätt
slutande dörrarna inte åstadkommer fara för per-
soner.
• Apparaten får inte läggas bland hushållsavfall eller
metallskrot. Undvik noggrant att skada kylrören, i
synnerhet i närheten av värmeväxlaren.
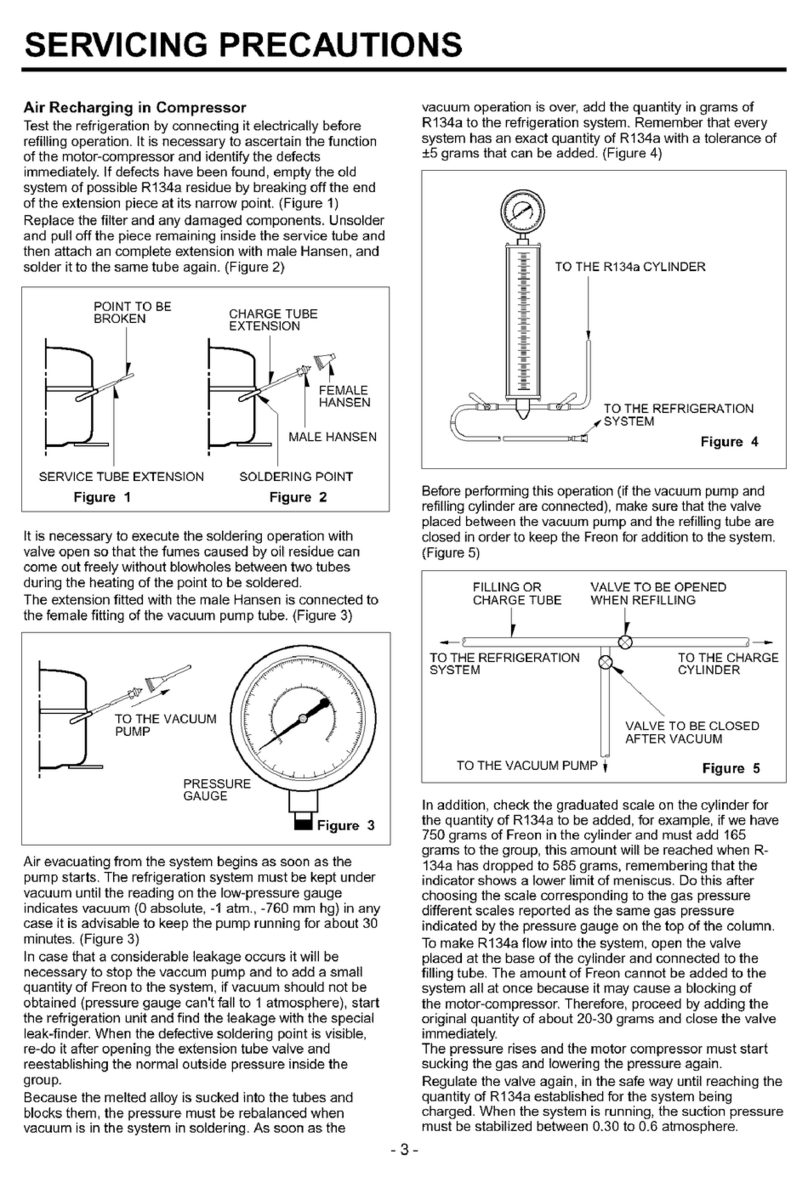
STOP
Jäteastia, jonka päälle on merkitty rasti, tarkoittaa, että Euroopan unionin alueel-
la tuote on toimitettava erilliseen keräyspisteeseen, kun tuote on käytetty lop-
puun.
Tämä koskee sekä laitetta että tällä symbolilla merkittyjä lisälaitteita. Näitä tuot-
teita ei saa heittää lajittelemattoman yhdyskuntajätteen joukkoon.

|5
6LIBD001 - 1709
METOS START
VIKTIGT !
•
STOP
Vid användning av R290 kylmedium, se viktig information på sidan 10
•
Försäkra före anslutning till elnätet att elanslutningen på installationsplatsen överensstäm-
mer med de värden som anges på apparatens typskylt. Typskylten finns till höger inne i appara-
ten. Fel spänning kan förorsaka brand, elstöt eller olycka
• Installation av denna apparat skall utföras enligt tillverkarens anvisningar samt följande lokala
direktiv och bestämmelser.
•
Apparaten bör anslutas till ett jordat uttag. Jordfel kan i felsituationer orsaka kortslutning
eller elstöt. Användning av felströmsskydd rekommenderas.
• Det är strängt förbjudet att använda skarvsladdar eller förgreningsdosor.
Förberedelser
Försäkra dig om att golvet på installationsplatsen
är jämnt och håller för skåpets tyngd.
Justera skåpet med hjälp av de ställbara benen så det
står vågrätt. Till hjälp kan ett vattenpass användas.
Den maximala avvikelsen är +/-0,5 grader.
Kontrollera att alla ben bär.Apparater försedda med hjul
kan inte justeras. Försäkra därför att golvet är plant och
jämnt.. På detta sätt garanteras det att dörrar och lås
fungerar på önskat sätt.
• Lämna ett mellanrum på minst 50 mm på skåpets
sidor och 500 mm ovanför skåpet för att säkra
tillräckligt luftcirkulation och för att förhindra att
kylkretsen skadas.
• Placera apparaten möjligast långt från värmekällor
(ugnar, spisar, värme-element mm) inklusive direkt
solsken. Förhindra inte kylaggregatets luftcirku-
lation. Att inte följa dessa föreskrifter kan skada
kylkretsen och livsmedlen som förvaras i skåpet.
• Vänta en stund med att starta om skåpet om det
flyttats. Om skåpet har lutats kraftigt, bör man
vänta minst 2 timmar innan det startas.
• Avlägsna plastfilmen som skyddar väggarna. Rengör
skåpet med vatten och milt rengöringsmedel.
• Läma inte låsbara dörrars nycklar åtkomliga för barn.
Granskning av elanslutningen
• Försäkra före uppkoppling att elanslutningen på
installationsplatsen överensstämmer med de
värden som anges på apparatens typskylt.
• Försäkra att elanslutningen är försedd med en 16
A säkring.
• Bryt strömtillförseln med uttagets huvudbrytare.
Anslut apparaten till uttaget med stickproppen
som ingick i leveransen.
Vägguttaget bör befinna sig på ett lätt åtkomligt ställe.
Användning
• Granska, att apparaten är försedd med en
stickpropp som passar till uttaget. Låt bemyndi-
gad personal vid behov byta ut stickproppen. För-
säkra att stickproppen sitter ordentligt i uttaget.
• Då alla förberedelserna gjorts är apparaten klar att
startas:
• Koppla på strömtillförseln genom att ställa den
yttre huvudbrytaren i ON-läge
• Koppla på apparaten genom att trycka på ON/
STAND BY-knappen. Efter ca en minut startar kom-
pressorn och skåpets innertemperatur börjar sjunka
mot det fabriksinställda värdet.
• Om du vill ändra på de värden som ställts in på fab-
riken, se ”Styrpanel”.
Placera produkter i skåpet först då det når den
inställda temperaturen.
Överskrid inte maximi kapacitete n som anges på
dekalen som är fäst på skåpets insida.
Användning
• Rätt kylförvaring av produkterna är av stor betydelse
vid hygienisk och trygg matproduktion. Den kan
förbättra kökets effektivitet samt påverka energi-
förbrukningen. Observera följande:
• Placera alltid produkterna på hyllorna. Det är förbju-
det att placera produkter på den inre bottenplattan.
Produkterna bör placeras i skåpet så att tillräcklig
luftcirkulation garanteras. Till detta kan hyllornas
höjdjustering utnyttjas. Placera aldrig produkter
i kontakt med innerväggar.
STOP
STOP
STOP

6|
6LIBD001 - 1709
METOS START
Styrpanel
Translation of the original instructions
ENGLISH 5
5
Control Panel
KEYPAD and ASSOCIATED FUNCTIONS
The keypad is blocked by keeping and pressed simultaneously
for a few seconds: "Loc" will appear on the display.
Pressing them once again will unblock the keypad: "UnL" will appear
on the display.
ON/STAND BY
Press this button for a few seconds to switch the appliance into
status ON or STAND BY.
MANUAL DEFROSTING
Press this button for a few seconds to activate manual defrosting, if
the temperature of the evaporator allows it and provided that the
Overcooling function is not activated.
If the defrosting time interval elapses while Overcooling is in
progress, the former will be activated upon conclusion of the latter.
CHAMBER LIGHT if parameter u1=0
Press the auxiliary button to switch the chamber light on and off
manually (only glass door version)
DOWN button
This scrolls the menu items and decreases the values.
When pressed for a few seconds, the Overcooling function is
activated unless defrosting or dripping is not in progress or the
evaporator fan is stopped.
During Overcooling, the working set point is decreased to the
temperature and for the time set by the parameters.
UP button
This scrolls the menu items and increases the values.
When pressed for a few seconds, the low RH% function ("rhL"
appears on the display) or the high RH% function ("rhH" appears on
the display) is activated for 10 seconds.
If the function is not available and the button is pressed, "----" will
appear on the display.
SET POINT
This provides access to the set point edit function.
STOPPING THE BUZZER (IF PRESENT)
Briefly press any button.
SETTING THE SET POINT
Press the SET () button: the compressor LED will flash.
Press the UP () or DOWN () button within 15 seconds.
Press the SET () button or do not operate for the compressor LED to
go off, after which the instrument will exit from the procedure.
DO NOT PERFORM ANY MAINTAINANCE WHEN THE
APPLIANCE IS IN ON OR STAND BY
DISCONNECT FROM ELECTRICAL POWER SUPPLY NET.
INDICATORS
LED MEANING
ON
:
The compressor is on
FLASHING: The working Set Point is being changed
Compressor protection in progress
ON
:
Defrosting in progress
FLASHING
Defrosting requested but compressor protection is in progress
Dripping in progress; Heating coolant in progress
ON
The evaporator fan is
on
FLASHING The evaporator fan is being stopped
ON : Chamber light switched on manually
FLASHING Chamber light switched on automatically
ON
The anti-steaming up resistors will be switched on
Auxiliary output switched on manually
Alarm output activated
The door resistors will be switched on
The evaporator valve will be activated
FLASHING : Auxiliary output switched on remotely
ON Overcooling in progress
ON Alarm or error in progress
ON
:
Not all the information regarding the HACCP alarms has
been displayed
FLASHING : At least one new alarm has been saved
OFF : All the information regarding the alarms has been displayed
List of the HACCP alarms has been deleted
ON Energy Saving in progress
ON Compressor maintenance required
ON The temperature measurement unit will be degrees Celsius
ON The temperature measurement unit will be degrees Fahrenheit
ON: The instrument is on stand-by
INDICATIONS
CODE
MEANING
rhL
Low RH% function selected
rhH
High RH% function selected
Loc
The keypad is blocked; The working Set Point is blocked
-
-
-
-
Requested function is not available
Brytare och funktioner
• Styrpanelen kan låsas genom att knapparna 3och
1hålls tryckta i några sekunder. ”Loc” visas på
displayen.
• Displayen låses upp genom att samma knappar
trycks på nytt. ”UnL” visas på displayen
1ON/STAND-BY
Apparaten startas (ON) och stängs av (STAND BY) genom
att knappen hålls tryckt i några sekunder.
2MANUELL AVFROSTNING
Avfrostningen startas genom att knappen hålls tryckt i några
sekunder.Avfrostningenstartarförutsatt att evaporatornstempe-
ratur tillåterdettaoch att Overcooling-funktioneninte är aktiverad.
3BELYSNING förutsatt att parameter u1=0
Avbrytare för skåpets innerbelysning (modeller med glasdörr).
4Pil NER knapp
För att bläddra i menyn; minskar värdet.
Genom att hålla knappen tryckt i några sekunder
aktiveras Overcooling-funktionen varvid en gul sig-
nallampa tänds. Under Overcooling-funktionen sänks
temperaturen till ett inställt värde för en inställd tid.
Funktionen startar inte om avfrostning pågår eller om
evaporatorfläkten har stannat.
5Pil UPP knapp
För att bläddra i menyn; ökar värdet. Genom att hålla
knappen tryckt i några sekunder aktiveras”low RH%”
(”rhL” på displayen) eller ”high RH%” -funktionen (”rhH”
på displayen) för 10 sekunder. Om denna funktion inte
ingår i apparatens utrustning visas ”----” på displayen.
6SET-knapp
Visning och ändring av börvärden.
Dämpning av eventuell ljudsignal
• Tryck kort på vilken som helst knapp.
Inställning av temperaturens börvärde
• Tryck på SET ( 6); kompressorns signallampa blinkar.
• Ställ inom 15 sekunder in temperaturen med hjälp
av UPP ( 5) och NER- ( 4) -knapparna.
• Bekräfta värdet genom att trycka på SET ( 6) eller
genom att vänta i 15 sekunder; kompressorns sig-
nallampa slocknar och displayen återgår till att visa
skåpets innertemperatur.
Utför inga underhålls- eller serviceåtgärder på
apparaten om den är i ”ON” eller ”STAND BY”
läge. Bryt alltid strömtillförseln till apparaten
innan dylika åtgärder utförs.
Signallampor
LED FÖRKLARING
Lyser: Kompressorn går.
Blinkar: Ändring av börvärde utförs.
Kompressorns startfördröjning aktiv.
Lyser: Avfrostning pågår
Blinkar: Avfrostning fördröjd pga att kompres-
sorns startfördröjning pågår.
Dropptid pågår.
Lyser: Evaporatorfläkten går
Blinkar: Evaporatorfläkten stannat
Lyser: Skåpets innerbelysning kopplats på manuellt
Blinkar: Skåpets innerbelysning kopplats på
automatiskt
Lyser:
Defrost av glasdörren pågår.
Reläutgången aktiverats manuellt
Larmutgången aktiverad.
Dörrtätningens värme-element aktiverat.
Evaporatorventilen aktiverad.
Blinkar: Reläutgången fjärraktiverats.
Lyser: Overcooling -funktionen aktiv.
Lyser: Larm eller fel.
Lyser: All HACCP-data har inte visats.
Blinkar: Åtminsåne ett nytt larm sparats.
Lyser inte: All HACCP-data har visats.
HACCP-larmlistan tömd.
Lyser: Energibesparingsfunktionen aktiverad.
Lyser: Kompressorn kräver service.
Lyser: Temperaturerna visas i Celsius-grader.
Lyser: Temperaturerna visas i Fahrenheit-grader.
Lyser:Apparaten är i stand-by -läge
Displaytexter
Teksti Betyder
rhL Low RH%-funktionen vald
rhH High RH%-funktionen vald
Loc Knapparna låsta;Temperaturens börvärde
låst.
- - - - Vald funktion finns ej att tillgå.
Translation of the original instructions
ENGLISH 5
5
Control Panel
KEYPAD and ASSOCIATED FUNCTIONS
The keypad is blocked by keeping and pressed simultaneously
for a few seconds: "Loc" will appear on the display.
Pressing them once again will unblock the keypad: "UnL" will appear
on the display.
ON/STAND BY
Press this button for a few seconds to switch the appliance into
status ON or STAND BY.
MANUAL DEFROSTING
Press this button for a few seconds to activate manual defrosting, if
the temperature of the evaporator allows it and provided that the
Overcooling function is not activated.
If the defrosting time interval elapses while Overcooling is in
progress, the former will be activated upon conclusion of the latter.
CHAMBER LIGHT if parameter u1=0
Press the auxiliary button to switch the chamber light on and off
manually (only glass door version)
DOWN button
This scrolls the menu items and decreases the values.
When pressed for a few seconds, the Overcooling function is
activated unless defrosting or dripping is not in progress or the
evaporator fan is stopped.
During Overcooling, the working set point is decreased to the
temperature and for the time set by the parameters.
UP button
This scrolls the menu items and increases the values.
When pressed for a few seconds, the low RH% function ("rhL"
appears on the display) or the high RH% function ("rhH" appears on
the display) is activated for 10 seconds.
If the function is not available and the button is pressed, "----" will
appear on the display.
SET POINT
This provides access to the set point edit function.
STOPPING THE BUZZER (IF PRESENT)
Briefly press any button.
SETTING THE SET POINT
Press the SET () button: the compressor LED will flash.
Press the UP () or DOWN () button within 15 seconds.
Press the SET () button or do not operate for the compressor LED to
go off, after which the instrument will exit from the procedure.
DO NOT PERFORM ANY MAINTAINANCE WHEN THE
APPLIANCE IS IN ON OR STAND BY
DISCONNECT FROM ELECTRICAL POWER SUPPLY NET.
INDICATORS
LED MEANING
ON
:
The compressor is on
FLASHING: The working Set Point is being changed
Compressor protection in progress
ON
:
Defrosting in progress
FLASHING
Defrosting requested but compressor protection is in progress
Dripping in progress; Heating coolant in progress
ON
The evaporator fan is
on
FLASHING The evaporator fan is being stopped
ON : Chamber light switched on manually
FLASHING Chamber light switched on automatically
ON
The anti-steaming up resistors will be switched on
Auxiliary output switched on manually
Alarm output activated
The door resistors will be switched on
The evaporator valve will be activated
FLASHING : Auxiliary output switched on remotely
ON Overcooling in progress
ON Alarm or error in progress
ON
:
Not all the information regarding the HACCP alarms has
been displayed
FLASHING : At least one new alarm has been saved
OFF : All the information regarding the alarms has been displayed
List of the HACCP alarms has been deleted
ON Energy Saving in progress
ON Compressor maintenance required
ON The temperature measurement unit will be degrees Celsius
ON The temperature measurement unit will be degrees Fahrenheit
ON: The instrument is on stand-by
INDICATIONS
CODE
MEANING
rhL
Low RH% function selected
rhH
High RH% function selected
Loc
The keypad is blocked; The working Set Point is blocked
-
-
-
-
Requested function is not available
Translation of the original instructions
ENGLISH 5
5
Control Panel
KEYPAD and ASSOCIATED FUNCTIONS
The keypad is blocked by keeping and pressed simultaneously
for a few seconds: "Loc" will appear on the display.
Pressing them once again will unblock the keypad: "UnL" will appear
on the display.
ON/STAND BY
Press this button for a few seconds to switch the appliance into
status ON or STAND BY.
MANUAL DEFROSTING
Press this button for a few seconds to activate manual defrosting, if
the temperature of the evaporator allows it and provided that the
Overcooling function is not activated.
If the defrosting time interval elapses while Overcooling is in
progress, the former will be activated upon conclusion of the latter.
CHAMBER LIGHT if parameter u1=0
Press the auxiliary button to switch the chamber light on and off
manually (only glass door version)
DOWN button
This scrolls the menu items and decreases the values.
When pressed for a few seconds, the Overcooling function is
activated unless defrosting or dripping is not in progress or the
evaporator fan is stopped.
During Overcooling, the working set point is decreased to the
temperature and for the time set by the parameters.
UP button
This scrolls the menu items and increases the values.
When pressed for a few seconds, the low RH% function ("rhL"
appears on the display) or the high RH% function ("rhH" appears on
the display) is activated for 10 seconds.
If the function is not available and the button is pressed, "----" will
appear on the display.
SET POINT
This provides access to the set point edit function.
STOPPING THE BUZZER (IF PRESENT)
Briefly press any button.
SETTING THE SET POINT
Press the SET () button: the compressor LED will flash.
Press the UP () or DOWN () button within 15 seconds.
Press the SET () button or do not operate for the compressor LED to
go off, after which the instrument will exit from the procedure.
DO NOT PERFORM ANY MAINTAINANCE WHEN THE
APPLIANCE IS IN ON OR STAND BY
DISCONNECT FROM ELECTRICAL POWER SUPPLY NET.
INDICATORS
LED MEANING
ON
:
The compressor is on
FLASHING: The working Set Point is being changed
Compressor protection in progress
ON
:
Defrosting in progress
FLASHING
Defrosting requested but compressor protection is in progress
Dripping in progress; Heating coolant in progress
ON
The evaporator fan is
on
FLASHING The evaporator fan is being stopped
ON : Chamber light switched on manually
FLASHING Chamber light switched on automatically
ON
The anti-steaming up resistors will be switched on
Auxiliary output switched on manually
Alarm output activated
The door resistors will be switched on
The evaporator valve will be activated
FLASHING : Auxiliary output switched on remotely
ON Overcooling in progress
ON Alarm or error in progress
ON
:
Not all the information regarding the HACCP alarms has
been displayed
FLASHING : At least one new alarm has been saved
OFF : All the information regarding the alarms has been displayed
List of the HACCP alarms has been deleted
ON Energy Saving in progress
ON Compressor maintenance required
ON The temperature measurement unit will be degrees Celsius
ON The temperature measurement unit will be degrees Fahrenheit
ON: The instrument is on stand-by
INDICATIONS
CODE
MEANING
rhL
Low RH% function selected
rhH
High RH% function selected
Loc
The keypad is blocked; The working Set Point is blocked
-
-
-
-
Requested function is not available
Translation of the original instructions
ENGLISH 5
5
Control Panel
KEYPAD and ASSOCIATED FUNCTIONS
The keypad is blocked by keeping and pressed simultaneously
for a few seconds: "Loc" will appear on the display.
Pressing them once again will unblock the keypad: "UnL" will appear
on the display.
ON/STAND BY
Press this button for a few seconds to switch the appliance into
status ON or STAND BY.
MANUAL DEFROSTING
Press this button for a few seconds to activate manual defrosting, if
the temperature of the evaporator allows it and provided that the
Overcooling function is not activated.
If the defrosting time interval elapses while Overcooling is in
progress, the former will be activated upon conclusion of the latter.
CHAMBER LIGHT if parameter u1=0
Press the auxiliary button to switch the chamber light on and off
manually (only glass door version)
DOWN button
This scrolls the menu items and decreases the values.
When pressed for a few seconds, the Overcooling function is
activated unless defrosting or dripping is not in progress or the
evaporator fan is stopped.
During Overcooling, the working set point is decreased to the
temperature and for the time set by the parameters.
UP button
This scrolls the menu items and increases the values.
When pressed for a few seconds, the low RH% function ("rhL"
appears on the display) or the high RH% function ("rhH" appears on
the display) is activated for 10 seconds.
If the function is not available and the button is pressed, "----" will
appear on the display.
SET POINT
This provides access to the set point edit function.
STOPPING THE BUZZER (IF PRESENT)
Briefly press any button.
SETTING THE SET POINT
Press the SET () button: the compressor LED will flash.
Press the UP () or DOWN () button within 15 seconds.
Press the SET () button or do not operate for the compressor LED to
go off, after which the instrument will exit from the procedure.
DO NOT PERFORM ANY MAINTAINANCE WHEN THE
APPLIANCE IS IN ON OR STAND BY
DISCONNECT FROM ELECTRICAL POWER SUPPLY NET.
INDICATORS
LED MEANING
ON
:
The compressor is on
FLASHING: The working Set Point is being changed
Compressor protection in progress
ON
:
Defrosting in progress
FLASHING
Defrosting requested but compressor protection is in progress
Dripping in progress; Heating coolant in progress
ON
The evaporator fan is
on
FLASHING The evaporator fan is being stopped
ON : Chamber light switched on manually
FLASHING Chamber light switched on automatically
ON
The anti-steaming up resistors will be switched on
Auxiliary output switched on manually
Alarm output activated
The door resistors will be switched on
The evaporator valve will be activated
FLASHING : Auxiliary output switched on remotely
ON Overcooling in progress
ON Alarm or error in progress
ON
:
Not all the information regarding the HACCP alarms has
been displayed
FLASHING : At least one new alarm has been saved
OFF : All the information regarding the alarms has been displayed
List of the HACCP alarms has been deleted
ON Energy Saving in progress
ON Compressor maintenance required
ON The temperature measurement unit will be degrees Celsius
ON The temperature measurement unit will be degrees Fahrenheit
ON: The instrument is on stand-by
INDICATIONS
CODE
MEANING
rhL
Low RH% function selected
rhH
High RH% function selected
Loc
The keypad is blocked; The working Set Point is blocked
-
-
-
-
Requested function is not available
Translation of the original instructions
ENGLISH 5
5
Control Panel
KEYPAD and ASSOCIATED FUNCTIONS
The keypad is blocked by keeping and pressed simultaneously
for a few seconds: "Loc" will appear on the display.
Pressing them once again will unblock the keypad: "UnL" will appear
on the display.
ON/STAND BY
Press this button for a few seconds to switch the appliance into
status ON or STAND BY.
MANUAL DEFROSTING
Press this button for a few seconds to activate manual defrosting, if
the temperature of the evaporator allows it and provided that the
Overcooling function is not activated.
If the defrosting time interval elapses while Overcooling is in
progress, the former will be activated upon conclusion of the latter.
CHAMBER LIGHT if parameter u1=0
Press the auxiliary button to switch the chamber light on and off
manually (only glass door version)
DOWN button
This scrolls the menu items and decreases the values.
When pressed for a few seconds, the Overcooling function is
activated unless defrosting or dripping is not in progress or the
evaporator fan is stopped.
During Overcooling, the working set point is decreased to the
temperature and for the time set by the parameters.
UP button
This scrolls the menu items and increases the values.
When pressed for a few seconds, the low RH% function ("rhL"
appears on the display) or the high RH% function ("rhH" appears on
the display) is activated for 10 seconds.
If the function is not available and the button is pressed, "----" will
appear on the display.
SET POINT
This provides access to the set point edit function.
STOPPING THE BUZZER (IF PRESENT)
Briefly press any button.
SETTING THE SET POINT
Press the SET () button: the compressor LED will flash.
Press the UP () or DOWN () button within 15 seconds.
Press the SET () button or do not operate for the compressor LED to
go off, after which the instrument will exit from the procedure.
DO NOT PERFORM ANY MAINTAINANCE WHEN THE
APPLIANCE IS IN ON OR STAND BY
DISCONNECT FROM ELECTRICAL POWER SUPPLY NET.
INDICATORS
LED MEANING
ON
:
The compressor is on
FLASHING: The working Set Point is being changed
Compressor protection in progress
ON
:
Defrosting in progress
FLASHING
Defrosting requested but compressor protection is in progress
Dripping in progress; Heating coolant in progress
ON
The evaporator fan is
on
FLASHING The evaporator fan is being stopped
ON : Chamber light switched on manually
FLASHING Chamber light switched on automatically
ON
The anti-steaming up resistors will be switched on
Auxiliary output switched on manually
Alarm output activated
The door resistors will be switched on
The evaporator valve will be activated
FLASHING : Auxiliary output switched on remotely
ON Overcooling in progress
ON Alarm or error in progress
ON
:
Not all the information regarding the HACCP alarms has
been displayed
FLASHING : At least one new alarm has been saved
OFF : All the information regarding the alarms has been displayed
List of the HACCP alarms has been deleted
ON Energy Saving in progress
ON Compressor maintenance required
ON The temperature measurement unit will be degrees Celsius
ON The temperature measurement unit will be degrees Fahrenheit
ON: The instrument is on stand-by
INDICATIONS
CODE
MEANING
rhL
Low RH% function selected
rhH
High RH% function selected
Loc
The keypad is blocked; The working Set Point is blocked
-
-
-
-
Requested function is not available
Translation of the original instructions
ENGLISH 5
5
Control Panel
KEYPAD and ASSOCIATED FUNCTIONS
The keypad is blocked by keeping and pressed simultaneously
for a few seconds: "Loc" will appear on the display.
Pressing them once again will unblock the keypad: "UnL" will appear
on the display.
ON/STAND BY
Press this button for a few seconds to switch the appliance into
status ON or STAND BY.
MANUAL DEFROSTING
Press this button for a few seconds to activate manual defrosting, if
the temperature of the evaporator allows it and provided that the
Overcooling function is not activated.
If the defrosting time interval elapses while Overcooling is in
progress, the former will be activated upon conclusion of the latter.
CHAMBER LIGHT if parameter u1=0
Press the auxiliary button to switch the chamber light on and off
manually (only glass door version)
DOWN button
This scrolls the menu items and decreases the values.
When pressed for a few seconds, the Overcooling function is
activated unless defrosting or dripping is not in progress or the
evaporator fan is stopped.
During Overcooling, the working set point is decreased to the
temperature and for the time set by the parameters.
UP button
This scrolls the menu items and increases the values.
When pressed for a few seconds, the low RH% function ("rhL"
appears on the display) or the high RH% function ("rhH" appears on
the display) is activated for 10 seconds.
If the function is not available and the button is pressed, "----" will
appear on the display.
SET POINT
This provides access to the set point edit function.
STOPPING THE BUZZER (IF PRESENT)
Briefly press any button.
SETTING THE SET POINT
Press the SET () button: the compressor LED will flash.
Press the UP () or DOWN () button within 15 seconds.
Press the SET () button or do not operate for the compressor LED to
go off, after which the instrument will exit from the procedure.
DO NOT PERFORM ANY MAINTAINANCE WHEN THE
APPLIANCE IS IN ON OR STAND BY
DISCONNECT FROM ELECTRICAL POWER SUPPLY NET.
INDICATORS
LED MEANING
ON
:
The compressor is on
FLASHING: The working Set Point is being changed
Compressor protection in progress
ON
:
Defrosting in progress
FLASHING
Defrosting requested but compressor protection is in progress
Dripping in progress; Heating coolant in progress
ON
The evaporator fan is
on
FLASHING The evaporator fan is being stopped
ON : Chamber light switched on manually
FLASHING Chamber light switched on automatically
ON
The anti-steaming up resistors will be switched on
Auxiliary output switched on manually
Alarm output activated
The door resistors will be switched on
The evaporator valve will be activated
FLASHING : Auxiliary output switched on remotely
ON Overcooling in progress
ON Alarm or error in progress
ON
:
Not all the information regarding the HACCP alarms has
been displayed
FLASHING : At least one new alarm has been saved
OFF : All the information regarding the alarms has been displayed
List of the HACCP alarms has been deleted
ON Energy Saving in progress
ON Compressor maintenance required
ON The temperature measurement unit will be degrees Celsius
ON The temperature measurement unit will be degrees Fahrenheit
ON: The instrument is on stand-by
INDICATIONS
CODE
MEANING
rhL
Low RH% function selected
rhH
High RH% function selected
Loc
The keypad is blocked; The working Set Point is blocked
-
-
-
-
Requested function is not available
|7
6LIBD001 - 1709
METOS START
Displayen
SKÅPETSTEMPERATUR
Visas på displayen under normalanvändning.
EVAPORATORNS TEMPERATUR (om evaporator-
givare ingår i skåpets utrustning)
Håll NER ( 4) tryckt i några sekunder och välj sedan
”Pb2” med hjälp av UPP ( 5) och NER ( 4) -knapparna.
Tryck nu på SET ( 6) så visas evaporatorns temperatur
på displayen. Återgå till normaldisplay genom att trycka
på SET ( 6) på nytt eller genom att vänta.
KONDENSORNS TEMPERATUR (om kondensor-
givare ingår i skåpets utrustning)
Håll NER ( 4) tryckt i några sekunder och välj sedan
”Pb3” med hjälp av UPP ( 5) och NER ( 4) -knapparna.
Tryck nu på SET ( 6) så visas kondensorns temperatur
på displayen. Återgå till normaldisplay genom att trycka
på SET ( 6) på nytt eller genom att vänta.
KOMPRESSORNS GÅNGTIDSRÄKNARE (”HACCP
EXTENDED” -modellen)
Håll NER ( 4) tryckt i några sekunder och välj sedan
”CH” med hjälp av UPP ( 5) och NER ( 4) -knapparna.
Tryck nu på SET ( 6) så visas kompressorns gångtid i
timmar på displayen. Återgå till normaldisplay genom
att trycka på SET ( 6) på nytt eller genom att vänta.
Inställning av tid och datum (beroende
på skåpets utrustning)
• Paina ALAS ( 4) muutaman sekunnin ajan ja valitse
sitten ”rtc”YLÖS ( 5) ja ALAS ( 4) -painikkeiden avulla.
• Tryck nu på SET ( 6) så visas ”yy”, ”nn”, ”dd”, ”hh”
och ”nn” turvis följda av två siffror som motsvarar år,
månad, dag, timmar och minuter. Dessa värden kan
ändras med hjälp av UPP 5och NER 4-knapparna.
• Lämna denna funktion genom att trycka på ON/STAND
BY ( 1).
HACCP Funktioner
Apparaten har ett minne för 3 HACCP larm (HACCP BASIC
modellen) eller för 9 larm (HACCP EXTENDED modellen).
Följande värden sparas:
• kritiskt värde
• datum och tid då larmet började (endast HACCP
EXTENDED modellen)
• larmets längd (1 min - 99 h 59 sek)
Kod Larm Kritiskt värde
AL larm för låg temp. lägsta temp. under larmet
AH larm för hög temp. högsta temp. under larmet
ld larm för öppen
dörr högsta temp. under larmet
PF larm förorsakat
av strömavbrott temp. då strömmen kopp-
las på igen (parameter AA)
• HACCP BASIC: Apparaten uppdaterar uppgifterna
om det nya larmet är allvarligare än det sparade eller
om det sparade larmets uppgifter redan visats. Om
displayen stängs av sparas inte larmen.
• HACCP EXTENDED: De nyaste larmet raderar det
älsta. Apparaten kan inte spara uppgifter angående
längden för ett PF-larm om strömavbrottet är så långt
att det förorsakar fel i klockans funktion.
• Då orsaken till larmet upphör återgår displayen till nor-
mal temperaturvisning med undantag för larmet föror-
sakat av strömavbrott som måste nollställas för hand.
• HACCP-LED ger information om HACCP-larmens
minnesstatus: om den lyser, har inte all information
om HACCP-larmen visats, om den blinkar har minst
ett nytt HACCP-larm sparats.
Visning av larmen
• Håll NER ( 4) tryckt i 2 sekunder varvid den första
beteckningen visas på displayen.
• Välj ”LS” genom att kort trycka på UPP ( 5) eller
NER ( 4) knappen.
• Tryck kort på SET ( 6); koden ”A L” , ”AH” eller ”id”
visas på displayen.
Välj larm
• med hjälp av UPP ( 5) och NER ( 4) -knapparna (välj
t ex ”AH”).
Granskning av larmets information
Tryck kort på SET ( 6); larmets signallampa upphör
att blinka och displayen visar följande information
(# endast i HACCP EXTENDED -modellen):
Koodi Betydelse
8,0 Kritiskt värde = 8,0 °C
StA # Displayen visar inom kort datum och tid för larmet
y07 # Larmet började 2007 (fortsätter...)
n03 # Larmet började i mars (fortsätter...)
d26 # Larmet började den 26 mars (fortsätter...)
h16 # Larmet började kl 16:00 (fortsätter...)
n30 # Larmet började kl 16:30 (fortsätter...)
Dur Displayen visar inom kort larmets längd
h01 Larmets längd 1 timme (fortsätter...)
n15 Larmets längd 1 timme 15 min
AH3 Valt larm
Lämna detta läge:
• tryck kort på ON/STAND-BY ( 1); displayen återgår
till att visa valt larm (i exemlet ”AH3”).
Lämna denna funktion:
• tryck upprepade gånger på UPP ( 5) eller NER ( 4)
knappen tills displayen återgår till att visa skåpets
temperatur. Alternativt vänta i 60 sekunder.
Om inga larm finns lagrade i apparatens minne visas
inte bokstäverna ”LS” på displayen.

8|
6LIBD001 - 1709
METOS START
Radering av HACCP-larmlistan
• Håll NER ( 2) knappen tryckt i 2 sekunder varvid den
första beteckningen visas på displayen.
• Välj ”rLS” med hjälp av UPP ( 5) och NER ( 4) knapparna.
• Tryck på SET 6.
• Ställ inom 15 sekunder in talet ”149” med hjälp av
UPP ( 5) och NER ( 4) knapparna.
• Tryck på SET 6eller vänta i 15 sekunder
• ”----” visas på displayen i några sekunder och HAC-
CP signallampan slocknar varefter displayen återgår
till normal funktion.
Om inga larm finns lagrade i apparatens minne visas
inte bokstäverna ”rLS” på displayen.
Larm och felsökning
Hälytykset ja viat
Kod Betyder
Åtgärd
iA Alarm multifunction entrance
Kalla på service
iSd Pressostat-larm
Stäng av apparaten och koppla på den igen. Kalla på
service om larmet upprepas.
COH Larm för hög temperatur i kondensorn
Granska kondensorns temperatur.
Stäng av apparaten och koppla på den igen; om
kondensorns temperatur fortfarande är för hög bör
kondensorn rengöras.
CSd Kompressorlarm
Granska kondensorns temperatur.
Stäng av apparaten och koppla på den igen; om
kondensorns temperatur fortfarande är för hög bör
kondensorn rengöras.
Pr1 Skåpets temperaturgivarfel
Kalla på service.
Användning kan fortsättas med standarprogram
Kod Betyder
Pr2 Evaporatorns temperaturgivafel
Kalla på service.
Användning kan fortsättas med standarprogram
Pr3 Kondensorns temperaturgivafel
Kalla på service.
Användning kan fortsättas med standarprogram
rTc Klock-fel
Ställ in datum och tid på nytt. Innan det är gjort är
HACCP-funktionen inte tillgänglig
Då orsaken till larmet upphör återgår displayen till normal
temperaturvisning med undantag för följande larm:
• Larm för strömavbrott (”PF”) som måste kvitteras
manuellt genom att trycka på vilken som helst knapp
• Pressostatlarm (”iSd”) som kräver att apparaten
stängs av eller att strömtillförseln till apparaten bryts
för ett ögonblick.
• Kompressorlarm förorsakat av hög temperatur i
kondenson (”CSd”) som kräver att apparaten stängs
av eller att strömtillförseln till apparaten bryts för ett
ögonblick.
Konfiguration
Tillvägagångssätt
• Försäkra att inga processer är igång.
• Håll UPP ( 5) och NER ( 4) tryckta i 4 sekunder: “PA”
visas på displayen.
• Tryck på SET ( 6)
• Ställ in talet ”19” inom 15 sekunder med hjälp av
UPP ( 5) och NER ( 4) knapparna.
• Tryck på SET ( 6)
• Håll UPP ( 5) och NER ( 4) tryckta i 4 sekunder: “SP”
visas på displayen.
Välj parameter:
• Tryck på UPP ( 5) eller NER ( 4)
Justera parameterns inställningar:
• Tryck på SET ( 6)
• Tryck på UPP ( 5) eller NER ( 4) inom 15 sekunder
• Tryck på SET 6eller vänta i 15 sekunder
Lämna konfigurationsläget:
• Håll UPP ( 5) och NER ( 4) tryckta i 4 sekunder eller
vänta i 60 sekunder.
• Stäng av apparaten efter att inställningarna ändrats.

|9
6LIBD001 - 1709
METOS START
Felsökning
Om apparaten inte fungerar eller fungerar avvikande från det normala, gå igenom nedanstående lista för att reda
ut felet.
Kalla på service om felet kvarstår. Meddela härvid felets art och apparatens tillverkningsnummer som anges på
apparatens typskylt.
PROBLEM MÖJLIG ORSAK ÅTGÄRD
Apparaten startar inte Strömtillförseln till apparaten bruten Granska att stickproppen sitter ordentligt
i uttaget.
Kompressorn stannar
sällan Omgivningens temperatur för hög Säkerställ tillräklig ventilation
För litet kylmedia Kalla på service.
Dörrens tätning sluter inte tätt Kalla på service.
Isbildning på evaporatorn Placera inte heta varor eller varor med hög
fuktighetsgrad i apparaten. Utför manuell
avfrostning.
Defekt kondensorfläkt Kalla på service.
Avdunstningskärlet
svämmar över Heta produkter eller produkter med hög
luftfuktighet placeras för ofta i apparaten Placera inte heta varor eller varor med hög
fuktighetsgrad i apparaten.
Dörrar/lådor öppnas för ofta Fäst uppmärksamhet vid apparatens an-
vändning.
Skåpets inner-
temperatud för hög Kondensorn smutsig Granska kondensorn med jämna mellanrum
och rengör vid behov.
Kondensorn luftcirkulation förhindrad Säkerställ kondensorns luftcirkulation.
Varm luft kommer in i skåpet Granska att dören sluter tätt och att dörrens
tätning är hel. Kalla vid behov på service.
Is har bildats på evaporatorn Starta den manuella avfrostiningen.

10 |
6LIBD001 - 1709
METOS START
Rengöring och underhåll
Nedanstående instruktioner måste följas nog-
grannt, specielt då kylmedium R290 används. Se
apparatens typskylt, punkt 13 (sida 3).
Täpp INTE till apparatens luftcirkulationsöppninga.
Använd INGA mekaniska apparater eller konstgjor-
da medel för att påskynda avfrostningen.
Tumma INTE på kylsystemet.
Använd INTE elapparater i apparatens kylkam-
mare utom om tillverkaren rekommenderar att
göra så.
FÖR ATT UNDVIKA ATT SKAPA EN BRANDFAR-
LIG BLANDNING, BÖR INSTALLATIONSPLAT-
SENS RUMSVOLYM VARA MINST 1m3/8g
KYLMEDIUM.
• Detta avsnitt är riktat till slutanvändaren och är viktigt
för att apparaten ska fungera korrekt på lång sikt.
• Åtgärderna som skall utföras kräver ingen särskild
teknisk kunskap.
• Rengöring och rutinunderhåll måste utföras minst
var sjätte månad. Vid behov måste ytterligare åtgär-
der utföras genom att kontakta leverantören och
använda original reservdelar.
VIKTIGT
Bryt alltid strömtillförseln till apparaten innan
rengörings- eller underhållsåtgärder utförs.
Det är förbjudet att rengöra apparaten med
trycktvätt. Undvik att spruta vatten direkt på
utsidan eller inuti skåpet eller på elektriska delar.
RENGÖRING
• Skåpets rengöringsbehov beror på skåpets använd-
ningsintensitet. Observera användningen och gör upp
ett tidsschema för rengöringsintervall enligt behov.
• Vid rengöring av ut- och invändiga sidor kan ett
neutralt eller lätt alkaliskt rengöringsmedel användas.
För rengöring av dörrtätningen rekommenderas för
hemmabruk avsedda neutrala vattenbaserade ren-
göringsmedel AVLÄGSNA ALDRIGTÄTNINGEN FÖR
RENGÖRING! Det rekommenderas att invändiga
delar då och då rengörs med desinficerande rengö-
ringsmedel. För övrigt kan smuts som förekommer
på ytorna avlägsnas med en fuktig duk. Rengöringen
underlättas om hyllorna avlägsnas.
• Använd aldrig redskap av metall vid rengöring av
skåpet.
• Avlägsna hyllorna gejdrar i samband med noggran-
nare rengöring.
VIKTIGT
Apparaten är tillverkad i rostfritt stål som i normalt
bruk är korrosionsbeständigt. Undvik användning
av starka rengöringsmedel som kan skada me-
tallytan.
Rutinunderhåll
Rengöring av kondensorn:
Rengör kondensorn med jämna mellanrum. Innan ren-
göring skall strömmen slås av och stickkontakten tas ur
vägguttaget.
• Vid rengöringen kan dammsugare eller en mjuk bors-
te användas. Om kondensorn borstas av, bör man
vara försiktig så inte aluminiumlamellerna skadas.
• Avlägsna och rengör möjliga filter och montera dä-
refter tillbaka filtret. Byt ut filtret ifall det är deffekt
eller för smutsigt.
Att inte följa dessa föreskrifter kan skada kylkretsen och
livsmedlen som förvaras i skåpet
Granska att dörren sluter tätt:
• Granska att dörrens tätning är i oklanderligt skick.
Det är viktigt att tätningen är jämn över hela tät-
ningsytan.
Kontrollera strömkabelns skick:
• Kontakta service om kabeln är bruten eller på annat
sätt skadad.
En skadad kabel kan förorsaka brand, elstöt eller olycka.
Tillfällig ur bruktagning
Följ instruktionerna nedan ifall apparaten förblir oanvänd
för en tid:
• Bryt strömtillförseln till apparaten.
• Avlägsna stickproppen från vägguttaget.
• Töm apparaten på alla matprodukter och rengör
apparaten.
• Förhindra unken lukt från att uppstå genom att läm-
na apparatens dörr på glänt så luften kan cirkulera
i skåpet.
• Skydda apparaten mot damm.
Byte av lampa (beroende på utrustning)
Byt lampan enligt följande:
• Stäng av apparaten och bryt strömtillförseln till den.
• Öppna apparatens dörr.
• Avlägsna lampans skyddsglas.
• Skruva loss lampan som sitter i styrpanelen och
ersätt den med en motsvarande ny lampa (lampans
spänning visas på dekalen).
• Montera tillbaka skyddsglaset.
Hyllornas max kapacitet
Hyllornas maximi kapacitet: 50 kg/hylla.
Produkterna bör placeras på hyllorna så att vikten
fördelas jämnt och så att luftcirkulationen inte
förhindras.
STOP
STOP
STOP

|11
6LIBD001 - 1709
METOS START
Jäteastia, jonka päälle on merkitty rasti, tarkoittaa, että Euroopan unionin alueel-
la tuote on toimitettava erilliseen keräyspisteeseen, kun tuote on käytetty lop-
puun.
Tämä koskee sekä laitetta että tällä symbolilla merkittyjä lisälaitteita. Näitä tuot-
teita ei saa heittää lajittelemattoman yhdyskuntajätteen joukkoon.

12 |
6LIBD001 - 1709
METOS START
Tekniset tiedot

|13
6LIBD001 - 1709
METOS START

14 |
6LIBD001 - 1709
METOS START

|15
6LIBD001 - 1709
METOS START

16 |
6LIBD001 - 1709
METOS START

|17
6LIBD001 - 1709
METOS START

18 |
6LIBD001 - 1709
METOS START
63
63
PARAMETERS / PARAMETER / LISTA PARAMETRI / PARAMÈTRES / PARÁMETROS
PARAMETERS / LISTE OVER PARAMETRE / ПАРАМЕТРЫ КОНФИГУРАЦИИ /
ا
PAR Description / Descrizione / Beskrivelse
0
+10
2
+10
-
25
-15
-
22
-18
-
20
-15
-
6
+4
-
2
+8
H = HACCP EXTENDED; GL = Glass Door / Glastüren / Porte Vetro / Portes vitrées / Puertas de
cristales / Glazen deuren / стеклянная дверь;
§ = only for some models / nur für einige Modelle. / solo per alcuni modelli / seulement pour
quelques modèles / sólo para algunos modelos / Alleen bij sommige modellen / Kun for nogle
modeller / Только для некоторого количества моделей
GL GL
SP
working setpoint / Betriebssollwert / SET point di lavoro / point de consigne [1]
2
2
-
2
2
-
2
2
-
18
-
4
-
2
CA1
cabinet probe offset / Offset Zellensonde / calibr. sonda / offset sonde chambre
0
0
0
0
-
2
0
0
CA2
evaporator probe offset (°C) / Offset Verdampfersonde (°C) / offset sonda evaporatore (°C) / offset sonde évaporateur
0
0
0
0
0
0
0
CA3
Offset condenser probe / Offset Kondensatorfühlers /Offset sonda condensatore / offset sonde condensateur H
0
0
0
0
0
0
0
P1
decimal point Celsius degree / Dezimalpunkt Grad Celsius / Punto decimale / point décimal degré Celsius (0=NO 1=YES)
0
0
0
0
0
0
0
P2
unit of measure temp. / Maßeinheit Temperatur / unità di misura / unité de mesure témp. (0=°С;1=°F) [3]
0
0
0
0
0
0
0
P3
Evap. probe function / Funktion der Verdampfersonde / funzione sonda evap / fonction sonde évaporateur (1=YES)
0
0
1
1
1
1
1
P4
Enabling of condenser probe / Aktivierung des Kondensatorfühlers / Abilitazione sonda condens
.
/ habilitation de
la sonde
condensate.
(1=YES)
H
1 1 1 1 1 1 1
P8
delay in display of variations in temp. detected by the probes /
Verspätung Anzeige Variation der von den Fühlern
gemessenen Temperat
.
/ ritardo visualiz
.
(ds) /
retard visualisation de la variation des températ
.
relevées par les sondes
5 5 5 5 5 5 5
r0
working setpoint differential / Differentialbetriebssollwert / differenziale setpoint di lavoro / différentiel point de consigne
2
2
3
3
2
2
2
r1
minimum working setpoint / Mindestbetriebssollwert / minimo setpoint di lavoro / point de consigne minimum
0
2
-
25
-
22
-
20
-
6
-
2
r2
maximum working setpoint / Maximalbetriebssollwert / massimo setpoint di lavoro / point de consigne maximum
10
10
-
15
-
18
-
15
4
8
r3
locking the working setpoint modification / Blockierung der Änderung des Betrieb
ssollwerts / blocco della modifica del
setpoint di lavoro / blocage de la mo
dification du point de consigne
(1=YES)
0 0 0 0 0 0 0
r4
Increase in temp. during Energy Saving function /
Temperaturanstieg während der Energy Saving
-
Funktion
/
Incremento di te
mp. in funzione Energy Saving
/
augmentation de la temp
.
durant la fonction Energy Saving
0 0 0 0 0 0 0
r5
decrease in temp. during Overcooling function / Abnahme der Temperatur während der Overcooling
-
Funktion /
decremento in overcooling
/
diminution de
la température durant la fonction Overcooling
3 3 3 3 3 3 3
r6
duration of Overcooling function / Dauer der Overcooling-Funktion/ durata overcooling / durée de la fonction Overcooling
30
30
30
30
30
30
30
r7
Min. difference “cell temp.
-
working setpo
int” (when the instrument switches on) such as to provoke the exclusion of the
consequent value of the evaporator temp. among the ones used for the calculation of the relative average (for the defrost
activation; if d8 = 3) / Derartiger Minimalunterschied "Temperatur der Zelle - Arbeitssollwert" (bei der Einschaltung des
Gerätes), dass der Ausschluss des sich ergebenden Wertes der Verdampfer-temperatur zwischen denjenigen, die für die
Berechnung des entsprechenden Mittelmaßes verwendet wurden, veranlasst wird (für die Aktivierung des Abtauens;
wenn d8 = 3) / Min. differenza “temp. cella - setpoint” (all’accensione) tale da provocare l’esclusione del valore della
temp.evaporatore tra quelli utilizzati per il calcolo della media per l’attivazione dello sbrinamento; se d8 = 3) / différence
minime "température de la cellule - point de consigne de travail" (à l'allumage de l'instrument) en mesure de provoquer
l'exclusion de la valeur conséquente de la température de l'évaporateur parmi celles utilisées pour le calcul de la
moyenne respective (pour l'activation du dégivrage; si d8 = 3)
[4]
10 10 10 10 10 10 10
C0
compressor delay since you turn on the instrument / Verspätung nach der Inbetriebnahme des Ger
ätes / ritardo
compressore dall’accensione dello strument
o / retard compresseur après la mise en marche de
[4]
1 1 1 1 1 1 1
C1
minimum time between 2 activations in succession of the comp./
Mindestzeit zwischen 2 aufeinanderfolgenden
Einschaltvorgängen des Verdichters / tempo minimo tra 2 accensioni successive del compr. / temps minimum entre 2
mises en marche con
sécutifs du compr..
[5] [6]
1 1 1 1 1 1 1
C2
Minimum time the compressor remains turned off / Mindestdauer des Abschaltens des Verdichters / durata minima dello
spegnimento del compr. /
durée minimum de l’arrêt du compr
.
[5]
1 1 1 1 1 1 1
C3
Minimum time the compressor remains turned on / Mindestdauer des Einschaltens des Verdichters / durata minima
dell’accensione del compr
.
/ durée minimum de la marche du compr
.
0 0 0 0 0 0 0
C4
ti
me the comp. remains turned off during the cabinet probe error / Abschaltdauer des Verdichters während Fehler
Zellensonde / durata
off
del comp. durante l’errore sonda cella / durée de l’arrêt du comp.
pendant l’erreur sonde
chamber
4 4 4 4 4 4 4
C5
time
the comp. remains turned on during cabinet probe error / Einschaltdauer des Verdichters währen Fehler Zellensonde
/ durata
on
del compr. durante l’errore sonda cella / durée de la marche du compres. pendant l
’erreur sonde chambre
5 5 6 6 6 5 5
C6
Conden
ser temp. is higher than that at which the condenser overheating alarm is activated (COH code) / Temp. des
Kondensators, oberhalb derer der Alarm Kondensator überhitzt aktiviert wird (Code “COH”) / Temp. condensatore
oltre la quale è attivato l’allarme condensatore surriscaldato / temp. du condensateur au dessus de laquelle sera
activée l'alarme surchauffe condensateur
(Code “COH”)
[7]
H
80 80 80 80 80 80 80
C7
Condenser
temp.
is higher than the limit at which the compressor blocked alarm is activated (
CS
d
code) /
Temp
.
des
Kondensators, oberhalb derer der Alarm Kompressor blockiert aktiviert wird (Code “CSd ”) / Temp. condensatore oltre
la quale è attivato l’allarme compressore bloccato / température du condensateur au dessus de laquelle sera activée
l'ala
rme compresseur bloqué (code “CSd”)
H
90 90 90 90 90 90 90
C8
Compressor alarm delay locked (
CSd
code) /
Verspätung Alarm Kompressor blockiert (Code “
CSd
”)
/ Ritardo allarme
compressore bloccato
/
retard alarme compresseur bloqué (code “CSd”)
[8]
H
1 1 1 1 1 1 1
CA
Number of operating hours in higher than the limit at which the need for maintenance is signaled /
Anzahl der
Betriebsstunden des Kompressors, oberhalb derer die Wartungsanfrage gemeldet wird / Ore di funzionamento del
compressore oltre cui viene segnalata la richiesta di manutenzione / nombre d'heures de fonctionnement du
compresseur au dessus duquel la maintenance est requise
H
0 0 0 0 0 0 0
d0
defrost interval / Abtauinterval / intervallo tra sbrinamenti / intervalle de dégivrage / intervalo de desescarche [9]
8
8
6
6
6
6
6
d1 type of defrosting / Abtautyp / tipo sbrinamento / type de dégivrage (0=electric; 1= Hot gas; 2=stop)
2
2
0
0
0
0
0
d2
temp. at end of defrosting / Temperatur bei Abtauende / Temp fine sbrinamento / témp. de fin dégivrage
21
21
12
12
12
12
12
d3 defrost duration / Abtaudauer / durata sbrinamento / durée du dégivrage / duración del desescarche
30
30
45
45
45
45
45
d4
defrost when you turn on the instrument / Abtauung bei Inbetriebnahme des Gerätes / sbrinamento
all'accensione /
dégivrage après la mise en marche de l’appareil / desescarche al encendido del instrumento
(
0=NO;
1=YES)
[4]
0 0 0 0 0 0 0

|19
6LIBD001 - 1709
METOS START
64
64
PARAMETERS / PARAMETER / LISTA PARAMETRI / PARAMÈTRES / PARÁMETROS
PARAMETERS / LISTE OVER PARAMETRE / ПАРАМЕТРЫ КОНФИГУРАЦИИ /
ا
PAR Description / Descrizione / Beskrivelse
0
+10
2
+10
-
25
-15
-
22
-18
-
20
-15
-
6
+4
-
2
+8
d5
defrost delay when you turn on the instrument (if d4 = 1) / Abtauungverspätung bei Inbetriebnahme des Gerätes
/
ritardo sbrinam
.
all'accensione (se d4 = 1) / retard dégivrage après la mise en marche de
l’appareil (si d4 = 1)
[4]
0 0 0 0 0 0 0
d6
temp.
shown during the defrost / Während des Abtauvorgangs angezeigte Temperatur / visualizzazione
temp.
durante sbr
inamento /
témp.
vi
sualisée pendant le dégivrage
[10]
1 1 1 1 1 1 1
d7
dripping duration / Abtropfdauer / durata gocciolamento / durée d'égouttage
0
0
5
5
5
5
5
d8
kind of defrost interval / Typ des Abtauintervalls / tipo intervallo sbrinamento / Type
de intervalle de dégivrage
0= Intervals – defr. will be activated once the instrument run for time d0; 1= Intervals – defr. will be activated once the
compressor has switched on for time d0; 2= Intervals – defr. will be activated once the evaporator temp. has altogether
been below temp. d9 for time d0; 3= Adaptable - defrosting will be activated when (condition 1) the evaporator temp. will
be below temp. d22 and the compressor will altogether be switched on for time d18 or when (condition 2) the evaporator
temp
.
will fall below temp
.
d19; 4= real time
–
def. will be activated at the times established in parameters Hd1 ... Hd6
[11]
0 0 3 3 3 3 3
d9
evaporator temp. is higher than that at which the defrost interval counter is suspended / Temp. des Verdampfer
s bei
deren Überschreiten das Zählen des Abtauvorgangs unterbrochen wird / conteggio d0 se tevap < d9 / temp. de
l'évaporateur au
-
dessus de laquelle le comptage de l'intervalle
de dégivrage est arête
0 0 0 0 0 0 0
d11
defrosting alarm switches off once m
ax
.
time limit has been reached (cod
e
“
dFd
”; if P3=1 / Aktivierung des Abtaualarms
für Maximaldauer abgeschlossen (Code “dFd”; wenn P3=1) / abilitazione allarme sbrinamento concluso per durata max
(se P3=1)
/ habilitation de l'alarme dégivrage conclu penda
nt une durée max
.
(cod
e
“
dFd
”; si P3=1)
1=YES
0 0 0 0 0 0 0
dA
minimum compressor on duration on activation of defrosting so that they may be activated / Mindestdauer des
Einschaltens des Verdichters bei Aktivierung des Abtauvorgangs, damit dieser aktiviert wird / min ON comp x def /
durée min. de la mise sous tension du compres
.
à l'activation du dégivrage afin que celui
-
ci puisse être activé
[12]
0 0 0 0 0 0 0
d16
predripping duration (the compressor will remain switched off, the defrosting output wil
l be activated and the
evaporator fan will remain switched off / Dauer des Vortropfens (während des Vortropfens, wird der Kompressor
ausgeschaltet bleiben, der Abtauausgang wird aktiviert warden und der Verdampferlüfter wird ausgeschaltet bleiben)
/ durata del pregocciolamento (il compressore rimarrà spento, l’uscita di sbrinamento verrà attivata e il ventilatore
dell’evaporatore rimarrà spento) / durée du pré-dégoulinement (durant le pré-dégoulinement le compresseur restera
éteint, la sortie du dégivrage s
era activée et le ventilateur
de l'évaporateur restera éteint)
0 0 0 0 0 0 0
d17
number of evaporator temp. values used for the calculation of the relative average (for the defrost activation; if d8 = 3) /
Anzahl der Temperaturwerte des Verdampfers, die für die Berechnung des relativen Mittelwertes verwendet werden (für
die Aktivierung des Abtauens; wenn d8 = 3) / numero di valori della temp. ’evaporatore utilizzati per il calcolo della relativa
media (per l’attivazione dello sbrinamento; se d8 = 3) / numéro des valeurs de la température de l'évaporateur utilisées
pour le calcul de la moyenne respective (pour l'activation du dégivrage;
si
d
8 = 3)
4 4 4 4 4 4 4
d18
defrost interval (if d8 = 3 and for condition 1) / Abtauintervall ( wenn d8 = 3 e für die
Bedingung 1) / intervallo di sbrin.
(se
d8 = 3 e per la condizione 1)
/
intervalle de dégivrage (si d8 = 3 et pour la condition 1)
40 40 40 40 40 40 40
d19
evaporator temp. above which the defrost is activated (relative to the evaporator temp. average, o
r “evaporator temp.
average - d19”) (if d8 = 3 and for condition 2) / Verdampfertemperatur, unterhalb derer das Abtauen aktiviert wird
(bezogen auf den Mittelwert der Temperaturen des Verdampfers oder "Mittelwert der Temperaturen des Verdampfers -
d19") ( wenn d8 = 3 und für die Voraussetzung 2) / Temp. dell’evap. al di sotto della quale viene attivato lo sbrinamento
(relativa alla media delle temp. dell’evap., ovvero “media delle temp. dell’evap. - d19”) (se d8 = 3 e per la condizione 2) /
température de l'évaporateur en-dessous de laquelle est activé le dégivrage (relative à la moyenne des températures de
l'évaporateur, ou
bien "moyenne des températures de l'évaporateur
-
d19") (seulement si d8 = 3 et pour la condition 2)
3 3 3 3 3 3 3
d20
minimum consec
utive time the compr. must be switched on such as to provoke the defrost activation / derartige
Mindestdauer im Anschluss an die Einschaltung des Kompressors, dass sie die Aktivierung des Abtauens
verursachen kann / durata minima consecutiva dell’accensione del compres. tale da provocare l’attivazione dello
sbrinamento
/ durée minimum suivante de l'allumage du compres. en mesure de provoquer l'activation du dégivrage
180 180 180 180 180 180 180
d21
minimum consecutive time the compressor must be switched
on after the insturment switches on (on condition that the
difference “cell temp. - working setpoint” is higher temp. r7) and after function Overcooling is activated such as to provoke
the defrost activation / derartige Mindestdauer im Anschluss an die Einschaltung des Kompressors durch die
Einschaltung des Gerätes (unter der Voraussetzung, dass die Differenz "Zelltemperatur - Betriebssollwert" über der
Temperatur r7 liegt) und durch die Aktivierung der Overcooling-Funktion, dass sie die Aktivierung des Abtauens
veranlasst / durata min. consecutiva dell’accensione del compr. dall’accensione dello strumento (a condizione che la
differenza “temp. della cella - setpoint di lavoro” sia superiore alla temp. r7) e dall’attivazione della funzione Overcooling
tale da provocare l’attivazione dello sbrinamento / durée minimum suivante de l'allumage du compres. depuis l'allumage
de l'instrument (à condition que la différence "température de la cellule - point de consigne de travail" soit supérieure à la
température r7)
et depuis l'activation de la fonction Overcooling en mesure de
provoquer l'activation du dégivrage
200 200 200 200 200 200 200
d22
evaporator temp. above which the defrosting interval is suspended (relative to the evaporator temp. average, or
“evaporator temp. average + d22”) (if d8 = 3 and for condition 1) / Verdampfertemp., oberhalb derer die Zählung des
Abtauintervalls unterbrochen wird (bezüglich des Mittelwertes der Temp. des Verdampfers oder "Mittelwertes der Temp.
des Verdampfers + d22") ( wenn d8 = 3 und für die Voraussetzung 1) / temp. dell’evap. al di sopra della quale il conteggio
dell’intervallo di sbrinamento viene sospeso (relativa alla media delle temp. dell’evaporatore, o “media delle temp.
dell’evaporatore + d22”) (se d8 = 3 e per la condizione 1) / température de l'évaporateur au-dessus de laquelle le
comptage de l'intervalle du dégivrage est arrêté (relative à la moyenne des températures de l'évaporateur, ou bien
"moyenne des températures de l'évaporateur + d22") (si d8 = 3 et pour la con
dition 1)
0 0 0 0 0 0 0
d23
evaporator temp. average increase during function Energy Saving (for defrost activation; if d8 = 3) /
Zunahme des
Mittelwertes der Temperaturen des Verdampfers während der Energy Saving-Funktion (für die Aktivierung des
Abtauens; wenn d8 = 3) / incremento della media delle temp. dell’evap. durante la funzione Energy Saving (per
l’attivazione dello sbrinamento; se d8 = 3) / augmentation de la moyenne des températures de l'évaporateur
durant la fonction Energy Saving (pour l'acti
vation du dégivrage; si d8 = 3)
1 1 1 1 1 1 1
A0
Temperature associated with the min. temp. alarm / Temperaturwert, der dem Mindesttemp.larm zugeordnet ist /
Temperatura associata ad allarme min / témp. associée à l'alarme de témp
. minimum
[13]
0 0 0 0 0 0 0
A1
temp. below which lower temp. alarm is activated; / Schwelle fur den Tief
-
Temperatur
-
Alarm / allarme temp. di minima /
témp. en dessous de laquelle l’alarme de témp. basse est active
-10 -10 -20 -20 -20 -20 -20
A2
kind of lower temp. alarm / A
larmtyp Mindesttemperatur / tipo di allarme di temp. di minima / type de alarme
de temp.
basse
0= NO Alarm;1=relative to SetPoint; 2=absolute
1 1 1 1 1 1 1
A4
temper. above which the upper temp. alarm is activated / Temperaturwert, über dem der Maximaltemp.larm aktiviert
20
20
20
20
20
20
20

20 |
6LIBD001 - 1709
METOS START
65
65
PARAMETERS / PARAMETER / LISTA PARAMETRI / PARAMÈTRES / PARÁMETROS
PARAMETERS / LISTE OVER PARAMETRE / ПАРАМЕТРЫ КОНФИГУРАЦИИ /
ا
PAR Description / Descrizione / Beskrivelse
0
+10
2
+10
-
25
-15
-
22
-18
-
20
-15
-
6
+4
-
2
+8
wird /
temp
eratura
al di sopra della quale viene attivato l’allarme di
temp.
di massima / empérature en dessus de
laquelle l’alarme de
témp.
haute est activée
A5
kind of upper temp. alarm / Alarmtyp Maximaltemp. /
tipo di allarme di temp. di massima / t
ype de alarme de temp.
haute
0= NO Alarm1=relative to SetPoint; 2=absolute
1 1 1 1 1 1 1
A6
upper temp. alarm delay since you turn on the instrument / Verspätung Hoch
-
Temperatu
-
Alarm nach der
Inbetriebnahme des Gerätes / ritardo allarme di temp. di massima dall’accensione dello strumento / retard alarme de
temp. haute après la mise en marche de l’a
ppareil
[4]
240 240 240 240 240 240 240
A7 temp. alarm delay / Verspätung Temperatur-Alarm / ritardo allarme temp. / retardo alarma temp.
15
15
15
15
15
15
15
A8
upper
temp.
alarm delay since the end of the defrost / Verzögerung Maximaltemperaturalarm nach Ende der
Abtauvorgang / ritardo allarme
temp.
dopo sbrinamento / retard alarme de
témp.
haute après la fin d
u dégivr
age
[14]
15 15 15 15 15 15 15
A9
delay in maximum temp. alarm / Verzögerung Alarm Maximaltemperatur nach Deaktivierung des Mikrotüreingangs /
rit ALL / retard de l'alarme de témp. maximum à partir de la conclusion de l'arrêt de l'éva
porateur
[
15
]
15 15 15 15 15 15 15
AA
Durat. of interruption in the power supply when instr. is switch on Alarm stored when the power supply is restored
(“PF” code) / derartige Dauer eines Stromausfalls, der eintritt, wenn das Gerät eingeschaltet ist, dass, bei
Wiederherstellung der Stromversorgung, die Speicherung des Stromausfallalarms veranlasst wird (Code “PF”) /
durata di un’interruzione dell’alimentazione che si manifesta quando lo strumento è acceso tale da provocare, al
ripristino dell’alimentazione, la memorizzazione dell’allarme interruzione dell’alimentazione (codice “PF”) / durée d'une
interruption de l'alimentation qui se manifeste quand l'instrument est allumé en mesure de provoquer, au
rétablissement de
l'alimentation, la mémorisation de l'alarme interruption
de l'alimentation (code “
PF
”)
[
16
]
H
1 1 1 1 5 5 5
Ab
Differential of parameters A1
and
A4 /
Differenzial der Parameter A1 und A4 /
diff
erenziale dei parametric A1 e A4
/
différentiel des paramètres A1 et A4
4 4 4 4 4 5 5
A12
kind of signal for power
interruption alarm (code “
PF
”)
/
Art der Alarmsignalisierung Stromausfall (Code “
PF
”)
/
tipo di
segnalazione allarme interruzione dell’alimentazione (codice “PF”) / type de segnalisation de l'alarme interruption de
l'alimentation (code “
PF
”)
(
0=
NO Alarm ;
1=
display
show “
PF
”)
H
1 1 1 1 1 1 1
F0
evaporator fan activity during normal operation / Aktivität des Verdampferventilators während des Normalbetriebs
/ Fan COMP acceso / activités du ventilateur de l'évaporateur pendant le normal fonctionnement
0=switched off; 1=switched on; see also F13, F14 and i10; 2=in parallel with the compr.; see also F9, F13, F14
and i10; 3=dependent on F1 [17]; 4=switched off if the compr. is switched off, dependent on F1 if the compr. is
switched on; see also F9 [16]; 5=depend
ent on F6; see also F9
5 5 5 5 5 5 5
F1
evaporator temp. above the limit at which the evaporator fan is switched off / Verdampfertemperatur bei deren
Überschreiten der Verdampferventilator abgeschaltet wird / T max ON ventola evap / témp. de l'évaporateur en
dessus de laquelle le ventilateur de l'évap
.
est arrêté
15 15 0 0 0 15 15
F2
evaporator fan activity during defrosting and dripping / Aktivität des Verdampferventilators während des Abtauens und
Abtropfens / attività del ventilatore dell’evaporatore durante lo sbrinamento e il gocciolamento / activité du ventilateur de
l'évaporateur pendant le dégivrage et l'égouttage
0=switched off;
1=switched on (setting parameter d7 to 0 is recommended)
;
2=dependent on F0
1 1 0 0 0 0 0
F3
maximum duration of ev
aporator fan disactivation / Dauer des Stillstands des Verdampferventilators /
durata massima del
fermo ventilatore dell’evaporatore
/ durée de l'arrêt ventilateur de l'évaporateur
0 0 4 4 4 4 6
F4
time duration that evaporator fan is switched off durin
g operation for a low
RH%
when the compressor is switched off
/ Dauer der Ausschaltung des Verdampferlüfters während des Betriebs für niedrigen relativen Luftfeuchtigkeitsanteil,
wenn der Kompressor ausgeschaltet ist / durata dello spegnimento del ventilatore dell’evaporatore durante il
funzionamento per bassa UR% quando il compressore è spento / durée de l'extinction du ventilateur de l'évaporateur
durant le fonctionnement pour un bas pourcentage d'humidité relative quand le
compresseur est éteint
40 40 40 40 40 40 40
F5
time duration that evaporator fan is switched on during operation for a low RH% when the compressor is switched off
/Dauer der Einschaltung des Verdampferlüfters während des Betriebs für niedrigen relativen Luftfeuchtigkeitsanteil,
wenn der Kompressor ausgeschaltet ist durata dell’accensione del ventilatore dell’evaporatore durante il
funzionamento per bassa UR% quando il compressore è spento / durée de l'allumage du ventilateur de l'évaporateur
durant le fonctionnement pour un bas pourcen
tage d'humidité relative quand le
compresseur est éteint
20 20 20 20 20 20 20
F6
operation for low or high percentage of relative humidity
/
N
iedrigen oder hohen relativen Luftfeuchtigkeitsanteil
/ alta
o bassa umidità relative / fonctionnement pour un bas ou un haut pourcentage d'humidité relative
0=low RH%
-
evap. fan operate with compr.; see also F4 & F5; 1= high RH%
-
evap. fan always run
[18]
1 1 0 0 0 0 0
F7
evaporator temp. below limit at which the evap
.
fan is disactivated / Verdampfertemper
atur, unterhalb derer der Stillstand
des Verdampferlüfters beendet wird / Temp. dell’evapor. al di sotto della quale il fermo ventilatore dell’evapor. viene
concluso
/
température de l'évapor
.
en
-
dessous de laquelle l'arrêt du ventilateur de l'évapor
.
est
conclu
(“setpoint + F7”);
0 0 5 5 5 5 4
F8
parameter F1 differential / Differenzial des Parameters F1 / differenziale del parametro F1 / différentiel du paramètre F1
2
2
2
2
2
2
2
F9
delay in the switching off of evaporator fan following the switchi
ng off of the compressor (if F0 = 2, 4 and 5) /
Verzögerung
Ausschaltung Verdampferlüfter seit der Ausschaltung des Kompressors ( wenn F0 = 2, 4 und 5) / ritardo spegnimento
ventilatore dell’evaporatore dallo spegnimento del compressore (se F0 = 2, 4 e 5) / retard de l'arrêt du ventilateur de
l'évaporateur depuis l'arrêt du compresseur (si F0 = 2, 4 et 5)
0 0 0 0 0 0 0
F11
condenser temp. above that at which the condenser fan is switched on (“F11 + 2.0 °C/4 °F, if u1 and/or u11 = 6 and the
compressor is switched on); see also F12 / Temperatur des Kondensators, oberhalb derer der Kondensatorlüfter
einschaltet wird (“F11 + 2,0 °C/4 °F, wenn u1 und/oder u11 = 6 und unter der Vor-aussetzung, der Kompressor
eingeschaltet ist)/ temp. del condensatore al di sopra della quale il ventilatore del condens. viene acceso (“F11 + 2,0 °C,
se u1 = 6 e se il compr. è acceso); vedi anche F12 / température du condensateur au-dessus de laquelle le ventilateur du
condensateur est allumé ("F11 + 2,0 °C/4 °F, si u1 et/ou
u11 =
6 et à condition que le compres
.
soit allumé)
[19]
H
33 33 33 33 33 33 33
F12
delay in switching off of the condenser fan following the switching off of the condenser (if u1 and/or u11 = 6) /
Ausschaltverzögerung Verdampferlüfter seit der Ausschaltung des Kompressors ( wenn u1 und/oder u11 = 6) / ritardo
spegnimento ventilatore del condensatore dallo spegnimento del compressore (se u1 = 6) / retard de l'arrêt du ventilateur
du condensateur depuis l'arrêt du compresseur (si u1 et/ou u11 = 6)
§
0 0 0 0 0 0 0
F13
time evaporator fan remains OFF during function Energy Saving; see also F14 and i10 (if F0=1 or 2) / Dauer der
Ausschaltung des Verdampferlüfters während der Energy Saving-Funktion; siehe auch F14 und I10 (wenn F0 = 1
oder 2) / durata spegnimento ventilatore evap. durante funzione Energy Saving; vedi anche F14 e i10 (se F0=1 o 2) /
durée de l'arrêt du ventilateur de l'évap
.
durant la fonction Energy Saving; voir également F14 et i10 (si F0 = 1 ou 2)
40 40 40 40 40 40 40
F14
time evaporator fan rem
ains ON during function Energy Saving; see also F13 and i10 (if F0=1 or 2) / Dauer der
20
20
20
20
20
20
20
This manual suits for next models
13
Table of contents
Other Metos Refrigerator manuals

Metos
Metos GNC660L1 User manual

Metos
Metos MAXIGLASS NOVERTA MG1/140LG User manual

Metos
Metos MORE ECO GNC Series User manual

Metos
Metos S50 L/R User manual

Metos
Metos Econo BC-600W User manual

Metos
Metos MBC-200 User manual

Metos
Metos EMS 9 INOX PM1 User manual

Metos
Metos Marine BC-75 User manual

Metos
Metos MORE GNC Series User manual

Metos
Metos BC-47 User manual
Popular Refrigerator manuals by other brands

Hoover
Hoover Refrigerator Maintenance and user guide

Progress
Progress PK0802 user manual

Currys Essentials
Currys Essentials CIR60W12 Instruction & installation manual

Motak
Motak MSD-1DREC-HC Service, installation and care manual

Electrolux
Electrolux 102216 Specifications

INVENTOR
INVENTOR MP630S user manual