Metro Mobility M1 Plus User manual
Owner’s Manual
(M1 Plus)

1
How to use this manual
How to use this manual
Your scooter will reach you in excellent condition having been
personally inspected before leaving the factory. By following the guidelines
for maintenance your scooter will maintain its first class condition and give
you years of complete reliability and satisfaction.

2
Contents
1.
Introduction .......................................................................................page3
2.
General Warnings.............................................................................page4
3.
Quick Start Guide.............................................................................page5
4.
Features....................................................................................page7
5.
Getting On or Off your Scooter.......................................................page8
6.
Control Panel ..................................................................................page9
7.
Tiller control function .....................................................................page11
8.
Freewheel Mechanism..................................................................page13
9.
Seat Removal and Adjustment......................................................page13
10.
Tiller and Battery and Charging...................................................page16
11.
Transportation...............................................................................page19
12.
Guidance for Safe Operation and Use ........................................page21
13.
Battery andCharging Information................................................page25
14.
General Warnings........................................................................page28
15.
EMC (EMI) Warnings ..................................................................page32
16.
Specifications............................................................................page40
17.
Routine Maintenance...................................................................page42
18.
Service History.............................................................................page43
19.
Trouble Shooting Guide...............................................................page45
20.
Guarantee.....................................................................................page48

3
With over 8 years’ experience, we are one of the longest established
mobility equipment manufacturers in the China. All of our Scooters,
Wheelchairs and Power Chairs undergo rigorous tests to ensure they meet
our requirements for comfort, safety and durability.
Our success is based on the strong traditions of quality, value for
money and genuinely caring for our customers. We pride ourselves not only
on designing and building the most innovative products, but also on our
commitment to offer an excellent standard of customer service both during
and after sale.
Before using your scooter please read this manual carefully. It will
provide you with all the information you will require. However, if you have
any queries about the use, maintenance or safety of your scooter, please
contact your local dealer. If you have any other questions please write to
the address below.
The scooter is classified as a category C vehicle under the European
wheelchair standard EN 12184.
It is intended for the use of people of all ages who may have difficulty
walking distances or for periods of time. It is ideal for outdoor use and
suitable for users up to 120kg in weight, 264lbs. Differing user weights can
cause performance variation. Maximum user weight tested using a 120kg
test dummy.
The scooter is designed to be driven on footpaths and to cross roads. It
has been manufactured to comply with the requirements of the Medical
Device Directive 93/42/EEC, the radio interference requirements of EEC
Directive 89/336/EEC and the battery charger requirements of EEC
Directive 73/23/EEC and89/336/EEC. Electro Magnetic fields, such as
those emitted by shop alarms may be disturbed by use of the scooter. The
function of the scooter may also be disturbed by Electro Magnetic fields
emitted by shop alarms.
We are dedicated to providing products of exacting quality that
conform fully and reliably to the requirements of their intended use. We are
BS/EN ISO 9001 accredited which is the internationally recognized
standard for quality management systems. This approval ensures we
provide quality in all areas of our business from development through to
final delivery. Should you require any further assistance then please
contact your local dealer.
1.Introduction

4
DO NOT OPERATE THE SCOOTER BEFORE READING AND
UNDERSTANDING THIS INSTRUCTION MANUAL.
IF YOU ARE IN DOUBT ABOUT THE MEANING OF THESE
INSTRUCTIONS, OR ANY OF THE CAUTIONS AND WARNINGS,
PLEASE CONSULT YOUR HEALTHCARE PROFESSIONAL, DEALER
OR RELEVANT TECHNICAL PERSONNEL.
FAILURE TO FULLY UNDERSTAND THE SCOOTER OPERATION
MAY RESULT IN ANUNEXPECTED RESPONSE FROM THE
EQUIPMENT WHICH CAN IN TURN LEAD TO POSSIBLE INJURY OR
DAMAGE.
NOTES
Warning and Caution notices used in this manual, apply to hazards
and unsafe practices that could result in personal injury or damage to
property.
WARNING
We supply an extensive range of mobility scooters to meet the varying
needs of individual users. It is the responsibility of the individual user and
their healthcare advisor qualified in making such choices, to decide which
scooter is suitable for the user’s intended purpose.
With regards to restraints, seat positioning straps, posture correction or
other positional aids and accessories, it is the obligation of the qualified
healthcare professional in conjunction with the dealer to ensure the
suitability of such equipment for the safe operation of the scooter.
Serious injury can occur in the event of a fall from a mobility scooter.
We DO NOT RECOMMEND that a scooter user is transported in any type
of vehicle when seated in the scooter.
At this time, there are no approved Tie-down Systems for the
transportation of a user in ANY moving vehicle whilst seated in a scooter.It
is our opinion that users of mobility scooters should be transferred into the
appropriate vehicle seating system and use should be made of the
restraints available to the auto industry.
Intended Use
This mobility scooter would be used by disabled, sick or old person.
2.General Warnings

5
Assembly
When lifting always keep the back straight, bend the knees and use
the lifting handles provided.
Ensure your freewheel mechanism is fully engaged, so your scooter
can not move while assembling.
Set the tiller by rotating the Tiller folding knob while moving the tiller
upwards. Remove the basket from the footboard and place on the bracket
located on the front of the tiller.
Lift the seat onto the seat post and press down to ensure it is fully
engaged.
Battery Charging
The battery MUST be charged for 12 hours before first use. Do not be
tempted to use the scooter unless the battery has been fully charged as
failure to do this will result in battery damage. Connect the battery charger
to the mains supply and the charging socket located on the battery pack.
Switch on the mains supply and then switch on the battery charger.
RED light = Power On,
YELLOW Light = Charging
GREEN Light = Charge Complete.
Charge the scooter overnight after each use to maintain battery
condition.
If you are in any doubt then please turn to pages 21and 22 of this
manual.
Typical Use
Designed for use on footpaths, for crossing roads and shopping. It
should not be driven through mud, water, snow, sand, loose gravel, long
grass or any other unsound surfaces.
Control Functions
Your scooter is equipped with the following features that can be found
on the tiller fascia panel:
3.Quick Start Guide

6
On/ Off Switch, Battery Gauge, Speed Control, head Light, Horn and
Directional Control Levers.
If you have previously used or owned a scooter before you MUST still
read the Owners Manual carefully to fully understand the controls and
safety warnings.
If you are in any doubt of their functions then please turn to pages13
and 16 of this manual.
Transporting
Your scooter may be disassembled quickly and simply for
transportation:
1.
Lift off the front basket.
2.
Remove the seat, leaving the seat stem in position.
3.
Place the basket on the floor mat appropriately.
4.
Lower the tiller, using the folding knob, to its lowest setting locking in
the basket. Make sure that there is at least 30mm between Tiller and
battery pack.
5.
using the lifting handles provided carefully lift the scooter safely and
securely into the luggage compartment of the vehicle.
TIP:Using the front bumper and rear lifting handle provided carefully lift the
scooter.
To reassemble the scooter reverses the sequence above.
Important:
When reassembling the scooter, remember to insert the battery locking
pin, because failure to do so may result in the batteries disengaging during
use. Always secure your scooter parts before transportation. Remember to
engage the drive unit by pushing the freewheel lever forwards to stop the
scooter from moving.

7
4.Features
8
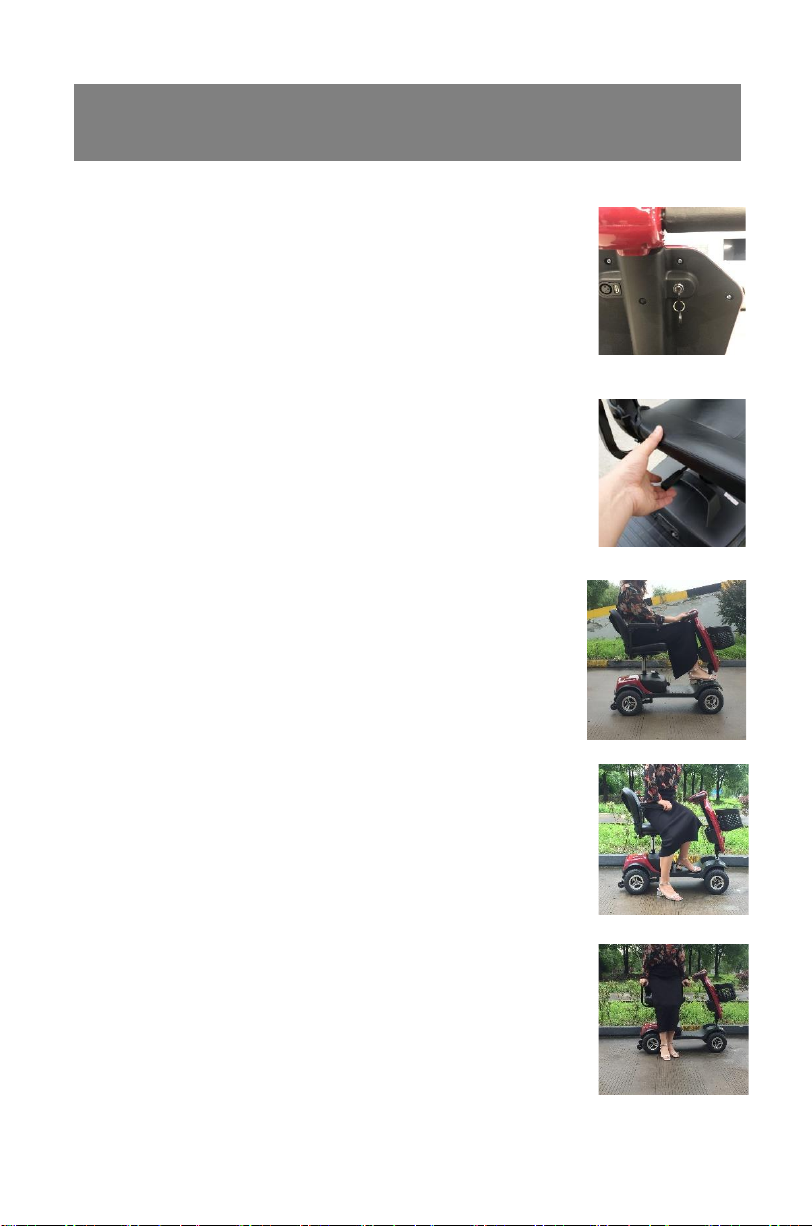
Getting on to your scooter
1.
Ensure that the key switch is turned to the off
position (Photo 5.1).
2.
Push forward the seat swivel lever located
under the seat on the
Right-hand side and rotate the seat to face you
(Photo 5.2).
3.
Put the armrests into the fully down position
and use them to steady yourself as you gently
lower yourself Into the seat (Photo 5.3).
4.
Push forward the seat swivel lever and gently
swivel the seat to face
Forward (Photo 5.4).
5.
Ensure that both feet are placed firmly on the
floorboard of the scooter and the seat is secure
(Photo 5.5).
Getting off your scooter
1.
Bring your scooter to a stop and turn the key
switch to off.
2.
Push forward the seat swivel lever located
under the seat on the right-hand side and rotate
the seat 90 degrees to Exit (Photo 5.2).
3.
Put BOTH feet on the ground and gently leave
the seat using the arm rests to assist you out of
the chair (Photo 5.3).
P5.1
P5.2
P5.3
P5.4
P5.5
5.Getting On or Off your Scooter

9
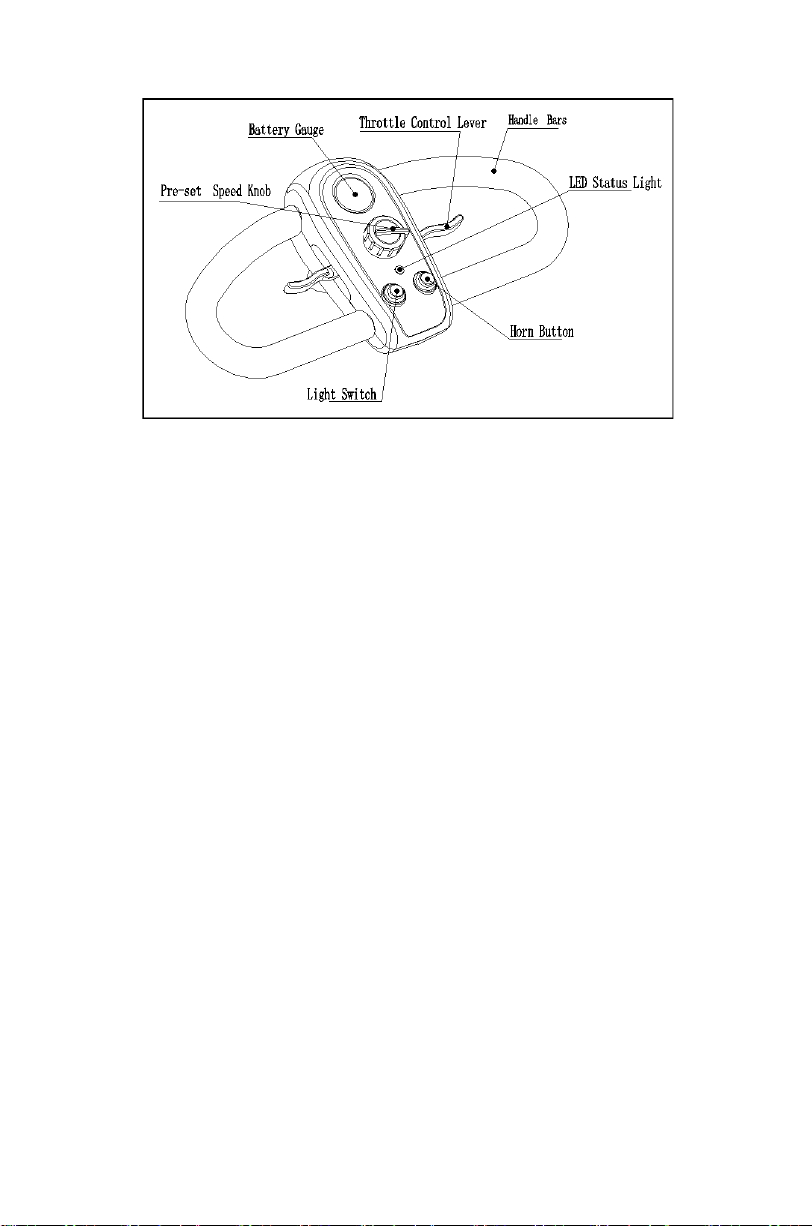
Hand Controls
All of the drive controls for the scooter are to be found on the Tiller
Control Box (Photo 6.1).
The Preset Speed Knob
Turning this knob to the left, reduces your available maximum speed.
Turning it to the right, increases the available maximum speed.
The Battery Gauge
This gives an approximation of battery charge and is illuminated for
clarity.
The gauge is “RED” empty, to “YELLOW” charge required, to
“GREEN” charged.
As the scooter moves over differing terrain, the Battery Gauge will dip
up and down, this is normal. For a more accurate indication, stop the
scooter and note the reading. In cold, damp weather the gauge will dip
more often as the capacity and efficiency of all batteries drops in such
conditions.
TIP:
If your battery gauge has gone into the “RED” section you can increase
your remaining range by reducing your maximum speed. Remember you
MUST charge your battery overnight as soon as you can to prevent battery
damage.
Operating the Lights
The lights are operated by pressing the blue button on the front fascia
panel. Press the button once to illuminate the lights, press the button again
to switch the lights off. Switch the lights on to make yourself more visible in
low levels of light, day or night.
6. Control Panel
10
P6.1

11
Throttle Lever
The throttle lever offers finger-tip control of your scooter.
It controls the speed as well as forward and reverse motion. To move the
scooter in a FORWARD motion PULL the lever with the RIGHT HAND or
PUSH the lever with the LEFT THUMB (Photo 7.1 ,Photo 7.2).
To move the scooter in a REVERSE motion PULL the lever with the LEFT
HAND or PUSH the lever with the RIGHT THUMB. The lever will return by
itself when released and the scooter will slow to a stop (Photo 7.1 ,Photo
7.2).
The more you move the lever, the more your speed increases up to its
preset maximum. It is possible to operate your scooter using one side of the
throttle lever. To do this you must PUSH and PULL on the chosen side of
the throttle lever.
Horn Button
Pressing the horn button operates an audible warning sound. Use this
function to warn pedestrians of your presence when necessary
P7.1 P7.2
Key Switch
P7.4 P7.5 P7.6
The key switch switches the scooter ON and OFF.
Please note that the key cannot be removed when it is in the ON position
7.Tiller Control Functions

12
(Photo 7.4.).
Make sure that this switch is in the OFF position BEFORE Getting on or off
the scooter. Remove the key to make sure The scooter is OFF (Photo 7.5).
Turning the key to OFF whilst driving will cause the scooter To stop very
abruptly. This is not recommended except in Emergency stop, as continual
use of this function could Result in damage to the scooter.
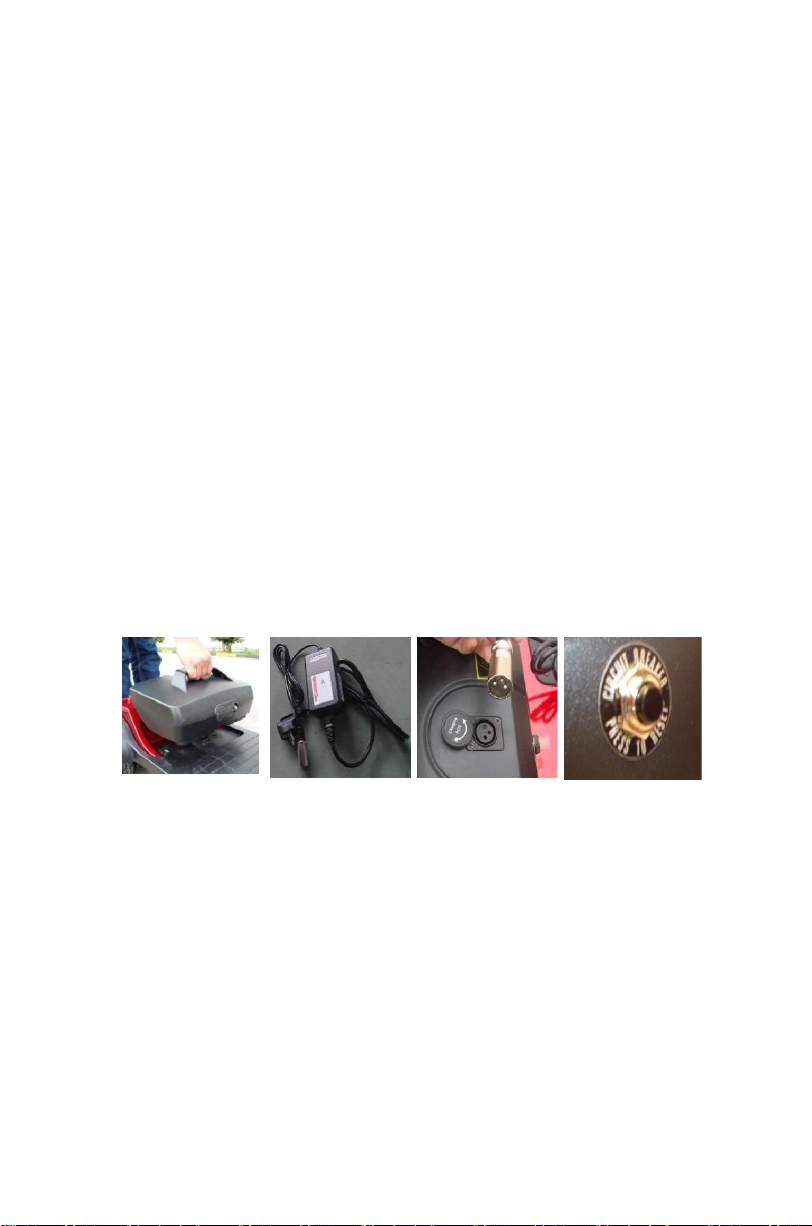
Off Board Charging Socket
The socket to connect the off-board charger is located on the battery pack
(Photo 7.6).
To use the socket, swivel the plastic cover to the left or right to reveal the
socket connections. The charger output plug can now be connected ready
to accept charge current from the battery charger.
After use, ensure that the plastic swivel cover is rotated back into place.
This action helps prevent water from entering the socket connections.
WARNING.
Do not attempt to charge your scooter outdoors or in damp/wet
conditions. Failure to comply with this instruction may lead to a shock
/ fire hazard.

13
8.Freewheel Mechanism
Freewheel mechanism
A freewheel device disengages the power drive to
allow manual operation P8 (i.e. the scooter can be
pushed at a walking pace).This safety function can
prevent your scooter from being driven by
someone illegally when parking. By pushing
BACKWARD the lever that is located on the right
hand side of the scooter rear panel can engage the
motor for you to drive. (P8). P 8
WARNING:
Use extreme caution in the freewheel mode especially
on slopes/inclines. Letting go of your scooter whilst it is in freewheel,
can cause the scooter to roll unexpectedly.
ALWAYS re-engage the freewheel device after use, failure to do so may
result in injury.
14
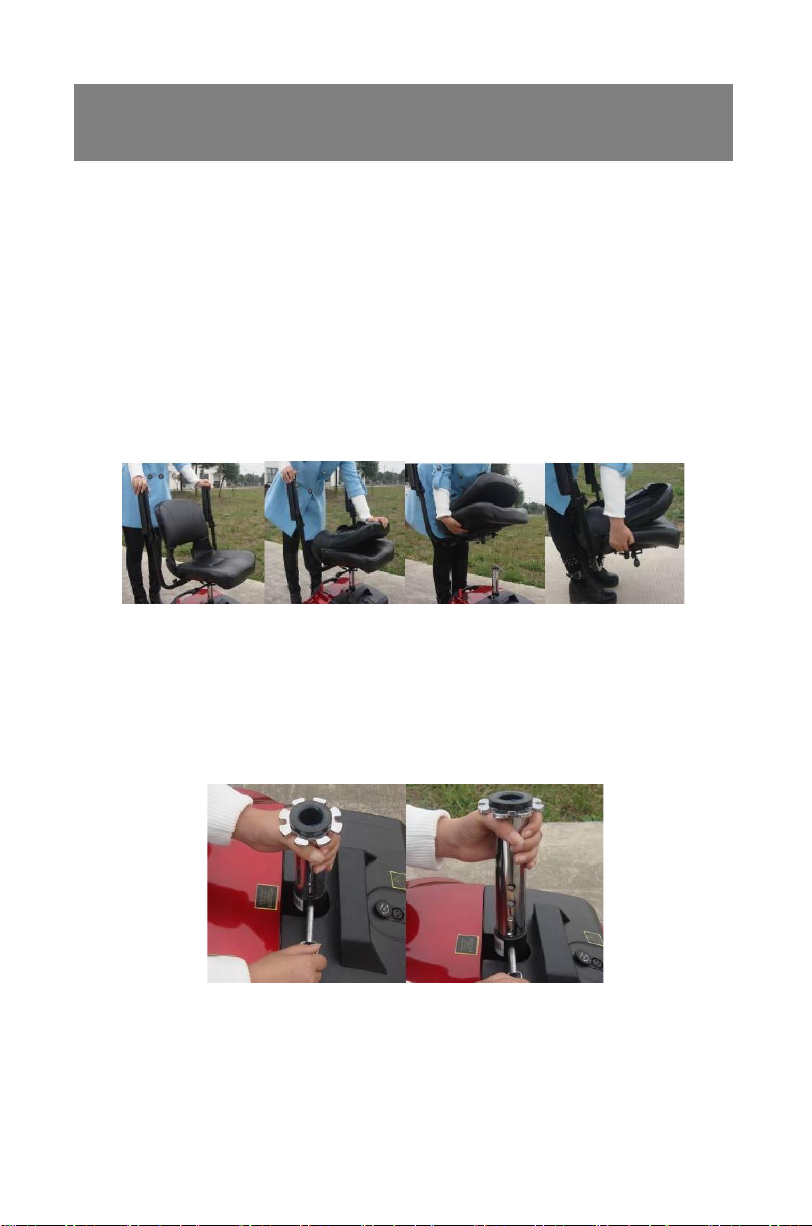
Removing the Seat
Please note that these instructions are to be used as a guide only.
1.
Lift armrests upwards for ease of access (Photo 9.1).
2.
Stand behind the seat and fold the backrest down(Photo 9.2).
3.
Grasp the seat base and keeping a firm grip, lift the seat vertically,
keeping your back straight. Bend knees ifrequired (Photo 9.3).
4.
Place seat at desired location for stowage, keeping back posturestraight
at all times, bend knees where required (Photo 9.4).
Note: Exercise caution when lifting the seat.
P9.1 P9.2 P9.3 P9.4
Seat Adjustment
1.
To adjust seat height, remove the seat as described (Photo 9.5).
2.
Move the seat post to the new position and refit the seat pin.
3.
Refit the seat.(Photo 9.6)
P9.5 P9.6
9.Seat Removal and Adjustment

15
Armrest Adjustment
1.
Pull the lock-pin out from the seat base(photo 9.7),
2.
Loose the adjustable bolt(photo 9.8).
3.
Moving the armrests to the desired position andre-tightening the
thumbwheel knobs to adjust the width of the armrest.
P9.7 P9.8

16
10.Tiller, Battery and Charging
Tiller Adjustment
The scooter features an infinitely adjustable tiller which allows you to lock
the tiller in the most comfortable driving position. This feature also lets you
fold the tiller down fully, for transportation and stowage.
The folding knob is located on the bottom of the tiller.
1.
Support the tiller with your left hand.
2.
Rotate the folding knob anticlockwise to release the tiller (Photo 10.1-
10.2).
3.
Move the tiller to the desired location.
4.
Rotate the folding knob clockwise to lock the tiller (Photo 10.2).
P10.1 P10.2 P10.3
Battery Removal
It is important to remove the seat and seat post first to allow better access
to the batteries.
Lift battery vertically out of its battery tray using the handle provided (Photo
10.4).
17
Remember to keep the knees bent and the back straight.
Battery Replacement
To replace the batteries reverse the sequence above Important:
Remember to keep the knees bent and the back straight.
When reassembling the scooter, remember to insert the locking pin,
because failure to do so may result in the batteries disengaging during use.
Ensure the battery wells are free from dirt and grit - this will affect the
performance of the battery contacts.
Off-Board Battery Charger
Your scooter is supplied with an off-board charging facility (Photo 10.5).
Please note that only chargers with a capacity of minimum 3.0 Amps and
maximum of 6.0 Amps supplied by your local authorized dealer should be
used.
1.
Switch your scooter off at the key switch(Photo 7.5).
2.
Swivel the charge connector cover located on the batter pack and
connect the charger (Photo 10.6 / Photo ②).
3.
Ensure that the charger plug is dry and intact before connecting it to the
mains and switching it on.
4.
A reset button is located on the battery.
Please check that the button is pressed in (Photo 10.7).
P10.4 P10.5 P10.6 P10.7
Note:
The charger is capable of charging from 240V to 100V, and 2Amp, off-
board charger has 3 possible indications:
1.
RED = Power is on.
2.
YELLOW = Charging.
3.
GREEN = fully charged.
Ensure the scooter is switched off before commencing the charging
process. After charging, always swivels the charging socket cover back into
place. This helps prevent water getting into the socket.(Photo 10.6 / Photo
②)
Please note that the scooter has a safety circuit to prevent it from being

18
driven off during charging. If your scooter fails to respond to normal control
after a charging period, please check that the battery charger has been
completely disconnected from the scooter.
The off-board charger must be kept dry in temperatures between
-25°C and 40°C and not be subjected to mec hanical damage.
In all cases, the charger must only be repaired by an authorized
dealer.
WARNING!
You can only use the original charger from our company. Use other
brand charger may shorten your warranty period, and use unknown
charger may cause damage to your scooters, and use wrong charger
may cause a fire.
Use extreme caution to manage the battery and charger.
Don’t throw the battery into the fire. You should manage the
exhausted battery according to the local law.
Don’t put the battery near to any heating device, which may cause the
battery to bomb.
Don’t press the battery or stab it, or let it endure any high pressure,
which may cause short circuit or overheating.
WARNING!
NO SMOKING OR NAKED FLAMES WHEN CHARGING BATTERIES.
DO NOT TOUCH BATTERY PACK TERMINALS WITH METAL
OBJECTS.
ONLY USE APPROVED REPLACEMENT BATTERIES.
IF DAMAGE TO BATTERIES OR BATTERY BOXES IS EVIDENT,
CONTACT YOUR LOCAL DEALER IMMEDIATELY - DO NOT ATTEMPT
TO SERVICE THE BATTERIES.
DEALER WARNING!
REMOVE METALLIC JEWELLERY WHEN WORKING WITH
BATTERIES.
WEAR GLOVES AND GOGGLES IF MOVING LEAKING BATTERIES.
REPLACE DAMAGED OR LEAKING BATTERIES IMMEDIATELY.
Fuses
There is a reset button as described previously. If a fault occurs, the
button will pop out. Switch the scooter off, press the button in and switch
the scooter back on.
There is a 30A fuse fitted to the positive terminal of battery. These
fuses must be replaced by an authorized service agent.
There is also a 2.5A fuse fitted in the charger and a fuse in the mains
plug of the battery charger. These fuses must be replaced by an authorized
service agent.
19
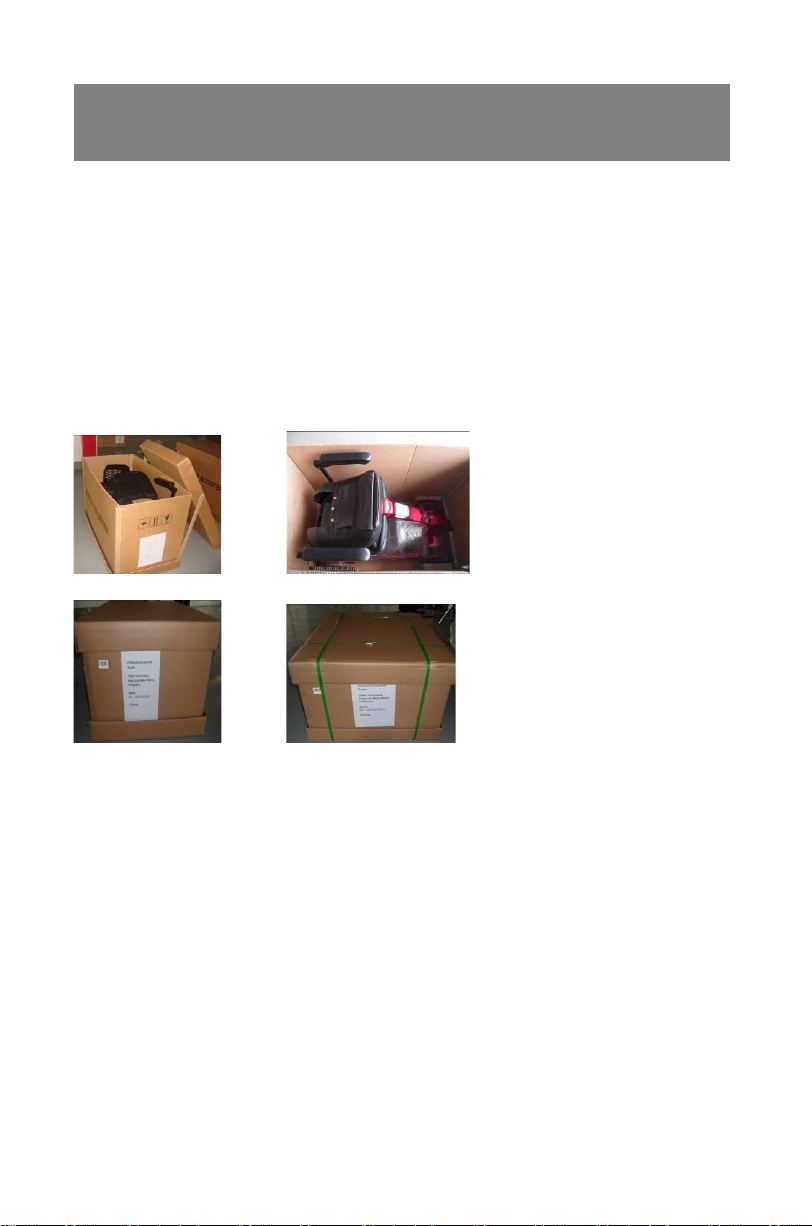
Packaging
We package the mobility scooter may prevent it from removing in the
package, shaking in the package or any scratch, by following the below
steps:
1, put the scooter into the prepared carton (Photo 11.1), like the position in
Photo 11.2.
2,Cover the carton and fix the whole carton with professional ropes for
packaging.(Photo 11.1 and Photo 11.2).
(P11.1) (P11.2)
(P11.3) (P 11.4)
Important
Our cartons comply with GB/T4857.18(equals to ISO4180/2):
1.Comply with test dropping from 500mm height
2. Pass transport testing requirements of 2.5m stacking;
Notes
1, Please make sure there is no any obvious damage on the outside of the
carton, crushed area or serial no. before open it.
2, reverse the packaging steps to get the scooters, owner manual, warranty
card, inspection report or quality certificates, and so on.
3
read the owner’s manual carefully to familiar with assembling or operating
your scooters.
4
turn on the scooter and check whether it is normally operated.
11.Transportation
Table of contents
Other Metro Mobility Scooter manuals


