Metronic Digi-Scart User manual

Digital Terrestrial Receiver
MET802
Ref. 441816
Digi-Scart


3
Before installing your digital terrestrial receiver it is important that you read and
understand the instructions completely.
To ensure that you are covered to receive Freeview coverage please text
your postcode to 83331 (standard network charges apply)
or visit : www.freeview.co.uk
Remember that contact with 230V AC mains can be lethal or can cause severe
electric shock. To avoid this risk :
• Neverattempttorepairyourreceiver.Pleasecontactyourretailer.
• Makesureallelectricalconnectionsareproperlymade.
• Donotplaceyourreceiverclosetosourcesofheat,suchasheater
or direct sunlight.
• Donotputanythingnearyourreceiverwhichmightdriporspillontoit.
• Neverplacetheproductnearobjectsfilledwithwater.
• Donotusealiquidformtocleanyourreceiverorremote.Adrycloth
will be sufficient.
If you come across a word that you do not understand, please refer to the
Glossary at the end of this manual (p.21).
Yourreceiveronlyhasonetuner,meaningthatyoucannotrecordachannel
other than the one you are watching.
TheremoterequirestwoAAA1.5Vbatteries.Ensuretheyareplacedcorrectly.
Please do not dispose of used batteries in your domestic bins. You should
bring them back to your point of sale and place them in the right container.
WARNING-IMPORTANT
This symbol indicates that the
product must not be treated as
household waste. The harmfull
substances possibly contained in
the equipment may have
negative consequences on the environment
and / or the human health. At the end of its
life, bring any electronic equipment back to
your retailer or at the collection point that
your city or town puts at your disposal.

4
Programming the receiver is achieved through the various menus.
In order to make this manual easier to understand, please follow the
i
nstructions below on how to access the menu as shown below :
GotoMENU/Settings/Installation.
This means :
• PresstheMENUkeytoaccessthemainmenu.
• Pressthe6arrow to select Settings.
• PressOKtoconfirm.
• Pressthe6arrow to select Installation.
• PressOKtoconfirm.
5
INDEX
1 Installation 06
2 Remote description 10
3 Receiver description 12
4 Daily use 13
5 Personalisingthechannelslisting 13
6 Parentallock 14
7 Resettingthereceiver 15
8 Miscellaneous settings 16
9 Channel Search 16
10 UsingthereceiverwithaVCR 17
A-Programming 17
B-Connecting 18
11 What to do if you experience a reception problem 19
12 Glossary 21
Assistance and advice 22
CONTENT
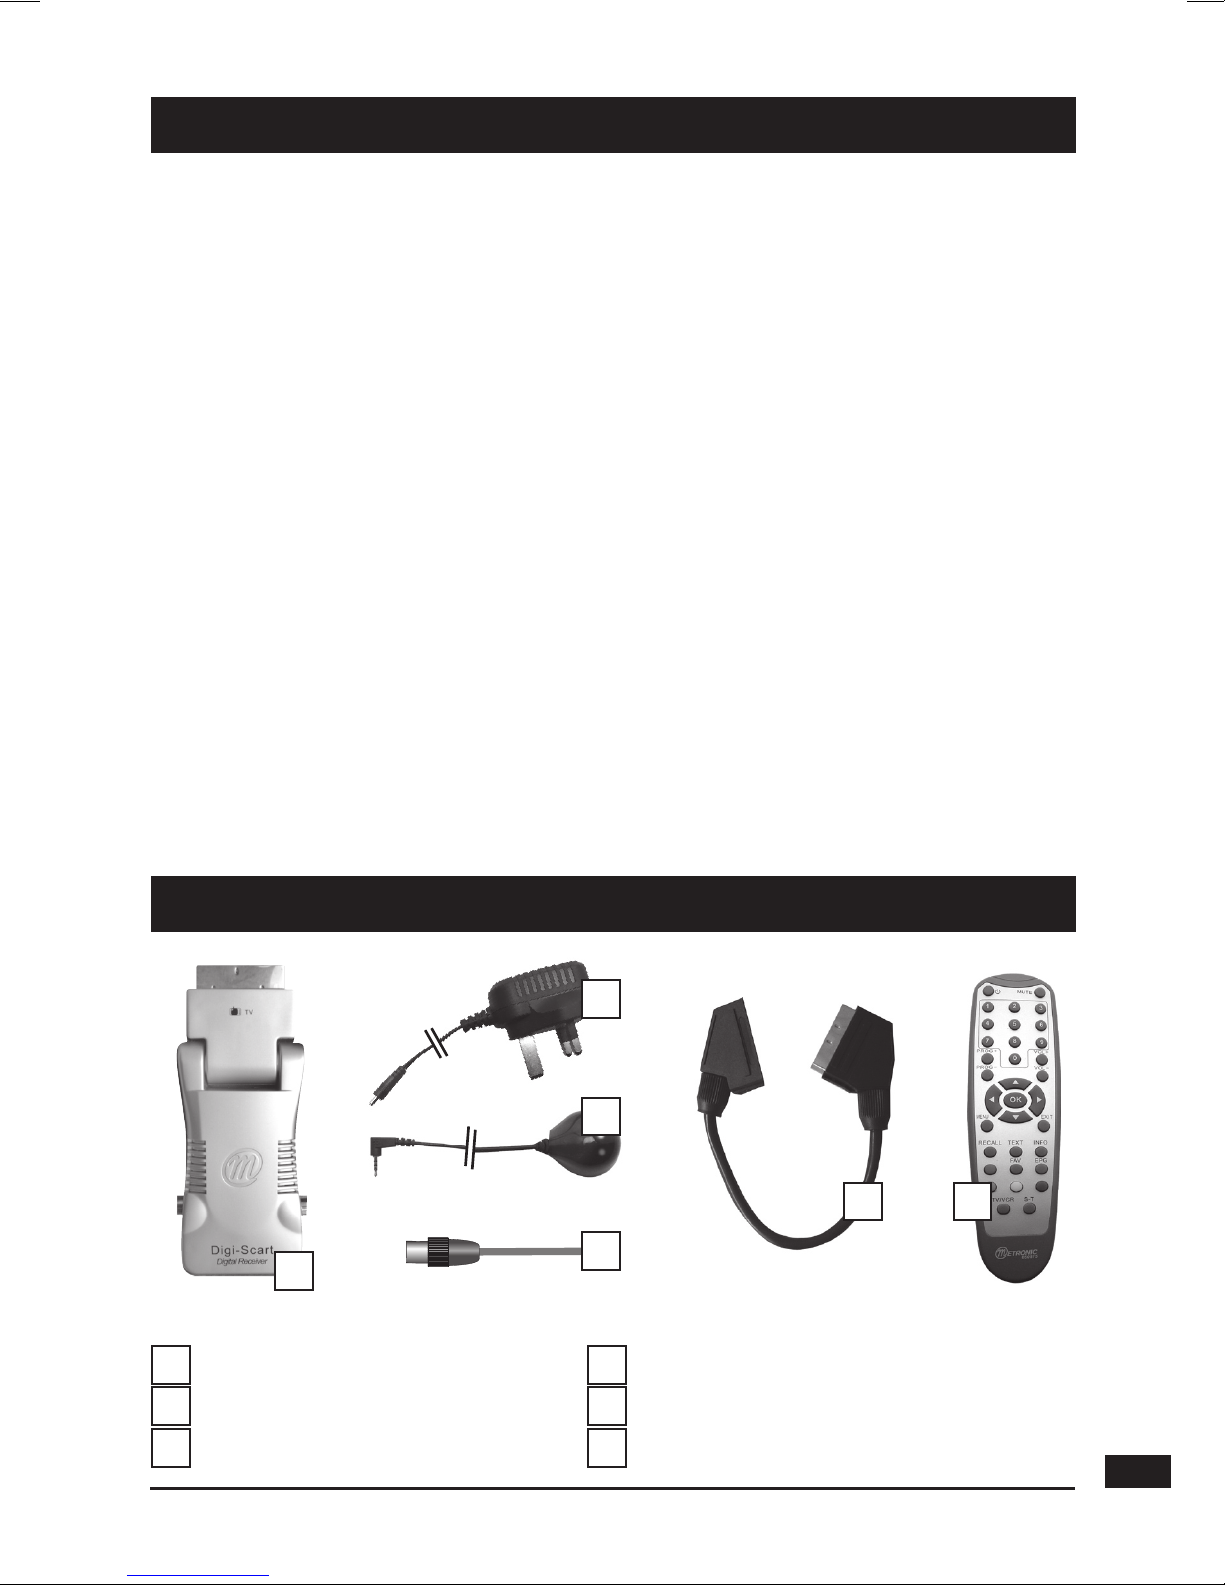
Digi-Scart
Poweradaptor
Remote control
Remote «Eye» for infrared
Coaxial cable
Scart extender
1
2
3
1
4
5
6
36
2
4
5

6
1 - Installation
A - Simplified installation
As the receiverisnotyetpluggedintothemainsource,connecttheantenna
directlytotheANTinputofthereceiver.Plugtheremote«Eye»(4)intotheIR
inputoftheDigi-Scart,andstickthiseyeonyourTVsothatthereisadirect
sightbetweentheeyeandtheremotecontroller.PlugtheDigi-Scartintoyour
TV.Thankstoitsuniqueswivelhinge,yourDigi-Scartisdesignedfitthescart
inputofanyTV.However,ifyouencounteraproblembecauseoftoonarrow
access,pleaseusethescartextender(6)provided.Insertthebatteriesinthe
remote. Switch on the TV.
A green indicator appears on the
remote «Eye». The “First Time
Installation” window appears
on TV. If this is not the case,
you should double-check the
scart connections and/or force
the A/V or EXT mode of your
TV (refer to the TV manual). If
you have a normal 4:3 TV, just
pressOKtolaunchtheautomatic
channel installation. If you have
awidescreen16:9TV,pressthe
4arrowandthenOK.
The automatic channels search
will start. At the end, the first
channelwillappear,meaningthe
standard installation is done.
If the search has not found
all channels (or none), this
probably means that you need to
better the installation (see next
paragraph). If no channels are
foundafteryouhavedoneso,this
probably means that you area
is not covered by Freeview.

ANT
TV
A B
Screened cable. Replace in case of poor reception by
ahighqualitycable.
By connecting theTV and the receiver using the Coax lead provided,
you will keep the analogue channels on your TV. You can then record a
digital channel whilst watching another analogue channel.
Optionifeveryoucan’tplugtheDigi-ScartintoyourTV.
A
B
C
C

8
B - Wedging / adjusting the aerial
If no channels have been found through your current antenna, it means
thatitprobablyispointing towardsannon-digital onlytransmitter.Ifyourarea
is covered by digital, it means that the programs are coming from another
transmitter.Youwillhencehavetoadjusttheantenna.Therearetwopossible
options,asfollows:
Option1
You know at least one network number (between 21 and 69) used
in your area.
• MENU / Settings / Installation /
Manual Search.
• Enterthe2digitoftheUHFchannel
number.
• Waitforafewsecondsandmonitor
the Level graph.
• Swivel the antenna to maximise
reception. When you get near the
emitter, the Signal Level should
increase, and then the Quality
should be good our very good.
If the Leveldoesnotincrease,thismeansthatyouhavechosenanincorrect
networknumber,orthattheemissionistoofarfromyourantenna.
• OnceyouhavereachedthemaximumLevel / Quality,screwtheantenna
tightly.
• PressEXIT.
• GotoMENU / Settings / Installation / Automatic Search.

9
Option2
You are able to receive national channels in analogue and you have no idea
aboutwhatyoucanreceiveindigitalquality.
If you are certain that you can receive additional channels, but you do
not know which network is used for these channels, we advise that
you do the following :
Find an UHF antenna with high gain (at least 15 dB) and connect it to
the ANT input of the receiver. Adjust the antenna so it is in the same
position as the previous one and start an automatic channels search
(GotoMENU/Settings / Installation / Automatic Search).
If you find channels that you were unable to receive with your previous
antenna,simplyreplaceitwiththenewone.Otherwise,swiveltheantenna1/8
of a turn and start another automatic search. As long as you do not find any
channels, continue the same process. You should end up receiving at least
a few channels.
• Selectoneofthenewchannelsreceived.
• GotoMENU / Settings / Installation / Manual Search
• Atthebottomofthescreen,youcanviewthereceptionlevel and quality.
• Turn the antenna to optimise the quality and level (quality must be
at least good).
• Screwtheantennatightly.
• PressEXITtogobacktothepreviousmenu.
• Make an automatic search (Go to MENU / Settings / Installation /
Automatic Search).

PROG+
PROG-
RECALL
MUTE
TV/VCR S-T
060815
2 - Remote Description
1
11
2
6
5
4
8
7
3
4
5
10
12
13
17
9
15
16
14

11
1 Digital keys. In normal use, they will allow you to enter the channel number you wish
toview.Inprogrammingmode,theywillallowyoutoenterdigitalvalues.
2
ON/OFFkey:allowsyoutoputthereceiveronstandbyorswitchiton.
3
MENU key : allows you to enter the main menu orto come back to the previous menu
whenyouareinasub-menu.
4
34
keys:Inthemenu,theyallowyoutomodifyvariousparameters.
5
65
keys:inmenus,theseallowyoutogofromonelinetoanother.
6
PROG+/PROG–keys:allowyoutochangechannelsinnormaluse.IntheFavourite
mode,thiskeyallowsyoutoviewyourfavouritechannels.
7
TheS-Tkey:allowsyoutoaccessthesubtitlesselectionmenu.ThevalueisOFF = no
subtitles.Whenyouactivatethesubtitles,theywillappearafterashortwhile,althoughthis
can sometimes take longer.
8
EPGkey(ElectronicProgramsGuide):allowsyoutoviewtheprogramplayingatthattime
and the following ones.
9
Colour keys : to be used in menus (red for watching digital teletext).
10
EXITkey:allowsyoutoleaveallmenusandgobacktothechannelyouwerewatching.
11
MUTEkey:bypressingthisonce,stopsthe sound,andbypressing itagainthesound
will come back to normal.
12
OKkey:allowsyoutovalidateachoiceinthemenus.Whilewatchingachannel,OKdis-
plays the channel list.
13 INFO key : If you press this key, information on the current channel you are watching
willappear(channelname,program,nextprogram).
14
Volumekeys.Inviewingmode,allowtoadjustthevolume.
15
TEXTkey:displaysthedigitalteletextservice,ifavailable.
16 FAVkey:allowsyoutoaccessyourfavouritelist.Pressseveraltimestoselectthecorrect
FAV list if youhavedefinedmore than one. In the FAV mode, a circle with the FAV list
numberappearsintheinformationbanner,betweentheTVlogoandtheclock.Toexitthe
FAVmode,presstheFAVkeyuntiltheFAVnumberdisappears.
17 RECALL key : to exit to the previously viewed menu.
21

12
A
B
C
3 -
Receiver Description
D
E
F
G
H
A B
CE
TVOutput(Coaxcableprovided).
DC input connector.
TCscartoutlet,toconnectthereceivertotheTV.
VCR scart socket.
Terrestrial antenna input.
Infra-redreceiver(detectstheremoteinfra-redsignal).
Statusindicators:redwhentheproductisonstandby,greenwhen
it is switched on.
Audio/videooutput.UsewithaJack/3RCAadaptor.
DC H
F
G
13
5 - Personalising the channels listing
Innormaluse,youwillonlyusethefollowingkeys(thefunctionofthesekeys
is explained in the previous paragraph) :
• PROG+/-keytochangechannels.
• MUTEkeytostopandbringbackthesound.
• Digitalkeystogodirectlytoachannel.
• EPGkeytoaccesstheprogramsguide.
• OKkeytoaccessthelistofservices.
• INFO key to find out about the channel you are viewing
(name,program,nextprogram).
• REDtoaccessthedigitalteletext.
4 -
Daily use
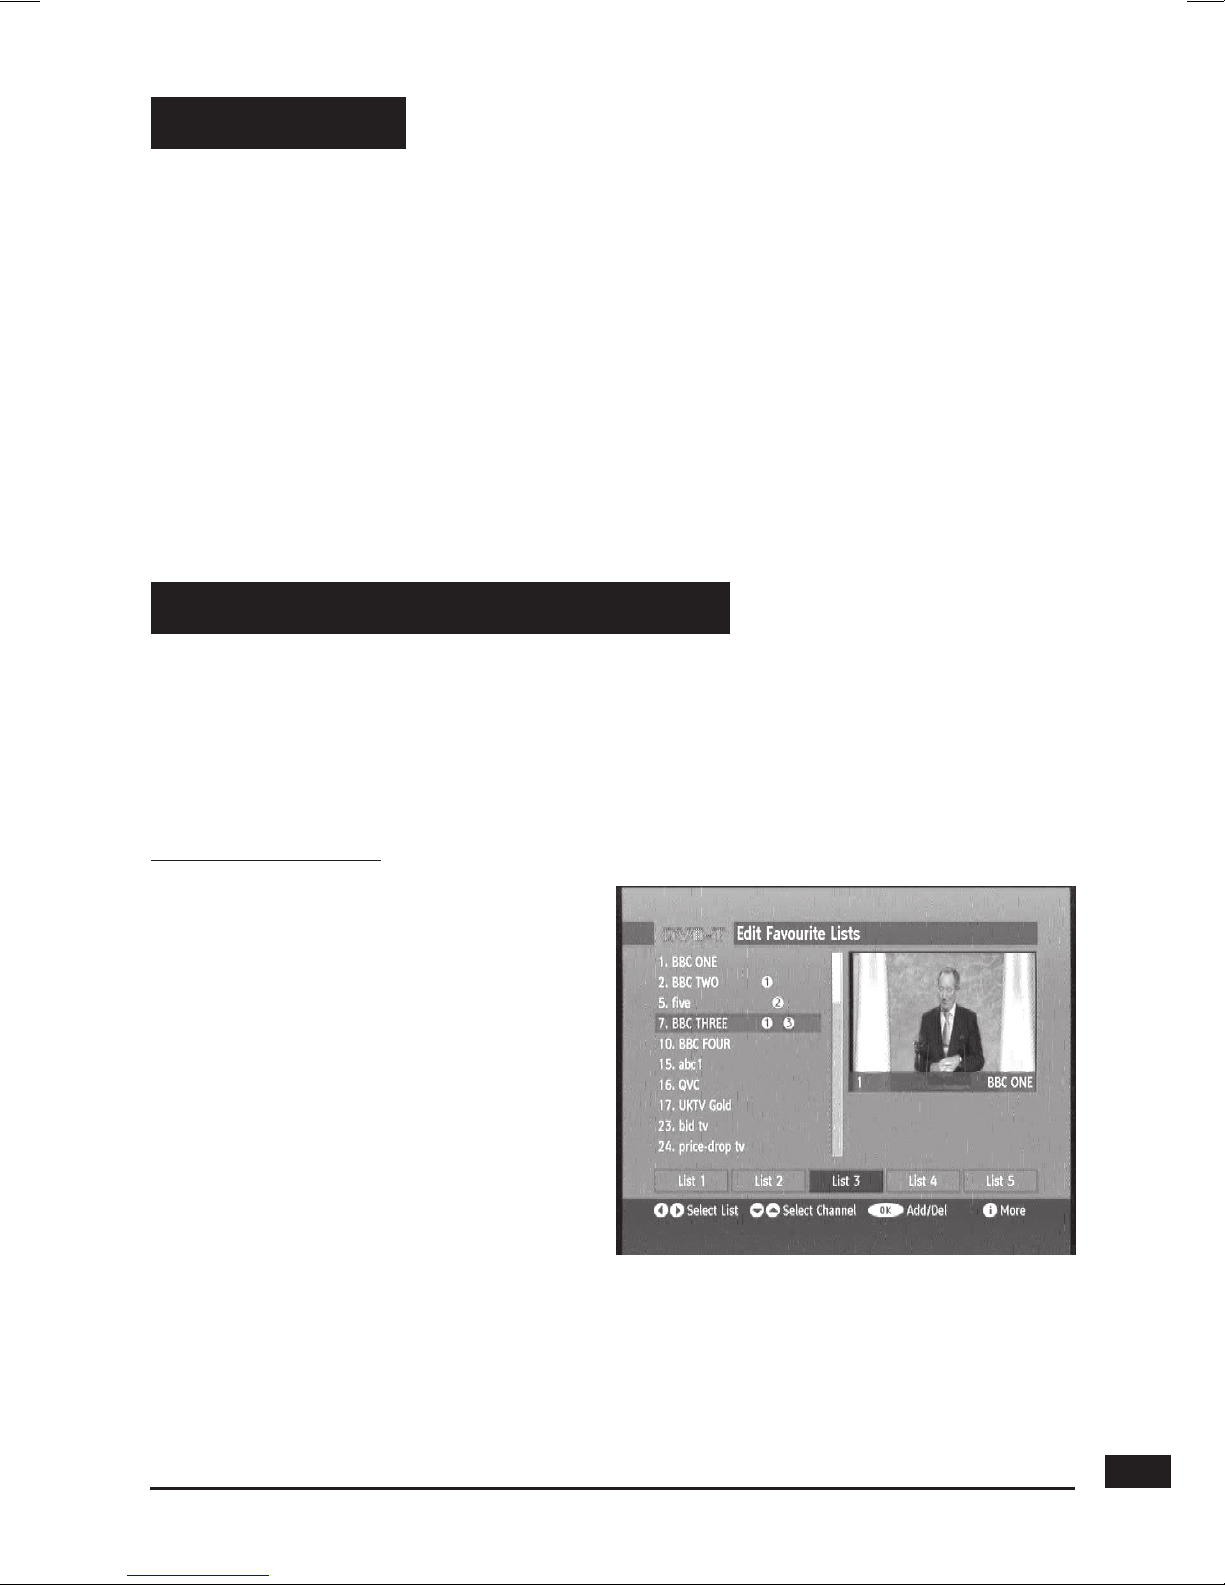
There are two ways of personalising the channel list. The first way is to create
favourite channels. The second is to delete or move existing channels.
A - Favourite channels
Selecting channels
• GotoMenu/ Favourites.
• The bottom of the screen
featuresthe5listsyoucanuse.
Select with 34 arrow keys the
list you want to edit.
• Selectwith56 arrow keys the
channels you want to place in
the selected list.
• Press OK, the list number will
appear near the channel name.
• Press EXIT when you are
done.
N.B. A FAV list may contain TV and Radio services together. A channel may be
added in different lists.

14
Viewing your favorite channels
SimplypresstheFAVkeyuntilthedesiredlistisshown.Fromnowon,the
PROG + and PROG - keys will allow to go from one channel to another
amongsttheselectedFAV list.Tocome backtothe fullchannellist, press
FAVuntilthebannerdoesn’tdisplaythenumberofanyFAVlist.
B - Modifying the channel list
Deleting channels
• GotoMenu/ Channel list.
• Usethe
56
keys to select the channel you wish to delete.
• Press4arrow key to select Delete.
• PressOKtwicetodeletetheselectedchannel.
• Selectanddeleteotherchannelsthesameway.
• PressEXITtoquit.
Renaming a channel
• GotoMenu/ Channel list.
• Usethe
56
keys to select the channel you wish to rename.
• Press4arrow key to select Edit Name.
• PressOKtwicetoentertheEditionmode.
• Use
56
arrow to change the letter between brackets and 4to edit the
next letter.
• PressOKtoconfirmthenewname.
• PressEXITtoquit.
6 - Parental Lock
Your receiver is delivered with a secret code (PIN) which is 0000.
Thiscodeallowstolockchannelsthatyoudonotwishotherstoaccess,orto
protect the settings of the receiver. We advise you to change this code.

15
ModifyingthePINcode
• GotoMenu/ Settings / Configuration.
• SelectParental SettingsandpressOK.
• EntertheoldPIN(0000onpurchase).
• OntheMenu Lockitem,selectInstallation with 4arrow key.
• GotoSet Lock KeyandpressOK
• OntheLock Keyfield,enterthe4figuresofyournewPIN(eg3112)
• OntheConfirmfield,enteragainthesamenewPIN.
• ALock Key Changed confirmation message is displayed.
IMPORTANT !KeepyourPINcodesafe.
Locking channels
• GotoMenu/ Channel list.
• Usethe
56
keys to select the channel you wish to lock.
• Press4arrow key to select Lock.
• PressOKtolocktheselectedchannel.
• EnteryourPIN,alocksignappearsafterthechannelname.
• Youcanlockotherchannelsthesameway.
• PressEXITtosaveandexit.
You should follow this process if you have modified the settings and hence
making the receiver inoperative. You should also reset the receiver if it shows
unexplained problems.
Resetting the receiver means that you will lose all personalised functions
(favourites,parentallocketc).
• GotoMenu/ Settings / Installation / First time installation.
• Press3to select YESandthenOK.
• Themenuwilldisappearandthereceiver will display the First Installation
menu.
•Unplugthemainsource,waitforafewsecondsandplugitback.
•Thereceiver is now back in its original configuration.
7 - Resetting the receiver

16
You can access several options in Menu / Settings / Configuration.
• OnTV type,select4:3 or 16:9 depending on your screen format.
IMPORTANT !Ifyouhavea4:3screen,donotadjusttheTV type to 16:9 !
• On TV output, choose between RGB and CVBS. The CVBS mode
(composite)givesanimageoflowerqualitythantheRGB,butiscompatible
with all TVs.
OntheFavourite Mode,youcanselectaFAVlistorcomebacktotheALLlist.
Thismenucanbeuseful,forexample,ifyouuseaUniversalRemoteController
whichdoesn’tfeaturetheFAVkey.
9 - Channel Search
You should follow this process when you have lost a channel or if new channels
are emitted by operators.
• GotoMenu/Settings / Installation / Automatic search.
• ConfirmthedeletionofpreviouslystoredchannelsbypressingOK.
The receiver will search for new channels and add them.
8 - Miscellaneous settings

17
10 - Using the receiver with a VCR
A - Programming
• GotoMenu / Timer.
• The Timers Programme
window lists the programs
to be recorded.
• To program a new recording,
pressOKonanemptyline.
• On the line Name, select with
34 arrow keys the channel you
want to record.
• On lines Start and End, enter
with digit keys the start time and
stop time of the programme.
• OnlineDate,enterthedate.
• PressOKtosavethesettings,the
Mode will turn to Active.
• PressMENUtosaveandexit.
You must then program your VCR in the same way so that it starts recording
at the same time.
You should remember to record the channel that corresponds to the scart lug
(AUX,EXTetc).PleaserefertoourVCRmanualifnecessary.
Ifyouswitchonthereceiverwhilstaprogramissupposedtoberecorded,you
willberequestedtoconfirmanychangesbypressingEXIT.

18
B - Connecting.
Simply connect your VCR to the VCR scart of your receiver.
Torecordachannel,startbyplayingthechannelonyourTV.Youshouldthen
startrecordingontheAVchanneloftheVCR(0,AV,EXTetc).Ifnecessary,
refer to your VCR manual to make sure you are doing everything correctly.
Foryourinformation,thischannelcannormallybefoundonmanyVCRsby
selectingchannel1andbythenpressingthePROG-keyonceortwice.
Toplayatape,thereceivershouldbeonstandby.Simplyinsertthetapeand
startplaying.Theimagewillappearonthescreen.Ifthisisnotthecase,
presstheTV/VCRkeyonyourVCRremote.
REMINDER ! You cannot record a channel other than the one you are watching.
ANT
VCR

19
11 - What to do if you experience a reception problem
Symptom Possible Cause Solution (to try)
You are receiving analogue
channelswithoutaproblem,
but no digital channel seems
to be getting through.
Your antenna is
pointing towards
an analogue
emitter,when
digital channels are
emitted by another
transmitter.
Adjusttheorientation
of your antenna (see
paragraph 1B).
You are receiving analogue
channelswithoutaproblem,
but no digital channel seems
to be getting through. You live
in a flat.
The system of
collective antenna
is not adapted to
terrestrial digital.
Contact the flat owner
or the residence union.
You are receiving analogue
channelswithoutaproblem,
but no digital channel seems
to be getting through.
Your area is
not covered by
digital terrestrial
yet. There is no
immediate solution.
You must wait until
your area is covered.
There are some channels
you are not receiving at all.
The channels that you are
receiving do not have a high
reception level. The image
you get in analogue is not
great either.
You are located far
from the emitter.
1-Tryanindoor
amplifier.
2-Tryamast
amplifier.
3-Findamore
performant antenna.
To help you figure out the problem you have come across, it could be useful
foryoutoobtainmoreinformationonthepositionofdigitalemitters,aswellas
theUHFnetworksthatareused.
IMPORTANT !Ifyouexperienceaproblemwiththedigitalterrestrialreception,
it is necessary to define as clearly as possible the symptom of the problem
that is occurring
If you refer to the board below, you will see various solutions for problems
you may come across.

20
Symptom Possible Cause Solution (to try)
You are receiving all digital
channels but the reception is
disrupted at times (i.e. when
another electrical product is
switched on).
You are
experiencing
electric
disturbances.
1-Replace the TV
cable that links the TV
plug to the antenna
with a screened cable.
2-Replacethe
accessories (splitters
etc) with screened
products.
3-Replacethecable
that connects the
antenna to the plug.
You are receiving some
networks but others are
disrupted or not received at all.
You are
experiencing
echoes.
1-Slightlyadjustthe
antenna.
2-Replacethe
antenna with a new one
that has more powerful
anti-echoscreens.
You are receiving some
networks but the networks
superior to 60 are disrupted or
not received at all.
Your antenna
hides the top of
theUFBband.
You need a more
powerful antenna for
thewholeUHFband.
You are receiving the
networksbetween21and35,
but none of those between 36
and 69.
Your antenna only
receives one part
oftheUHFband.
You need a more
powerful antenna that
is designed to work on
thewholeUHFband.
Your reception is fine most
ofthetime,butitisdisrupted
when it rains or at some other
random moments.
You are on the
limit on the
covered area.
You need a more
powerful antenna.
What is a disrupted reception in digital ?
In digital reception, a disrupted reception results in frozen pictures
(partiallyortotally),ortheappearanceofmosaiceffect.Thesoundmaydisappear
for a while, or strange effect can be heard. The consequences are totally
differentfromtheconsequenceinanalogue(snoweffect).
What about indoor reception ?
The transmission parameters are not optimised for indoor reception. As a
consequence,eventhoughitispossibletoreceiverFreeviewchannelswith
an indoor antenna, it is never guaranteed. Coverage areas are dened for
a roof-aerial. Indoor reception is only possible at a short distance from the
transmitter. In this case, electronic noise from home appliances
(washingmachines,switches,...)oftencauseseetingreceptionproblems.
You cannot find the solution to your problem.
Pleasesendusyourqueryat:[email protected].
This manual suits for next models
1
Table of contents
Other Metronic TV Receiver manuals


