MetroPCS MetroSmart Ride Guide

MANAGE YOUR FAMILY OR
SMALL BUSINESS VEHICLES
IN-CAR WI-FI HOTSPOT TO
STAY CONNECTED
REAL-TIME VEHICLE &
MAINTENANCE NOTIFICATIONS
ROADSIDE ASSISTANCE FROM
ALLSTATE®MOTOR CLUB
GPS TRACKING &
GEOFENCING
4G LTE CAPABLE DEVICE
START GUIDE
Screenshot simulated & subject to change
Screenshot simulated & subject to change
Qualifying plan required for use of select features.
MANAGE YOUR FAMILY OR
SMALL BUSINESS VEHICLES
IN-CAR WI-FI HOTSPOT TO
STAY CONNECTED
REAL-TIME VEHICLE &
MAINTENANCE NOTIFICATIONS
ROADSIDE ASSISTANCE FROM
ALLSTATE®MOTOR CLUB
GPS TRACKING &
GEOFENCING
4G LTE CAPABLE DEVICE
4G
LT E

CHECK VEHICLE COMPATIBILITY
The MetroSMART Ride™device plugs into the
OBD-II (On-Board Diagnostics) port. Most cars
and light-duty trucks that are model year 1996
or newer in the USA have an OBD-II port.
Please check that your vehicle is compatible
by visiting:
www.metropcs.com/metrosmartrideexplore
NOTE: The MetroSMART Ride device is not
compatible with electric (EV) and plug-in hybrid
vehicles. Fuel data from some diesel vehicles
may not be accurate.
STEP 1

DOWNLOAD & INSTALL THE APP
The MetroSMART Ride app is available on the
Apple App Store and on Google Play.
Search for “MetroSMART Ride” in your app store.
TIP: Make sure you are running the latest version
of your operating system and that your phone
meets the minimum technical requirements to
run the app.
STEP 2

STEP 3
CREATE YOUR ACCOUNT
Run the MetroSMART Ride app on your phone,
tap “Sign Up” on the home screen, and follow
the steps to create a new account.
You will be asked to verify your mobile phone
number via text message. Please use your mobile
phone number, not the number associated with
your MetroSMART Ride device.
TIP: If you already have a MetroSMART Ride
account, please use your existing credentials
to sign in.

STEP 4
INSERT THE MICRO-SIM CARD
Use the included tool to eject the SIM tray
from the MetroSMART Ride device.
Take the micro-SIM card that was included in
the MetroSMART Ride box, position the
micro-SIM card so that it sits ush, then fully
insert the tray into the device.
NOTE: Please ensure that your SIM card has
been activated before proceeding to Step 5.
To activate your SIM, please call customer service
at 1.888.8metro8 (1.888.863.8768).
STEP 5
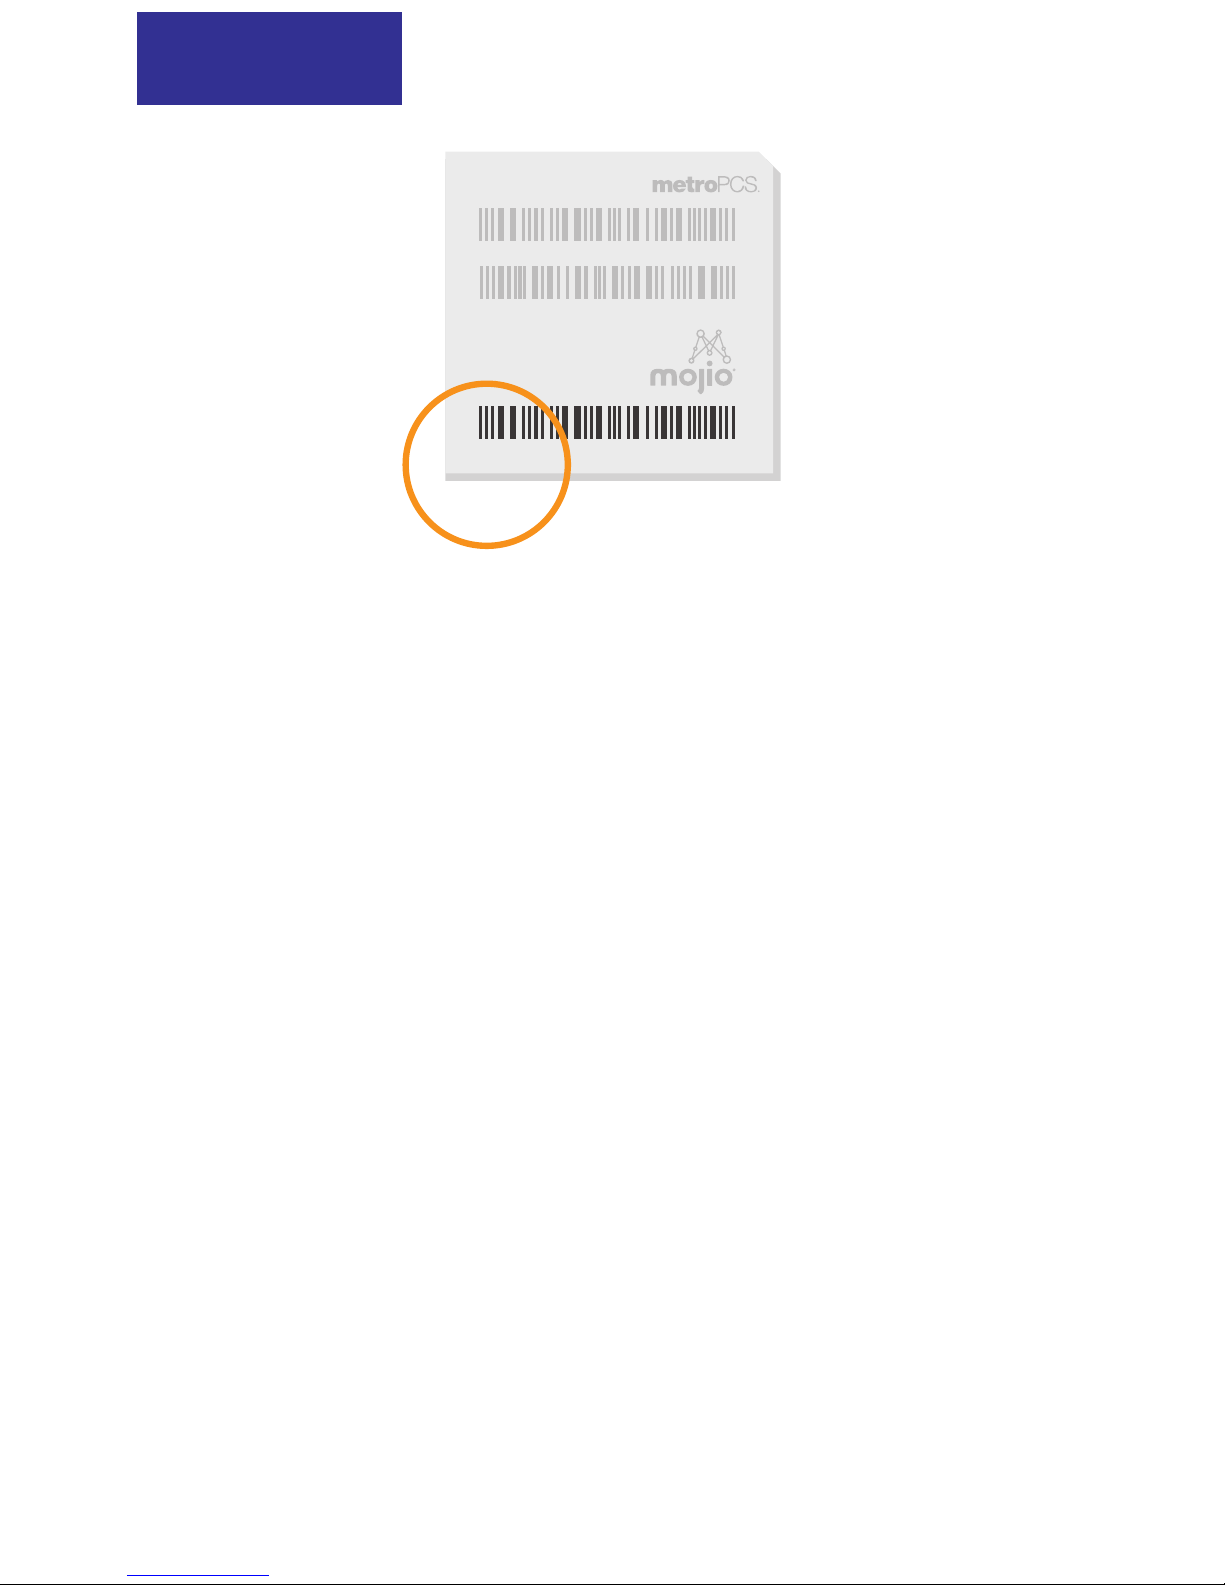
SCAN THE IMEI BARCODE
Every MetroSMART Ride device has a unique
15 digit IMEI code.
The IMEI code can be found on the back of
the device and also on the Wi-Fi hotspot card.
When prompted by the app, use your
smartphone’s camera to scan the IMEI barcode.
You can also enter the IMEI code manually.
NOTE: Do not plug the device into your vehicle
until the app instructs you to do so in Step 7.
IMEI:000000000000000
WIFI MAC:XXXXXXXXX
S/N:XXXXXXXXX
SSID:XXXXXXXXXX
Password:XXXXXXXX
H/W:XXXXXXX
DATE:MM/YYYY
Model: ZX000
FCC ID: 000-ZX000
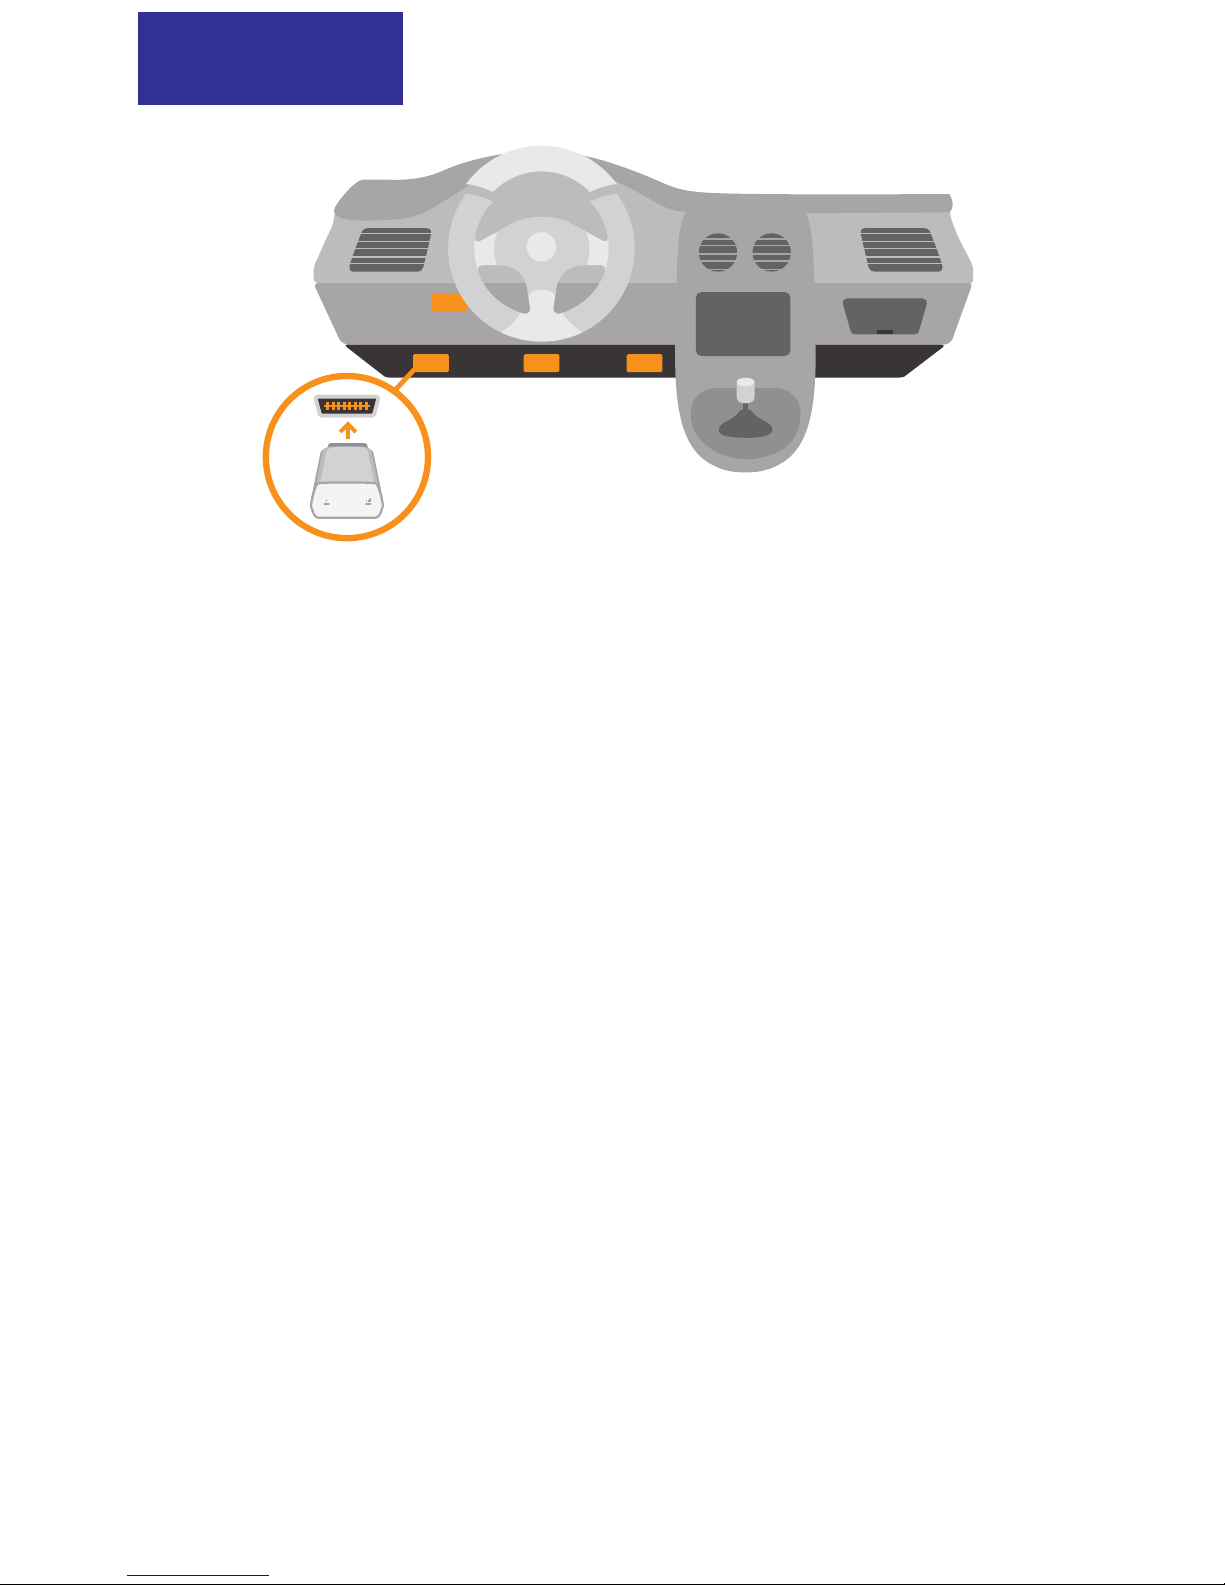
FIND YOUR OBD-II PORT
The OBD-II port is usually located underneath
the driver’s side dashboard, often within
18 inches of the steering wheel.
If you are having trouble locating your car’s
OBD-II port, the MetroSMART Ride app
can help you nd it. Or visit:
www.metropcs.com/metrosmartrideexplore
TIP: Tap the ashlight icon in the MetroSMART
Ride app to turn on your smartphone’s ashlight
when searching for your OBD-II port.
STEP 6
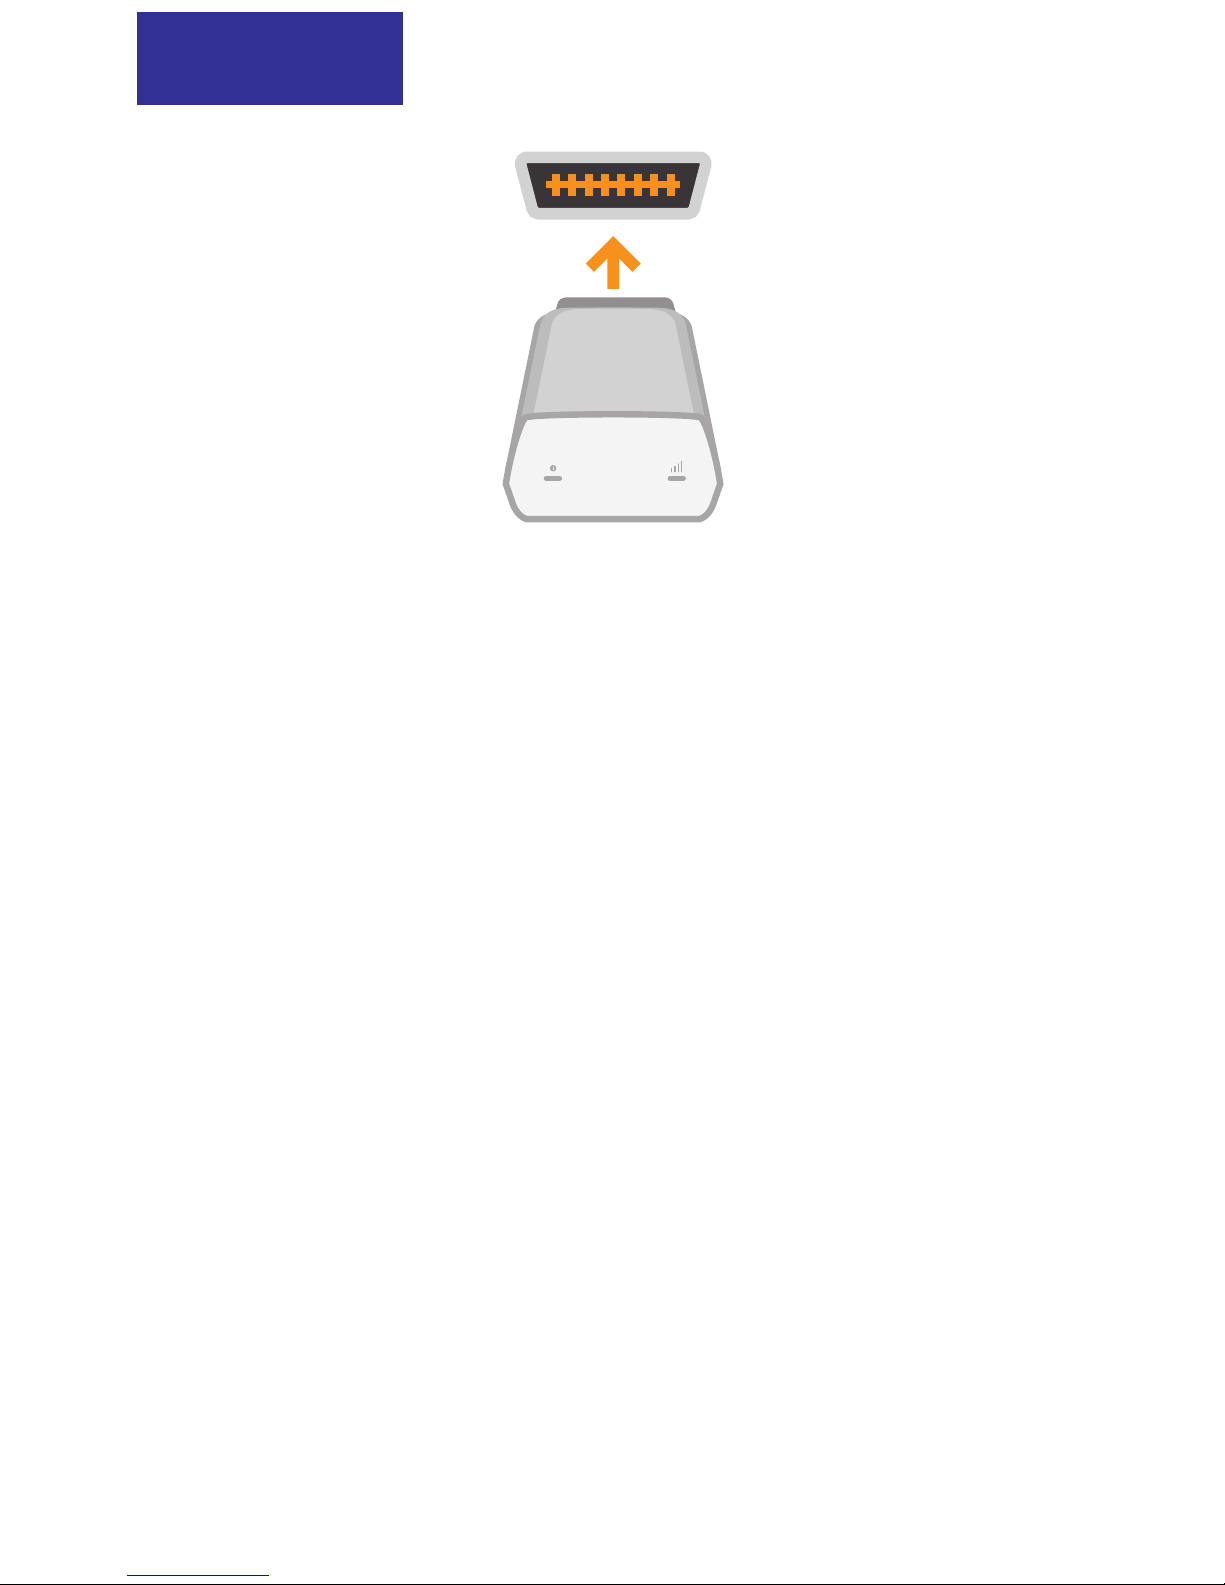
INSTALL YOUR DEVICE
Now that you’ve found the OBD-II port, you
can install the MetroSMART Ride device in
your vehicle.
Align the device with the port and plug it in
for a snug t.
TIP: Never install your device in an
underground parking lot or in an area of
weak cellular coverage. The device needs to
establish its rst connection to the network to
complete the setup.
STEP 7

GO FOR A DRIVE
Go for a 10 minute drive to nish setting up the
MetroSMART Ride experience.
Once the MetroSMART Ride device has
established a cellular connection with the
network, it will generate a GPS lock.
The MetroSMART Ride app will notify you once
the setup is complete.
Distracted driving is never OK.
Do not use your phone while driving.
STEP 8

STEP 9
ACCESS YOUR WI-FI HOTSPOT
Your in-car Wi-Fi hotspot will now be accessible
via its default network name (SSID) and password.
You can nd this information on the Wi-Fi Hotspot
Card and also on the back of the MetroSMART
Ride device.
You can easily manage your Wi-Fi hotspot,
including turning it on and o, in the MetroSMART
Ride app. Under the menu, tap on ‘Wi-Fi Hotspot’.
NOTE: Qualifying MetroPCS rate plan required
for Mobile Hotspot feature.

STEP 10
ROADSIDE ASSISTANCE
With a qualifying rate plan, MetroSMART Ride
includes a 24/7 toll-free hotline and roadside
assistance service through the Allstate®
Motor Club.
For more information, please visit:
https://www.roadsidemobile.com/tac/metro
NOTE: Qualifying MetroPCS rate plan required
for Roadside Assistance feature, and you
must opt in to the Terms and Conditions of the
program to receive the service.

1
6
2
3
4 5
1 Device Reset Hole
2 Micro-SIM Card Slot
3 Restart Key
4 LED 1
5 LED 2
6 OBD-II Interface
8090008100WL
YOUR OBD-II DEVICE

LED STATUS LIGHTS
LED INDICATOR LED STATUS
LED 2 (SIGNAL) GREEN BLINKING
The device is connected to the 4G LTE
network and data is being transferred
LED 1 (POWER) GREEN BLINKING
The internal battery is powering the device
LED 1 (POWER) GREEN SOLID
The vehicle is powering the device
LED 2 (SIGNAL) GREEN SOLID
A 4G LTE connection is established but
no data is being transferred
LED 2 (SIGNAL) RED SOLID
The device has power but no cellular
connection

ADVANCED WI-FI SETTINGS
To congure your Wi-Fi network, please connect to
your MetroSMART Ride Wi-Fi hotspot network and
use the 4G LTE Mobile Hotspot Conguration Page.
•Launch an Internet browser on your smartphone,
tablet or laptop and enter http://192.168.0.1 in the
address bar. Select ‘Go’ or ‘Enter’.
•Enter the default password: admin. You can also use
the last 8 digits of your device’s unique IMEI code.
You can enable Allowed Devices to prevent unapproved
devices from connecting to your Wi-Fi hotspot.
When enabled, only the MAC addresses listed in the
Allowed Devices Information section can access your
Wi-Fi Hotspot Network. From the conguration page:
•Select Settings > Wi-Fi Settings
•Set Allowed Devices Switch to On, and select ‘Apply’
•Enter the Nickname and MAC Address
•Click or Press ‘Apply’
TIP: To prevent a device from connecting to your
Wi-Fi Hotspot, select ‘Remove’ in the Operation
column for a given device.

ADDITIONAL INFORMATION
METROPCS TERMS AND CONDITIONS OF SERVICE
(“AGREEMENT”)
For the most recent and up-to-date version of the
MetroPCS Terms and Conditions of Service to which
you agree and will be bound when you activate, use,
change or pay for your MetroPCS service, please visit
metropcs.com/terms.
Welcome to MetroPCS. We are pleased that you have
selected us as your wireless carrier. Our Terms and
Conditions of Service are available at https://www.
metropcs.com/terms-conditions/terms-conditions-
service.html. These Terms and Conditions of Service
apply to all devices and wireless services provided
by us to you and consist of several parts, which may
be amended from time to time. In the event that the
terms and conditions relating to a feature you may have
selected or may be included in your Rate Plan conict
with the MetroPCS Terms and Conditions of Service, the
MetroPCS Terms and Conditions of Service shall control.
By: (a) giving us a written or electronic signature or
telling us orally that you accept the MetroPCS Terms and
Conditions of Service; (b) activating Service (if you are a
new subscriber); (c) using your Service after your Service

is activated or after you make a change or addition to
your Service; (d) paying for the Service; or (e) failing to
activate Service within 30 days after the purchase of
your wireless device, unless you return your wireless
device within MetroPCS’ applicable return period,
you agree to the MetroPCS Terms and Conditions of
Service and the terms and conditions of service and
use related to any feature you may have selected or
may be included in your Rate Plan, including, but not
limited to:
•You waive your right to a jury trial in disputes
with MetroPCS;
•Your disputes with MetroPCS will be decided by
an arbitrator;
•You waive your right to institute or participate in
class action litigation against MetroPCS;
•You will provide MetroPCS with accurate
information about yourself;
•MetroPCS may communicate with you from
time to time about your Service;
•You will pay all taxes and regulatory fees even
if your rate plan is inclusive of taxes and
regulatory fees; and

•MetroPCS may terminate your Service if you fail to
timely pay for your Service or violate the Terms and
Conditions of Service in any way, including abuse
of the Service or violations of applicable laws.
CUSTOMER SERVICE
If you have any questions regarding your Service
or information in this Agreement, you may call our
activation center at 1-888-8metro8 (1.888.863.8768).
BILLING FOR PREMIUM & THIRD-PARTY SERVICES
CALIFORNIA RESIDENTS ONLY
Certain parties besides MetroPCS have the ability to
place charges on your bill for premium services.
You may access these services and authorize the
placement of charges on your bill through your phone
or online account. MetroPCS also provides customers,
at no additional cost, with the ability to restrict the
placement of charges for premium and third-party
services on your account. Contact customer care or go
to www.metropcs.com/blocking for more information.

CUSTOMER SUPPORT
Need more help? Please visit your local MetroPCS
store or refer to the options below if you need
additional assistance.
MetroPCS automated customer service can be
reached from any phone. Dial 1.888.8metro8
(1.888.863.8768) and follow the prompts.
Sign up for MyAccount to view account details,
check your balance, make a payment, manage
eWallet and more. More information is available at
www.metropcs.com
COPYRIGHT
MetroPCS related trademarks and other intellectual
property are the exclusive properties of T-Mobile USA,
Inc. Copyright ©2018 T-Mobile USA, Inc.
Mojio, powered by Mojio, and the Mojio logo are
trademarks and registered trademarks of Moj.io Inc.
Moj.io attributes © 2018 Moj.io Inc. All Rights Reserved.
For more information about Roadside Assistance
from Allstate®Motor Club, please visit:
https://www.roadsidemobile.com/tac/metro

8090008100WL
Table of contents
Popular Automobile Accessories manuals by other brands

Heise
Heise HE-SWP8 installation instructions

RADICAL
RADICAL R-C10HY1 Device installation manual

Whispbar
Whispbar K433W Fitting instructions

Kolpin Powersports
Kolpin Powersports Cycle Country 25-1190 Assembly & owners manual

Blaupunkt
Blaupunkt 7 608 502 000 installation instructions

Fab Fours
Fab Fours Open Fender installation manual


