Xforce PR-104 User manual

DN2794 X Force PR-104 V1.1
2 | P a g e
Table Of Contents
Component Description ............................................................................................................................................................................................ 3
Front View
............................................................................................................................................................................................................... 3
Left View. ............................................................................................................................................................................................................... 3
Right View.............................................................................................................................................................................................................. 3
Basic Operation......................................................................................................................................................................................................... 4
Preview Mode........................................................................................................................................................................................................ 4
IR Function............................................................................................................................................................................................................. 4
Video Record ......................................................................................................................................................................................................... 4
Snap Shot. ............................................................................................................................................................................................................. 5
Audio Record ......................................................................................................................................................................................................... 5
Playback Mode.......................................................................................................................................................................................................... 5
Video Playback...................................................................................................................................................................................................... 5
Audio File Playback............................................................................................................................................................................................... 6
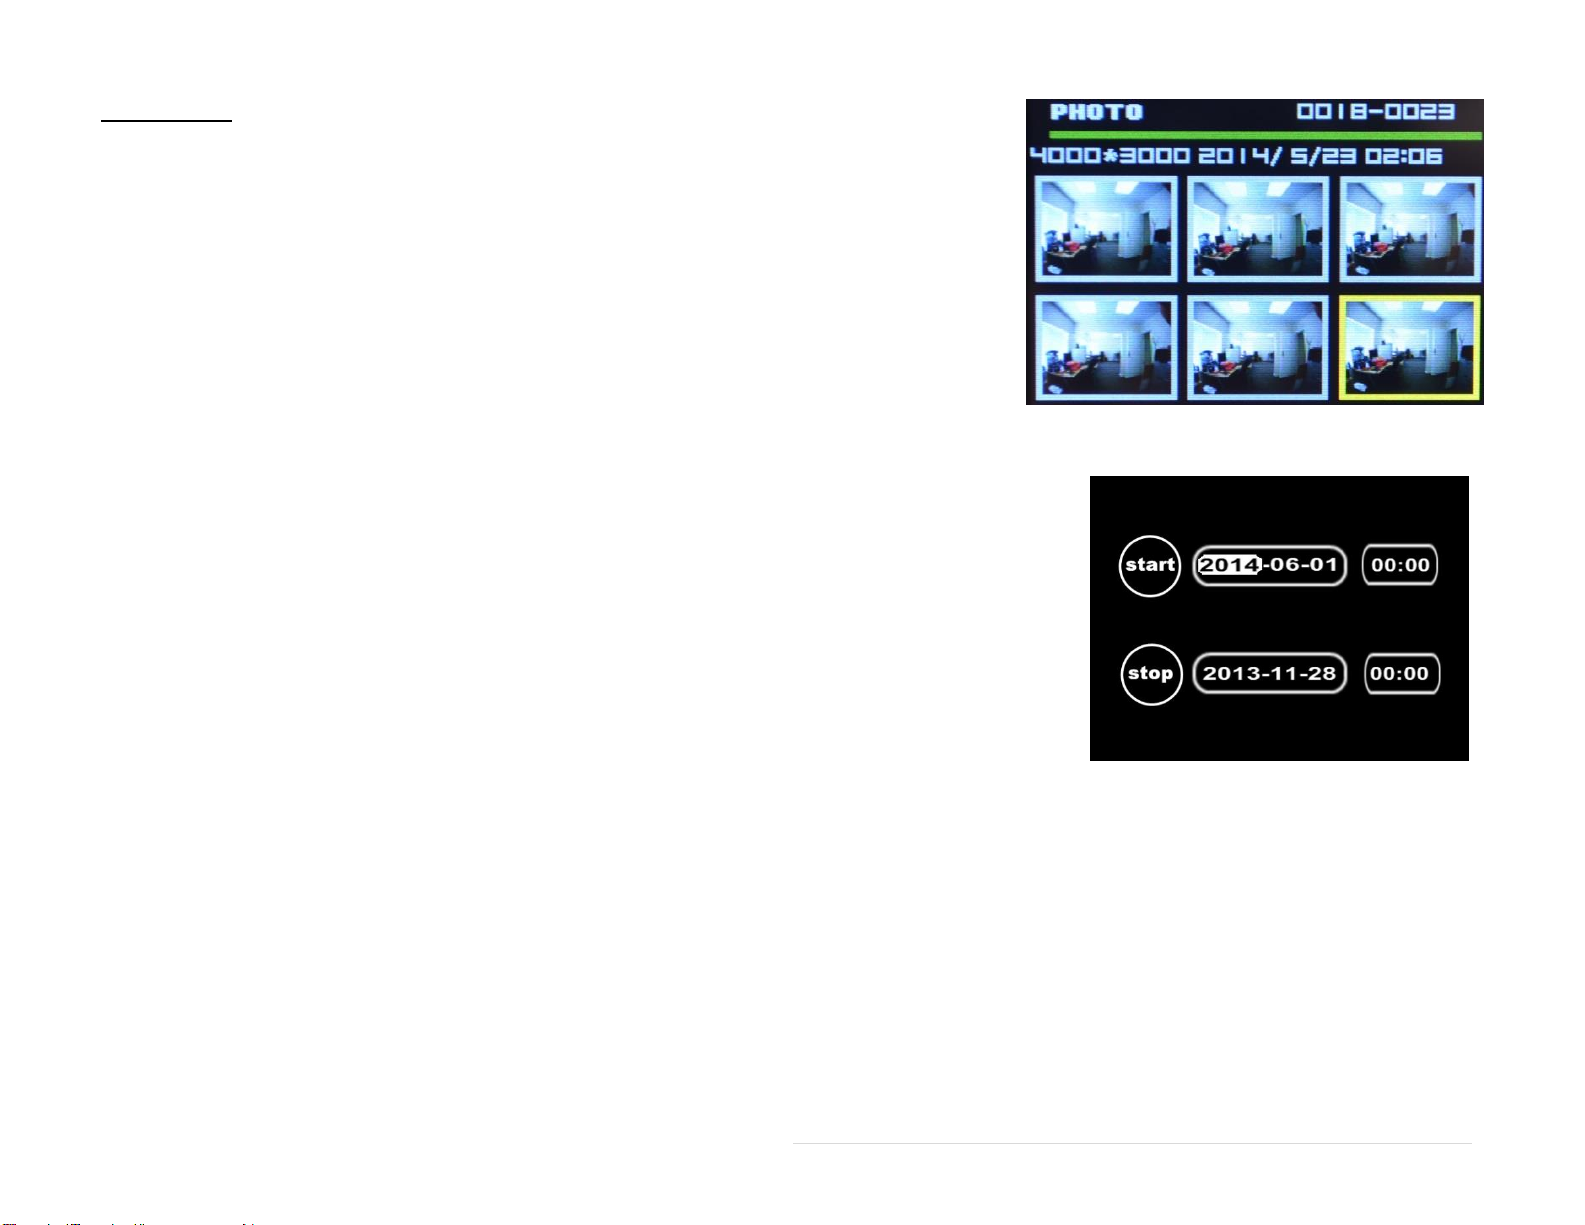
Photograph File Playback...................................................................................................................................................................................... 7
File Search............................................................................................................................................................................................................. 7
Exit Playback Mode. .............................................................................................................................................................................................. 7
Screen Off.............................................................................................................................................................................................................. 7
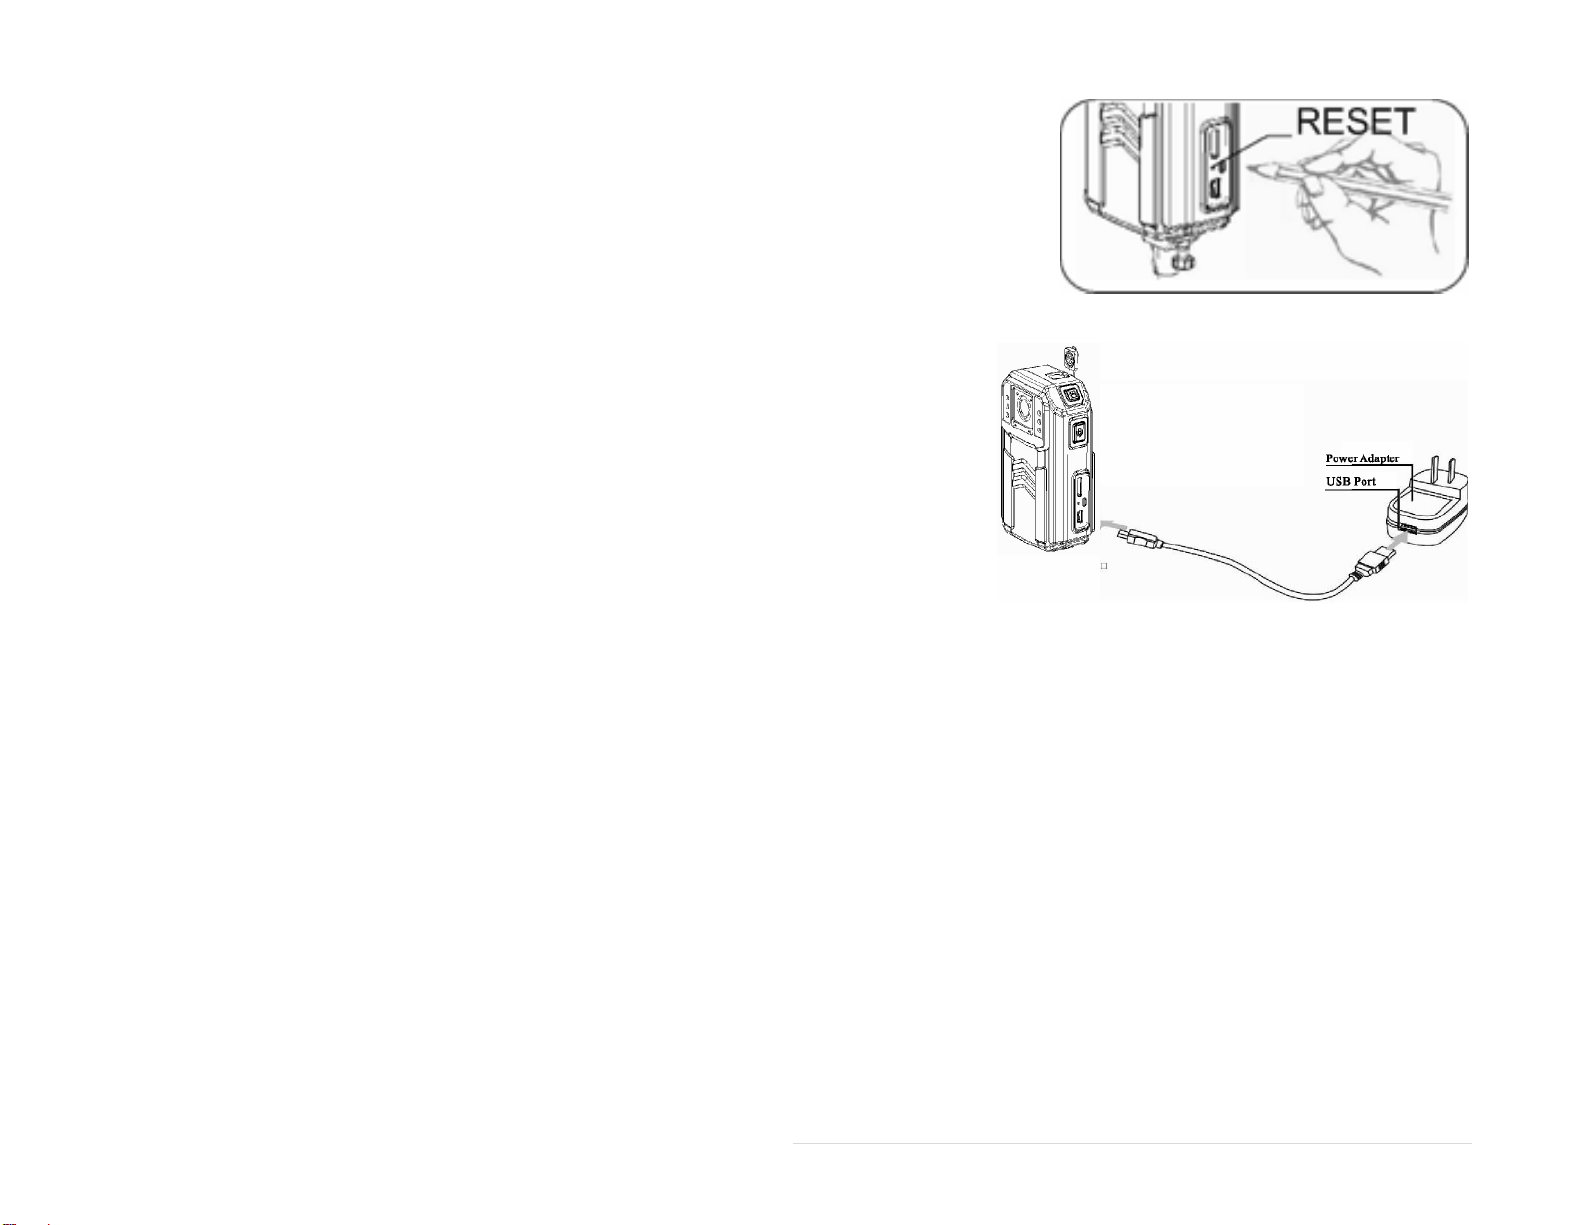
Reset...................................................................................................................................................................................................................... 8
Battery Charging.................................................................................................................................................................................................... 8
SOFTWARE.............................................................................................................................................................................................................. 8
Installing the USB Driver (Windows Vista (32 and 64bit) Windows 7(32 and 64bit) windows 8/8.1 (32bit); Windows 10. ................................. 8
Installing the USB Windows 8/8.1 (64bit); Windows 10........................................................................................................................................ 9
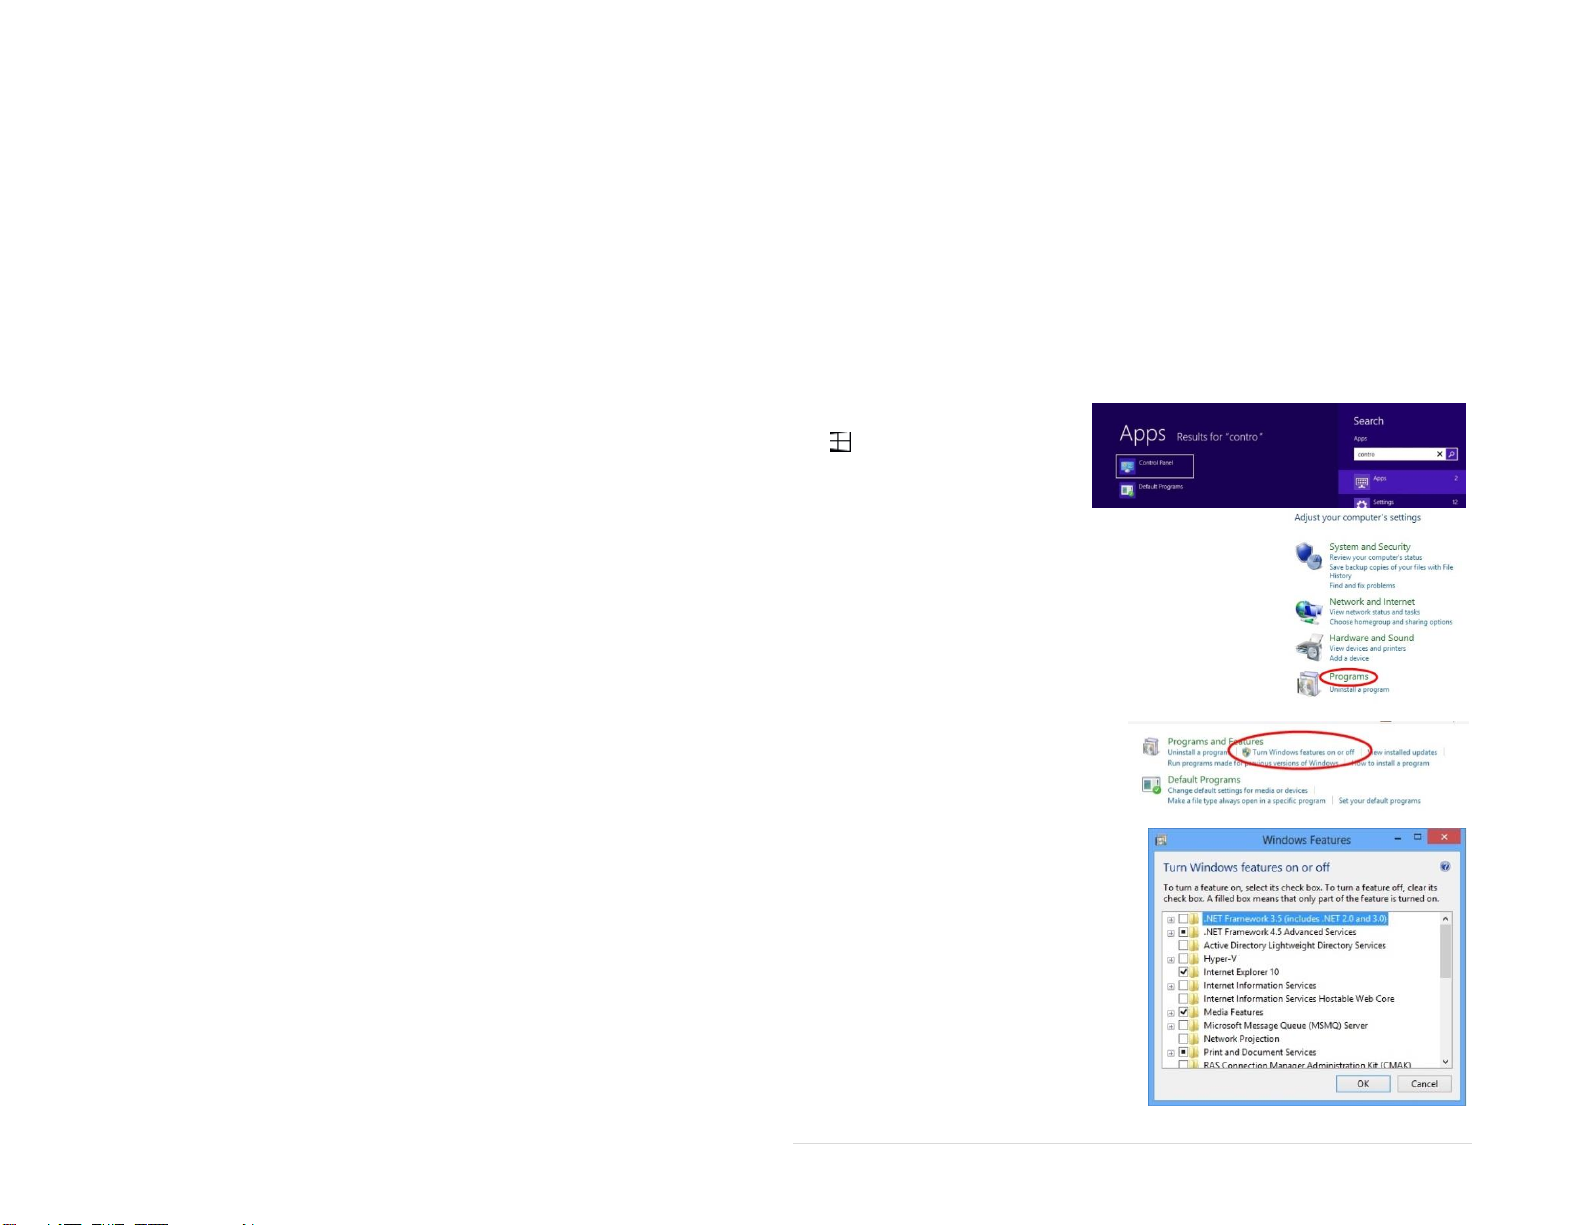
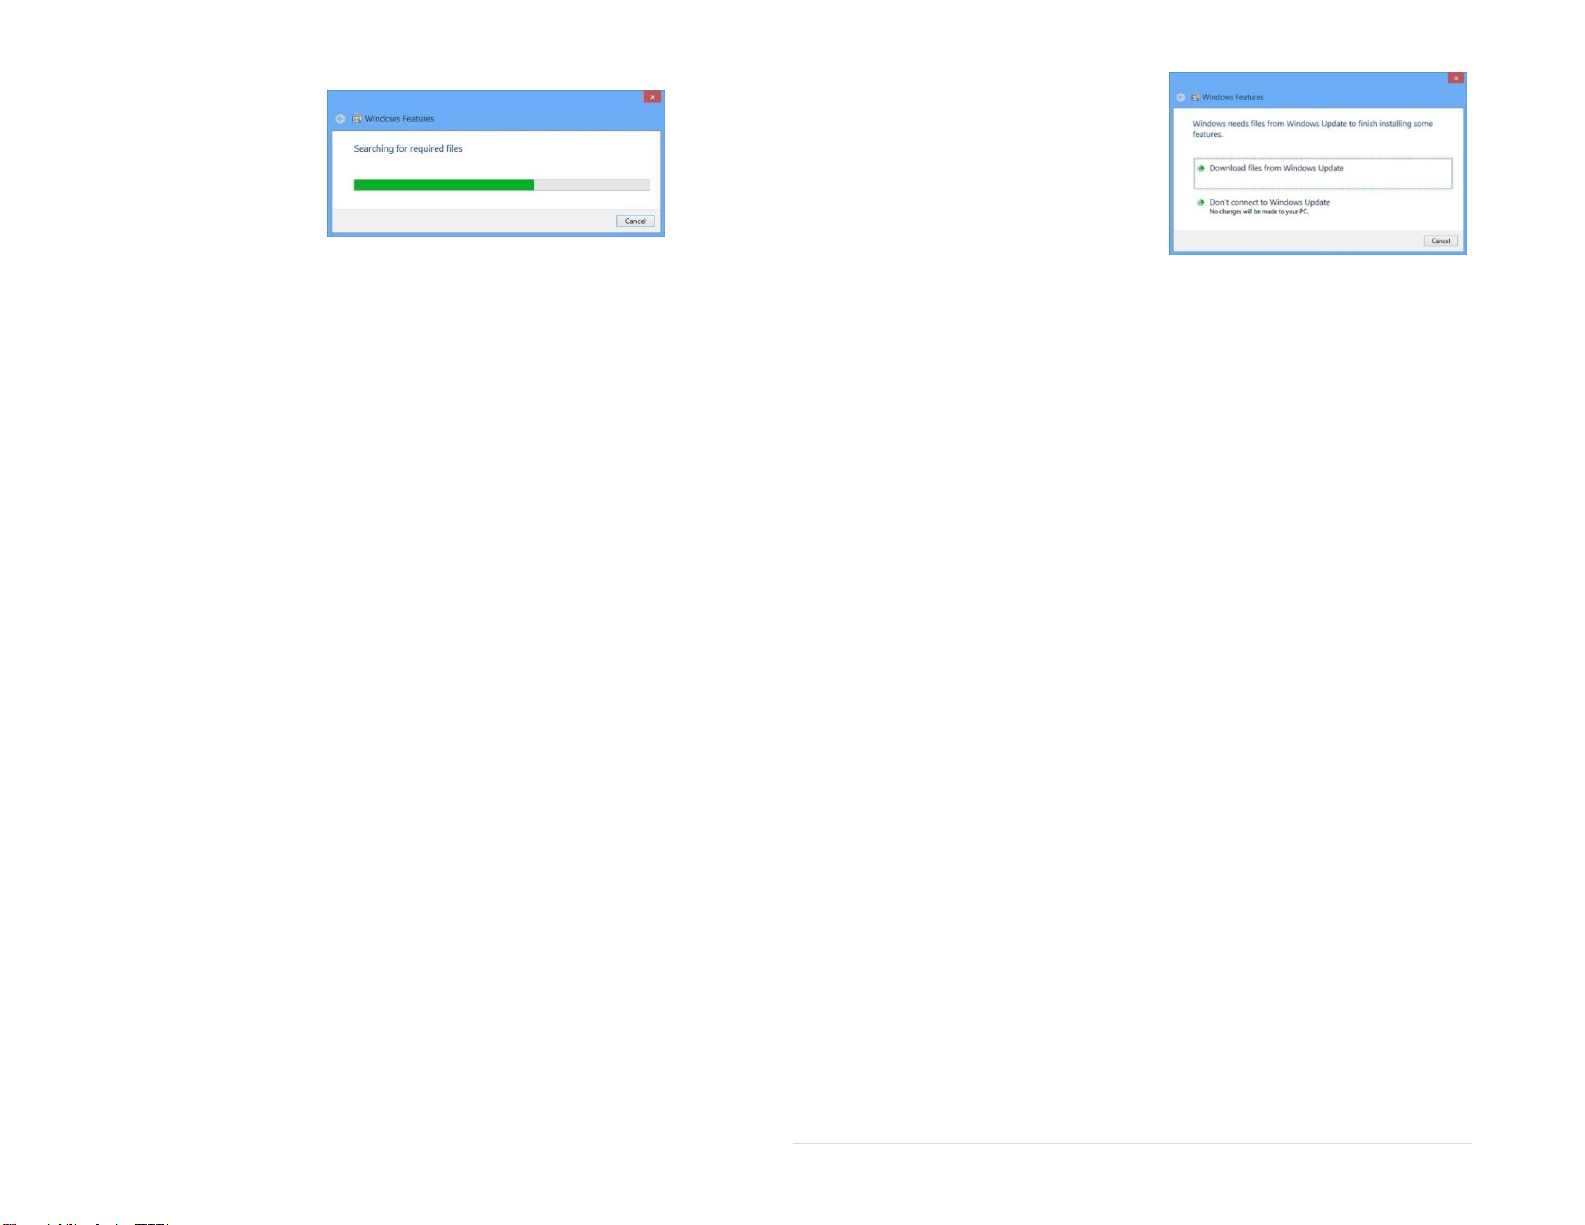
How to Enable .netFramework in Windows 8/8.1; Windows 10. .......................................................................................................................... 9
Installing the USB Drivers.................................................................................................................................................................................... 10
APPENDIX. ............................................................................................................................................................................................................. 11
Trouble Shooting. ................................................................................................................................................................................................ 11

DN2794 X Force PR-104 V1.1
3 | P a g e
Component Description
Front View
A: GPS Connection. Please note that this is currently reserved for future development
B: Base Connector. Used to attach approved microphone cables.
1. Camera Lens.
2. Charge Indicator. Illuminates when connected to the AC adapter.
3. Status LED. Green denotes unit is powered up. Red Indicates that XForce PR-104 is in record
mode.
4. Infrared Panels. Press and hold the M button for 3 seconds to activate.
5. Microphone. Used to record audio for Video and Audio recordings.
Left View.
6. Video Record Button. Press and hold to begin Video recording. Press and hold a second time to
Stop Video recording. Two Audible beeps will sound when recording stops. If the XForce PR-104 is
powered off Press and Hold the Video Record Button until an audible beep sounds then immediately
release the Video Record Button. XForce PR-104 will power-up and enter immediately into Video
Record Mode, two Audible beeps will sound when recording stops. Video Record Button is also used
in conjunction with Button 13, Playback Button, to advance through the menu items.
7. Back Clip. Removable clip for attaching the XForce PR-104. Clip can be rotated 360° allowing a
range of Video Recording angles to be attained.
8. Audio Button. Press once to begin recording, status led (3) will flash when audio is recording. Press
a second time and the XForce PR-104 will stop recording. Two beeps will sounds when Aufio
Recording ends. Audio button is also used to back out of the Playback menu screen.
9. USB / HDMI connection cover. Use raised part to open the cover and then swivel the cover to
expose the required connection, USB or HDMI.
Right View.
10. Snap Shot Button. Press once to take a single snap shot. Press and hold to take 5 snap shots with
One second intervals.
11. PTT. Press To Talk.
12. Screen Button. Press to place PR-104 into Sleep mode. Press any other button to activate XForce
PR-104. Please see Video Record for more information on the M Button.
13. Playback Button. Displays menu items for Video Playback; Snap Shot, and Audio playback. Press
once on a selected menu item and a sub menu will appear for that item. Press a second time on a
selected item in the sub-menu to bring selected file. Press 8, Audio button, to go back one menu
screen.
14. Power Button. When pressed to power the XForce PR-104 on NO beeps will sound. When Pressed
to turn the XForce PR-104 two beeps will sound.

DN2794 X Force PR-104 V1.1
4 | P a g e
Basic Operation
Preview Mode.
Press the power button to begin the boot sequence. The system will automatically go into preview mode and the Status led will be green.
Preview Mode can be broken down into the following 7 parts.
1.
Snap Shot parameters. Displays current mega-pixel setting for images.
2.
Remaining number of Snap Shots available at current settings.
3.
GPS Indicator. (Reserved for future development).
4.
Video parameters. Displays current video settings.
5.
Battery indicator.
6.
Remaining amount of Video record time at current settings.
7.
System Date and Time.
IR Function.
In low level light situations the XForce PR-104 has in-built IR Functionality. To activate the IR Functionality on the XForce PR-104 press and
hold the M button for 3 seconds. If IR Functionality is activated all Video recordings and Snap Shots will be in Black and White.
Video Record
After a successful boot, the system will automatically enter into preview mode, press the
video record button and the XForce PR-104 will begin to record video.
The Status light will turn to red and flash. The Video Icon, top left hand corner of the
window will change to Orange. Above the Date and Time of the recording, bottom of
window, a timer will begin to display the length of the currently recording video.
To conserve battery life it is possible to press the M button on the side of the PR-104 to
temporarily turn off the viewing screen. Video will continue to record, as indicated by the
flashing Red led on the front of the XForce PR-104.
Press the Video record key again and the XForce PR-104 will stop recording. The
system will beep twice. Recorded video will be saved in MP4 format. To activate IR
Functionality during Video Recording press and Hold the M button for 3 seconds. The live display will change to Black and White. The M
button is a toggle and will Turn IR Functionality Off when pressed a second time.

DN2794 X Force PR-104 V1.1
5 | P a g e
Snap Shot
.
Once the system has completed its boot sequence, the system will automatically go into preview mode. Press the Snap Shot button to take a
photograph. If the Snap Shot button is held down, Five snap shots will be taken approximately One second apart. The native format for the
photo is JPG.
Audio Record
In preview mode, press the audio record button to begin to record audio. Press audio record
button a second time and the system will cease recording, two beeps will sound indicating
recording has ended. System will now revert to preview mode. Default audio file is saved as a
.WAV
1. Red indicates audio recording status
2. Recording length
Playback
Mode.
In preview mode press the Playback button and select the required type of playback; Video;
Snap Shot or Audio.
To navigate through the Playback use the Video or Snap Shot button. Once the required
selection is highlighted press the playback button, this will open a sub-menu for the selected
item. To navigate through the sub-menu use the Video or Snap Shot button. Once the correct
item has been highlighted, press the Playback button again.
Video Playback
After selecting Video Playback and entering the sub-menu a grid of available videos will be
displayed as thumbnails.
This menu will display the total number of video files available (top right hand corner). With a
thumbnail highlighted the video number will be displayed next to the total number of videos, in
the screen shot on the right, Video 6 of a total of 9 is highlighted.
Below the Green dividing bar, and above the thumbnails, the video resolution (1280x720) is
displayed as well as the date and time of the highlighted video recording. Once a recording has
been selected press the Playback button.
In Playback Mode use the Snap Shot button to fast forward current video. Fast forward is
available at X2, X4, X8, X16, X32 and X64 speed. Once the required start point in the video has been reached, press the Playback Button.

DN2794 X Force PR-104 V1.1
6 | P a g e
For Reverse playback, use the Video button. Reverse is available at X2, X4, X8, X16, X32 and X64 speed. Once the required start point in the
video has been reached, press the Playback Button.
The Playback window has defined areas of information.
1.
Displays the current position of video playback in relation to the total file length, 6
Minutes 41 seconds of 10 minutes 5 seconds, in the example on the right.
2. Displays the XForce PR-104 ID as set in XDeploy custom mobile device management
software.
3.
Date and Time of the Video currently being played back.
Press the Audio Record Button to go back to thumbnail view.
Audio File Playback.
After selecting Audio playback and entering the sub-menu, a grid of available audio clips will
be displayed.
The menu will display a total number of available audio clips (top right hand corner). When a
thumbnail is highlighted the audio clip number will be displayed next to the total number of
audio files available. In the screen shot on the right audio clip 12 of 67 is highlighted.
Below the Green dividing bar the date and time of the highlighted audio recording is
displayed. Once a recording has been selected press the Playback button.
Press the Audio Record Button to go back to thumbnail view.

DN2794 X Force PR-104 V1.1
7 | P a g e
Photograph File Playback.
Please Note:
In thumbnail view if Snapshots have been recorded at their highest resolution,
the thumbnail will display as a white square titled 18M. This is due to pixel limitation on the
playback screen. These Snapshot files will display as expected when the PR-104 is
connected to a PC.
Once Photograph mode has been selected, in thumbnail mode press the Playback key and
the display will change to full screen.
Press the Video Record button or the Photograph button to switch between the previous or
next file.
Press the Audio Record Button to go back to thumbnail view.
File Search.
In thumbnail playback mode for Video; Snap Shot or Audio press and hold the playback button, this
will display a screen from which a start date / time and an end date / time can be entered.
Press the video record button and photograph button to select the date search option, press the
screen button M (this will decrease the Year date) and audio record button (this will advance the
Year date).
Press the Snap Shot button to advance to the next field. Press the Video button to go back one
field. Once in the selected field, e.g. Month, press the Audio button to advance by One month.
Press the M button to go back One month.
To set the time search range, press playback button to confirm search. Any files within the specified
range will now be displayed.
Exit Playback Mode.
In full screen playback mode, press the audio record button to go back to thumbnail playback mode, press the audio record button a second
time to get back to video/photo/audio folder. Select interface, press audio record button a third time to revert to preview mode.
Screen Off.
Press the Screen Off Button (M) the LCD will turn off and the system will go into sleep (power save) mode. Press any Button to activate the
system and exit sleep mode.

DN2794 X Force PR-104 V1.1
8 | P a g e
Reset
If there is a need to reset the XForce PR-104, use a fine point pen and depress the reset
button on the device.
Note:
Resetting the XForce PR-104 does not cause the loss of any data or file corruption.
Battery Charging.
The XForce PR-104 comes with an integral Rechargeable battery. Use a USB
connection when the battery is low.
The XForce PR-104 will display a Red led when charging either from a USB
connection or from an adapter. Once charging has completed the Led will turn off.
Note:
It is advisable to turn the XForce PR-104 off during charging. Charging the
battery every three months will optimize the expected life span of the battery.
SOFTWARE.
Installing the USB Driver (Windows Vista (32 and 64bit) Windows 7(32 and 64bit) windows 8/8.1 (32bit);
Windows 10.
Insert the CD into the optical drive of your PC. Select the USB Drivers from the software section.
DirectUSB Setup.
When prompted by the CD menu, Save the file prior to running.
Accept the license agreement when prompted.
Accept all default values, click Next.
Accept the default installation path and click Install.
Once all files have been copied, an Installation Complete window will appear. Click on Finish.

DN2794 X Force PR-104 V1.1
9 | P a g e
Installing the USB Windows 8/8.1 (64bit); Windows 10.
In order for XDeploy and XTract software to function with the XForce PR-104, USB drivers must be installed on the target PC. The drivers
install normally with Windows Vista (32 bit/64 bit) and Windows 7 (32 bit/64 bit) and Windows 8 (32 bit).
With Windows 8 (64 bit) and Windows 10, Microsoft changed the requirements relating to the signing of drivers. Gatekeeper Systems is in
the process of having the USB driver package signed for Windows 8 (64 bit). A driver package is available on a cd available from Gatekeeper
Systems, or, as a Drop Box link. Please call Gatekeeper Systems 1-888-666-4833 for information regarding the Drop Box option.
Uninstall any previous version of the Direct-USB drivers as there is a need to disable driver signature enforcement for the Direct- USB Drivers
to be loaded correctly. Ensure Microsoft .netFramework V2 is installed prior to installing the USB Drivers. Windows 8.1 / Wi ndows 10 includes
.net 3.5 (which includes .net 2.0) but may not be enabled.
How to Enable .netFramework in Windows 8/8.1; Windows 10.
In the top right hand corner above the user name type Control Panel. This will force Windows to
search for Control Panel.
In Windows 10 click the Windows Start Icon.
In the results on the left, click on Control Panel.
In Control Panel, Click on Programs.
Under Programs and Features, click on Turn Windows Features On or Off.
A window will appear with options for Windows Features.
Click on the box to the left of .NET Framework 3.5 (includes .NET 2.0 and 3.0). This will place a Black
square in the center.
Click OK.

DN2794 X Force PR-104 V1.1
10 | P a g e
Once OK has been
clicked, a dialog
window will appear
stating “Searching
for required files”.
Once the search is complete a dialog
window will appear. Select Download files
from Windows Update.
Windows will now download and install the
required files. Once the files have been
downloaded, click on Close.
Installing the USB Drivers.
1.
Swipe from the right side of the screen and bring out the Charms bar (Windows 8) or, Select the Windows Start Icon (Windows
10)
.
2. From the Menu which now appears, click on POWER.
3. From the POWER Menu which now appears, click on RESTART whilst holding down the SHIFT key.
4. From the OPTIONS screen, select TROUBLESHOOTING.
5. On the TROUBLESHOOTING page select ADVANCED.
6. Select STARTUP SETTINGS.
7. From the STARTUP SETTINGS click on RESTART.
8. On the screen which now appears press
7
(“Disable Driver Signature Enforcement”) on the keyboard.
9.
Please Note:
This will disable driver signature enforcement for the current session.
10. Login to the Computer as normal. With the XForce PR-104 connected to the Computer and powered on install the Direct-USB
driver package. Accepting all default values.
11.
Please Note:
Two drivers should be installed; One for removable Media and a Second for the Camera (PR-104) itself.
12. Install XForce XDeploy and XForce XTract by Gatekeeper Systems. Accept all default values.
13. Disconnect the XForce PR-104 from the Computer.
14. Reboot the Computer. This is required to ensure Driver Signature Enforcement is re-enabled.
15. Login to the Computer as normal.
16. Connect the XForce PR-104 to the computer.
17. Power on the XForce PR-104.
18. There should be Two USB connection notification sounds if the XForce PR-104 is successfully detected.
19. If the XForce PR-104 is not successfully detected, disconnect the XForce PR-104 from the computer.
20. Re-connect the XForce PR-104 and power on the XForce PR-104.
21. Launch XDeploy clicking the Refresh button to refresh the list of available XForce PR-104’s if necessary.
Once installed, in Control Panel, Programs and Features the USB drivers will be displayed as: DirectUSB Drivers Version XXX
(where XXX is the version of the driver installed).

DN2794 X Force PR-104 V1.1
11 | P a g e
APPENDIX.
Trouble Shooting.
Can't Boot Up
Low battery
Charge the battery with the power adapter
No Display On The screen
While The indicator Light Is
On
Enters into power saving mode
Press any functional key
Distorted Photograph/ Video
Dirty camera lens
Clean the lens with a soft clean cloth.
Not recognized by a host
computer
USB cable incorrectly inserted; Incorrect
password.
Reinsert the USB cable. Re-Enter the password.
Charging time is
unexpectedly long
Loose Power Connection. Power on
and charging via USB cable.
Checktheconnectorand reconnect.
Turn off the XForce PR-104 allow it to be fully charge and then restart.
Table of contents
Other Xforce Automobile Accessories manuals
Popular Automobile Accessories manuals by other brands

Kogan
Kogan KAMIRRCRBSA quick start guide

Fabtech
Fabtech FTS24092 installation instructions

KUSSMAUL
KUSSMAUL 091-18-098 installation instructions

Whelen Engineering Company
Whelen Engineering Company Core-R C399RK7 installation guide

Omix-Ada
Omix-Ada Rugged Ridge Alloy 13551.18 manual

Skoda
Skoda 5E5 064 711 Fitting instructions