Mibrasa HMB MINI User manual

INSTRUCTION MANUAL
Feeding the Senses!
www.mibrasa.com
A MAJOR CAUSE OF OVEN-RELATED FIRES IS FAILURE TO MAINTAIN
REQUIRED CLEARANCES (AIR SPACES) TO COMBUSTIBLE MATERIALS.
IT IS OF UTMOST IMPORTANCE THAT THIS OVEN BE INSTALLED ONLY IN
ACCORDANCE WITH THESE INSTRUCTIONS.
EN / FR

Contents
1 Introduction 4
2 Mibrasa® oven description 5
3 Models 6-8
4 Installation instructions 9-14
4.1 Requirements for oven surroundings
4.2 Installation and assemble instructions
4.3 Smoke extraction
5 Instructions of use 15-17
5.1 Loading the charcoal
5.2 Lighting the charcoal
5.3 Prior to cooking
5.4 Ready to cook
5.5 After use
5.6 Reutilizing charcoal from the previous service
6 Safety and maintenance standards 18-19
6.1 Daily cleaning
6.2 Weekly cleaning
6.3 Special care
6.4 Safety standards: WARNINGS & DANGERS
7 General sales conditions 20
7.1 Warranty
7.2 Returns
7.3 Property reserve
Read all instructions before installing and using the appliance.
Save these instructions.

Mibrasa®charcoal ovens are robust and solid, an essential piece of equipment for any
kitchen, which will give a unique and delicious flavor to all your ingredients.
Mibrasa®charcoal ovens comply to the strict standards & regulations set by internationally
recognised certifications of quality.
Our ovens
Mibrasa®is a closed grill designed and developed in our workshops. Made from the best
quality steel by expert hands, our grills are designed to satisfy even the most demanding
chefs.
The technical specifications allow the user to accurately control the airflow through the
grill, changing the intensity of the heat of the embers. A highly efficient way of cooking
and cutting down the amount of charcoal needed.
Mibrasa®charcoal ovens allow you to cook all types of foods retaining the natural flavors
while bringing out a unique taste.
The versatility of our products
We have a wide range of high quality products and accessories allowing you to completely
personalize your Mibrasa®oven, adapting it to your needs.
The advantages of Mibrasa®ovens :
• Imparts an unbeatable flavour and aroma to ingredients.
•
Functions as both a grill and oven at the same time.
•
Grilling foods is easier and quicker than any traditional or convection oven.
•
Energy efficient reducing the amount of charcoal needed compared to an open grill.
open oven.
•
Designed to cook simultaneously with two grills to maximize cooking surface area.
•
A robust product made from only the highest quality materials, and with very low
maintenance.
1 Introduction
4

5
2 Mibrasa® oven description
1 Firebreak
2 Upper damper
Open Closed
3 Door handle
4 Grills
5 Thermometer
6 Cast iron grids
7 Door
8 Grease collector
9 Lower damper/ash pan
Note: Regulating the entry of airflow is controlled through the opening and closing of the lower
damper whilst the outflow of air is controlled using the upper damper.
Models Grill size (inches) No. of Diners
HMB MINI 21.65 x 13.58 +/- 35
HMB MINI PLUS 21.65 x 15.55 +/- 45
HMB 75 21.65 x 23.43 +/- 75
HMB 110 30.32 x 23.43 +/- 110
HMB 160 30.32 x 31.5 +/- 160
Grill sizes and approximate number of diners:
Accessories included:
Oven tongs
Cast iron grids (3, 6
or 8 units according
to model)
Grill brush
Grill Charcoal poker Ash shovel
Note: See the full list of accessories available at www.mibrasa.com

6
3 Models
Models A A1 A2 B B1 P C C1 C2 H I D1 D2 E
(
+/-)
HMB MINI 20.47 24,41 36,22 27.56 28.94 3.94 19.29 24.02 31.50 9.06 7.87 4.50 6.06 31,50
HMB MINI PLUS 25.60 29,53 41,34 27.56 28.94 3.94 20.08 24.80 34.65 9.06 9.25 4.50 6.06 27,56
HMB 75 25.59 29,53 41,34 27.56 28.94 3.94 27.56 32.28 42.52 9.06 11.81 4.50 6.06 27,56
HMB 110 29.13 33,07 44,09 36.22 37.59 3.94 27.56 32.28 46.06 9.06 11.81 4.50 6.06 23,62
HMB 160 29.13 33,07 44,09 36.22 37.59 3.94 35.43 40.16 53.54 9.06 13.78 4.50 6.06 23,62
Column Emakes reference to the recommended height of the worktop above floor level that the oven should be set upon.
Models A A1 A2 B B1 P C C1 C2 H I D1 D2 E (
+/-)
HMB SB 75 31.50 35,43 45,87 27.56 28.94 3.94 27.56 32.28 42.52 9.06 11.81 4.50 6.06
27,56
HMB SB 110 35.04 38,98 49,41 36.22 37.60 3.94 27.56 32.28 46.06 9.06 11.81 4.50 6.06
23,62
HMB SB 160 35.04 38,98 49,41 36.22 37.60 3.94 35.43 40.16 53.54 9.06 13.78 4.50 6.06
23,62
HMB Worktop models
HMB SB Worktop model with heating rack
Dimensions in inches
Column Emakes reference to the recommended height of the worktop above floor level that the oven should be set upon.

7
HMB AB with cupboard below
Models A A1* A2* A3* B B1 C C1 C2 H I D1 D2
HMB AB 75 25.59 29.13 54.72 66.14 27.56 28.94 25.20 32.28 42.52 9.06 11.81 4.50 6.06
HMB AB 110 29.13 27.17 56.30 67.72 36.22 37.60 25.20 32.28 46.06 9.06 11.81 4.50 6.06
HMB AB 160 29.13 27.17 56.30 67.72 36.22 37.60 33.07 40.16 53.54 9.06 13.78 4.50 6.06
HMB AB SB with cupboard below and heating rack
Models A A1* A2* A3* B B1 C C1 C2 H I D1 D2
HMB AB SB 75 31.50 29.13 60.63 71.26 27.56 28.94 25.20 32.28 42.52 9.06 11.81 4.50 6.06
HMB AB SB 110 35.04 27.17 62.20 72.64 36.22 37.60 25.20 32.28 46.06 9.06 11.81 4.50 6.06
HMB AB SB 160 35.04 27.17 62.20 72.64 36.22 37.60 33.07 40.16 53.54 9.06 13.78 4.50 6.06
*Calculated using leg height at 6.7”. Regulable leg height between 5.31”- 7.68”.
*Calculated using leg height at 6.7”. Regulable leg height between 5.31”- 7.68”.

8
HMB AC with complete cupboard
Models A B C C1 C2
HMB AC 75 74.80 33.46 25.59 32.68 42.91
HMB AC 110 74.80 42.13 25.59 32.68 46.46
HMB AC 160 74.80 42.13 33.46 40.55 53.94
Measurements are subject to technical changes.

4 Installation instructions
9
4.1 Requirements for oven surroundings
The installer should contact the local building or fire officials concerning any installation
restrictions or need for inspection of the oven installation.
The minimum hearth extension areas to be covered with relationship to the door opening
of the oven for combustible floors should be the following:
1) 30” to each side of the door opening
2) 36” in front of the door opening
Clearances to construction/other appliances
Unit to backwall = 3”
Unit to sidewalls = 3”
Countertop models should be placed on a fireproof material table or stand, preferably
metals: stainless steel, etc. Such support must be strong enough to support the weight
of the oven.
4.2 Installation and assembly instructions
Due to the heavy weight of the ovens it is recommended to use mechanical means for
moving and/or lifting.
Worktop models: HMB MINI, MINI PLUS, HMB 75, 110, 160; HMB SB 75, 110, 160
The height of the table or stand for HMB MINI oven should be around 33.5”, and the height for
Mini Plus/75/110/160 HMB should be be around 25.6”.
A hand/powered pallet truck/forklift should be used whenever possible to lift the oven and
place on the countertop (Fig.1) To reduce the maximum weight, we recommend removing
the grills, cast iron grids, charcoal grid support and the ash pan.
Fig. 1

10
Models with cupboard below HMB AB 75, 110, 160; HMB AB SB 75, 110, 160
In order to attach the oven with the cupboard underneath, remove the grill, the cast iron
grids, charcoal support and ashpan. Carefully insert the forks of a suitable lifting device
to the end of the space of the ash pan. Proceed to attach (fig 1) once in the correct posi-
tion and tighten the 4 bolts in the interior of the cupboard (Fig.2).
Fig. 1
Fig. 2

Models with full cupboard: HMB AC 75, 110, 160
11
Remove the cabinet below from the full cupboard. Place the cupboard in the desired
position, open the cupboard doors, remove the grill and dismantle the support frame by
removing the bolts found on both sides. Attach the oven to the cupboard below following
the instructions given for models HMB AB 75, 110,160 (Fig. 1). With the oven attached to
the cabinet below, wheel the oven into the full cupboard and lock in the castor brakes.
Place the grill and support frame back in place. (Fig. 2).
Fig. 1 Fig. 2
An alternative option to provide more working space
inside the heating cabinet is to install the security
accessories outside of the cabinet. In order to do this,
connect the extended flue duct to the oven smoke
outlet prenetrating the cabinet’s roof. Assemble the
firebreak and dissipating filter over the duct. (Fig. 3).
Fig. 3

12
4.3 Smoke extraction
When the oven is installed in the interior of a closed building an extractor hood of sufficient
dimensions is required.
The extractor hood must have a suitable depth in order to cover the opening of the oven
and stand out laterally by 5.9”on both sides.
The ductwork must be either galvanized steel or stainless steel, uniform and well sealed
throughout. It is important to avoid installing horizontal pipes and must provide frequent
access points to remove the build up of solid/liquid residues and creosote, see point 6.3
on cleaning and special care.
It is recommended that the ductwork is installed with a vent cap in order to improve the
removal of smoke.
Installation of the exhaust hood in accordance with the standard NFPA 96.
MIBRASA®Protective components
Firebreak: Is installed where the smoke
leaves the oven. Its function is to prevent
flames or sparks from escaping the oven.
Dissipating filter: This is installed over the
firebreak. It filters and spreads the flow
of air, slowing it down and dropping its
temperature.
To guarantee the correct operation of the said components, the recommended
charcoal loads mentioned on page 15 should be respected.

13
This type of installation consists of an extractor hood, which is independent of the oven.
To make this possible the filtration system must be installed in the front part of the
extractor hood. The ductwork must be either galvanized or stainless steel, 11.8” in
diameter up to the highest part of the building. Installation of the firebreak and the
dissipating filter are required.
Installation options
Table showing extractor hood measurements and required flow rates:
Oven with independent extraction
Models Flow rate (gal/s) Hood dimensions (in.)
(width, depth)
Minimum height from the floor
(in.)
HMB MINI 183 39.4” x 39.4” 78.7”
HMB MINI PLUS 183 39.4” x 39.4” 78.7”
HMB 75 205 51.2” x 51.2” 78.7”
HMB 110 235 59” x 51.2” 78.7”
HMB 160 257 59” x 59” 78.7”

14
Oven installed under extractor hood with other cooking appliances.
General ventilation ductwork
It is necessary to install the oven
with the firebreak and dissipating fil-
ter. This prevents sparks and flames
from escaping the oven. The smoke
is filtered and the flow of smoke is
gently reduced, cooling its tempera-
ture prior to contact with the
ventilation system.
Independent ventilation ductwork
In this case the firebreak is installed and
connected to an independent chimney to
the exterior of the building. The diameter
of the tube must be Ø5.9”/7.87”. The con-
nection between the firebreak and the
chimney is created by means of a chute
of an adequate size so that the firebreak
can be removed for cleaning or mainte-
nance purposes.
Consult local regulations regarding the use of solid fuel ovens.
78.7”
78.7”
15
5 Instructions of use
5.1 Loading the charcoal
Open the oven door and remove the grills from inside in order to facilitate loading the
charcoal. The quantity of charcoal required will depend on the Mibrasa®oven sized
model. (See Table 1)
Table 1. Approximate quantity of charcoal according to Mibrasa model.
Model Amount
HMB Mini 11 lbs
HMB Mini Plus 14 lbs
HMB 75 22 lbs
HMB 110 33 lbs
HMB 160 40 lbs
5.2 Lighting the charcoal
Once the charcoal has been placed in the oven, use the poker provided to make a heap of
charcoal in the centre of the oven leaving approximately 5.9” of space at the back of the
oven. This allows for maximum air to circulate resulting in the most effective light up.
Open the ash pan to 2”, situated in the lower part of the oven. Pull open the upper damper,
so that the lever is set to a vertical position.
Set the upper damper to a vertical position.
Open the lower damper/ash pan about 2”.
Position Mibrasa®Ecofirelighters in three places, one in the centre of the oven and one either
side of the heap of charcoal. Place a small piece of charcoal on top of the firelighters to facili-
tate setting it alight, and then close the door.
CAUTION
It is compulsory that a member of the kitchen staff is present for the entire lighting up process.
During the fire-up, the door must remain closed. This will ensure the most effective light up
while minimising any risk of accidents.
It is very important to respect the maximum charcoal load in every Mibrasa®oven.

16
5.3 Prior to cooking
Once the charcoal has been lit, wait at least 40 minutes until the charcoal has totally
turned into embers.
It is important not to start cooking until the charcoal has turned to embers.
Once the embers are white in colour and ready, slide the ash pan back in and leave to
rest for a few minutes until the flames die down. Use the charcoal poker to spread the
embers evenly.
Close the ash pan.
Note: Make sure the ash pan is permanently closed when cook-
5.4 Ready to cook
Depending on the quantity or variety of foods you want to cook, insert one or two of the
grills provided. The oven has a variety of different height settings to place the grills. The
position of the grill will depend on the type of product you are going to cook.
We recommend using the upper grill for pizzas, jacket potatoes, gratin, etc.
The lower grill should be used for cooking meat, fish, vegetables, etc.
Upper grill
Lower grill

17
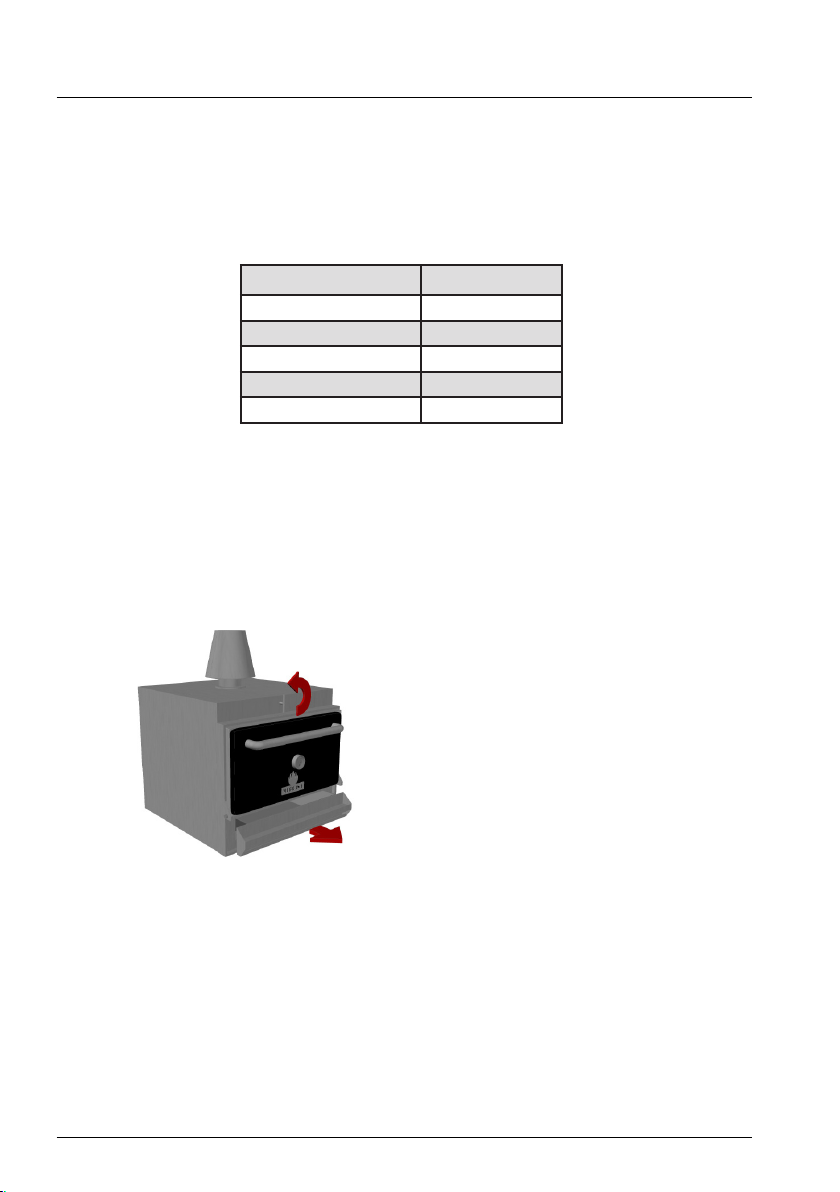
Turn the upper damper/regulator to a 45 º – 60 º angle so that the oven reaches a suit-
able temperature for cooking. (See Fig. 1). Remember that the ash pan should remain
closed when cooking.
Changing the position of the upper damper will regulate the intensity of the embers. If
smoke is coming through the door while cooking, open the damper just enough to allow
the smoke to leave the chimney. (Fig.2).
The door must remain closed during operation. Open only the door when handling food.
Fig.1 Fig.2
5.5 After use
When you have finished using the oven, close the damper (Fig. 3) and check that the ash
pan is closed (Fig. 4). This way, the embers left over will burn slower and can be used
again the next time.
Fig.3
5.6 Reutilizing charcoal from the previous service
Open the oven door and remove the grills (Fig. 1). Using the charcoal poker provided,
remove the charcoal allowing the ash to fall down into the ash pan below.
Once the grids are free from ash, load the oven with charcoal again for its next use.
Close the oven door and follow the previous steps from 5.2 – 5.4.
Fig.1
Remove grills
WARNING:
It is necessary to use heatproof
gloves when removing the grills.
Fig.4

18
6 Safety and maintenance
6.1 Daily cleaning
It is not necessary to clean the inside of the oven using chemical products or water.
Grills: Clean using the grill brush provided after each use.
Ash pan: Open the ash pan, use a metal ash shovel provided by Mibrasa®to remove the
ash and transfer to a metal container with a tight-fitted lid. If you think it is necessary,
you can remove the pan from the oven completely to facilitate cleaning. Once the ashes
have completely cooled down they can be disposed of with other organic material or used
as fertilizer.
WARNING Do not dispose the ashes in a flammable-container or heat-deformable con-
tainer.
Space between the door and the frame: This should always be kept clean so that it can be
closed properly.
6.2 Weekly cleaning
Firebreak: Remove the firebreak from the oven. Shake gently from side to side to allow
the ash to fall. Never clean with water as the ash will stick to the base and can be diffi-
cult to remove
Cast Iron Grids: Remove the grids and use the grill brush provided to clean the slots
inside the oven. It is important to keep the slots clean.
Ash pan: Remove the ash pan and clean away any ash and cinders remaining. A build-up
of ash can make closing the door difficult.
6.3 Special care
Extractor hood and ductwork: It is very important the keep the extractor hood filters clean
as well as the interior and ducts, so as to avoid a build up of soot, fat and creosote1,
which could result in a possible fire.
Follow the weekly cleaning procedures and annual maintenance of the hood, ventilation
box and flue ducts in accordance to the extraction hood manufacturer’s requirements.
Pulverisation water filtration systems are also accepted to compliment the use of this
oven. The ductwork should be inspected at least twice a year to determine when creosote
build up has occured. When creosote has accumulated, it should be removed to reduce
risk of fire.
Mibrasa®is not responsible for any damages occurred caused by wrongful use or when the
installation instructions have not been followed.
1 Creosote – Formation and need for removal. When wood is burned slowly, it produces tar and other organic
vapors that combine with expelled moisture to form creosote. The creosote vapors condense in a relatively cool
oven flue and exhaust hood of a slow burning fire. As a result, creosote residue accumulates on the flue lining
and exhaust hood. When ignited, this creosote makes an extremely hot fire. The oven flue should be inspected at
least twice a year to determine when creosote buildup has occurred. When creosote has accumulated, it should be
removed to reduce risk of fire.

19
Please read this entire manual before you install the oven.
Failure to follow instructions may result in property damage, bodily injury, or even death.
6.4 Safety standards
WARNINGS
• Do not pack required air spaces with insulation or other materials.
• Only use charcoal in the Mibrasa®oven.
• The first time the oven is used do not cook food for at least one hour after lighting.
• Proceed with reasonable care when operating a Mibrasa®oven. Never leave the oven
unattended when lit.
• Wear heatproof gloves while using the oven.
• The door must remain closed during operation. Open only the door when handling food.
• CAUTION Do not overfire - when flames spill out of the oven, you are over-firing.
• Disposal of ashes – Ashes should be placed in a metal container with a tight-fitting lid.
The closed container of ashes should be placed on a non-combustible floor or on the
ground, well away from all combustible materials, pending final disposal. When the
ashes are disposed by burial in soil or otherwise locally dispersed, they should be
retained in the closed container until all cinders have thoroughly cooled. The closed
container of cinders should be placed on a non-combustible floor or on the ground
well away from all combustible materials.
•
Do not attempt to pour water over the the hot coals, only close the upper and lower dampers.
• Do not clean the oven when it is in operation or hot.
• Do not use chemical products to clean the exterior of the oven when in use or hot.
(The interior of the oven is self-cleaning)
• Do not use products not specified for use with this oven.
DANGERS
• When this oven is not properly installed, a fire may result. To reduce the risk of fire,
follow the installation instructions.
• Keep children and pets away from the oven and flammable products. Accessible parts
of the oven may be very hot.
• Do not fry food in the oven using oil. The temperature is very high and could cause
serious harm or damage.
• Do not place combustible materials within a distance of 28” from the front, top, bottom,
rear or side of the Mibrasa®oven.
• Do not use alcohol, oil or other liquids similar to ignite or rekindle hot coals. Use only
Mibrasa®firelighters.
• In the case of installing the oven in an outdoor setting, do not cover the Mibrasa®oven
with any type of protective cover or inflammable material when it is in operation or hot.

7 General conditions
7.1 Warranty
• All Mibrasa®ovens have a 2-year warranty against any manufacturing defect.
• The warranty is void for damage caused by misuse or poor product installation.
• The customer will be responsible for the installation, fine-tuning and maintenance
of the goods.
• Warranty does not include: (I) repairs or replacements that may arise as a result of
current use, (II) parts of limited use, i.e. items such as lamps and fuses, (III) where
the buyer or third party has started repairs, modifications or adjustments without
the prior consent of Mibrasa®, (IV) those defects not immediately notified within
the warranty period stated above (V) those defects or damage due to negligence
not attributable to Mibrasa®, or an accident, misuse, improper installation, mi
handling or abnormal conditions of temperature, humidity, dirt, corrosion or (VI)
that have become damaged through no fault of Mibrasa®.
7.2 Returns
• All goods must be returned in the original condition.
• All returns must be notified in writing, and must be confirmed by our
sales department.
• All returns must reach Mibrasa®prepaid. Returned material must enclose the
invoice and delivery note number.
7.3 Property Reserve
• Mibrasa®retains title to the goods to the total amount of the price integrity.
• Mibrasa®reserves the right to change their products and prices without notice.
20

This manual suits for next models
16
Table of contents
Languages:
Other Mibrasa Oven manuals


Popular Oven manuals by other brands

Siemens
Siemens HN978GM.1 User manual and installation instructions

GE
GE Profile PK956SRSS Dimensions and installation information

Blodgett
Blodgett 1048 Installation operation & maintenance

Thermador
Thermador ME271ES use and care manual

DeLonghi
DeLonghi EO40 Series manual

Sears
Sears Kenmore 75855 installation manual


