Micmas MS-9603 User manual

Micmas
PRODUCT MANUAL

Micmas MS9603 User Manual
Professional Quad Wireless Microphone System
Thank you for purchasing this Micmas Wireless Microphone System. We strive to bring you professional
equipment at an affordable price. Don't let the prices deceive you. Just because we are less expensive than
the big brand companies, does not mean quality has been compromised. We manufacture the best wireless
microphone, the highest quality wireless microphone, and the most affordable wireless microphone. Again
we stand behind our product 100%.
We also know that choosing the right gear can be the difference between a terrible performance and a
rockstar like performance that could lead to future gigs and possible contracts. That is why we offer the
best, most personal customer service in the industry. We are real people here to guide you in the right
direction to make sure you get the right gear that will be ideal and work best in certain situation and various
venues! We treat our customers the way we want to be treated, like family!
So not only will you receive the highest quality, most affordable gear in the industry, you will also receive
top notch customer service, plus all the technical expertise you will ever need is just a phone call or email
away! Join the Micmas revolution and see what tens of thousands already know. Whether it is for the garage
band, live sound, stage, or studio... Micmas is bang for the buck, the best Wireless microphone
Manufacturer!
Features
• Wide Frequency Response Digital Control Circuit - resists unwanted interference with a 60dB signal to
noise ratio and a 45dB carrier wave.
• Silent Function - Silent switches and low THD (total harmonic distortion) protect your PA gear from pops
and distortion.
• Wide Range - Wireless transmission is possible over 400 feet in good surroundings.
• Series Output Circuit - Can connect to an audio mixer or other PA equipment in multiple ways.
• Cardioid Pickup Pattern - Microphone sound pickup emphasizes main sound source and minimizes
background noise.
• Windscreen and Pop Filter - Microphone design includes built-in windscreen and pop lter to minimize
environmental noise and sibilant sounds in speech.
• High Quality Microphone Element - Microphone constructed for best audio quality possible.
• Adaptable - Receiver can work with multiple microphone types to allow for choosing the best equipment
for the situation.

Specifications
Operating Range: up to 400 feet
Channel Selection: 200 UHF channels
Frequency Range: 640-690 MHz
Frequency Stability: ±0.05%
Modulation Mode: UHF
Frequency Response: 40Hz-15KHz
Dynamic Range: >100dB
S/N: >100dB
THD: <0.5%
Audio Output: Individual Balanced XLR outputs, Mix Unbalanced TS or XLR
Power Voltage: AC 110V or 220V
Temperature Range: -4°F to 140°F
Battery Life: up to 8 hours
Receiver Front
1. Antenna
2. Channel Select
3. Volume Control
4. LCD Display
5. Power Button
6. IR Sensor
1
324
6
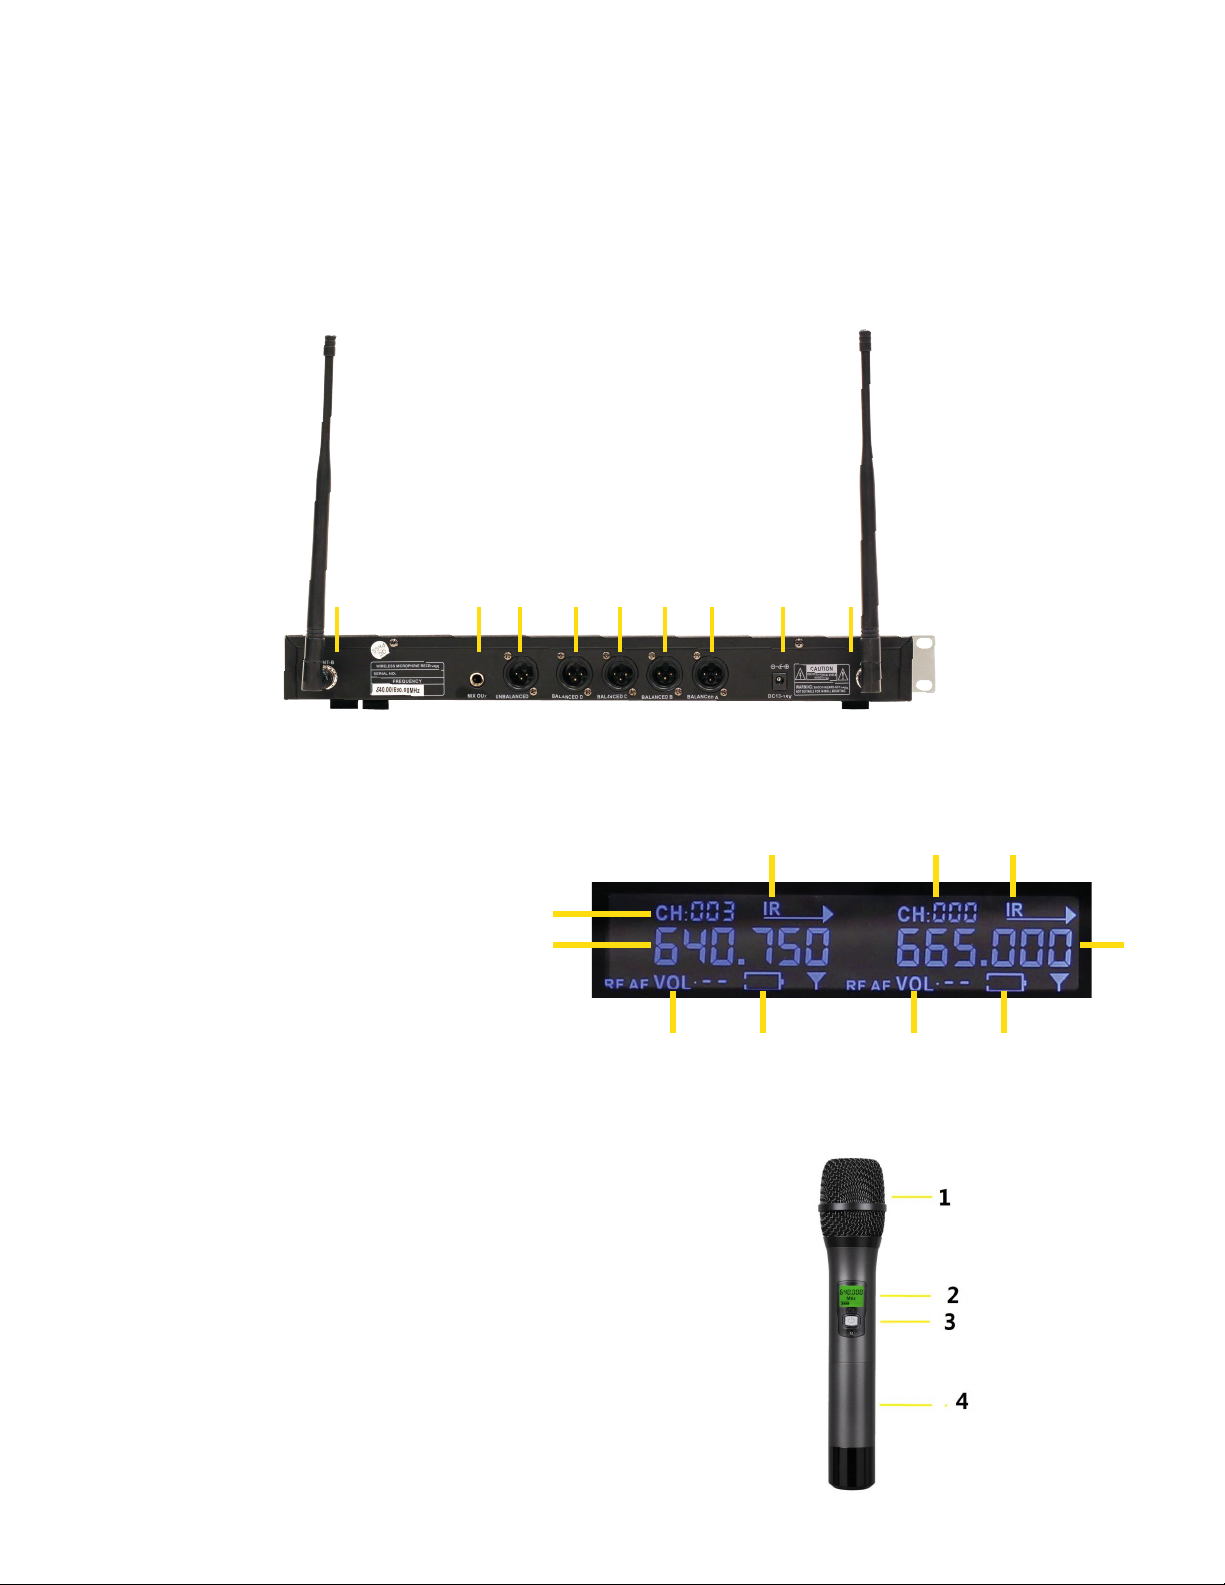
Receiver Rear
1. Antenna Port
2. Individual Channel Output - 3-Pin XLR Male Connection
3. Mix Audio Output - 1/4”TS Female Connection or 3-Pin XLR Male Connection
4. AC Power Input
Receiver LCD Display
1. CH - UHF Channel Number
2. IR - Indicator for IR Transmission
3. UHF Frequency
4. RF - Signal Strength Indicator
5. VOL - Not Used
6. Battery Level
Handheld Microphone
1. Windscreen and Pop Filter
2. LCD Display
3. Power ON/OFF
4. Battery Cover
23 41 12 2 2 2
1
2
3 3
21
5 56 6

Microphone LCD Display
1. Channel Frequency
2. Battery Level
Lavalier
1. Windscreen
2. Clip
3. Mini-XLR Output
body Pack Top
1. Mini-XLR Input
2. Power LED
3. Power ON/OFF
4. IR Receiver
5. Antenna
1 2 3 4 5

Body Pack LCD Display
1. Channel Frequency
2. Battery Level
Setup and Operation
1. Connect the Receiver to PA system with XLR for individual channel sends or via TS for mix output.
2. Turn on the Receiver
3. Power on handheld microphone or body pack.
4. To manually choose a frequency, press the UP or DOWN buttons located on the receiver until a
desired frequency is selected. After selection is made, it becomes locked after 3 seconds.
5. To SCAN all frequencies for a clear channel, press and hold the SET button until the receiver starts scanning
the available frequencies. A clear frequency is selected and becomes locked after the scan is complete.
6. To sync the receiver frequency with the handheld microphone or body pack:
•Power on handheld microphone or body pack.
•Press SET button once to begin frequency sync between the receiver and the handheld microphone or
body pack. The IR indicator on the receiver will begin ashing.
•Point the LCD display on a handheld microphone or the top of the body pack towards the receiver,
approximately 6 inches from the center front face of the receiver.
•The IR sync will tune the microphone or body pack to the desired frequency on the receiver. The receiver
will attempt to sync the frequency for approximately eight seconds.
7. Adjust volume with the volume control on the face of the receiver.
8. Repeat this procedure for each microphone or body pack, while making sure that they do not use the same
frequency.
.
Handheld Microphone Addendum
1. In cases of extreme interference, it may help to toggle the HI/LO switch located inside the battery compartment.
2. Hold the tip of the microphone about an inch from your mouth, at about 45°. The most important thing is to
maintain consistent microphone positioning for a consistent volume and tone. Varying the angle or
the distance from your mouth will change the sound produced.

Troubleshooting
Faint Sound or No Sound
•Verify connections to PA system
•Adjust channel volume
•Turn on handheld microphone or body pack
•Check that batteries are installed correctly.
•Change or charge batteries
•Verify AC adapter is plugged securely into AC outlet
•Check that receiver unit is powered on
•Verify that antennas are connected securely
Audio Interference, Artifacts, or Dropouts
•Change receiver and handheld microphone or body pack to a dierent frequency
•Identify and remove sources of interference: mobile phones, Wi-Fi access points, signal processors, electronics, etc.
•Charge or change batteries
•Verify system is being used within recommended range.
•Move system away from metallic surfaces
•Provide line-of-sight from handheld microphone or body pack to receiver unit antennas
Distortion
•Lower channel volume
•Change or charge batteries
•Verify delity of signal cable to PA
IR Sync Not Working
•Verify both units are turned on
•Hold the handheld microphone with LCD display turned towards the receiver
•Hold the body pack with the top of the unit turned towards the receiver
•Hold the handheld microphone or body pack 3 to 6 inches from the center front face of the receiver
If you are still experiencing issues after following this troubleshooting guide, please call us directly at
instructions provided in this manual are subject to change without notice.
Visit us a t: www.micmas.cn
Table of contents
Other Micmas Microphone System manuals


