Micro Motion CMF Series User manual

Micro Motion
TM
Micro Motion®
ELITE®Sensor
Instruction Manual
Installation and Operation Manual
P/N 20000175, Rev F
June 2003
All manuals and user guides at all-guides.com
all-guides.com

All manuals and user guides at all-guides.com

Micro Motion®
ELITE®Sensor
Instruction Manual
For online technical support, refer to the EXPERT2™ tool at
www.expert2.com. To speak to a customer service
representative, call the support center nearest you:
• In U.S.A., phone 1-800-522-MASS (1-800-522-6277)
• In Canada and Latin America, phone (303) 530-8400
• In Asia, phone (65) 6770-8155
• In the U.K., phone 0800 - 966 180 (toll-free)
• Outside the U.K., phone +31 (0) 318 495 670
©2003, Micro Motion, Inc. All rights reserved. Micro Motion is a registered trademark
of Micro Motion, Inc. The Micro Motion and Emerson logos are trademarks of
Emerson Electric Co. All other trademarks are property of their respective owners.
All manuals and user guides at all-guides.com

All manuals and user guides at all-guides.com

Micro Motion®ELITE®Sensor Instruction Manual i
Contents
Before You Begin. . . . . . . . . . . . . . . . . . . . . . . . . . . . . . . . . . 1
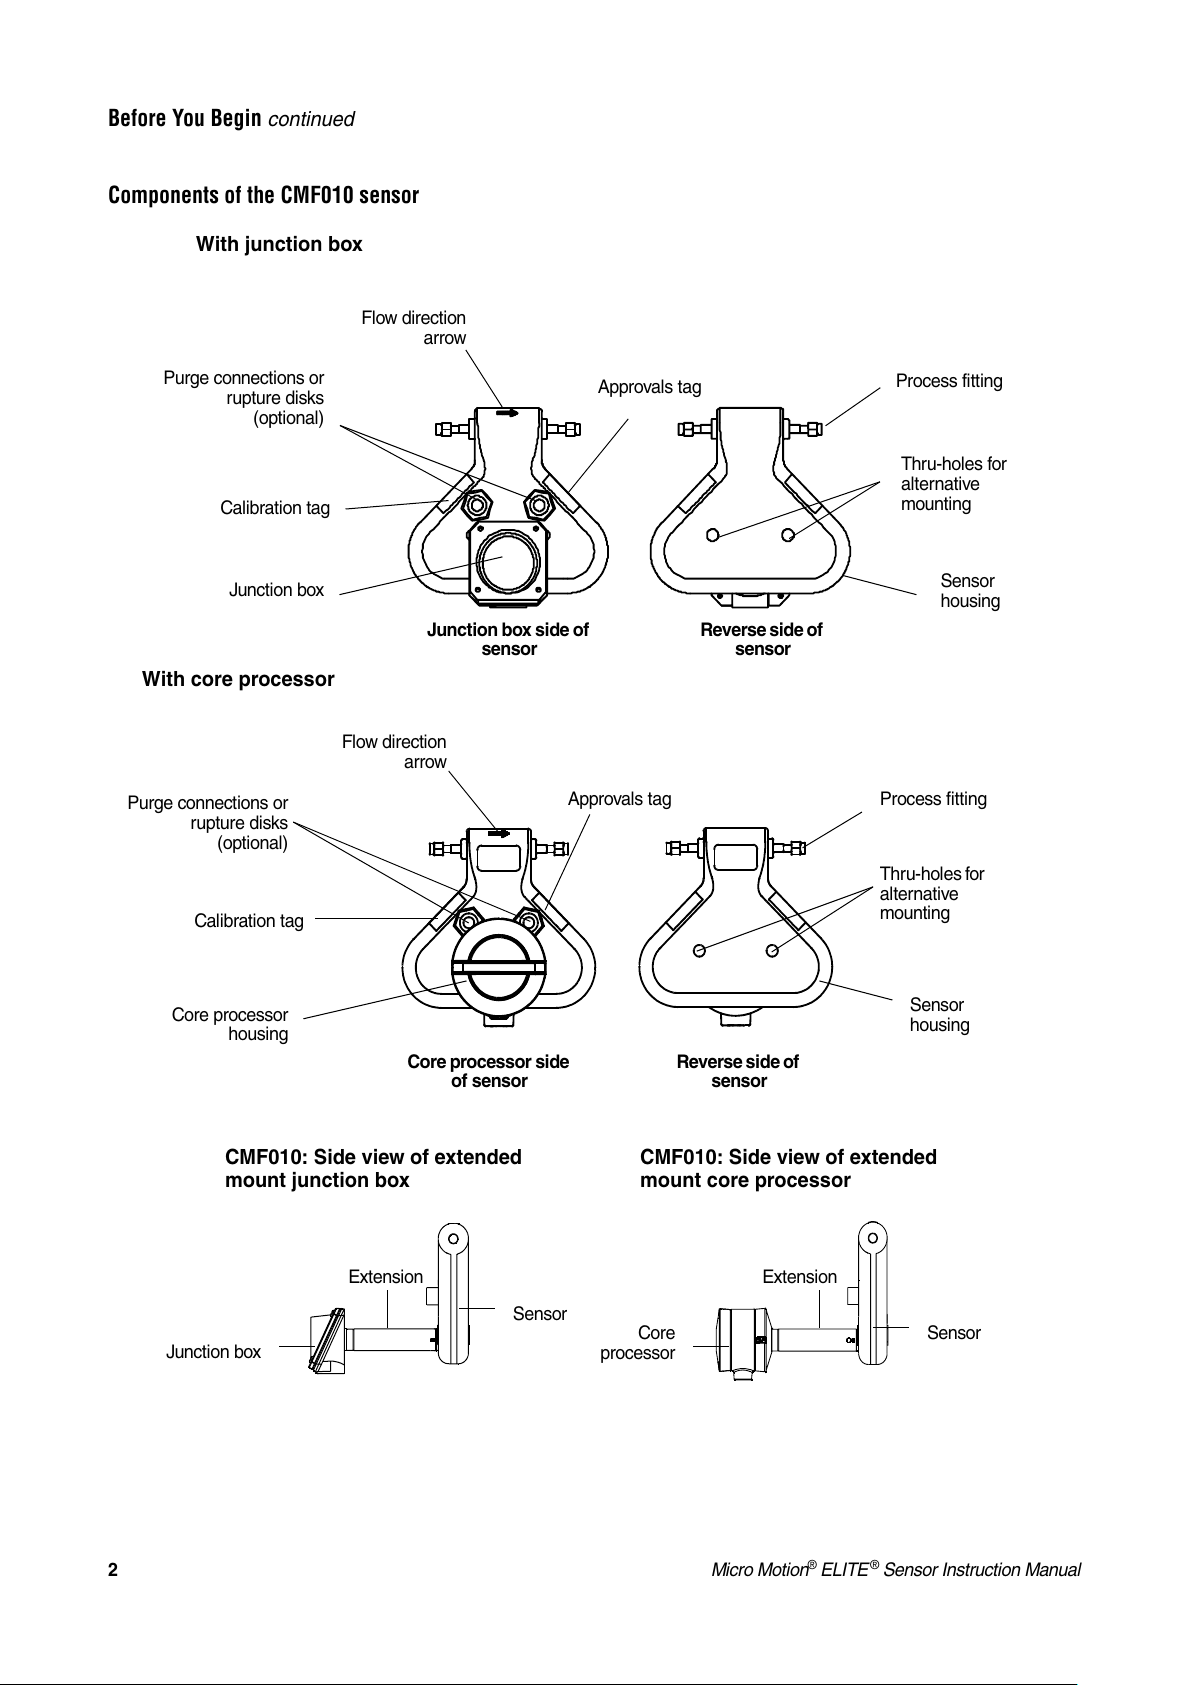
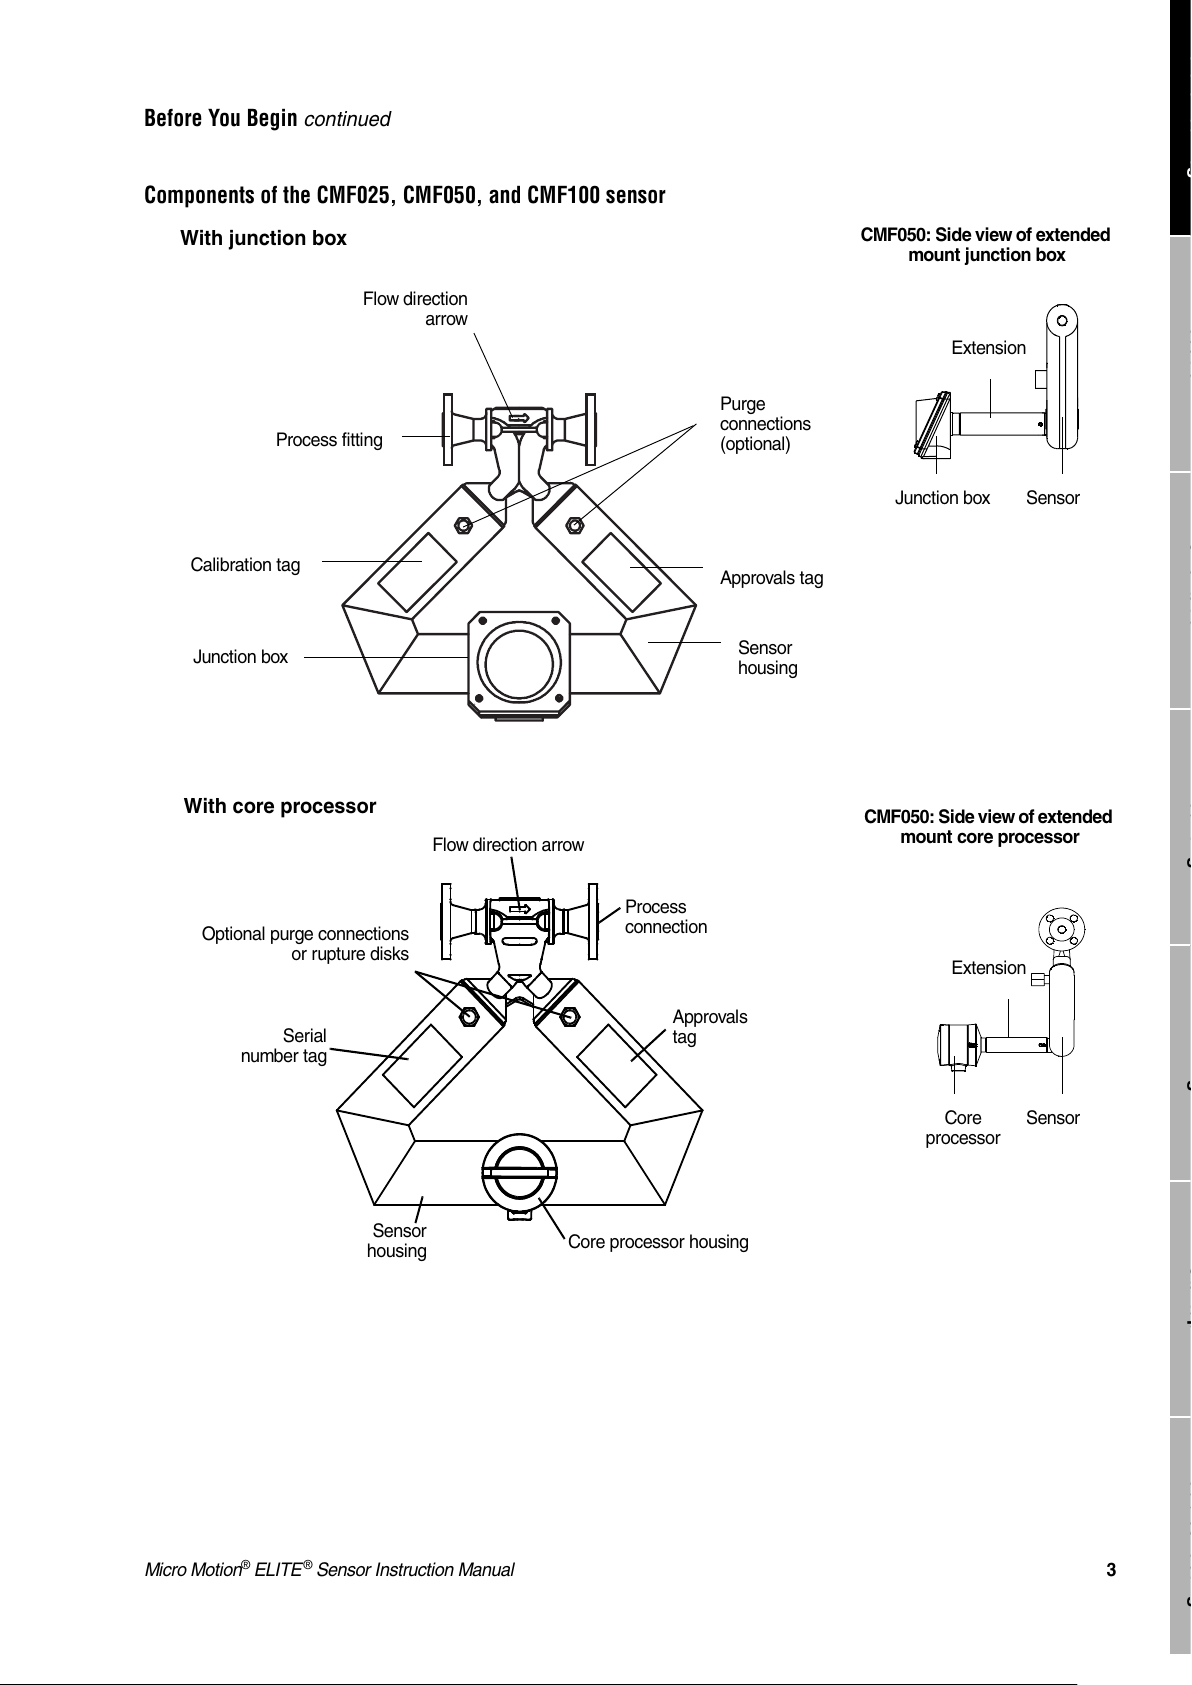
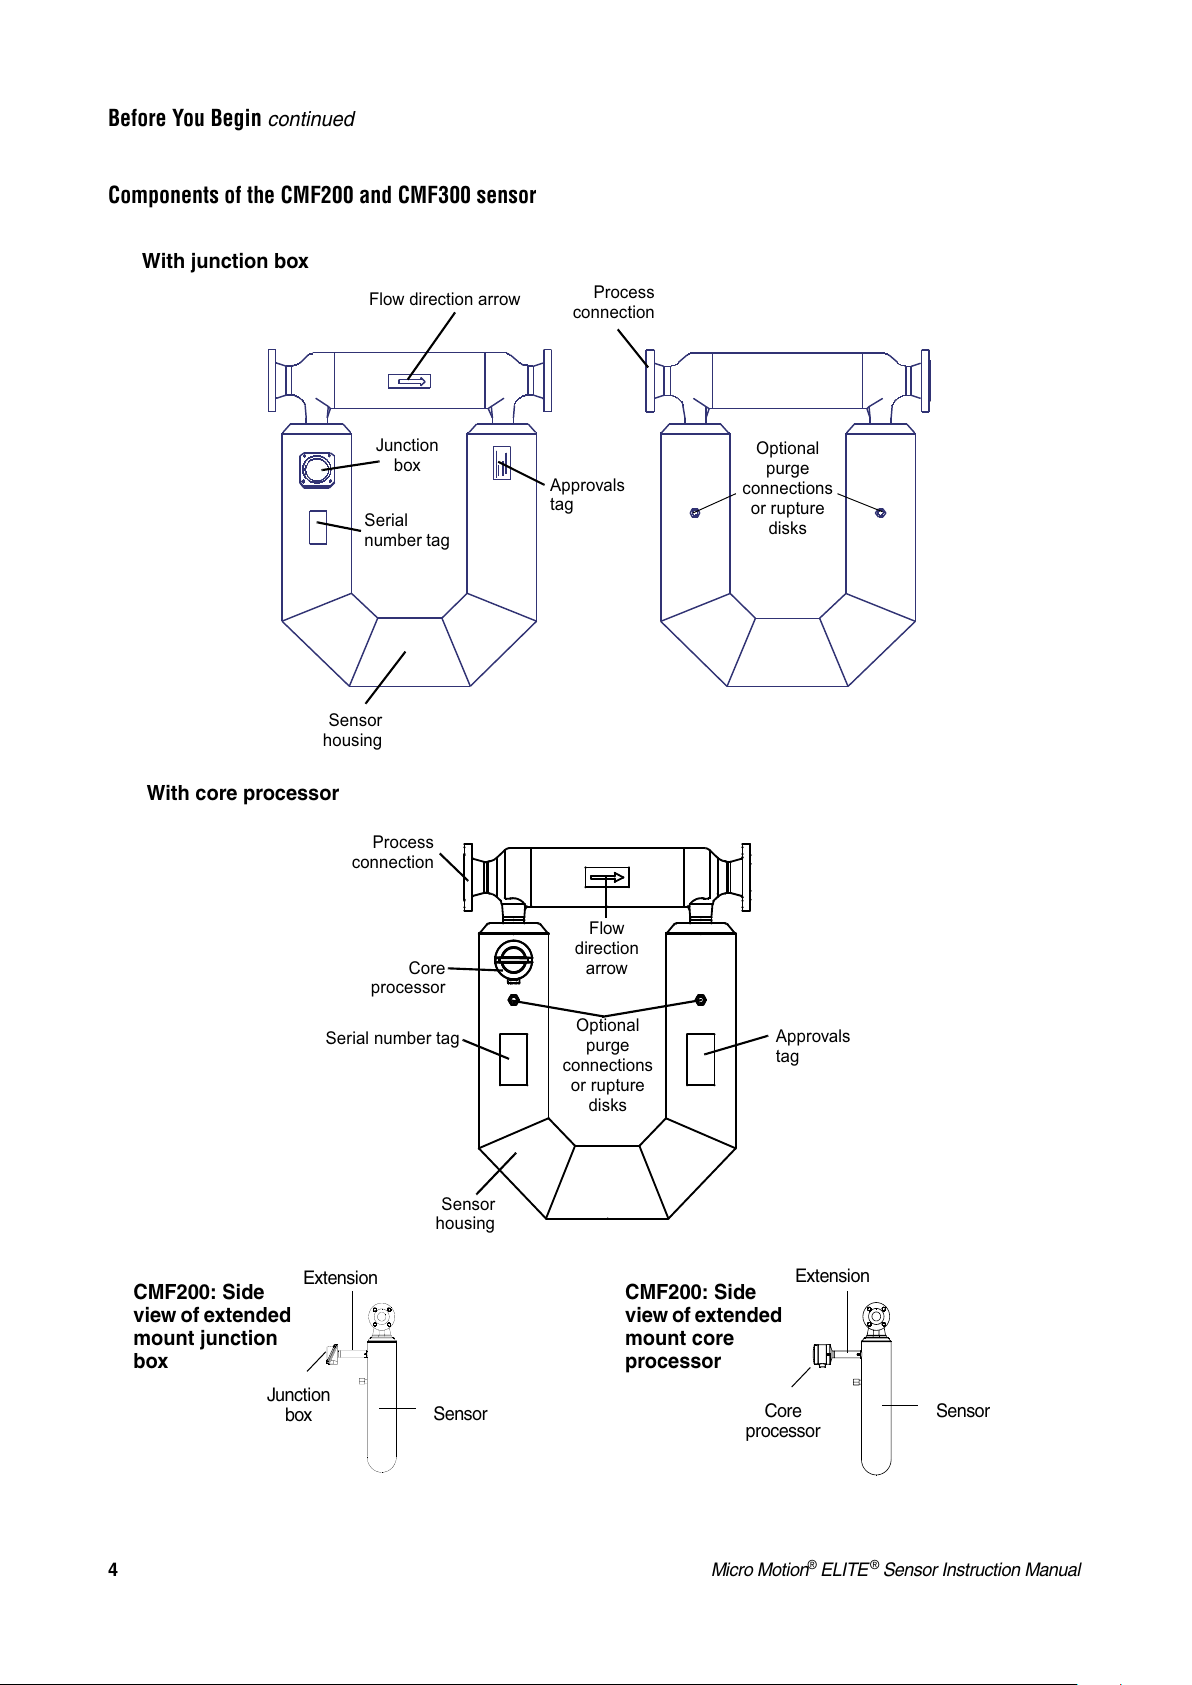
Your new sensor. . . . . . . . . . . . . . . . . . . . . . . . . . . . . . . . . . . . . 1
The installation process . . . . . . . . . . . . . . . . . . . . . . . . . . . . . . . 7
Additional information. . . . . . . . . . . . . . . . . . . . . . . . . . . . . . . . . 8
Step 1. Location . . . . . . . . . . . . . . . . . . . . . . . . . . . . . . . . . . . 9
Pipe run . . . . . . . . . . . . . . . . . . . . . . . . . . . . . . . . . . . . . . . . . . . 9
Maximum wiring distances . . . . . . . . . . . . . . . . . . . . . . . . . . . . . 9
Environmental limits . . . . . . . . . . . . . . . . . . . . . . . . . . . . . . . . . . 10
Core processor. . . . . . . . . . . . . . . . . . . . . . . . . . . . . . . . . . . . . . 11
Valves. . . . . . . . . . . . . . . . . . . . . . . . . . . . . . . . . . . . . . . . . . . . . 11
Hazardous area installations . . . . . . . . . . . . . . . . . . . . . . . . . . . 11
Step 2. Orientation . . . . . . . . . . . . . . . . . . . . . . . . . . . . . . . . 13
Flow direction . . . . . . . . . . . . . . . . . . . . . . . . . . . . . . . . . . . . . . . 13
Orienting the conduit opening. . . . . . . . . . . . . . . . . . . . . . . . . . . 13
Process fluid. . . . . . . . . . . . . . . . . . . . . . . . . . . . . . . . . . . . . . . . 15
Step 3. Mounting . . . . . . . . . . . . . . . . . . . . . . . . . . . . . . . . . . 19
Optional CMF010 mounting . . . . . . . . . . . . . . . . . . . . . . . . . . . . 20
CMF300A high-temperature sensors . . . . . . . . . . . . . . . . . . . . . 21
Installing wafer-style sensors . . . . . . . . . . . . . . . . . . . . . . . . . . . 21
Step 4. Wiring . . . . . . . . . . . . . . . . . . . . . . . . . . . . . . . . . . . . . 25
Hazardous area installations . . . . . . . . . . . . . . . . . . . . . . . . . . . 25
CMF400 sensor . . . . . . . . . . . . . . . . . . . . . . . . . . . . . . . . . . . . . 25
CMF400 booster amplifier . . . . . . . . . . . . . . . . . . . . . . . . . . . . . 26
CMF300A junction box . . . . . . . . . . . . . . . . . . . . . . . . . . . . . . . . 29
Connecting and shielding 9-wire cable. . . . . . . . . . . . . . . . . . . . 33
Core processor to a 4-wire remote transmitter or remote host. . 36
Sensor grounding . . . . . . . . . . . . . . . . . . . . . . . . . . . . . . . . . . . . 41
Step 5. Startup. . . . . . . . . . . . . . . . . . . . . . . . . . . . . . . . . . . . . 43
Zeroing . . . . . . . . . . . . . . . . . . . . . . . . . . . . . . . . . . . . . . . . . . . . 43
Configuration, calibration, and characterization . . . . . . . . . . . . . 43
Customer Service. . . . . . . . . . . . . . . . . . . . . . . . . . . . . . . . . . . . 44
All manuals and user guides at all-guides.com

ii Micro Motion®ELITE®Sensor Instruction Manual
Contents continued
Troubleshooting . . . . . . . . . . . . . . . . . . . . . . . . . . . . . . . . . . . 45
General information. . . . . . . . . . . . . . . . . . . . . . . . . . . . . . . . . . . 45
Zero drift . . . . . . . . . . . . . . . . . . . . . . . . . . . . . . . . . . . . . . . . . . . 47
Erratic flow rate. . . . . . . . . . . . . . . . . . . . . . . . . . . . . . . . . . . . . . 48
Inaccurate flow rate or batch total. . . . . . . . . . . . . . . . . . . . . . . . 49
Inaccurate density reading . . . . . . . . . . . . . . . . . . . . . . . . . . . . . 50
Inaccurate temperature reading . . . . . . . . . . . . . . . . . . . . . . . . . 51
Troubleshooting at the transmitter . . . . . . . . . . . . . . . . . . . . . . . 51
Troubleshooting at the sensor. . . . . . . . . . . . . . . . . . . . . . . . . . . 55
Appendix A Purge Fittings. . . . . . . . . . . . . . . . . . . . . . 59
Appendix B Rupture Disks. . . . . . . . . . . . . . . . . . . . . . 63
Appendix C Label Maintenance
and Replacement. . . . . . . . . . . . . . . . . . . . . . . . . . . . . . . 65
Appendix D Return Policy . . . . . . . . . . . . . . . . . . . . . . 67
Index . . . . . . . . . . . . . . . . . . . . . . . . . . . . . . . . . . . . . . . . . . . . . . . 69
All manuals and user guides at all-guides.com
all-guides.com

Wiring Startup TroubleshootingBefore You Begin Location Orientation Mounting
Micro Motion®ELITE ® Sensor Instruction Manual 1
Before You Begin
Your new sensor Your new Micro Motion®ELITE®sensor (CMF series) is one part of a
Coriolis flowmetering system. The other part is a transmitter.
Transmitter connections
The sensor (except CMF300A) is available with two different transmitter
connections:
•An integral core processor for connecting to a 4-wire remotely mounted
transmitter or to a user-supplied remote host.
•A 9-wire junction box for connecting to a remotely mounted transmitter,
or to a remotely mounted core processor.
The CMF300A sensor is available only with a remote junction box.
European installations
This Micro Motion product complies with all applicable European
directives when properly installed in accordance with the instructions in
this manual. Refer to the EC declaration of conformity for directives that
apply to this product.
The EC declaration of conformity, with all applicable European
directives, and the complete ATEX Installation Drawings and Instructions
are available on the internet at www.micromotion.com/atex or through
your local Micro Motion support center.
Sensor components
Components of the sensor are illustrated throughout the rest of this
section.
All manuals and user guides at all-guides.com

2Micro Motion®ELITE ® Sensor Instruction Manual
Before You Begin continued
Components of the CMF010 sensor
With junction box
Flow direction
arrow
Purge connections or
rupture disks
(optional)
Calibration tag
Sensor
housing
Junction box
Junction box side of
sensor
Reverse side of
sensor
Process fitting
Thru-holes for
alternative
mounting
Approvals tag
With core processor
Flow direction
arrow
Purge connections or
rupture disks
(optional)
Calibration tag
Sensor
housing
Core processor
housing
Core processor side
of sensor
Reverse side of
sensor
Process fitting
Thru-holes for
alternative
mounting
Approvals tag
CMF010: Side view of extended
mount junction box
CMF010: Side view of extended
mount core processor
Junction box
Sensor
Extension
Core
processor
Sensor
Extension
All manuals and user guides at all-guides.com

Micro Motion®ELITE ® Sensor Instruction Manual 3
Before You Begin continued
Wiring Startup TroubleshootingBefore You Begin Location Orientation Mounting
Components of the CMF025, CMF050, and CMF100 sensor
With junction box
With core processor
Flow direction
arrow
Process fitting
Purge
connections
(optional)
Approvals tag
Sensor
housing
Junction box
Calibration tag
CMF050: Side view of extended
mount junction box
CMF050: Side view of extended
mount core processor
Junction box Sensor
Extension
Core
processor
Extension
Sensor
Approvals
tag
Flow direction arrow
Core processor housing
Serial
number tag
Optional purge connections
or rupture disks
Process
connection
Sensor
housing
All manuals and user guides at all-guides.com

4Micro Motion®ELITE ® Sensor Instruction Manual
Before You Begin continued
Components of the CMF200 and CMF300 sensor
CMF200: Side
view of extended
mount junction
box
CMF200: Side
view of extended
mount core
processor
Junction
box
Extension
Sensor Core
processor
Extension
Sensor
With junction box
With core processor
$SSURYDOV
WDJ
)ORZ
GLUHFWLRQ
DUURZ
&RUH
SURFHVVRU
6HULDOQXPEHUWDJ 2SWLRQDO
SXUJH
FRQQHFWLRQV
RUUXSWXUH
GLVNV
3URFHVV
FRQQHFWLRQ
6HQVRU
KRXVLQJ
$SSURYDOV
WDJ
)ORZGLUHFWLRQDUURZ
-XQFWLRQ
ER[
2SWLRQDO
SXUJH
FRQQHFWLRQV
RUUXSWXUH
GLVNV
3URFHVV
FRQQHFWLRQ
6HQVRU
KRXVLQJ
6HULDO
QXPEHUWDJ
All manuals and user guides at all-guides.com

0LFUR0RWLRQ(/,7(6HQVRU,QVWUXFWLRQ0DQXDO
Before You BeginFRQWLQXHG
:LULQJ 6WDUWXS 7URXEOHVKRRWLQJ%HIRUH<RX%HJLQ /RFDWLRQ 2ULHQWDWLRQ 0RXQWLQJ
Components of the CMF300A sensor
Components of the CMF400 sensor: Integral booster amplifier with core processor
)ORZGLUHFWLRQ
DUURZ
3URFHVVILWWLQJ 3XUJH
FRQQHFWLRQV
RSWLRQDO
$SSURYDOV
WDJ
6HQVRU
KRXVLQJ 5HPRWHPRXQW
MXQFWLRQER[
&DOLEUDWLRQWDJ
LQFKIOH[LEOHFRQGXLW
LQFKEHQGUDGLXV
&DOLEUDWLRQ
WDJ
3URFHVVILWWLQJ
%RRVWHU
DPSOLILHU
$SSURYDO
WDJ
6HQVRU
KRXVLQJ
&RUHSURFHVVRUKRXVLQJ
&XVWRPHUWDJ
LIUHTXHVWHG
All manuals and user guides at all-guides.com
all-guides.com

0LFUR0RWLRQ(/,7(6HQVRU,QVWUXFWLRQ0DQXDO
Before You BeginFRQWLQXHG
Components of the CMF400 sensor: Remote booster amplifier with core processor
Components of the CMF400 sensor: Integral booster amplifier with junction box
$SSURYDO
WDJ
)DFWRU\VXSSOLHG
ZLULQJ
5HPRWH
ERRVWHU
DPSOLILHU
&RUHSURFHVVRU
KRXVLQJ
3URFHVV
ILWWLQJ
,QWULQVLFDOO\VDIHZLULQJ ([SORVLRQSURRIZLULQJ
6HQVRU
KRXVLQJ
$SSURYDO
WDJ
&DOLEUDWLRQ
WDJ
&XVWRPHU
WDJ LI
UHTXHVWHG
3URFHVV
ILWWLQJ
&DOLEUDWLRQ
WDJ
6HQVRU
KRXVLQJ
-XQFWLRQ
ER[
$SSURYDO
WDJ
&XVWRPHUWDJ
LIUHTXHVWHG
%RRVWHU
DPSOLILHU
All manuals and user guides at all-guides.com

0LFUR0RWLRQ(/,7(6HQVRU,QVWUXFWLRQ0DQXDO
Before You BeginFRQWLQXHG
:LULQJ 6WDUWXS 7URXEOHVKRRWLQJ%HIRUH<RX%HJLQ /RFDWLRQ 2ULHQWDWLRQ 0RXQWLQJ
Components of the CMF400 sensor: Remote booster amplifier with junction box
The installation process ,QVWDOOLQJ\RXUQHZVHQVRULQYROYHVILYHVWHSV
6WHS/RFDWLRQ
'HWHUPLQLQJWKHSURSHUORFDWLRQIRUWKHVHQVRUWDNLQJLQWRDFFRXQW
KD]DUGRXVDUHDVSURFHVVSLSLQJWUDQVPLWWHUORFDWLRQDQGYDOYHV6HH
SDJH
6WHS2ULHQWDWLRQ
'HWHUPLQLQJWKHGHVLUHGRULHQWDWLRQIRUWKHVHQVRULQWKHSURFHVV
SLSHOLQH6HHSDJH
6WHS 0RXQWLQJ
,QVWDOOLQJWKHVHQVRULQWKHSLSHOLQH6HHSDJH
6WHS:LULQJ
&RQQHFWLQJWKHIORZPHWHUFDEOHWRWKHVHQVRUDQGWUDQVPLWWHU6HH
SDJH
6WHS6WDUWXS
5HTXLUHPHQWVIRUIORZPHWHUVWDUWXS6HHSDJH
)DFWRU\VXSSOLHG
ZLULQJ
-XQFWLRQER[
5HPRWH
ERRVWHU
DPSOLILHU
$SSURYDO
WDJ
3URFHVV
ILWWLQJ
([SORVLRQSURRIZLULQJ
$SSURYDO
WDJ
6HQVRU
KRXVLQJ
,QWULQVLFDOO\VDIHZLULQJ
&XVWRPHUWDJ
LIUHTXHVWHG
&DOLEUDWLRQ
WDJ
All manuals and user guides at all-guides.com

0LFUR0RWLRQ(/,7(6HQVRU,QVWUXFWLRQ0DQXDO
Before You BeginFRQWLQXHG
Additional information ,QDGGLWLRQWRLQVWDOODWLRQLQVWUXFWLRQVWKHIROORZLQJVXEMHFWVDUHDOVR
FRYHUHGLQWKLVPDQXDO
7URXEOHVKRRWLQJIRUSUREOHPVWKDWPLJKWEHDWWULEXWDEOHWRWKHVHQVRU
EHJLQVRQSDJH
3XUJHILWWLQJVDUHGHVFULEHGLQ$SSHQGL[$SDJH
5XSWXUHGLVNVDUHGHVFULEHGLQ$SSHQGL[%SDJH
0DLQWHQDQFHRIODEHOVLVH[SODLQHGLQ$SSHQGL[&SDJH
5HWXUQSROLF\IRU0LFUR0RWLRQHTXLSPHQWLVGHVFULEHGLQ$SSHQGL['
SDJH
All manuals and user guides at all-guides.com

0LFUR0RWLRQ(/,7(6HQVRU,QVWUXFWLRQ0DQXDO
:LULQ 6WDUWXS 7URXEOHVKRRWLQ%HIRUH<RX%H LQ /RFDWLRQ 2ULHQWDWLRQ 0RXQWLQ
Installation
Step 1 Location
Pipe run 0LFUR0RWLRQVHQVRUVGRQRWUHTXLUHDVWUDLJKWUXQRISLSHXSVWUHD RU
GRZQVWUHD ,IWZRLGHQWLFDOVHQVRUVDUHLQVWDOOHGLQVHULHVWKH\VKRXOG
EHDWOHDVWIW DSDUW
Maximum wiring distances 8VHWKHVHJXLGHOLQHVIRUFDOFXODWLQJ D[L X ZLULQJGLVWDQFHV
0D[L X GLVWDQFHEHWZHHQVHQVRUDQGWUDQV LWWHUGHSHQGVRQFDEOH
W\SH6HH7DEOH
.H\VIRUVHQVRUORFDWLRQ
7KHVHQVRU D\EHORFDWHGDQ\ZKHUHLQWKHSURFHVVOLQHDVORQJDV
WKHIROORZLQJFRQGLWLRQVDUH HW
%HIRUHRSHUDWLRQ\RX XVWEHDEOHWRVWRSIORZWKURXJKWKHVHQVRU
'XULQJWKH]HURLQJSURFHGXUHIORZ XVWEHVWRSSHGFR SOHWHO\DQG
WKHVHQVRU XVWEHIXOORISURFHVVIOXLG
,IWKHVHQVRUKDVDFRUHSURFHVVRU\RX XVWDOVRFRQVLGHU
HQYLURQ HQWDOUHTXLUH HQWVRIWKHFRUHSURFHVVRU
'XULQJRSHUDWLRQWKHVHQVRU XVWUH DLQIXOORISURFHVVIOXLG
7KHVHQVRU XVWEHLQVWDOOHGLQDQDUHDWKDWLVFR SDWLEOHZLWKWKH
FODVVLILFDWLRQVSHFLILHGRQWKHVHQVRUDSSURYDOVWDJ6HH
LOOXVWUDWLRQVSDJHV
Table 1. Maximum cable lengths
&DEOHW\SH :LUH DX H 0D[LPXPOHQ WK
0LFUR0RWLRQZLUHWRDQ09'
WUDQV LWWHURUFRUHSURFHVVRU
1RWDSSOLFDEOH IHHW HWHUV
0LFUR0RWLRQZLUHWRDOORWKHU
WUDQV LWWHUV
1RWDSSOLFDEOH IHHW
HWHUV
0LFUR0RWLRQZLUH 1RWDSSOLFDEOH IHHW
HWHUV
8VHUVXSSOLHGZLUH
3RZHUZLUHV9'& $:* IHHW HWHUV
$:* IHHW HWHUV
$:* IHHW
HWHUV
6LJQDOZLUHV56 $:* RU
ODUJHU
IHHW
HWHUV
All manuals and user guides at all-guides.com

0LFUR0RWLRQ(/,7(6HQVRU,QVWUXFWLRQ0DQXDO
LocationFRQWLQXHG
&0)ERRVWHUDPSOLILHUFDEOH
7KH&0)VHQVRULVVKLSSHGZLWKIHHW HWHUVRIFDEOHIRU
FRQQHFWLQJWRWKHUH RWHERRVWHUD SOLILHU)RUORQJHUFDEOHOHQJWKVXS
WRIWFRQWDFW0LFUR0RWLRQ
&0)$MXQFWLRQER[
7KH&0)$KLJKWH SHUDWXUHVHQVRUFR HVZLWKDLQ
SUHLQVWDOOHGIOH[LEOHFRQGXLW7KLVFRQGXLWLVUHTXLUHGIRUDJHQF\
DSSURYDOHJ8/&6$$7(;HWF$MXQFWLRQER[LVFRQQHFWHGWRWKH
HQGRIWKLVFDEOHE\WKHIDFWRU\7KHMXQFWLRQER[SURYLGHVDQH[WHULRU
JURXQGWRWKHVHQVRUDQGKRXVHVWKHWHU LQDOVWULSIRUWKHIORZ HWHU
FDEOH
Environmental limits ,QVWDOOWKHVHQVRULQDORFDWLRQWKDWIDOOVZLWKLQWKHIROORZLQJOL LWV
3URFHVVIOXLGWHPSHUDWXUHOLPLWV
•±WR)±WR&IRUVHQVRUZLWKMXQFWLRQER[
•±WR)±WR&IRUVHQVRUZLWKFRUHSURFHVVRU
±WR)±WR&IRUVHQVRUZLWKH[WHQGHGFRUH
SURFHVVRU
•WR)WR&IRU&0)$VHQVRU
$PELHQWWHPSHUDWXUHOLPLWV
•±WR)±DQG&IRUVHQVRUZLWKFRUHSURFHVVRU
•±WR)±WR&IRU&0)$UH RWHMXQFWLRQER[
)RU$7(;DSSURYDOVSURFHVVIOXLGWH SHUDWXUHFDQEHIXUWKHUUHVWULFWHG
E\D ELHQWWH SHUDWXUHV)RUJXLGHOLQHVJRWRZZZ LFUR RWLRQFR
DWH[
&0)ERRVWHUDPSOLILHUOLPLWV
,QVWDOOWKHERRVWHUD SOLILHULQDORFDWLRQWKDWIDOOVZLWKLQWKHIROORZLQJ
OL LWV
3URFHVVIOXLGWH SHUDWXUHOL LWVEHWZHHQ±WR)±WR
&IRUWKHLQWHJUDOO\ RXQWHGERRVWHUD SOLILHUZLWKHLWKHUWKHFRUH
SURFHVVRURUMXQFWLRQER[
3URFHVVIOXLGWH SHUDWXUHOL LWVEHWZHHQ±WR)±WR
&IRUWKHUH RWHO\ RXQWHGERRVWHUD SOLILHUZLWKHLWKHUWKH
FRUHSURFHVVRURUMXQFWLRQER[
$ ELHQWWH SHUDWXUHOL LWVEHWZHHQ±WR)±WR&
ZLWKHLWKHUDFRUHSURFHVVRURUMXQFWLRQER[
All manuals and user guides at all-guides.com
all-guides.com

LocationFRQWLQXHG
:LULQ 6WDUWXS 7URXEOHVKRRWLQ%HIRUH<RX%H LQ /RFDWLRQ 2ULHQWDWLRQ 0RXQWLQ
0LFUR0RWLRQ(/,7(6HQVRU,QVWUXFWLRQ0DQXDO
Core processor 7KHVHQVRUZLWKDFRUHSURFHVVRUKDVD D[L X SURFHVVWH SHUDWXUH
OL LWRI)&,IWKHSURFHVVIOXLGWH SHUDWXUHLVH[SHFWHGWR
H[FHHGWKLVWH SHUDWXUH\RX XVWXVHDMXQFWLRQER[ RGHOVHQVRUZLWK
DZLUH6HULHVRUWUDQV LWWHU
Valves $IWHUWKHVHQVRUDQGWUDQV LWWHUKDYHEHHQIXOO\LQVWDOOHG\RX XVW
SHUIRU WKH]HURLQJSURFHGXUH'XULQJWKH]HURLQJSURFHGXUHIORZ
WKURXJKWKHVHQVRU XVWEHKDOWHGDQGWKHVHQVRUWXEHV XVWEH
FR SOHWHO\IXOORISURFHVVIOXLG$VKXWRIIYDOYHGRZQVWUHD IUR WKH
VHQVRULVUHTXLUHGWRKDOWIORZGXULQJWKH]HURLQJSURFHGXUH
Hazardous area installations 0DNHVXUHWKHKD]DUGRXVDUHDVSHFLILHGRQWKHVHQVRUDSSURYDOVWDJLV
VXLWDEOHIRUWKHHQYLURQ HQWLQZKLFKWKHVHQVRULVLQVWDOOHG6HH
LOOXVWUDWLRQVRQSDJHV)RULQVWDOODWLRQLQDQDUHDWKDWUHTXLUHV
LQWULQVLFVDIHW\UHIHUWR0LFUR0RWLRQ8/&6$6$$RU$7(;
GRFX HQWDWLRQVKLSSHGZLWKWKHVHQVRURUDYDLODEOHIUR WKH0LFUR
0RWLRQZHEVLWH
)RUDFR SOHWHOLVWRIKD]DUGRXVDUHDFODVVLILFDWLRQVIRU0LFUR0RWLRQ
VHQVRUVUHIHUWRWKH(;3(57V\VWH DWZZZH[SHUWFR
,I\RXGRQ¶WKDYHDFFHVVWRWKH:RUOG:LGH:HE\RXFDQREWDLQDQ,6
DQXDOE\FRQWDFWLQJWKH0LFUR0RWLRQ&XVWR HU6HUYLFH'HSDUW HQW
•,QWKH86$SKRQH0$66
•,Q&DQDGDDQG/DWLQ$ HULFDSKRQH
•,Q$VLDSKRQH
•,QWKH8.SKRQHWROOIUHH
•2XWVLGHWKH8.SKRQH
All manuals and user guides at all-guides.com

0LFUR0RWLRQ(/,7(6HQVRU,QVWUXFWLRQ0DQXDO
All manuals and user guides at all-guides.com

0LFUR0RWLRQ(/,7(6HQVRU,QVWUXFWLRQ0DQXDO
:LULQJ 6WDUWXS 7URXEOHVKRRWLQJ%HIRUH<RX%HJLQ /RFDWLRQ 2ULHQWDWLRQ 0RXQWLQJ
Installation
Step 2 Orientation
Flow direction 0LFUR0RWLRQVHQVRUVPHDVXUHDFFXUDWHO\UHJDUGOHVVRIIORZGLUHFWLRQ
)ORZGLUHFWLRQDUURZ
7KHVHQVRUKDVDIORZGLUHFWLRQDUURZVHHLOOXVWUDWLRQVSDJHVWR
KHOS\RXFRQILJXUHWKHWUDQVPLWWHUIRUIORZGLUHFWLRQ7KHVHQVRU
PHDVXUHVIORZLQHLWKHUGLUHFWLRQKRZH HULIWKHSURFHVVIOXLGIORZVLQ
WKHGLUHFWLRQRSSRVLWHWRWKHIORZGLUHFWLRQDUURZWKHQWKHWUDQVPLWWHU
PXVWEHFRQILJXUHGDSSURSULDWHO\)RUPRUHLQIRUPDWLRQLQFOXGLQJ
FRQILJXUDWLRQLQVWUXFWLRQVUHIHUWRWKHWUDQVPLWWHULQVWUXFWLRQPDQXDO
9HUWLFDOSLSHOLQH
,IWKHVHQVRULVLQVWDOOHGLQD HUWLFDOSLSHOLQHOLTXLGVDQGVOXUULHVVKRXOG
IORZXSZDUGWKURXJKWKHVHQVRU*DVHVPD\IORZXSZDUGRUGRZQZDUG
Orienting the conduit opening 7KHFRQGXLWRSHQLQJLQWKHFRUHSURFHVVRUKRXVLQJRUMXQFWLRQER[
VKRXOGEHSRLQWHGGRZQZDUGWRUHGXFHWKHULVNRIFRQGHQVDWLRQRU
PRLVWXUHLQWKHFRUHSURFHVVRURUMXQFWLRQER[)ROORZWKHLQVWUXFWLRQVLQ
WKLVVHFWLRQWRURWDWHWKHFRUHSURFHVVRUKRXVLQJRUMXQFWLRQER[,ILWLV
QRWSRVVLEOHWRURWDWHWKHFRUHSURFHVVRUKRXVLQJRUMXQFWLRQER[LQVWDOO
ZLULQJZLWKGULSOHJVLQWKHFRQGXLWRUFDEOHV
RUHSURFHVVRUKRXVLQJ
<RXFDQURWDWHWKHFRUHSURFHVVRUKRXVLQJLQGHSHQGHQWO\IURPWKH
WHUPLQDOVLQVLGHEHIRUHWKHZLULQJLVDWWDFKHG5RWDWHRQO\WKHOLGDQG
FRUHSURFHVVRUKRXVLQJDQGQRWWKHHQWLUHFRUHSURFHVVRU6HHWKH
ILJXUHRQSDJH,IWKHHQWLUHFRUHSURFHVVRULVURWDWHGWKHVHQVRUZLOO
EHGDPDJHG
.H\VIRUVHQVRURULHQWDWLRQ
7KHVHQVRUZLOOIXQFWLRQSURSHUO\LQDQ\RULHQWDWLRQLIWKHVHQVRUIORZ
WXEHVUHPDLQILOOHGZLWKSURFHVVIOXLG
$87,21
7ZLVWLQJWKHFRUHSURFHVVRUZLOOGDPDJHWKHVHQVRU
'RQRWWZLVWWKHFRUHSURFHVVRU
All manuals and user guides at all-guides.com

0LFUR0RWLRQ(/,7(6HQVRU,QVWUXFWLRQ0DQXDO
OrientationFRQWLQXHG
Core processor mounted on ELITE sensor
7RRULHQWWKHFRUHSURFHVVRUFRQGXLWRSHQLQJ
7KHKRXVLQJOLGDQGFRUHSURFHVVRUKRXVLQJFDQEHUHPR HGRU
LQVWDOOHGE\SUHVVLQJDQGWXUQLQJHLWKHUFORFNZLVHRUFRXQWHUFORFNZLVH
WXUQ
5HPR HWKHKRXVLQJOLG
5HPR HWKHFRUHSURFHVVRUKRXVLQJGLVHQJDJLQJLWIURPWKHKRXVLQJ
EDVH
5HLQVWDOOWKHFRUHSURFHVVRUKRXVLQJVRWKHFRQGXLWRSHQLQJLVLQWKH
GHVLUHGORFDWLRQ
5HLQVWDOOWKHKRXVLQJOLG
5RWDWHRQO\WKHFRUHSURFHVVRUKRXVLQJDQG
OLG'RQRWURWDWHWKHFRUHSURFHVVRU
&RUHSURFHVVRU
+RXVLQJOLG
+RXVLQJEDVH
&RUHSURFHVVRUKRXVLQJ
All manuals and user guides at all-guides.com
This manual suits for next models
9
Table of contents