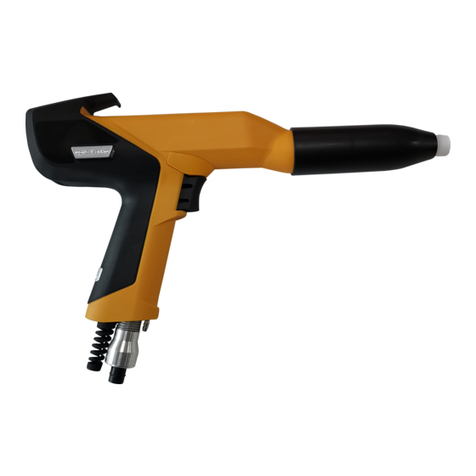
Microbecide TC-320 User manual

Page 1
TC-320 Electrostatic Sprayer
Operator Manual
_____________________
This manual last updated August 2020
Trademarks and Brand Names shown are the property of their respective owners.
TheTC-320 is powerful, compact, efficient, cost effective, easy to operate and user-friendly to
maintain. Before operating the TC-320 for the first time, please read the Operator
Responsibility statement below and read this Manual thoroughly for important information and
instructions for the safe operation of this sophisticated piece of equipment which will enable you
to keep your machine running at peak efficiency for decades.
Thank you, we appreciate your business!
If at any time you have questions or issues, contact us:
In the USA:
Elsewhere:
For your records:
The Microbecide® TC-320
Electrostatic Sprayer:
______________________
Model #
______________________
Serial #
______________________
Spraygun Serial #
______________________
Purchase Date

Page 2
Your TC-320 has been engineered to be safe during intended operation.
However, as with all line-powered electrical equipment certain safety procedures
are always recommended.
●Use a GFCI (Ground Fault Circuit Interrupter) power outlet.
●If an extension cord is necessary, use a three-prong grounding cord.
●Turn OFF the TC-320 before unplugging.
●Unplug the TC-320 when not in use. Always unplug by grasping the plug, not by pulling
the cord. Do not pull the TC-320 by the power cord. Do not crimp the cord or cause it to
be damaged by straining it around sharp corners. Keep power cord away from heat
sources. Never unplug the machine with wet hands. Do not use the TC-320 with a
damaged power cord. Call us for a replacement.
●Use protective clothing, eye protection and gloves as when dealing with materials to be
applied with the TC-320 as indicated by manufacturers’ label. Follow manufacturers’ label
recommendations when applying, handling, mixing, storing, disposing and first aid.
●The pressurized air lines will heat up under continuous use. The thumb push quick
connectors can become very hot to the touch, exercise caution when handling the air
lines.
●Always flush out the spraygun and hose with clean soapy water after every day’s
operation. This is the most important thing you can do to ensure trouble free operation of
the TC-320. Failure to clean these on a regular basis will cause the system to malfunction
and will negate the warranty.
●Always ensure the spraygun is triggered and liquid is flowing through the spraygun when
the electrostatic sprayer is operating. Failure to trigger the spraygun for an extended time
may result in the liquid pump overheating.
●The air filter on the compressor should be checked frequently, and if clogged it should be
cleaned. Failure to clean the compressor air filter will cause problems with air pressure
and possible hose failure.
GENERAL PRECAUTIONS and BEST PRACTICES
OPERATOR RESPONSIBILITY
It is the responsibility of those who operate the TC-320 to read this Owner’s
Manual to understand all safe and correct operating procedures. Lack of
attention to safety can result in reduction of efficiency, an accident, even
personal injury. Failure to follow the instructions herein could cause
irreparable damage
to your equipment.

Page 3
●The spraygun assembly can freeze up when ambient temperature is less than 500 F (100
C).
●Ensure the spraygun battery is fully charged which will provide approximately ten hours of
continuous use.
1. OVERVIEW
The TC-320 Electrostatic Sprayer combines airspray atomization with proprietary Microbecide®
spray charging technology to produce electrically charged spray droplets that are carried to a
target surface in a low-pressure, continuous air stream.
The electrostatic charge is strong (approximately 75X that of gravity) thus defying gravity
allowing droplets to move in any direction to uniformly cover surfaces including their backside
and underside. Our electrostatic sprayer provides more than twice the deposition efficiency of
hydraulic and non-electrostatic sprayers. These features combine in the TC-320 to provide the
best surface coverage of any machine on the market.
The spraygun is corrosion-proof and easy to clean.
The TC-320 is virtually maintenance-free and guarantees you savings in the application of
chemicals.
Conventional Sprayer TC-320 Sprayer
2. Recommended Application Technique
Note: When using unfamiliar spray materials always test on a small area before treating
the entire surface.
The goal when applying any liquid using the TC-320 is to achieve even coverage over the
surface. The TC-320 has been specifically designed to help you do just that by controlling the
rate of flow of liquid and by propelling the liquid with a continuous air flow. Therefore, you can
stay well away from the target surface and let the electrostatic attraction do the work. Here are
some tips to achieve the best possible coverage with the TC-320:
1. First charge the battery in the spraygun
The University of California completed a series of tests to investigate what happens to spray liquid
after it leaves the spraygun tip.
Conclusion:
Electrostatic technology places over 4 times the amount of liquid onto a target surface
using 50% less chemicals.
Less solution used overall, less waste, improved operator productivity, significant cost savings!

Page 4
2. Before spraying expensive material train yourself to use the TC-320 using water as the
spray liquid.
3. The TC-320 should always be operated at temperatures above 50° Fahrenheit (10°
Celsius) otherwise the atomized liquid might freeze at the nozzle opening.
4. Set the Flow Control Gauge at 100 to 120. Check this setting from time to time as the
flow rate changes with operating temperature of the sprayer as well as the temperature
and humidity of the areas in which you are spraying.
5. Train yourself inside before trying to spray outside. You should notice a plume existing
the spray gun. The objective is to run this plume smoothly and evenly along the surface
you are treating. Let the electrostatics pull the plume onto the surface; you do not really
spray the liquid onto the target, let the electrostatics do the work.
6. The optimal spraying distance from the target surface is
approximately 1m (3 feet), this gives the charged mist
enough space to develop into a chaotic cloud that will be
attracted to the target surface.
7. Hold the liquid flow control trigger ON and point the
spraygun at a right angle to the target surface. Start at
the highest point and use a zigzag horizontal stroke to
apply the coating down to the lowest point. Try to have
each stroke overlap the previous one by about 50%
even when moving from one area to be treated to the
next. You can use vertical strokes if it suits the area
better; just make sure to work in a methodical pattern
and have your strokes overlap.
8. Be careful to keep the spraygun level. This helps reduce the occasional drip.
9. You do not have to stop the application process on each return stroke. Just concentrate
on a regular zigzag application pattern. Periodically check to make sure the red LED
indicator is illuminated on the spraygun which indicates all controls are operating as
intended. Note: Press the test button on the battery to test charge; recharge or replace
the battery if necessary.
10. Apply the liquid to be sprayed according to manufacturer specifications.
3. Quick Step-by-Step Operating Guide
1. Prepare the liquid to be applied.
2. Connect the liquid input line to the liquid container.
3. Connect the liquid input line to the liquid input connector at the top of the sprayer.
4. Connect the twin line hose to the liquid and air output connectors at the sprayer.
5. Connect the twin line hose to the liquid and air connectors on the spraygun.
6. Plug the power cord into an appropriate receptacle. Turn on the TC-320 sprayer.
7. Depress the flow control trigger and allow sprayer to draw liquid to the spraygun.
Note: To speed up the filling of the hose with liquid, open the flow control valve until liquid
starts to spray. Reset the flow control valve to 100 – 120 or to your desired setting.

Page 5
8. Observe flow rate gauge and adjust Flow Rate Control Valve to desired rate of flow.
9. Turn on the electrostatics by depressing the switch until it laches and
the red LED is on.
10. Begin spraying.
Important Cautions
Always make sure liquid is flowing through the sprayer when
power is applied. Failure to keep liquid flowing through sprayer
may result in the liquid pump overheating.
The TC-320’s compressor becomes hot enough to burn during
operation especially when continually running. DO NOT TOUCH.
The compressor has a built-in thermal overload switch so in the
event the TC-320 overheats, the compressor will shut down
automatically. Should this happen, leave the case open and
allow the unit to cool down for about one hour.
4. Air & Liquid Delivery Systems
The air compressor plugs into an electrical source to produce compressed air which atomizes
and propels the liquid.
There are 3 chromed quick connect connectors at the TC-320 case and 2 chromed quick
connect connectors at the spraygun.
1. Container Liquid Line Input Connector ( top of the case)
2. Liquid Line Output Connector (on the right side of the case)
3. Air Line Output Connector (on the right side of the case)
4. Spray Gun Liquid Line Input Connector (on spray gun)
5. Spray Gun Air Line Input Connector (on spray gun)
To connect the quick connects
1. Push the liquid and air plug connectors into their respective sockets until
you feel it latch. They are different sizes and cannot be cross connected.
2. Pull gently to make sure they are properly seated.
To disconnect the quick connects
1. Release the plug connectors.
2. Pull the plug connectors out of the socket.
Always flush out the spray gun with clean soapy water
after each day’s use. This is the most important thing you
can do to ensure trouble free operation of the TC-320.

Page 6
5. The Electrostatic Spraygun
For operator safety the power supply for the TC-320 spraygun is separate
from the power supply for the TC-320 compressor. The spraygun is
powered by a 12V battery located at the base of the spraygun housing.
Activation of the spray gun’s trigger causes a liquid plume to be created
and directed toward the target surface.
Make sure the spray gun battery is in good working order before using it.
The “electrostatics” can be turned “On” and “Off” by a switch at the back of the
spray gun’s housing. Push the switch “in,” and when latched, the LED light will
illuminate indicating the power to the electrostatics are “on.” To turn “off” the
electrostatics, push the switch and release and you’ll see the LED light go dark
indicating the electrostatics are “off.” When not in use be sure to keep the
electrostatics in the “off” position.
Control the flow of liquid “on” and “off” at the spray gun by depressing or
releasing the trigger to control the liquid flow on/off.
There is a hook on the side of the spraygun. This is a strain relief for the hose. By placing the
hose in this hook, the strain on the spraygun connectors is reduced significantly allowing the
operator to move about more freely without the worry of putting strain on the hoses and
connectors.
Note: Occasionally when using the spraygun the operator might feel a slight “tingling” sensation
when working in an enclosed space; this is not dangerous to the operator, it’s akin to static
electricity. In order to minimize the “static electricity” build up, the operator can make contact
with the grounding stud located on the left side of the spraygun (screw head on the left side of
the spraygun, just above the trigger). Additionally make sure the TC-320 is properly grounded;
the TC-320 has a built-in short, stainless-steel chain attached to the bottom of its housing, this
chain adds to the grounding of the sprayer.
User serviceable parts of the spray gun is the battery. Except for the battery, nothing inside the
spray gun shell is serviceable by the operator.
Do not open the spraygun shell; doing so will void all warranties.
6. Battery
The spraygun’s electrostatics are powered by a 12V battery located at the base of the spraygun
housing. Under average operating conditions the battery will last 10 to 12 hours of operation on
a charge. Recharge when the red LED on the spraygun shell doesn’t illuminate when the switch
is pushed in.
Order a Battery Charger and Replacement Battery Pack from us:
In the USA: Elsewhere:
Spray Gun Servicing by Manufacturer
We will thoroughly service your spraygun, replace any worn parts and recalibrate the
electrostatics if you like for a modest service charge plus the cost of replacement parts.
Periodic servicing will increase sprayer performance and prolong the life of your spraygun.
Email us to discuss spray gun servicing:service@wctinfo.com

Page 7
7. Setting Flow Rate
The Flow Rate setting is determined by:
1. Coverage Desired, i.e., the amount of liquid you wish to apply to a given surface
2. Operator Speed, i.e., the time required for an operator to spray a given area. An
experienced operator can adequately spray about 10 Square Feet (one Square Meter) in
3 seconds.
By example, suppose you want to treat ~ 8,000 Sq. Ft. Referring to the Flow Rate Table below,
read down Column #3 (Sq. Ft./Gallon) and locate the closest square feet desired to be treated.
Then read across to Column #1 (Gauge Setting); note “100” is the indicator.
So, at a Flow Gauge setting of 100, you can cover ~8,100 Sq. Ft. using ~ One Gallon of
product.
At a Flow Gauge setting of 100, a skilled operator can apply liquid to an area of ~ 12,000 Sq. Ft.
per Hour.
Furthermore, as you can see from the Table, the higher the Flow Gauge setting the larger the
droplet size therefore fewer square feet are covered per gallon. Whereas, the lower the Gauge
setting, the finer the droplet size, so more Square Feet would be covered per gallon.
The above is by example of an experienced operator. Other factors to consider besides
operator experience are chemical label application requirements, dwell times necessary,
humidity, temperature, etc. Experience, by on-the-job training, is key.
FLOW RATE TABLE
Gauge
Setting
Coverage
Sq.Ft./
Liter
Sq.Ft./
Gal
240
896.7
3393.9
230
935.7
3541.4
220
978.2
3702.4
210
1024.8
3878.7
200
1076.0
4072.7
190
1132.6
4287.0
180
1195.6
4525.2
170
1265.9
4791.4
160
1345.0
5090.8
150
1434.7
5430.2
140
1537.1
5818.1
130
1655.4
6265.6
120
1793.3
6787.8
110
1956.4
7404.8
100
2152.0
8145.3
90
2391.1
9050.4
80
2690.0
10181.7
70
3074.3
11636.2
60
3586.7
13575.5
50
4304.0
16290.6
40
5380.0
20363.3
30
7173.3
27151.1
20
10760.0
40726.6

Page 8
8. Maintenance
To clean the TC-320 & SprayGun
1. Clean the exterior case with mild detergent using a damp cloth.
2. Fill liquid container with clean water, turn on the sprayer and engage the spraygun
trigger to flush the sprayer, spraygun and lines with the clean water. Allow air to flow for
30 seconds after the water has been sprayed. Always flush out the spraygun with clean
soapy water after every day’s operation. This is the most important thing you can do to
ensure trouble free operation of the TC-320.By cleaning at the end of the workday you
will avoid long-term buildup that will eventually cause clogs, poor spray patterns and
shorten spraygun life.
3. Apply lubricating grease to all quick connect fittings. Lubricating grease can be ordered
from our website.
To clean the spraygun assembly
Establish routine maintenance intervals to disassemble and clean the spraygun assembly.
Generally, it is recommended protocol to thoroughly clean the assembly at least every 50 hours
of machine use. To clean the assembly:
1. Unscrew the spraygun cone shaped cover from the base, clean any debris found.
Note: Take care not to damage the liquid tip when the cover is removed.
2. Use a small brush (soft or mild bristle) to clean the inside of the cover and the hole
through it. Rinse thoroughly.
3. Scrub the base with the detergent solution using a soft bristle brush. Be sure to
thoroughly clean the base cavity and take care not to damage the liquid tip.
4. Reassemble assembly by screwing on the cover hand tight. Wipe clean the exterior of
all hoses and fittings connected to the base.
The spraygun cover should be hand tight. Never use pliers or other tools to tighten it.
9. Troubleshooting
Symptom
Possible Problem
Corrective Action
⋅
Air pressure seems too low
⋅
Air connector/s might be leaking
⋅Inspect for damaged O-rings on quick
connects – Spray connectors with soapy
water – replace O-rings that bubble
⋅No spray from spraygun or the spray
is erratic and/or spits
⋅
Liquid connectors might be leaking
⋅
Inspect for damaged O-rings on quick
connects – Spray connectors with soapy
water – replace O-rings that bubble
⋅Debris in the spraygun
⋅
Clean assembly; See instructions herein
⋅Spray is freezing up
⋅
Make sure the temperature of the water
is at least 50°F (10°C)
⋅
Over tightened assembly cover
⋅
Loosen cover. It should only be hand-
tight
⋅Charging indicator (LED) blinks or
⋅Battery is exhausted
⋅Recharge battery If problem persists,

Page 9
goes out during operation
replace battery pack
⋅
Dirty cone assembly
⋅
Clean assembly according to
instructions
⋅Air compressor cuts out during
operation
⋅
Compressor has overheated
⋅Let unit cool for approximately 1 hour
with case open
⋅
Electrostatic sprayer will not start
⋅
No power
⋅Make sure the unit is plugged into an
appropriate electrical receptacle
⋅
Sprayer is not switched On
⋅
Make sure the power switch is On
⋅Tripped GFCI
⋅Reset GFCI
⋅Dirty air filter
⋅Clean air filter
See our website https://microbecide.com/partners.php for a list of our Distributors
World Changing Technologies Pte Ltd TransAct, Inc.
80 Genting Lane #05-02 5 Slate Court, Suite C2
Ruby Industrial Park Woodland Park, NJ 07424
Singapore 349565 USA
email: [email protected] email: i[email protected]
Tel: +65 6449 3928
Table of contents
