manuals.online logo
Brands
  1. Home
  2. •
  3. Brands
  4. •
  5. Microh
  6. •
  7. Dj Equipment
  8. •
  9. Microh Ledstagepar v2 User manual

Microh Ledstagepar v2 User manual

1
TABLE OF CONTENTS
1. INTRODUCTION AND UNPACKING 1
2. SAFTEY INSTRUCTIONS 1-2
3. OPERATION INSTRUCTIONS 2-4
4. MOUNTING AND INSTALLATION 4-5
5. DMX-512 CONTROL CONNECTIONS 5-6
6. MENU NAVIGATION 6-7
7. DMX CHANNELS 8
8. KEY FEATURES 8
9. TECHNICAL SPECIFICATIONS 8
11. MAINTENANCE AND CLEANING 9
1. INTRODUCTION AND UNPACKING
Thank you for purchasing the MICROH LEDSTAGEPAR V2 wash fixture. For your own safety and knowledge, please read this
manual before installing or operating the device. This manual covers the important information on installation and applications.
Please install and operate the fixture according to instructions. Meanwhile, please keep this manual for future reference.
The MICROH LEDSTAGEPAR V2 wash fixture is made of a new type of high temperature cast aluminum casing. The fixture is
designed and manufactured strictly following CE standards, complying with international standard DMX512 protocol. This fixture is
applicable but not limited to large-scale live performances, theater, studio, nightclubs and discos.
The MICROH LEDSTAGEPAR V2 wash fixture uses 36 x 1W LEDs (12 Red, 12 Green, and 12 Blue). Please unpack carefully when
you receive the fixture and check if it was damaged during the transportation. And please check whether the following items are
included inside the box:
Fixture – One Power Cord – One User Manual - One
2. SAFTEY INSTRUCTIONS
This device has left the factory in perfect condition. In order to maintain this condition and to ensure safe operation, it is absolutely
necessary for the user to follow the safety instructions and warning notes written in this user manual.
If the device has been exposed to temperature changes, do not switch it on immediately. The arising condensation could damage
the device. Leave the device switched off until it has reached room temperature, and is dry.
3
MASTER/SLAVE MODE
- By connecting either the 3 or 5 pin DMX, you can daisy chain up to 30 units on master/ slave mode. Daisy chain the
fixtures together by plugging from the DMX output of the first fixture into the DMX input of the second fixture, and so on…
- On your Master fixture set the unit to SOUND, MANUAL, COLOUR FADE or COLOUR CHASE control and select one of
the internal programs.
- All slave lights must be set “A001”
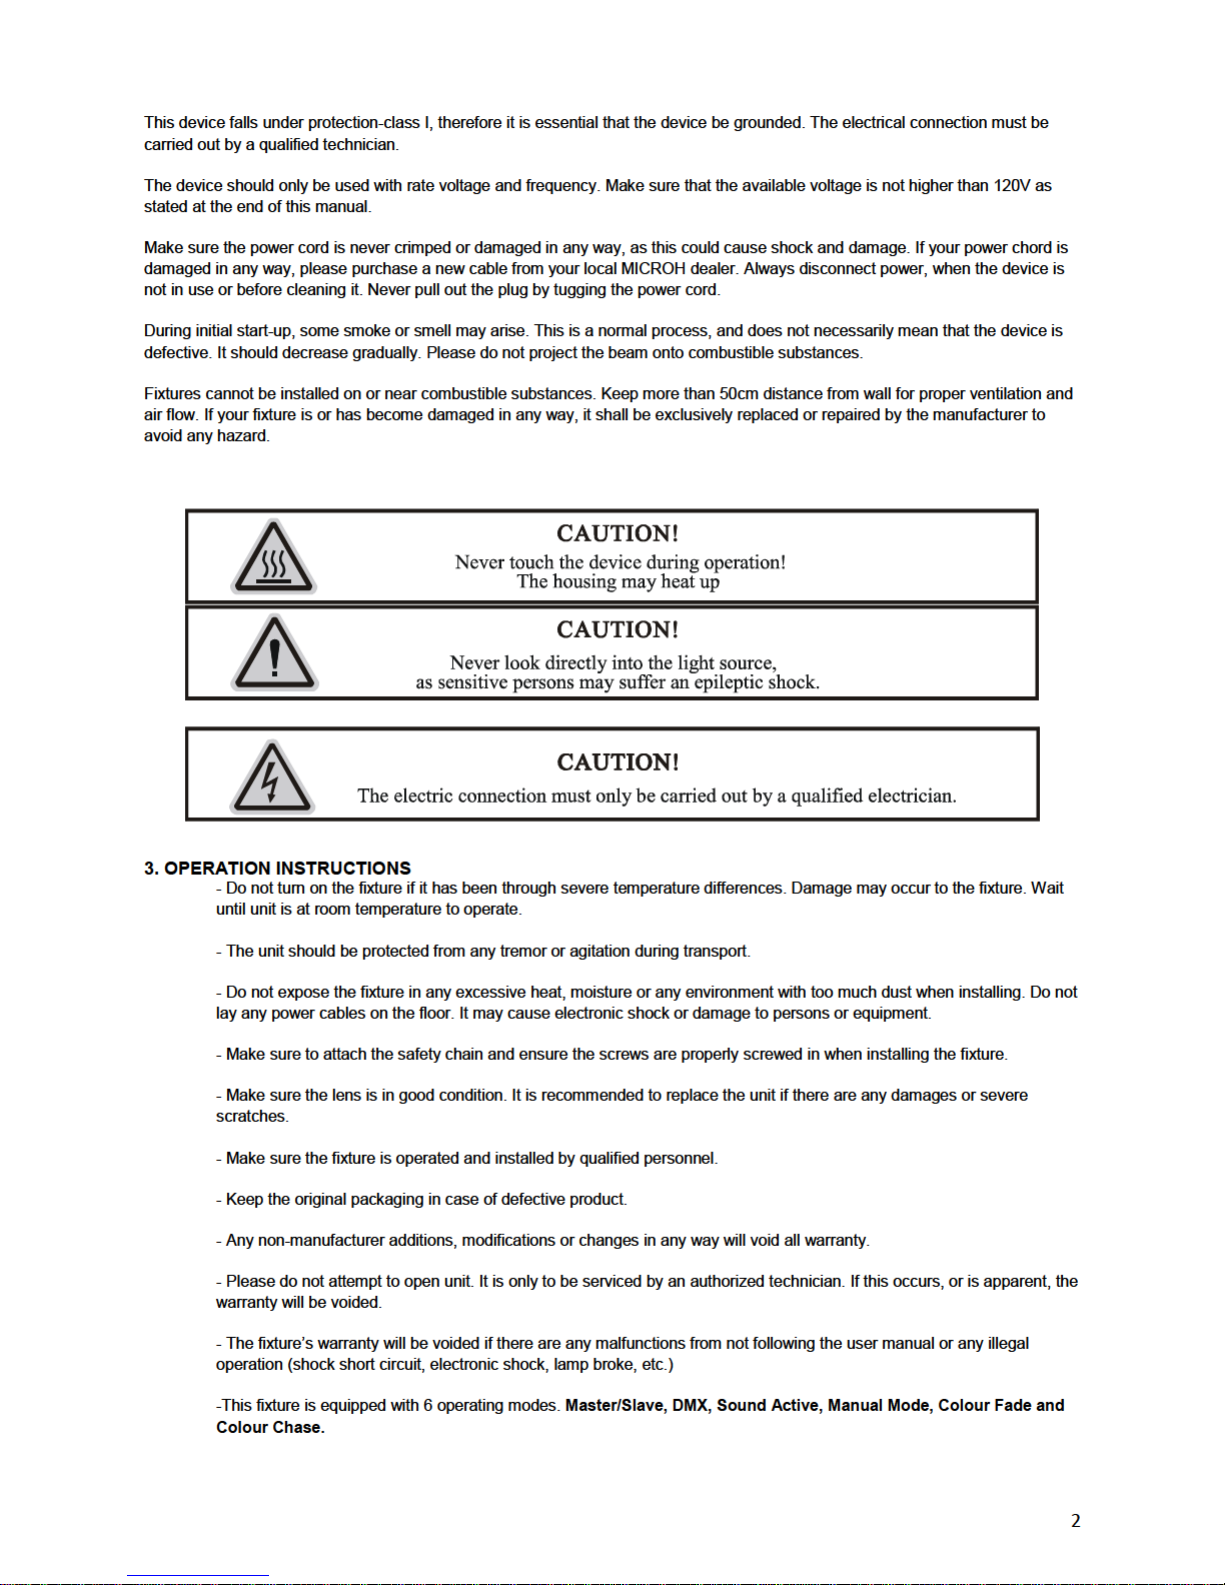
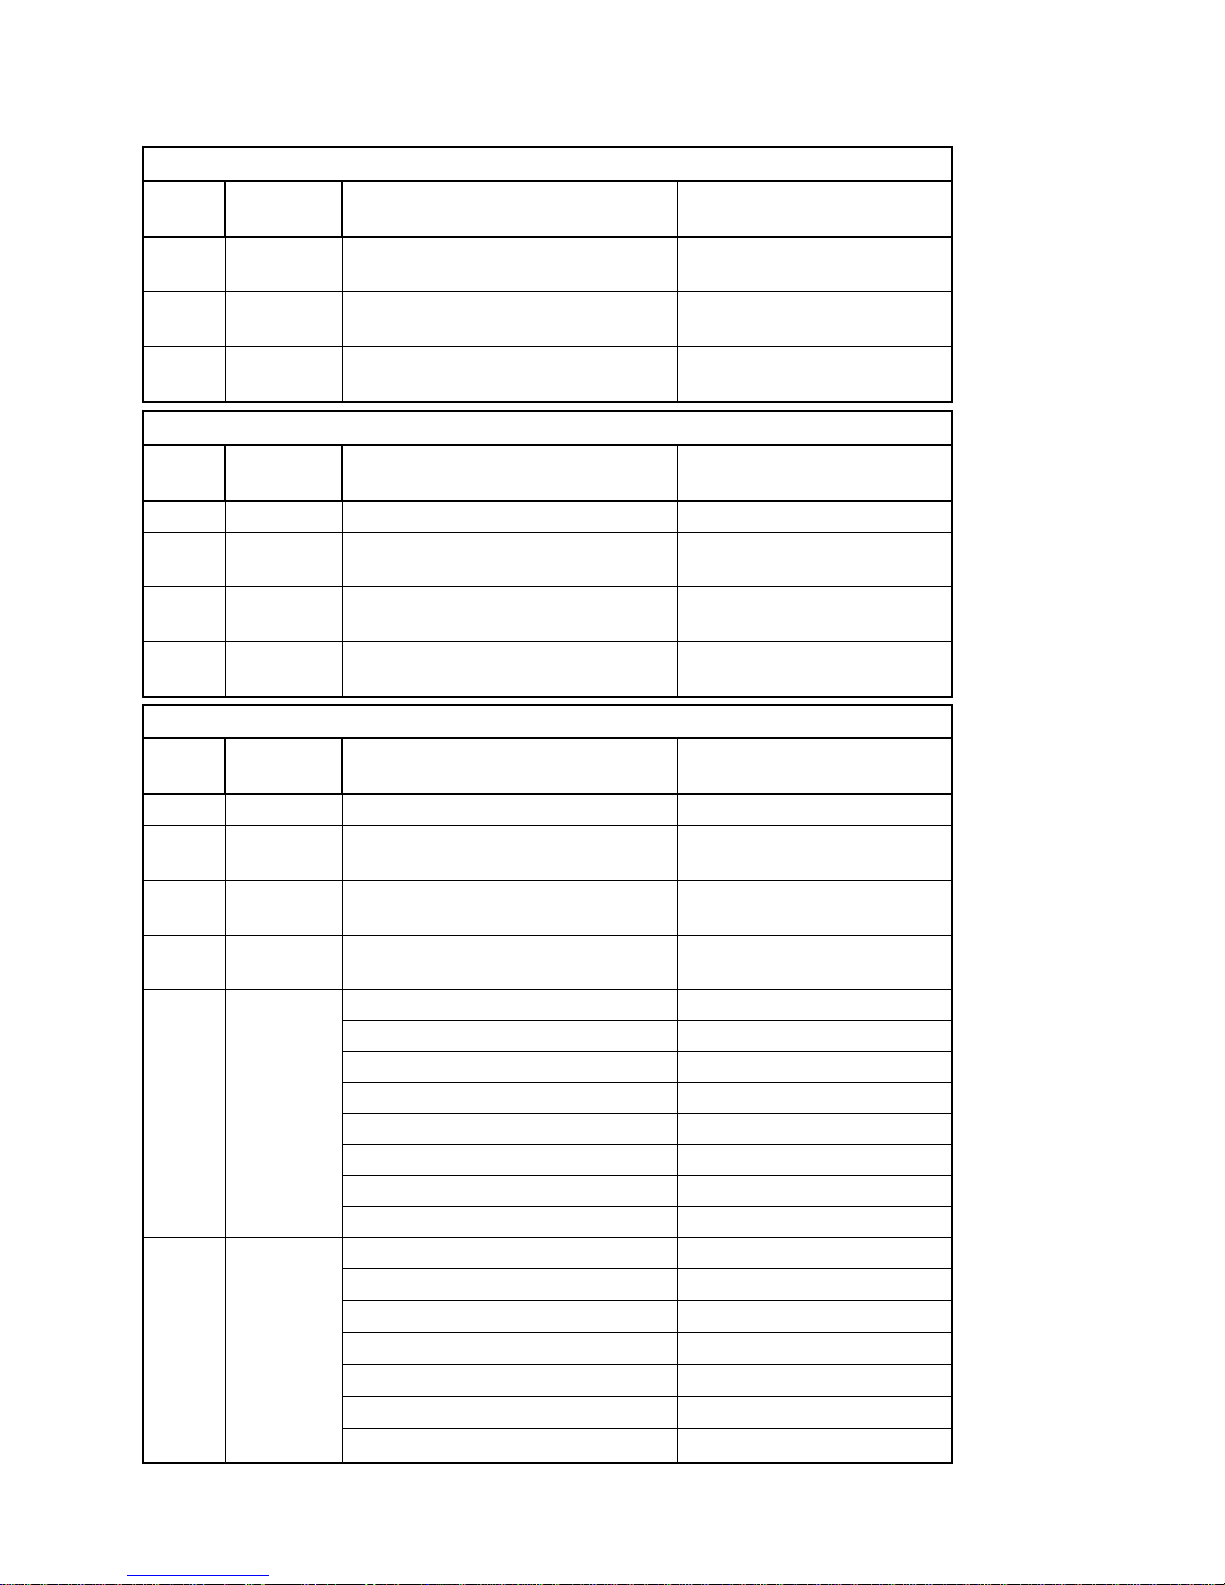
DMX
- From the main menu select “ADDR” and press ENTER. By using the UP and DOWN buttons, you can set the DMX
address. Press ENTER when number is reached.
- Once the address is set, leave the unit powered on for 3 minutes in order to store the address within the unit so that it
returns to that address when powered off/on.
- To select between one of the three DMX modes, Select “ADDR” and press ENTER. Press ENTER again and choose
either “Axx”, “Fxxx” or “Pxxx” with UP and DOWN arrows.
SOUND ACTIVE MODE
- From the main menu, select either “SOUA” or “SOUF”.
- SOUA mode with chase randomly through the internal programs activated by sound.
- SOUF mode will chase through 7 individual full bar colours.
- To adjust the audio sensitivity, select “SEnS” from the main menu and press ENTER. Using the UP and DOWN buttons
select number 0 through 15. (0 being the lowest, and 15 being the highest sensitivity.)
MANUAL MODE
- From the main menu, select “rLXX”, “gLXX”, and “bLxx” and use the UP and DOWN buttons to adjust each individual
colour from numbers 0 through 15. (0 being off, and 15 being the full intensity.) This will create a custom colour mix of
your choosing.
COLOUR FADE
- From the main menu, select “FAXX” and use the UP and DOWN buttons to select the speed of the colour fade. (0 being
the slowest, 15 being the fastest.)
AUTO COLOUR CHANGE (7 COLOUR CHANGE)
- From the main menu, select “ASXX” and use the UP and DOWN buttons to select the speed of colour change. (0 being
the slowest, 15 being the fastest.)
CHASE MODE
- From the main menu, select “CEXX” and use the UP and DOWN buttons to select your desired chase from numbers 1
through 15.
- To adjust the speed of the chase, select “CSXX” from the main menu and use the UP and DOWN buttons to select
speeds 1 to 15. (1 being the slowest, and 15 being the fastest.)
STROBE (FLASH)
- To apply strobe (FLASH) to one of the auto modes, select “FLxx” from the main menu and use the UP and DOWN
buttons to select your desired flash rate from 1 to 15. (1 being the slowest and 15 being the fastest)
4
4. MOUNTING AND INSTALLATION
Caution:For added protection, mount the fixtures in areas outside walking paths, seating areas, or in areas were the fixture might
be reached by unauthorized personnel. Before mounting the fixture to any surface, make sure that the installation area can hold a
minimum point load of 10 times the device’s weight. Fixture installation must always be secured with a secondary safety attachment,
such as an appropriate safety cable. Never stand directly below the device when mounting, removing, or servicing the fixture.
Whether installing inverted on a truss or ceiling, or set on a flat level surface (see illustration below). Be sure this fixture is kept at
least 0.5m (1.5 ft.) away from any flammable materials (decoration etc.). Always use and install the supplied safety cable as a safety
measure to prevent accidental damage and/or injury in the event the clamp fails.
Mounting Points: Overhead mounting requires extensive experience, including calculating working load limits. A knowledge of the
installation material being used, and periodic safety inspection of all installation material and the fixture are all imperative and should
only be performed by a qualified technician. Improper installation can result in bodily injury and damage.
Be sure to complete all rigging and installation procedures before connecting the main power cord to the appropriate wall outlet.
Regardless of the rigging option you choose for your MICROH LEDSTAGEPAR V2 wash fixture, always be sure to secure your
fixture with a safety cable. The fixture provides a built-in rigging point for a safety cable on the hanging bracket as illustrated above.
Be sure to only use the designated rigging point for the safety cable and never secure a safety cable to a carrying handle.
5. DMX-512 CONTROL CONNECTIONS
This fixture complies with international USITT DMX standards and can be used with either a 3 pin or 5 pin DMX connector. Plug in
the provided 3 pin XLR cable to the female 3-pin XLR output of your controller and the other side to the male 3-pin XLR input of the
LEDSTAGEPARV2. To connect the units to DMX, you must daisy chain the fixtures together as referred in the diagram below.
Always end your DMX-512 connection with a DMX terminator.
6
7
8
7. DMX CHANNELS
DMX profile Mode A (3CH)
DMX
CH
FUNCTION
DESCRIPTION
VALUE
1
LED
colour
RED
0 - 255
2
LED
colour
GREEN
0 - 255
3
LED
colour
BLUE
0 - 255
DMX profile Mode P (4CH)
DMX
CH
FUNCTION
DESCRIPTION
VALUE
1
DIMMER
MASTER DIMMER
0 - 255
2
LED
colour
RED
0 - 255
3
LED
colour
GREEN
0 - 255
4
LED
colour
BLUE
0 - 255
DMX profile Mode F (6CH)
DMX
CH
FUNCTION
DESCRIPTION
VALUE
1
DIMMER
MASTER DIMMER
0 - 255
2
LED
colour
RED
0 - 255
3
LED
colour
GREEN
0 - 255
4
LED
colour
BLUE
0 - 255
5 STROBE
NO FUNCTION
0 - 9
STROBE SLOW TO FAST
10 - 57
NO FUNCTION
58 - 59
PULSE ON TO OFF / SLOW TO FAST
60 - 108
NO FUNCTION
109 - 110
PULSE ON TO OFF / SLOW TO FAST
111 - 159
NO FUNCTION
160 - 161
RANDOM STROBE
162 - 255
6 MACROS
NO FUNCTION
0 - 9
COLOUR FADE
10 - 50
COLOUR FADE RGB ONLY
51 - 91
COLOUR FADE CHASE
92 - 132
COLOUR SNAP CHASE
133 - 173
MACROS
174 - 214
RANDOM MACROS
215 - 255
9
8. KEY FEATURES
- 36 x 1W LEDs (12 Red, 12 Green, 12 Blue)
- 3 and 5 Pin XLR Input & Output
- IP66 Rated
- 30° Beam Angle (15° & 45° Lens Kits Available)
- Double Bracket for Truss and Floor Mounting
- Digital Display
9. TECHNICAL SPECIFICATIONS
MODEL: LEDSTAGEPAR V2
LAMP: 36 1W LEDS
VOLTAGE: 120VAC 60Hz
WARRANTY: 2 Year Limited Warranty
10. MAINTENANCE AND CLEANING
The following points have to be considered during the inspection:
1) All screws for installing the device, or parts of the device must be tightly connected, and must not be corroded.
2) There must not be any deformations on the housing, colour lenses, fixations or installation spots (ceiling, suspension, trussing).
3) Mechanically moved parts must not show any traces of wearing and must not rotate with unbalances.
4)The electric power supply cables must not show any damage, material fatigue or sediments.
10
Further instructions depending on the installation spot and usage must be handled by a skilled installer or technician.Any safety
issues must be resolved.
In order to keep the fixture in good condition and extend the life, we suggest regular cleaning to the fixture.
1) Clean the inside and outside lens each week to avoid the light output from darkening due to accumulation of dust, dirt, etc.
2) Clean the fan each week.
3) A detailed electrical check by approved technician every three months is advised. Ensure the circuit contacts are in good
condition, and prevent from overheating.
We recommend a frequent cleaning of the device. Please use a moist, lint- free cloth. Never use alcohol or solvents.
There are no serviceable parts inside the device. Please refer to the instructions under “Installation instructions”.
Should you need any spare parts, please order genuine MICROH parts from your local dealer.
IF YOU SHOULD EXPERIENCE ANY PROBLEMS OR ISSUES PLEASE CONTACT MICROH PROFESSIONAL PRODUCTS BY
EMAIL AT [email protected]m
In the event that your unit is defective in any way, please contact your local dealer to obtain an RA number for service
repair.
DISCLAIMER – MICROH believes that the information contained within this user manual is accurate. However, Microh is
not responsible for any error or addendums to this manual. If you have any comments or general suggestions on how this
manual can be improved please contact [email protected]. Thank you.

Other Microh Dj Equipment manuals

Microh Wash 250 NXT User manual

Microh

Microh Wash 250 NXT User manual

Microh LED MAX ZOOM QUAD User manual

Microh

Microh LED MAX ZOOM QUAD User manual

Microh NEORAY 120 User manual

Microh

Microh NEORAY 120 User manual

Microh LED BLADE P64 MKIII User manual

Microh

Microh LED BLADE P64 MKIII User manual

Microh LEDBARQX 185 User manual

Microh

Microh LEDBARQX 185 User manual

Microh ZM300 User manual

Microh

Microh ZM300 User manual

Microh FIREFOX-RG User manual

Microh

Microh FIREFOX-RG User manual

Microh LED Bladep186 User manual

Microh

Microh LED Bladep186 User manual

Microh LED COB100 PAR CWWW User manual

Microh

Microh LED COB100 PAR CWWW User manual

Microh ULTRA SPOT 575 User manual

Microh

Microh ULTRA SPOT 575 User manual

Microh LED Quadpar TRI MKII User manual

Microh

Microh LED Quadpar TRI MKII User manual

Microh LED TRI BAR V2 User manual

Microh

Microh LED TRI BAR V2 User manual

Microh LED PROFILE 120CW User manual

Microh

Microh LED PROFILE 120CW User manual

Microh LIVE575 User manual

Microh

Microh LIVE575 User manual

Microh LED SLIM P64 User manual

Microh

Microh LED SLIM P64 User manual

Microh Titan RGB 6W User manual

Microh

Microh Titan RGB 6W User manual

Microh OMNI HZR User manual

Microh

Microh OMNI HZR User manual

Popular Dj Equipment manuals by other brands

Cameo SUPERFLY XS user manual

Cameo

Cameo SUPERFLY XS user manual

Monacor IMG Stage Line SDC-202LED manual

Monacor

Monacor IMG Stage Line SDC-202LED manual

Chauvet TFX-48CON Technical reference manual

Chauvet

Chauvet TFX-48CON Technical reference manual

ADJ HYDRO WASH X7 User instructions

ADJ

ADJ HYDRO WASH X7 User instructions

EK R2 user manual

EK

EK R2 user manual

PR Lighting XR480S BWS user manual

PR Lighting

PR Lighting XR480S BWS user manual

LD LAX12D USB user manual

LD

LD LAX12D USB user manual

EuroLite TS-250 user manual

EuroLite

EuroLite TS-250 user manual

RGBlink mini pro quick start

RGBlink

RGBlink mini pro quick start

Robert Juliat TIBO manual

Robert Juliat

Robert Juliat TIBO manual

Monacor img Stage Line LED-810DMX instruction manual

Monacor

Monacor img Stage Line LED-810DMX instruction manual

TECshow Mini Bubble Master user manual

TECshow

TECshow Mini Bubble Master user manual

Snow Masters T-1500 Mini manual

Snow Masters

Snow Masters T-1500 Mini manual

EuroLite LED Ball Spot user manual

EuroLite

EuroLite LED Ball Spot user manual

Adkins WIRELESS-HEX-9 user manual

Adkins

Adkins WIRELESS-HEX-9 user manual

Pioneer DDJ-WEGO3 Firmware update procedures

Pioneer

Pioneer DDJ-WEGO3 Firmware update procedures

ArtFox Beam Wash 19QX user manual

ArtFox

ArtFox Beam Wash 19QX user manual

Velleman HQ Power SCAN FLOWER VDL300SF manual

Velleman

Velleman HQ Power SCAN FLOWER VDL300SF manual

manuals.online logo
manuals.online logoBrands
  • About & Mission
  • Contact us
  • Privacy Policy
  • Terms and Conditions

Copyright 2025 Manuals.Online. All Rights Reserved.