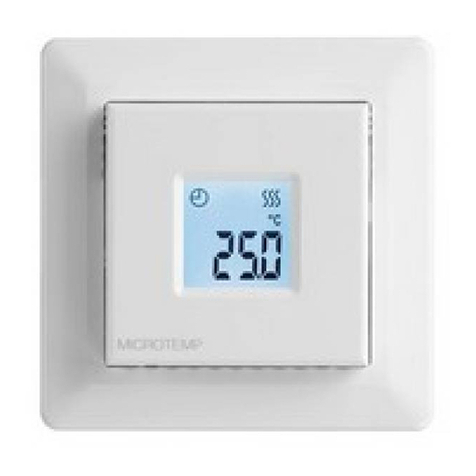
MICROMATIC Microtemp MTC4 User manual

PAGE 2
© 2021 OJ Electronics A/S
Table of contents
Table of contents . . . . . . . . . . . . . . . . . . . . . . . . . . 2
Introduction . . . . . . . . . . . . . . . . . . . . . . . . . . . . . 3
Menu overview. . . . . . . . . . . . . . . . . . . . . . . . . . . . 4
Icons . . . . . . . . . . . . . . . . . . . . . . . . . . . . . . . . . 5
Buttons and navigation . . . . . . . . . . . . . . . . . . . . . . . 6
Adjust the heating schedule . . . . . . . . . . . . . . . . . . . . 7
Override the heating schedule . . . . . . . . . . . . . . . . . . . 8
Child Lock . . . . . . . . . . . . . . . . . . . . . . . . . . . . . . 9
Factory reset . . . . . . . . . . . . . . . . . . . . . . . . . . . . .10
Time settings (cLc). . . . . . . . . . . . . . . . . . . . . . .11
Day settings (dAy). . . . . . . . . . . . . . . . . . . . 12
Schedule and events (5chE). . . . . . . . . . . . . . . . . .13
Display settings (Lcd). . . . . . . . . . . . . . . . . . . . . .14
Remote Control (rCt). . . . . . . . . . . . . . . . . . . . . .15
Open Window (OPEn). . . . . . . . . . . . . . . . . . 16
Adaptive start (AdAP). . . . . . . . . . . . . . . . . . 17
Adjust (AdJ). . . . . . . . . . . . . . . . . . . . . . . 18
Temperature scale (5cAL). . . . . . . . . . . . . . . . 19
Software version (-5U). . . . . . . . . . . . . . . . . . 20
Temperature readout (-FtP,-rtP). . . . . . . . . . . . 21
Power limit (P Li ) 1/2 . . . . . . . . . . . . . . . . . . . . . . .22
Power limit (P Li ) 2/2 . . . . . . . . . . . . . . . . . . . . . . .23
Pulse width modulation (PuL5) 1/2 . . . . . . . . . . . . . . .24
Pulse width modulation (PuL5) 2/2 . . . . . . . . . . . . . . .25
Floor temperature limits (FLLo,FLHi). . . . . . . . . . . . .26
Temperature limits (tLLo,tLhi). . . . . . . . . . . . . . . .27
Sensor application (APP). . . . . . . . . . . . . . . . . . . .28
Exiting the menu (donE). . . . . . . . . . . . . . . . . . . . .29
Change of front cover . . . . . . . . . . . . . . . . . . . . . . . .30
Troubleshooting and additional information. . . . . . . . . . . .31
Contact: Help and support . . . . . . . . . . . . . . . . . . . . .32

PAGE 3
© 2021 OJ Electronics A/S
Introduction
Thank you for choosing the Microtemp MTC4 to
control your heat. We hope you enjoy this thermostat
and that it meets your needs for both comfort and
energy eciency. We have designed this product in
accordance with our strict quality and environmental
requirements.
Microtemp MTC4 is a clock thermostat that easily can
be set to a customized weekly heating schedule. Up to
4 events per day limits the energy consumption.
This thermostat can be used as a controller for electric
room heating pursuant to EN50559.

PAGE 4
© 2021 OJ Electronics A/S
Menu overview
Settings Options
CLc (Clock) 00:00 - 23:59
dAY (Day) Mon, TuE, WEd, tHu,
Fri, SAt, Sun
5chE (Schedule) 5-2, 6-1, 1E2, 1E4, 7E4
Lcd1 (Lcd) Set, cLc, --
Lcd2 (Lcd) Set, tP
rCt(Remote
controlled temp.) 5..25°C
OPEn (Open window) On/O
AdAP (Adaptive start) On/O
Adj (Adjust) -9.9..10°C
5cAL (Scale) °C, now
-5U (Software Version) Readout value
-FtP (Floor temp.) Readout value
-RtP (Room temp.) Readout value
Settings Options
PLi (Power Limit) 0..30
PuL5
(Pulse Width
Modulation)
Aut CYHi: 10..60
CYLo: 10..30
O DiFF: 0.3..10°C
On CYcL: 10..60
FLLo (Floor limit low) 0..40°C
FLHi(Floor limit high) 0..40°C
tLLo (Temp. limit low) 0..40°C
tLHi(Temp. limit high) 0..40°C
APP
(sensor application)
RRoom
FFloor
CRegulator
RF Room w. floor
limits
RE External room
sensor
donE (Done)
Entry
point for
initial
setup
Entry
point for
daily use
settings
Settings for daily use
Settings for installation
Read out values
M

PAGE 5
© 2021 OJ Electronics A/S
Icons
Icon Meaning Icon Meaning
Schedule operation
Open window
Heating is activated
Child lock is engaged
Manual mode
Temperature scale, Celsius
The thermostat is in regulator
mode APP: C
Setpoint
Remote Control

PAGE 6
© 2021 OJ Electronics A/S
Buttons and navigation
The front cover can be flipped down.
The on/o switch is located behind the front cover, on the
left side of the front, up = on / down = o.
On the right there are three buttons: A top button ””, a
middle button ” ”and a bottom button ””.
””: The middle button is used to acess the menu and
confirm changes and settings made in the menu.
”” and ””: The up and down buttons are used to
navigate through the menu and change parameters and
settings.

PAGE 7
© 2021 OJ Electronics A/S
You can adjust the preset schedule to your own needs, by
adjusting the time and setpoint temperature. To change
the heating schedule, see page 13.
For the most ecient regulation possible, a maximum
of 5° between the setback- and comfort tempearture is
recommended.
Example of a 4-event schedule:
Event 1: From 06:00 to 09:00 the thermostat will maintain a
temperature of 25°.
Event 2: From 09:00 to 16:00 the thermostat will maintain a
temperature of 22°.
Event 3: From 16:00 to 23:00 the thermostat will maintain a
temperature of 23°
Event 4: During the night (From 23:00 to 06:00), a temperature
of 20° is maintained.
00:00 06:00 09:00 16:00 23:00
20°
25° 23°
22°
20°
2 431
Adjust the heating schedule
Menu structure:
5chE: 5-2, 6-1, 1E4, 7E4, 1E2 (see page 13)
REMOTE
Changing the time and setpoint in an event:
• Press ”” and ”” for 3 seconds to enter schedule
and event settings.
• You can now change the time and temperature
setpoint for event 1 in the chosen schedule.
• Use ”” and ”” to change the time and confirm
with ” ”.
• Use ”” and ”” to change the temperature setpoint
and return with ” ”.
Note: Step 3 and 4 will be repeated either 2 or 4 times
for each day, depending on the number of events in the
chosen schedule (see previous page)

PAGE 8
© 2021 OJ Electronics A/S
Override the heating schedule
REMOTE
Override heating schedule
Temporary override:During scheduled operation, you
can either use ”” or ”” to override the programmed
setpoint/temperature. This override will hold until next
scheduled event.
During temporary override, a clock ” ”and manual
mode ” ”symbol are shown on the dispay.
Permanet override:Press the ” ”one time to activate
manual override. The thermostat is now in manual
operation and the setpoint temperature can be adjusted
with ”” or ””.
Press ” ” again to exit manual mode and continue with
scheduled operation. During manual mode override, the
manual mode symbol ” ”is shown on the display.
REMOTE

PAGE 9
© 2021 OJ Electronics A/S
Child Lock
REMOTE
Child Lock
The child lock can be activated directly if the thermostat
is idle, or if the thermostat‘s backlight is activated, but
never from within the menu.
• Activate the child lock by pressing ””and ””
simultaneously for 8 seconds, until the padlock ” ”
icon is shown on the display.
• The padlock icon indicates that the childlock is
activated.
• Deactivate the child lock by pressing ”” and ””
simultaneously for 8 seconds, until the padlock icon is
no longer shown in the display.

PAGE 10
© 2021 OJ Electronics A/S
Factory reset
REMOTE
Factory reset
• Activate the thermostat by pressing any of the three
buttons. The backlight will be lit.
• Press ” ” for 8 seconds until the factory reset menu
appears.
Note: After 3 seconds the thermostat will enter the
settings - Keep pressing ” ”for additional 5 seconds.
• Use ””or ”” to navigate through the options and
confirm with ” ” .
no: The thermostat will not perform a factory reset.
SchE: The thermostat will return all schedule and event
settings to default.
ALL: All settings in the thermostat will be factory
reset.

PAGE 11
© 2021 OJ Electronics A/S
Time settings (cLc)
REMOTE
This option allows you to set the time. The time settings is
used to control the event during scheduled operation.
Access clock settings:
• Press ” ” for 3 seconds to enter the settings.
• Scroll through the settings until cLc appears on the
display.
• Press ” ”to enter the options.
• Use ”” or ”” to change hours. Return with ” ”.
• Use ”” or ”” to change minutes. Return with ” ”.
Menu structure:
cLc: 00:00 to 23:59

PAGE 12
© 2021 OJ Electronics A/S
Day settings (dAy)
This option allows you to change the day of the week.
This is used by the heating schedule during scheduled
operation.
REMOTE
Access day settings:
• Press ” ” for 3 seconds to enter the settings.
• Scroll through the settings until dAy appears on the
display.
• Press ” ”to enter the options.
• Use ”” or ”” to change the day of the week.
Menu structure:
dAy: Mon,tuE,VEd,tHu,Fri,5At,5un

PAGE 13
© 2021 OJ Electronics A/S
Schedule and events (5chE)
This option allows you to choose the schedule that best
fits your needs. you can also turn it o.
To adjust a preset schedule, see page 7.
The schedules dier in the number of days with 4 events
and 2 events.
Denition of dierent schedule types:
OFF: Events are disabled and the setpoint temperature
is maintained 24/7
5-2: Monday to Friday with 4 events,
Saturday and Sunday with 2 events
6-1: Monday to Saturday with 4 events,
Sunday with 2 events
1E4: Monday to Sunday with 4 events
7E4: Monday to Sunday are individual, with 4 events
1E2: Monday to Sunday with 2 events
REMOTE
Access schedule and event settings:
• Press ” ” for 3 seconds to enter the settings.
• Scroll through the settings until 5che appears on the
display.
• Press ” ”to enter the options.
• Use ”” or ”” to change the schedule.
• Press ” ” to return to the settings.

PAGE 14
© 2021 OJ Electronics A/S
Display settings (Lcd)
This setting allows you to select which data you want to
be shown in the idle display.
Lcd 1:
Set = Temperature setpoint
cLc = Clock
-- = Nothing is shown.
Lcd 2:
Set = Temperature setpoint
tP = Measured temperature
Display settings are not applicable if the sensor applicati-
on is set to C.
Menu structure:
Lcd 1:
5et: Temperature setpoint
cLc: Clock
--: Nothing is shown.
Lcd 2:
5et: Temperature setpoint
tP: Measured temperature
REMOTE
Access display settings:
• Press ” ” for 3 seconds to enter the settings.
• Scroll through the settings until either Lcd 1 or Lcd 2
appears on the display.
• Press ” ”to enter either Lcd 1 or Lcd 2.
• Use ”” or ”” to select what data you want to see on
Lcd 1 or Lcd 2.
• Press ” ” to return to the settings.

PAGE 15
© 2021 OJ Electronics A/S
Remote Control (rCt)
This setting allows you to set the temperature setpoint for
the thermostat, when it is remote controlled.
Remote control is activated from a 230V signal possibly
through an external control, clock or timer, connected to
the S-terminal.
When the thermostat is remote controlled “REMOTE” is
shown in the display.
This setting is factory set to 10°C but can be set between
5 and 25°C in steps of 0.5°C.
Menu structure:
rct: 5 and 25°C
REMOTE
Access remote controlled temperature settings:
• Press ” ” for 3 seconds to enter the settings.
• Scroll through the settings until rctappears on the
display.
• Press ” ”to enter the options.
• Use ”” or ”” to set the temperature between 5 and
25°C. Return with ” ”.

PAGE 16
© 2021 OJ Electronics A/S
Open Window (OPEn)
This setting allows you to enable the ”Open window”
function.
The thermostat can detect an open window by registering
a rapid drop in temperature.
With the function enabled, the thermostat stops heating
for 30 minutes if an open window is detected.
Menu structure:
open:
On: Open window function is enabled.
O: Open window function is disabled.
REMOTE
Access settings for open window function:
• Press ” ” for 3 seconds to enter the settings.
• Scroll through the settings until open appears on the
display.
• Press ” ”to enter the options.
• Use ”” or ”” set the open window function On or
O.

PAGE 17
© 2021 OJ Electronics A/S
Adaptive start (AdAP)
This setting allows you to enable adaptive start function.
After af few days, the adaptive start will have
automatically calculated how much earlier the heating
must be turned on/o to achieve this.
See illustrations below when adaptive start is ON or OFF:
REMOTE
Access settings for adaptive start:
• Press ” ” for 3 seconds to enter the settings.
• Scroll through the settings until AdAP appears on the
display.
• Press ” ”to enter the options.
• Use ”” or ”” set the open window function On or
O.
Menu structure:
AdAP:
On: Adaptive start is enabled.
O: Adaptive start is disabled.
17° 25° 17°
06:00
09:00
Adaptive
start On:
17° 25° 17°
06:00
09:00
Adaptive
start O:

PAGE 18
© 2021 OJ Electronics A/S
Adjust (AdJ)
This option allows you to calibrate the measured room
temperature.
You should only calibrate the sensor if the temperature
reading diers significantly from the actual temperature.
Note that with sensor application F, the temperature is
measured in the floor, this temperature would be higher
than the ambient temperature.
Adjust is not applicable if the sensor application is set to
C.
Menu structure:
ADJ: Measured temperature -9,9...10°C
REMOTE
Access adjustment settings:
• Press ” ” for 3 seconds to enter the settings.
• Scroll through the settings until either ADJ appears on
the display.
• Press ” ”to enter Adjustment options.
• Use ”” or ”” to adjust the temperature.
• Return to the settings with ” ”.

PAGE 19
© 2021 OJ Electronics A/S
Temperature scale (5cAL)
REMOTE
This setting sets the temperature scale which will be
displayed. Either as celsius or a numerical value.
Temperature values:
• C°: The temperatures will be displayed as celsius.
• nu: The temperatures will be displayed as a numerical
value (1-10).
Access the Temperature Scale settings:
• Press ” ” for 3 seconds to enter the settings.
• Scroll through the settings until 5cAL appears on the
display.
• Use ”” or ”” to choose to show the temperature in
either Celsius or a numerical value.
• Return to the settings with ” ”.
Menu structure:
5cAL:
C°: temperatures displayed as celsius
nu: temperatures displayed as a numerical value.

PAGE 20
© 2021 OJ Electronics A/S
Software version (-5U)
This setting provides a read-out of the software version.
Menu structure:
-5U: Read-out
REMOTE
Accessing software version readout:
• Press ” ” for 3 seconds to enter the settings.
• Scroll through the settings until -5Uappear on the
display. The SW version is shown below.
Table of contents
Other MICROMATIC Thermostat manuals
Popular Thermostat manuals by other brands

Thermon
Thermon XT Series Installation, operation & maintenance instructions

Eurotronic
Eurotronic Comet Zigbee manual

Rinnai
Rinnai Brivis DGH Manual Controller Operating & installation manual

TFC
TFC HWPRS User instruction manual

DIVERSITECH
DIVERSITECH 675-TS32 instruction manual

Motison
Motison CyberStat CY1201 user manual