Micron Handy User manual

Instruction Manual
Publication Part Number: 9117 Revision: 1


3
Battery case
DESCRIPTION
The HANDY is a lightweight hand-held, spinning disc, Controlled Droplet Applica-
tion (CDA) sprayer, designed for the application of herbicides at low volumes (10 to
30 litres/hectare). It is powered by four torch (D-cell/R20) batteries, which give over
40 hours spraying. Liquid is fed by gravity through colour coded feed nozzles. An
electrically governed motor spins the atomiser disc at a constant 2000 rpm to produce
uniform spray droplets of around 250 micron; large enough to minimise any risk of
spray drift. The ergonomic design of the HANDY, with the carrying handle and bot-
tle being an integral part of the machine allows for closed chemical transfer and im-
proved operator safety. The weight of the machine ready to spray is 6.2 kg.
CONTENTS Page
Description................................................................................................................. 3
Safety.......................................................................................................................... 4
Operator protection..................................................................................................... 4
Preparing for spraying................................................................................................ 5
Mixing and filling....................................................................................................... 6
Calibration.................................................................................................................. 9
Before spraying........................................................................................................ 10
To start spraying....................................................................................................... 10
To stop spraying....................................................................................................... 11
After spraying........................................................................................................... 12
Storage...................................................................................................................... 12
Troubleshooting ....................................................................................................... 13
HANDY parts drawing............................................................................................. 14
HANDY parts list..................................................................................................... 15
5 litre spray bottle
Feed nozzle
On / off switch
Atomiser
disc Spray head
Battery case
clamp

4
SAFETY
Using agrochemicals is a hazardous process. Operators should comply with all rele-
vant legislation and/or regulations governing the use of agrochemicals and should use
appropriate personal protective equipment (see ‘OPERATOR PROTECTION’).
Never use the HANDY in potentially explosive atmospheres or spray flammable liq-
uid through it.
The HANDY can be used with most conventional herbicides, as well as specific
CDA formulations (only available in some countries).
Always read the product label carefully to discover:-
♦ approved applications
♦ maximum dose rates
♦ maximum number of treatments
♦ operator protection required
♦ necessary environmental protection measures
N.B. ‘Dose rate’ refers to the amount of chemical
product applied per hectare.
Never eat, drink, or smoke when working with agrochemicals. After using agro-
chemicals or handling equipment wash your hands thoroughly. Keep people
(especially children) and animals out of areas being sprayed.
Always store agrochemicals safely to protect people and animals, and to safeguard
the environment (take special care to avoid water pollution). See ‘SPRAYING’ sec-
tions for guidelines on safe use of the HANDY in operation.
OPERATOR PROTECTION
Always wear the protective clothing items listed on the product label for mixing and
filling. The minimum protective clothing required for spraying with the HANDY is:
♦
rubber gloves
♦
boots/shoes and long trousers
♦
eye protection
♦
long sleeved shirt
Note:
a) Acoustic information: the sound pressure level at the operator’s ear does not exceed
70 dB(A).
b) Vibration: the weighted RMS acceleration value at the hands when using this ma-
chine does not exceed 2.5 m/sec².

5
PREPARING FOR SPRAYING - NEW SCREW SWITCH
PARTS LIST AND DIAGRAM - NEW SCREW SWITCH
1. Remove the green protective cover from the
atomiser disc.
4. Make sure that the locking screw on the battery case
clamp is tight and that the air bleed tube is correctly
positioned in the groove as shown.
Air bleed tube
Locking screw
2. Remove the switch end piece as shown on the label.
3. Insert four batteries (D-cell/R20) negative i.e. flat
end first, and replace the switch end piece
DESCRIPTION PART
NO.
SCREW SWITCH PLUG 7464
SCREW SWITCH SLEEVE 7465
CONNECTOR SCREW SWITCH 7495
TURN OFF
TURN ON
7495
7464
7465

6
Always wear gloves when handling
agrochemicals and equipment. Always use the correct equipment
when mixing and measuring.
MIXING, FILLING AND CALIBRATION
Mixing and filling is generally the most hazardous process in the spraying operation.
Always follow the label instructions. Always use a funnel (preferably with a filter)
when filling the bottle. Only mix enough spray for the area to be treated thereby
avoiding the need for disposal of unused spray mix.
Always wash off any skin
contamination Always clean all equipment after
use.
With the HANDY herbicides are usually applied in around 20 litres total spray vol-
ume per hectare, with the exception of glyphosate which can be applied at volumes as
low as 10 litres per hectare. These are lower volumes than recommended for high
volume application with knapsack sprayers. Use the minimum dose rate recom-
mended on the label for the intended treatment and add water to make up to the vol-
ume required for application with the HANDY.

7
For example, if the label recommends applying a minimum of 2 litres of product
made up to 200 litres of water per hectare with a knapsack sprayer, use 2 litres of
product made up to 20 litres for application with the HANDY, i.e. a spray mix con-
centration of 10%.
Do not use herbicide concentrations greater than the maximum recommended on the
label (unless specific training or recommendations have been given) if the label:
♦
specifically prohibits use of ‘Reduced Volumes’ i.e. increased concentrations;
♦
has a statutory requirement for use of personal protective equipment when using
the diluted product at high volumes (N.B. this will appear in the statutory box on
the label); or
♦
carries one of the following hazard ratings: ‘very toxic’, ‘toxic’ or ‘corrosive’ or
carries the warning ‘risk of serious damage to the eyes’
Micron do not generally recommend using spray mixes more than ten times the maxi-
mum concentration recommended for high volume application with knapsack spray-
ers. The safest product and lowest dose rate appropriate for the treatment should be
used at all times.
To prepare the spray mix select the dose rate of product to be applied per hectare
(from the product label) and mix in a suitable container. With liquid formulations,
mixing can generally be carried out in the 5 litre spray bottle as shown below. For-
mulations which are harder to mix such as wettable powders or granules should be
first mixed in a bucket and the spray mix then transferred to the spray bottle.
1. Half fill the spray bottle with water 2. Measure out the exact amount of
product and add to the spray bottle

8
a) glyphosate: 2 litres
add water: +8 litres
Total volume: 10 litres
i.e. 1 part glyphosate : 4 parts water
e.g. 1 litre of glyphosate + 4 litre of
water in 5 litre spray bottle
b) 2,4-D (500 g/l) 3 litres
add water: +17 litres
Total volume: 20 litres
i.e. 3 parts 2,4-D : 17 parts water
e.g. 750 ml of 2,4-D + 4.25 litres of
water in 5 litre spray bottle.
3. Fill with water up to the 5 litre mark. 4. Attach the spray bottle to the battery
case clamp, making sure that the un-
ion nut is firmly tightened.
5. Shake the bottle to ensure thorough
mixing - check for leaks. 6. Wipe the bottle with a dry cloth.
Never use leaking equipment. Take care to avoid the spillage of spray mix.
Examples of mixing spray - for 1 hectare

9
The formula below gives the relationship between swath width, flow rate, walking
speed and total spray volume:
Flow rate (ml/min) = 6 x total spray volume (l/ha) x walking speed (m/s) x band width (m)
The table below gives examples of feed nozzle selection and walking speed to
achieve desired total volume application rates.
These values have been measured using water only. Actual flow rates will depend on
the viscosity of the spray liquid used and the angle at which the operator holds the
sprayer. Before spraying, therefore, the HANDY should be calibrated by the operator
for the spray mix being used.
CALIBRATION
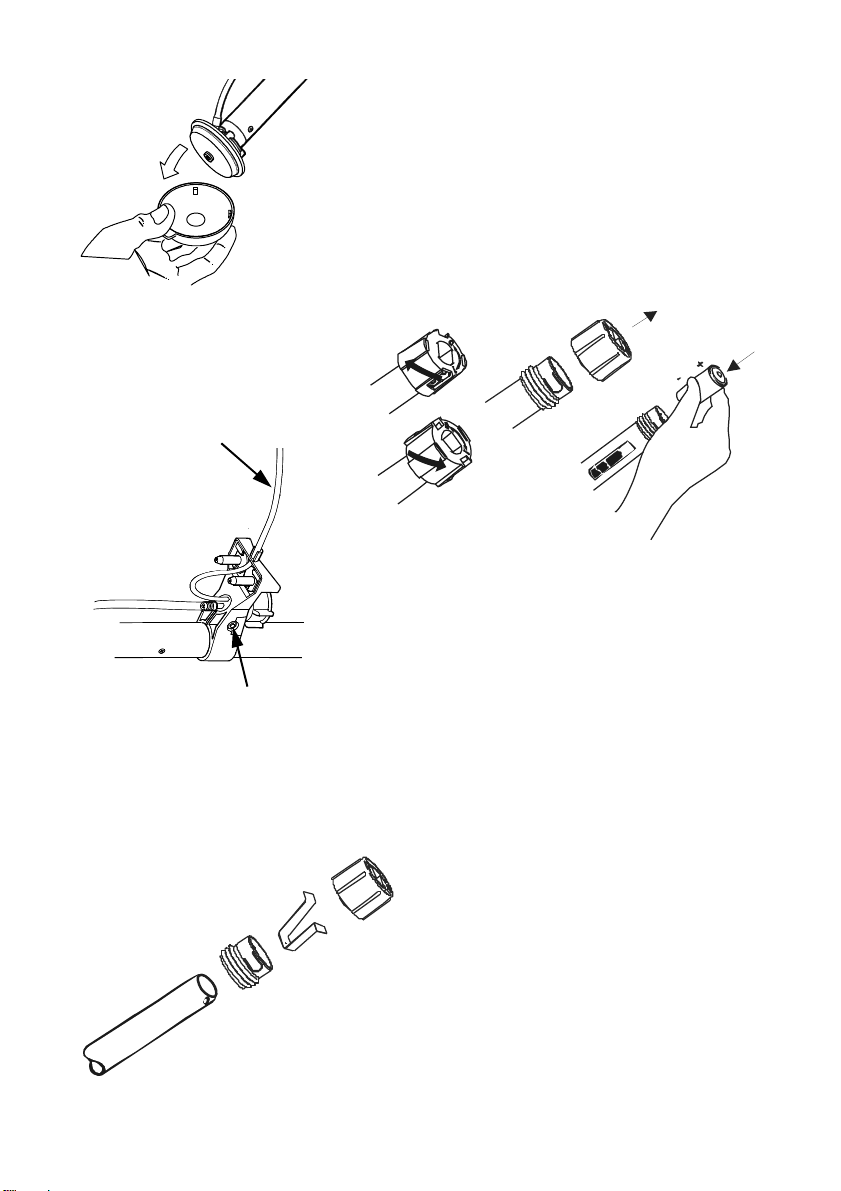
To calibrate the HANDY remove the atomiser disc (see ‘AFTER SPRAYING’) and
collect and measure the volume of spray liquid dispensed in one minute with the
sprayer held in the normal “head down” spraying position (see ‘TO START SPRAY-
ING’). As the balance of the machine and hence angle at which it is held will vary as
the spray bottle empties, an average flow rate will be obtained if measured with the
bottle half full.
It may be necessary to fit a different feed
nozzle to obtain the desired flow rate. To
change the nozzle, pull off the feed tube and
remove the two screws which hold the nozzle
in position. Alternative nozzles are located in
slots in the battery case clamp. These are
colour coded according to flow rate. Select
the colour needed and screw into place.
Blue Yellow Red
Orange
Increasing flow rate
Once the flow rate for a particular feed nozzle has been determined, walking speed
should be adjusted to achieve the required spray volume.
In general it is preferable to walk more slowly to achieve the required spray volume
than to use higher flow rates.
Total spray volume
(l/ha)
Band width
(m)
Feed nozzle
Flow rate
(ml/min)
Walking speed
(m/sec)
10 (i.e. glyphosate)
1
Blue
70
1.2
20 (i.e. other herbicides)
1
Orange
180
1.5
Example: required spray volume rate = 20 l/ha Flow rate measured = 150 ml/min
Walking speed (m/s) = Flow rate (ml/min) = 150 = 1.25
6 x 1 x total spray volume (l/ha) 6 x 20

10
BEFORE SPRAYING
Check the wind speed and direction (below 5 kph is safest). Take special care to
avoid drift by keeping the spray head as low as possible.
Before spraying for the first time use soap and water only to familiarise yourself with
the sprayer and check the spray pattern produced. Put around a litre of water in the
spray bottle and add a few drops of liquid detergent such as household washing up
liquid. The detergent is important to reduce the surface tension in the liquid feed tube
and helps ensure an even flow.
TO START SPRAYING
To start spraying, first switch on the motor
and check that the atomiser disc is spinning
(never touch the disc when it is spinning).
Then, holding the spray bottle by the handle,
tilt it backwards into the “head down” spray-
ing position so that the spray head is below
the level of the bottle. This allows spray liq-
uid to flow onto the atomiser disc.
The battery case should be at an angle of
around 35° to the ground with the spray head
about 20 cm above the ground or top of the
weed canopy. Make sure that the spray head
is far enough behind you so as to avoid con-
taminating the back of the legs. Look behind
to ensure that the sprayer is not leaking
around the union nut and to confirm that
spray is being issued from the disc.
“Head Down” Position
Start walking at the required speed. Occa-
sionally glance behind to ensure that spray is
being produced from the atomiser disc and
the feed nozzle is not blocked.
At the end of the row do not interrupt the
flow by turning the sprayer into the head up
position, but continue application on the next
row.

11
TO STOP SPRAYING
If there is any spray liquid left in the spray bottle,
keep the motor running and slowly tilt the sprayer
so that the head is above the level of the bottle and
when no more spray liquid is emitted from the at-
omiser disc, switch off the sprayer. Do not raise the
spray head above waist level with the disc still spin-
ning as spray may continue to be emitted.
“Head Up” Position
AFTER SPRAYING
1. Dispose of any surplus spray mix according to
the product approval. Store products safely,
locked up and out of the reach of children.
2. It is essential to clean the sprayer and bottle
thoroughly using water and detergent after use.
Never immerse the spray head in water or under
a tap, since this will destroy the electric motor.
A water and detergent mix should be put in the
bottle, rinsed around, and then sprayed out onto
the treated area or an area of waste ground. The
sprayer and bottle should be wiped down exter-
nally using a cloth.
3. Periodically remove the atomiser disc with a pair of pliers and clean using a soft
brush. When refitting the atomiser disc ensure that the two small lugs on the in-
side of the disc hole align with the slot in the white shaft which attaches to the
motor.

12
After working with agrochemicals, or handling spraying equipment, always thor-
oughly wash hands and exposed skin. All protective clothing should be washed sepa-
rately from other clothing and stored. Contaminated gloves should be washed inside
and out.
STORAGE
Before storing for long periods, make sure that the batteries are removed to prevent
leaking and that the sprayer is clean and dry. Both the sprayer and batteries should be
stored in a dry place away from direct sunlight.

13
Troubleshooting
a) Atomiser disc spins but does not spray or sprays irregularly. Check
−
the feed nozzle. If the feed nozzle is blocked remove and soak in soapy water.
Never blow through the nozzle with your mouth.
−
that the feed nozzle gives a flow rate within the operating range.
−
that the air bleed tube is not blocked and correctly positioned (see ‘PREPARING
FOR SPRAYING’)
−
the atomiser disc is clean and undamaged. Clean or replace.
c) Leakage occurs at the bottle connection.
Check:
−
that the O-ring (part number 5148) around the
bottle connector (part number 5752) is in place
and in good condition. Replace if necessary.
a) Atomiser disc fails to spin or spins un-
evenly. Check:
−
that the batteries are fitted correctly.
−
the condition of the batteries. Replace
if necessary. Battery condition can be
checked using a torch or torch bulb and
electrical wire as shown.
−
that electrical terminals and contact points are clean and that electrical wires are
not broken or corroded.
−
if the atomiser disc is rubbing on the motor front plate or the motor shaft is bent.
Replace the disc or motor if necessary.
−
the motor for corrosion or obvious signs of wear. Replace if necessary.
Bottle connector O-ring

14
HANDY PARTS DRAWING
12
3
4
56789104
11
13
14
15
16
1718
19
20
21
22
23
24
25
26
27
28
30
18
29
18
18
31
4
32
34
35
36
33
3738

15
HANDY PARTS LIST
NO DESCRIPTION PART NO. QTY
1 ATOMISER PROTEXCTIVE COVER, GREEN 4462/GREEN 1
2 ATOMISER COVER 5021 1
3 SLINGER / DUMMY SHAFT 5022 1
4 SCREW No. 6 x 3/8” POZI PAN HD, TYPE B S/S 5399 11
5 FRONT PLATE 5424 1
6 O’RING BS611 NITRILE 5454 1
7 O’RING BS365-30, NITRILE 5455 1
8 MOTOR HERBI 5442 1
9 SPRING 9/32” LONG 4457 2
10 MOTOR HOUSING 6125 1
11 WIRE 1MM SQ, RED 0.59M LONG 4368/59 1
12 AIR VENT TUBE, 0.2M LONG 3512/20 1
13 WIRE 1MM SQ, BLACK 0.56M LONG 4134/56 1
14 TUBE 5MM x 8MM PVC, 0.51M LONG 4993/20 1
15 SPRING, BATTERY CASE S/S 5363 1
16 CENTRE CONNECTOR 5375 1
17 TERMINAL RING 5575 4
18 SCREW No.6 x 3/8” S/S FLANGED HD, TYPE AB 4646 4
19 AIR BLEED DEFLECTOR 5063 1
20 PIN 1MM x 10MM LONG, BRASS 5463 1
21 FILTER, 40 MESH 4428 1
22 O’RING BS125, VITON 5148 1
23 BOTTLE CONNECTOR 5752 1
24 TUBE 6MM x 9MM, PVC, 0.2M LONG 4309/20 1
25 UNION NUT 5753 1
26 NUT M6, PLAIN STEEL 3691 1
27 BATTERY CASE CLAMP 6126 1
28 SCREW M6 x 25MM, SLOTTED PAN HD A2 S/S 5787 1
29 NOZZLE, ORANGE 4766 1
NOZZLE, BLUE 4338 1
NOZZLE, YELLOW 3405 1
30 TUBE, 3/16” O/D, NYLON, 0.45M LONG 3374/45 1
31 BATTERY CASE, ALUMINIUM, 0.75M LONG 5377 1
32 LABEL HANDY 8426 1
34 SWITCH SLEEVE 7465 1
35 CONNECTOR, SWITCH, PRESSED 7495 1
36 SWITCH PLUG 7464 1
37 BOTTLE, 5 LITRE 6167 1
38 CAP, 40MM 6177 1
33 LABEL, BATTERY ON/OFF 8621 1

16
NOTES

17
NOTES

18
NOTES


Copyright © Micron Sprayers Ltd. 2013
General Enquiries:
Micron Group
Bromyard Industrial Estate,
Bromyard, Herefordshire,
HR7 4HS, U.K.
T+44 (0)1885 482397
F+44 (0)1885 483043
E[email protected]o.uk
Australian Enquiries:
Micron Group
P.O. Box 1246, Berri 5343,
South Australia
T+61 (0)8 8582 4077
Eenquiries@enviromist.com.au
www.micron.co.uk
Table of contents
Other Micron Paint Sprayer manuals

Micron
Micron ULVAFAN MK2 User manual

Micron
Micron Microfit Herbi User manual

Micron
Micron Herbi-4 CDA User manual

Micron
Micron AU8115MS Installation and operation manual

Micron
Micron Enviromist Spraydome 1000 Owner's manual

Micron
Micron Electrafan 240 User manual

Micron
Micron Herbidome 350 User manual

Micron
Micron Herbiflex4 User manual

Micron
Micron Ulva+ User manual

Micron
Micron Herbi-4 CDA User manual