Micron AU8115MS Installation and operation manual

Air Assisted Vehicle Mounted ULV and LV Sprayer
Operator’s Manual & Parts Catalogue


AU8115MS
AIR ASSISTED
VEHICLE MOUNTED
ULV & LV SPRAYER
Operator's Manual
and
Parts Catalogue
Micron Sprayers Limited
Bromyard Industrial Estate
Bromyard
Herefordshire HR7 4HS
United Kingdom
Tel: (01885) 482397
+44 1885 482397
Fax: (01885) 483043
+44 1885 483043
Web site: www.micron.co.uk 02/20


TABLE OF CONTENTS
1. INTRODUCTION.....................................................................................1
2. SPECIFICATION.....................................................................................2
3. INSTALLATION.......................................................................................4
3.1 Installation on Vehicle...................................................................4
3.2 Assembly of Sprayer.....................................................................4
3.3 Electrical Installation and Test......................................................5
4 CONTROLS.............................................................................................5
4.1 Pump and Valves..........................................................................6
4.2 Engine ..........................................................................................6
4.2.1 Engine Controls.................................................................7
4.2.2 Engine Start/Stop Preocedure...........................................8
4.2.3 Using Remote Starter........................................................8
4.2.4 Using Engine Key Switch..................................................9
4.2.5 Using Manual Engine Starter ............................................9
4.2.6 Engine Stop.....................................................................10
5 SAFETY.................................................................................................10
5.1 Using Pesticides.........................................................................10
5.2 Engine Safety .............................................................................11
6 CALIBRATION .......................................................................................12
6.1 Measure the Forward Speed of the Vehicle................................12
6.2 Select a Suitable Track Spacing.................................................12
6.3 Calculate required Flow Rate from the Sprayerr.........................13
6.4 Set the Flow Rate.......................................................................14
6.5 Select the Correct Droplet Size...................................................16
7 SPRAYING PROCEDURE.....................................................................17
7.1 After Use.....................................................................................17
7.2 Cleaning .....................................................................................18
7.3 Additional Applications................................................................18
8 MAINTENANCE.....................................................................................18
8.1 Engine ........................................................................................18
8.1.1 Oil .................................................................................18
8.2 Fan .........................................................................................19
8.3 Pump .........................................................................................19
8.4 Atomiser .....................................................................................20
9 FAULT FINDING....................................................................................22
10 PARTS.................................................................................................24
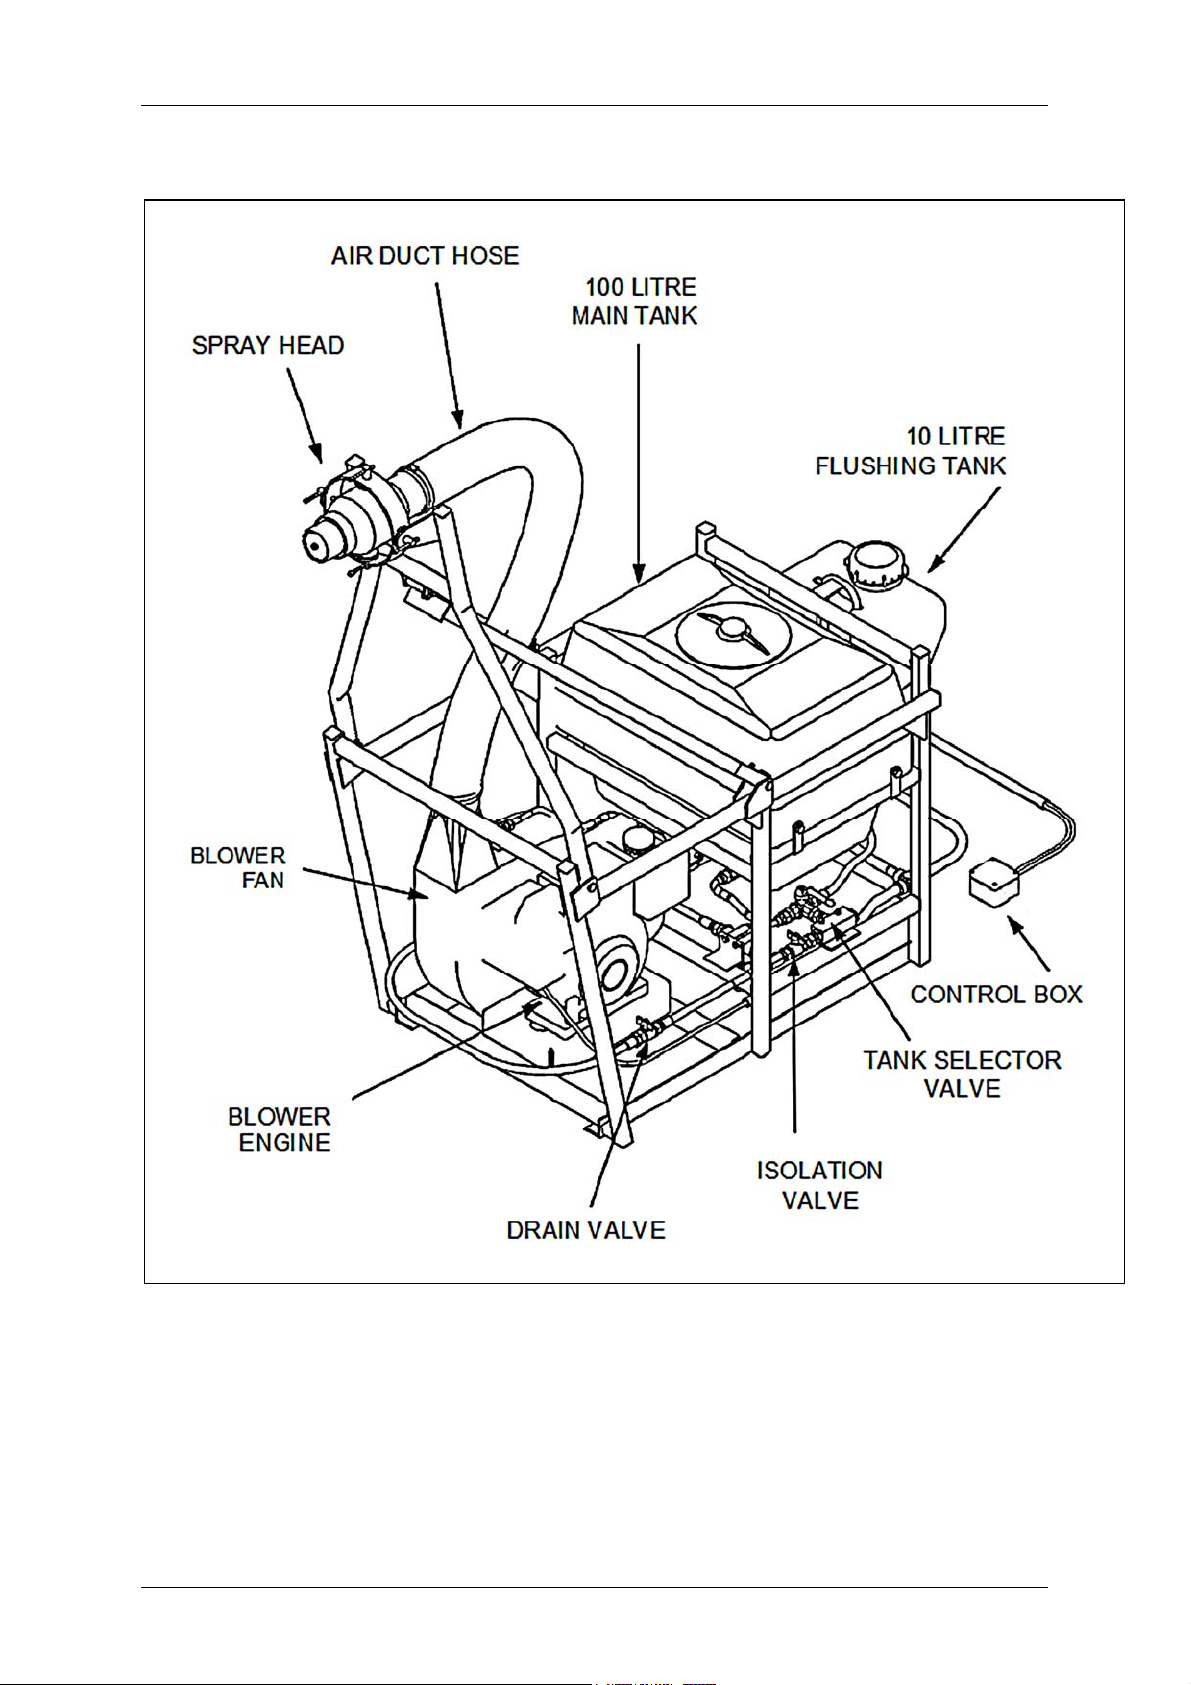
10.1 AU8115MS Main Components .................................................24
10.2 AU8115MS Pipework Components ..........................................28
10.3 AU8115MS Sprayhead Components........................................32
10.4 AU8115MS Atomiser Components...........................................33
10.5 EX7008 Pump Components .....................................................34
10.6 5881A Filter Components.........................................................35
10.7 EX7463 Electric Throttle Actuator Components........................36
11 ELECTRICAL SCHEMATIC.................................................................36


MICRON AU8115MS VEHICLE MOUNTED SPRAYER
1. INTRODUCTION
This manual contains all information required to ensure successful application of
products for agricultural, public health and pest control using the AU8115MS vehicle
mounted sprayer. Full instructions and operation details are included along with all
necessary information required to maintain and repair the equipment and to identify
any spare parts.
The AU8115MS sprayer is designed for a wide range of agricultural, public health
and pest control spray tasks. It can be mounted in the rear of any pick-up truck or
other suitable vehicle, with all controls installed in the cab of the vehicle for
maximum operator safety.
The sprayer is designed around the proven Micronair AU8000 sprayhead. This uses
a rotary atomiser to produce spray droplets of a precisely controlled size. Control of
the droplet size minimises wastage of pesticide and ensures optimum penetration
and coverage of the target. This ensures flexibility over a wide range of application
parameters and products. The sprayer can be used for flow rates from 0.2 – 3.5
litres per minute.
The sprayhead is driven by a high velocity air stream produced by a blower powered
by a reliable 4 stroke engine with electric start. The air stream from the sprayhead
carries the spray droplets for a distance of up to 10 metres in still air and typically
enables a swath of 50 – 100 metres to be achieved when using a drift spraying
technique with a wind speed of 2 metres/second or more. The air stream also
ensures optimum penetration of dense foliage and carries all spray safely away from
the vehicle and its driver. The sprayhead is fitted in an adjustable mounting which
enables it to be directed towards the target to ensure optimum coverage.
The AU8115MS sprayer is operated from a control box in the vehicle cab. This
incorporates switches for the electric engine starter, engine throttle and pesticide
pump.
It is the responsibility of the user to determine the optimum application rate and
droplet size for the product mix being used. This information should then be used in
conjunction with the section on Calibration to determine the required atomiser flow
rate. It is important to read this manual carefully before using the sprayer.

2
MICRON AU8115MS VEHICLE MOUNTED SPRAYER
2. SPECIFICATION
Dimensions: 140 cm long x 76 cm wide x 85 cm high
(excluding spray head and support)
Height of spray head: 180 cm above bed of vehicle
Weight (empty): 130 kg
Pesticide tank: 100 litres capacity; UV stabilised polyethylene
Flushing tank: 10 litres capacity; UV stabilised polyethylene
Pesticide flow rate: 0.2 – 3.5 litres/minute
Flow rate adjustment: By manually adjustable restrictor valve or by
interchangeable restrictor orifice discs
Pump: 12 V magnetically coupled centrifugal pump
Spray droplet size: 40 – 100 microns VMD (depending upon
formulation used)
Spray band width 10 – 100 metres (when using a drift spraying
technique)
Engine : 4 stroke petrol (gasoline) 13 HP engine with
electric start and electrically operated throttle
Fuel capacity: 5.0 litres
Running time (with full fuel tank): 3 hours approx.
Electrical requirements: 12 volts DC (vehicle battery)
50 A (during electric start)
10 A maximum (spraying)

3
MICRON AU8115MS VEHICLE MOUNTED SPRAYER
Fig. 1 – Components of AU8115MS Sprayer

4
MICRON AU8115MS VEHICLE MOUNTED SPRAYER
3. INSTALLATION
3.1. Installation on Vehicle
The AU8115MS Sprayer can be installed on any vehicle with an open bed and an
enclosed cab to protect the driver from the spray. The sprayer should be
positioned as far to the rear of the vehicle as possible so that when the support
frame is raised the atomiser projects behind the rear of the vehicle. When
positioning the sprayer in the vehicle, ensure that there is easy access to engine
controls, starter cord, control valves, filter etc.
The frame of the sprayer should be rigidly
secured to the vehicle using the nuts, bolts,
washers and foot plates provided. The bolts
should be fitted in four holes drilled in the bed of
the vehicle in appropriate positions, taking care
to avoid the vehicle fuel tank or other vulnerable
items. Alternatively, for a temporary installation
the sprayer can be tied down with ropes secured
around the frame
Fig. 2 – Attachment to Vehicle
3.2. Assembly of Sprayer
The AU8115MS sprayer is shipped partially dismantled and must be assembled prior
to use. The procedure for setting up a new sprayer is as follows:
1. Position the lower ends of the sprayhead support frame between the lugs at
the rear of the sprayer frame and secure in position with the pins and R-clips
provided.
2. Position the lower ends of the A-frame between the lugs at the rear of the
sprayer frame and secure in position with the pins and R-clips provided.
3. Raise the support frame so that it protrudes over the rear of the sprayer.
4. Secure the support frame by lifting the A-frame and locking in place through the
securing lug with the pin and R-clip provided.
5. Position the spray head in the support ring. Place a red fibre friction disc
between each mounting boss and the inside of the support ring. Fix the spray
head in position with securing bolts and washers as supplied.
6. Secure the air duct hose to the fan outlet using the hose clip provided.
7. Connect the lower end of the feed hose to the atomiser to the outlet of the
needle valve mounted on the top of the blower casing.
8. Fill the engine crankcase with oil as described in section 8.1.1.

5
MICRON AU8115MS VEHICLE MOUNTED SPRAYER
3.3. Electrical Installation and Test
1. Route the flexible conduit from the sprayer over or under the bed of the vehicle
and into the vehicle cab. Ensure that the conduit is clear of sharp edges or hot
parts (eg the engine exhaust under the bed of the vehicle) and is not vulnerable
to damage from objects placed in the rear of the vehicle.
9. Route the cable for the control box (with the 7-pin connector) to a suitable
position in the vehicle cab.
10. Connect the control box to the cable and tighten the retaining ring on the
connector.
11. Route the battery cable to the battery in the engine compartment of the vehicle.
12. Connect the battery leads to the vehicle battery with the red wire to the positive
(+) terminal and the black wire to the negative (-) terminal.
13. Ensure that the THROTTLE switch on the control box is set to IDLE and the
PUMP switch is set to OFF.
14. Plug the connector on the battery cable into the receptacle on the battery
leads.
15. Secure the cable in the engine compartment with the cable ties provided.
Ensure that the cable is well clear of sharp edges and all moving or hot parts.
16. Put a small quantity (about 5 litres) of diesel or kerosene in the sprayer tank,
operate the valves to select the main tank, fully open the flow control valve and
place a bucket under the atomiser.
17. Set the PUMP switch on the control box to ON. Check that the pump operates
and that liquid flows from the atomiser. Set the PUMP switch to OFF.
18. Move the THROTTLE switch on the control box between the IDLE and ON
positions and check that the throttle linkage at the top of the engine above the
air filter moves between its extreme minimum and maximum positions.
19. Test the starting and stopping of the engine as described in section 4.2 below.
IMPORTANT: the engine is shipped without oil. OIL MUST BE ADDED before
starting the engine
4. CONTROLS
This section describes the main features and controls of the sprayer and gives a
brief explanation of their functions. Further details will be found elsewhere in this
manual.

6
MICRON AU8115MS VEHICLE MOUNTED SPRAYER
4.1. Pump and Valves
The AU8115MS sprayer is fitted with an electrically driven magnetically coupled
pump that is powered from the vehicle battery. The on/off switch for the pump is
located on the control box located in the vehicle cab.
Three valves control the flow of pesticide:
A master isolation valve that shuts off
all liquid flow.
A three way tank selector valve that
determines whether the main (100
litre) tank or the flushing (10 litre) tank
is used.
A drain valve allows the system to be
drained after use.
Fig.3 – Location of Valves
To check that the pump is operating
correctly place a small amount (5 – 10
litres) of kerosene or diesel oil in the 10
litre tank. Rotate the two-way valve
towards the rear of the sprayer to select
the 10 litre tank and ensure that the
isolation valve near the filter is open
Angle the spray head downwards and
place a container underneath the
atomiser. Switch on the pump at the
control box without the engine of the
sprayer running. After a short time, liquid
should start flowing from the atomiser. Flow rate to the head is controlled either the
adjustable valve or in-line orifice restrictor – refer to the Calibration section. Check
that there are no leaks from any hoses or connections.
4.2. Engine
The sprayer is fitted with a Briggs and Stratton 13 HP four stroke engine with electric
start. The engine drives a blower that provides air both to rotate the atomiser and to
carry the spray droplets away from the sprayer and towards the target.
Fig. 4 – Flow Check

7
MICRON AU8115MS VEHICLE MOUNTED SPRAYER
There are three options for starting the engine:
By a remote switch on the sprayer control box in the vehicle cab.
By a key switch on the engine.
By the manual (rope) starter on the engine.
Power for the electric starter is provided by the battery of the vehicle on which the
sprayer is installed. The engine throttle is controlled by an electric actuator mounted
on the sprayer. This is operated by a switch on the sprayer control box in the vehicle
cab (see Fig. 6).
4.2.1. Engine Controls
1. Fuel On/Off valve lever (black): mounted on the side of the engine. Must be
opened by moving fully to the right before starting the engine and closed by
moving fully to the left when the sprayer is not in use.
2. Engine choke lever (grey): mounted on the side of the engine above the
fuel valve. The choke lever should be in the OPEN ( ).position (fully to the
right when the engine is running. The choke must be set to the CLOSED
position ( ).by moving the lever to the left when starting engine with the
manual (rope) starter and returned to the OPEN position during normal
running. It should not be necessary to close the choke when starting the
engine with the electric starter at temperatures above about 15° C.
3. Throttle control: remotely operated from the control box. DO NOT attempt to
directly operate the throttle control lever on the engine.
4. Ignition and engine electric starter switch: key switch mounted on the side of
the engine.
5. Manual rope starter pull handle. Mounted on the side face of the engine.
Fig. 5 – Engine Controls

8
MICRON AU8115MS VEHICLE MOUNTED SPRAYER
Fig. 6 – Control Box in Cab
4.2.2. Engine Start/Stop Procedure
Before starting the engine check the fuel and oil levels. If necessary, add fuel or oil
as described in section 8.1.1. Open the fuel valve by moving the black lever fully to
the right.
4.2.3. Using Remote Starter
1. Set the CHOKE lever on the engine to the OPEN (Run) position ( ).
2. Set the key switch on the engine to the ON ( l ) position with the key vertical.
IMPORTANT: The engine will not start if the key switch is set to the anti-
clockwise (O) STOP position
3. Set the THROTTLE switch on the control box to the ON position.
4. Hold the ENGINE switch on the control box in the START position until the
engine starts. Release the ENGINE switch when the engine starts. The switch
is spring loaded and will return to the RUN position. In case the engine fails to
start set the CHOKE control on the engine to the CLOSED position ( ).
Return the CHOKE control to the OPEN position ( ). after the engine starts.

9
MICRON AU8115MS VEHICLE MOUNTED SPRAYER
5. If the machine is not required to spray immediately set the THROTTLE switch
on the control box to IDLE.
4.2.4. Using Engine Key Switch
1. If the engine is cold set the CHOKE lever on the engine to the CLOSED
position ( ).
2. Set the ENGINE switch on the control box to the central RUN position.
IMPORTANT: The engine will not start if the ENGINE switch on the control
box is set to the STOP position.
3. Set the THROTTLE switch on the control box to the ON position.
4. Turn the key switch on the engine fully clockwise to the START ( ) position
until the engine starts. Release the key switch and allow it to return to the ON
position as soon as the engine is running.
5. If necessary, return the CHOKE lever on the engine to the RUN position ( ).
6. If the machine is not required to spray immediately set the THROTTLE switch
on the control box to IDLE.
4.2.5. Using Manual Engine Starter
1. Set the ENGINE switch on the control box to the central RUN position.
2. Set the key switch on the engine to the ON ( l ) position (key vertical).
IMPORTANT: The engine will not start if the ENGINE switch on the control
box or the key switch on the engine is set to the STOP position
3. Set the THROTTLE switch on the control box to the ON position.
4. If the engine is cold set the CHOKE lever on the engine to the CLOSED
position ( ).
5. Pull the engine starter cord gently until the compression of the engine is felt.
Release the cord so that it retracts fully and then pull again firmly to start the
engine. The cord should never be pulled fully out to the end stop as this will
strain the cord and the starter mechanism and could lead to premature failure.
If the engine does not start easily, move the choke to MID position. If the
engine still fails to start and the carburettor becomes flooded, set the choke to
the OPEN position and pull the starter cord at least 10 times before repeating
the normal starting procedure.
6. If the machine is not required to spray immediately set the THROTTLE switch
on the control box to IDLE.

10
MICRON AU8115MS VEHICLE MOUNTED SPRAYER
4.2.6. Engine Stop
1. Set the THROTTLE switch on the control box in the vehicle cab to the IDLE
position.
2. Set the ENGINE switch on the control box in the vehicle cab to STOP.
3. Move the fuel valve lever on the engine to the CLOSED position (fully to the
left).
IMPORTANT: Ensure that neither the ENGINE switch on the control box nor
the ignition switch on the engine is left in the STOP position before starting
the engine.
5. SAFETY
5.1. Using Pesticides
1. ALWAYS follow the safety instructions on the pesticide
label when handling and using pesticides.
2. ALWAYS wear appropriate protective clothing during
filling and calibration.
3. DO NOT spray near people or domestic animals.
There should be no people or domestic animals within
200 metres downwind from where spraying is to take
place.
4. Ensure spraying does not take place near waterways,
rivers or lakes.
5. DO NOT carry people, bedding, clothing or animals in
the back of the spray vehicle when spraying or when it
is contaminated with pesticide.
6. NEVER carry foodstuffs in the spray vehicle.
7. ONLY use a spray vehicle fitted with an enclosed cab.
8. ALWAYS wash hands, face and body after filling the
spray tank, after spraying and before eating or
smoking.
9. ALWAYS carry soap and towels for washing in the cab
of the spray vehicle and a supply of petrol, water and
rags for cleaning the vehicle and sprayer.

11
MICRON AU8115MS VEHICLE MOUNTED SPRAYER
5.2. Engine Safety
For full details of the safe operation and maintenance of the engine refer to the
Briggs & Stratton Vanguard Engine Operator’s Manual supplied with the sprayer.
IMPORTANT: fire, explosion or injury to the operator can occur if the following
instructions are not followed:
1. Do not run the engine in an enclosed area. Exhaust gases contain carbon
monoxide, an odourless and deadly poison.
2. Do not fill the petrol (gasoline) tank while the engine is running. Allow the
engine to cool for two minutes before refuelling. Only fill in a well ventilated
area.
3. If petrol (gasoline) is spilled, move the sprayer away from the area of the spill
and avoid creating any source of ignition until the petrol (gasoline) has
evaporated.
4. Do not operate the engine without a muffler fitted. Inspect the muffler
periodically and replace if necessary.
5. Do not use the engine on any forest covered, brush covered or grass covered
unimproved land unless a spark arrester is attached to the muffler.
6. Do not operate the engine if the air cleaner or the cover directly over the
carburettor air intake is removed.
7. When transporting the sprayer, the fuel shut-off valve must be closed to
prevent fuel leaking from carburettor.
8. Do not choke the carburettor to stop the engine.
9. Do not run the engine at excessive speeds.
10. Do not change the engine speed selected by the original equipment
manufacturer.
11. Avoid contact with the exhaust, cylinder or fins when they are hot as contact
may cause burns.
12. To prevent accidental starting when servicing the engine or sprayer, always
remove the spark plug or disconnect the wire from the spark plug.
CAUTION TO UNITED STATES CUSTOMERS:
If this engine is not equipped with a spark arrester and is to be used on any forest
covered, bush covered, or grass covered unimproved land, before using on such
land a spark arrester must be added to the muffler. The arrester must be maintained
in effective working order by the operator. In the State of California the above is
required by law (section 4442 of the California Public Resources Code). Other
states may have similar laws. Federal laws apply on federal lands. See your
Authorised Briggs & Stratton Service Centre for spark arrester muffler options.

12
MICRON AU8115MS VEHICLE MOUNTED SPRAYER
6. CALIBRATION
To apply the correct volume of spray liquid to an area it is necessary to calibrate the
sprayer accurately. This is critically important to prevent under or over dosing of
pesticide. The calibration procedure is as follows:
6.1. Measure the Forward Speed of the Vehicle
1. Select a gear that will give an appropriate speed in the terrain of the spray area
and carry out a trial run over a measured distance of 100 metres. Measure
how long it takes, in seconds, to cover this distance (time = t seconds).
2. Calculate the forward speed using the formula: Speed (km/hr) = 360/t
Example: time to cover 100 metres, t = 36 seconds, so speed = 360/36 = 10 km/hr
Note that the vehicle’s speedometer is unlikely to be accurate at the low speeds
typically used for spraying.
6.2. Select a Suitable Track Spacing
The track spacing is the distance between successive spray passes of the vehicle.
Spray passes should always be made with the wind at right angles to the direction of
travel of the vehicle. Although the peak spray deposit is likely to occur at a point
downwind of the vehicle some spray will be carried more than twice this distance.
Spray coverage of the target area is evened out by accumulating spray deposits
from overlapping swaths. This is known as an incremental spraying technique.
When using droplets of 50 – 75 µm (VMD) in diameter in a steady wind (in excess of
7 km/hr or 2 m/s) a track spacing of 50 – 100 metres will be possible in open areas
with sparse vegetation. A narrower track spacing will be necessary if larger droplet
sizes are used or if the sprayer is used in lighter winds. If necessary, the track
spacing can be determined by measuring the width of the swath deposited under the
prevailing operating conditions. As a guide, the track spacing should be less than
about 50% of the measured swath to ensure sufficient overlap of successive swaths.

13
MICRON AU8115MS VEHICLE MOUNTED SPRAYER
Fig. 7 – Incremental Spraying Technique
6.3. Calculate Required Flow Rate from the Sprayer
The required flow rate (in litres per minute) can be calculated using the following
formula:
Flow Rate (l/min) = Volume Application Rate (l/ha) x Speed (km/hr) xTrack Spacing (m)
600
Volume application rate is chosen so as to apply the recommended dose of active
ingredient (see FAO guidelines or manufacturer’s label).
Example: if required volume application rate = 0.5 litres per ha (l/ha)
Vehicle speed = 10 kilometres per hour (km/hr)
Track spacing = 50 metres (m)
Then required flow rate from sprayer = 0.5 x 10 x 50 = 0.42 litres/ min
600
= 420 ml/min
The tables below give examples of combinations of flow rates and vehicle speeds
needed to apply volume application rates of 0.5 and 1.0 litre per hectare.

14
MICRON AU8115MS VEHICLE MOUNTED SPRAYER
Atomiser Flow Rate (ml/min)Volume Application
Rate 0.5 l/ha Vehicle Forward Speed (km/hr)
Track Spacing (m) 5.0 7.5 10.0 15.0 20.0
25 104 156 208 312 417
30 125 188 250 375 500
35 146 219 291 438 583
50 208 313 417 616 833
100 417 616 833 1250 1667
Atomiser Flow Rate (ml/min)Volume Application
Rate 1.0 l/ha Vehicle Forward Speed (km/hr)
Track Spacing (m) 5.0 7.5 10.0 15.0 20.0
25 208 312 417 614 834
30 250 375 500 750 1000
35 291 438 583 876 1076
50 417 616 833 1232 1667
100 833 1250 1667 2500 3334
6.4. Set the Flow Rate
The flow rate from the AU8115MS can be controlled either by the use of an
adjustable restrictor valve or by interchangeable in-line orifice restrictor plates. The
orifice restrictor plates should only be used when the sprayer will remain set to a
constant flow rate for a long period. The adjustable restrictor valve should used
when frequent changes of flow rate are required as it eliminates the need to
disconnect pipe fittings and the consequent risk of exposure to pesticide.
To set the flow rate:
1. Park the vehicle facing into the wind with the spray head downwind so as to
minimise operator contamination.
2. Ensure the drain valve is closed and the main tank valve open.
3. Put at least 10 litres of the actual pesticide to be used into the main tank.
4. Place a clean bucket directly underneath the atomiser to collect spray liquid.
5. Referring to the table below, either select the orifice restrictor plate that gives
the flow rate closest to that required and fit it in the outlet of the flow regulator
valve or adjust the setting of the restrictor valve to a position that gives the flow
rate closest to that required. If using orifice restrictor plates, the restrictor valve
MUST be set to the fully open position for both calibration and spraying. Note
that the values given in the tables are for light oil. Actual flow rates will vary
according to the pesticide used and its viscosity. The flow rate must always be
measured with the actual product to be sprayed.
Table of contents
Other Micron Paint Sprayer manuals

Micron
Micron Herbi-4 CDA User manual

Micron
Micron Electrafan 240 User manual

Micron
Micron ELECTRAFAN 12 User manual

Micron
Micron Enviromist Spraydome 1000 Owner's manual

Micron
Micron ULVAFAN MK2 User manual

Micron
Micron Handy User manual

Micron
Micron Microfit Herbi User manual

Micron
Micron Ulva+ User manual

Micron
Micron Herbi-4 CDA User manual

Micron
Micron Herbiflex4 User manual
Popular Paint Sprayer manuals by other brands

Carlisle
Carlisle Ransburg RansFlex RFXi Series Service manual

F5
F5 Paint Shaker Installation and instruction manual

Graco
Graco Pro Xp 60 AA WB Instructions - parts

Graco
Graco 333013B Instructions - parts

MeiVac
MeiVac MAK Series Owner's operation and maintenance manual

Fimco
Fimco 3PT-65-12V-7 owner's manual