manuals.online logo
Brands
  1. Home
  2. •
  3. Brands
  4. •
  5. MicroNX
  6. •
  7. Personal Care Product
  8. •
  9. MicroNX BL30N User manual

MicroNX BL30N User manual

Popular Personal Care Product manuals by other brands

DC-Connex DCX-L201 user manual

DC-Connex

DC-Connex DCX-L201 user manual

MPVTruma MicroDrop CalimeroJet instruction manual

MPVTruma

MPVTruma MicroDrop CalimeroJet instruction manual

Bosch PHA230 instruction manual

Bosch

Bosch PHA230 instruction manual

Beautify 4000001 care guide

Beautify

Beautify 4000001 care guide

MEIYATI Pro Spa quick start guide

MEIYATI

MEIYATI Pro Spa quick start guide

Blossom LED M3 R24 installation guide

Blossom

Blossom LED M3 R24 installation guide

Philips HB875/01 user manual

Philips

Philips HB875/01 user manual

Orliman SITLIVE OSL3120 INSTRUCTIONS FOR USE AND PRESERVATION

Orliman

Orliman SITLIVE OSL3120 INSTRUCTIONS FOR USE AND PRESERVATION

GE T8 Basic service manual

GE

GE T8 Basic service manual

Pretika ST102 Instructions for use & warranty information

Pretika

Pretika ST102 Instructions for use & warranty information

Beurer FC 76 Instructions for use

Beurer

Beurer FC 76 Instructions for use

Pebble Grey 500.40.70-75 manual

Pebble Grey

Pebble Grey 500.40.70-75 manual

PUSH ortho quick start guide

PUSH

PUSH ortho quick start guide

Dermlite DL3N instructions

Dermlite

Dermlite DL3N instructions

DERMAPEN SEMI user manual

DERMAPEN

DERMAPEN SEMI user manual

Carex SunLite user guide

Carex

Carex SunLite user guide

Roper Rhodes Intense Installation & Aftercare Instructions

Roper Rhodes

Roper Rhodes Intense Installation & Aftercare Instructions

Interacoustics Titan IMP440 Setup & installation

Interacoustics

Interacoustics Titan IMP440 Setup & installation

manuals.online logo
manuals.online logoBrands
  • About & Mission
  • Contact us
  • Privacy Policy
  • Terms and Conditions

Copyright 2025 Manuals.Online. All Rights Reserved.

BL30N
Instructions for use
PORTABLE HANDPIECE
포터블 핸드피스
다시 한 번 당사제품을 선택해 주신 것에 감사드립니다.
Thanks for your selection of our products one more.
사용설명서의 지시사항을 지키지 않아 발생하는 사고는
당사에서 책임지지 않으며 사용자는 제품의 안전한 사용과
보관에 책임이 있습니다.
The accidents by nonfulfillment of this instruction is not our
responsibility. User should pay attention to safe use and
keeping.
제품의 품질향상을 위해 외관 및 사양에 사전예고 없이 변경될
수 있습니다.
Design and specification can be changed without notice for
quality improvement.
궁금하신 사항이 있으실 경우 언제든지 연락 주시면 최선을
다해 대응 하겠습니다.
Please contact us whenever you have a question.
1. 안전 / Safety Information
1.1 위험 / Danger
1.2 경 고 / Warning
1) 본 제품은 정해진 전원정격사양에서만 사용되어야 합니다. 정격 사양에서 벗어난
전원을 사용할 수 없습니다.
This product shall be used only under the rated power specified. Power outside
the rated power range shall not be applied.
2) 본 제품에 이상의 원인을 파악할 수 없거나, 간단히 해결을 하지 못하는 경우 즉시
본사로 연락하여 조치를 받으시기 바랍니다.
If you can not figure out the cause of this product or can not solve it easily,
please contact our office immediately and take action.
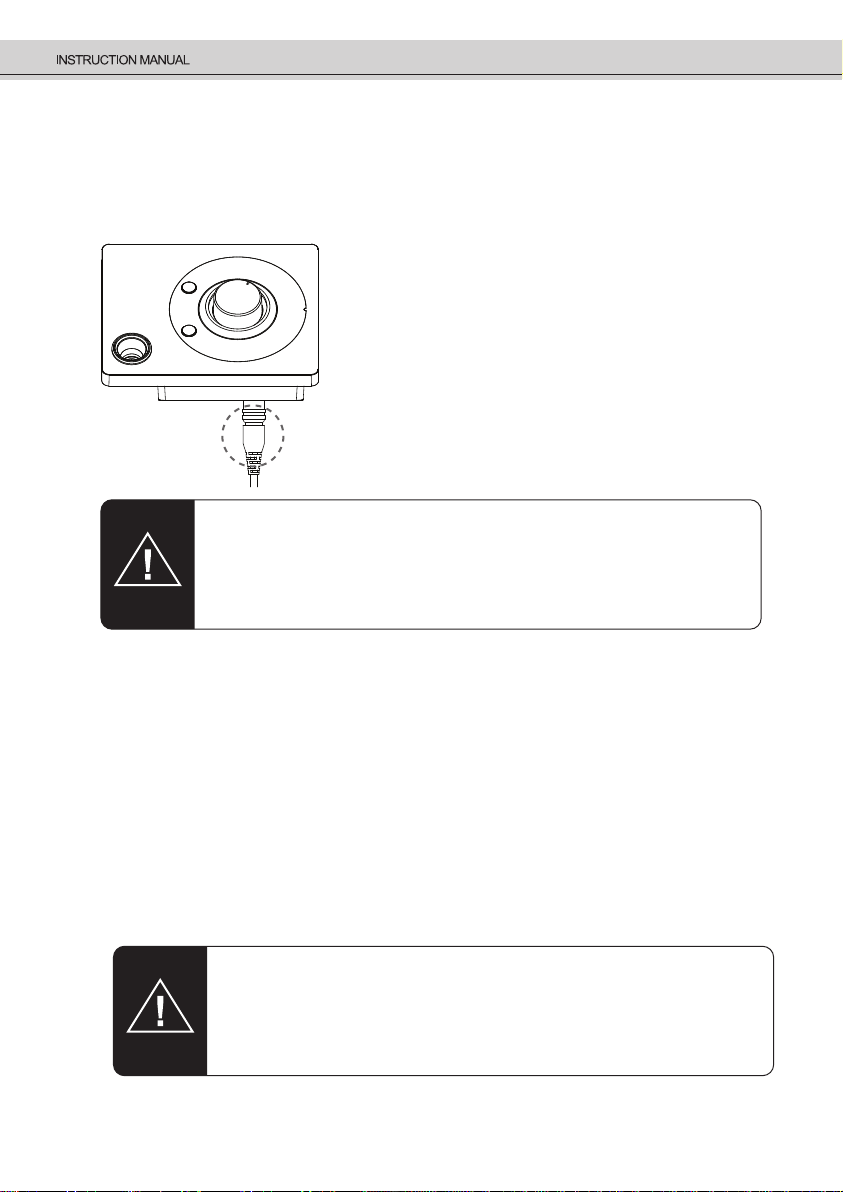
3) 본 제품은 지정된 전용 충전어댑터로만 충전이 가능합니다.
다른 종류의 어댑터 연결 시 장치손상이나 감전, 화재의 원인이 됩니다.
This device should only be used with the pre-specified standard charging adapter.
Using other types of adapters may cause damage to the unit, electric shock, or fire.
1) 제품을 임의로 분해 혹은 개조하지 마십시오. 분해 시 본사로부터 A/S를 받으실 수 없습니다.
Do not disassemble or modify the product. After Service can not be received
from the head office when disassembling.
2) 사용 전 척이 잠겨있는지 확인하고, 절대로 핸드피스 작동 시 핸들을 돌리거나
척을 열지 마십시오.
Before using, check the locking of chuck and never turn or open the chuck during
handpiece operation.
3) 당사 제품은 당사의 악세서리(풋 스위치 등)나 부품과 함께 사용해야합니다.
Our products are needed to be used with our accessory(foot switch etc) and parts.
4) 절대로 핸드피스를 청소하기 위하여 오일을 사용하지 마십시오.
Definitely do not use oil to clan the handpiece.
5) 핸드피스에 충격을 가하지 마십시오. 내부의 일부 부품은 충격에 약합니다. 떨어뜨렸을 경우
버가 굽었는지 등 이상 유무를 주의 깊게 확인 후 사용하십시오.
Do not damage to the handpiece. Some part inside is weak from shock.
If dropped check whether the bur is curved and any problem carefully before using.
6) 전원코드, 플러그, 콘센트가 손상된 경우 사용을 말고 정상적인 것으로 교체 후 사용 하십시오.
In case that a power cord, plug, outlet are damaged, use the machine after replacing that.
7) 줄을 당겨 코드를 뽑지 마시고 반드시 플러그 몸체를 잡고 뽑으십시오.
Don’t pull the line of power cord, pull out it with holding the plug body.
9) 여러 개의 기기를 하나의 콘센트에서 동시에 사용하지 마십시오. 화재 및 감전의 위험이 있습니다.
Do not use several machines on the same outlet. It may cause fire or electric shock.
1.3 주 의 / Caution
1) 작업환경, 특히 핸드피스 주위를 청결히 해주시오.
Keep the work place clean, especially the handpiece.
2) 안전하고 건조한 곳에서 작업하십시오. 경사진 곳을 피하십시오.
Work in safe and dry place, Avoid inclined place.
3) 어린이, 장애인, 노약자 등의 접근을 피하십시오.
Do not allow a Children, the elderly or invalid to access this machine.
4) 모든 버튼을 부드럽고 주의 깊게 사용해 주십시오.
Use all buttons carefully and softly.
5) 제품의 용량 내에서 작업을 하시기 바랍니다.
Use the machine under its capacity.
6)
고회전으로 핸드피스를 사용하기 전 저회전에서 버의 떨림이나 이상 유무를 확인 하십시오.
In case of high speed work, be sure the handpiece vibration or any problem at low speed.
7) 반드시 핸드피스가 완전히 멈춘 후 버를 교체하십시오.
After handpiece stop completely, change a bur.
8) 전원 코드를 분리 및 전원을 켜고 끌 때 주변에 방해가 되는 물건이 없어야 합니다.
When disconnecting the power cord and turning the power button on and off,
there should be no obstructions nearby.
1.4 알 림 / Notice
1) 사용설명서를 정독하여, 각 부분의 기능을 숙지한 후 사용하시기 바랍니다.
After reading the instruction manual, please familiarize yourself with the functions
of each part.
2)
기기부품의 폐기 및 재활용에 대해서는 지역정부규격 및 재활용 계획에 따라 주시기 바랍니다.
For disposal and recycling of equipment parts, please comply with local government
standards and recycling plans.
3) 제품을 사용하지 않을 시 반드시 전원을 꺼 주십시오.
Be sure to turn off the power when not using the product.
1) Controller
2) Handpiece
2. 제품 설명 / Description
2.1 제품의 구성 / Description of System, Components and Functions
No. 구성품명 Part Name
컨트롤러 Controller
핸드피스 Handpiece
풋 스위치 Foot switch
충전 어댑터 Charge Adapter
모델명 Model Name.
BLC-P300
BL-300H
FS-30E
XSG1681000
■ 패키지명 Package Name : BL30N
Part No.
4BL3130N0
3BL31HP00
9FS32F320
9ADT31681
수량 Quantity
1
1
1
1
1
2
3
4
파워코드 Power Code -9APC3EK00 1
5
Speed Control Dial
Speed Digital
Indicator
(x1,000)
Handpiece Holder
Status of Battery Motor On/Off button
Rotation button
LED ON: Reverse
LED OFF: Forward
Status of Charging
LED Orange: Charging
LED Green: Complete
DC input
Foot Switch
Connector
Power Switch Handpiece Connector
2.2 성 능 / Product Performance
1) Controller
3) Foot switch
4) Charge Adapter & Power code
2) Handpiece
Model
Weight
Dimension
Power supply voltage
Battery
Power Consumption
BLC-P300
400g
150(W) X 115(D) X 80(H) mm
16.8V, 1.0A
14.8Vdc, 1.2A (Li-Polymer Battery)
20W
Model
Weight
Dimension
Max. Speed
Bur size
BL-300H
132g
132(L) x Ø21.8(D) mm
30,000 rpm
Ø2.35mm
2.3 환경 조건 / Environmental Conditions
주의
-지정된 환경 요인을 벗어난 장소에서 운전 시 오동작의 발생 우려가 있습니다.
CAUTION
-Operation of the device in an environment other than those specified by
manufacturer may lead to causing the device malfunction.
3) Foot Switch
1) 보관 조건 Storage conditions
Temperature
Humidity
Air pressure
-10℃~+50℃ / +14℉~+122℉
10% ~ 90%
500hPa ~ 1060hPa
2) 동작 조건 Operation conditions
Temperature
Humidity
Air pressure
0℃~+40℃(32℉~104℉)
20% ~ 80%
800hPa ~ 1060hPa
4) Charge Adapter
Model
Dimension
Input
Output
XSG1681000
44(W) X 79(L) X 29(H) mm
100-240V, 50/60 Hz, 0.6A
16.8V, 1.0A
Model
Dimension
Function
Class of protection
FS-30E
96(W) X 100(L) X 25(H) mm
Motor On/Off
IPX1
3.2 풋 스위치 연결 / Connection of the foot switch
1) 컨트롤러 후면의 페달 연결부와 풋 스위치 케이블의 연결 잭의 이상여부를
확인합니다.
Visually check if any damaging condition appears on the pedal connector at the
side of the controller as well as the connection jack of the foot switch cable.
2) 풋 스위치 연결 잭을 컨트롤러 후면의 풋 스위치 커넥터에 삽입합니다.
Insert the connection jack into the pedal connector at the side of the Controller.
3) 풋 스위치 사용 시 작동모드 스위치를 눌러 Foot 모드로 설정합니다.
When using the Foot switch, set the Foot mode to push the Operatio mode switch
경고
-전원이 꺼진 상태에서 풋 스위치를 연결 하십시오.
WARNING
-Turn off the power and connect the foot switch.
3. 설치 / Installation
3.1 컨트롤러와 핸드피스 연결 / Connection the motor with a cable
경고
-반드시 전원을 끈 후 컨트롤러와 핸드피스를 연결 하십시오.
WARNING
-Be sure to turn off the power before connecting the controller to the
handpiece.
1) 컨트롤러의 후면의 핸드피스 커넥터와 핸드피스
연결부에 나있는 홈을 확인합니다.
Check the hole at handpiece connector on the back
of the controller and the handpiece connection.
2) 핸드피스 케이블의 △표시가 상단을 향하게 하여
케이블을 밀어 연결합니다.
Insert the pins of the connection terminal of the motor
into the holes of the connector cable with the △ mark
on the handpiece cable facing upwards.
△
4. 사용 방법 / Operation
4.1 사용 전 주의사항 / Cautions before using
4.2 사용 방법 / How to Operate the Product
1) 본 제품은 지정된 전용 충전어댑터로만 충전이 가능합니다. 다른 종류의 어댑터
연결 시 장치손상이나 감전, 화재의 원인이 됩니다.
This device should only be used with the pre-specified standard charging adapter.
Using other types of adapters may cause damage to the unit, electric shock, or fire.
2) 버가 잠겨있는지 확인하시고, 열려있을 경우 핸들을 돌려 잠그십시오.
Be sure the handpiece’s bur is locked, If the bur is unlocked,
please lock it by turing the handle
3) 핸드피스를 손으로 잡은 상태에서 제어기의 전원을 켜십시오.
With holding the handpiece, turn on the control box power on its front.
4) 제품의 사용 목적 이외의 용도로 사용하지 마세요. 제품의 사용 목적 이외의 사용
시에는 제품의 손상 및 사용자에게 상해를 야기할 수 있습니다.
Do not use for other purposes. It may cause damage to the product and users.
1) 후면의 전원 스위치를 눌러 제어기를 켜거나 끕니다.
Press the power switch on the back of the controller to turn on or off the controller.
2) 배터리 충전량 표시 및 속도 조정 볼륨부에 조명이 켜지는 지 확인합니다.
Check that the battery charge level is displayed and that the speed adjustment
volume section lights up.
4.2.1 일반 작동방법 General Operation
1) [속도 조절 다이얼]을 돌려 원하는 속도를 설정합니다.
Turn the [Speed Control Dial] to set the desired speed.
• 시계방향 Clockwise – 속도증가 Increasing speed (Max. 30,000rpm)
• 반시계방향 Counter clockwise – 속도감소 Decreasing speed
2) [모터 On/Off 버튼]을 짧게 누르면 모터가 일시적으로 정지하고,
다시 누르면 기존설정속도로 회전합니다.
Press the [Motor On/Off button] shortly to stop the motor temporarily.
Press again to rotate at the existing speed.
3) 현재 동작되는 속도는 패널에 1,000단위로 표시됩니다.
The currently operating speed is displayed on the panel in units of 1,000.
4.2.2 속도 조절 Speed adjustment
핸드피스가 정지한 상태에서 [회전전환버튼]를 눌러 핸드피스의 회전방향을 설정합니다.
The rotational direction of the motor can be set by pressing the direction of rotation
switch when the motor is not running.
● LED Off – 정방향 회전 Direction of Forward
● LED On – 역방향 회전 Direction of Reverse
4.2.3 회전방향 설정 Setting direction of rotation
4.2.4 풋 스위치 사용 The Foot mode
1) [속도조절다이얼]로 속도를 0으로 설정합니다.
Set the speed to 0 with the [Speed Control Dial].
2) 풋 스위치를 컨트롤러 후면의 단자에 연결합니다.
Connect the Foot Switch to the terminal on the back of the controller.
3) 컨트롤러의 [모터 On/Off 버튼]을 2초간 누르면 LED가 켜지고 풋 모드로 설정됩니다.
Press the [Motor On/Off button] on the controller for 2 seconds to turn on the LED
and set the Foot mode.
4) 풋 스위치를 짧게 누르면 모터가 구동되며, 다시 누르면 모터 구동이 정지됩니다.
Pressing the Foot Switch short will start the motor, and Pressing it again will stop
the motor
5) 풋 스위치를 길게 누르면, 누르는 동안만 모터 구동이 가능합니다.
If you press and hold the Foot Switch, you can drive the motor only while pressing it.
6) 풋 스위치 모드에서 [모터 On/Off 버튼]을 2초간 누르면 LED가 꺼지고, 핸드모드로 변경된다.
Pressing the [Motor On/Off button] for 2 seconds in Foot mode turns the LED off and
changes to Hand mode.
7) 풋 스위치를 컨트롤러로부터 분리시키면 핸드모드로 자동 변경됩니다.
If you disconnection of the Foot Switch, automatically change to Hand mode.
주의
-
-
반드시 속도를 0으로 세팅한 후 모드 변경을 하십시오.
풋 스위치가 연결되어 있어야만, 풋 모드 설정이 가능합니다.
WARNING
- Be sure to set the speed to 0rpm, and change the mode.
- The Foot mode can be set only when the Foot Switch is connected.