Beautural 1-MR05US01 User manual

1byone Products Inc.
1230 E Belmont Street, Ontario, CA, USA 91761
Customer Service: +1 909-391-3888
www.1byonebros.com
Made in China
Professional
Manicure & Pedicure Kit
Instruction Manual

1
Introduction
Thank you for purchasing Beautural Professional Manicure
& Pedicure Kit. This instruction manual contains important
information about safety, usage, and disposal. Use the product as
described and keep this manual for future reference. If you sell this
kit or pass it on, also give this manual to the new owner.
Warning
• The Professional Manicure & Pedicure Kit is intended for
household and commercial use.
• This kit may only be used by children over 8 and dependents if
they are properly supervised and have been made fully aware of
the risks of use.
• Children must not play with this manicure & pedicure kit.
• Cleaning and user maintenance must not be performed by
children unless supervised.
• Do not use this kit if it shows signs of damage or does not
function properly. In these cases, contact Customer Services.
Safety Instructions
• A considerable amount of heat may be generated on the skin
during use.
• When using the manicure & pedicure device, carefully check its
results during the treatment process. This is particularly advisable
in the case of users suffering from diabetes, as they are less
sensitive to pain and are liable to become injured. Always use
with extreme care. If in doubt, ask your physician.
• This manicure & pedicure kit must be used only for the purpose
for which it has been developed, and in the manner described in
the instructions for use. Any improper use can be dangerous.
• Switch off the manicure & pedicure device immediately in the
event of defects or malfunctions.

2 3
• Only qualified technicians can perform repairs on electrical
devices. Improper repairs may subject users to considerable
danger.
• Use the manicure & pedicure device only with the accessories
provided.
• Never leave the manicure & pedicure device unattended when it
is in operation.
• Keep the manicure & pedicure kit away from sources of heat.
• Do not use the manicure & pedicure device under a cover,
blanket, pillow, etc.
• Do not use the manicure & pedicure device longer than 15
minutes at a time. After use, let the manicure & pedicure device
rest for 15 minutes before restarting it again to allow the motor
to cool. This will prolong the manicure & pedicure device’s
lifespan.
• Do not use the manicure & pedicure device when bathing or
showering. Do not store or keep the device in places from where
it can fall into a bath or wash basin.
• Never immerse the manicure & pedicure device in water or other
liquids.
• If the manicure & pedicure device drops into water, unplug it
from power immediately.
• Ensure your hands are dry before handling the manicure &
pedicure device.
• Do not continue to use the power adapter if it has been
damaged.
• For reasons of hygiene, the manicure & pedicure kit should only
be used on one individual only.
Product Description
7
6
3
5
4
1
2
8
159 1411 13
12
10 18 1916 17
1. Attachment
2. Speed Buttons “+/-”
3. Handle
4. LED Rotation Direction Indicator
(red: clockwise/green: anti-
clockwise)
5. On/off/direction switch
6. LED Light
7. Power Adapter
8. Carrying Case
9. Sapphire Disk (fine)
10. Sapphire Disk (coarse)
11. Flame Milling Cutter
12. Cylindrical Milling Cutter
13. Hardened Skin Remover
14. Sapphire Cone
15. Felt Cone
16. Round Sapphire Grinder
17. Needle-shaped Grinder
18. Mandrel
19. Sanding Band

4 5
Included Items
1 x Manicure & Pedicure Device
10 x Attachments
20 x Sanding Bands
1 x Power Adapter
1 x Carrying Bag
1 x Instruction Manual
Before using the Professional Manicure & Pedicure Kit for the first
time, check the package contents to ensure all parts are free of
visible damage.
Operating Instructions
1. This manicure & pedicure kit is intended only for the treatment of
hands (manicure) and feet (pedicure).
2. Make sure the manicure & pedicure device is switched off before
plugging into power and fitting attachments.
3. Select an attachment and push into the top of the manicure
& pedicure device. A clicking sound will be heard when
the attachment has correctly engaged. To remove, pull the
attachment straight out of the device.
4. Slide the on/off/direction switch in the desired direction. The
selected direction of rotation is shown by the colored LED
direction indicator as follows:
– Red LED = anti-clockwise
– Green LED = clockwise
5. The two buttons marked with plus (+) and minus (-) allow the
speed of rotation to be selected (15 speed levels optional). It is
recommended to start the manicure & pedicure device at low
speed and increase it as required. The device will start with the
lowest speed setting (setting 1) the first time it is turned on after
being plugged into power.
6. Do not exert heavy pressure and always guide the attachments
carefully over skin and nail surfaces.
7. Move the manicure & pedicure device under light pressure in
circular movements slowly over the body parts being treated.
Notes:
• The attachments will have a reduced effect if the skin is softened
or moist. For this reason, it is not recommended to take a bath
or shower immediately before using the manicure & pedicure
device.
• In order to retain the skin’s natural protection, do not remove
too much skin from calluses. Removing too much skin may also
cause calluses to grow back much harder.
• Always ensure the attachment heads can rotate freely. If they
become jammed or are blocked from rotating, the device will
become very hot and suffer damage.
• After every use, apply moisturizing cream to the skin parts
treated.
Important:
Always continue checking the results of the manicure or pedicure
while in progress. This is particularly important for diabetics as their
hands and feet may be less sensitive.
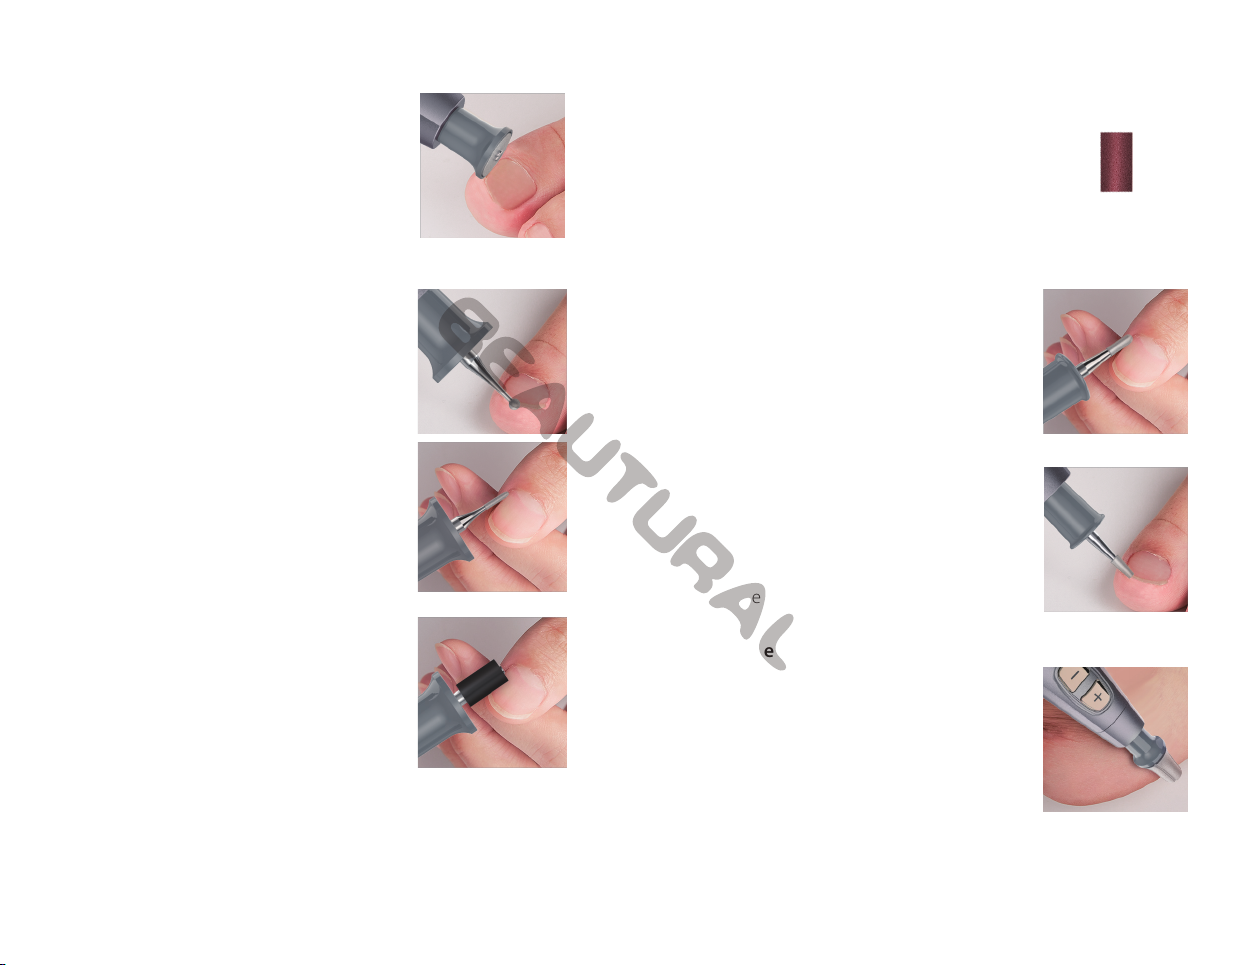
Attachments and Instructions
1. Sapphire Disk (ne)
A fine-grained sapphire disk for filing and
treatment of thinner nails such as fingernails.
• Only the inner sapphire disk rotates, while the
outer support is stationary, enabling precise
filing of the nails without the risk of burning
the surrounding skin due to the fast rotation
of the disk.

6 7
2. Sapphire Disk (coarse)
A coarse-grained sapphire disk for filing and
treatment of thicker nails such as toenails.
• As with the find-grained disk, only the inner
sapphire disk rotates, enabling precise filing
of the nails without the risk of burning the
surrounding skin. Always work from the
outside of the nail to the tip.
3. Round Sapphire Grinder
Removes corns.
• When removing a layer of skin from the corn,
you will quickly penetrate deeper into the
skin and could injure the periosteum.
4. Needle-shaped Grinder
Remove dead skin.
• This is a precision tool, so proceed cautiously
when using this attachment. This attachment
frees ingrown nails and cuts away parts of
dead nails. Use only at low speed.
5. Mandrel
Holds sanding bands.
6. Sanding Band
Removes dry skin and foot calluses and treats
nails.
• Sanding bands can be removed and
discarded after a single use. Twenty single-
use sanding bands are included. To maintain
natural skin protection, do not completely
remove calluses.
7. Flame Milling Cutter
For removing ingrowing nails.
• Guide the flame milling cutter carefully onto
the treatment area and cut away the affected
nail part.
8. Cylindrical Milling Cutter
For grinding and smoothing thickly-grown
toenail surfaces.
• Apply the milling cutter horizontally to the
nail surface and remove the unwanted layer
of nail using slow circular movements. Apply
light pressure.
9. Hardened Skin Remover
For removing large-scale and thick hardened
skin or calluses on the soles and heels of the
feet.
• Guide the hardened skin remover attachment
over the parts of the sole and heel to be
treated. Exert gentle pressure. Note that it is
not recommended to remove too much skin
from calluses as this may cause them to grow
back much harder.

8 9
10. Sapphire Cone
For removing thick or large calluses on the soles and
heels. This attachment is intended for large areas.
• Guide the sapphire cone over the parts of
the sole and heel to be treated. Use a circular
motion while applying gentle pressure. Apply
moisturizing cream after every treatment.
Note that it is not recommended to remove
too much skin from calluses as this may
cause them to grow back much harder.
11. Felt Cone
For both smoothing and polishing nail edges
after filing and for cleaning nail surfaces after
grinding.
• Polish with the felt cone using a circular motion.
• Never polish in a single place without
continuous movement across the nail’s
surface as friction will cause a large amount
of heat to develop.
Memory Function
When powering off the manicure & pedicure device using the On/
Off switch, the last-used speed setting will be active when the
device is next turned on. The last-used speed setting will be erased
from memory if the device is unplugged from power and the
device will use speed setting 1 (the lowest setting) when plugged
back in and turned on.
Maintenance and Care
• Before cleaning the manicure & pedicure device, always unplug it
from power.
• Clean the attachments with a slightly moistened cloth. You can
also moisten the cloth with mild soap to remove more stubborn
dirt and grim.
• If necessary to improve hygiene, the attachments can be cleaned
with a cloth or brush moistened with alcohol. Carefully dry the
attachments afterwards.
• Do not drop the manicure & pedicure device.
• Make sure no water ever enters the manicure & pedicure device.
• Do not use chemical detergents or scouring agents for cleaning.
• Never immerse the manicure & pedicure kit in water or other
liquids.
Specications
Model: 1-MR05US01, HC-383
Voltage Input: AC 100V-240V
Frequency: 50/60HZ
Voltage Output: 30V DC250mA
Operating temperature: +5°C - +40°C
Storage temperature: 0°C - +40°C
Rotation per minute: Speed level 1~ Speed Level 15: 2000~4600
rpm (±15%)
This product’s packaging is made from environmentally
friendly material and can be disposed of at your local
recycling plant.

10
Custo
mer Service/Kundenservice
Service Clients/Atención al cliente/Assistenza Clienti
UNITED STATES
Phone: +1 909-391-3888
(Mon-Fri 9:00am - 5:00pm PST)
Email: ushelp@1byonebros.com
CANADA Email: cahelp@1byonebros.com
UNITED KINGDOM
Phone: +44 158 241 2681
(Mon-Fri 9:00am - 6:00pm UTC)
Email: [email protected]
GERMANY/FRANCE
ITALY/SPAIN Email: [email protected]
BRAND OWNER
1byone Products Inc.
1230 E Belmont Street, Ontario, CA, USA 91761
Customer Service: +1 909-391-3888
www.1byonebros.com
This manual suits for next models
1
Table of contents
Other Beautural Personal Care Product manuals
Popular Personal Care Product manuals by other brands

Guardian
Guardian ProTec user guide

AQUARATE
AQUARATE Hydracup v1.0 user guide

Sissel
Sissel Soft Bambini Instructions for use

Graham Field
Graham Field Lumex 7921RA Assembly and operation instructions

ARTMEX
ARTMEX V7 user manual

JAMES MARTIN VANITIES
JAMES MARTIN VANITIES TAMPA 901-M29.5-GW installation instructions

tanning essentials
tanning essentials SPRAY STATION Training manual

PurrSong
PurrSong LavvieTAG manual

Scarlett
Scarlett TOP Style SC-HAS73I10 instruction manual

Unicare Health
Unicare Health Emergency Bed Power Unit Instruction & safety manual

Eyedaptic
Eyedaptic EYE4 user manual

SAFIO
SAFIO XV-7 instructions