MICROTRONIX DX-2200-SW-02 User manual

4056 Meadowbrook Drive, Unit 126
London, ON Canada N6L 1E3
www.microtronix.com
MICROTRONIX
DX-2200
DUAL-VIEW
2X1SDI VIDEO SWITCHER
USER MANUAL V3.61

Page 2 of 87
This User Manual provides basic information about using the Microtronix DX-2200
Dual-view 2x1 SDI Video Switcher, (Model PN: DX-2200-SW-02). The following
table shows the document revision history.
Date
Rev.
Description
Jan. 10, 2012
1.00
Initial release
Nov. 12, 2012
1.01
Added Digital zoom feature.
Jan. 09, 2013
1.02
Added commands to show or hide a text string (this is in addition to the existing
command to toggle visibility).
Feb. 14, 2013
2.00
Revised Serial Command structure.
Added 1080i and 1080p video resolutions.
March 1, 2013
2.10
Added NTSC and PAL resolutions.
Added text background & overlay transparency.
Added ‘O’ commands for output mode control.
Serial control mode changed to always be active.
March 12,
2013
2.20
Added new commands to configure the control DIP & Toggle switches and changed
the default DIP switch settings.
Removed the ML command.
Added font size 003 & 004. Add text field reset commands.
Strings in RS232 commands must now be enclosed in quotations.
Fixed a bug with I1, I2 commands in Overlay mode.
Added preset PiP sizes and control of x, y gap.
Increased number of text fields to 12.
Changes to RS232 input to support comment lines and ignore leading white spaces.
May 17, 2013
2.30
Add Mode 7 –two images vertically stacked
June 27, 2013
2.31
Added new section & Table 9: Low Level Text Control Commands & Codes
Aug 14, 2013
2.41
Added new commands for a frame number counter text overlay.
Added a three digit ‘Annn’ command to control transparency with greater resolution.
Aug 26, 2013
2.50
Added alpha blending transition effect in Alpha Blended Overlay Mode. (Table 6)
Added additional Frame Counter modes of operation.
Aug 30, 2013
2.51
Added vertical and horizontal split screen in Alpha Blended Overlay Mode.
Changed transition commands from T to TP…
Added programmable size/position for the primary and secondary layers in Alpha
Blended Overlay Mode
Sep 17, 2013
3.00
Added zoom control commands for center position and window selection.
Changed zoom to be controlled for selected/non-selected input instead of by input
connector number.
Added alpha blending effects for secondary layer.
Changed second alpha set by TPB / TSB commands to apply to both transition
effects and split screen modes.
For Mode 5, changed ‘I1’,’I2’,’IT’ to switch inputs and ‘T’ to apply inverse alpha for
visibility reversal of the two inputs.
Added support for setting size in Alpha Blended mode in percent.
Nov 28, 2013
3.01
Fix a problem causing improper configuration or no video output when the unit
powers up with a saved configuration and the video inputs have been connected
before power up.
Add S0, S1, ST commands.
Document
Revision History

DX-2200 –Dual-view 2x1 SDI Video Switcher
Page 3 of 87
Mar 18, 2014
3.10
Add firmware update capability over RS232.
Add SnnSN, SnnHN, SnnVN commands to change text field visibility without updating
the display.
Changes to command parsing.
Nov 14, 2014
3.20
Add support for Rev E PCB.
Fonts are loaded at first use instead of power up so the unit starts faster.
Add fonts containing selected Wingding characters
Add selected extended ASCII characters to the Tahoma fonts.
Feb 11, 2015
3.50
Add new 'S' commands to support rectangle drawing and graphic images on the
overlay.
Add section about the DX-2200 Uploader.
Add the 'L' commands to control the overlay layer.
Add baud rate change command.
Product now supports 48 fields on the overlay layer instead of 12.
Add more information about image field transparency and background.
Jun 03, 2014
3.60
Add additional Tahoma fonts
Add capability for G and S commands to operate on a range of fields
Add S/GnnNm and S/GnnJmm commands.
Jun 25, 2014
3.61
Add additional Tahoma size 48 fonts and Bitstream Vera Mono Fonts
Updated Model number due addition of SDI Loop Output port and new enclosure
Update pictures of the enclosure and the DX-2200 board assembly
E-mail
Sales Information: sales@microtronix.com
Support Information: support@microtronix.com
Website
General Website: http://www.microtronix.com
FTP Upload Site: http://microtronix.leapfile.com
Phone Numbers
General: (01) 519-690-0091
How to Contact
Microtronix

DX-2200 –Dual-view 2x1 SDI Video Switcher
Page 4 of 87
Table of Contents
Document Revision History..............................................................................................................................2
How to Contact Microtronix..............................................................................................................................3
E-mail............................................................................................................................................................3
Website.........................................................................................................................................................3
Phone Numbers............................................................................................................................................3
Features...........................................................................................................................................................8
Introduction ......................................................................................................................................................9
Text Overlay OSD Features.........................................................................................................................9
Hardware........................................................................................................................................................10
Power Requirements..................................................................................................................................10
Operation .......................................................................................................................................................10
Display Modes............................................................................................................................................10
Display Mode 1: Full-screen 2x1 Switcher .............................................................................................11
Display Mode 2: Picture-in-Picture .........................................................................................................11
Display Mode 3: Dual view, Picture-and-Picture ....................................................................................11
Display Mode 4: Split Screen..................................................................................................................11
Display Mode 5: Alpha Blended Overlay................................................................................................11
Display Mode 6: Standby Switcher.........................................................................................................12
Display Mode 7: Dual-view, Vertically Stacked ......................................................................................12
Sample Outputs..........................................................................................................................................12
Default Startup Configuration.....................................................................................................................14
LED Status Indicators.................................................................................................................................14
Output Video Format..................................................................................................................................15
Video Output Modes 1 & 3......................................................................................................................15
Video Output Mode 2..............................................................................................................................16
Default Output Video Mode ....................................................................................................................16
Input Video Format.....................................................................................................................................16
Video Buffering and Delay..........................................................................................................................16
SERIAL & MANUAL Control.......................................................................................................................17
SERIAL Mode of Operation ....................................................................................................................17
Serial Port Control Commands ...........................................................................................................17
Input Selection SERIAL Commands...................................................................................................18
Input Auto Switch SERIAL Command.................................................................................................19
Alpha Blending Effects SERIAL Commands.......................................................................................20
Mode Control SERIAL Command.......................................................................................................24
Alpha Blended Overlay Size and Position SERIAL Commands.........................................................24
Picture-in-Picture Position & Size SERIAL Commands......................................................................27
Alpha Blending Transparency SERIAL Command .............................................................................28
Baud Rate SERIAL Command............................................................................................................30
Graphic Overlay SERIAL Commands.................................................................................................30
Sample Text Field Commands............................................................................................................47
Low Level Text Control Commands....................................................................................................50
Frame Counter Overlay SERIAL Commands .....................................................................................51
Overlay Control SERIAL Commands..................................................................................................57
Layer Control SERIAL Commands .....................................................................................................57
Digital Zoom Command ......................................................................................................................60
User Interface Commands ..................................................................................................................63
User Interface Function Configuration ................................................................................................63
Resetting DX-2200 Switches to Factory Default Configuration ..........................................................64
Recommendations for DX-2200 Configuration...................................................................................65
DX-2200 Example Configuration Command File................................................................................67
Output Video Format Command.........................................................................................................68
Configuration Flash Serial Commands ...............................................................................................70
Other Serial Command Codes............................................................................................................70
MANUAL Mode of Operation..................................................................................................................71

DX-2200 –Dual-view 2x1 SDI Video Switcher
Page 5 of 87
Toggle Switch......................................................................................................................................71
DIP Switch Settings.............................................................................................................................72
DX2200 Software Upload Utility.....................................................................................................................72
Firmware Update Procedure ......................................................................................................................72
Uploading Images.......................................................................................................................................72
Wingdings Font Table....................................................................................................................................74
Extended ASCII Fonts....................................................................................................................................75
Design Customizations ..................................................................................................................................75
One Year Warranty........................................................................................................................................76
Hardware....................................................................................................................................................76
Firmware.....................................................................................................................................................76
Limited Liability...........................................................................................................................................76
Appendix A: Updating IP Core On-Board Flash ............................................................................................77
Programming the Flash Device..................................................................................................................77
Appendix B: Internal Circuit Board Description..............................................................................................78
SDI Video Interfaces...................................................................................................................................78
RS-232 Serial Control Port .....................................................................................................................79
RS-232 3-Pin Header, J2....................................................................................................................79
Power Requirements..................................................................................................................................79
Power Connectors ..................................................................................................................................79
JTAG Header..........................................................................................................................................79
Reset Pushbutton SW1..............................................................................................................................80
Board Dimensions......................................................................................................................................80
Appendix C: Optional USB to RS-232 Serial Port Adapter............................................................................81
Appendix D: Regulatory Compliance Information..........................................................................................82
Industry Canada (IC)..................................................................................................................................82
Federal Communications Commission (FCC) Declaration of Conformity..................................................82
CE Declaration of Conformity.....................................................................................................................83

DX-2200 –Dual-view 2x1 SDI Video Switcher
Page 6 of 87
Listing of Tables
Table 1: Description of LED Status Indicators................................................................................................15
Table 2: Serial Port Command Acknowledgement Codes..............................................................................18
Table 3: Function of the Inputs For Each Display Mode.................................................................................18
Table 4: Input Selection SERIAL Command Codes .......................................................................................19
Table 5: Input Auto Switch Serial Command Codes.......................................................................................20
Table 6: Alpha Blended Overlay Transition Effects ........................................................................................21
Table 7: Mode Control SERIAL Command Codes .........................................................................................24
Table 8: Alpha Blended Size and Position Control SERIAL Command Codes..............................................25
Table 9: PiP Control Serial Command Codes.................................................................................................28
Table 10: Transparency SERIAL Command Codes.......................................................................................29
Table 11: Alpha Blended Overlay Mode Transparency SERIAL Command Codes.......................................29
Table 12: Text and Symbol Fonts...................................................................................................................34
Table 13: Graphic Overlay SERIAL Command Codes...................................................................................42
Table 14: Low Level Text Command Codes...................................................................................................50
Table 15: Frame Counter Overlay SERIAL Command Codes .......................................................................55
Table 16: Overlay Control SERIAL Command Codes....................................................................................57
Table 17: Layer Control SERIAL Command Codes .......................................................................................59
Table 18: Digital Zoom Command Codes.......................................................................................................61
Table 19: User Interface Command Codes ....................................................................................................66
Table 20: Output Video Format Command Codes .........................................................................................69
Table 21: Flash Serial Command Codes........................................................................................................70
Table 22: Other Serial Command Codes........................................................................................................70
Table 23: Operation of 2-Position Momentary Toggle Switch ........................................................................71
Table 24: Operation of the 4-Position DIP Switch ..........................................................................................72
Table 25: Windings Character Table ..............................................................................................................74
Table 26: Extended ASCII Character Table ...................................................................................................75
Table 27: RS-232 Serial Control Port DB9 Pin Assignments .........................................................................79
Table 28: RS-232 3-Pin Header, J2................................................................................................................79

DX-2200 –Dual-view 2x1 SDI Video Switcher
Page 7 of 87
Listing of Figures
Figure 1: DX-2200 –Dual-view 2x1 SDI Video Switcher................................................................................10
Figure 2: Digital Zoom PiP..............................................................................................................................12
Figure 3: Dual-view –Custom Picture-and-Picture display with text and time code Frame Counter.............13
Figure 4: Dual-view –Vertically Stacked with text OSD .................................................................................13
Figure 5: Alpha Blended PiP with Text Overlay OSD.....................................................................................13
Figure 6: SDI Input LEDs................................................................................................................................14
Figure 7: SDI Out & Power LEDs....................................................................................................................14
Figure 8: Alpha Blended Vertical Split column 400 –Example 1a .................................................................23
Figure 9: Alpha Blended Vertical Split column 900 –Example 1b .................................................................23
Figure 10: Alpha Blended with scaling –Example 1a.....................................................................................26
Figure 11: Alpha Blended Vertical split with frame counter –Example 1b.....................................................26
Figure 12: Samples of active text and graphic logo........................................................................................33
Figure 13: Samples of transparent text and background................................................................................34
Figure 14: Sample of the available Tahoma font sizes...................................................................................36
Figure 15: Character set - codes 20-7F and A0-FF........................................................................................36
Figure 16: Sample of Rectangle, Target Marker and Text..............................................................................42
Figure 17: Sample of Corner Markers, Target and Text.................................................................................42
Figure 18: Example 1 - red text OSD with white background.........................................................................48
Figure 19: Example 2 –sample of default text ...............................................................................................49
Figure 20: Frame Counter text display –Example 2 ......................................................................................54
Figure 21: Frame Counter text display –Example 3 ......................................................................................54
Figure 22: JTAG Cable Connection................................................................................................................77
Figure 23: DX-2200 –Dual-view 2x1 SDI Switcher Board .............................................................................78
Figure 24: USB to DB9 RS-232 Serial Port Adapter Kit .................................................................................81

DX-2200 –Dual-view 2x1 SDI Video Switcher
Page 8 of 87
The key hardware features of the DX-2200 –Dual-view 2x1 SDI Video
Switcher (Model PN: DX-2200-SW-02) includes:
Two 75ΩSD/HD-SDI input ports
Two 75ΩSD/HD-SDI output ports
oOne the Switcher output
oOne loop through output of SDI input port 1
One DB9, RS-232 Serial Control Port
Note: With custom DX-2200 firmware, the RTS & CTS modem signals on
the DB9 Serial Port can be configured to operate as a second Serial
Data Port and function as RS-232 Receiver and Transmitter signals.
A custom serial “Y” cable is used to bring out the two ports.
Supported functionality:
Digital switching between 2 SDI inputs using switches or a serial control
port commands
Glitch-free video switching between SDI inputs and modes of operation
Video formats:
o720p @ 25 / 29.97 / 30 / 50 / 59.94 / 60 fps
o1080i @ 25 / 29.97 / 30 fps
o1080p @ 23.98 / 24 / 25 / 29.97 / 30 fps
o1080psf @ 23.98 / 24 / 25 / 29.97 / 30 fps
oNTSC @ 59.94 fps
oPAL @ 50 fps
Video Modes:
o2x1 (Full-screen) Switcher
oAlpha blended Picture-in-Picture with size and position control,
oDual view, Picture-and-Picture,
oSplit screen,
oAlpha blended overlay, and
oStandby switcher.
Text overlay OSD:
oUp to 48 independent Graphic Fields
oFields support Text, Rectangle, Corner Marker, Target Marker, and
Image Field types.
oFilled or open rectangles
oSize, color, transparency and position control
oConfigurable background color for text
oAlpha blended text and background
oAlpha blending of graphic fields
Output video Frame Counter text overlay display,
Alpha blended video switching transition effects,
Digital Zoom: 28 steps of 0.25 from 1x to 8x,
User defined operation of DIP & Toggle switches
NOTE: The text/graphics overlay OSD is supported in progressive but not in
either interlaced or Progressive segmented Frame (PsF) video formats.
Features

DX-2200 –Dual-view 2x1 SDI Video Switcher
Page 9 of 87
The Microtronix DX-2200 –Dual-view 2x1 SDI Video Switcher (Model Part
Number: DX-2200-SW-02) is a high performance dual input SDI Video Switcher
supporting enhanced video capabilities including: 2x1 glitch-free video switching,
picture-in-picture (PiP), picture-and-picture (PAP), Split-Screen, text overlay / on
screen display (OSD), Alpha Blending and Digital Zoom. The product is available
as a stand-alone product in an aluminum enclosure or as an open printed circuit
board for incorporation into embedded video system. The unit is designed for use
in broadcast, professional video recording and high-end surveillance applications.
To ensure glitch-free continuous/artifact free video output, the two input SDI video
streams are firstly frame synchronized then switched during the vertical interval
period when a frame is complete. Additional frame buffers are used to eliminate
artifacts which can occur when operating in a PiP or PAP mode during which
scalers or clippers are being used.
When processing interlaced video, a field detector is used to synchronize the input
frame buffers and video processing to ensure the correct alignment of the video
fields when switching between the video streams or swapping PiP or PAP
displays. The output video format can be the same as the format detect on the
SDI input 1 (SDI-1) video source, or can be programmed independently.
The product supports synchronized switching of SD / HD SDI video formats. Text
overlay is supported on progressive video only.
The units can be configured to retain the user configuration in on-board flash
during power ON / OFF power cycles.
Text Overlay OSD Features
The DX-2200 supports text overlay OSD in all display modes of operation.
Features of the text overlay OSD include:
1) Display of 48 independent Fields of up to 96 characters.
2) Alpha blending of the text on the video screen.
3) Active Frame Counter.
4) Independent color selection of text fields.
5) Configurable background color.
6) Opacity control.
7) Independent ON/OFF control of text fields.
8) X-Y position control.
9) Permanent retention of text fields in flash memory.
10) Eight font / text size combinations.
The text is supplied to the DX-2200 Switcher through the RS-232 serial port. The
user can optionally store the text fields in the on-board flash in which case they will
be retained power ON/OFF power cycles.
NOTE: The Text/graphic overlay feature is supported in progressive video formats
only.
Introduction

DX-2200 –Dual-view 2x1 SDI Video Switcher
Page 10 of 87
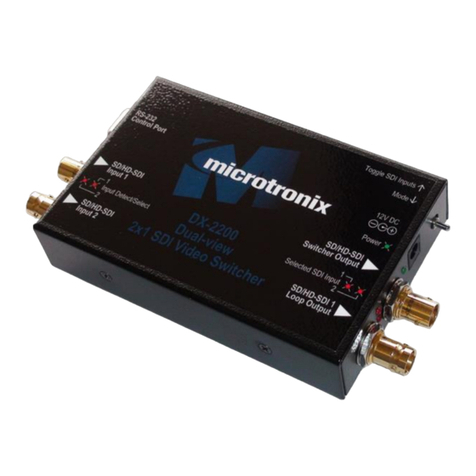
The DX-2200 –Dual-view 2x1 SDI Video Switcher is available as a stand-alone
product supplied in an enclosure as show in Figure 1 below or as an open-frame
board (for building into embedded video system) as shown in Figure 23 shown in
Appendix B.
Figure 1: DX-2200 –Dual-view 2x1 SDI Video Switcher
Power Requirements
The DX-2200 Switcher is powered from a standard 5.5mm center positive 5-12Vdc
1.3A 10W (120/240VAC) regulated switching power adapter.
Display Modes
The DX-2200 Switcher supports the display of the SDI video either full-screen or in
a variety of dual-viewer window modes. The display modes include:
oMode 1: Full-screen 2x1 Switcher
oMode 2: Picture-in-Picture,
oMode 3: Dual view, Picture-and-Picture –side-by-side,
oMode 4: Split screen,
oMode 5: Alpha blended overlay, and
oMode 6: Standby Switcher.
oMode 7: Dual view, vertically stacked
Hardware
Operation

DX-2200 –Dual-view 2x1 SDI Video Switcher
Page 11 of 87
The Text Overlay (On Screen Display) is supported in all Display Modes for
progressive video formats only. The Text Overlay is always the top layer in the
output video mix.
The Frame Counter capability is supported in all Display Modes for progressive
video formats only.
The Zoom capability is supported in all Display Modes. Either input can be
zoomed. Except in Display Mode 4 (Split Screen), the zoom can be configured
either as zoom percentage and center position, or as top left corner and size. In
Display Mode 4, only the zoom factor can be set and the zoom position cannot be
changed.
Display Mode 1: Full-screen 2x1 Switcher
In the Full-screen Switcher mode, the selected input is displayed full screen and
the unit can switch from one input to the other.
Display Mode 2: Picture-in-Picture
In Picture-in-Picture (PiP) mode, the selected input is displayed full and the other
input is displayed as a picture in picture with configurable size, position and
transparency (alpha blending). Using either the toggle switch or serial commands,
the DX-2200 can switch between the inputs selected for display full screen and for
the PiP.
Display Mode 3: Dual view, Picture-and-Picture
In the Picture-and-Picture (PAP) mode, the images are scaled to display both
sources side by side. The selected input is displayed on the left side of the screen,
and the other input is displayed on the right.
Using either the toggle switch or serial commands, the DX-2200 can switch inputs
to interchange the left and right side images.
Display Mode 4: Split Screen
In the Split Screen mode, half of each input image is displayed. The left half of the
selected input is displayed on the left side of the output video, and the right half of
the other input is displayed on the right side of the output video.
Using either the toggle switch or serial commands, the DX-2200 can switch inputs
to interchange the left and right side images.
Display Mode 5: Alpha Blended Overlay
In the Alpha Blended Overlay mode, both images are displayed with configurable
alpha blending of the images. The selected input is displayed over a black
background, with the non-selected layer mixed on top of it. The alpha of each
input can be adjusted and the two images can be zoomed, moved, and re-sized in
the output video.

DX-2200 –Dual-view 2x1 SDI Video Switcher
Page 12 of 87
Display Mode 6: Standby Switcher
The Standby Switcher automatically switches between the two inputs sources.
The selected input is the preferred source, but if no signal is available the other
source will be displayed. The DX-2200 returns to the preferred source if the signal
is restored.
Display Mode 7: Dual-view, Vertically Stacked
In the dual-view vertically stacked mode, the images are scaled to display both
sources one above the other. The selected input is displayed at the top of the
screen, and the other input is displayed below it.
Using either the toggle switch or serial commands, the DX-2200 can switch inputs
to interchange the upper and lower images.
Sample Outputs
Samples of the various output display modes are shown in the following figures.
Figure 2: Digital Zoom PiP

DX-2200 –Dual-view 2x1 SDI Video Switcher
Page 13 of 87
Figure 3: Dual-view –Custom Picture-and-Picture display with
text and time code Frame Counter
Figure 4: Dual-view –Vertically Stacked with text OSD
Figure 5: Alpha Blended PiP with Text Overlay OSD

DX-2200 –Dual-view 2x1 SDI Video Switcher
Page 14 of 87
Default Startup Configuration
The power up configuration is determined by both the DIP switch setting and the
configuration saved in flash. The factory default setting has no saved configuration
in flash and the following DIP switch settings:
Table 4: Default DIP switch (SW4) setting
Switch
Setting
1
Off
2
Off
3
Off
4
Off
The factory default power on or reset configuration is set to operate in Mode 1, the
full-screen 2x1 video switcher. The unit will initially display SDI input 1 (SDI-1) on
the output. If there is no input signal (or if it cannot be properly detected), the SDI
output will display black.
User specific setups can be stored in flash to enable the DX-2200 to start in other
modes, for example, with a PiP or PAP configuration or with a preset text overlay.
LED Status Indicators
The location of the 5 LEDs is show in the following two figures.
Figure 6: SDI Input LEDs
Figure 7: SDI Out & Power LEDs

DX-2200 –Dual-view 2x1 SDI Video Switcher
Page 15 of 87
The operation of the LEDs is summarized in Table 1 below.
Table 1: Description of LED Status Indicators
LED
Color
Use
Mode of Operation
Input-Top
(Board D4)
Red
SDI Input 1
OFF: SDI 1 input not available
Flashing: SDI 1 input available
ON: SDI 1 input available and selected as primary input
Input-
Bottom
(Board D4)
Red
SDI Input 2
OFF: SDI 2 input not available
Flashing: SDI 2 input available
ON: SDI 2 input available and selected as primary input
Input
(Board D3)
Green
Power
ON: Power ok
Output-Top
(Board D5)
Red
SDI Input1
Out
OFF: SDI 1 input not available
Flashing: SDI 1 input available
ON: SDI 1 input available and selected as primary input
Output-
Bottom
(Board D5)
Red
SDI Input 2
Out
OFF: SDI 2 input not available
Flashing: SDI 2 input available
ON: SDI 2 input available and selected as primary input
Output Video Format
The settings of the DX-2200 and the video source connected to SDI input 1
(SDI-1) determine the output video format. The output video has three Modes of
operation:
Output Mode 1: The output video format is the same as the SDI Input 1 format.
Output Mode 2: The output video format (resolution and frame rate) is set to a
specific format that was set by a SERIAL Control command.
Output Mode 3: The output video format is the same as the SDI Input 1 format
and the clock frequency is locked to the source frequency.
Video Output Modes 1 & 3
The default output video format is Mode 1 in which the SDI output is the same
format as on SDI input 1. The mode can be changed by a SERIAL control
command. Refer to Output Format SERIAL Command Codes (See Table 20) for
details of the commands used to change the output video modes.
When operating in Output Mode 1 or Mode 3 (assuming the SDI-1 video source is
recognized as one of the supported video formats) the DX-2200 will reconfigure
itself to match the output video to the detected input format. Reconfiguration of the
output video format momentarily stops video output. When no video is connected
to SDI input 1, or if the format is not recognized, the unit will continue to operate
without changing the output video format.

DX-2200 –Dual-view 2x1 SDI Video Switcher
Page 16 of 87
Video Output Mode 2
When operating in Video Output Mode 2, the output video resolution and frame
rate is determined exclusively by the setting programmed into the DX-2200 by a
SERIAL Control command. See commands listed in Table 20.
Default Output Video Mode
The factory default output video format is 720p 60 fps. If the unit is powered up, or
reset by the factory reset SERIAL command, or reset by pressing the reset
pushbutton when the board is out of the enclosure, without a video source
connected to SDI input 1, then it will operate at 720p, 60 fps. The default video
mode can be changed by saving a configuration to flash while the unit is operating
with a different video format.
Input Video Format
When a supported video format is connected to one of the SDI Input connectors,
the DX-2200 will recognize the signal and illuminate the corresponding LED.
Depending on the operating settings of the DX-2200, the format of the video
connected to SDI input 1 may determine the output video format. If the SDI-1
video format is changed the unit may switch to a different output video format. The
format of the video source connected to SDI Input 2 (SDI-2) never has any effect
on the output format.
If the video source connected to SDI Input 2 has a different resolution or frame
rate than the source connected to SDI Input 1, the DX-2200 will apply frame
repetition, frame dropping, or scaling as required to convert the video to the format
that is being output.
The DX-2200 does not convert between progressive and interlaced video formats.
If the video source connected to an input is interlaced (or PsF) when the output
format is progressive, or if the video source is progressive when the output format
is interlaced (or PsF), then the Input will not be recognized. The indicator LED will
be OFF and the video source cannot be selected for display.
The Text Overlay OSD remains available when the input video sources are not
present.
Video Buffering and Delay
When operating with progressive video, the DX-2200 uses two frame buffers in
each input path. Each buffer will delay by a minimum of one frame and a
maximum of two frames, giving a total delay of between two and four frames on
each input. The frame buffers account for the majority of the video delay through
the DX-2200. Other elements in the video processing path will add additional
delays of a few lines of video.
When operating in interlaced video modes, an additional frame buffer is required
in the video output path. This buffer adds an additional delay of between one and
two frames to the video path.

DX-2200 –Dual-view 2x1 SDI Video Switcher
Page 17 of 87
The actual delay will depend on the timing of the connection of the input signals
and the phase relationship between the inputs if they are not locked to each other.
Depending on operation conditions, the video delay may remain constant, or may
vary over time. The DX-2200 does not require the two video inputs to be
synchronized, and the output video can either be locked in frequency to input 1, or
use an internally video clock. When different video clocks are used, small
differences between the clocks will cause the video delay to change. If the output
clock is slower than the input clock, video will accumulate in the frame buffers until
a frame is dropped to prevent buffer overflow. When the output clock is faster than
the input clock, the length of video in the buffers will decrease until a frame must
be repeated to prevent buffer underflow. If all video clocks are derived from the
same source and are identical in frequency, the delay through the DX-2200 will
remain constant.
SERIAL & MANUAL Control
The DX-2200 Switcher has two methods of control: SERIAL Control using the
RS232 port, and MANUAL Control using the DIP switch and Toggle switch.
SERIAL Control allows control full of the capabilities of the DX-2200, and
MANUAL Control provides a subset of functions.
SERIAL Control is always active. In the factory default configuration the Toggle
Switch and DIP switch are active.
The functions of the DIP switch and Toggle switch can be reconfigured by SERIAL
Control commands to customize the Switcher so that the controls provide the set
of functions required for a specific user application. The modified configuration can
be saved on board in the flash configuration memory
SERIAL Mode of Operation
When SERIAL control is used, the DX-2200 Switcher is controlled via commands
sent to the DB9 Serial Control Port.
The serial port of the computer connected to the DX-2200 should be configured for
115,200 baud, 1 stop bit, and no flow control.
Microtronix sells an optional USB to DB9 RS-232 Serial Port Adapter Kit,
(PN: 811-USB-RS232-Kit) which can be used to connect the USB port of a PC or
laptop to the Serial Port of the DX-2200. (See Appendix C.)
SERIAL PORT CONTROL COMMANDS
In the SERIAL mode commands sent to the Serial Control Port control the
operation of the DX-2200. Commands consist of ASCII alpha-numeric codes and
are not case sensitive. All serial commands are terminated with a carriage return
(CR), a line feed (LF), or a semicolon. The use of a semicolon terminator allows
more than 1 command per line to improve readability of script files.
Commands may be sent directly to the DX-2200 one character at a time using a
terminal program running on a connected computer, or they may be developed in
a text editor such as Notepad and then uploaded to the DX-2200 by the terminal

DX-2200 –Dual-view 2x1 SDI Video Switcher
Page 18 of 87
program. The second method has the advantage of allowing the commands to be
saved, viewed, edited and resent. The text editor used must save the configuration
files as 8 bit ASCII data.
Space or tab characters before a command or trailing a command are ignored, as
are spaces or tabs following a comma that separates parameters within a
command. Any characters on a line following a tick (') character are treated as
comments. A comment may begin after a delimiter, or may follow a command with
or without spaces or tabs between the command and the comment.
ASCII string parameters are delimited with quotation marks. If a quotation mark or
backslash character is required within a string (for example to display as part of a
text overlay), then it must be preceded by a backslash character.
Valid and invalid serial commands are acknowledged with a ‘+’ and ‘-’ response
respectively. Carriage return, line feed, or semicolon characters without a
preceding command are acknowledged with a ‘*’.
The command codes are extensible, additional commands and functionality can
be added as required. Contact Microtronix sales or technical support with your
requirements.
Table 2: Serial Port Command Acknowledgement Codes
Response Code
Mode of Operation
+
Valid command received
-
Invalid command received
*
Valid CR, LF, or semicolon received
INPUT SELECTION SERIAL COMMANDS
The Input Selection SERIAL Commands, (see Table 4, Table 1, Figure 22), are
used to select the SDI input. Switching between SDI inputs is supported at all
video resolutions.
The following table shows the function of the selected input and the non-selected
input for each Display Mode.
Table 3: Function of the Inputs For Each Display Mode
Mode of Operation
Selected Input
Non-Selected Input
Display Mode 1:
Full-screen 2x1 Switcher
Full Screen Output
Not Visible
Display Mode 2:
Picture-in-Picture
Full Screen Background
PiP
Display Mode 3: Dual view,
Picture-and-Picture
Left Image
Right Image
Display Mode 4:
Split Screen
Left half of the source is
is displayed as the left
Right half of the
source is displayed

DX-2200 –Dual-view 2x1 SDI Video Switcher
Page 19 of 87
half of the output video
an the right half of
the output video
Display Mode 5:
Alpha Blended Overlay
Mixed onto a black
background.
Mixed on top of the
selected input and
background
Display Mode 6:
Standby Switcher
The preferred source.
Displayed full screen if
present
Alternate source
displayed when
preferred source not
present
Display Mode 7:
Dual-view, Vertically Stacked
Displayed at the top of
the screen.
Displayed at the
bottom of the screen
The ‘I1’ and ‘I2’ Input Selection Commands can select a specific input, or the ‘IT’
command can be used to select the other input.
The ‘T’ command has a function that depends on the operating mode. In Alpha
Blended Overlay Mode, the ‘T’ command changes the alpha of the non-selected
input to the inverse of the current value. When Alpha Blended Overlay Mode has
the two inputs in the same location in the output video, the ‘T’ command has the
effect of reversing the visibility between the two layers. In all other modes, the ‘T’
command performs the same function as the ‘IT’ command.
NOTE: Using the ‘T’ command to apply the inverse alpha to the non-selected
input provides the highest quality switch between the two inputs when
operating in Alpha Blended Overlay mode when both inputs are overlaid
with partial visibility. If Alpha Blended Overlay mode is reconfigured so
that the two inputs are not overlaid, then the ‘T’ command cannot be used
as a switching command and ‘I1’, ‘I2’, or ‘IT’ must be used instead.
Table 4: Input Selection SERIAL Command Codes
Command Code
Mode of Operation
Input Selection Commands
I1
Select input 1
I2
Select input 2
IT
Swap Inputs
T
In Display Mode 5, change the alpha of the non-
selected input to the inverse of the current value to
reverse visibility of the inputs.
In all other Display Modes, this command performs
the same functions as the ‘IT’ command.
INPUT AUTO SWITCH SERIAL COMMAND
The Input Auto Switch Commands are used to set auto switch mode on or off.
When auto switch is on, the DX-2200 will automatically switch inputs if the
selected input source is not available for display, but the other input is available.

DX-2200 –Dual-view 2x1 SDI Video Switcher
Page 20 of 87
Mode 5 (Alpha blended Overlay) does not support auto switch.
Mode 6 (Standby Switcher) is not affected by the auto switch setting and will
always switch when the preferred input is not present but the other input is
present.
Table 5: Input Auto Switch Serial Command Codes
Command Code
Mode of Operation
Input Selection Commands
IA
Toggle auto switch between on / off
IA0
Set auto switch off
IA1
Set auto switch on
ALPHA BLENDING EFFECTS SERIAL COMMANDS
In the Alpha Blended Overlay Mode (Mode 5), the DX-2200 uses alpha blending to
provide Transition Effects and Horizontal or Vertical Alpha Split modes. The
difference between the wipe Transition Effects and the Alpha Split modes is that
the transition effects automatically move the alpha transition point across the video
after the effect has been triggered, and the Alpha Split modes allow manual
control of the position of the alpha transition.
In the Alpha Blended Overlay mode, the video from both inputs is mixed into the
output video and each video source can be independently sized and positioned in
the output video. The selected input is mixed onto a black background. The other
input is mixed on top of the selected input. The Alpha Blending effects operate
only within the output video window of the source to which the effect is applied and
change the alpha blending of the source as it is mixed into the output video.
When Alpha Blending Effects are applied to the selected layer, they change the
transparency of the layer and determine the mix between the selected layer and
the black background behind it. When applied to the non-selected layer, the Alpha
Blending Effects determine the mix between the non-selected layer and the layers
behind it, which could be the black background, the selected layer, or a mix
between them.
When the two inputs are the same size and in the same position in the output
video, the Alpha Blending effects can be used to switch from one input to the other
by changing the top layer in the mix (the non-selected layer) from fully visible to
fully transparent. The Transition Effects will then provide an automatic progressive
switch from one image to the other, and the Horizontal / Vertical Alpha Split modes
will provide a split image where the change from one layer to the other can be set
(and changed) by Serial Commands.
The Alpha Blending Commands beginning with ‘TS’ affect the selected layer, and
the commands beginning ‘TP’ affect the non-selected layer.
Table of contents
Other MICROTRONIX Switch manuals
Popular Switch manuals by other brands

TRENDnet
TRENDnet TEG-S081FMi Specifications

D-Link
D-Link DKVM-4U Quick installation guide

Digitus
Digitus DN-80112-1 Quick installation guide

Lindy
Lindy 32810 user manual

PCB Piezotronics
PCB Piezotronics IMI Sensors 686B11 Installation and operating manual

Extron electronics
Extron electronics SW2 HDMI Specifications